Hama RC 130 User manual

RUS
E
F
D
GB
I
NL
GR
PL
H
CZ
SK
S
P
FIN
RO
BG
Manual de instruções
Instrukcja obsługi
Bruksanvisning
Käyttöohje
Работна инструкция
Operating Instructions
Bedienungsanleitung
Mode d‘emploi
Instrucciones de uso
Руководство по эксплуатации
Istruzioni per l‘uso
Gebruiksaanwijzing
Οδηγίες χρήσης
Instrukcja obsługi
Használati útmutató
Návod kpoužití
Návod na použitie
Radio Controlled Clock ”RC130“
Funkwecker
00136241
00136242
00136243

2
1
3
4
5
6
7
8

2
Controls and Displays
1. SNOOZE /LIGHT button =activating the
backlight (approx. 5seconds) /stopping the
alarm for 4minutes
2.
p
button =selection of the date, time, alarm
time /switching between 12 and 24-hour format
/time zone display
3. qbutton =selection of the date, time, alarm
time /language selection
4. mode button =setting the date, time, alarm /
switch the display mode
5. °C/°F Taste =activate/deactivate manual radio
signal reception /switches between °C and °F
6. button =activating/deactivating the alarm
7. Battery compartment
8. Battery compartment cover
1. Explanation of Warning Symbols and Notes
Warning
This symbol is used to indicate safety instructions
or to draw your attention to specichazards
and risks.
Note
This symbol is used to indicate additional
information or important notes.
2. Package Contents
•RC130 radio-controlled alarm clock
•2xAAA batteries
•these operating instructions
3. Safety Notes
•The product is intended for private, non-
commercial use only.
•Protect the product from dirt, moistureand
overheating, and only use it in adry environment.
•Donot use the product in areas wherethe use of
electronic devices is not permitted.
•Donot place the product near interference elds,
metal frames, computers, TVs, etc. Electronic
devices and window frames can negatively affect
the product’sfunctionality.
•Donot drop the product and do not expose it to
any major shocks.
•Donot attempt to service or repair the product
yourself.Leave any and all service work to
qualied experts.
•Donot modify the product in any way.Doing so
voids the warranty.
•Keep the packaging material out of the reach of
children due to the risk of suffocation.
•Dispose of packaging material immediately
according to locally applicable regulations.
Warning –Batteries
•Immediately remove and dispose of dead
batteries from the product.
•Only use batteries (or rechargeable batteries)
that match the specied type.
•Donot mix old and new batteries or batteries of
adifferent type or make.
•When inserting batteries, note the correct
polarity (+ and -markings) and insert the
batteries accordingly.Failure to do so could
result in the batteries leaking or exploding.
•Donot overcharge batteries.
•Keep batteries out of the reach of children.
GOperating instruction

3
•Donot short circuit the batteries/rechargeable
batteries and keep them away from uncoated
metal objects.
4. Getting Started
Open the battery compartment cover (8), remove
the contact breaker and then close the battery
compartment cover (8).
5. Operation
Note –Input
Hold down the pbutton (2) or the qbutton (3)
to select the values faster.
5.1. Automatic date/time setting using the
DCF signal
•Once you have inserted the battery,the display
is switched on, an acoustic signal sounds and
the alarm clock automatically starts searching
for aDCF signal. During the search, the wireless
symbol will ash. This process can take 3
to 5minutes.
•When the wireless signal is received, the date and
time areautomatically set.
Display Searching for the DCF
signal
Display ashing Active
Display steady
(not ashing)
Successful –signal is being
received
Not displayed Error –signal search ended
Weak signal reception
Note
The clock automatically searches for the DCF signal
once an hour to ensurethat the time is correct. If
the search fails, it ends and is repeated at the next
clock hour.The radio icon will go out
•Ifthe station still does not receive asignal, press
and hold the °C/°F button (5) for approx. 3
seconds to start the manual search for the DCF
signal. The wireless symbol will start to ash
Not
The manual search takes about 3to5minutes. If
the search fails, it ends and is repeated at the next
clock hour.The radio icon will go out.
Note –Summer time
The clock automatically switches to summer time.
Sappears on the display as long as summer
time is activated.
5.2. Manually setting the date/time
•Press and hold the mode button (4) for approx. 3
seconds to start manually setting the date/time.
•Set the following information in the order listed:
hour,minute, year,month, day
•Toselect the individual values, press the pbutton
(2) or the qbutton (3) and conrm each selection
by pressing the mode button (4).
•Ifyou do not make an entry for 30 seconds, the
settings will automatically close.
5.3. Setting the time format and day of the
week
•Press the pbutton (2) to switch between the 12
and 24-hour formats. In the 12-hour format, AM
or PM appears beforethe time.

4
•Toset the language for the day of the week
display,press and hold the qbutton (3) for
approx. 3seconds. Press and hold the qbutton
(3) until the language you want is shown.
Note –Day of the week
Youcan choose German (GE), English (EN),
Swedish (SW), Dutch (DU), Italian (IT), Spanish
(SP)orFrench (FR)for the weekday display.
5.4. Alarm settings and display
•Press the mode button (4) repeatedly until AL1
is displayed.
•Hold the mode button (4) for approx. 3seconds.
The hours display begins to ash.
•Press the pbutton (2) or the qbutton (3) to
select the hour for the alarm time and conrm your
selection by pressing the mode button (4). The
minutes display begins to ash.
•Repeat the process to set the minutes for the
alarm time. Once you have conrmed your minutes
selection with the mode button (4), alarm 1is
activated and 1appears.
•You can also set asecond alarm time.
•Press the mode button (4) repeatedly until AL2 is
displayed and repeat the settings for AL1.
•Press the button (6) to activate/deactivate
alarm time 1, alarm time 2orboth at once.
The alarm symbols 1and/or 2will appear/
not appear.
•Ifthe alarm is triggered, the corresponding alarm
symbol will begin to ash and an alarm will sound.
•Press the button (6) to stop the alarm.
Otherwise, it will stop automatically after 4
minutes.
•Ifyou press the SNOOZE /LIGHT button (1)
during the alarm, the alarm is interrupted
for 4minutes and then goes off again. The
corresponding alarm symbol and the snooze
symbol ZZwill ash.
5.5. Settings and display for asecond time
zone
•Press and hold the pbutton (2) for approx. 3se-
conds to display the second time zone as the main
time. The Fsymbol appears next to the time.
•Press the mode button (4) repeatedly until the
temperatureisdisplayed.
•Press and hold the mode button (4) for approx. 3
seconds to set asecond time in another time zone.
The hours display begins to ash.
•Press the pbutton (2) or the qbutton (3) to
make the setting and conrm your selection by
pressing the mode button (4).
•Toswitch to the current local time, press and hold
the pbutton (2) again for approx. 3seconds.
The Fsymbol is no longer displayed.
5.6. Dual Time settings and display
•Press the mode button (4) repeatedly until DUAL
TIME is displayed.
•Press and hold the mode button (4) for
approximately 3seconds. The hours display
begins to ash.
•Press the pbutton (2) or the qbutton (3) to
make the setting and conrm your selection by
pressing the mode button (4). The minutes display
begins to ash.
•Repeat the process to set the minutes.

5
5.7. Temperature display
•Press the mode button (4) until the temperature
is displayed.
•Press the °C/°F button (5) to choose between °C
and °F for the temperaturedisplay.
5.8. Backlight
If you press the SNOOZE /LIGHT button (1), the
display will light up for approx. 5seconds.
6. Care and Maintenance
Only clean this product with aslightly damp, lint-free
cloth and do not use aggressive cleaning agents.
Make surethat water does not get into the product.
7. Warranty Disclaimer
Hama GmbH &CoKG assumes no liability and
provides no warranty for damage resulting from
improper installation/mounting, improper use of
the product or from failuretoobserve the operating
instructions and/or safety notes.
8. Service and Support
Please contact Hama Product Consulting if you have
any questions about this product.
Hotline: +49 9091 502-115 (German/English)
Further support information can be found here:
www.hama.com
9. Technical Data
RC 130 radio-controlled alarm clock
Power supply 3.0 V
2xAAA batteries
Measuring
range
Temperature
–10°C –+50°C
10. Declaration of Conformity
Hereby,Hama GmbH &CoKG declares
that the radio equipment type
[00136241, 00136242, 00136243] is in
compliance with Directive 2014/53/EU.The full text of
the EU declaration of conformity is available at the
following internet address:
www.hama.com->00136241, 00136242,
00136243->Downloads.
Frequency band(s) 77.5 kHz

6
Bedienungselemente und Anzeigen
1. SNOOZE /LIGHT-Taste =Aktivierung
Hintergrundbeleuchtung (ca. 5Sekunden) /
Unterbrechung des Wecksignals für 4Minuten
2.
p
-Taste =Auswahl Datum, Uhrzeit, Wecker
/Umstellung 12-/24-Stundenformat /Anzeige
Zeitzone
3. q-Taste =Auswahl Datum, Uhrzeit, Wecker /
Sprachauswahl
4. mode-Taste =Einstellung Datum, Uhrzeit,
Wecker /Anzeigenwechsel
5. °C/°F Taste =Aktivierung /Deaktivierung
manueller Funksignal-Empfang /Wechsel
zwischen °C und°F
6. -Taste =Aktivierung /Deaktivierung Wecker
7. Batteriefach
8. Batteriefachabdeckung
1. Erklärung von Warnsymbolen und Hinweisen
Warnung
Wirdverwendet, um Sicherheitshinweise zu
kennzeichnen oder um Aufmerksamkeit auf
besondereGefahren und Risiken zu lenken.
Hinweis
Wirdverwendet, um zusätzlich Informationen oder
wichtige Hinweise zu kennzeichnen.
2. Packungsinhalt
•Funkwecker RC 130
•2AAA Batterien
•diese Bedienungsanleitung
3. Sicherheitshinweise
•Das Produkt ist fürden privaten, nicht-gewerblichen
Haushaltsgebrauchvorgesehen.
•Schützen Siedas Produkt vorSchmutz, Feuchtigkeit
und Überhitzung undverwenden Sieesnur in
trockenen Umgebungen.
•Benutzen Sie das Produkt nicht in Bereichen, in
denen elektronische Produktenicht erlaubt sind.
•Positionieren Sie dasProdukt nicht in derNähe
vonStörfeldern, Metallrahmen,Computern
und Fernsehernetc.Elektronische Gerätesowie
Fensterrahmenbeeinträchtigen dieFunktiondes
Produktes negativ.
•Lassen Siedas Produkt nicht fallen undsetzen Siees
keinen heftigen Erschütterungen aus.
•Versuchen Sie nicht, das Produkt selbst zu warten
oder zu reparieren.Überlassen Sie jegliche
Wartungsarbeit demzuständigenFachpersonal.
•Nehmen Sie keineVeränderungen am
Produkt vor. Dadurchverlieren sie jegliche
Gewährleistungsansprüche.
•Halten SieKinder unbedingt von dem
Verpackungsmaterial fern,esbesteht
Erstickungsgefahr.
•Entsorgen Sie das Verpackungsmaterialsofort
gemäß denörtlich gültigen Entsorgungsvorschriften.
Warnung –Batterien
•Entfernenund entsorgen Sie verbrauchteBatterien
unverzüglich ausdem Produkt.
•Verwenden SieausschließlichAkkus (oder
Batterien), die demangegebenen Typentsprechen.
•Mischen Sie alte und neue Batterien nicht,sowie
Batterien unterschiedlichen Typs oder Herstellers.
•Beachten Sieunbedingtdie korrekte Polarität
(Beschriftung +und -) der Batterien undlegen
Sie diese entsprechendein.Bei Nichtbeachtung
besteht dieGefahr desAuslaufens oder einer
Explosion der Batterien.
DBedienungsanleitung

7
•Laden Sie Batteriennicht.
•Bewahren SieBatterien außerhalbder Reichweite
vonKindernauf.
•SchließenSie Akkus/Batterien nicht kurzund halten
Sie sievon blanken Metallgegenständen fern.
4. Inbetriebnahme
Öffnen Sie die Batteriefachabdeckung (8),
entfernen Sie den Kontaktunterbrecher und schließen
Sie die Batteriefachabdeckung (8) wieder.
5. Betrieb
Hinweis –Eingabe
Halten Sie die p-Taste (2) oder die q-Taste (3)
gedrückt, um die Werte schneller auswählen
zu können.
5.1. Automatische Einstellung Datum/ Uhrzeit
nach DCF-Funksignal
•Nach dem Einlegen der Batterie wirddas Display
eingeschaltet, es ertönt ein akustisches Signal und
der Wecker beginnt automatisch die Suche nach
einem DCF-Signal. Während des Suchvorgangs
blinkt das Funksymbol auf.Dieser Vorgang
kann 3bis 5Minuten dauern.
•Bei Empfang des Funksignals werden Datum und
Uhrzeit automatisch eingestellt.
Anzeige Suche nach DCF-Signal
Blinkende Anzeige Aktiv
Dauerhafte Anzeige Erfolgreich –Signal wird
empfangen
Keine Anzeige Fehlgeschlagen –
Signalsuche eingestellt
Schwacher Signalempfang
Hinweis
Die Uhr sucht automatisch einmal proStunde
nachdem DCF-Signal, um eine korrekte Uhrzeit
zu gewährleisten. Falls die Suche fehlschlägt, wird
diese beendet und zur nächsten vollen Stunde
wiederholt. Das Funksymbol erlischt.
•Wirdwiederholt kein Signal empfangen, drücken
und halten Sie die °C/°F Taste (5 )für ca. 3
Sekunden, um die manuelle Suche nach dem
DCF-Signal zu starten. Das Funksymbol
beginnt zu blinken.
Hinweis
Der manuelle Suchvorgang dauert etwa 3-5
Minuten. Falls dieser fehlschlägt, wirddie
Suche beendet und zur nächsten vollen Stunde
wiederholt. Das Funksymbol erlischt.
Hinweis –Sommerzeit
Die Uhrzeit stellt sich automatisch auf die
Sommerzeit um. Solange die Sommerzeit aktiv ist,
wirdauf dem Display Sangezeigt.
5.2. Manuelle Einstellung Datum/ Uhrzeit
•Drückenund haltenSie die mode-Taste (4 )für
ca.3Sekunden, um die manuelle Einstellung von
Datum/ Uhrzeit zu starten.
•Stellen Sie diefolgendenInformationen
nacheinander ein: Stunde, Minute, Jahr,Monat,Tag
•DrückenSie zum Auswählen dereinzelnen
Werte die p-Taste (2) oderdie q-Taste (3) und
bestätigen Sie diejeweiligeAuswahl durch Drücken
der mode-Taste (4).

8
•Die Einstellungen werden automatisch beendet,
wenn länger als 30 Sekunden keine Eingabe erfolgt.
5.3. Einstellung von Zeitformat und Wochentag
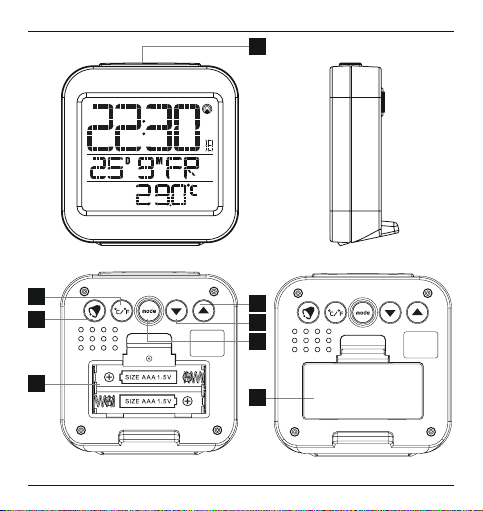
•Drücken Sie die p-Taste (2), um zwischen dem
12- und 24-Stundenformat zu wechseln. Im
12-Stundenformat werden AM bzw. PM vor der
Uhrzeit angezeigt.
•Drücken und halten Sie die q-Taste (3) für ca. 3
Sekunden, um die Sprache der Wochentaganzeige
einzustellen. Halten Sie die q-Taste (3) dabei
so lange gedrückt, bis die gewünschte Sprache
angezeigt wird.
Hinweis –Wochentag
Sie können für die Wochentaganzeige die
Sprachen Englisch (EN), Deutsch (GE),
Italienisch (IT), Französisch (FR), Spanisch (SP),
Niederländisch (DU)oder Schwedisch (SW)
wählen.
5.4. Einstellung und Anzeige Wecker
•Drücken Sie wiederholt die mode-Taste (4), bis
AL1 angezeigt wird.
•Halten Sie die mode-Taste (4) für ca. 3Sekunden.
Die Stundenanzeige beginnt zu blinken.
•Drücken Sie die p-Taste (2) oder die q-Taste
(3) ,umdie Stunden der Weckzeit auszuwählen
und bestätigen Sie die Auswahl durch Drücken
der mode-Taste (4). Die Minutenanzeige beginnt
zu blinken.
•Wiederholen Sie diesen Vorgang für die Minuten
der Weckzeit. Nachdem Sie die Auswahl der
Minuten mit der mode-Taste (4) bestätigt haben,
ist die Weckzeit 1aktiviert und 1wirdangezeigt.
•Sie haben die Möglichkeit eine zweite Weckzeit
zu bestimmen. Drücken Sie wiederholt die mode-
Taste (4), bis AL2 angezeigt wirdund wiederholen
Sie die Einstellungen wie für AL1.
•Drücken Sie die -Taste Taste (6), um die
Weckzeit 1, Weckzeit 2oder beide gleichzeitig zu
aktivieren/ deaktivieren. Die Alarmsymbole 1
und/ oder 2werden angezeigt/ nicht angezeigt.
•Wirdder Wecker entsprechend ausgelöst, beginnt
das jeweilige Alarmsymbol zu blinken und ein
Wecksignal ertönt.
•Drücken Sie die -Taste (6), um den Alarm zu
beenden. Andernfalls endet dieser automatisch
nach 4Minuten.
•Drücken Sie während des Wecksignals die
SNOOZE /LIGHT-Taste (1), wirddas Wecksignal
für 4Minuten unterbrochen und dann erneut
ausgelöst. Das jeweilige Alarmsymbol sowie das
Snoozesymbol ZZblinken.
5.5. Einstellung und Anzeige zweite Zeitzone
•Drückenund haltenSie die p-Taste (2) fürca.
3Sekunden,umsichdie zweite Zeitzone als
Hauptuhrzeit anzeigen zu lassen.Eswirdneben der
Uhrzeit dasSymbol
F
angezeigt.
•DrückenSie wiederholt die mode-Taste (4),bis die
Temperatur angezeigt wird.
•Drückenund haltenSie die mode-Taste (4) für ca.3
Sekunden, um einezweite Uhrzeitineiner anderen
Zeitzone einzustellen. DieStundenanzeige beginnt
zu blinken.
•Nehmen Siedie Einstellung mithilfe der p-Taste (2)
oder q-Taste (3) vorund bestätigen Siedie Auswahl
durchDrücken der mode-Taste (4).
•Drückenund haltenSie die p-Taste (2) erneutfür ca.
3Sekunden,umindie aktuelle Ortszeit zu wechseln.
Das Symbol
F
wird nichtmehrangezeigt.

9
5.6. Einstellung und Anzeige Dual Time
•Drücken Sie wiederholt die mode-Taste (4), bis
DUAL TIME angezeigt wird.
•Drücken und halten Sie die mode-Taste (4) für
ca. 3Sekunden. Die Stundenanzeige beginnt
zu blinken.
•Nehmen Sie die Einstellung mithilfe der p-Taste
(2) oder q-Taste (3) vor und bestätigen Sie die
Auswahl durch Drücken der mode-Taste (4). Die
Minutenanzeige beginnt zu blinken.
•Wiederholen Sie diesen Vorgang für die Einstellung
der Minuten.
5.7. Anzeige Temperatur
•Drücken Sie die mode-Taste (4), bis die
Temperatur angezeigt wird.
•Drücken Sie die °C/°F Taste (5), um bei der
Temperaturanzeige zwischen °C und °F zu
wechseln.
5.8. Hintergrundbeleuchtung
•Drücken Sie die SNOOZE /LIGHT-Taste (1), wird
das Display für ca. 5Sekunden beleuchtet.
6. Wartung und Pflege
Reinigen Sie dieses Produkt nur mit einem
fusselfreien, leicht feuchten Tuch und verwenden Sie
keine aggressiven Reiniger.Achten Sie darauf,dass
kein Wasser in das Produkt eindringt.
7. Haftungsausschluss
Die Hama GmbH &CoKG übernimmt keinerlei
Haftung oder Gewährleistung für Schäden, die
aus unsachgemäßer Installation, Montage und
unsachgemäßem Gebrauch des Produktes oder einer
Nichtbeachtung der Bedienungsanleitung und/oder
der Sicherheitshinweise resultieren.
8. Service und Support
Bitte wenden Sie sich bei Fragen zum Produkt gerne
an die Hama-Produktberatung.
Hotline: +49 9091 502-115 (Deu/Eng)
WeitereSupportinformationen nden sie hier:
www.hama.com
9. Technische Daten
Funkwecker RC 130
Stromversorgung 3,0 V
2xAAA Batterie
Messbereich
Temperatur –10°C –+50°C
10. Konformitätserklärung
Hiermit erklärt die Hama GmbH &CoKG,
dass der Funkanlagentyp [00136241,
00136242, 00136243] der Richtlinie
2014/53/EU entspricht. Der vollständige Text der
EU-Konformitätserklärung ist unter der folgenden
Internetadresse verfügbar:
www.hama.com->00136241, 00136242,
00136243->Downloads.
Frequenzband/
Frequenzbänder 77,5 kHz

10
Éléments de commande et d'affichage
1. Touche SNOOZE /LIGHT =allumage du rétro-
éclairage (env.5secondes) /interruption de la
sonnerie de réveil pour 4minutes
2. Touche
p
=réglage de la date, de l'heure, de
l'heurederéveil /sélection du format 12/24
heures /achage du fuseau horaire
3. Toucheq=réglage de la date, de l'heure, de
l'heurederéveil /sélection de la langue
4. Touche mode =réglage de la date, de l'heure,
de l'heurederéveil /changement d’achage
5. Touche °C/°F =Activation /Désactivation
de la réception manuelle du signal radio /
Commutation entre°Cet°F
6. Touche =Activation /Désactivation du réveil
7. Compartiment àpiles
8. Couvercle du compartiment àpile
1. Explication des symboles d‘avertissement et
des remarques
Avertissement
Ce symbole est utilisé pour indiquer des consignes
de sécurité ou pour attirer votreattention sur des
dangers et risques particuliers.
Remarque
Ce symbole est utilisé pour indiquer des
informations supplémentaires ou des remarques
importantes.
2. Contenu de l‘emballage
•Réveil radio-piloté RC 130
•2piles LR03/AAA
•Mode d'emploi
3. Consignes de sécurité
•Ceproduit est destiné àune installation
domestique non commerciale.
•Protégez le produit de toute saleté, humidité,
surchauffe et utilisez-le uniquement dans des
locaux secs.
•N‘utilisez pas le produit dans les zones dans
lesquelles l‘utilisation d‘appareils électroniques
est interdite.
•Neplacez pas le produit àproximité de champs
parasites, de cadres métalliques, d‘ordinateurs,
de téléviseurs, etc. Les appareils électroniques
ainsi que les cadres de fenêtreont une inuence
négative sur le fonctionnement du produit.
•Protégez le produit des secousses violentes et
évitez tout choc ou toute chute.
•Netentez pas de réparer l’appareil vous-même ni
d’effectuer des travaux d’entretien. Déléguez tous
travaux d‘entretien àdes techniciens qualiés.
•N’apportez aucune modication àl’appareil.
Des modications vous feraient perdrevos droits
de garantie.
•Tenez les emballages d‘appareils hors de portée
des enfants, risque d‘étouffement.
•Recyclez les matériaux d’emballage conformément
aux prescriptions locales en vigueur.
Avertissement -concernant les piles
•Retirez les piles usagées immédiatement du
produit pour les recycler.
•Utilisez exclusivement des batteries (ou des
piles) du type indiqué.
•N’utilisez pas simultanément des piles usagées
et des piles neuves ou des piles de différents
types.
FMode d‘emploi

11
•Respectez impérativement la polarité de la pile
(marquage +et-)lors de l‘insertion dans le
boîtier ;risques d‘écoulement et d‘explosion
des piles si tel n‘est pas le cas.
•Nesurchargez pas les piles.
•Conservez les piles hors de portée des enfants.
•Necourt-circuitez pas les batteries/piles et
éloignez-les des objets métalliques.
4. Mise en service
Ouvrez le couvercle du compartiment àpiles
(8), retirez le lm de protection, puis refermez le
couvercle du compartiment àpiles (8).
5. Fonctionnement
Remarque concernant la saisie
Maintenez la touche p(2) ou la touche q
(3) enfoncée andefairedéler rapidement
les chiffres.
5.1. Réglage automatique de la date /de
l'heure sur la base du signal horaire DCF
•L'écrans'allumeaprès avoir inséré lespiles;
un signal sonoreretentit et le réveil recherche
automatiquementlesignalhoraireDCF.Lesymbole
radio clignote pendant la recherchedusignal
horaire. Cette procédure dure de 3à5minutes.
•Ladate etl'heure sont régléesautomatiquement
dèsque l'unitédétectelesignal radio.
Achage Recherche du signal
horaireDCF
Achage clign Recherche active
Achage permanent Recherche aboutie -signal
en cours de réception
Aucun achage Échec de réception - nde
la recherche du signal
Réceptiondusignal faible
Remarque
Le réveil recherche automatiquement le signal
horaireDCF une fois par heureandegarantir
l'exactitude horaire. En cas d'échec de la
recherche du signal, le réveil recommence à
rechercher le signal l'heurepleine suivante. L’icône
de radio s'éteint.
•Encas de nouvel échec de réception, appuyez sur
la touche °C/°F (5) pendant environ 3secondes
andelancer une recherche manuelle du signal
horaireDCF.L'icône radio se met àclignoter.
Remarque
La recherche manuelle dureenviron 3-5 minutes.
En cas d'échec de détection du signal, le réveil
recommence àrechercher le signal àl'heurepleine
suivante. L’icône de radio s'éteint.
Remarque concernant l'heured'été
Le réveil s'adapte automatiquement àl'heure
d'été. Sapparaît àl’écran pendant la durée de
l’heured’été.
5.2 Réglage manuel de la date /del'heure
•Appuyez sur la touche mode (4) pendant environ
3secondes andedémarrer le réglage manuel de
la date /del'heure.
•Vous pouvez régler successivement les valeurs
suivantes :heure, minute, année, mois, jour

12
•Appuyez sur la touche p(2) ou la touche q
(3) andesélectionner les différentes valeurs,
puis conrmez votresélection en appuyant sur la
touche mode (4).
•Laprocédurederéglage se termine
automatiquement si vous n'appuyez sur aucune
touche pendant plus de 30 secondes.
5.3 Réglage du format horaire et du jour de
la semaine
•Appuyez sur la touche p(2)andecommuter
entrel’achagedel’heureauformat12heures ou
24 heures. AM ou PM apparaît avantles chiffresde
l'heurelorsqueleformat 12 heures estsélectionné.
•Appuyez sur la touche q(3)pendant environ
3secondes andesélectionner la langue pour
l'achage des jours de la semaine. Appuyezsur
la touche q(3)etmaintenez-la enfoncée jusqu'à
achage de la langue souhaitée.
Remarque concernant l'achage
des jours de la semaine
Vous pouvez acher le jour de la semaine dans
les langues suivantes :anglais (EN),allemand
(GE),italien (IT),français (FR),espagnol (SP),
néerlandais (DU) ou suédois (SW).
5.4 Réglage et affichage de l'heure de réveil
•Appuyez sur la touche mode (4), jusqu'à ce que
AL1 apparaisse àl'écran.
•Maintenez la touche mode (4) enfoncée pendant
environ 3secondes. Les chiffres de l'heurese
mettent àclignoter.
•Appuyez sur la touche p(2) ou sur la touche q
(3) andesélectionner l'heurederéveil, puis
conrmez votresélection en appuyant sur la
touche mode (4). Les chiffres des minutes se
mettent àclignoter.
•Répétezcette étape pour les minutesdel'heure de
réveil. L'heure de réveil1est activée et
1
apparaît
àl'écran après avoir conrméles minutes àl'aide de
la touche mode (4).
•Vous pouvez alors sélectionnerune deuxième
heurederéveil.
•Appuyezplusieurs foissur la touche mode (4)
jusqu’à ce que AL2 apparaisseàl’écran, puis
répétezles étapes effectuées pour le réglage de AL1.
•Appuyezsur la touche (6)and’activer (ou
désactiver)l'alarme 1, l'alarme2ou les deux. Les
icônes d'alarme
1
et/ou
2
apparaissent à
l'écran /disparaissent de l'écran.
•Lors du déclenchement de l'alarmederéveil, l'cône
d'alarme correspondant se metàclignoteretune
alarme sonore retentit.
•Appuyezsur la touche (6)and'arrêter l'alarme.
L'alarme s'arrête également automatiquementau
boutde4minutes.
•L’alarme s’interrompt pendant 4minutes,puis
retentit ànouveau si vous appuyez sur la touche
SNOOZE/LIGHT (1) pendant le retentissement
de l'alarme. L'icôned'alarme correspondant,ainsi
que l'icône de répétition de l'alarme
ZZ
se mettent
àclignoter.
5.5 Réglage et affichage du deuxième fuseau
horaire
•Appuyez sur la touche p(2) pendant environ
3secondes and'acher l'heuredudeuxième
fuseau horairecomme heureprincipale. L'icône
Fapparaît àcôté des chiffres de l'heure.
•Appuyez plusieurs fois sur la touche mode (4)
jusqu'à ce que la températureapparaisse àl'écran.
•Appuyez sur la touche mode (4) pendant environ
3secondes anderégler l'heured'un deuxième
fuseau horaire. Les chiffres de l'heuresemettent
àclignoter.

13
•Appuyez sur la touche p(2) ou sur la touche q
(3) andesélectionner les différentes valeurs,
puis conrmez votresélection en appuyant sur la
touche mode (4).
•Appuyez ànouveau sur la touche p(2) pendant
environ 3secondes anderetourner àl'heure
du premier fuseau horaire. L'icône Fdisparaît
de l'écran.
5.6. Réglage et affichage de l'heure d'un
deuxième fuseau horaire (dual time)
•Appuyezplusieursfoissur la touche mode (4)
jusqu'à ce que DUAL TIME apparaisse àl'écran.
•Appuyezsur la touche mode (4) pendant env.
3secondes.Les chiffres de l'heuresemettent à
clignoter.
•Appuyezsur la touche p(2) ou surlatouche q
(3)andesélectionnerles différentes valeurs, puis
conrmez votresélectionenappuyantsur la touche
mode (4).Les chiffresdes minutessemettent
àclignoter.
•Répétezl'étape précédentepourréglerles minutes.
5.7. Affichage de la température
•Appuyez sur la touche mode (4) jusqu'à ce que la
températureapparaisse àl'écran.
•Appuyez sur la touche °C/°F (5), ande
sélectionner l'achage en degrés Celsius ou
Fahrenheit.
5.8. Rétroéclairage
•Appuyez sur la touche SNOOZE /LIGHT (1) an
d'allumer l'écran pendant environ 5secondes.
6. Soins et entretien
Nettoyez ce produit uniquement àl’aide d’un chiffon
non pelucheux légèrement humide ;évitez tout
détergent agressif.Veillez àcequ’aucun liquide ne
pénètredans le produit.
7. Exclusion de garantie
La société Hama GmbH &CoKG décline toute
responsabilité en cas de dommages provoqués par
une installation, un montage ou une utilisation non
conformes du produit ou encoreprovoqués par un
non respect des consignes du mode d‘emploi et/ou
des consignes de sécurité.
8. Service et assistance
En cas de question concernant le produit, veuillez
vous adresser au service de conseil produits de Hama.
Ligne téléphonique directe :+49 9091 502-115
(allemand/anglais)
Vous trouverez ici de plus amples informations
concernant l‘assistance :www.hama.com
9. Caractéristiques techniques
Réveil radio-piloté RC 130
Alimentation en
électricité
3,0 V
2piles LR03/AAA
Plage de mesure
Température –10°C –+50°C
10. Déclaration de conformité
Le soussigné, Hama GmbH &CoKG,
déclareque l‘équipement radioélectrique
du type [00136241, 00136242,
00136243] est conforme àladirective 2014/53/UE.
Le texte complet de la déclaration UE de conformité
est disponible àl‘adresse internet suivante:
www.hama.com->00136241, 00136242,
00136243->Downloads.
Bandes de fréquences 77,5 kHz

14
Elementos de manejo eindicadores
1. Tecla SNOOZE /LIGHT =Activación de
la retroiluminación (aprox. 5segundos) /
Interrupción de la señal del despertador durante
4minutos
2. Tecla
p
=Selección de fecha, hora, despertador
/Conmutación del formato horario de 12/24
horas /Indicación de la zona horaria
3. Tecla q=Selección de fecha, hora, despertador
/Selección de idioma
4. Tecla mode =Ajuste de fecha, hora,
despertador /conmutación de la visualización
5. Tecla °C/°F =Activación/ desactivación de la
recepción manual de la señal de radiofrecuencia
/Cambio entre°Cy°F
6. Tecla =Activación/desactivación del
despertador
7. Compartimento parapilas
8. Cubierta del compartimento parapilas
1. Explicación de los símbolos de aviso ydelas
indicaciones
Aviso
Se utiliza paracaracterizar las indicaciones de
seguridad oparallamar la atención sobrepeligros
yriesgos especiales.
Nota
Se utiliza paracaracterizar informaciones
adicionales oindicaciones importantes.
2. Contenido del paquete
•Despertador por radiofrecuencia RC 130
•2pilas AAA
•Estas instrucciones de manejo
3. Instrucciones de seguridad
•Elproducto es paraeluso doméstico privado, no
comercial.
•Proteja el producto de la suciedad, la humedad yel
sobrecalentamiento yutilícelo sólo en recintos secos.
•Noutilice el producto en áreas donde no se permitan
aparatos electrónicos.
•Noposicione el producto en las proximidades
de campos de interferencia, marcos de metal,
ordenadores, televisores, etc. Losdispositivos
electrónicos ylos marcos de las ventanas afectan
negativamente al funcionamiento del producto.
•Nodeje caer el producto ni lo someta asacudidas
fuertes.
•Nointente mantener orepararelaparato por
cuenta propia. Encomiende cualquier trabajo de
mantenimiento al personal especializado competente.
•Norealice cambios en el aparato. Esto conllevaría la
pérdida de todos los derechos de la garantía.
•Mantenga el material de embalaje fueradel alcance
de los niños, existe peligrodeasxia.
•Deseche el material de embalaje en conformidad con
las disposiciones locales sobreeldesecho vigentes.
Aviso –Pilas
•Retireydeseche de inmediato las pilas
gastadas del producto.
•Utilice exclusivamente pilas recargables (o pilas)
que sean del mismo tipo.
•Nomezcle pilas viejas ynuevas, ni tampoco
pilas de tipos ofabricantes diferentes.
•Observe siemprelacorrecta polaridad
(inscripciones +y-)delas pilas ycoloque éstas
de forma correspondiente. La no observación
de lo anterior conlleva el riesgo de derrame o
explosión de las pilas.
EInstrucciones de uso

15
•Nosobrecargue las pilas.
•Mantenga las pilas fueradel alcance de
los niños.
•Nocortocircuite las pilas recargables/baterías y
manténgalas alejadas de objetos metálicos.
4. Puesta en funcionamiento
Abralacubierta del compartimento de pilas (8),
retireelseparador de contacto yvuelva acerrar la
cubierta del compartimento de pilas (8).
5. Funcionamiento
Nota –Introducción de datos
Mantenga pulsada la tecla p(2) olateclaq(3)
paraseleccionar los valores más rápidamente,
5.1. Ajuste automático de la fecha/hora según
la señal DCF
•Cuando se colocan las pilas, se enciende
la pantalla, suena una señal acústica yel
despertador empieza abuscar una señal DCF
automáticamente. Durante la búsqueda, el
símbolo de radiofrecuencia parpadea. Este
proceso puede durar de 3a5minutos.
•Cuando se recibe la señal de radiofrecuencia, la
fecha ylahoraseajustan automáticamente.
Visualización Búsqueda de señal
DCF
Indicación intermitente Activa
Indicación constante
La búsqueda ha
nalizado con éxito, se
recibe la señal
Ninguna indicación La búsqueda ha
fallado yhaterminado
Recepción débilde
la señal
Nota
El reloj busca automáticamente la señal DCF una
vez cada horaparagarantizar una horacorrecta.
Si la búsqueda falla, ésta se termina yserepite
alasiguiente horaenpunto. El símbolo de
radiofrecuencia se apaga.
•Sinoserecibieraseñal repetidamente, pulse y
mantenga pulsada la tecla °C/°F (5) durante
aprox. 3segundos parainiciar la búsqueda
de señal DCF de forma manual. El símbolo de
radiofrecuencia empieza aparpadear.
Nota
El proceso de búsqueda manual durade3a5
minutos. Si la búsqueda falla, ésta se termina yse
repite alasiguiente horaenpunto. El símbolo de
radiofrecuencia se apaga.
Nota –Horario de verano
•Lahoraseajusta automáticamente al horario
de verano. Durante el horario de verano, en la
pantalla se visualiza S.
5.2. Ajuste manual de fecha/hora
•Pulse ymantenga pulsada la tecla mode (4)
durante aprox. 3segundos parainiciar el ajuste
manual de fecha/hora.
•Ajuste sucesivamente los siguientes datos: hora,
minuto, año, mes, día

16
•Paraseleccionar cada valor,pulse la tecla p
(2) olatecla q(3) yconrme la selección
correspondiente pulsando la tecla mode (4).
•Los ajustes nalizan automáticamente si no
se hace ninguna entrada durante más de 30
segundos.
5.3. Ajuste del formato de hora yeldía de
la semana
•Pulse la tecla p(2) paraconmutar entrelos
formatos de 12 y24horas. En el formato de 12
horas se visualiza AM oPM delante de la hora.
•Pulseymantenga pulsadalateclaq(3) durante
aprox. 3segundos para ajustar el idioma que se
utilizaráenlaindicacióndel díadelasemana.
Mantengapulsada la tecla q(3)hasta quese
visualice el idioma deseado.
Nota –Día de la semana
Para la visualización del día de la semana puede
elegir entrelos idiomas alemán (DE), inglés (EN),
sueco (SW), neerlandés (DU), italiano (IT), español
(SP)ofrancés (FR).
5.4. Ajuste eindicación de despertador
•Pulserepetidamente la tecla mode (4)hastaque
se visualiceAL1.
•Mantengapulsada la tecla mode (4) durante aprox.
3segundos. La indicacióndelas horas empieza
aparpadear.
•Pulselatecla p(2) olatecla q(3)para
seleccionar lashoras de la hora de alarma y
conrmelaselección pulsando la tecla mode (4). La
visualización de losminutos comienzaaparpadear.
•Repita esteproceso para los minutos de la horade
alarma deldespertador.Conrmada la selección de
los minutos con la tecla mode (4), la hora de alarma
1queda activada visualizándose
1
.
•Tiene la posibilidad de ajustar una segundahorade
alarmadedespertador.Pulse repetidamente la tecla
mode (4) hasta que se visualice AL2 yrepita los
ajustesrealizados para AL1.
•Pulselatecla (6) paraactivar/desactivar la
horadealarma 1, la hora de alarma 2oambas
simultáneamente.Sevisualiza(n)/deja(n)de
visualizarse lossímbolos de alarma
1
y/o
2
.
•Cuando se activa el despertador,elsímbolodela
alarmacorrespondiente empieza aparpadear y
suena una señaldedespertador.
•Pulselatecla (6) paracancelarlaalarma. De
otromodo, ésta nalizaautomáticamente tras
4minutos.
•Sidurantelaseñal deldespertador pulsa la tecla
SNOOZE/LIGHT (1),laseñal deldespertador
se interrumpe durante 4minutos yseactivade
nuevo pasadoese tiempo. El símbolo de la alarma
correspondienteyelsímbolo desnooze
ZZ
parpadean.
5.5. Ajuste yvisualización de una segunda
zona horaria
•Pulse ymantenga pulsada la tecla p(2) durante
aprox. 3segundos paravisualizar la segunda zona
horaria como zona horaria principal. Se visualiza el
símbolo Fjunto alahora.
•Pulse repetidamente la tecla mode (4) hasta que
se visualice la temperatura.
•Pulse ymantenga pulsada la tecla mode (4)
durante aprox. 3segundos paraajustar una
segunda horaenotrazona horaria. La indicación
de las horas empieza aparpadear.
•Realice el ajuste mediante la tecla p(2) ola
tecla q(3) yconrme la selección pulsando la
tecla mode (4).

17
•Parapasar alahoralocal actual, pulse y
mantenga pulsada nuevamente la tecla p(2)
durante aprox. 3segundos. Deja de visualizarse
el símbolo F.
5.6. Ajuste yvisualización de la función Dual
Time
•Pulse repetidamente la tecla mode (4) hasta que
se visualice DUAL TIME.
•Pulse ymantenga pulsada la tecla mode (4)
durante aprox. 3segundos. La indicación de las
horas empieza aparpadear.
•Realice el ajuste mediante la tecla p(2) ola
tecla q(3) yconrme la selección pulsando la
tecla mode (4). La visualización de los minutos
comienza aparpadear.
•Repita este proceso paraajustar el valor deseado
paralos minutos.
5.7. Visualización de la temperatura
•Pulse la tecla mode (4) hasta que se visualice la
temperatura.
•Pulse la tecla °C/°F (5) paraconmutar entre°Cy
°F en la indicación de la temperatura.
5.8. Retroiluminación
Si pulsa la tecla SNOOZE /LIGHT (1), la pantalla se
ilumina durante aprox. 5segundos.
6. Mantenimiento ycuidado
Limpie este producto sólo con un paño que no
suelte pelusas ligeramente humedecido ynoutilice
limpiadores agresivos. Asegúrese de que no entre
agua en el productot.
7. Exclusión de responsabilidad
Hama GmbH &CoKG no se responsabiliza ni
concede garantía por los daños que surjan por
una instalación, montaje omanejo incorrectos del
producto opor la no observación de las instrucciones
de manejo y/o de las instrucciones de seguridad.
8. Servicio ysoporte
Si tiene que hacer alguna consulta sobreelproducto,
diríjase al asesoramiento de productos Hama.
Línea directa: +49 9091 502-115 (Alemán/Inglés)
Encontrar más información de soporte aquí:
www.hama.com
9. Datos técnicos
Despertador por radiofrecuencia
RC 130
Alimentación de
corriente
3,0 V
2pilas AAA
Rango de medición
Temperatura –10°C –+50°C
11. Declaración de conformidad
Porlapresente, Hama GmbH &CoKG,
declaraque el tipo de equipo
radioeléctrico [00136241, 00136242,
00136243] es conforme con la Directiva 2014/53/UE.
El texto completo de la declaración UE de
conformidad está disponible en la dirección Internet
siguiente:
www.hama.com->00136241, 00136242,
00136243->Downloads.
Banda obandas de
frecuencia 77,5 kHz

18
Органы управления ииндикации
1. Кнопка SNOOZE/LIGHT =включение
подсветки (ок.5секунд)/автоповтор сигнала
будильника (пауза 4минуты)
2. Кнопка
p
=выбор даты,времени,
будильника /переключение формата
индикации текущеговремени (12/24) /
отображение часовогопояса
3. Кнопка q=выбор даты,времени,
будильника /выбор языкаl
4. Кнопка mode =настройка даты,времени,
будильника /выбор режима индикации
5. Кнопка °C/°F =выбор единицы измерения
температуры (°C/°F) / включение/
выключение принудительногоприема
радиосигнала
6. Кнопка =активация/деактивация
будильника
7. Отсекбатарей
8. Крышка отсека батарей
1. Предупредительные пиктограммы и
инструкции
Внимание
Данным значком отмечены инструкции,
несоблюдение которых можетпривести к
опасной ситуации.
Примечание
Дополнительная или важная информация.
2. Комплект поставки
•Радиобудильник RC 130
•2батареи ААА
•Настоящая инструкция
3. Техника безопасности
•Изделие предназначено толькодля домашнего
применения.
•Беречь от грязи,влаги иисточников тепла.
Эксплуатировать тольковсухих условиях.
•Не применять взапретных зонах.
•Прибор разрешается подключать толькок
соответствующей розеткеэлектросети.Розетка
электросети должна находиться рядом с
устройством влегкодоступном месте.
•Не ронять.Беречь от сильных ударов.
•Запрещается самостоятельно ремонтировать
устройство.Ремонт разрешается производить
толькоквалифицированному персоналу.
•Запрещается вносить изменения в
конструкцию.Впротивном случае гарантийные
обязательства аннулируются.
•Упаковку не давать детям:опасность асфиксии.
•Утилизировать упаковку всоответствии с
местными нормами.
Внимание –Батареи
•Израсходованные батареи немедленно
удалять из прибора иутилизировать.
•Разрешается применять аккумуляторы
толькоуказанноготипа.
•Не применять различные типы или новые и
старые батареи вместе.
•Соблюдатьполярность батарей (+ и-).
Несоблюдение полярности можетстать
причиной взрыва батарей.
•Не подвергатьаккумуляторы чрезмерной
зарядке.
•Батареи хранить вбезопасном месте ине
давать детям.
RРуководство по эксплуатации

19
•Не закорачивать контакты батарей.
Не хранить рядом сметаллическими
объектами.
4. Ввод вэксплуатацию
Откройте крышку отсека батарей (8), удалите
изолятор изакройте крышку отсека батарей
(8).
5. Эксплуатация
Примечание –вводданных
Чтобы ускорить изменение значения во время
настройки,удерживайте кнопку p(2) или
кнопку q(3).
5.1. Автоматическая настройка даты/
времени по сигналу DCF
•После загрузки батарей включается дисплей
иподается звуковой сигнал.Затем прибор
автоматически начинает поиск радиосигнала
точноговремени (DCF). Во время поиска на
дисплее мигает символрадиосигнала .
Этот процессможет длиться от 3до 5минут.
•После приема радиосигнала выполняется
автоматическая настройка даты ивремени.
Индикация Поиск сигнала DCF
Индикация мигает Активно
Горит непрерывно Сигнал принят успешно
Нет индикации Сигнал не принят
Слабыйприем сигнала
Примечание
Поиск радиосигнала точноговремени
осуществляется каждый час.Если сигнал
принять не удалось,операция завершается
автоматически.Повторная попытка будет
произведена вследующий полный час.Значок
радиосигнала гаснет.
•Если сигнал повторно не удается принять,
нажмите иок.3секунд удерживайте кнопку
°C/°F (5), чтобы включить поиск радиосигнала
DCF вручную.Значок радиосигнала
мигает.
Примечание
Поиск радиосигнала вручную продолжается
3–5 минут.Если сигнал принять не удалось,
операция завершается автоматически.
Повторная попытка будет произведена в
следующий полный час.Значок радиосигнала
гаснет.
Примечание –индикация
летнеговремени
Переключение на летнее время происходит
автоматически.Во время индикации летнего
времени на дисплее отображается значок S.
5.2. Настройка даты ивремени вручную
•Нажмите иок.3секунд удерживайте кнопку
mode (4), чтобы вручную настроить дату и
время.
Other manuals for RC 130
2
This manual suits for next models
3
Table of contents
Languages:
Other Hama Clock Radio manuals