Haussmann 59595078 User manual

59595078
N1F-GT-250/3.0-C
Model / Modèle:
Manuel de l’utilisateur (p.15)
Electric grass trimmer
Operator’s Manual (p. 2)
Coupe-herbe électrique
Customer Service / Service à la clientèle: 1-866-206-0888
Notre personnel du service à la clientèle est disponible pour vous aider. Pour obtenir de l’aide pour le montage de votre produit, pour signaler des
pièces endommagées ou manquantes, ou pour toute autre information, veuillez composer notre numéro sans frais: 1-866-206-0888.
Our Customer service staff is available to help you. For help with product assembly, to report damaged or missing parts, or for
any other information, please call our toll-free number: 1-866-206-0888.
Enregistrez votre produit
Nous vous invitons à enregistrer votre produit en ligne afin de faciliter les communications; pour ce faire, veuillez visiter le www.outilshaussmann.com
CONSERVEZ CE GUIDE
Vous aurez besoin de ce guide pour les règles de sécurité, le fonctionnement et la garantie. Conservez-le avec votre facture d'origine dans un endroit sûr au
sec pour référence future.
Register your product
We invite you to register your product online to make future communications easier. To do so, simply visit our website www.haussmanntools.com.
SAVE THIS MANUAL
You will need this manual for safety instructions, operating procedures, and warranty. Put it and the original sales invoice in a safe, dry place for future
reference.

Fig.1
Parts list
1. On/off switch
2. Cord sleeve
3. Cord hook
4. Cord & plug
5. Auxiliary handle
6. Upper handle shaft
7. Lower handle shaft
8. Cooling vent
9. Safety guard
10. Cooling fan
11. Spool
12. Trimmer head
Nomenclature des pièces
1. Interrupteur marche / arrêt
2. Manchon de cordon
3. Crochet de cordon
4. Cordon et fiche
5. Poignée auxiliaire
6. Manche supérieur
7. Manche inférieur
8. Évent de refroidissement
9. Protecteur
10. Ventilateur de refroidissement
11. Bobine
12. Tête de coupe

2
TABLE OF CONTENTS
ENGLISH
SAFETY SYMBOLS
Safety symbols
Safety instructions
Application
Technical data
Assembly
Operation
Maintenance
Warranty
Parts List
Schematic Drawing
p.2
p.3
p.5
p.6
p.6
p.7
p.10
p.12
p.13
.............................................................................................
........................................................................................
.................................................................................................
............................................................................................
...................................................................................................
....................................................................................................
..............................................................................................
...................................................................................................
....................................................................................................
Please read all of the safety and operating instructions carefully before
using this tool. Please pay particular attention to all sections of this User
Guide that carry warning symbols and notices. Some of the following symbols
maybe used on this tool.
p.14.....................................................................................
Warning
Read operator’s manual
Wear eye and ear protection
Don’t expose to rain
Remove the plug from the mains immediately if cable
is damaged or cut.
Keep all bystanders at least 50 ft (15 m) away.

3
SAFETY INSTRUCTIONS
NO.
ENGLISH
!
WARNING! Read and understand all instructions. Failure to follow the
instructions listed below may result in serious personal injury.
NO. !
WARNING! When using electric tools, machines or equipment, basic safety
precautions should always be followed to reduce the risk of fire, electric shock,
and personal injury. Completely read the manual before proceeding to use this
tool. KEEP THESE INSTRUCTIONS
READ ALL INSTRUCTIONS BEFORE USING THIS APPLIANCE
Special safety precautions must be taken to reduce the risk of personal
injury.
A. FOR ALL DOUBLE-INSULATED APPLIANCES
1) Replacement Parts
When servicing use only identical replacement parts.
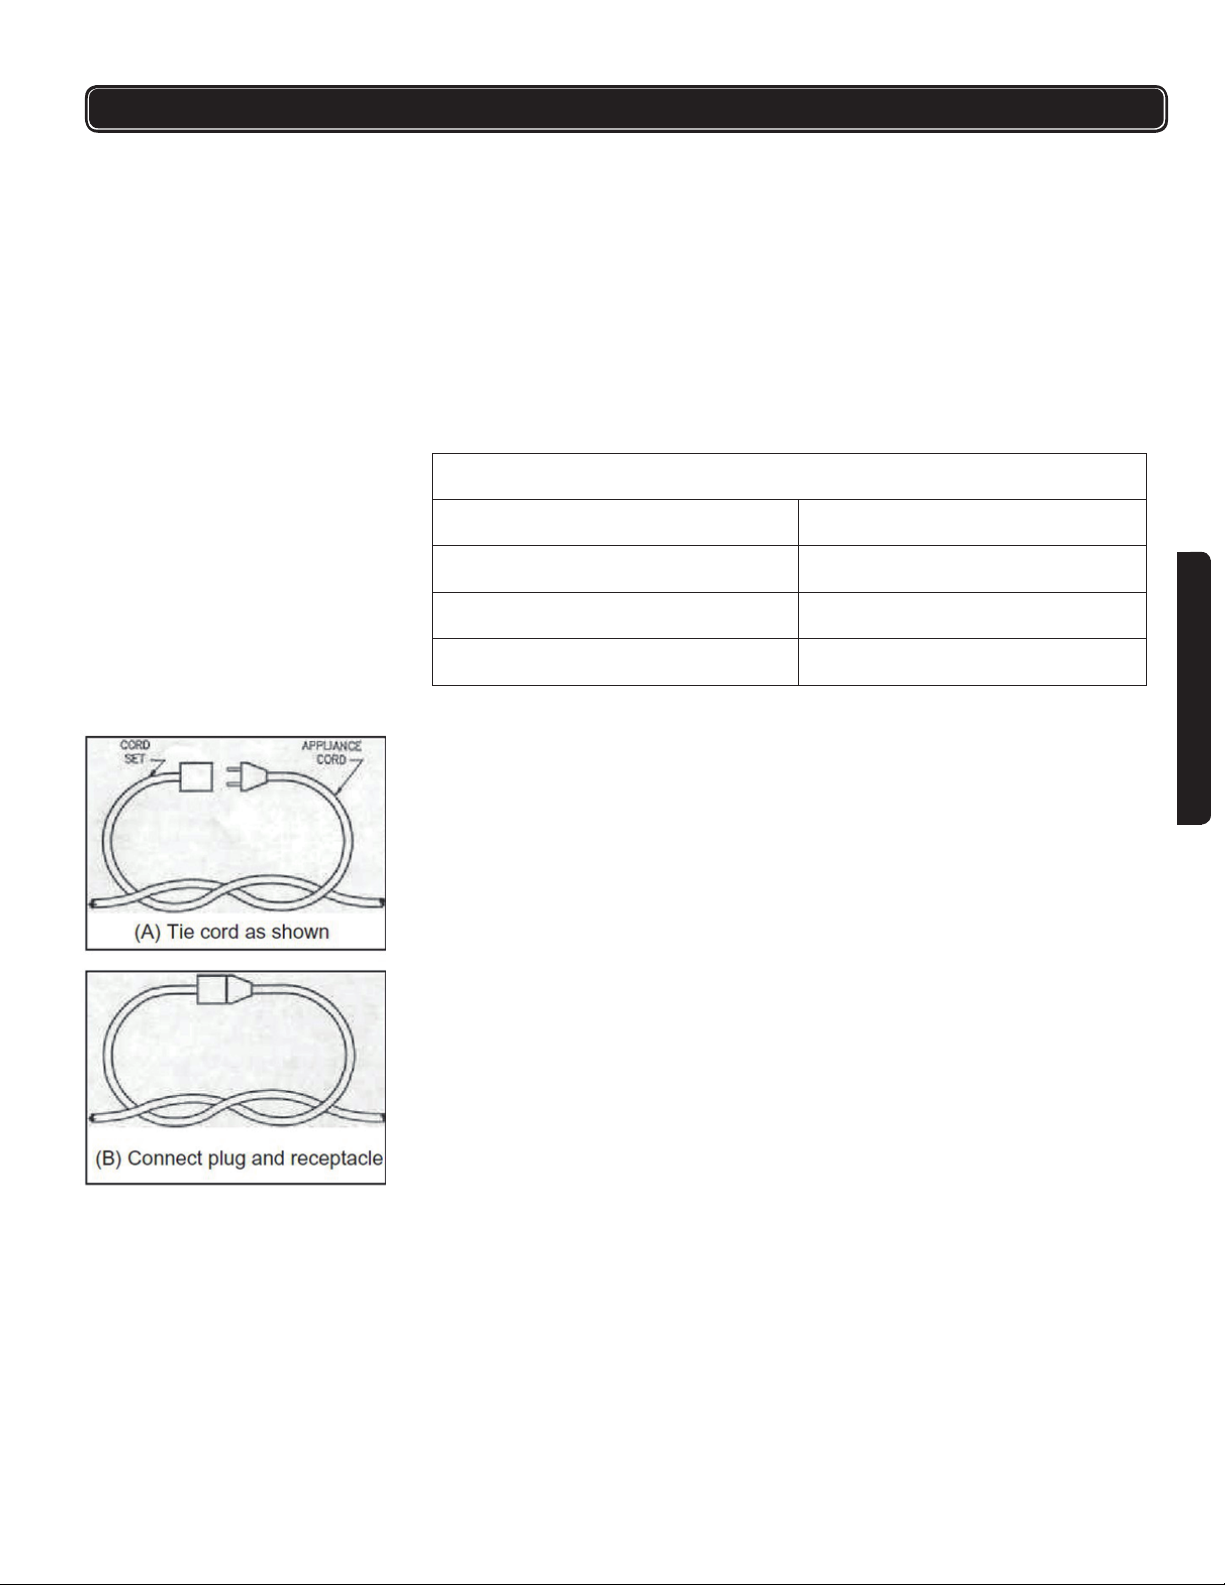
2) Polarized Appliance Connections
To reduce the risk of electric shock, this appliance has a polarized plug (one
blade is wider than the other) and will require the use of a polarized extension
cord. The appliance plug will fit into a polarized extension cord only one way. If
the plug does not fit fully into the extension cord, reverse the plug. If the plug
still does not fit, obtain a correct polarized extension cord. A polarized
extension cord will require the use of a polarized wall outlet. This plug will fit
into the polarized wall outlet only one way. If the plug does not fit fully into the
wall outlet, reverse the plug. If the plug still does not fit, contact a qualified
electrician to install the proper wall outlet.
Do not change the equipment plug, extension cord receptacle, or extension
cord plug in any way.
B. FOR ALL APPLIANCES
1) Avoid Dangerous Environment – Don’t use appliances in damp or wet
locations.
2) Don’t use appliance in rain.
3) Keep all other people, including children, pet and bystanders outside the 50 ft
(15 m) hazard zone, stop the trimmer immediately if you are approached.
4) Dress Properly – Do not wear loose clothing or jewelry. They can be caught in
moving parts. Use of rubber gloves and substantial footwear is recommended
when working outdoors. Wear protective hair covering to contain long hair.
5) Wear eye protection. – Always use face or dust mask if operation is dusty.
6) Use Right Appliance – Do not use appliance for any job except that for which it
is intended.
7) Ground Fault Circuit Interrupter (GFCI) protection should be provided on the
circuit(s) or outlet(s) to be used for the gardening appliance. Receptacles are
available having built-in GFCI protection and may be used for this measure of
safety.

4
SAFETY INSTRUCTIONS
ENGLISH
8) Warning – To reduce the risk of electric shock, use only with an extension
cord intended for outdoor use, such as an extension cord of cord type SW-A,
SOW-A, STW-A, STOW-A, SJW-A, SJOW-A, SJTW-A. or SJTOW-A.
9) Extension Cord – Make sure your extension cord is in good condition. When
using an extension cord, be sure to use one heavy enough to carry the
current your product will draw. An undersized extension cord will cause a
drop in line voltage resulting in loss of power and overheating. If in doubt, use
the next heavier gauge. The smaller the gauge number, the heavier the cord.
10) Avoid Unintentional Starting – Don’t carry plugged-in appliance with finger
on switch. Be sure switch is off when plugging in.
11) Handle cord carefully – Never carry appliance by cord or yank it to
disconnect from receptacle. Keep cord from heat, oil, and sharp edges.
12) Don’t Force Appliance – It will do the job better and with less likelihood of a
risk of injury at the rate for which it was designed.
13) Don’t Overreach – Keep proper footing and balance at all times.
14) Stay Alert – Watch what you are doing. Use common sense. Do not operate
appliance when you are tired or under the influence of alcohol, drugs or
medication that cause drowsiness.
15) Disconnect Appliance – Disconnect the appliance from the power supply
when not in use, before servicing, when changing accessories such as
blades, and the like.
16) Keep guards in place and in working order.
17) Keep hands and feet away from cutting area.
Read this manual carefully prior to operating the grass trimmer. It contains
important safety, maintenance and operating instructions. Read these
instructions thoroughly even if you are already familiar with trimmer use.
To reduce the risk of disconnection of appliance cord from the extension cord
during operating:
i) Make a knot as shown in Fig.2;
ii) Use one of the plug-receptacle retaining straps or connectors described in
this manual.
Extension Cord Gauge Chart
Length of Cord Gauge
25 Ft. (7.5 m) 18 Gauge
50 Ft. (15 m) 16 Gauge
100 Ft. (30 m) 16 Gauge
SELECT AN EXTENSION CORD
SAFETY PRECAUTIONS
Fig.2

5
SAFETY INSTRUCTIONS
APPLICATION
ENGLISH
O.
Read all safety warnings and instructions.
Failure to follow the warnings and instructions may result in electric shock,
fire and/or serious injury.
OPERATOR SAFETY
- Wear protective glasses or goggles;
- Never allow children or people unfamiliar with the instructions to use the
machine;
- Stop using the machine while people, especially children, or pets are nearby;
- Only use the machine in daylight or good artificial light;
- Before using the machine and after any impact, check for signs of wear or
damage and repair as necessary;
- Never operate the machine with damaged guards or without the guards in
place;
- Keep hands and feet away from the cutting head at all times;
- Take care against injury form any device fitted for trimming the filament line
length. After extending new cutter line always return the machine to its normal
operating position before switching on;
- Never fit metal cutting elements;
- Never use replacement parts or accessories not provided or recommended by
the manufacturer;
- Always ensure that ventilation openings are kept clear of debris.
Intended Use
The HAUSSMANN grass trimmer is intended for the cutting of grass and weeds
under bushes, as well as on slopes and edges that cannot be reached with the
lawn mover.
Check the box contents
Carefully remove the snow thrower from its packaging and check the following
parts are present:
-- grass trimmer
-- safety guard
-- auxiliary handle and tightening bolt
If any parts are missing or damaged, please contact Customer Service at
1-866-206-0888.
Parts list
The numbering of the product parts refers to the illustration of the machine on
page 1 (Fig. 1 ).
1. On/off Switch
2. Cord sleeve
3. Cord hook
4. Cord & plug
5. Auxiliary handle
6. Upper handle shaft
7. Lower handle shaft
8. Cooling vent
9. Safety guard
10. Cooling fan
11. Spool
12. Trimmer head

6
TECHNICAL DATA
ENGLISH
ASSEMBLY
Observe correct mains voltage: The voltage of the power source must match
the voltage specified on the nameplate of the unit.
1. Place your handle on the tool as shown(Fig.5).
2. Adjust handle to the most comfortable position.
3. Pass the handle knob bolt through auxiliary handle. Screw the handle knob
bolt into the captive nut on the far side of the auxiliary handle(Fig.5).
4. Adjust the forward or backward to a comfortable position; tighten knob
securely.
Product code
Model number
Input voltage rating
Rated current
No load variable speed
Cutting width
Cutting line diam. and length
Net weight
59595078
N1F-GT-250/3.0-C
120 V~, 60 Hz
3 AMP
12 000 RPM
10" (250 mm)
0.055" x 19.6'
3.1lbs (1.4 kg)
Assemble the auxiliary handle
Advice
1. Place unit on a flat surface.
2. Push the upper half frame into the lower one each other as the following
picture, until they are tightly connected(Fig.3&Fig.4).
Assemble the unit
NO.
!WARNING! Ensure during assembly that the power cable is not squeezed and
that it has sufficient play.
Fig.3
Fig.4
Fig.5

7
ASSEMBLY
OPERATION
ENGLISH
The trimmer must be used outdoors only, at an ambient temperature between
0ºC and 45ºC.
Switch On/Off
To switch the grass trimmer ON, squeeze the on/off switch, to switch the grass
trimmer off, release the on/off switch.
1. Unplug the tool.
2. Remove the screw from the motor housing
3. Put guard in direction of arrow to align with screw hole.
4. Firmly press the guard into place.
5. Secure the guard with screw. Never use the tool unless the guard is properly
fitted.
Assemble the safety guard(Fig.6)
NO. !
WARNING! The guard must be properly installed. The guard provides partial
protection from the risk of thrown objects to the operator and others.
NO. !
WARNING! Never use steel wire, rope, string, or other materials as cutting line,
which can break off and become a dangerous projectile.
NO. !
WARNING! The cutting head continues to rotate after the trimmer has
been switched off, wait until it has stopped then lay down the tool.
NO. !
WARNING! Remove stones, loose pieces of wood and other objects from the
cutting area. The blade continues to rotate for a few seconds after the grass trimmer
is switched off. Allow the motor/blade to stop rotating before switching on again.
Do not rapidly switch off and on.
NO. !
NOTE: If guard is not properly installed, damage to unit (including motor failure)
will result.
Fig.6

8
OPERATION
ENGLISH
FIRST How to disassemble the spool.
1) Disconnect the mains plug.
2) Press together both locking devices (4) at the spool cover (3) and remove
spool cover. (Fig.7&Fig.8)
SECOND How to wind the string
Hook the string in the groove as shown in Fig.10.
3) Remove the spool from the spool cover. (Fig.9)
4) Remove the spring.
5) Clean off dirt and grass residues.
2) Wind the string as shown in Fig.11 and hook the two ends in the side
grooves.
Replacing the spool kit
Fig.7
Fig.8
Fig.9
Fig.10
Fig.11
3) Firmly place the cover on the spool and pull them approx.9 cm out of the
spool.(Fig. 12)
Fig.12

9
OPERATION
ENGLISH
Check length of nylon cutting line (Fig.16)
1) Pull line (6) to inner edge of outer guard (8). If the line is too short, i.e. more
than 50mm from inside edge of guard, push down on centre of trimmer head
(5) and at the same time pull the line a few centimeters past the edge of the
guard.
2) Remove trimming blade guard (9).
NO.
!
Note: Only remove trimming blade guard (9) when all operation checks have been
carried out.
Store trimming blade guard (9) after replacing new nylon cutting line. When the
trimmer starts, the line will automatically be cut to the correct length
Fig.13
Fig.14
Fig.15
Fig.16
4) Along the groove slide the string into the hole in the string cover. (Fig.13)
5) Prepare to assemble the spool into the trimmer.
Third How to assemble the spool
1) Insert the spring into the shroud and thread the string into the hole as shown
in Fig.14.
2) Place the spool cover (3) on the spring and press it firmly down until the
locking devices (4) of the spool cover (3) securely click into place. (Fig.15)

10
OPERATION
ENGLISH
MAINTENANCE
The grass trimmer comes with a full line spool. The line wears down during
work. To feed in new line, switch the machine on and press the head of the
spool firmly against the ground. The line will automatically be released by the
centrifugal force. The trimmer line will be cut to the right length by the blade
on the lime cover.
To increase line length
1) Move the grass trimmer left and right, keeping it well away from the body. The
trimmer can efficiently cut grass up to a height of 15cm. Cut higher grass in
stages.
2) When using the trimmer hold at an angle of about 20°to the ground (Fig. 17)
and swing the trimmer from side to side. (Fig.17)
Do not overload the trimmer - cut in small sections, which will greatly improve
efficiency by keeping the trimmer running at a high speed. (Fig.18)
Cutting grass
NO.
!WARNING! Always wear protective gloves during maintenance operations.
Do not carry out maintenance when the engine is running or hot.
NO.
!WARNING! Use only original manufacturer's replacement parts, accessories and
attachments. Failure to do so can cause possible injury and poor performance.
Fig.17
Fig.18
• Before conducting any maintenance make sure the trimmer is unplugged.
• Only the maintenance operations described in this manual may be carried out
by the user. Any other tasks must be completed by a specialist.
• Check all screws regularly to ensure that they sit tight.
• Only use original replacement parts. Only these spare parts are designed and
suitable for the device. Other replacement parts will not only lead to an
invalidation of the warranty, they may also endanger you and your
environment.

11
MAINTENANCE
ENGLISH
STORAGE
Clean the line trimmer thoroughly before storing.
Store the line trimmer in a dry, well-ventilated place that is inaccessible to
children. Keep away from corrosive agents.
Motor operates
slowly or will
not operate
Extension cord connection
loosen
Spool housing can not
rotate freely
Cutting line does not
protrude
Electrical failure
Connect the cord correctly
Carefully clean the spool
housing
Cut the spool line off unit it
reach the line trimming blade
Contact customer service
TROUBLESHOOTING
TROUBLE CAUSE REMEDY
NO. !
WARNING ! Always stop unit and disconnect from the power source before
performing all of the recommended remedies below except remedies that
require unit to be operating.
Spool head
will not
advance line
Cutting head bound with
accumulated grass
String head out of line
Spool bound up
String head dirty
Line twisted when refilled
Not enough line is exposed
Stop the unit and clean string
head
Refill with new line
Replace the spool
Clean spool and spool
housing
Disassemble and rewind the
line
Push the bump knob and pull
out line until it is outside of
the string head

12
WARRANTY
ENGLISH
Thank you for investing in a HAUSSMANN power tool. These products have
been made to demanding, high-quality standards and are guaranteed for
domestic use against manufacturing faults for a period of 36 months from the
date of purchase.
This guarantee does not affect your statutory rights. In case of any malfunction
of your tool (failure, missing part, etc.), please contact one of our service
technicians at our toll free service line at 1-866-206-0888 from 8 AM to 6 PM,
Monday to Friday, Eastern time. RONA reserves the right to repair or replace
the defective tool, at its discretion.
The product is guaranteed for 36 months if used for normal trade purposes. Any
guarantee is invalid if the product has been overloaded or subject to neglect,
improper use or an attempted repair other than by an authorized agent.
Heavy-duty, daily professional or hire usage are not guaranteed. Due to
continuous product improvement, we reserve the right to change the product
specification without prior notice.
Register your product
We invite you to register your product online to make future
communications easier. To do so, simply visit our website
www.haussmanntools.com.

13
PARTS LIST
ENGLISH
Please refer to the Schematic Drawing, on the next page.
No.
DESCRIPTION
Quantity
1
2
3
4
5
6
7
8
9
10
11
12
13
14
15
16
17
18
19
20
21
22
Power cord protector
Cable sheath
Switch handle
Switch spring
Left handle
Right handle
Switch
Screw ST3.1×13
Screw ST4.2×13
Screw ST3.1×13
Internal cable
Label
Screw ST4.2X13
Cover
Brush
Brush holder
Motor cover
Nut
Bearing 626Z
Rotor
Left housing
Bearing 627Z
1
1
1
2
1
1
1
1
1
8
2
1
7
1
2
2
1
2
1
1
1
1
23 Stator assembly 1
1
27
28
29
30
31
32
33
34
35
36
37
38
39
40
41
42
43
44
45
Screw M4×50
Motor front cover
Plastic column
Rivet
Fan
Spring
Left cover
Label
Spool
Spool cover
Screw St4.2X13
Blade
Screw ST4.2X9.5
Guard
Label
Upper front handle
Nut
Screw
Lower front handle
46 Screw
2
1
1
2
1
1
1
1
1
3
1
1
1
1
1
1
1
6
No.
DESCRIPTION
Quantity
24
25
26
Right housing
Flat washer 4
Spring washer 4
1
2

14
ENGLISH
FRANÇAIS
SCHEMATIC DRAWING / SCHÉMA
N1F-GT-250/3.0-C

15
LISTE DES PIÈCES
FRANÇAIS
Veuillez vous reporter au schéma à la page précédente.
N° d’article
DESCRIPTION
Quantité
1
2
3
4
5
6
7
8
9
10
11
12
13
14
15
16
17
18
19
20
21
22
Protecteur de cordon d’alimentation
Gaine de câble
Bouton de poignée
Ressort
Poignée gauche
Poignée droite
Interrupteur
Vis ST3.L×L3
Vis ST4.2×L3
Vis ST3.L×L3
Ligne de connexion
Étiquette
Vis ST4.2X13
Couvercle
Balai
Poignée de balai
Couvercle du moteur
Écrou
Roulement 626Z
Rotor
Boîtier gauche
Roulement 627Z
23 Stator
1
1
1
2
1
1
1
1
1
8
2
1
7
1
2
2
1
2
1
1
1
1
1
1
27
28
29
30
31
32
33
34
35
36
37
38
39
40
41
42
43
44
Vis M4×50
Couvercle avant du moteur
Colonne de plastique
Rivet
Ventilateur
Ressort
Couvercle gauche
Étiquette
Bobine
Couvercle de bobine
Vis ST4.2X13
Lame
Vis ST4.2X9.5
Protecteur
Etiquette
Poignée avant supérieure
Écrou
Vis
45
46
Écrou avant inférieur
Vis
2
1
1
2
1
1
1
1
1
3
1
1
1
1
1
1
1
6
N° d’article
DESCRIPTION
Quantité
24
25
26
Boîtier droit
Rondelle plate 4
Rondelle à ressort 4
1
2

16
TABLE DES MATIÈRES
SYMBOLES DE SÉCURITÉ
Schéma
Liste des pieces
Symboles de sécurité
Directives de sécurité
Application
Caractéristiques techniques
Assemblage
Fonctionnement
Entretien
Garantie
p.14
p.15
p.16
p.17
p.19
p.20
p.20
p.21
p.24
......................................................................................................
.........................................................................................
..................................................................................
.................................................................................
...................................................................................................
........................................................................
................................................................................................
..........................................................................................
.......................................................................................................
Veuillez lire toutes les instructions de sécurité et de fonctionnement avant d'utiliser
le présent outil. Veuillez porter une attention particulière à toutes les sections dans
le présent Guide de l'utilisateur qui portent des symboles d'avertissement et avis.
Certains des symboles ci-dessous sont présentés dans ce manuel.
p.26.....................................................................................................
Avertissement
Lisez le manuel de l’utilisateur
Portez des protections auditive et oculaire
Ne pas exposer à la pluie
Retirez la fiche de la prise immédiatement si le câble
est endommagé ou coupé.
Garder tous les spectateurs à une distance
de 50 pi (15 m).
FRANÇAIS

FRANÇAIS
17
DIRECTIVES DE SÉCURITÉ
NO. !
AVERTISSEMENT! Veillez à lire et à bien comprendre toutes les consignes.
Si vous ne suivez pas les indications suivantes, il existe un risque de blessures
graves.
NO. !
AVERTISSEMENT! Quand vous utilisez des outils, des machines ou des
équipements électriques, il faut toujours respecter les mesures de sécurité de
base pour minimiser le risque d'incendie, de choc électrique et de blessures
personnelles. Veuillez lire le manuel en entier avant d'utiliser cet outil.
CONSERVEZ CES INSTRUCTIONS.
VEUILLEZ LIRE TOUTES LES INSTRUCTIONS AVANT D’UTILISER
CET APPAREIL
Pour réduire le risque de blessures corporelles, vous devez prendre des
précautions de sécurité particulières.
A. POUR TOUS LES APPAREILS À DOUBLE ISOLATION
1) Pièces de rechange
Pour les réparations, utiliser uniquement des pièces de rechange identiques.
2) Connexions polarisées
Pour réduire le risque de choc électrique, cet appareil possède une fiche
polarisée (une lame est plus large que l'autre) et exige l'utilisation d'une
rallonge polarisée. Il n’y qu’une façon d'insérer la fiche de l'appareil dans la
rallonge polarisée. Si la fiche ne s'insère pas complètement dans la rallonge,
retourner la fiche. Si la fiche ne rentre toujours pas, il faut prendre une
rallonge polarisée adaptée. Une rallonge polarisée requiert l'utilisation d'une
prise murale polarisée. Il n’y qu’une façon d'insérer cette fiche dans la prise
murale polarisée. Si la fiche n'entre pas complètement dans la prise murale,
retourner la fiche. Si la fiche ne rentre toujours pas, communiquer avec un
électricien qualifié pour installer une prise murale appropriée. Ne pas modifier
la fiche d'équipement, le réceptacle de rallonge, ou la prise de rallonge.
B. POUR TOUS LES APPAREILS
1) Évitez les environnements dangereux - N'utilisez pas les appareils dans des
endroits humides ou mouillés.
2) N'utilisez pas les outils sous la pluie.
3) Gardez tous les gens, incluant enfants, animaux de compagnie et spectateurs,
hors de la zone de danger de 50 pi (15 m). Arrêtez le travail immédiatement si
vous êtes approché.
4) Habillez-vous correctement - Ne portez pas de vêtements amples ou de
bijoux. Ils peuvent être pris dans les pièces en mouvement. Des gants en
caoutchouc et chaussures fermées sont recommandés lors de travaux
extérieurs. Portez un filet protecteur pour les cheveux longs.
5) Portez des lunettes de protection - Utilisez toujours le masque à poussière si
le travail à effectuer produit de la poussière.
6) Utilisez le bon appareil - N'utilisez pas cet appareil pour tout autre travail que
pour lequel il est destiné.
7) Un disjoncteur de protection de mise à la terre (GFCI) devrait être installé sur
le circuit ou la sortie utilisé pour l'appareil de jardinage. Il existe des prises
avec disjoncteur intégré, qui peuvent être utilisées pour cette mesure de
sécurité.

18
DIRECTIVES DE SÉCURITÉ
8) AVERTISSEMENT - Pour réduire le risque de choc électrique, utilisez
uniquement avec une rallonge électrique destinée à être utilisée à l'extérieur,
comme une rallonge de type SW-A, SOW-A, STW-A, STOW-A, SJW-A,
SJOW-A, SJTW-A. ou SJTOW-A.
9) Rallonge - Assurez-vous que votre rallonge est en bon état. Lorsque vous
utilisez une rallonge, veillez à utiliser un calibre suffisant pour supporter le
courant. Un cordon de calibre inférieur entraînera une chute de tension
entraînant une perte de puissance et une surchauffe. En cas de doute,
utilisez le calibre suivant. Plus le numéro de calibre est petit, plus la rallonge
est puissante.
10) Évitez tout démarrage involontaire - Ne transportez pas l'appareil en ayant
le doigt posé sur le commutateur. Que le commutateur est hors tension lors
du branchement.
11) Manipulez le cordon avec soin - Ne déplacez jamais l'appareil par le cordon
ni tirer sur ce dernier pour le débrancher. Garder le cordon éloigné de la
chaleur, l'huile et des rebords tranchants.
12) Ne forcez pas l'appareil - Il fera le travail mieux et avec moins de risque de
blessure à la vitesse pour laquelle il a été conçu.
13) Ne dépassez pas votre portée - Maintenez un bon équilibre en tout temps.
14) Restez vigilant - Regardez ce que vous faites. Utilisez votre bon sens.
N'utilisez pas l'appareil lorsque vous êtes fatigué ou sous l'influence d'alcool,
de drogues ou de médicaments causant la somnolence.
15) Débranchez l’appareil – Débranchez l'appareil de l'alimentation électrique
lorsqu'il n'est pas utilisé, avant l'entretien ou lors du changement des
accessoires tels que lames, etc.
16) Maintenez les protecteurs en place et en bon ordre de fonctionnement.
17) Gardez les mains et les pieds hors de la zone de coupe.
Lisez ce manuel attentivement avant d'utiliser le coupe-herbe. Il contient
d'importantes consignes de sécurité, d’entretien et de fonctionnement. Veuillez
lire ces consignes minutieusement, même si l'utilisation d'un coupe-herbe
vous est déjà familière.
Pour réduire le risque de déconnexion du cordon appareil de la rallonge en
cours de fonctionnement:
i) Faites une boucle tel qu'illustré à la Fig.2;
i i) Utilisez l'une des sangles de retenue de cordon ou connecteurs décrits dans
ce manuel.
Tableau de calibre de la rallonge
Longueur de la corde Calibre
25 pi (7.5 m) calibre 18
50 pi (15 m) calibre 16
100 pi (30 m) calibre 16
SÉLECTIONNEZ UNE RALLONGE
MESURES DE SÉCURITÉ
Fig.2
FRANÇAIS
Branchez la fiche dans la prise
Nouez le cordon
Rallonge Cordon

19
DIRECTIVES DE SÉCURITÉ
APPLICATION
O.
Lisez attentivement toutes les consignes de sécurité et toutes les instructions.
Le non-respect des avertissements et des instructions peuvent entraîner un choc
électrique, un incendie et/ou une grave blessure.
SÉCURITÉ DE L'UTILISATEUR
- Portez des lunettes de protection
- Ne jamais laisser des enfants ou des personnes peu familières avec les
instructions utiliser l’appareil;
- Arrêtez d'utiliser l’appareil lorsque les gens, surtout les enfants, ou des animaux
se trouvent à proximité;
- N'utilisez l’appareil qu'à la lumière du jour ou sous un bon éclairage artificiel.
- Avant de mettre l'appareil en marche et après tout choc, vérifiez qu'il ne
présente aucun signe d'usure ou de dommage, et faites-le réparer si
nécessaire.
- Ne faites jamais fonctionner l’appreil avec des protections endommagées ou
manquantes.
- Gardez les mains et les pieds éloignés de la tête de coupe à tout moment.
- Evitez des blessures causées par l’outil monté pour couper la longueur de fil de
coupe. Après l'extension du nouveau fil de coupe, toujours retourner la
machine à sa position normale de fonctionnement avant de l'allumer;
- Ne montez jamais des éléments de coupe en métal;
- N'installez utiliser de pièces de rechange ou accessoires non fournis ou
recommandés par le fabricant;
- Vérifiez toujours que les orifices de ventilation sont exempts de tous débris.
Utilisation
Le coupe-herbe HAUSSMANN est conçu pour la tonte du gazon et des
mauvaises herbes sous les buissons, ainsi que sur les pentes et les bords qui ne
peut être coupés avec la tondeuse.
Vérification du contenu de l’emballage
Sortez soigneusement l'outil de son emballage et vérifiez que les pièces
présentes sont présentes :
-- coupe-herbe
-- protecteur
-- poignée auxiliaire et boulon de serrage
Si toute pièce est endommagée ou manquante, veuillez communiquer avec le
Service à la clientèle au 1-866-206-0888.
Liste des pièces
La numérotation des caractéristiques du produit renvoie à l'illustration de l'outil
sur la page des représentations graphiques de la page 1 (Fig. 1).
1. Interrupteur marche / arrêt
2. Manchon de cordon
3. Crochet de cordon
4. Cordon et fiche
5. Poignée auxiliaire
6. Manche supérieur
7. Manche inférieur
8. Event de refroidissement
9. Protecteur
10. Ventilateur de refroidissement
11. Bobine
12. Tête de coupe
FRANÇAIS
This manual suits for next models
1
Table of contents
Languages:
Other Haussmann Trimmer manuals

Haussmann
Haussmann GGT600LU User manual

Haussmann
Haussmann 68125135 User manual

Haussmann
Haussmann GHT610NU User manual

Haussmann
Haussmann 8401020 User manual

Haussmann
Haussmann H2TOOLKIT-18 User manual

Haussmann
Haussmann CGT24U User manual

Haussmann
Haussmann HLG033 User manual

Haussmann
Haussmann 02325004 User manual

Haussmann
Haussmann ST05 User manual

Haussmann
Haussmann 8401022 User manual