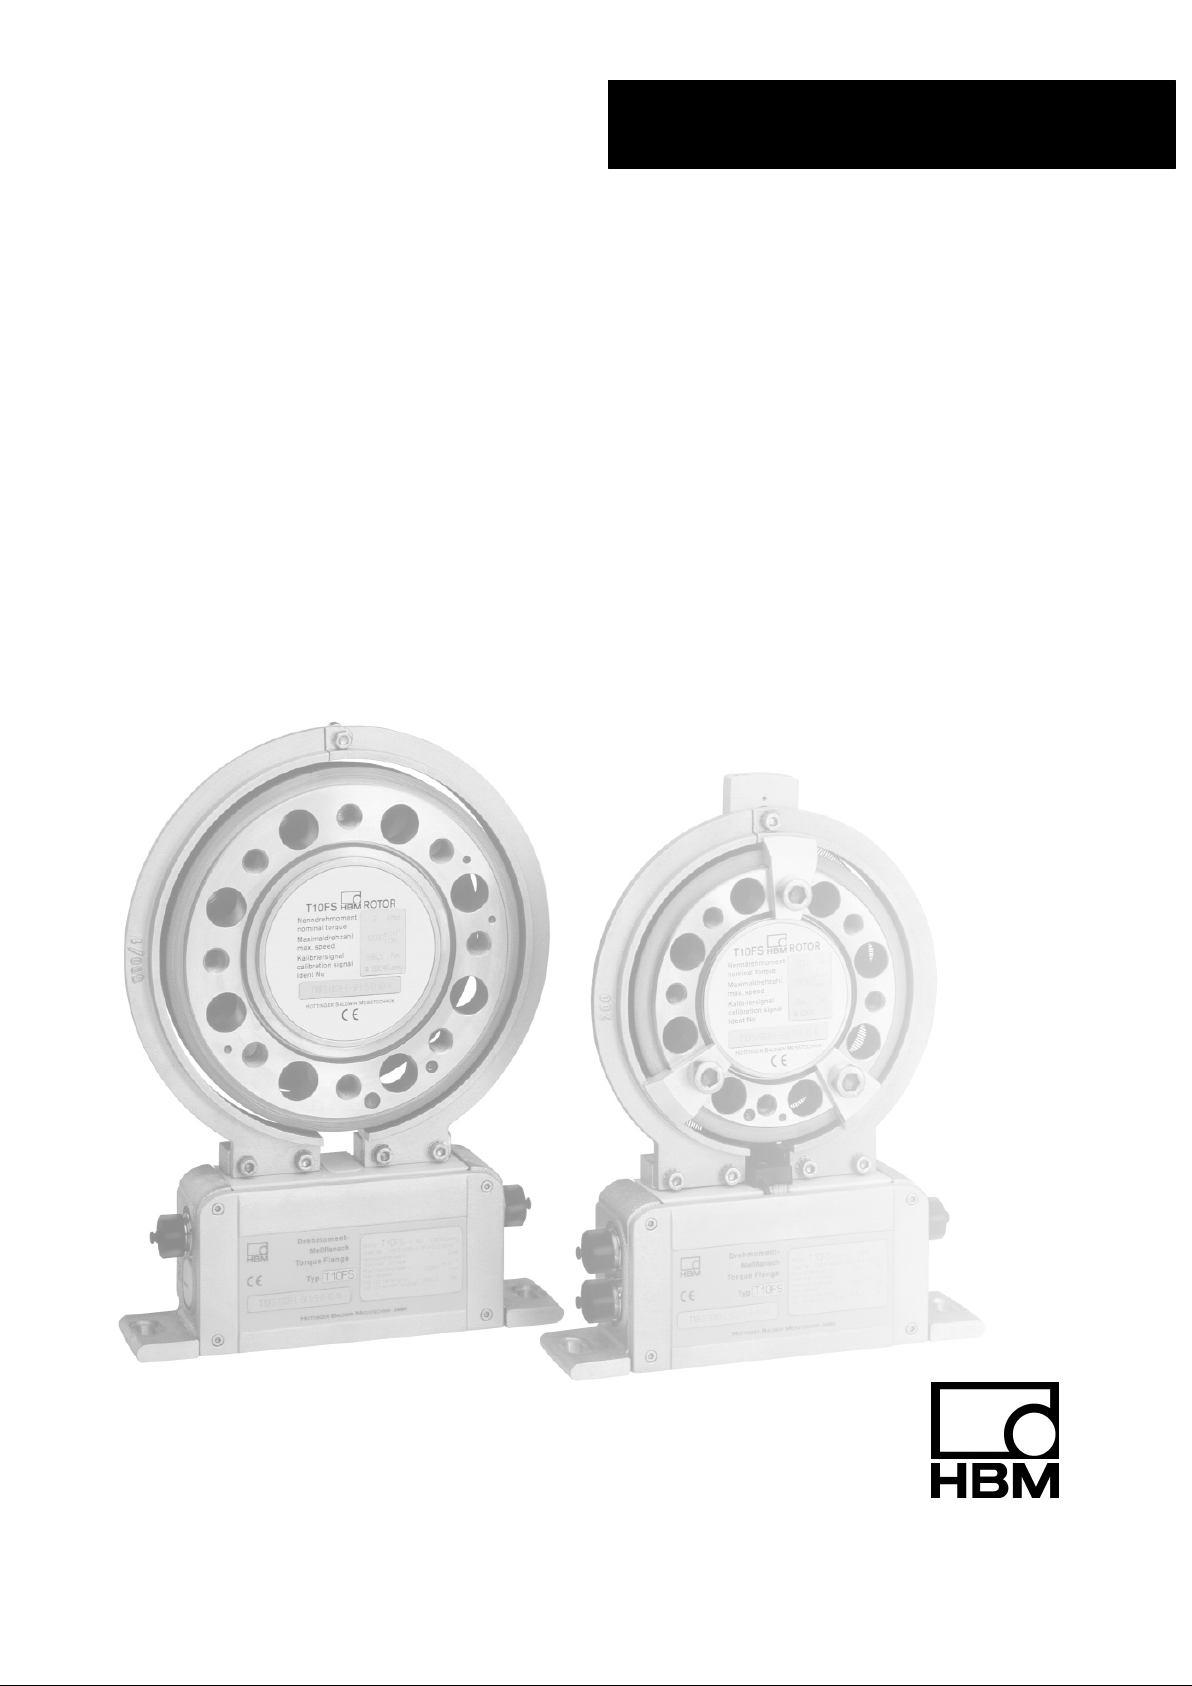
HBM T10FS User manual

A0785‐14.1 en
Torque Flange
T10FS
Mounting instructions


3
T10FS
A0785-1.4 en HBM
Contents Page
Contents
Safety instructions 6..............................................
1 Torque flange versions 10.......................................
2 Application 11..................................................
3 Structure and mode of operation 12..............................
4 Mechanical installation 13.......................................
4.1 Conditions on site 14........................................
4.2 Installation orientation 14....................................
4.3 Installation options 15.......................................
4.3.1 Installation without dismantling the antenna ring (without
speed measuring system) 15...........................
4.3.2 Installation with subsequent stator mounting (without
speed measuring system) 16...........................
4.3.3 Installation example with couplings 17...................
4.3.4 Installation example with joint shaft 17...................
4.4 Mounting the rotor 18.......................................
4.5 Installing the stator 20.......................................
4.6 Installing the clamp fixture 22................................
4.7 Mounting the slotted disc (optical speed measuring system) 24...
4.8 Fitting the mounting elements (speed measuring system) 25.....
4.8.1 Fixing the mounting elements 26........................
4.8.2 Mounting the torque flange with a speed measuring
system 26...........................................
4.9 Aligning the stator (speed measuring system) 28................
4.9.1 Magnetic speed measuring system 28...................
4.9.2 Optical speed measuring system 32.....................
5 Electrical connection 34.........................................
5.1 General information 34......................................
5.2 Shielding design 35.........................................
5.3 Option 2, code KF1 36......................................
5.3.1 Adaptation to the cable length 36.......................
5.4 Option 2, code SF1/SU2 38..................................
5.5 Supply voltage 40..........................................

T10FS
4
A0785-1.4 enHBM
6 Calibration 42..................................................
6.1 Calibration Option 2, code KF1 42............................
6.2 Calibration Option 2, code SF1/SU2 43........................
7 Settings 44.....................................................
7.1 Torque output signal, code KF1 45............................
7.2 Torque output signal, code SF1/SU2 45.......................
7.3 Setting up the zero point 46..................................
7.4 Functional testing 47........................................
7.4.1 Power transmission 47................................
7.4.2 Testing the optical speed module 47.....................
7.5 Setting the pulse count 49...................................
7.5.1 Magnetic speed measuring system 49...................
7.5.2 Optical speed measuring system 51.....................
7.6 Vibration suppression (hysteresis) 53..........................
7.7 Form of speed output signal 54...............................
7.8 Type of speed output signal 55...............................
7.9 Optical speed measuring system with a reference pulse 55.......
8 Loading capacity 57.............................................
8.1 Measuring dynamic torque 57................................
9 Maintenance 59.................................................
9.1 Torque flange maintenance 59...............................
9.2 Speed module maintenance 59...............................
9.2.1 Magnetic speed measuring system 59...................
9.2.2 Optical speed measuring system 59.....................
10 Dimensions 60.................................................
10.1 Rotor dimensions 60........................................
10.2 Rotor dimensions with the magnetic speed system 62............
10.3 Stator dimensions 63........................................
10.4 Stator dimensions with the magnetic speed system 64...........
10.5 Mounting dimensions 65.....................................
11 Order numbers, accessories 66..................................
12 Specifications 67...............................................

5
T10FS
A0785-1.4 en HBM
13 Supplementary technical information 75..........................
13.1 Output signals 75...........................................
13.1.1 Output MD torque (connector 1) 75......................
13.1.2 Output N: Speed and speed with a reference pulse
(connector 2) 76......................................
13.1.3 Connector 2, double frequency, stat. direction of rotation
signal 77.............................................
13.2 Axial and radial run‐out tolerances 78.........................

T10FS
6
A0785-1.4 enHBM
Safety instructions
Designated use
The T10FS torque flange is used exclusively for torque and rotation speed
measurement tasks, and directly associated control and regulatory tasks. Use
for any additional purpose shall be deemed to be not as intended.
In the interests of safety, the transducer should only be operated as described
in the Operating Manual. It is also essential to comply with the legal and
safety requirements for the application concerned during use. The same
applies to the use of accessories.
The transducer is not a safety element within the meaning of its designated
use. Proper and safe operation of this transducer requires proper
transportation, correct storage, assembly and mounting, and careful
operation.
General dangers of failing to follow the safety instructions
The transducer corresponds to the state of the art and is failsafe. The
transducer can give rise to remaining dangers if it is inappropriately installed
and operated by untrained personnel.
Everyone involved with mounting, starting up, maintaining, or repairing the
transducer must have read and understood the Operating Manual and in
particular the technical safety instructions.
Residual dangers
The scope of supply and performance of the transducer covers only a small
area of torque measurement technology. In addition, equipment planners,
installers and operators should plan, implement and respond to the safety
engineering considerations of torque measurement technology in such a way
as to minimize remaining dangers. On‐site regulations must be complied with
at all times. Reference must be made to remaining dangers connected with
torque measurement technology.

7
T10FS
A0785-1.4 en HBM
The following symbols are used in this Operating Manual to point out
remaining dangers:
Symbol: DANGER
Meaning: Maximum danger level
Warns of an imminently dangerous situation in which failure to comply with
safety requirements will result in death or serious physical injury.
Symbol: WARNING
Meaning: Possibly dangerous situation
Warns of a potentially dangerous situation in which failure to comply with
safety requirements can result in death or serious physical injury.
Symbol: ATTENTION
Meaning: Dangerous situation
Warns of a potentially dangerous situation in which failure to comply with
safety requirements could result in damage to property or some form of
physical injury.
Symbols for application and disposal instructions, as well as useful
information:
Symbol: NOTE
Means that important information about the product or its handling is being
provided.
Symbol:
Meaning: CE mark
The CE mark enables the manufacturer to guarantee that the product
complies with the requirements of the relevant EC directives (the Declaration
of Conformity can be found at http://www.hbm.com/HBMdoc).

T10FS
8
A0785-1.4 enHBM
Symbol:
Meaning: Statutory waste disposal mark
In accordance with national and local environmental protection and material
recovery and recycling regulations, old devices that can no longer be used
must be disposed of separately and not with normal household garbage.
If you need more information about waste disposal, please contact your local
authorities or the dealer from whom you purchased the product.
Conversions and modifications
The transducer must not be modified from the design or safety engineering
point of view except with our express agreement. Any modification shall
exclude all liability on our part for any damage resulting therefrom.
Qualified personnel
The transducer must only be installed and used by qualified personnel, strictly
in accordance with the specifications and with safety requirements and
regulations. It is also essential to comply with the legal and safety
requirements for the application concerned during use. The same applies to
the use of accessories.
Qualified personnel means persons entrusted with siting, mounting, starting
up and operating the product who possess the appropriate qualifications for
their function.

9
T10FS
A0785-1.4 en HBM
Accident prevention
According to the prevailing accident prevention regulations, once the torque
flange has been mounted, a covering agent or cladding has to be fitted as
follows:
The cover or cladding must not be free to rotate.
The cover or cladding should avoid squeezing or shearing and provide
protection against parts that might come loose.
Covers and cladding must be positioned at a suitable distance or be
arranged so that there is no access to any moving parts within.
Covers and cladding must also be attached if the moving parts of the
torque flange are installed outside peoples' movement and operating
range.
The only permitted exceptions to the above requirements are if the various
parts and assemblies of the machine are already fully protected by the design
of the machine or by existing safety precautions.
Warranty
In the case of complaints, a warranty can only be given if the torque flange is
returned in the original packaging.

T10FS
10
A0785-1.4 enHBM
1 Torque flange versions
In the case of option 2 “Electrical configuration", the T10FS torque flange
exists in versions KF1, SF1 and SU2. The difference between these versions
lies in the electrical inputs and outputs on the stator, the rotors are the same
for all the versions of a measuring range. Alternatively, versions SF1 and SU2
can be equipped with a magnetic or optical speed measuring system (in the
case of the optical system, with or without a reference pulse).
SF1
Measurand
Type
Energy supply
Output signal
Can be
connected to
HBM
measurement
electronics
Excitation voltage
54 VPP/14 kHz;
square‐wave
Torque
KF1
Connection
cable
FrequencyFrequency
V1 ... V4
Excitation voltage
generator in HBM
electronics
T10FS
Torque
Speed, magnetic or optical (option)
Speed and reference pulse, optical (option)
SU2
Supply voltage 18 V to 30 V DC
Excitation voltage generator in the torque flange
V5, V6, W1, W2, W5, W6
Voltage
and
frequency
Fig. 1.1: T10FS versions
You can find out which version you have from the stator identification plate.
The version is specified in the “T10FS-..." number there.
Example: T10FS-001R- SU2-S-0-V1-Y (see also Page 66).

11
T10FS
A0785-1.4 en HBM
2 Application
T10FS torque flanges record static and dynamic torque on fixed or rotating
shafts and also return RS-422 signals with direction of rotation information to
determine the speed. With an optical speed measuring system, a reference
pulse can also be output with the speed pulses. Test beds can be extremely
compact because of the short construction of the measurement flanges. They
offer a very wide range of applications.
In addition to conventional test‐bench engineering (engine, roll and
transmission test benches), new solutions are possible for torque
measurements partly integrated in the machines. Here, you benefit in full from
the T10FS torque flange special characteristics:
low rotor weights
low mass moments of inertia
small outside diameters
no bearings, no slip rings
Thanks to the bearing‐free design and the contactless transmission of
excitation voltage and measured values, there are no friction or bearing
heating effects.
Torque flanges are supplied for nominal (rated) torques from 100 Nm to
10 kNm. Depending on the nominal (rated) torque, maximum speeds of up to
24 000 min-1 are permissible.
T10FS torque flanges are reliably protected against electromagnetic
interference. They have been tested with regard to EMC according to the
relevant European standards, and carry the CE mark.

T10FS
12
A0785-1.4 enHBM
3 Structure and mode of operation
Torque flanges consist of two separate parts: the rotor and the stator. The
rotor comprises the measuring body and the signal transmission elements.
Strain gauges (SGs) are mounted on the measuring body. The rotor
electronics for transmitting the bridge excitation voltage and the measurement
signal are located centrally in the flange. The transmitter coils for contactless
transmission of excitation voltage and measurement signal are located on the
measuring body's outer circumference. The signals are sent and received by
a separable antenna ring. The antenna ring is mounted on a housing that
includes the electronic system for voltage adaptation and signal conditioning.
Connectors for the torque signal, the voltage supply and the speed signal
(option) are located on the stator. The antenna ring should be mounted more
or less concentrically around the rotor (see Chapter 4).
A magnetic or optical sensor performs the speed measurement. With a
magnetic measuring system, a magnetized rotor is sampled by means of a
MagnetoResistive sensor (MR).
The optical sensor works on the infrared transmitted light barrier principle. The
reference pulse is generated by a magnet in the slotted disc and a
magnetoresistive sensor. In the case of option 2 (speed measuring system),
code L, the speed sensor is mounted on the stator, the customer attaches the
associated slotted disc on the rotor. In the case of code H, the slotted disc is
already mounted on the rotor.
Stator
Antenna segments
Rotor
(without slotted disc)
Fan‐type lock
washers
Housing
Optical speed sensor (option)
Fig. 3.1: Mechanical structure, exploded view

13
T10FS
A0785-1.4 en HBM
4 Mechanical installation
WARNING
Handle the torque flange carefully! The transducer could suffer
permanent damage from mechanical shock (dropping), chemical effects
(e.g. acids, solvents) or thermal effects (hot air, steam).
With alternating loads, you should cement the rotor connection screws
into the mating thread with a screw locking device (medium strength) to
exclude prestressing loss due to screw slackening.
An appropriate shaft flange enables the T10FS torque flanges to be mounted
directly. It is also possible to mount a joint shaft or relevant compensating
element directly on the rotor (using an intermediate flange when required).
Under no circumstances must the permissible limits specified for bending
moments, lateral and longitudinal forces be exceeded. Due to the T10FS
torque flanges' high torsional stiffness, dynamic changes on the shaft train are
minimized.
IMPORTANT
The effect on critical bending speeds and natural torsional vibrations
must be checked to avoid overloading the measurement flanges due to
the resonance stepup.
NOTE
Even if the unit is installed correctly, the zero point adjustment made at
the factory can shift by approx. "150 Hz. If this value is exceeded, we
advise you to check the mounting conditions. If the residual zero offset
when the unit is removed is greater than "50 Hz, please send the
transducer back to the Darmstadt factory for testing.
For correct operation, comply with the mounting dimensions (see Page
64).

T10FS
14
A0785-1.4 enHBM
4.1 Conditions on site
T10FS torque flanges are protected to IP54 according to EN 60529. They
must be protected against coarse dirt particles, dust, oil, solvents and
humidity. During operation, the prevailing safety regulations for the security of
personnel must be observed (see “Safety instructions").
There is wide ranging compensation for the effects of temperature on the
output and zero signals of the T10FS torque flange (see Specifications on
Page 67). This compensation is carried out at static temperatures in extensive
furnace processes. This guarantees that the circumstances can be
reproduced and the properties of the transducer can be reconstructed at any
time.
If there are no static temperature ratios, for example, because of the
temperature differences between the measuring body and the flange, the
values given in the specifications can be exceeded. So for accurate
measurements, static temperature conditions must then be obtained by
cooling or heating depending on the application. As an alternative, check
thermal decoupling by means of heat radiating elements such as multi‐disk
couplings.
4.2 Installation orientation
The measurement flange can be mounted in any position. With clockwise
torque, the output frequency is 10 kHz to 15 kHz. With HBM amplifiers or with
the “voltage output" option, a positive output signal (0 V ... +10 V) is present.
In the case of the speed measuring system, an arrow is attached to the head
of the sensor to clearly define the direction of rotation. If the measurement
flange moves in the direction of the arrow, connected HBM measuring
amplifiers deliver a positive output signal (0 V ... +10 V).

15
T10FS
A0785-1.4 en HBM
4.3 Installation options
In principle, there are two possibilities for torque flange mounting: with the
antenna ring complete or dismantled. We recommend mounting as described
in Chapter 4.3.1. If installation in accordance with 4.3.1 is not possible (e.g. in
the case of subsequent stator replacement or mounting with a speed
measuring system), you will have to dismantle the antenna ring. It is essential
in this case to comply with the notes on assembling the antenna segments
(see “Mounting the stator" and “Mounting the slotted disc").
4.3.1 Installation without dismantling the antenna ring (without speed
measuring system)
1. Install rotor 2. Install stator
3. Finish installation of shaft train
Customer
mounting
Support supplied by
customer
Clamp fixture
4. Mount the clamp fixture where required

T10FS
16
A0785-1.4 enHBM
4.3.2 Installation with subsequent stator mounting (without speed
measuring system)
1. Install rotor 2. Install shaft train
3. Remove one antenna segment
5. Align stator and finish installation
4. Install antenna segment around shaft train
Support supplied by
customer
Clamp fixture
6. Mount the clamp fixture where required
Customer mounting

17
T10FS
A0785-1.4 en HBM
4.3.3 Installation example with couplings
Fig. 4.1: Installation example with coupling
4.3.4 Installation example with joint shaft
Fig. 4.2: Installation example with joint shaft

T10FS
18
A0785-1.4 enHBM
4.4 Mounting the rotor
Additional installation notes for the speed measuring system can be found in
Chapter 4.7, Page 24.
NOTE
Usually the rotor identification plate is no longer visible after
installation. This is why we include with the rotor additional stickers
with the important ratings, which you can attach to the stator or any
other relevant test‐bench components. You can then refer to them
whenever there is anything you wish to know, such as the calibration
signal. To explicitly assign the data, the identification number and the
measuring range are engraved on the rotor where they can be seen from
outside (see Fig. 4.3).
1. Prior to installation, clean the plane surfaces of the measurement flanges
and counter flanges. For safe torque transfer, the surfaces must be clean
and free from grease. Use a piece of cloth or paper soaked in solvent.
When cleaning, make sure that you do not damage the transmitter coils.
6x or 8x fastening screw (10.9/12.9)
6x or 8x (Z) DIN EN ISO 4762 hexagon socket screw (10.9/12.9)
Rotor
Identification number/measuring range
Fig. 4.3: Screwed rotor joint

19
T10FS
A0785-1.4 en HBM
2. For the bolted rotor connection, use eight DIN EN ISO 4762 property
class 10.9 hexagon socket screws (measuring range w 3 kNVm: 12.9)
of a suitable length (dependent on the connection geometry).
We recommend fillisterhead screws DIN EN ISO 4762, blackened,
smoothheaded, permitted size and shape variance as per DIN ISO 4759,
Part 1, product class A.
WARNING
With alternating load: Use a screw locking device (e.g. LOCTITE no. 242)
to glue the screws into the counter thread to exclude prestressing loss
due to screw slackening.
3. Fasten all screws with the specified tightening torque (Tab. 4.1).
4. For further mounting of the shaft train, there are eight tapped holes on the
rotor. Also use screws of property class 10.9 (or 12.9) and fasten with the
tightening torque specified in Tab. 4.1.
IMPORTANT
With alternating loads, use a screw locking device to cement the
connecting screws into place! Guard against contamination from
varnish fragments.
Nominal (rated)
torque
(NVm)
Fastening screws
(Z)1)
Fastening screws
Property class
Prescribed
tightening torque
(NVm)
100 M8 10.9 34
200
500 M10
10.9
67
1k M10 67
2k M12 115
3k M12
12.9
135
5k M14 220
10k M16 340
Tab. 4.1: Fastening screws
1) DIN EN ISO 4762912; black/oiled/mtot=0.125

T10FS
20
A0785-1.4 enHBM
4.5 Installing the stator
On delivery, the stator has already been installed and is ready for operation.
The antenna segments can be separated from the stator, for example, for
maintenance or to facilitate stator mounting. To stop you modifying the center
alignment of the segment rings opposite the base of the stator, we
recommend that you separate only one antenna segment from the stator.
If your application does not require the stator to be dismantled, proceed as
described in points 2., 6., 7. and 8.
Version with speed measuring system
As the optical speed sensor includes the slotted disc, it is not possible to
move the stator axially over the pre‐assembled rotor. In this case, you should
also comply with Chapter 4.7.
NOTE
Check the screw connections of the antenna segments (see Fig. 4.4) both
after initial installation and then at regular intervals for correct fit and tighten
them if necessary.
Fan‐type lock washer
Fig. 4.4: Screw fittings of the antenna segments
Other manuals for T10FS
2
Table of contents
Other HBM Industrial Equipment manuals
Popular Industrial Equipment manuals by other brands

PCB Piezotronics
PCB Piezotronics IMI SENSORS 638A06 Installation and operating manual

Fireye
Fireye SureFire II SP-48-NG-FD instruction manual

Emerson
Emerson Micro Motion ELITE installation manual

BAC
BAC VTL Operating and maintenance instructions

ABB
ABB HT604399 Operation manual

Somat
Somat SPC50 Operation manual