HBM AED9101C-Z2/22 Firmware update

A2967−1.0 en/de/fr
Digital transducer
Electronics
Digitale Aufnehmer-
elektronik
Électronique numérique
de capteur
AED9101C-Z2/22
Safety Instructions
Sicherheitshinweise
Consignes de sécurité

English Page 3 −18. . . . . . . . . . . . . . . . . . . . . . . . . . . . . . . . . . . . . . . . . . . . . . . . .
Deutsch Seite 19 −34. . . . . . . . . . . . . . . . . . . . . . . . . . . . . . . . . . . . . . . . . . . . . . .
Français Page 35 −49. . . . . . . . . . . . . . . . . . . . . . . . . . . . . . . . . . . . . . . . . . . . . . .

3
AED9101C-Z2/22
A2967−1.0 en/de/fr HBM
Contents Page
English
1 Introduction 4. . . . . . . . . . . . . . . . . . . . . . . . . . . . . . . . . . . . . . . . . . . . . . . . .
2 Warnings and symbols used 7. . . . . . . . . . . . . . . . . . . . . . . . . . . . . . . . . .
3 Special features 8. . . . . . . . . . . . . . . . . . . . . . . . . . . . . . . . . . . . . . . . . . . . . .
4 Field of application 8. . . . . . . . . . . . . . . . . . . . . . . . . . . . . . . . . . . . . . . . . . .
5 Mechanical construction 9. . . . . . . . . . . . . . . . . . . . . . . . . . . . . . . . . . . . . .
6 Mounting 10. . . . . . . . . . . . . . . . . . . . . . . . . . . . . . . . . . . . . . . . . . . . . . . . . . . .
7 Preparing the cables 12. . . . . . . . . . . . . . . . . . . . . . . . . . . . . . . . . . . . . . . . .
8 Connection 13. . . . . . . . . . . . . . . . . . . . . . . . . . . . . . . . . . . . . . . . . . . . . . . . . .
9 Specifications 15. . . . . . . . . . . . . . . . . . . . . . . . . . . . . . . . . . . . . . . . . . . . . . .
10 Declaration of Conformity 16. . . . . . . . . . . . . . . . . . . . . . . . . . . . . . . . . . . .
Further information can be found in the AED9101C documentation.

AED9101C-Z2/22
4
A2967−1.0 en/de/frHBM
1 Introduction
Designated use
The AED9101C-Z2 / 22 digital transducer electronics module comprises the
AED9101C basic device and the AD103C amplifier board.
The electronics are a resource that can be used in the potentially explosive
atmospheres of either Zone 2 or Zone 22 −but not in both zones simultan-
eously −for connecting strain gage load cells with a total bridge resist-
ancew80 Wand for connecting a digital processing device with an RS-232,
RS-422 or RS-485 interface. The degree of protection is “nA” per EN
60079-15 or “tD” per EN 61241-1, and is based on the IP65 sealing protec-
tion of the housing.
The device must be protected against mechanical damage.
In the interests of safety, the transducer electronics should only be operated
as described in the Mounting Instructions. It is also essential to comply with
the legal and safety requirements for the application concerned during use.
The same applies to the use of accessories.
If applicable, follow the national legal and safety requirements for using elec-
tronics in potentially explosive atmospheres.
Transducer electronics are not a safety element within the meaning of desig-
nated use. For safe and trouble-free operation, these transducer electronics
must not only be correctly transported and expertly stored, sited and installed
but must also be carefully operated and maintained.
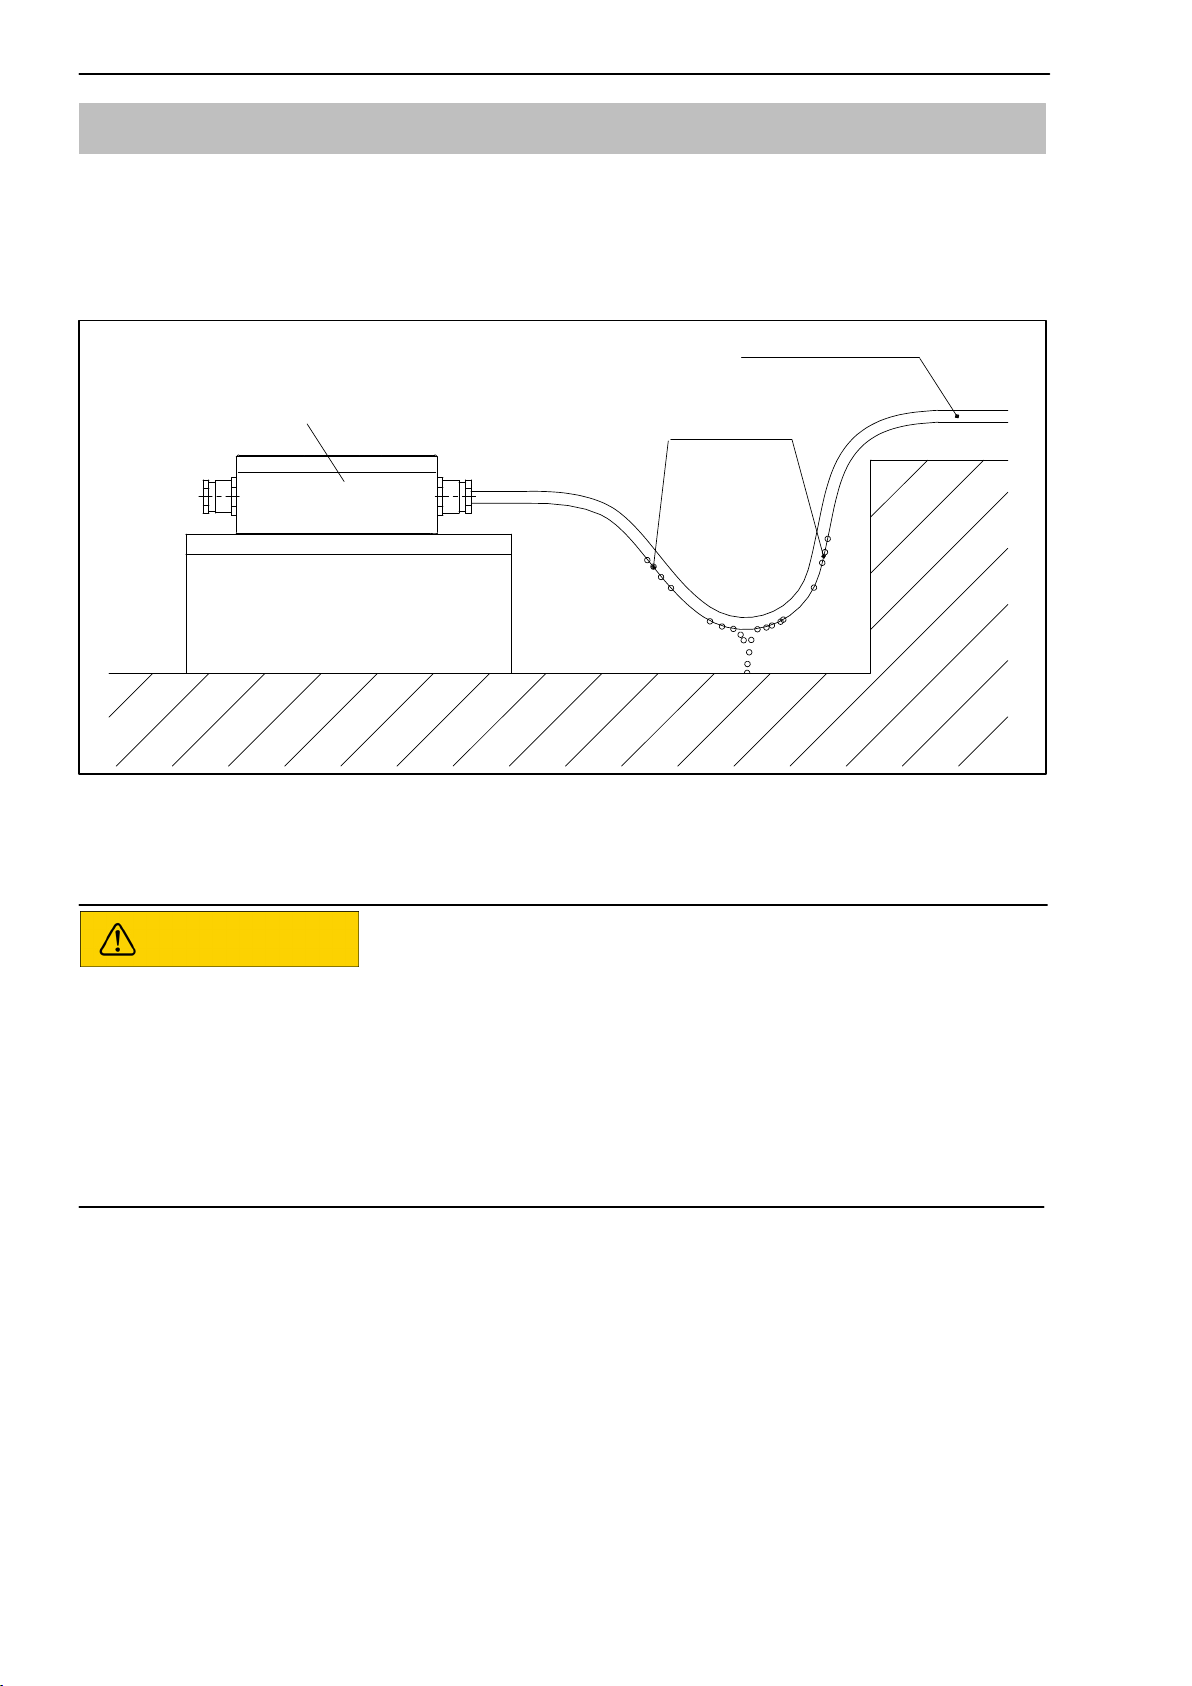
Notes for installation and operation
The amplifier board must only be operated in an enclosed housing. To main-
tain the IP65 degree of protection, all unused cable glands must be sealed
with the plugs provided. The associated swivel nuts must also be tightened, to
prevent moisture and dust penetration.
Use only cables that fall within the 5 mm to 9 mm diameter range stated by
the manufacturer of the M16 x 1.5 screwed cable glands.
The housing should only be opened once it is certain that the atmosphere is
not potentially explosive, or if the electrical equipment inside the housing has
been disconnected from the mains for at least five minutes and is
voltage-free.
Make sure that the rated voltage of the equipment does not exceed 30 V DC,
and that the rated voltage is not exceeded by more than 40% by the effect of
transients. Transducer electronics should be included in local potential equal-
ization.

5
AED9101C-Z2/22
A2967−1.0 en/de/fr HBM
Maintenance and servicing
The provisions of EN60079-17 must be met for maintenance and servicing or
inspection. It is particularly important to maintain the components pivotal to
the type of protection.
The housing should only be opened for maintenance once it is certain that the
atmosphere is not potentially explosive, or if the electrical equipment inside
the housing has been disconnected from the supply voltage and is
voltage-free.
Regularly check the condition of the seals. When replacing cable entries and
vent plugs, make sure that they are properly sealed.
Changes or modifications must not be made to devices intended for use in
potentially explosive atmospheres.
Should it no longer be possible to guarantee risk-free operation, disconnect
the device from the operating voltage and secure it to prevent further use.
General dangers of failing to follow the safety instructions
The transducer electronics are state of the art and reliable. Electronics can
give rise to residual dangers if they are inappropriately installed and operated
by untrained personnel.
Everyone involved with the installation, commissioning, maintenance or repair
of these transducer electronics must have read and understood the Operating
Manual and in particular the technical safety instructions.
Residual dangers
The scope of supply and performance of the transducer electronics covers only
a small area of connection technique. In addition, equipment planners, installers
and operators should plan, implement and respond to the safety engineering
considerations of the connection technique in such a way as to minimize
remaining dangers. On-site regulations must be complied with at all times.
There must be reference to the residual dangers associated with the connec-
tion technique.
Qualified personnel
Qualified personnel means persons entrusted with siting, mounting, starting up
and operating the product, who possess the appropriate qualifications for their
function.
Transducer electronics are only to be deployed by qualified personnel strictly in
accordance with the technical data and with the safety rules and regulations
which follow. The same applies to the use of accessories.

AED9101C-Z2/22
6
A2967−1.0 en/de/frHBM
Conditions at the place of installation
Do not allow the transducer electronics to become dirty or damp.
Maintenance
Transducer electronics are implemented in degree of protection IP65
(dust-tight, protected against water jets). Make regular checks to ensure the
tightness and efficiency of the rubber cover seal and the screw fittings.
Material-related application limitations
Note whether in your field of application there are certain substances that on
their own or in combination with other substances, can also attack aluminum
alloys or plastics. If this is the case, the operator must provide adequate
means of protection. The additional means of protection must be verified by
regularly checking their effectiveness.
Accident prevention
The prevailing accident prevention regulations must be observed.
Unauthorized conversions and modifications are prohibited
The device must not be modified from the design or safety engineering point
of view without HBM’s express agreement. Any modification shall exclude all
liability by HBM for any damage resulting therefrom.
It is strictly forbidden to carry out any repairs and soldering work on the
motherboards or to replace any components. Repairs must only be under-
taken by persons who are authorized to do so by HBM.
During installation and when connecting the cables, take action to prevent
electrostatic discharge as this may damage the connected electronics.
All the interconnecting cables must be shielded cables. The shield must be
connected extensively to ground on both sides.

7
AED9101C-Z2/22
A2967−1.0 en/de/fr HBM
2 Warnings and symbols used
This manual uses the symbols described below to draw attention to residual
dangers.
The marking below draws your attention to a potentially dangerous situation in
which failure to comply with safety requirements could result in slight or
moderate physical injury.
CAUTION
Description of a potentially dangerous situation.
Measures to avoid/avert the danger.
The marking below draws your attention to a situation in which failure to
comply with safety requirements could lead to damage to property.
NOTE
Description of a situation that could lead to damage to property.
The marking below draws your attention to important information about the
product or about handling the product.
Important
Important information
The marking below contains application tips or other information that is useful
to you.

AED9101C-Z2/22
8
A2967−1.0 en/de/frHBM
3 Special features
Equipment group II, equipment category 3
−Connecting load cells in parallel in a six-wire circuit with a minimum parallel
bridge resistance of y80 Ω.
−HBM’s shielding design provides EMC-proofing as per EN 45 501
−Degree of protection IP65 per EN 60 529
Transducer electronics also allow the shielding to be connected convention-
ally by means of the screen strands. With this method, EMC-proofing under
EN 45 501 is restricted, which could lead to measurement errors when there
are electromagnetic interference fields.
4 Field of application
Transducer electronics can be deployed in Zone 2 or in Zone 22:
Permissible ambient temperature range −20 °C pTap40 °C
Zone 2: II 3 G Ex nA II C T4
Type of protection: “protected by the housing”
Zone 22: II 3 D Ex tD A22 IP65 T 52 5C
(air/dust mixtures with non-conductive dust)
Type of protection: “protected by the housing”

9
AED9101C-Z2/22
A2967−1.0 en/de/fr HBM
5 Mechanical construction
The basic device extends the functionality of AD amplifier boards and
provides:
•mechanical protection (IP65)
•the voltage supply for the amplifier motherboard and transducer excitation
•a total transducer bridge resistance y80 Ω
•a choice of RS-422, RS-485 and RS-232 serial interfaces
•an EMC-tested module
The amplifier motherboard is designed as a plug-in board that is plugged into
the motherboard of the basic device via a 25-pin D-connector. The basic
device contains the terminals for the transducer, power supply and PC
connections, the slide switch for interface selection and the voltage stabilizer.
The connection cables exit the housing via PG cable glands on the side.
Transducer
connection Interface
settings
RS-485
bus termination
Interface, voltage supply,
trigger input, diagnosis
AD103C amplifier connection
Fig. 5.1: Mechanical construction (AED9101C housing without amplifier board)

AED9101C-Z2/22
10
A2967−1.0 en/de/frHBM
6 Mounting
In the preferred mounting position, there is a downward loop to the cables
(drip loop) before they enter the transducer electronics. This makes it more
difficult for moisture to get in.
Transducer electronics Moisture
Connection cable
Fig. 6.1: Installing the connection cable
CAUTION
If the mounting screws in the cover are not correctly tightened (not
enough or too much), the specified IP degree of protection and EMC
protection are at risk, and as a result, explosion protection may be lost,
or there may be measurement errors.
Tighten the screws with a torque of 3 N@m in the sequence described in
Fig. 6.2.

11
AED9101C-Z2/22
A2967−1.0 en/de/fr HBM
Tighten the mounting screws in the following
sequence:
Tightening torque for the cover
screws: 3 N⋅m
1.
4.
2.
3.
Fig. 6.2: Sequence for tightening the mounting screws
∅4.4
6
X190
X65
X40
53
137
EMC/Ex screw fittings: 3 x M16x1.5 50.616M/EMC/EX
Vent plugs: 1 x M16x1.5 10.615M/G/EX
Fig. 6.3: Mounting dimensions
Transducer connection
Potential equalization
Fig. 6.4: Site of the potential equalization terminal

AED9101C-Z2/22
12
A2967−1.0 en/de/frHBM
7 Preparing the cables
For optimum results, proceed as follows:
•Remove the outer cable sheath and expose approx. 10 to 15 mm of the
braided screen, subject to the diameter of the cable.
•Slide the cap nut and the bladed insert with sealing ring onto the cable.
•Bend the braided screen outward at right angles (90°).
•Fold the braided screen over towards the outer sheath, that is, turn it over a
further 180°.
•Put the intermediate connection piece on as far as the braided screen and
briefly turn it to and fro around the cable axis.
•Slide the bladed insert with sealing ring into the intermediate connection
piece and engage the anti-twist protection.
•Screw on the cap nut and tighten it up.
Shielded cable
Cap nut
Sealing ring
Bladed insert
Braided screen
Intermediate
connection piece
Fig. 7.1: Clamping gland assembly

13
AED9101C-Z2/22
A2967−1.0 en/de/fr HBM
8 Connection
Make sure that the rated voltage of the equipment does not exceed 30 V DC,
and that the rated voltage is not exceeded by more than 40 % by the effect of
transients.
If the power supply and the serial signal output are connected in one cable,
remove the screwed cable gland that is not being used and seal the opening
in the housing with the vent plug provided.
A potential equalization terminal is available on the housing for connecting a
cable with a maximum cross-section of 4 mm@.
Important
The terminals are designed for a wire cross-section of 2.5 mm2, with a solid
(rigid) or finely stranded (flexible) conductor. When using finely stranded
conductors with wire end ferrules, the cross-section is limited to 1.5 mm2.
The terminals are identified as shown in Fig. 8.1. The colors correspond to the
color code used for most HBM load cells.
GN
RD
WH
GY
BK
TE1
2
2’
1
4
3’
3
0.1 uF TE4
BU
AED9101C
Color code:
BU = blue
RD = red
GY = gray
GN = green
WH = white
BK = black
1
7
21
15
16
Fig. 8.1: Transducer connection in AED9101C for a 6-wire connection
For transducers implemented in a four-wire configuration, use the connection
diagram shown in Fig. 8.2. In this situation, the sense lead at the transducer
electronics input must be jumpered.

AED9101C-Z2/22
14
A2967−1.0 en/de/frHBM
GN
RD
WH
GY
BK
TE1
2
2’
1
4
3’
3
0.1 uF
TE4
BU
AED9101C
1
7
21
15
16
Color code:
BU = blue
RD = red
GY = gray
GN = green
WH = white
BK = black
Fig. 8.2: Transducer connection in a four-wire configuration without extension
cable, with jumpers 2 −2’and 3 −3’
When connecting several transducers, we recommend using HBM’s
VKK2R-8Ex junction box. The incoming leads to the AED should always be
shielded cables.
When connecting several transducers to the AED, take into consideration the
number of load cells that can be connected (and the resultant bridge resist-
ance), with regard to the external supply voltage, so that the maximum dissip-
ation is not exceeded in the AED9101C basic device.
23 °C [73.4 °F]
U in V
30
24
21
16
13
40 °C [158 °F]
Impedance in Ω
No. of transducers
350 175 87
12 3 4
Fig. 8.3: Maximum operating voltage for the AED9101C basic device, with regard
to the number of transducers and the ambient temperature

15
AED9101C-Z2/22
A2967−1.0 en/de/fr HBM
9 Specifications
Type AED9101C
Amplifier AD103C
Measurement signal input mV/V ±3, nominal ±2
Transducer connection:
SG transducer (full bridge)
Transducer connection type
Length of transducer cable
Bridge excitation voltage
Ω
m
VDC
≥80 …4000
Six-wire circuit
≤100
5
Interfaces:
Hardware (selected by slide-switch))
Length of interface cable
RS-232
RS-422, RS-485
Max. number of bus nodes (RS-485)
m
m
RS-232, RS-422, RS-485
≤15
≤1000
32
Diagnostics bus (2-wire RS-485-)
Protocol
Baud rate, max.
Node address
Length of interface cable, max.
kBits/s
m
ASCII/binary
38.4
0 …89
1000
Trigger input
Input voltage range, LOW
Input voltage range, HIGH
Input current at high level = 30 V
V
V
mA
0 1
2 …30
<3
Power supply:
Supply voltage
Current consumption (without load cell)
VDC
mA
2 …30
≤120 1)
Temperature range:
Nominal (rated) temperature
Storage temperature
°C−20 …+40
−40 …+85
Dimensions mm 190 x 65 x 40
Materials
Housing
Screws
Cast aluminum alloy, AISi ENAC-44300
DIN EN 1706, unpainted
rustfree
Screwed cable glands
EMC/Ex screw fittings
Vent plug
3 x M16x1.5 50.616M/EMC/EX
1 x M16x1.5 10.615M/G/EX
Weight, approx. g440 (without AD10x)
Degree of protection per EN 60529
(IEC 529) IP65
1) Current consumption ≤120 mA + Excitation voltage UB= 5 V
Bridge resistance RB

AED9101C-Z2/22
16
A2967−1.0 en/de/frHBM
10 Declaration of Conformity

17
AED9101C-Z2/22
A2967−1.0 en/de/fr HBM

AED9101C-Z2/22
18
A2967−1.0 en/de/frHBM

19
AED9101C-Z2/22
A2967−1.0 en/de/fr HBM
Inhalt Seite
Deutsch
1 Einführung 20. . . . . . . . . . . . . . . . . . . . . . . . . . . . . . . . . . . . . . . . . . . . . . . . . .
2 Verwendete Warnhinweise und Symbole 23. . . . . . . . . . . . . . . . . . . . . . .
3 Charakteristische Merkmale 24. . . . . . . . . . . . . . . . . . . . . . . . . . . . . . . . . .
4 Einsatzbereich 24. . . . . . . . . . . . . . . . . . . . . . . . . . . . . . . . . . . . . . . . . . . . . . .
5 Mechanischer Aufbau 25. . . . . . . . . . . . . . . . . . . . . . . . . . . . . . . . . . . . . . . .
6 Montage 26. . . . . . . . . . . . . . . . . . . . . . . . . . . . . . . . . . . . . . . . . . . . . . . . . . . . .
7 Konfektionierung der Kabel 28. . . . . . . . . . . . . . . . . . . . . . . . . . . . . . . . . . .
8 Anschließen 29. . . . . . . . . . . . . . . . . . . . . . . . . . . . . . . . . . . . . . . . . . . . . . . . .
9 Technische Daten 31. . . . . . . . . . . . . . . . . . . . . . . . . . . . . . . . . . . . . . . . . . . .
10 Konformitätserklärung 32. . . . . . . . . . . . . . . . . . . . . . . . . . . . . . . . . . . . . . .
Bitte entnehmen Sie weitergehende Informationen der Dokumentation zur
AED9101C.

AED9101C-Z2/22
20
A2967−1.0 en/de/frHBM
1 Einführung
Bestimmungsgemäßer Gebrauch
Die digitale Aufnehmerelektronik AED9101C−Z2 / 22 ist eine Baugruppe,
bestehend aus dem Grundgerät AED9101C und der Messverstärkerplatine
AD103C.
Die Elektronik ist ein Betriebsmittel für den Einsatz in explosionsgefährdeten
Bereichen entweder der Zone 2 oder der Zone 22 −nicht jedoch in beiden
Zonen gleichzeitig −zum Anschluss von Dehnungsmessstreifen-Wägezellen
mit einem Gesamt-Brückenwiderstandw80 Wund zum Anschluss einer
digitalen Auswerteeinrichtung mit RS-232, RS-422 oder RS-485-Schnittstelle.
Die Schutzart ist „nA“ nach EN 60079-15 bzw. „tD“ nach EN 61241-1 und
beruht auf der Abdichtung des Gehäuses in Schutzart IP65.
Das Gerät ist vor mechanischen Beschädigungen zu schützen.
Zur Gewährleistung eines sicheren Betriebs darf die Aufnehmerelektronik nur
nach den Angaben in der Montageanleitung verwendet werden. Bei der
Verwendung sind zusätzlich die für den jeweiligen Anwendungsfall erforderli-
chen Rechts−und Sicherheitsvorschriften zu beachten. Sinngemäß gilt dies
auch für die Verwendung von Zubehör.
Beachten Sie ggf. länderspezifische Rechts- und Sicherheitsvorschriften für
den Einsatz von Elektroniken in explosionsgefährdeten Bereichen.
Die Aufnehmerelektronik ist kein Sicherheitselement im Sinne des bestim-
mungsgemäßen Gebrauchs. Der einwandfreie und sichere Betrieb dieser
Aufnehmerelektronik setzt sachgemäßen Transport, fachgerechte Lagerung,
Aufstellung und Montage sowie sorgfältige Bedienung und Instandhaltung
voraus.
Hinweise für Installation und Betrieb
Die Messverstärker-Platine darf nur in geschlossenem Gehäuse betrieben
werden. Zur Aufrechterhaltung der Schutzart IP65 müssen alle unbenutzten
Kabeldurchführungen mit den mitgelieferten Stopfen verschlossen werden.
Drehen Sie auch die hierzu gehörige Überwurfmutter fest, um das Eindringen
von Feuchtigkeit und Staub zu vermeiden.
Es dürfen nur Kabel verwendet werden, die in dem vom Hersteller der Kabel-
verschraubungen M16 x 1,5 genannten Durchmesserbereich von 5 mm bis
9mmliegen.
Das Gehäuse darf nur geöffnet werden, wenn sichergestellt ist, dass keine
explosionsfähige Atmosphäre vorliegt oder wenn die elektrischen Betriebs-
mittel im Inneren des Gehäuses für mindestens 5 Minuten vom Netz getrennt
waren und spannungsfrei sind!
Table of contents
Languages:
Other HBM Transducer manuals