Heinner HSJ-710H User manual

www.heinner.com 240W, 50/60Hz, 220-240V
0
SLOW JUICER
NutricionVita
Model: HSJ-710H / HSJ-505HBG
www.heinner.com
•Slow juicer cold extract
•Power: 240
•Color: white/ burgundy
•Speed: 60 rpm

www.heinner.com 240W, 50/60Hz, 220-240V
1
Thank you for purchasing this product!
I. INTRODUCTION
Before using the appliance, please read carefully this instruction manual and keep it for future
reference.
This instruction manual is designed to provide you with all required instructions related to the
installation, use and maintenance of the appliance.
In order to operate the unit correctly and safety, please read this instruction manual carefully before
installation and usage.
II. CONTENT OF YOUR PACKAGE
➢Slow juicer cold press
➢User manual
➢Warranty card
➢Cleaning brush
➢Cold dessert accessory

www.heinner.com 240W, 50/60Hz, 220-240V
2
III. SAFETY PRECAUTIONS
IV. PRODUCT DESCRIPTION
When using electrical appliances,basic safety precautions should always be followed Including
the following:
1. Read all instructions.
2. To protect against risk of electrical shock do not put motor or base of unit in water or
other liquid.
3. Close supervision is necessary when any appliance is used by or near children.
4. Unplug from outlet when not in use, before putting on or taking off parts, and before
cleaning.
5. Avoid contacting moving parts.
6. Do not operate any appliance with a damaged cord or plug or after the appliance
malfunctions, or is dropped or damaged in any manner. Return appliance to the nearest
authorized service facility for examination, repair or electrical or mechanical adjustment.
7. The use of attachments not recommended or sold by the manufacturer may cause fire,
electric shock or injury.
8. Do not use outdoors.
9. Do not let cord hang over edge of table or counter.
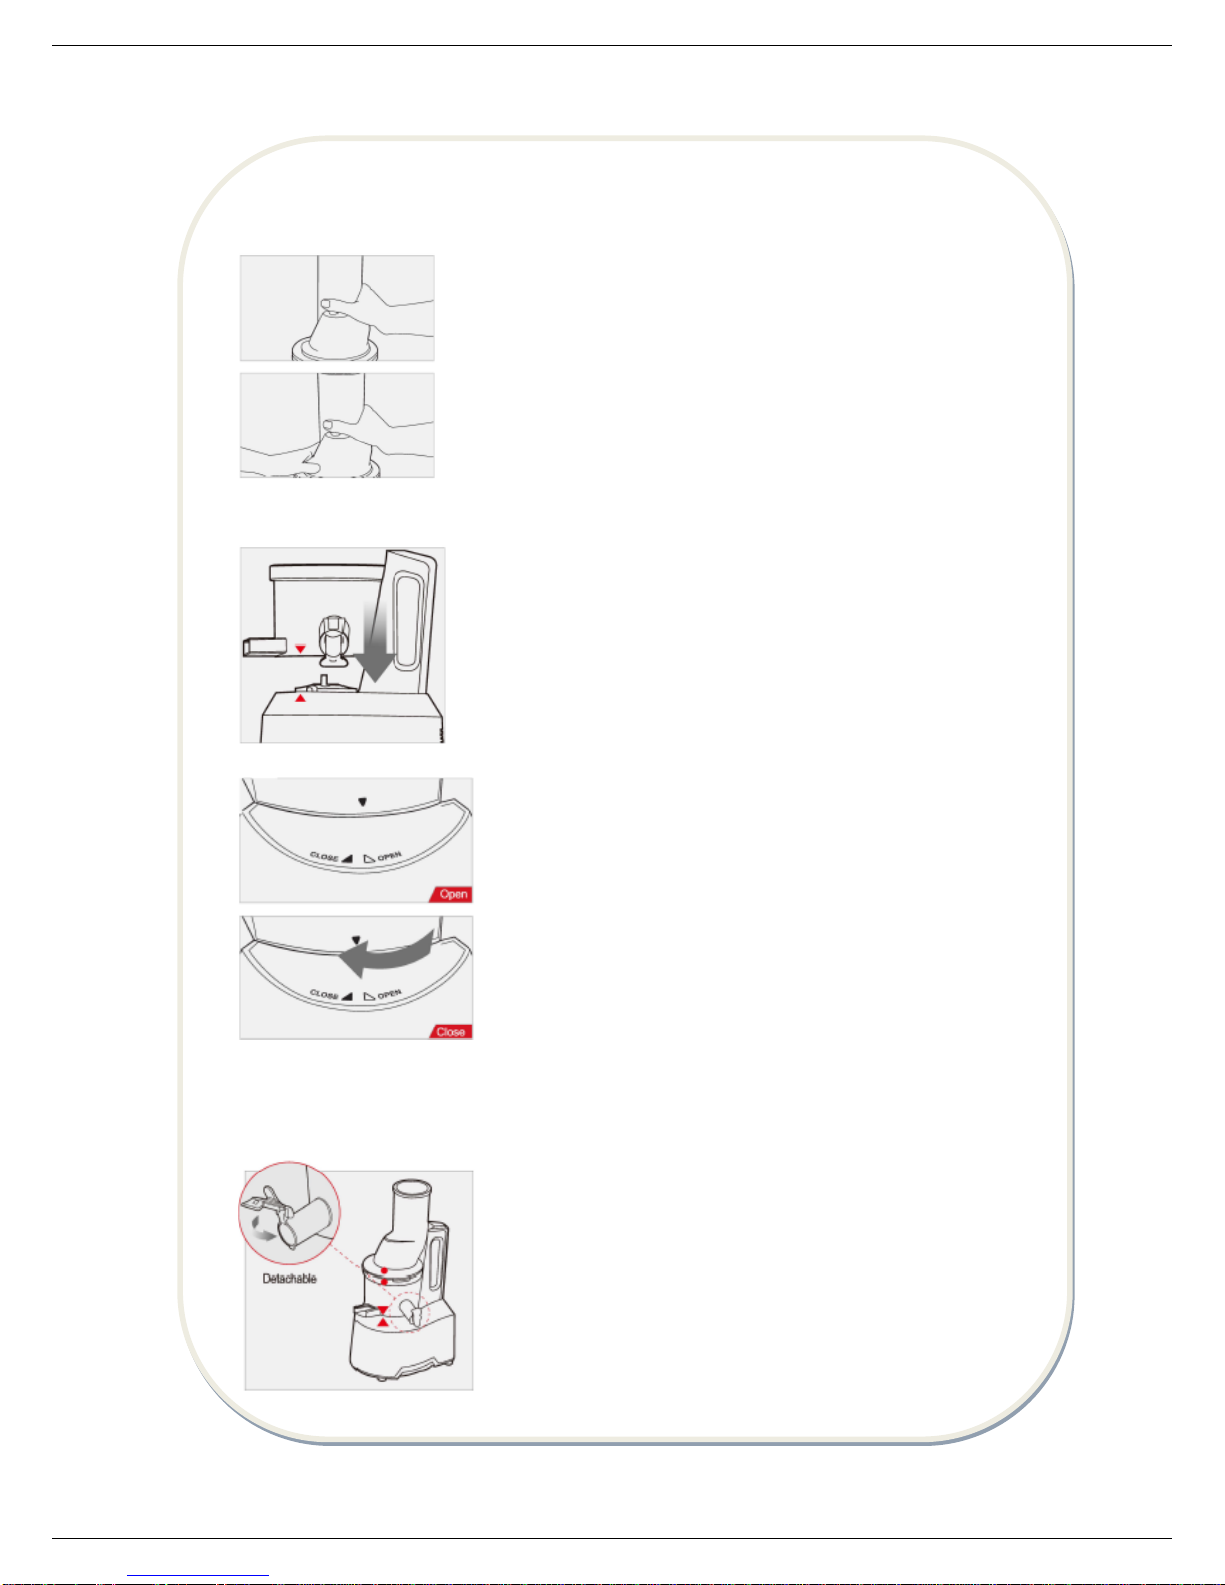
10. Always make sure juicer cover is clamped securely in place before motor is turned on. Do
not unfasten clamps while juicer is in operation.
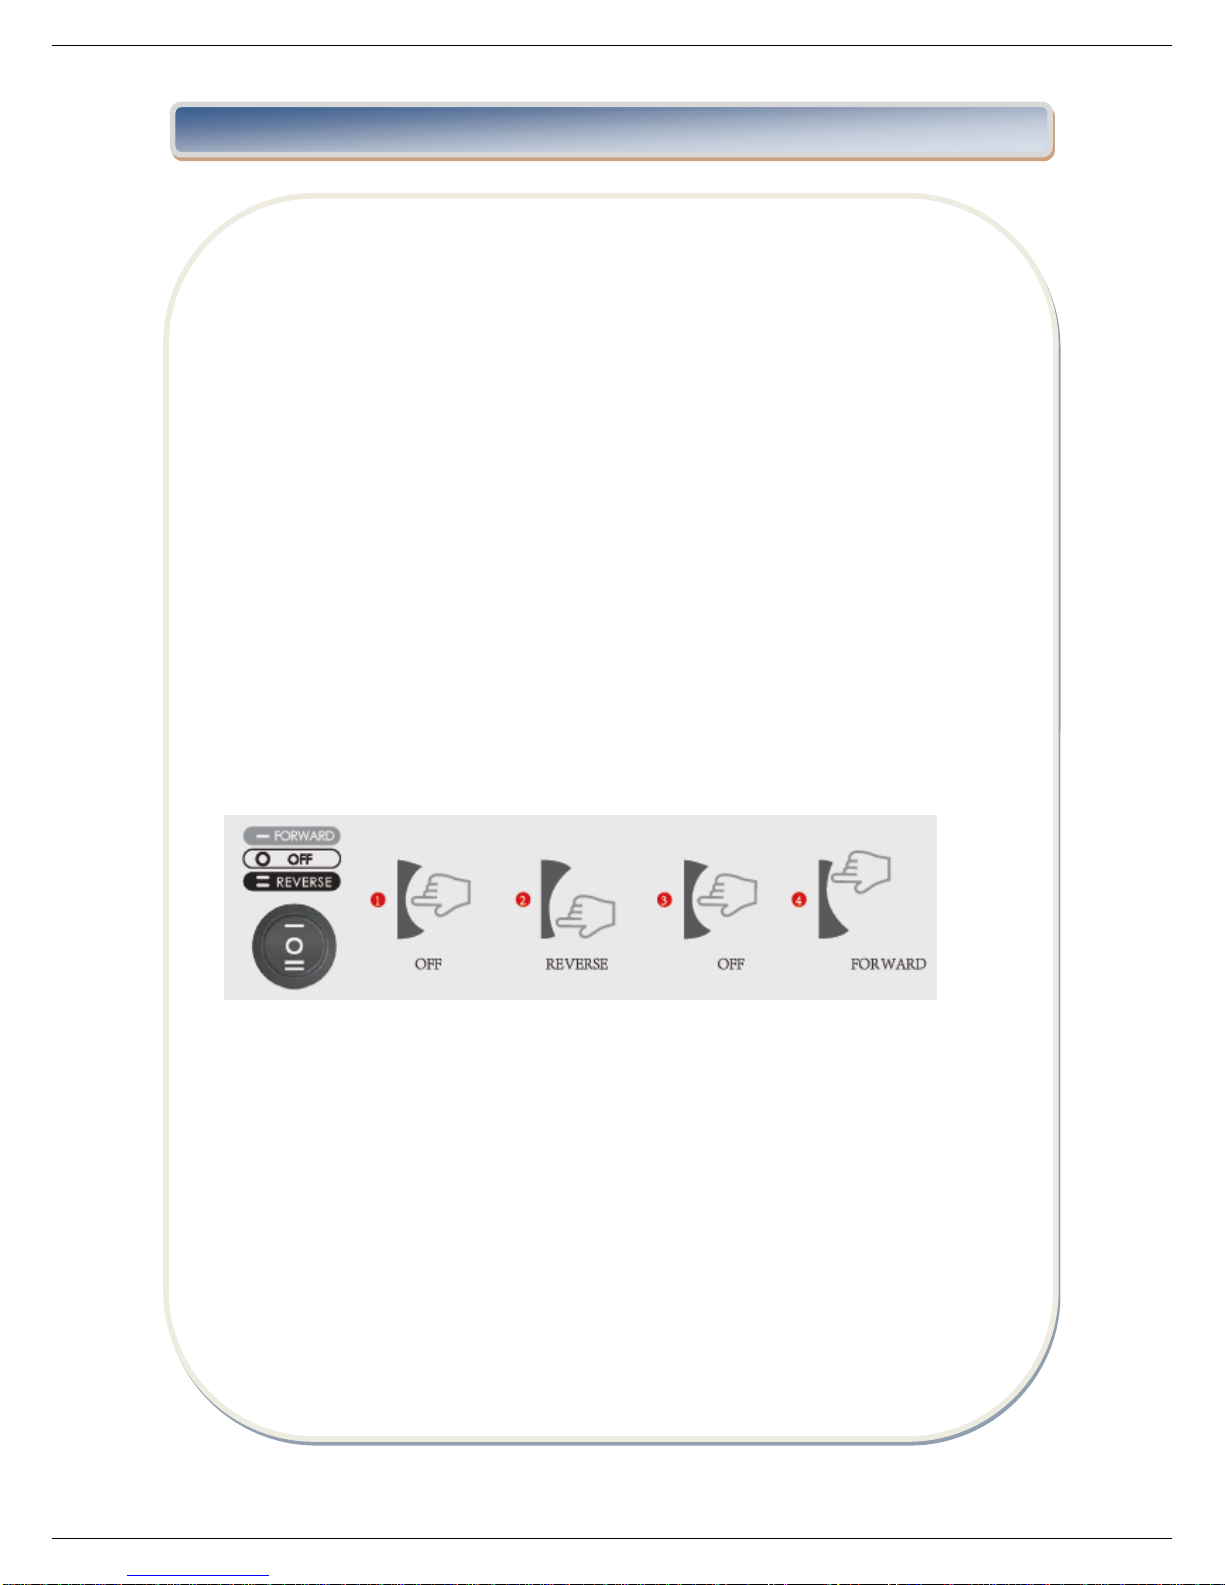
11. Be sure to turn switch to OFF position after each use of your juicer. Make sure the motor
stops completely before disassembling.
12. Do not put your fingers or other objects into the juicer opening while it is in operation. lf
food becomes lodged in opening, use food pusher or another piece of fruit or vegetable to
push it down. When this method is not possible turn the motor off and disassemble juicer to
remove the remaining food.
13. Do not use the appliance if the rotating sieve is damaged.
14. When a separable pulp container is provided, Do not operate without the pulp container
in place.
15. Please do not alter the appliance in anyway.
16. Do not use the appliance for anything other than its intended purpose as described in the
manual.
17. The appliance should be used for limited period of time.
This appliance is for household use only. Please follow the instructions in the manual
carefully.
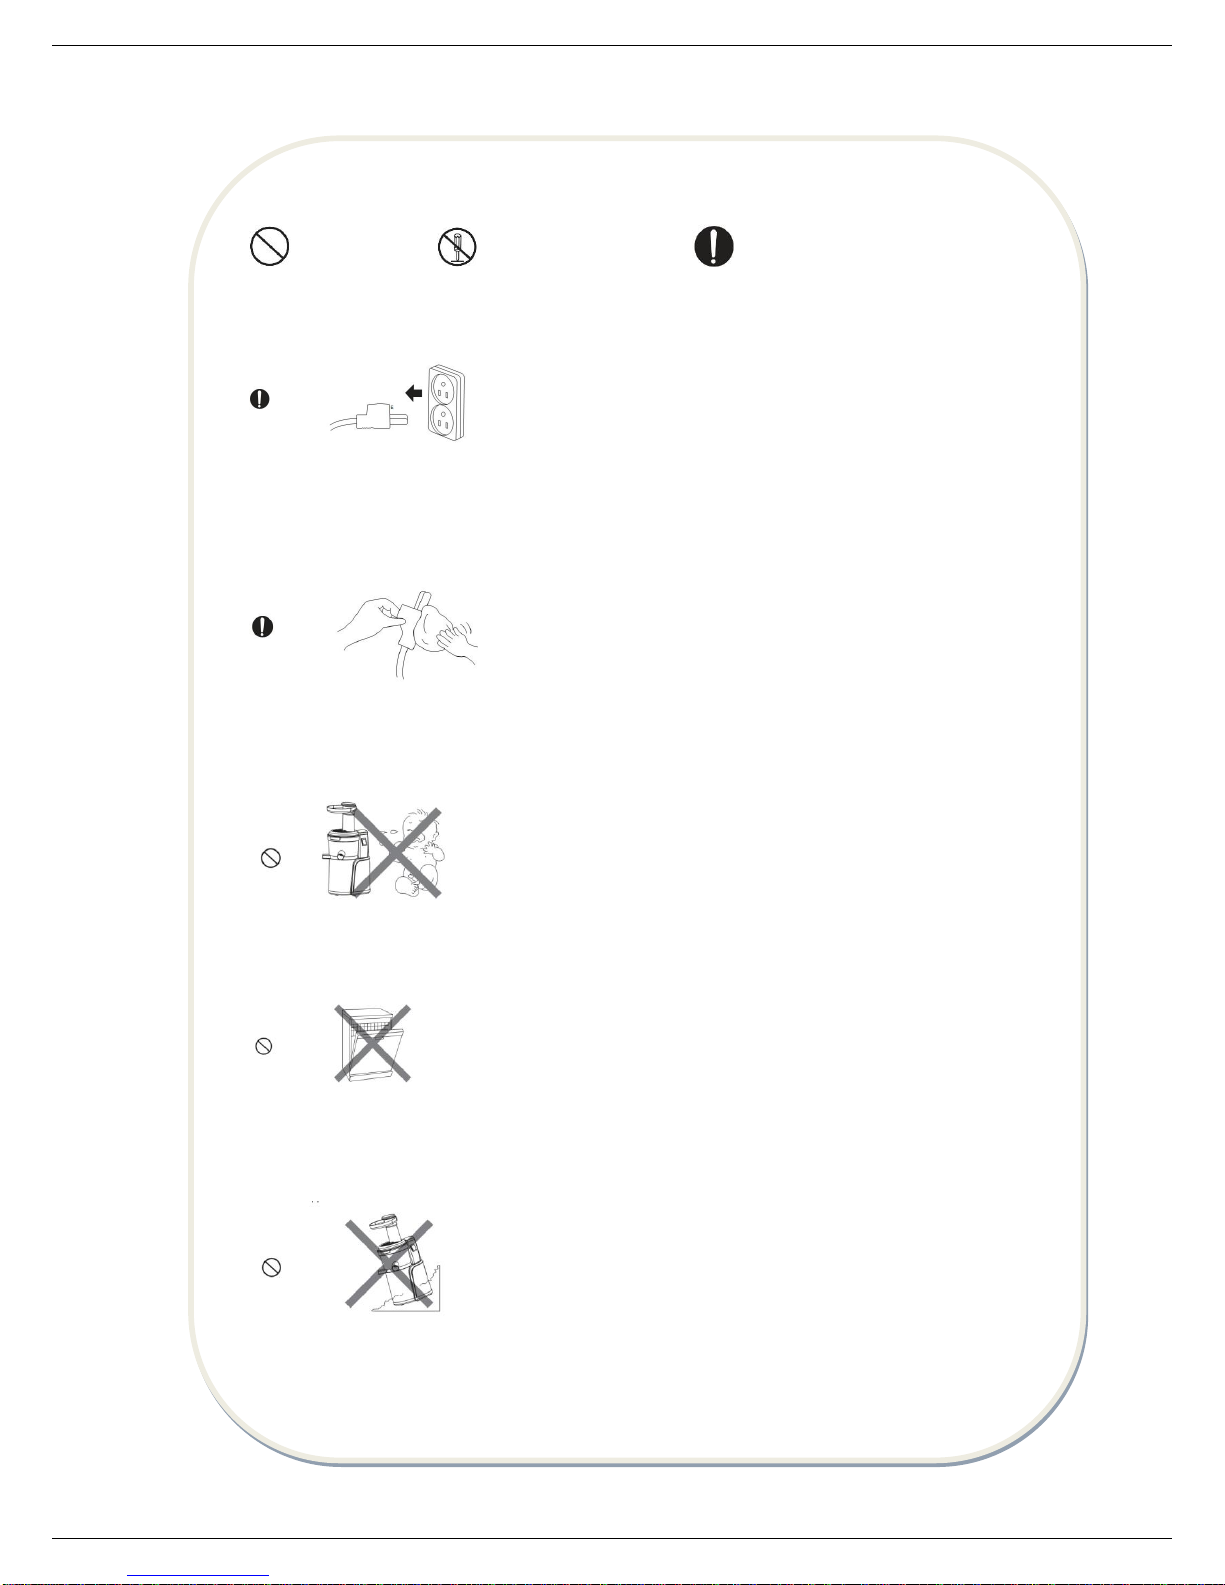
The following information is critical to prevent any injuries or damage to the appliance.
Please read the following instructions and use the appliance properly.
Warning: This sign warns risk of death or severe injuries
Caution: This sign warns risk of injuries or product damage

www.heinner.com 240W, 50/60Hz, 220-240V
3
Prohibited Do not disassemble Must take action
Unplug the power cord when not in use
Do not keep or operate the appliance near Infants or toddlers.
*It may injure them
Use a dry towel to clean he power cord.
*It may cause an explosion or electric shock
Do not put the juicer parts in the dishwasher or extremely hot water.
*The pars may war faster
Do not use the appliance on an uneven surface.
*It may cause a malfunction if the appliance tips over
Do not use any hazardous chemicals to the appliance. DO NOT put the appliance in
dishwasher or extremely hot water.
*It may change the color of the appliance or could result in fire.
Do not repair, disassemble the base, or customize the appliance may not operate properly
causing fire, electric shock, or injury.

www.heinner.com 240W, 50/60Hz, 220-240V
4
Do not spray water flammable sprays near the appliance.
It may cause an explosion or electrical shock.

www.heinner.com 240W, 50/60Hz, 220-240V
5
IV. DESCRIPTION

www.heinner.com 240W, 50/60Hz, 220-240V
6

www.heinner.com 240W, 50/60Hz, 220-240V
7
V. ASSEMBLING
Wash the parts before first use. Ensure that the compression silicone and silicone ring are
assembled properly.
STEP 1
Firmly insert the compression silicone into the slot below the pulp spout.
Note I The Juicer may leak if not assembled properly.
STEP 2
Place the juicing screw into the strainer. Turn and press down on it until it clicks into place.
Note I The juicing screw needs to be locked in place in order to close the drum lid.
STEP 3
Assemble the strainer into the rotation wiper then place this assembly in to the juicing bowl
ensuring the red dot • on the strainer is aligned with the red dot • on the juicing bowl.
STEP 4
Place the drum lid on to the juicing bowl aligning the red dot• on the drum lid with the red
dot• on the juicing bowl. Turn clockwise to close, aligning the red dot• on the drum lid with
the close mark.

www.heinner.com 240W, 50/60Hz, 220-240V
8
TIP: For easy assembly hold the drum lid by grabbing the feeding tube and turn clockwise as
shown in the illustration.
STEP 5.
Place the bowl on the base so that its grey arrow lines up with the black arrow on the base.
STEP 6. Open/Close mark on the top-set.
Note: Juicer will not operate if parts are not assembled properly.
STEP 7.
Place the pulp cup under the pulp spout and place the juice cup under the juice spout as
shown in the illustration.

www.heinner.com 240W, 50/60Hz, 220-240V
9
VI. USING INSTRUCTIONS
1. After preparing the ingredients, plug the power cord into a wall outlet.
Do not touch the power cord with wet hands. It may cause electrical shock, short-circuit,
or fire. Check the safety of the wall outlet.
2. Press the FORWARD button to operate.
Forward: Pulls down and slowly masticates the ingredients. Reverse: Pushes the ingredients
back up to dislodge them.
If the ingredients become jammed in the screw and the drum lid does not open, press the
OFF button. Then press and hold the REVERSE button until the ingredients become
dislodged. Repeat REVERSE - OFF - FORWARD as often as needed to achieve the desired
result.
If the juicer stops during operation:
Switch the button to OFF position then press and hold the REVERSE button until the
ingredients become dislodged.
Repeat REVERSE - OFF - FORWARD as needed.
FORWARD: Pulls down the food OFF: Stops the operation REVERSE: Pushes the food back
up.
REVERSE: Pushes the ingredients back up to dislodge them.
The REVERSE button only works while holding down the switch.
Switch OFF ensuring that the juicer comes to a complete stop. Then press REVERSE. Hold
the REVERSE button for 2-3 seconds and release. Repeat as needed. Let the juicer stop
completely before using the REVERSE button to prevent malfunction.
If the juicer does not work after these steps, disassemble and clean the parts before
operating the juicer again.
3. Insert the prepared ingredients one piece at a time.
Fibrous leafy vegetables (celery, kale, etc.):
» Separate each stem. Cut the outer stems that are thick and tough to 4 inches long or
less. Bundle up the leafy vegetables as inserting into the juicer. Alternate between leafy
parts and stems.

www.heinner.com 240W, 50/60Hz, 220-240V
10
Before extracting, remove hard seeds or pits in ingredients.
When juicing frozen fruits with small seeds, ensure that even the seeds are completely
thawed.
Insert the ingredients one piece at a time.
After inserting ingredients, use the pusher when it is necessary. Too much use of the pusher
may affect the juice quality.
» Intermittently use the pusher for soft ingredients like tomatoes and apples. Constant
use of pusher for soft ingredients may affect the juice quality.
4. Use the smart cap to make mixed juices, stop juice from dripping, or rinse between
different juices.
Juicing with the smart cap closed creates various mixed juice creations when different fruits
and vegetables, milk, banana, beans etc. are selected.
After juicing, close the smart cap to stop the juice from dripping, especially when
disassembling the juicing bowl off the base.
When making different juices quickly rinse away any leftover flavors by running a glass of
water in the juicer with the smart cap closed.
Leave the smart cap open when juicing ingredients that create excessive foam during
extraction, (e.g. apples, celery).
Pay close attention when operating with the smart cap closed. Juice may overflow if the
juice collected in the juicing bowl exceeds its capacity marked on the bowl.
After juice and pulp are completely extracted, switch the unit OFF
•If the remaining ingredients in the juicing bowl have not been extracted completely, the
drum lid may not open easily. After each extraction, run the juicer for an additional 30
seconds to let the juicer extract the remaining pulp.
•When the drum lid is stuck, press the REVERSE - OFF - FORWARD button in this order;
switching back and forth 2 or 3 times to dislodge the ingredients. Then place hands on top
of the drum lid and firmly press down while simultaneously turning the drum lid counter
clockwise to open.
» Depending on the ingredients, pour water down the feeding tube to rinse out the
interior of the juicing bowl and then attempt to remove the drum lid.

www.heinner.com 240W, 50/60Hz, 220-240V
11
TIPS ON OPERATION
1. Operating the juicer without ingredients can cause damage to the screw.
2. Do not continuously operate the juicer for more than 30 minutes.
This can damage the motor from overheating.
After continuous use, let the juicer rest for 30 minutes to cool down before starting another
session.
3. Do not put fingers or other objects into the feeding tube. Always use provided
pusher when needed.
If other objects are inserted into the feeding tube during operation, such materials can get
stuck and damage the juicer parts and/or cause injury.
4. Do not put dried or hard ingredients like whole grains, fruits with hard seeds or ice
into the juicer.
These may damage the juicer parts (e.g. juicing bowl, juicing screw, and strainer).
Beans or grains can be used if soaked overnight or boiled.
Fruits with pits and hard seeds (e.g. nectarines, peaches, mangoes and cherries) must be
pitted before juicing.
When using frozen fruits with small seeds such as grapes, completely thaw before inserting
them into the juicer.
5. Do not use ingredients containing excessive amounts of vegetable oil or animal fat.
Do not use the juicer to extract vegetable oil from ingredients.
If vegetable/animal oil gets on the juicing screw, it may reduce performance and even
damage the part.
6. Do not reinsert the extracted pulp into the juicer. This can cause the juicer to stop or
cause the drum lid not to open.
7. After juicing ingredients with seeds like grapes, thoroughly clean all the crevices on the
bottom of the juicing screw.

www.heinner.com 240W, 50/60Hz, 220-240V
12
VII. TIPS ON INGREDIENTS
Juicer damage due to owner negligence or from not following the instructions in the owner's
manual will void the warranty service.
DO NOT put the following ingredients into the juicer:
1. HARD SEEDS. Peach, nectarines, apricot, plum, mango, etc. Remove hard seeds from the
ingredients before juicing.
2. HARD OR INEDIBLE SKINS. Pineapple, melon, mango, orange, etc. Peel the skins from the
ingredients before juicing.
3. FROZEN FRUITS OR ICE. Frozen strawberry, blueberry, raspberry, etc. Completely thaw
frozen fruits before juicing. Do not use ice.
4. VEGETABLE OR ANIMAL OIL. Sesame seed, butter, margarine, etc.
Do not extract ingredients containing vegetable or animal oil. This can reduce performance
and even damage the juicer.
5. OTHERS. Coconut, sugarcane, whole grains, etc. Do not extract ingredients with no water
content.
Experience the best quality juice by understanding each ingredient's characteristics and
knowing the optimal way of handling the ingredients.
The Slow Juicer is an innovative product that uses a patented slow-speed masticating
technology to efficiently extract the juice from ingredients. The juicer is designed to obtain
the best result from ingredients with firm composition and with high water content. For best
result, each ingredient should be prepared and extracted depending on its characteristics and
properties.

www.heinner.com 240W, 50/60Hz, 220-240V
13
VIII. INGREDINETS
BEFORE OPERATING:
Before Operating: If the juicer is jammed or if the drum lid does not open, press the
REVERSE button and hold until it becomes dislodged.
Repeat REVERSE-OFF-FORWARD as needed.
Continue operating the juicer until all the ingredients in the juicing bowl are extracted. The
drum lid may not open easily if there is a lot of pulp remaining in the juicer.
Every ingredient yields different amounts of juice.
JUICE YIELD
For the optimal extraction and maximum juice yield, cut the ingredients following the
guidelines given in this section.
Insert ingredients slowly monitoring how the ingredients are extracted.
The juice yield may vary depending on the juicing speed.
SOFT FRUITS AND VEGETABLES
1-4wedges
- Peel the skin off oranges, and for tomatoes and apples, take out the stem.
- If the ingredients are larger than the feeding
tube, cut the ingredients into pieces that will fit into the feeding tube.
- Fruits with seeds must be pitted before extraction. Cut to 1-4 wedges then slowly insert
the ingredients down the feeding tube.
PREPARATION TIPS:
Cut 1-4 wedges.
EXTRACTION TIPS:
• Slowly insert the ingredients one piece at a time.
•Use the pusher to push the ingredients down the feeding tube. (The pusher also helps
prevent juice from spraying out of the feeding tube when extracting ingredients with high
water content)
•Leave the smart cap open when juicing ingredients that create excessive foam during
extraction.
(Foam can accumulate if operated with the smart cap closed. )
•It is recommended that the extracted juice be consumed within 48 hours after
extracting. Depending on the density of the ingredients the extracted juice can gradually
show layers over time.
•If there is an excessive amount of foam, use a mesh strainer to separate it from the
juice.
•When an ingredient is being masticated by the juicing screw, the squeezed ingredient
may splash juice through the feeding tube. Use the pusher to block out the juice splash
when juicing.

www.heinner.com 240W, 50/60Hz, 220-240V
14
HOW TO USE A SMART CAP:
Juicing with the smart cap closed allows mixed juice creations with different fruits,
vegetables and liquids.
After juicing, close the smart cap to block excess juice from dripping, especially when
disassembling the juicing bowl off the base.
When making juices quickly rinse away any leftover flavors by
running a glass of water in the juicer with the smart cap closed.
Leave the smart cap open when juicing ingredients that create excessive foam during
extraction (e.g. apples, celery).
Pay close attention when operating the juicer with the smart cap closed. Juice may overflow
if the juice collected in the juicing bowl exceeds its capacity marked on the juicing bowl.
ADJUSTING THE AMOUNT OF PULP IN THE JUICE:
Depending on the ingredient, you may get extra pulp in the juice when juicing continuously.
To reduce the amount of pulp, disassemble the top-set and wash frequently.
HARD FRUITS AND VEGETABLES
* Hard fruits and vegetables may put excess strain onto the motor and cause it to stall.
* Soak in cold water prior to juicing and cut to appropriate sizes.
* To increase the juice yield, juice fruits and vegetables with high water content.
PREPARATION TIPS:
• Slice the ingredients 1-inch-thick or cut 1 inch wide and 2-6 inches long.
• Soak hard ingredient like carrots and ginger in cold water prior to juicing.
EXTRACTION TIPS:
• Slowly insert the ingredients one at a time.
• Pace the juicing speed ensuring each ingredient is thoroughly extracted.
• To maximize the juice yield, juice with ingredients with high water content.
INGREDIENTS WITH SMALL SEEDS
Slowly insert ingredients with small seeds to prevent the seeds from clogging the strainer.
Insert ingredients slowly to minimize the amount of leftover seeds in the strainer.
For best result, juice with ingredients with higher amount of fluid(e.g. apple, pear)
PREPARATION TIPS:
• When juicing frozen ingredients(e.g. raspberry, strawberry), make sure they are
completely thawed.
• Thoroughly rinse ingredients like grapes. Take the grapes off and discard the stem.
• For pomegranate, discard the skin and juice only the inner part.

www.heinner.com 240W, 50/60Hz, 220-240V
15
EXTRACTION TIPS:
• Depending on the size of the grape, insert 3-5 grapes at a time while monitoring the
extraction result.
• Thaw frozen ingredients like pomegranate and raspberry then insert about 1
tablespoon (5g) at a time.
• Frozen ingredients usually lose significant amount of fluid from thawing. When juicing,
mix milk or yogurt to balance the fluid lost.
CAUTION: If the lid does not open due to excessive amount of small seeds left in the juicing
bowl, continuously run the juicerfor30 second to extract any leftover seeds. If the lid is still
stuck, repeat REVERSE- OFF- FORWARD until the ingredients become dislodged. Then twist
the lid to open while pushing downwards on the lid with palms (depending on the
ingredient, pour some water down the feeding tube for quick rinsing to help dislodging).
FIBROUS AND/ OR TOUGH LEAFY INGREDIENTS (E.9. CELERY, KALE, PINEAPPLE):
Fibrous ingredients like celery and kale should be cut into small lengths before juicing.
When the pulp outlet is blocked by the fibrous ingredients, press the
REVERSE-OFF-FORWARD button in this order, switching back and for the 2-3 times.
1. When juicing leafy If leafy ingredients like celery and kale, do not collect more than 500g
per session. For best result, disassemble and wash the top-set before juicing again.
2. If leafy ingredients wrap around the juicing screw, open the lid and remove the fibers
before continue juicing.
3. It's best to juice with ingredients with higher amount of fluid, like Carrots, apples, fibrous
ingredients = 9:1 [recommended ratio].
PREPARATION TIPS:
• Soak fibrous ingredients in cold water for about 30 minutes before cutting them.
• Separate each stem. Cut the outer stems that are thick and tough to 4 inches Ion g or
less.
EXTRACTION TIPS:
One at a time, slowly insert the prepared ingredients.
Insert more ingredients after the previously inserted ingredients have been completely
extracted.
- Roll leaves into spiral as inserting into the juicer.
- Insert the leafy part of the ingredients first then alternate between leafy parts and stems.
- For ingredients like wheatgrass, grab a handful and insert in a bundle.
CAUTION
• The fibers from tough ingredients like celery can wrap around the juicing screw and affect
juicer's performance. Cut the stems that are thick and tough to 4 inches long or less.

www.heinner.com 240W, 50/60Hz, 220-240V
16
•Foam can build up from juicing fibrous ingredients. Use strainer to remove the foam before
serving.
•For ingredients like pineapple, slice off the rind of the pineapple and cut around the fibrous core.
Cut the flesh of the pineapple to smaller pieces.
•Recommended amount of juicing per session is 500g. When juicing more than 500g, wash the
top-set before continue juicing.
VIII. DISASEMBLING AND CLEANING
1. Switch OFF and unplug the power cord from the wall outlet.
Extract all the remaining pulp in the juicing bowl before stopping the juicer.
• For easier clean up, operate the juicer for an additional 30 seconds after the juice is
extracted.
• When the drum lid is stuck, press the REVERSE-OFF -FORWARD button in this order,
switching back and forth 2 to 3 times to dislodge. Then place hands on top of the drum lid
and firmly press down simultaneously turning the drum lid counter clockwise to open.
2. Turn the drum lid counter clockwise to open.
When moving the appliance, do not lift by grabbing the feeding tube. Always lift the
appliance by grabbing the base or handle.
3. Place the bowl on the base so that its grey arrow lines up with the black arrow on the
base.

www.heinner.com 240W, 50/60Hz, 220-240V
17
4. Remove the juicing screw, strainer and rotation wiper unit from the juicing bowl. Clean
with provided brush.
Immediately clean the juicer after each use. If remaining residue in the juicer dries up, it can
make disassembling and clean-up difficult. The excess build up can cause poor performance
in future uses.
• For easier disassembly, place the top-set in the sink and run the water through from
the top of the top-set.
• Thoroughly dry the bottom of the juicing screw where it connects to the metal cylinder
shaft on the base.
5. Place the juicing bowl under running water and unplug the compression silicone to clean
the pulp spout.
Soak the juicing bowl in a solution of warm water with baking soda or little bit of bleach to
clean the excess build up.

www.heinner.com 240W, 50/60Hz, 220-240V
18
IX. COLD DESERT ACCESSORY
A. To assemble the top set, place the Juicing screw and the blank strainer in the juicing bowl
and close the lid.
1. Insert the blank strainer into the juicing bowl while aligning the red dots• of the blank
strainer and the juicing bowl.
2. Insert the juicing screw into the blank strainer with a twisting motion.
3. Place the lid onto the juicing bowl by aligning the red dots• of the lid and the juicing
bowl. Then, rotate the lid clockwise until the lid is secured.
* When using the blank strainer, always leave the Smart Cap open.
B. Place the assembled top set onto the base.
Align the arrow ↓from the lid with the OPEN sign from the base and rotate the top set
clockwise until the arrow ↓from the lid is in CLOSE position.
CAUTION
The bland strainer is used only with frozen ingredients. Depending on the different
ingredients. Allow the frozen items to thaw for 5 to 20 minutes before use. Slowly process a
smaller amount per batch.
• Do not use ice or process ingredients containing vegetable or animal oil. It may cause a
malfunction.
• Remove hard seeds from the ingredients and peel the skins from the ingredients before
juicing.

www.heinner.com 240W, 50/60Hz, 220-240V
19
X. TROUBLESHOOTING
1. WHEN THERE IS NO POWER TO THE JUICER:
Check if the power cord is properly plugged in. Check if the drum lid and the juicing bowl
are properly assembled.
Check if the top-set and the base are properly assembled.
Juicer will not operate if parts are not assembled properly.
2. LOW JUICE YIELD:
Different ingredients hold different amounts of fluid that will yield different amounts of
juice. If the ingredients are not fresh, they may contain reduced amounts of fluid, which will
yield less juice.
Check if the compression silicone is firmly inserted.
If the ingredient itself has low water content, it may help to soak it in water before juicing.
If juicing ingredients with small seeds, after a few servings, it may reduce the juice yield. For
best result, disassemble and wash the top-set in between juicing.
If there is seed residue on the bottom of the strainer, this can affect juicer performance and
the overall juice yield.
3. THERE IS TOO MUCH PULP IN THE JUICE:
When continuously juicing, and depending on the ingredient, the juice may contain a lot of
fine pulp.
To reduce the fine pulp, clean the top-set frequently and extract the pulp.
Use a mesh strainer and put the juice through it to collect the unwanted pulp.
If the strainer and the screw are damaged and affecting the juicer's performance, it is
recommended the parts be replaced.
* The lifetime of each part may vary depending on length and method of use and
ingredients extracted.
If too many ingredients are inserted at the same time, it may cause the juicer to stop
frequently. This can lead to pulpy juice. Insert the ingredients slowly and few at a time.
4. THE DRUM LID WILL NOT CLOSE:
Make sure the juicing screw is pushed all the way in to the strainer in order for the drum lid
to close properly.
If the juicing screw is not properly in position, the drum lid may not close.
This manual suits for next models
1
Table of contents
Languages:
Other Heinner Juicer manuals

Heinner
Heinner HSJ-160RD User manual

Heinner
Heinner FRESH 400 User manual

Heinner
Heinner HSJ-200X User manual

Heinner
Heinner C300SS User manual

Heinner
Heinner C160SS User manual

Heinner
Heinner HSJ-200WH User manual

Heinner
Heinner HSJ-200WH User manual

Heinner
Heinner HSJ-600GR User manual

Heinner
Heinner HSJ-200X User manual

Heinner
Heinner C250X User manual