manuals.online logo
Brands
  1. Home
  2. •
  3. Brands
  4. •
  5. Helvex
  6. •
  7. Toilet
  8. •
  9. Helvex WC MIURA 16 TCC User manual

Helvex WC MIURA 16 TCC User manual

Cada metro de altura de su
producto a la base del tinaco
equivalen a (0,1 kg/cm²) [1,42
PSI].
Hola soy Fluxy, te
ayudaré a instalar
tu producto.
Instalación General
Every meter of height of your
product to the base of the tub
is equivalent to (0,1 kg/cm²)
[1,42 psi].
Hi I'm Fluxy, I'll
help you to install
your product.
/ General Installation
1Instale la taza de acuerdo a las distancias que se muestran en la figura. / Attach the toilet according to the distances shown in figure.
S11700252E21
ADVERTENCIA / WARNING
Para disminuir el riesgo de lesiones o daños a la propiedad, lea todas las instrucciones antes de
instalar el producto. Utilice gafas de seguridad. En obras de construcción, instalación, modificación,
ampliación y reparación deben cumplir con el reglamento de construcción y obras de su localidad.
El producto ilustrado puede sufrir cambios de aspecto como resultado de la mejora continua a la que
está sujeto.
Agradecemos su elección por los productos HELVEX.
Estamos seguros de que su confiabilidad por el producto excederá sus más altas expectativas, cuya
funcionalidad, estética, durabilidad, respaldo integral y alta calidad le otorgarán plena satisfacción
por años, reflejando el compromiso con la calidad, innovación y el medio ambiente que forman parte
de Helvex.
Thank you for choosing HELVEX products.
We are confident that the product reliability will exceed your maximum expectations. The functionality,
aesthetics, durability, quality and support will grant you full satisfaction for years, it is Helvex
commitment to the quality, innovation and the environment.
To reduce the risk of injury or property damage, read all instructions. Before installing the product,
please remember to use safety glasses. Apply building normative for any construction, installation,
alteration, extension or repair.
As result of continuous improvement, the product illustration may change in appearance.
Esta guía de instalación aplica al producto en cualquier acabado. / This installation
guide applies to the product in any finish.
Herramienta Requerida / Required Tools Artículos Incluidos en su Producto
/ Item Included in your Product
kit de sujeción
tank fixing kit
screwdriver
destornillador
Ø 3/8 “Drill bit
taladro con broca
de Ø 3/8” pencil
lápiz
silicón antihongos
silicon antifungal
floor fixing kit
kit de fijación
al piso
INSTALLATION
GUÍA DE INSTALACIÓN
GUIDE
foamy gasket
empaque
esponjoso asiento
seat
Inodoro Elongado, Trampa Oculta, Tecnología Cero Contacto
de Baterías con Botón de Sensor Independiente y Botón de
Descarga Manual 4,8 l, Blanco. / Elongated Toilet, Hidden
Trap, Contact Zero Technology of Battery with Independent
Sensor Button and Manual Flushing Button 4.8 l, White.
32,6 cm (12,8”)
85 cm
(33,4”)
Front View
Vista Frontal /
73,0 cm (28,7”)
Vista Lateral / Side View
*15 cm (5,9”)
tubería de PVC Ø 4”
Nivel de Piso Terminado
pared con
acabado final manguera flexible
(no incluida)
válvula de paso
(no incluida)
*30,5 cm (12”)
NPT
FFL
2%
wall finish
off valve
(not included)
PVC pipe Ø 4 “
manguera flexible
(no incluida)
Finished Floor Level
*Recommended Dimmensions
*Medidas Recomendadas
llave 7/16”
7/16” wrench
WC MIURA16 TCC
extensión
del tanque
extension
Requerimientos de Instalación
Installation Requirements
WC MIURA 16 TCC 0,8 11,3 78,4
Requerimientos de Instalación
Installation Requirements
kg/cm² PSI kPa kg/cm² PSI kPa
6,0 85,3 588,3
Para el correcto funcionamiento de éstos productos, se
recomiendan las siguientes presiones:
For the correct operation of these products, the following
pressures are recommended:
Modelo / Model
Mínima / Minimum Máxima / Maximum
42,0 cm
(16,5”)
[email protected]
Original Spare Parts:
Consultancy and Technical
(52) 55 53 33 94 31
(52) 55 53 33 94 00
Refacciones Originales:
Asesoría y Servicio Técnico:
Ext. 5913, 5068 y 4815
Service:
(52) 55 53 33 94 21
[email protected]
www.refaccioneshelvex.com.mx
4
Instalación Taza / Bowl Installation
tubo de
drenaje
barreno
Coloque el tanque acostado sobre su respaldo en una superficie
suave, posteriormente coloque el empaque esponjoso (incluido)
en la parte inferior del tanque, enrosque la extensión (incluída). /
Place the tank lying on its back of a soft surface, then place the
foamy gasket (included) into the bottom of the tank , screw the
extension (included).
tuerca (incluida)
pija
(incluida)
pija con
tuerca
tubo de
drenaje
3
Instale el cuello de cera (no incluido) o la brida sanitaria (no incluida) y coloque la taza
presionando hacia abajo. / Install the wax ring (not included) or toilet flange (not included)
and place the bowl by pressing down.
drill hole
Inserte la rondana y enrosque la tuerca
en la pija, para fijar la taza. / Insert the
washer and screw the nut to fix the bowl.
drain tube
lag with nut
nut (included)
lag
(included)
drain tube
drain
Wall Finished
Vista Superior
/ Top View
90°
Muro Terminado
15,2 cm
(5,98”)
válvula de paso (no incluida)
20 cm
(7,8”)
desagüe
shut off valve (not included)
Trace sus líneas como se indica. / Trace
lines as indicated.
No apretar las tuercas más de lo necesario,
para evitar daños a su producto.
Not tighten the nuts more than necessary,
to avoid damgae.
Barrene con broca de Ø 3/8” para
concreto (no incluida) y coloque los
taquetes (incluidos) en los barrenos.
/ Drill with Ø 3/8" drill bit concrete
(not included) and place the anchors
(includes) into the holes.
Enrosque las pijas (incluidas) en los
taquetes al piso. / Screw the lags
(included) in the ground anchors.
taquetes
(incluidos)
anchors
(included)
2
30,5cm
(12,0”)
instalación con cuello de cera
wax ring installation
instalación con brida sanitaria
toilet flange installation
3
2
5 6
7
4 cm mín.
(1,57" min.)
tuerca
nut
rondana
washer
Utilice el kit de fijación al piso incluido en el producto.
Use the floor fixing kit included in the product.
desagüe
use these holes
to see the
installation
drain
utilice las mirillas
para visualizar
la instalación
brida sanitaria
(no incuida)
toilet flange
(not included)
empaque
esponjoso
(incluido)
foamy gasket
(included)
Verifique que esté colocado el
o’ring en la extensión. / Verify
that the o-ring is placed in the
extension.
cuello de cera
(no incuido)
wax ring
(not included)
extensión
(incluida)
extension
(included)
válvula de alimentación
15/16"-14 NS-1
fill valve
15/16" - 14 NS-1
Coloque el tanque en la taza. / Place the tank over the bowl.
tanque
taza
tank
bowl
8
módulo de control
control module
Coloque la tapa del tanque, verificando la posición frontal
correcta. / Place the cover of the tank, verify the correct position.
Enrosque la manguera (no incluida) a la llave angular y a la
extensión. / Screw the hose to the shut off valve and the
extension.
Instalación de Baterías para el Módulo de Control / Installation of Batteries of the Control Module
Purgue la línea de
alimentación antes de
enroscar la manguera.
Purge the supply line
before connecting the
hose.
Aplique silicón anti hongos (no incluido) en la periferia del W. C. /
Apply antifungal silicone (not included) in the periphery of the
toilet.
3
10
11 12
tapa
lid
tanque
tank
manguera
(no incluida)
hose (not included)
extensión 15/16”-14 NS-1
15/16”-14 NS-1 extension
llave angular
(no incluida)
shut off valve
(not included)
Inserte los empaques y tornillos, enrosque alternadamente
hasta que el tanque esté alineado y fijo. / Insert the gaskets and
screws, tighten alternately until the tank is aligned and fixed.
Antes de apretar, verifique que el tanque quede alineado con la taza.
La instalación del tanque es con el kit de sujeción del tanque.
Before being too tight, check that the tank is aligned with the bowl.
The tank installation is with the tank fixing kit.
9
tornillo
screw
empaque
gasket
Retire la tapa del inodoro, desconecte el módulo de control y retírelo del soporte. Desenrosque el tornillo de la tapa del módulo de control e
inserte las baterías (no incluidas) verificando su posición. Coloque la tapa y enrosque el tornillo y presione el sello de goma del cable para sacar
el aire. Vuelva a colocar y a conectar el módulo. / Remove the lid, disconnect the control module and remove it from the holder. Unscrew the
screw from the control module cover and insert the batteries (not included) by checking their position. Place the cover and screw the screw and
press the rubber seal off the cable to get the air out. Place again and connect the module.
13
tapa
cover
tornillo
screw
portabaterías
battery holder
tapa
lid
4 baterías alkalinas
tipo “AA”
4 alkaline batteries
type "AA”
silicón antihongos
(no incluido)
antifungal silicone
(not included)
módulo de
control
control module
soporte
holder
4
Desenrosque los tornillos, retire la tapa del sensor y coloque las baterías (no incluidas). Inserte la tapa y enrosque los tornillos. / Unscrew the
screws, remove the sensor cover and place the batteries (not included). Insert the cover and screw the screws.
14
tornillo
screw
tapa
cover
sensor
Nota: Las baterías del sensor deberán ser instaladas dentro de los 3 minutos después de haber instalado las baterías al módulo de control para que se
sincronicen. / Note: The sensor batteries shall be installed within 3 minutes after the batteries have been installed to the control module to synchronize.
Instalación de Baterías para el Sensor / / Installation of the Batteries of the Sensor
3 baterías alkalinas
tipo “AAA”
3 alkaline batteries
type "AAA”
15
Componentes Internos del Tanque / Tank Internal Components
Los componentes se encuentran instalados y calibrados para una máxima eficiencia. / The components are installed and calibrated for a
maximum efficiency.
16
35
1
4
6
1. Válvula de Descarga / Flush Valve
2. Tornillo del Flotador / Float Screw
3. Manguera / Hose
4. Rebosadero / Rebosadero
Flotador 5. / Float
6. Módulo de Control / Control Module
Hose Refil 7. Manguera Refil /
2
7
marca del nivel
de agua
water level mark
A.- Coloque la base del sensor en la posición a instalar deseada,
marque los barrenos, perfore con broca de 3/16", inserte los
taquetes y fije la base enroscando los tornillos. Coloque el sensor
sobre la tapa y gire para fijarlo. / A.- Place the sensor cap in the
desired position to be installed, mark the drills, drill with 3/16" drill
bit, insert the anchors and fix the base screwing the screws.
Place the sensor on the cap and rotate to fix it.
Instalación con Tornillos. / Installation with Screws.
B.- Limpie y seque la superficie donde se va a instalar. Presente la base
tomando como referencia el desfase de los 10° con respecto a la
horizontal y marque los barrenos. Retire la cubierta del adhesivo y adhiera
la base en la superficie. Coloque el sensor sobre la base y gire para
fijarlo. / B.- Clean and dry the surface where it will be installed. Present the
base by reference to the offset of 10° with respect to the horizontal and
mark the bores. Remove the cover from the adhesive and attach the base
to the surface. Place the sensor on the base and rotate to fix it.
Instalación con Adhesivo. / Installation with Adhesive.
Nota: No instale ni use el sensor en lugares húmedos como el área de la regadera o tina de baño, evite el contacto con agua. /
Note: Do not install or use the sensor in wet places such as the shower or bath tub areas, avoid contact with water.
50,5 mm
1,9"
tornillo
screw
base
sensor
base
taquete
anchor
tapa
cap
adhesivo
adhesive
Instalación del Sensor / Sensor Installation
Recomendado para superficies rugosas. /
Recommended for rough surfaces.
Recomendado para superficies lisas. /
Recommended for smooth surfaces.
10°
10°
base
base
En caso de que las baterías estén bajas o exista una falla electrónica, el producto tiene un botón mecánico de accionamiento manual para
generar la descarga, sólo presiónelo con el dedo. / In case the batteries are low or there is an electronic failure, the product has a mechanical
manually operated button to generate the flush, just press it with your finger.
Mantenimiento del Filtro / Filter Maintenance
Levante la tapa, desenrosque la manguera (incluida) de la
conexión de entrada de agua y retire el filtro. / Lift the lid,
unscrew the hose (included) from the water inlet connection and
remove the filter.
22 23
tapa
lid
filtro
filter
manguera
(incluida)
hose (included)
Limpie el filtro con agua y un cepillo suave y ensamble otravéz. /
Clean the filter with water and soft brush and assemble it again.
filtro
filter
No olvide realizar este procedimiento
frecuentemente para un perfecto
funcionamiento de su equipo. / Do not forget
to perform this procedure frequently for
perfect functioning of your computer.
Operación Asiento / Seat Operation
Mantenimiento del Filtro / Filter Maintenance
6
Para abrir levante la tapa y/o asiento y para cerrar sólo empuje el asiento o tapa hacia la taza. / To open, lift the cover and / or seat and to close
just push the seat or cover to the toilet.
Para abrir / To open Para cerrar / To close
21
20
botón mecánico
mechanical button
Nota: El producto es accionado por medio de la presión del agua de la línea de alimentación. Antes de utilizarlo asegúrese que la válvula de paso esté abierta y que la presión de la
línea esté dentro del rángo de presión indicada. En caso de suspensión del suministro de agua no podrá hacerse la descarga, aún y cuando el taque tenga agua.
Note: The product is powered by supply line pressure. Before using it, make sure that the valve is open and that the line pressure is within the indicated pressure range. In case of
suspension of the water supply, the discharge cannot be made, even if the tank has water.
Abra los cubretornillos y coloque el asiento en el W. C., introduzca la rondana como se muestra y enrosque el tornillo hasta apretar. / Open the
screw covers and place the seat in the toilet, enter the washer as shown and tighten the screw until tight.
screw cover
cubre tornillos
Cierre los cubretornillos / Close the screws cover
Instalación Asiento / Seat Installing
18
17
cubretornillos
screw cover
rondana
washer
tornillo
screw
5
Operación / Operation
Asegúrese de que la línea de alimentación esté abierta. Para activar la descarga debe de generar un movimiento oscilatorio enfrente del sensor.
La distancia de detección es de 25mm a 40mm. / Make sure the supply line is open. To activate the flush must generate an oscillatory movement
opposite sensor. The detection distance is from 0,98" to 1,57".
Operación / Operation
19
detección de movimiento
oscilatorio
oscillatory motion detection
Cuando el sensor detecte el movimiento de la mano y parpadee 5 veces, es indicativo que las baterías están bajas y requieren reemplazarse.
When the sensor detects hand movement and blinks 5 times, it is indicative that the batteries are low and need to be replaced.
26
7
Cambio de Baterías / Bateries Changing
módulo de
control
control module
Retire la tapa del inodoro, desconecte el módulo de control y retírelo del soporte. Desenrosque el tornillo de la tapa del módulo de control e
inserte las baterías (no incluidas) verificando su posición. Coloque la tapa y enrosque el tornillo y presione el sello de goma del cable para sacar
el aire. Vuelva a colocar y a conectar el módulo. / Remove the lid, disconnect the control module and remove it from the holder. Unscrew the
screw from the control module cover and insert the batteries (not included) by checking their position. Place the cover and screw the screw and
press the rubber seal off the cable to get the air out. Place again and connect the module.
24
tapa
cover
tornillo
screw
portabaterías
battery holder
tapa
lid
4 baterías alkalinas
tipo “AA”
4 alkaline batteries
type "AA”
módulo de
control
control module
soporte
holder
Cuando el sensor detecte el movimiento de la mano y parpadee 12 veces, es indicativo que las baterías están bajas y requieren reemplazarse. /
When the sensor detects hand movement and blinks 12 times, it is indicative that the batteries are low and need to be replaced.
sensor
Para el sensor, retire de acuerdo a su instalación (ver paso 14), desenrosque los tornillos, retire la tapa y coloque las baterías. Arme
nuevamente según su instalación. / For the sensor, remove according to your installation (see step 14), unscrew the screws, remove the cap
and place the batteries. Assemble again according to your installation.
25
Nota: Las baterías del sensor deberán ser instaladas dentro de los 3 minutos después de haber instalado las baterías al módulo
de control para que se sincronicen. / Note: The sensor batteries shall be installed within 3 minutes after the batteries have been
installed to the control module to synchronize.
tornillo
screw
tapa
cover
sensor
3 baterías alkalinas
tipo “AAA”
3 alkaline batteries
type "AAA”
Si al terminar la instalación el módulo sensor se ilumina pero el módulo de control no descarga, retire y coloque las baterías para sincronizar los
códigos. / If at the end of the installation the sensor module lights up but the control module does not make the flush, remove and place the
batteries to synchronize the codes.
Sincronización de Códigos entre el Módulo de Control y el Sensor / Code Synchronization Between Control Module and Sensor
Paso I
Remueva las baterías de ambos módulos, del módulo de
control y del módulo de sensor. Espere 1 minuto por lo menos.
Step I
Remove the batteries from both modules, the sensor module
and the control module. Wait at least 1 minute.
Paso II
Coloque las baterías del módulo de control. Revise bien la
posición en que debe colocarse cada pila. Después de 3
minutos coloque las baterías al módulo del sensor. /
Step II
Place the batteries in the control module. Check the position in
which each battery should be placed. After 3 minutes, place the
batteries in the sensor module.
Posibles Causas y Soluciones / Troubleshooting
Advertencia: No se recomienda colocar pastillas de cloro en el interior del tanque para garantizar el funcionamiento de la
válvula y durabilidad de los empaques. / Warning: It is not recommended to place chlorine tablets inside the tank to
guarantee the functioning of the valve and the durability of the gaskets.
Recomendaciones de Limpieza / Cleaning Recommendations
In Guadalajara:
Contact:
Enter our free
training courses.
In Monterrey:
En la Ciudad de México:
In Mexico City:
En Monterrey: En Guadalajara:
01 55 53 33 94 00
Ext. 5804, 5805 y 5806
(0133) 36 19 01 13
Comunícate:
Participa en nuestros
cursos gratuitos
de capacitación.
(0181) 83 33 57 67
(0181) 83 33 61 78
Es muy importante seguir las siguientes instrucciones para conservar los
acabados de los productos HELVEX, con brillo y en perfecto estado:
1. Utilice únicamente agua y un paño limpio.
2. No utilice fibras, polvos, abrasivos, ni productos químicos.
3. No utilice objetos punzo-cortantes para limpiar los acabados.
4. Se recomienda realizar la limpieza de su producto diariamente.
Visite nuestras páginas www.helvex.com.mx para México y www.helvex.com
para el mercado Internacional
It is very important to follow the instructions below to preserve HELVEX products
finishes, shiny and in perfect condition:
1. Use only water and a clean cloth.
2. Do not use fibers, powders, abrasives, or chemicals.
3. Do not use sharp objects to clean the finish.
4. It is recommended to clean your product daily.
Visit our pages www.helvex.com.mx for Mexico and www.helvex.com
for the International market.
HELVEX, S. A. DE C. V. Calzada Coltongo # 293, Col. Industrial Vallejo, Alcaldía Azcapotzalco, C. P. 02300, Ciudad de México.
Problema / Problem Causas / Causes Soluciones / Solutions
La válvula de admisión no abre.
/ The fill valve does not open.
Verificar que el flotador no esté obstruído.
/ Verify that the float is not obstructed.
El flotador de la válvula está bloqueado.
/ The valve float is locked.
Verificar las conexiones de la manguera.
/ Verify the hose connections.
La conexión de la manguera no sella.
/ The hose connection doesn’t seal.
El filtro está sucio.
/ The filter is dirty.
No se acciona el sensor.
/ The sensor is not actuated.
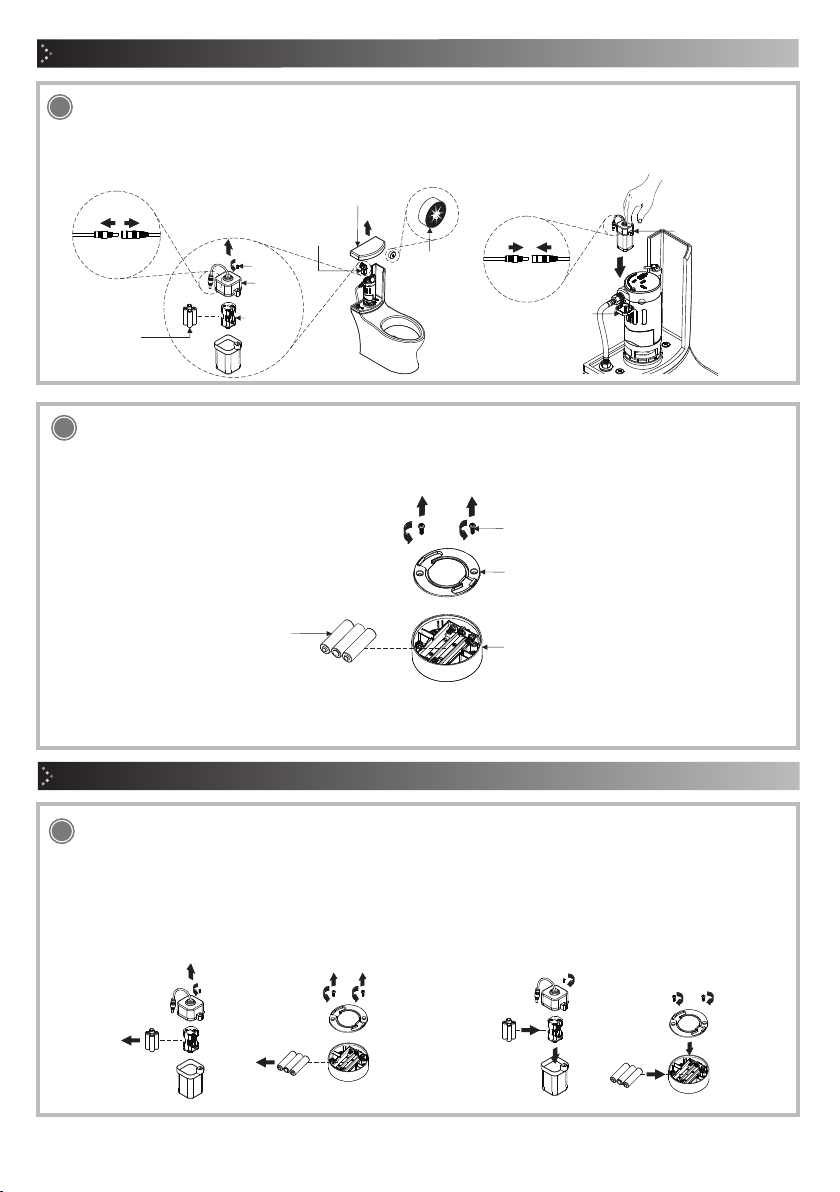
Baterías bajas.
/ Low batteries.
Reemplace las baterías del sensor ó modulo de control (Pag 7
"Cambio de Baterías"). / Replace the sensor or control module
batteries (Pag 7 "Bateries changing").
El módulo de control no está conectado correctamente.
/ The control module is not connected properly.
Verifique la conexión de los cables.
/ Check the wiring connection.
Los códigos sensor no coinciden con los códigos
del módulo de control. / Sensor codes don’t match the
control module codes.
Sincronización (Pag. 7, paso 26).
/ Synchronization (Pag. 7, step 26).
Remueva el filtro de la manguera y proceda
a limpiarlo (Pag. 6 "Mantenimiento del Filtro"). / Remove
the filter from the hose and proceed to clean
(Page 6 "Filter Maintenance").
No descarga o es insuficiente.
/ It does not make a flush or is
insufficient..
Verificar que el flotador no esté obstruído.
/ Verify that the float is not obstructed.
El flotador de la válvula está bloqueado.
/ The valve float is locked.
Baterías bajas.
/ Low batteries.
Reemplace las baterías del sensor ó modulo de control (Pag 7
"Cambio de Baterías"). / Replace the sensor or control module
batteries (Pag 7 "Bateries changing").
El filtro está sucio y tapado.
/ The filter is dirty and clogged.
Remueva el filtro de la manguera y proceda
a limpiarlo (Pag. 6 "Mantenimiento del Filtro"). / Remove
the filter from the hose and proceed to clean
(Page 6 "Filter Maintenance").
Producto: Taza Tanque con Asiento.
Marca: Helvex.
Modelos: WC MIURA 16TCC
Distancia para sensar movimiento: 25mm a 40mm.
Energía:
Para el Módulo de Control - 6Vcc (4 baterías alcalinas AA).
Para el Sensor - 4,5Vcc (3 baterías alcalinas AAA).
Product: Tank Toilet with Seat.
Brand: Helvex.
Models: WC MIURA 16TCC
Distance to detect movement: 0,98" to 1,57".
Energy:
For the Control Module - 6VDC (4 AA alkaline batteries).
For the Sensor - 4,5VDC (3 AAA alkaline batteries).
Datos Técnicos / Technical Data

This manual suits for next models

1

Other Helvex Toilet manuals

Helvex MG GOBI TDS User manual

Helvex

Helvex MG GOBI TDS User manual

Helvex AT-1 User manual

Helvex

Helvex AT-1 User manual

Helvex WC 2.5 User manual

Helvex

Helvex WC 2.5 User manual

Helvex WC MURANO User manual

Helvex

Helvex WC MURANO User manual

Helvex AF-1 User manual

Helvex

Helvex AF-1 User manual

Helvex WC DRAKAR2 User manual

Helvex

Helvex WC DRAKAR2 User manual

Helvex OP CAPRI PLUS User manual

Helvex

Helvex OP CAPRI PLUS User manual

Helvex TZF NAO User manual

Helvex

Helvex TZF NAO User manual

Helvex UMG GOBI TDS User manual

Helvex

Helvex UMG GOBI TDS User manual

Helvex WC AUSTRAL L 2P User manual

Helvex

Helvex WC AUSTRAL L 2P User manual

Helvex WC-OPTION-AT2 User manual

Helvex

Helvex WC-OPTION-AT2 User manual

Helvex MG Ferry User manual

Helvex

Helvex MG Ferry User manual

Helvex WC AUSTRAL User manual

Helvex

Helvex WC AUSTRAL User manual

Helvex WC MIURA User manual

Helvex

Helvex WC MIURA User manual

Helvex WC BOLMEN User manual

Helvex

Helvex WC BOLMEN User manual

Helvex WC MIURA16 User manual

Helvex

Helvex WC MIURA16 User manual

Helvex TZF NAO PARED User manual

Helvex

Helvex TZF NAO PARED User manual

Helvex WC OP CAPRI User manual

Helvex

Helvex WC OP CAPRI User manual

Helvex ATM User manual

Helvex

Helvex ATM User manual

Helvex WC DRAKAR User manual

Helvex

Helvex WC DRAKAR User manual

Helvex OP RIVOLI PLUS User manual

Helvex

Helvex OP RIVOLI PLUS User manual

Helvex AT-5 User manual

Helvex

Helvex AT-5 User manual

Helvex WC MURANO 2P User manual

Helvex

Helvex WC MURANO 2P User manual

Helvex OP RIVOLI PLUS User manual

Helvex

Helvex OP RIVOLI PLUS User manual

Popular Toilet manuals by other brands

TECE TECEone operating instructions

TECE

TECE TECEone operating instructions

Toto CS945P Series installation manual

Toto

Toto CS945P Series installation manual

Mansfield Vanquish Quick Install instructions

Mansfield

Mansfield Vanquish Quick Install instructions

Clou CL/04.06060.20 installation instructions

Clou

Clou CL/04.06060.20 installation instructions

IFO iCON 40400 Operating and maintenance instructions

IFO

IFO iCON 40400 Operating and maintenance instructions

Dyconn NIARA K81 Series product manual

Dyconn

Dyconn NIARA K81 Series product manual

SILFRA QUIKTRONIC QT 810 installation instructions

SILFRA

SILFRA QUIKTRONIC QT 810 installation instructions

Kohler K-6299 Detailed Planning Dimensions

Kohler

Kohler K-6299 Detailed Planning Dimensions

Grohe SENSIA IGS Mounting instructions

Grohe

Grohe SENSIA IGS Mounting instructions

Separett Tiny 1271-01 installation manual

Separett

Separett Tiny 1271-01 installation manual

SPX Johnson Pump AquaT Series instruction manual

SPX

SPX Johnson Pump AquaT Series instruction manual

Sun-Mar EXCEL quick start guide

Sun-Mar

Sun-Mar EXCEL quick start guide

Toto CS320D Series installation manual

Toto

Toto CS320D Series installation manual

CORONA 251618 installation instructions

CORONA

CORONA 251618 installation instructions

Woodbridge T-0042 Installation and care guide

Woodbridge

Woodbridge T-0042 Installation and care guide

Graco MODES Carry Cot manual

Graco

Graco MODES Carry Cot manual

Kohler K-3496 Installation and care guide

Kohler

Kohler K-3496 Installation and care guide

American Standard Vormax 7381426-100.0070A instructions

American Standard

American Standard Vormax 7381426-100.0070A instructions

manuals.online logo
manuals.online logoBrands
  • About & Mission
  • Contact us
  • Privacy Policy
  • Terms and Conditions

Copyright 2025 Manuals.Online. All Rights Reserved.