manuals.online logo
Brands
  1. Home
  2. •
  3. Brands
  4. •
  5. Henderson
  6. •
  7. Door Opening System
  8. •
  9. Henderson SIM100 User manual

Henderson SIM100 User manual

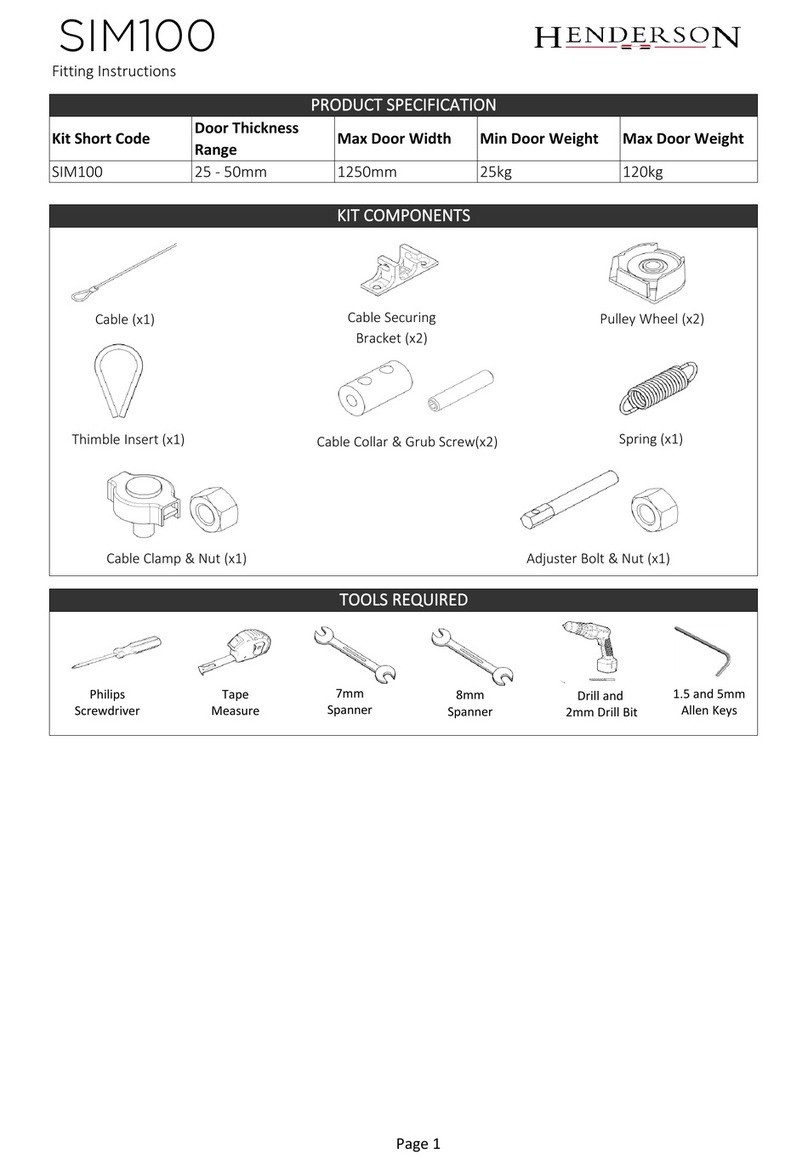
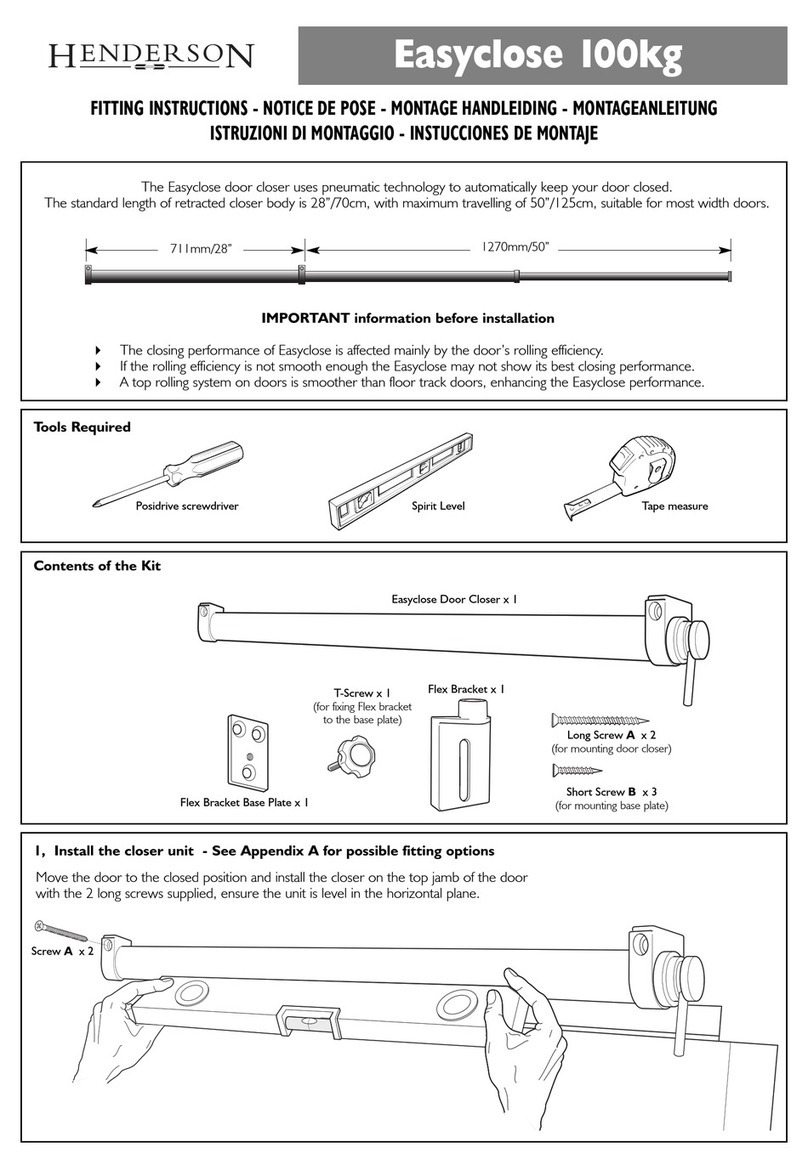
For a pair of bi-parting doors up to 1250mm wide each, to be used with a pair of Husky 100 or Pocket Door Kits
(PDK range) . Door thickness between 25mm and 50mm. Minimum door weight 25kg.
1. Install the Husky 100 system for two bi-parting doors in
accordance with the instructions (supplied in the Husky kit)
ensuring that the doors have been fitted correctly and are sliding
freely, and the clip stops are secured at the door opening limits.
2. Remove the last bolt from both end clips with the 5mm Allen key
and replace with the extended bolt, complete with the pulley
assembly to both of the clip stops. See diagrams 1 and 2.
3. Disconnect both of the doors from the sliding gear and fit the left
and right hand door brackets to the top of both the doors in a
central position and 5mm off the centre of the door thickness,
using the screws provided, see diagram 5. Then re-hang the doors
as before.
4. Taking the cable (ensuring it is ‘kink’ free), hook the fixed loop
end of the cable to the right hand door bracket as shown in
diagram 4.
5. Feed the cable through the right hand pulley wheel. Ensure that
the cable travelling in and out of the pulley runs parallel, see
diagram 2.
6. Place the cable collar into the left hand door bracket, and thread
the cable through the collar as shown in diagram 3. Do not
tighten the grub screws at this stage.
7. Feed the cable through the left hand pulley wheel. Ensure that
the cable travelling in and out of the pulley runs parallel, see
diagram 1.
8. Whilst holding the cable, with a small amount of tension, thread
the cable clamp on to the cable. Then form a loop and insert the
thimble into the loop. Feed the end of the cable back through the
cable clamp to hold the shape of the loop, see diagram 4.
9. Fit the adjuster bolt on to the right hand door bracket complete
with the two lock nuts, then hook the spring on to the adjuster
bolt and hook the cable loop on to the other end of the spring,
see diagram 4.
10. Pull the excess cable through the cable clamp until the spring
starts to pull back, then tighten the cable clamp nut with the
7mm spanner to secure the cable loop. Cut off any excess cable
with the cable cutters.
11. Using the 8mm spanners adjust the adjuster nut to tension the
cable so there is no sag in the cable and lock off the lock nut.
12. Position the doors so that they are centralised within the
opening and tighten the grub screws in the cable collar with the
1.5mm Allen key to secure the doors in place. Test the operation
of the system to ensure it is working correctly.
Tools Required
1 x Phillips screwdriver 2x8mm spanners
1x7mm spanner 1 x Tape measure
1 x Cable cutters1xDrill + 2mm drill bit
(for drilling pilot holes on top of doors)
1xAllen key - 1.5mm
1xAllen key - 5mm
Simultaneous Action Kit - SIM100
FITTING INSTRUCTIONS - NOTICE DE POSE - MONTAGE HANDLEIDING - MONTAGEANLEITUNG
INSTRUZIONI DI MONTAGGIO - INSTUCCIONES DE MONTAJE
Part No: 370262
July 2017 - Issue 4
P C Henderson Limited, Durham Road, Bowburn, County Durham DH6 5NG, UK. Web: www.pchenderson.com
UK Customer Services Department: Tel: +44 (0)191 377 7345 Fax: +44 (0)191 377 3116 Email: [email protected]
Export Department: Tel: +44 (0)191 377 7346 Fax: +44 (0)191 377 0755. Email: [email protected].
For all technical queries email our Technical Department: [email protected]
(All dimensions in mm)
Diagram 2. Right hand clip stop and pulley assembly
Centre Line of doors
5mm
Left hand door Right hand door
5mm
Clip stop end bolt removed and replaced with extended
bolt, spacer and pulley assembly
Diagram 1. Left hand clip stop and pulley assembly
Diagram 4. Cable anchored to right hand door, tensioning
and adjustment bolt.
Clip stop end bolt removed and replaced with
extended bolt, spacer and pulley assembly
Track
Fixed loop
Right hand door
bracket
Thimble
insert
Lock nut
Adjuster nut
Door thickness
Spring
Cable clamp
Cable
Adjuster bolt
Cable
Diagram 5.
Diagram 3. Cable anchored to left hand door
Cable collar
Left hand door Right hand door
Left hand door
bracket Grub
screws
Cable
Elevation view of system

Other Henderson Door Opening System manuals

Henderson Evolve Glass SIM Kit User manual

Henderson

Henderson Evolve Glass SIM Kit User manual

Henderson HUSKY 100 User manual

Henderson

Henderson HUSKY 100 User manual

Henderson HUSKY 50 User manual

Henderson

Henderson HUSKY 50 User manual

Henderson SIM100 User manual

Henderson

Henderson SIM100 User manual

Henderson Easyclose User manual

Henderson

Henderson Easyclose User manual

Henderson HUSKY Folding 25 Series User manual

Henderson

Henderson HUSKY Folding 25 Series User manual

Henderson MARATHON FDK1 User manual

Henderson

Henderson MARATHON FDK1 User manual

Henderson Bifold User manual

Henderson

Henderson Bifold User manual

Henderson ZENITH User manual

Henderson

Henderson ZENITH User manual

Henderson EVOLVE POCKET DOOR PRO Series User manual

Henderson

Henderson EVOLVE POCKET DOOR PRO Series User manual

Henderson SIROCCO User manual

Henderson

Henderson SIROCCO User manual

Popular Door Opening System manuals by other brands

Record 102-020.110.805 Maintenance and troubleshooting

Record

Record 102-020.110.805 Maintenance and troubleshooting

CRL H100E10 Instruction of Assembly

CRL

CRL H100E10 Instruction of Assembly

GEZE ECturn Wiring diagram

GEZE

GEZE ECturn Wiring diagram

cinetto PS60 Easy Assembly instructions

cinetto

cinetto PS60 Easy Assembly instructions

LCN 4840 installation instructions

LCN

LCN 4840 installation instructions

D+H VRS 10 Original instructions

D+H

D+H VRS 10 Original instructions

RUSTICA Heavy-Duty Bypass Track System installation instructions

RUSTICA

RUSTICA Heavy-Duty Bypass Track System installation instructions

SUGATSUNE Lapcon SDS-C301N-BLK installation guide

SUGATSUNE

SUGATSUNE Lapcon SDS-C301N-BLK installation guide

MFZ Control CS 320 operating instructions

MFZ

MFZ Control CS 320 operating instructions

LCN 4050 Series installation instructions

LCN

LCN 4050 Series installation instructions

Keller LD350 Field assembly  instructions

Keller

Keller LD350 Field assembly instructions

GATEXPERT GK-E Series user manual

GATEXPERT

GATEXPERT GK-E Series user manual

Mantion SLID'UP 2500 Instructions for assembly

Mantion

Mantion SLID'UP 2500 Instructions for assembly

RollSeal RS-500M Installation and operation manual

RollSeal

RollSeal RS-500M Installation and operation manual

Aritech ACA 001 Mounting instructions

Aritech

Aritech ACA 001 Mounting instructions

Taymor 8500VF Series installation instructions

Taymor

Taymor 8500VF Series installation instructions

ABH 2100 quick start guide

ABH

ABH 2100 quick start guide

SECO-LARM SD-C101-SGQ Installation template

SECO-LARM

SECO-LARM SD-C101-SGQ Installation template

manuals.online logo
manuals.online logoBrands
  • About & Mission
  • Contact us
  • Privacy Policy
  • Terms and Conditions

Copyright 2025 Manuals.Online. All Rights Reserved.