Nabco GT-1400 User manual

1 of 26
GT1400 Standard Single/Hurricane Single
Folding Door Installaon Manual
P/N C-00177 Rev 6-14-21
Nabco Entrances Inc. S82 W18717 Gemini Drive Muskego, Wisconsin 53150
Phone: (877) 622-2694 Fax: (888) 679-3319 www.nabcoentrances.com
NABCO hours of Operaon: Monday to Friday 8:00 a.m.- 4:30 p.m. (Central Time)
Associated Manuals Part Numbers: Opus Control Wiring and Programming Manual; P/N C-00139
GT Folding Door Owners Manual; P/N C-00111
NABCO Price Book” for Sensors, Switches, and Accessories; P/N 16-9244-30
• Turn OFF all power to the Automatic Door if a Safety System is not working.
• Instruct the Owner to keep all power turned OFF until corrective action can be achieved
by a NABCO trained technician. Failure to follow these practices may result in serious
consequences.
• NEVER leave a Door operating without all Safety detection systems operational.
WARNING
Table of Contents
3
3
3
Secon 3.1 To the Installer ................................................................3
Secon 3.2 Objecve .....................................................................4
Secon 4.1 Type of Fold Door ..............................................................4
Secon 4.2 Folding Door Conguraon ......................................................4
Secon 4.4 Emergency Egress ..............................................................4
Secon 4.5 Folding Door Standard Components ...............................................5
Secon 4.6 Parts of the Header ............................................................5
6
Secon 5.1 Prepare the Header ............................................................6
Secon 5.2 Secure Jamb Tubes to Rough Opening .............................................6
Secon 5.3 Secure Header to Rough Opening .................................................7
8
9
9
Secon 8.1 How to Determine Handing ......................................................9
Secon 8.2 The Handing Harness ...........................................................9
9
Secon 9.1 Install the (Floor Poron) of Boom Pivot ..........................................9
Secon 9.2 Install the Boom Pivot (Door Poron) ...........................................10
Secon 9.3 Secure Spindle Drive Bar to Folding Door ..........................................10
Secon 9.4 Secure Folding Door to Frame ...................................................11
Secon 9.5 Secure Guide Channel to Folding Door ............................................11

2 of 26
GT1400 Standard Single/Hurricane Single Folding Door Installaon Manual www.NabcoEntrances.com
P/N C-00177 Rev 6-14-21

3 of 26
www.NabcoEntrances.com GT1400StandardSingle/HurricaneSingleFoldingDoorInstallaonManual
Rev 6-14-21 P/N C-00177
Warning labels are universal and used to alert an individual of potenal harm to one’s self or to others. The following warning labels
are listed in a hierarchy order that denes the most potenal danger rst, and the least potenal danger last. Please refer to this
page in the event that a warning label is displayed within this manual and further denion needs to be explained.
high
Note: Indicates important informaon that provides further instrucon.
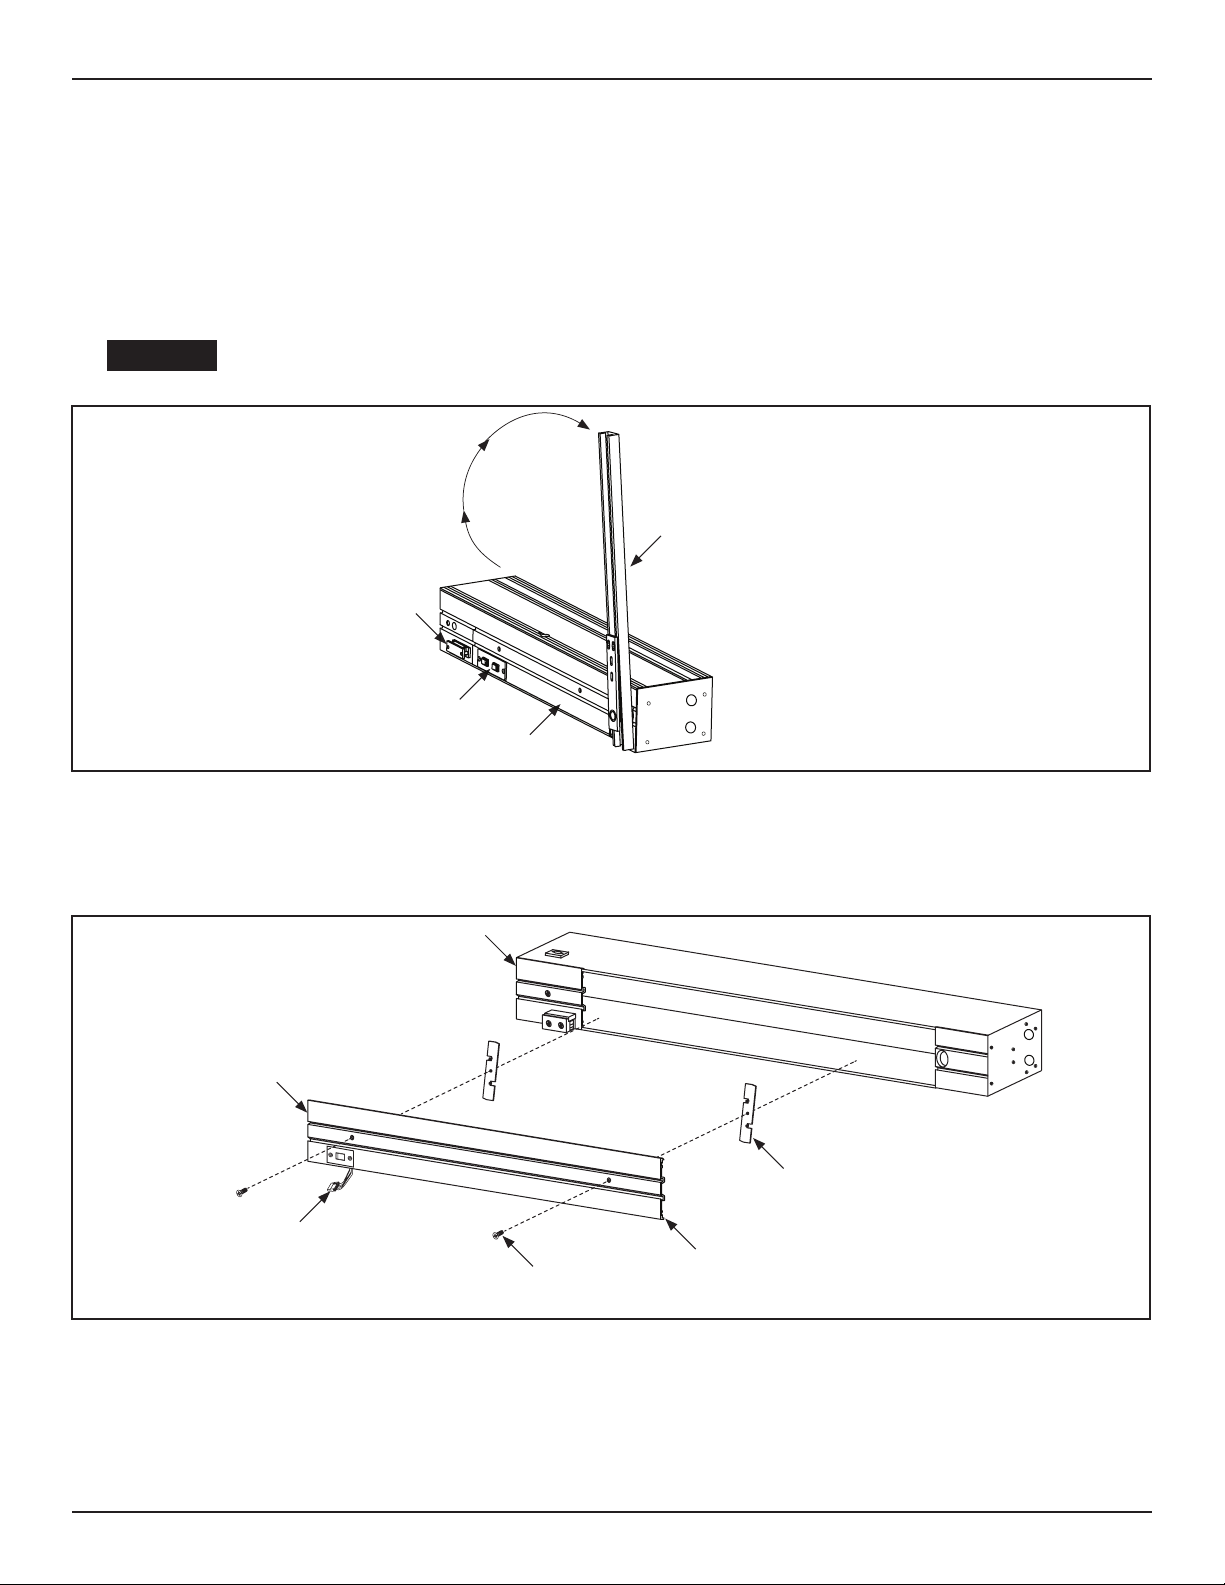
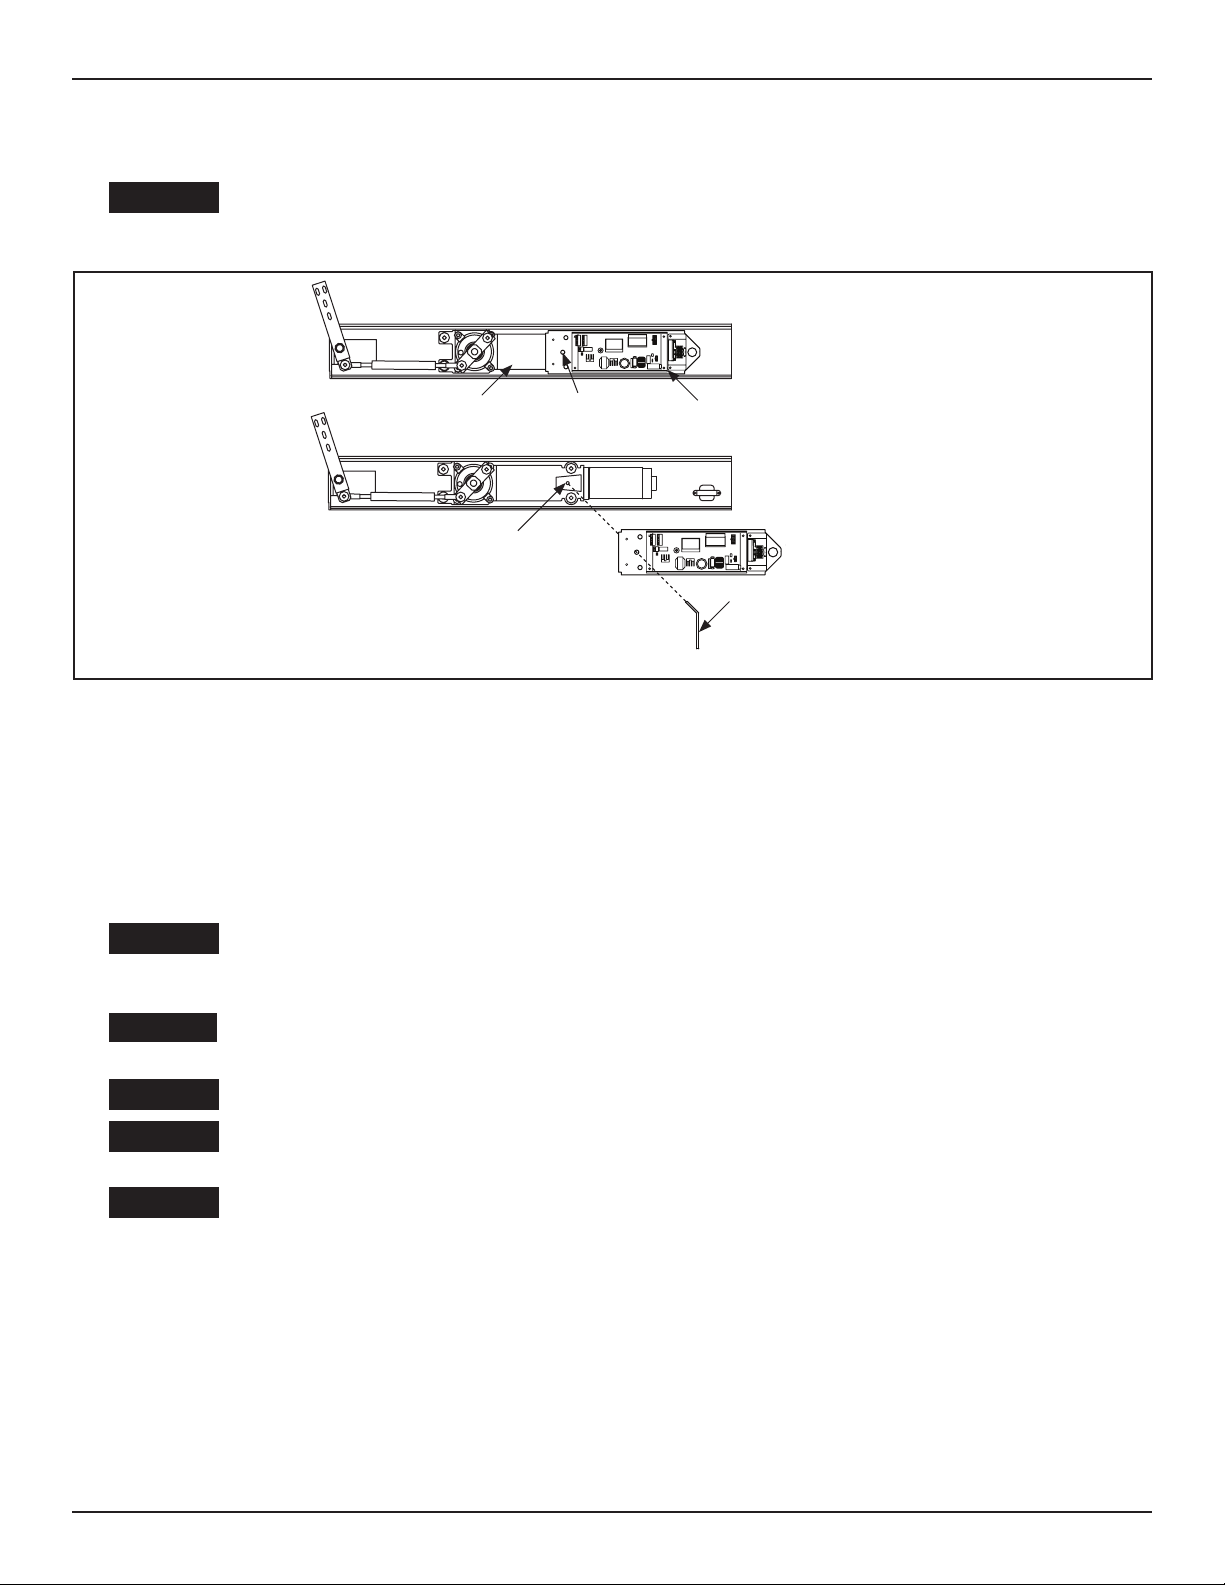
The purpose of this manual is to familiarize the installer and purchaser with the proper installaon and operaon of this system.
It is essenal that this equipment be properly installed and operaonal before the door is used by the public. It is the installer’s
responsibility to inspect the operaon of the entrance system to be sure it complies with any applicable standards. In the United
States ANSI Standard A156.10 covers the GT-1400 Fold Door System. Also in the United States all installed glass must meet ANSI
Standard Z97.1.
All automac equipment complies with UL325 and CAN/CSA -C22.2 No 247-92. Other local standards or codes may apply. Use them
in addion to the ANSI standard. The GT-1400 is listed with the Underwriters Laboratory and is idened as such on the label.
DANGER
WARNING
CAUTION
WARNINGWARNINGWARNING
WARNINGWARNING
CAUTION
CAUTION

4 of 26
GT1400 Standard Single/Hurricane Single Folding Door Installaon Manual www.NabcoEntrances.com
P/N C-00177 Rev 6-14-21
Instruct the building owners and operator on the essenals of the operaon of the door and this device. The owner should follow
these instrucons to determine whether the door is operang properly and should immediately call for service if there is any
malfuncon. All installaon changes and adjustments must be made by qualied, NABCO trained technicians.
Note: As an Opon, the GT-1400 Fold door can be cered to have a “Hurricane High Impact Compliant Version” manufactured
to meet the High Velosity Hurricane Zone (HVHZ) requirements of the Florida building codes.
The GT-1400 Fold Door is designed to be installed within a Rough Opening of a Building. The door funcon is controlled by the Opus
Control that oers many features to accommodate most installaon opons. This manual oers step by step instrucons.
XStandard Fold Door XHurricane Fold Door
XInstalled within Rough Opening of Building X Fold Door folds to the right or le
XBoom Load Header XDoor Panels always fold toward the direcon of breakout.
DN 2407 RH Single Fold
LH Single Fold
FS FX
FX FS
FX = Slide panel with breakout capabilies.
FS = Swing Panel with breakout capabilies.
Figure 1
DN 2408
FS FX
Le Hand
Right Hand
FX FS
Le Hand
Right Hand
CAUTION
Figure 1

5 of 26
www.NabcoEntrances.com GT1400StandardSingle/HurricaneSingleFoldingDoorInstallaonManual
Rev 6-14-21 P/N C-00177
DN 2409 Example Shown: RH Single Fold
Header
Top Rail
Slide Panel Swing Panel
Boom Rail
Flush Bolt Assembly
Munn
Pivot Sle
Door Hinge
Jamb Tube
Floor Pivot
Thumbturn Lock
Non-Foldout side
Keyed Lock
Strike Sle
Sensors
Floor Track
Opon
Sensor on
Non-Foldout side
Figure 2
DN 2411
1
23456
7
8
9
10
2
5-1/2”
7-1/2”
11
Example Shown: RH Single Fold Header
Fold Side
12
11
11

6 of 26
GT1400 Standard Single/Hurricane Single Folding Door Installaon Manual www.NabcoEntrances.com
P/N C-00177 Rev 6-14-21
1. Go to the non-breakout side of opening. Place Header so the Magnec Latch is on the oor and the boom is facing the
breakout side of opening.
2. Go to the Guide Channel. Swing out the Guide Channel 90 degrees away from the Magnec Latch.
a. Connue to manually hold the Guide Channel when taking o the Dress Plate and Lock Plates.
Do not let go of the Guide Channel, it will spring back to its original location and can result in
personal injury or damage.
Figure 3
DN 0987
Guide Channel
Swing
Out 90
Magne c Latch
Dress Plate
Rocker Switch
3. Remove screws used to secure the Dress Plate.
4. Carefully lower the Dress Plate unl the Rocker Switch wiring is exposed. Disconnect the Switch from the switch harness.
Remove the Dress Plate and Lock Plates.
5. Manually return the Guide Channel to its original posion, so that it bus up against the Magnec Latch.
Figure 4
DN 0988
#10-24x3/4”
Screw
Lock Plate
Dress Plate
(w/Rocker Switch)
Bo om of Header
Rocker Switch
Harness
Dress Plate
ON
HOLD-OPEN
OFF OFF
1. Posion Jamb tubes on either side of Header so the Weathering faces up, and the open end at the boom of each Jamb
Tube is facing the breakout side of opening.
2. Secure Jambs Tubes to Header with 1/4 inch Star Washers and 1/4-20 x 3/4 inch Bolts, provided by NABCO.
DANGER

7 of 26
www.NabcoEntrances.com GT1400StandardSingle/HurricaneSingleFoldingDoorInstallaonManual
Rev 6-14-21 P/N C-00177
Figure 5
DN 0989
Magne c Latch
Bo om of Jamb Tube
(towards Exterior opening)
EXTERIOR
Door Opening
Weathering must face up
(towards Exterior opening)
3. Li to posion the assembled Frame into the rough opening.
4. Plumb Jamb tubes in both planes to ensure the rough opening allows a 1/4 inch clearance. Shim back of Jamb as required.
5. Plumb the Header at the top to ensure the rough opening allows a 1/4 inch clearance. Shim top of Header as required.
6. Secure Jamb Tubes to Rough Opening accordingly.
XStandard Fold Door
• Use 1/4 inch diameter anchors with a minimum of 3 per Jamb tube, maximum is 48 inches on center. Drill 1/4 inch
diameter holes in the face of Jamb and then countersink each hole. Secure with appropriate Fasteners.
XHurricane Fold Door
• Screw in anchors to secure the Frame (per manufacturer’s cercaon document(s).
Verify that each Motor is connected to the Opus Control before inserting Pin or 1/8” Allen
Wrench into Coupling Access Hole via the Access Hole on the Opus Control. Failure to do so
will allow the Fold Doors to slam shut without motor braking in the event the Pin or 1/8” Allen
Wrench falls out.
Do not let go of the Guide Channel if a Pin or 1/8” Allen Wrench has not been inserted into the
Coupling Access Hole, it will spring back to its original location and can result in personal
injury or damage.
1. Ensure the Motor is connected to the Opus Control.
2. Swing the Guide Channel out and away from the Magnec Latch. It will be necessary to manually hold the Guide Channel in
the 90 degree posion unl the Pin or 1/8 inch Allen Wrench is inserted into the Coupling Access Hole.
Figure 6
DN 0990
Guide Channel
(open towards Exterior) Swing Out
90
EXTERIOR
1/4" Anchor
3. Locate the access hole in the Opus Control mounng bracket which leads to the Coupling Access Hole in the Operator. Insert
a Pin or 1/8 inch Allen Wrench into both Access Holes.
DANGER
DANGER

8 of 26
GT1400 Standard Single/Hurricane Single Folding Door Installaon Manual www.NabcoEntrances.com
P/N C-00177 Rev 6-14-21
4. Insert a Pin or 1/8 inch Allen Wrench into both Access Holes.
Do not allow the Pin or 1/8 inch Allen Wrench to drop out of the Access Hole at any time
during installation. The Guide Channel will spring back to its original location and can result in
personal injury or damage.
Figure 7
Operator
Insert Pin or Allen Wrench
Lovejoy Access
Coupling Hole
Access Hole
DN 0991
Opus Control Assembly
1413121110
98
7654321
1413121110
98
7654321
5. With the Guide Channel locked into the 90 degree open posion, secure Header to the rough opening:
XStandard Fold Door
• Use 1/4 inch diameter anchors with a maximum 48 inches on center. First anchor maximum is 36 inches from each
end of the Header. Secure with appropriate Fasteners.
XHurricane Fold Door
• Screw in anchors to secure the Frame (per manufacturer’s cercaon document(s).
Shut the installation site, branch Circuit Breaker OFF. Failure to do so may result in serious
personal or fatal injury. When uncertain whether power supply is disconnected, always verify
using a voltmeter.
All high voltage electrical connections must be made by licensed electricians according to
National and Local electrical codes/regulations.
Permanent wiring shall be employed as required by local codes.
Keep all Incoming 120 VAC wiring separate from low voltage wiring within Header. 120 VAC
Power wires must be routed (separate from other wiring) located near the top of inside Header.
Ensure that the Grounding of the Electric Power Supply is installed/connected in a proper way
(especially the PE Cable from the Building Side).
Note: It is recommended for the Installer to house all Incoming 120 VAC wires within an Electrical Conduit.
DANGER
DANGERDANGER
WARNING
CAUTION
CAUTION
CAUTION

9 of 26
www.NabcoEntrances.com GT1400StandardSingle/HurricaneSingleFoldingDoorInstallaonManual
Rev 6-14-21 P/N C-00177
1413121110
98
7654321
21
Hot
Ground
DN 1593 Green
Neutral
Black
SINGLE FOLDING DOOR
White
Motor
On/Off
Power Switch
WhiteWhite
Black Black Black
Ground Screw
120 VAC
Green
OPUS CONTROL
MOUNTING BRACKET
Cable Clamp/Conduit
7/8" Holes
Cable Clamp/Conduit
7/8" Hole
Transformer
(Op onal)
The easiest way to determine Handing is to parally open the folding door, and then stand in the threshold area with your back facing
the hinge side of the door frame. If the fold door fully OPENS to the LEFT it is a le hand door. If the fold door fully OPENS to the
RIGHT it is a right hand door.
DN 2056 Le Hand
INTERIOR
EXTERIOR
Right Hand
INTERIOR
EXTERIOR
Figure 8
Note: The Handing Harness is used for Right Handed Units only. Le Handed Units do not use a Handing Harness.
1. Obtain the Handing Harness.
2. Connect the (Break Module Harness) Female Pin to the Male Pin Housing (Handing Harness).
3. Connect the (Break Module Harness) Male Pin Housing to the Female Pin (Handing Harness).
DN 1345
MOTOR
OPUS CONTROL
BREAK MODULE
HARNESS
MOTOR HARNESS
HANDING
HARNESS
MOTOR CONNECTOR
141312
1110
9
8
7
6
54
32
1
21
12
21
12
21
1. Obtain the Boom Pivot Parts Box provided by NABCO. (2) 1/4 - 20 round head screws provided by the Pivot Manufacturer
are not required.
2. Insert the Boom Pivot into the Notch located at the boom of Jamb tube. Secure with (1) 1/4-20 x 7/8 inch screw.

10 of 26
GT1400 Standard Single/Hurricane Single Folding Door Installaon Manual www.NabcoEntrances.com
P/N C-00177 Rev 6-14-21
Figure 9
DN 0835
1/4-20 x 7/8”
Flat Head Screw
Pivot Jamb Tube
3. Using the Boom Pivot as a template, drill down through (2) screw holes with a 1/4 inch Masonry drill bit at least 1-1/2
inches into the oor.
4. Insert (1) 1-1/2 inch Anchor into each drilled hole.
5. With the open end poinng to Jamb Tube, align screw holes with the Boom Pivot (The Pivot Plate can be adjusted by
sliding it in either direcon).
6. Secure the Pivot Base Bracket to the Boom Pivot with (2) #14 x 1-1/2 inch Phillips Head Screw.
7. Screw the Pivot Bearing onto the Thread Post.
Figure 10
DN 0836
#16 Blue Anchor #14 x 1-1/2” Phillips
Pan Head Screw
Boom Pivot
Floor
Pivot Base Bracket
Pivot Bearing
Thread Post
1. Lay the Folding Door onto a at surface. Go to the Boom Rail. Locate (2) pre-drilled holes inside Web.
2. Insert the Boom Pivot (Door Poron) onto the Spacer. Align screw holes to the Web. Secure the Boom Pivot Assembly to
the Boom Rail with:
X(2) 1/4 - 20 x 1-1/4” Hex Screws when Spacers are used.
X(2) Phillips Head Screws (packed in Part Bag 14-102345) when Spacers are not used.
Figure 11
DN 0330
1/4” Star Washer
Spacer for Bo om Pivot
Web
1/4-20 x 1-1/4” Hex Screw
Use Hex Screws when Spacers are necessary
Pivot S le
Bo om Pivot
Use Phillips Head Screws packed in Parts Bag
14-10235 only when Spacers are not necessary
Note: The Drive Bar is installed to the Channel Guide at the NABCO Factory for shipping purposes only and must be removed
from the Channel Guide before the Folding Door can be installed.
1. Ensure the Pin or 1/8 inch Allen Wrench is sll inserted into the Coupling Access Hole.
2. Go to the Spindle Drive Bar. Remove the Hex Bolt and Nut.
3. Release the Spindle Drive Bar from the Guide Channel. The Spindle Drive Bar can be pushed up toward the Header or down
into the Top Web of the Folding door, but will remain at a 90 degree angle.
4. The Guide Channel can now freely swing closed or open. Swing the Guide Channel up against the Magnec Latch.

11 of 26
www.NabcoEntrances.com GT1400StandardSingle/HurricaneSingleFoldingDoorInstallaonManual
Rev 6-14-21 P/N C-00177
Figure 12
DN 0844
Nut
Guide Channel
Spindle Drive Bar
Bolt
Spindle Drive Bar - 90 Out
(Lowered down from Header)
Guide Channel
90
1. With the Folding Door sll on a at surface, go to the Pivot End of the Top Web.
2. Remove (4) 1/4-20 x 3/4 inch Hex Head Screws and (4) 1/4 inch Star Washers from Riv-nuts located inside the Web.
Figure 13
DN 0845
1/4” Star Washer
1/4-20 x 2”
Phillips Head Screw
Web
3. Li the Folding Door from the at surface. Keep Door Panels loosely folded.
4. Tilt the Folding Door to slide the Spindle Drive Bar into the Pivot end of Top Web. The Spindle Drive Bar can be pushed up
toward the Header to allow clearance.
5. Upright the Folding Door to slide the Boom Pivot onto the Pivot Bearing located inside the Boom Rail.
6. Go back to the Top Web. Lower the Spindle Drive Bar unl it bus up against the Web.
7. Secure the Spindle Drive Bar to the Web with (4) 1/4-20 x 3/4 inch Hex Head Screws and (4) 1/4 inch Star Washers that were
saved for reinstallaon.
a. Do not ghten down bolts at this me. Bolts need to be loose enough to allow the Folding Door to be adjusted.
Figure 14
DN 0992
Spindle
Drive Bar
Pivot Bearing
1/4” Star Washer
1/4-20 x 3/4”
Phillips Head Screw
1. Manually hold open the Folding door while removing the Pin or 1/8 inch Allen Wrench from the Coupling Access Hole.
2. Swing out, and then li the Guide Channel so it is directly on top of the Guide Roller located inside the Top Web at the Strike
end. Drop the Guide Channel onto the Guide Roller. Allow the Folding door to close without slamming closed.

12 of 26
GT1400 Standard Single/Hurricane Single Folding Door Installaon Manual www.NabcoEntrances.com
P/N C-00177 Rev 6-14-21
Figure 15
DN 0851
Guide Channel
Guide Roller
3. Adjust Door Panels so the gaps around the Top, Boom, and Sides are parallel to the Jamb Tubes, Header, and Threshold.
a. Adjustments can be done using the Top Pivot Bracket and Boom Pivot Bearing.
4. Tighten down the (4) 1/4-20 x 3/4 inch Hex Head screws and (4) 1/4 inch Star Washers.
Figure 16
DN 0993
SINGLE FOLD DOOR
Gap
Gap
5. Push on the Bar located in the middle of Bi-Fold Panels to manually fold open the Door.
6. Go to the Spindle Drive Bar located inside the Top Web, at the Pivot end.
7. Obtain (1) Split Plasc Bushing that was provided by NABCO.
8. Push the Split Plasc Bushing around the Spindle between the Guide Channel and Spindle Drive Bar.
Figure 17
DN 0850
Split Plasc Bushing
Spindle
Guide Channel
Spindle Drive Bar

13 of 26
www.NabcoEntrances.com GT1400StandardSingle/HurricaneSingleFoldingDoorInstallaonManual
Rev 6-14-21 P/N C-00177
Note: Each Push Rod has been pre-installed at the NABCO Factory to ensure the Folding door will fully close under normal
operaon. However, aer installaon, adjustments may be necessary.
1. Go to the Push Rod that needs to be adjusted. Loosen both Hex Locknuts.
a. One Hex Locknut has le hand threads, the other Hex Locknut has right hand threads.
2. Turn the Push Rod clockwise or counterclockwise to lengthen or shorten the Push Rod unl the Folding Door can fully close
with both door panels at.
a. One end of each Push Rod has le-hand threads; the other end has right hand threads.
3. Re-ghten both Hex Locknuts. Do not overghten.
Figure 18
DN 0994 Rod End Hex Locknuts
1413121110
98
7654321
Note: Weathering Extrusions are pre-installed with brush at the NABCO. Weathering Extrusions are bent at the NABCO Factory to
t the shape of the Door Hinge.
1. Go to the Outside boom of the door. Posion the Weathering Extrusion so the bent poron lays on top of the Door Hinge.
2. Secure the weathering brush to Folding door panels with #6 x 1/2 inch self tapping, color matched screws.
Figure 19
DN 0855
#6x1/2” Self Tapping,
Color-Coordinated screws
Weathering
Extrusion
Door Hinge
Weathering
Brush
Note: Cross-Blocking helps direct glass weight away from the strike edge of the door, to prevent sagging and possibly dragging
on the oor or threshold.
Note: Place Seng Blocks in the designated marked spots, only.
1. Ensure the Base Glass Stop (Preinstalled at the NABCO Factory) is free of debris and/or sharp objects.
2. Go to the STRIKE side of panel at the TOP.
1. Measure (6) inches across from the Strike End of Top Rail, towards the Pivot Sle. Mark that spot.
2. Measure (6) inches down from the Strike End of Top Rail towards the Boom Rail. Mark that spot.
CAUTION

14 of 26
GT1400 Standard Single/Hurricane Single Folding Door Installaon Manual www.NabcoEntrances.com
P/N C-00177 Rev 6-14-21
3. Go to the PIVOT side of panel at the BOTTOM.
1. Measure (6) inches across from the Pivot End of Boom Rail, towards the Strike Sle. Mark that spot.
2. Measure (6) inches up from the Pivot End of Boom Rail, towards the Top Rail. Mark that spot.
4. For each marked spot, place (1) Seng Block (not provided by NABCO) on top of the Base Glass Stops.
5. Place the Glass Panel up against the Vinyl and sits on top of the Seng Blocks.
6. Shi the Glass Panel unl it is square.
7. Secure the Glass Panel with Snap-In Glass Stops (Provided by Nabco).
DN 1699
Glass Panel
6”
6”
6”
6”
Top Rail
Boom Rail
Pivot Sle
Strike Sle
Seng Block
Top Seng Block
Seng Block
Base Glass Stop
M-60255
M-70255
Snap-In
Glass Stop
M-60338
M-70338
Glass Panel
Example Shown:
1/2” Tall, 1/4” Glass
1/2”
Vinyl
M-00339
Figure 20

15 of 26
www.NabcoEntrances.com GT1400StandardSingle/HurricaneSingleFoldingDoorInstallaonManual
Rev 6-14-21 P/N C-00177
1A-01089 1FLOOR PIVOT,CENTER HUNG,MACHINED Connect Floor Pivot Assembly to boom of Swing Door
2A-01047 1Adjust height of the Center Hung Floor Pivot unl it is ush to bot-
tom of Swing Door
3T-00459 2PHSMS,14x1.500L.,PHIL,ZINC,AB Secure Floor Pivot Assembly to Floor
4T-00124 1“FHMS,1/4-20x0.875L.,PHIL,ZINC” Secure Pivot Base Bracket to Pivot Jamb Tube
5T-00314 2SCREW ANCHOR, #16 X 1” LG Secure Floor Pivot Assembly to Floor
6M-01115 1BRACKET,PIVOT BASE Secure Floor Pivot Assembly to Pivot Jamb Tube
7T-00330 2HHCS 1/4-20x1.25 L. Secure Center Hung Floor Pivot to Boom of Swing Door only if a
Pivot Spacer is used
Floor Pivot Assembly
DN 1359
1
2
3
45
6
7
1
2
3
4
5
6
7

16 of 26
GT1400 Standard Single/Hurricane Single Folding Door Installaon Manual www.NabcoEntrances.com
P/N C-00177 Rev 6-14-21
1M-01736 BRACKET,BIFOLD,OPUS
2V-00552 Used on Opus Control FUSE;5A;GMA;5X20mm
3V-00288 Used on Brake Module FUSE,3 AMP,250V,FAST,2AG,AXIAL LEAD
4T-00078 PHMS,10-32x0.625L.,PHIL,ZINC
5M-01072 HARNESS,POWER,MAGNUM/OPUS
6T-00282 22 inch WIRE,18 AWG,600V,UL 1015,GREEN
7M-01182 HARNESS,POWER,ROCKER SWITCH
8T-00362 TERMINAL,RING,1/4”,RED
9T-00419 NUT,HEX,1/4-20,KEPS,ZINC
10 A-01003 MODULE,BRAKE,OPUS
11 M-01546 CONTROLLER,OPUS
DN 1592
A-01135 with Switch; A-00136 without Switch
123
4
5
6
7
8
9
10
11
1
2
3
4
5
6
7
8
9
10
11

17 of 26
www.NabcoEntrances.com GT1400StandardSingle/HurricaneSingleFoldingDoorInstallaonManual
Rev 6-14-21 P/N C-00177
DN 0997
Viewed from Non-Break Out Side
*Sold as an Opon
1
2
3*
4
5
6
7
8
9
10
11
12
13
14
15
16
17
18
19
20
21
22
6
23
24

18 of 26
GT1400 Standard Single/Hurricane Single Folding Door Installaon Manual www.NabcoEntrances.com
P/N C-00177 Rev 6-14-21
1M-01220 RH OPERATOR,MOUNT,WELDMENT,RH BI-FOLD
M-01219 LH OPERATOR,MOUNT,BIFOLD,LH
2T-00126 “HHCS,5/16-240.625L.,ZINC”
3A-01185 Sold as an Opon XFMR;24V;40A;W-MTG.BKT.& HDW.
4A-01290 LH OPER,SWGR,W/ENCOD,ROF,LH,NO CLUTCH,BFOLD
A-01291 RH OPER,SWGR,W/ENCOD,ROF,RH,NO CLUTCH,BFOLD
5A-00620 GROUND WIRE:SWING OPERATOR:MAGNUM
6T-00185 SHCS,10-24x0.500L.,BK.OX.
7A-00824 RH “OPERATOR,SWGR,W/ENCODER, RH CLUTCHLESS”
A-00823 LH “OPERATOR,SWGR,W/ENCODER, LH CLUTCHLESS”
8T-00232 SHCS,10-24x0.875L.,ZINC
9A-01053 “OPER. SWINGER,W/O MTR.,NO CLUTCH,RH;ROF
10 V-00090 MOTOR,SHORT FRAME,ENCODER,DUOWEI
11 T-00092 WASHER,.438 ID,1.00 OD,.083 THK,ZINC
12 T-00067 NUT,HEX,JAM,3/8-16,ZINC
13 M-01159 RING, STOP - HOLD DOWN
14 T-00334 FHMS:5/16-18x0.750L.:SOKT:ZN
15 M-01475 LIMIT STOP:C.U.
16 A-00489 STOP,RING ASSY
17 A-01135 With Switch CONTROLLER,BI-FOLD,W/ SWITCH,OPUS
A-01136 Without Switch CONTROLLER,BI-FOLD,W/O SWITCH,OPUS
18 T-00025 NUT,WHIZLOCK,3/8-16,ZINC
19 T-00231 WASHER, LOCK, SPLIT, #10 ID, ZINC
20 A-00806 HARNESS,SWITCH,BIFOLD,OPUS
21 A-01000 HARNESS,MOTOR,OPUS
22 A-01001 HARNESS,HANDING,OPUS
23 T-00309 NUT,HEX,5/16-24,WHIZLOCK
24 C-00067 NAMEPLATE,NABCO LOGO
1
2
3
4
5
6
7
8
9
10
11
12
13
14
15
16
17
18
19
20
21
22
23
24

19 of 26
www.NabcoEntrances.com GT1400StandardSingle/HurricaneSingleFoldingDoorInstallaonManual
Rev 6-14-21 P/N C-00177
DN 0998
Viewed from Non-Break Out Side
1
2
3
4
5
6
7
8
9
10
11
12
14
15
16
17
18
19 20
21 22
23
2
1
3
2
1
5
13
8
24
25 26
27
28
29

20 of 26
GT1400 Standard Single/Hurricane Single Folding Door Installaon Manual www.NabcoEntrances.com
P/N C-00177 Rev 6-14-21
1T-00064 HHCS,1/4-20x0.750L.,ZINC
2T-00087 WASHER, LOCK, EXT, 1/4 ID, ZINC
3A-60739 Clear “END CAP,HEADER,BIFOLD,204”
A-70739 Dark Bronze “END CAP,HEADER,BIFOLD,313”
4M-01335 ARM, BELL CRANK, BI-FOLD SPINDLE
5T-00126 “HHCS,5/16-240.625L.,ZINC”
6V-00328 “BEARING,RADIAL,15MM IDX32MM ODX9MM”
7A-00629 GUIDE:UPPER SPINDLE:BIFOLD
8T-00408 “HHCS,3/8-24x1.500L.,ZINC”
9A-01161 PUSH ROD;SINGLE FOLD
10 M-00450 SPACER,MTG.END CAP
11 T-00074 NUT,HEX,NYLOCK,3/8-24,ZINC
12 M-01177 LOCK COVER PLATE - BOTTOM
13 A-00758 SWITCHBREAKOUT
14 T-00391 “FHMS,10-24x0.750L.,PHIL,ZINC”
15 T-00031 Black Zinc FHMS,10-32x0.500L.,PHIL,UCUT,T-LOBE,BKZN
T-00184 Zinc FHMS,10-32x0.500L.,PHIL,UCUT,TRI-LOBE,ZN
16 A-00728 “MAGNETIC LATCH,RETROFIT KIT”
17 T-00368 PHMS:10-24x1.250L.:PHIL
18 A-01048 SWITCH,ROCKER,BIFOLD,OPUS
19 M-00499 WEATHERING:PILE:.27W X .25H:W/ ADH & FIN
20 V-00188 BEARING SLEEVE,1.181ODx.984IDx
21 M-01518 LATCH BLOCK
22 T-00241 FHMS,10-24x0.500L.,PHIL,ZINC
23 M-01208 ARM,BELL CRANK,OPERATOR
24 M-00282 FLEXIBLE MAGNETIC STRIP
25 V-00214 RH ROD END,THREAD RH
26 T-00264 NUT,HEX, 3/8-24
27 T-00384 WASHER:EXT:3/8ID :ZINC
28 M-01338 PUSH ROD,SINGLE FOLD
29 V-00216 LH ROD END,THREAD LH
1
2
3
4
5
6
7
8
9
10
11
12
13
14
15
16
17
18
19
20
21
22
23
24
25
26
27
28
29
Other manuals for GT-1400
1
This manual suits for next models
1
Table of contents
Other Nabco Door Opening System manuals

Nabco
Nabco GT20 Owner's manual

Nabco
Nabco C-00139 User manual

Nabco
Nabco GT20 8300 User manual

Nabco
Nabco GYRO TECH GT-1175 User manual

Nabco
Nabco ICU 2400 User manual

Nabco
Nabco 710 User manual

Nabco
Nabco 243681-05 User manual

Nabco
Nabco GYRO TECH GT-1175 User manual

Nabco
Nabco GT20 Owner's manual

Nabco
Nabco GYRO TECH GT-1175 Owner's manual