Hirose HIF Series User manual

HIFシリーズ
リボンケーブル結線作業方法説明書
HIF SERIES
RIBBON CABLE CONNECTION INSTRUCTION MANUAL
安全に使用していただくために使用前に、必ずこの取扱説明書をお読みください。
また、いつでもすぐに読めるように、この取扱説明書を保管してください。
CAUTION :
Be sure to read this Instruction Manual carefully before using it to secure safety in operation.
In addition, save this Instruction Manual so that it is available whenever necessary for review.
ヒロセ電機株式会社
HIROSE ELECTRIC CO., LTD.
注意
Feb.1.2023Copyright2023HIROSEELECTRICCO.,LTD.AllRightsReserved.

はじめに
この度は、HIF シリーズ リボンケーブル結線工具をご購入戴き誠に有難うございます。
本書は、HIF コネクタへリボンケーブルを結線する手順および工具の取扱説明書です。
ご使用前に必ず本書をよくお読みいただき十分ご理解の上、正しくご使用くださいますようお願い致します。
PREFACE
Thank you very much for your purchase of our HIF Series Ribbon Cable Connection Tool.
This Manual describes the procedure for connecting ribbon cables to the HIF connectors and the details of the tool.
Be sure to read this Instruction Manual carefully before using it to secure safety in operation.
Feb.1.2023Copyright2023HIROSEELECTRICCO.,LTD.AllRightsReserved.

i
安全にご使用していただくために
本工具を実際にご使用されるオペレータの方および、保守、修理等をされる保全の方は、以
下の安全についての注意事項 を熟読されて、怪我などされないようにご使用ください。
なお、本取扱説明書および、警告表示の内容を十分に理解し、指示を守ってください。
(I)警告表示の説明
※損害の程度の分類は、以下を参考とする。
重傷:失明、けが、やけど(高温・低温)、感電、骨折、中毒などで、後遺症が残るもの
および治療に入院・長期の通院を要するものを言う。
傷害: 治療に入院や長期の通院を要さない、けが、やけど、感電などを指す。
物的損害: 家屋・家財および家畜・ペットにかかわる拡大損害を指す。
安全についての注意事項
注意
基本的注意事項
1.ご使用される前に本取扱説明書および、付属に入っている全ての説明書類を必ずお読みくださ
い。また、いつでもすぐに読めるように、この取扱説明書を大切に保存してください。
安全装置
1.本工具には、安全カバー等の安全装置は取り付いていません。結線作業に際しては、ハンドル
部に指等挟まないよう安全に十分配慮してご使用ください。
用途
1.この工具は、本来の用途および本取扱説明書に規定された使用方法以外には使用しないでくだ
い。用途以外の使用に対しては、当社は責任を負いません。
2.工具には、改造等を加えないでください。改造によって起きた事故に対しては、当社は責任を
負いません。
保守
1.不慣れによる事故を防ぐため、修理、調整は工具を熟知した保全技術者が本取扱説明書の指示
範囲で行ってください。不適切な修理・調整および非純正部品による事故に対しては、当社は
責任を負いません。
2.人身事故を防ぐため、修理調整・部品交換等の作業後は、ねじ・ナット等が緩んでいないこと
を確認してください。
3.工具の使用期間中は、定期的に清掃を行ってください。
4.事故を防ぐため、修理・調整した結果、正常に動かない場合は直ちに操作を中止し、当社に連
絡し、修理依頼してください。
取り扱いを誤った場合に、使用者が死亡または重傷を負う危険が切迫
して生じることが想定される場合。
取り扱いを誤った場合に、使用者が死亡または重傷を負う可能性が想
定される場合。
取り扱いを誤った場合に、使用者が傷害を負う危険が想定される場合
および物的損害のみの発生が想定される場合。
危険
警告
注意
Feb.1.2023Copyright2023HIROSEELECTRICCO.,LTD.AllRightsReserved.

ii
FOR SAFE OPERATION
The operators of the tool and the maintenance personnel who are in charge of maintenance and repair work are required to read
the following SAFETY INSTRUCTIONS .
Fully understand and follow the descriptions given in this Instruction Manual and the warning symbols attached to the tool.
(I) Description of warning messages
* Determine the degree of impairment referring to the below-stated classification.
Major injury : Loss of eyesight, wounds, burns (hyperthermal and hypothermal burns), electric shocks, fracture of a bone,
poisoning, etc. requiring emergency treatment or extended medical care.
Injury (Minor injury) : Wounds, burns, electric shocks, etc. requiring medical treatment.
Damage to property : Damage to the machinery and or the surrounding area.
SAFETY INSTRUCTIONS
Basic safety instructions
1. Be sure to read understand and follow all the instructions and other materials supplied with the unit as before using the
tool. Save this Instruction Manual and make it available for review whenever necessary.
Safe operation
1. Such safety devices as the safety cover and the like are not attached to this tool. When performing connection, use this
tool while fully considering so that the fingers or the like are not caught in the handle section.
Application
1. This tool shall only be used for its originally intended purpose while following the instructions specified in this
Instruction Manual. Hirose assumes no responsibility for any misuse of the tool other than the intended use.
2. Modifications to this tool is prohibited. We assume no responsibility for accidents resulting from modifications.
Maintenance
1. To prevent possible accidents caused by unfamiliarity with the operation of the tool, repair and adjustment of the tool
shall be conducted only by maintenance personnel who have a full knowledge of the tool. Any repair and adjustment
beyond the range covered by the instructions given in this Instruction Manual is prohibited. We assume no
responsibility for accidents caused by improper repair or adjustment or the use of non-genuine part(s).
2. To protect against personal injury, check to be sure that screws and nuts are properly tightened after the completion of
repair/adjustment works or replacement of the parts.
3. Periodically cleaning of the tool is recommended.
4. In the event that your tool fails to perform normally after repair or adjusting immediately stop the work and contact us
for service so as to protect against personal injury.
Misuse of the tool will expose the operator to immediate danger of major injury or
death.
WARNING
Misuse of the tool may expose the operator to danger of major injury or death.
Misuse of the tool may expose the operator to danger of injury and may cause
damage to property.
CAUTION
DANGER
CAUTION
Feb.1.2023Copyright2023HIROSEELECTRICCO.,LTD.AllRightsReserved.

目次
1.HIF シリーズ結線治具及び適合治具一覧表..........................................................1
2.Hi‑Flex 結線プレス各部の名称 ..............................................................................3
3.適合治具取付方法およびラチェット調整方法 .....................................................4
4.ケーブルの切断割増および切断上の注意 .............................................................7
5.HIF2 結線方法(I.C タイプ、ディップタイプ)....................................................8
6.HIF3(ソケットタイプ)結線方法......................................................................11
7.結線完了後の製品取扱注意.................................................................................14
8.接続回路図............................................................................................................15
CONTENTS
1. Listing of the HIF Series connection jigs and applicable jigs...................................2
2. Configuration of the Hi-Flex connection press .........................................................3
3. Procedures for mounting an applicable jig and for adjusting the ratchet ..............4
4. Cutting allowance of cables and cautions to be taken when cutting them...............7
5. Procedure for connecting the HIF2 (IC type and DIP type) ....................................8
6. Procedure for connecting the HIF3 (socket type)....................................................11
7. Cautions to be taken when handling the product after the completion of connection......14
8. Connection circuit diagram ...................................................................................15
Feb.1.2023Copyright2023HIROSEELECTRICCO.,LTD.AllRightsReserved.

-1-
1.HIF シリーズ結線治具及び適合治具一覧表
表‑1
圧接(結線)プレス ガイドプレート 加圧ブロック
種別 製品番号 HRSNo. 製品番号 HRSNo.
製品番号 HRSNo.
製品番号
HIF2B‑1OD‑2.54R(A.SA.B.SB) 550‑0137‑2
HIF2BM‑GPA
550‑0138‑5
HIF2BM‑10PB
HIF2B‑2OD‑2.54R(A.SA.B.SB) 550‑0139‑8
HIF2BM‑20PB
HIF2B‑26D‑2.54R(A.SA.B.SB) 550‑0140‑7
HIF2BM‑26PB
HIF2B‑3OD‑2.54R(A.SA.B.SB) 550‑0141‑0
HlF2BM‑34PB
HIF2B‑34D‑2.54R(A.SA.B.SB) 550‑0142‑2
HIF2BM‑40PB
HIF2B‑4OD‑2.54R(A.SA.B.SB) 550‑0143‑5
HIF2BM‑50PB
HIF2B‑5OD‑2.54R(A.SA.B.SB) 550‑0144‑8
HlF2BM‑60PB
デ
ィ
ッ
プ
タ
イ
プ
HIF2B‑6OD‑2.54R(A.SA.B.SB)
550‑0145‑0
HIF2BM‑30PB
HIF2B‑14‑2.54R(A.SA.B.SB) 550‑0084‑8
HIF2B‑GPB14‑IC(専用加圧ブロックが含まれます)
HIF2B‑16‑2.54R(A.SA.B.SB) 550‑0085‑0
HIF2B‑GPB16‑IC(専用加圧ブロックが含まれます)
HIF2B‑24‑2.54R(A.SA.B.SB) 550‑0087‑6
HIF2B‑GPB24‑IC(専用加圧ブロックが含まれます)
H
I
F
2
B
シ
リ
I
ズ
I
C
タ
イ
プ
HIF2B‑40‑2.54R(A.SA.B.SB) 550‑0080‑7
HlF2B‑GPB40‑IC(専用加圧ブロックが含まれます)
HIF2C‑1ODT‑1.27R(S) 550‑0104‑3
HIF2C‑10PB
HIF2C‑16DT‑1.27R(S) 550‑0105‑6
HIF2C‑16PB
HIF2C‑2ODT‑1.27R(S) 550‑0106‑9
HIF2C‑20PB
HIF2C‑26DT‑1.27R(S) 550‑0107‑1
HIF2C‑26PB
HIF2C‑3ODT‑1.27R(S) 550‑0108‑4
HIF2C‑30PB
HIF2C‑34DT‑1.27R(S) 550‑0109‑7
HIF2C‑34PB
HIF2C‑40DT‑1.27R(S) 550‑0110‑6
HIF2C‑40PB
HIF2C‑5ODT‑1.27R(S) 550‑0111‑9
HIF2C‑50PB
H
I
F
2
シ
リ
I
ズ
H
I
F
2
C
シ
リ
I
ズ
HIF2C‑6ODT‑1.27R(S)
550‑0103‑0
HIF2C‑GPA
(全極数共用)
550‑0112‑1
HIF2C‑60PB
極数
シリーズ
6
10
14
16
20
26
30
34
40
50
60
64
HIF3
−
○
−
○
○
○
○
○
○
○
○
−
HIF3A
−
○
○
○
○
○
○
○
○
○
○
−
HIF3B
○
○
○
○
○
○
○
○
○
○
○
○
HIF3BA
○
○
○
○
○
○
○
○
○
○
○
○
HIF3BB
−
−
−
−
−
−
−
−
−
○
○
○
HIF3J
−
○
○
○
○
○
○
○
○
○
○
−
ソ
ケ
ッ
ト
タ
イ
プ
HIF3N
−
○
○
○
○
○
○
○
○
○
○
−
550‑0156‑7
HIF3‑GPA2
HIF3*シリーズ
(*A.B.BA.BB.
J.N)
全極数共用
550‑0133‑1
HIF1 加圧ブロック
加圧ブロックA‑01
(全極数共用)
HIF3‑6PD‑2.54R 550‑0153‑9
HIF3‑GPD6(専用加圧ブロックが含まれます)
HIF3‑10PD‑2.54R 550‑0071‑6
HIF3‑GPD10(専用加圧ブロックが含まれます)
HIF3‑16PD‑2.54R 550‑0072‑9
HIF3‑GPD16(専用加圧ブロックが含まれます)
HIF3‑20PD‑2.54R 550‑0073‑1
HIF3‑GPD20(専用加圧ブロックが含まれます)
HIF3‑26PD‑2.54R 550‑0074‑4
HIF3‑GPD26(専用加圧ブロックが含まれます)
HIF3‑30PD‑2.54R 550‑0075‑7
HIF3‑GPD30(専用加圧ブロックが含まれます)
HIF3‑34PD‑2.54R 550‑0076‑0
HIF3‑GPD34(専用加圧ブロックが含まれます)
HIF3‑40PD‑2.54R 550‑0077‑2
HIF3‑GPD40(専用加圧ブロックが含まれます)
HIF3‑50PD‑2.54R 550‑0078‑5
HIF3‑GPD50(専用加圧ブロックが含まれます)
H
I
F
3
シ
リ
I
ズ
プ
ラ
グ
タ
イ
プ HIF3‑60PD‑2.54R 550‑0079‑8
HIF3‑GPD60(専用加圧ブロックが含まれます)
HIF4
シリーズ
HIF4‑*D‑3.18R
(*極数:16,20,26,34,40) 550‑0061‑2
HIF4‑GPA
(全極数共用)
550‑0133‑1
加圧ブロックA‑
01
(全極数共用)
HIF5B‑*D‑2.54R
HIF5C‑*D‑2.54R
HIF5D‑*D‑2.54R
HIF5E‑*D‑2.54R
HIF5F‑*D‑2.54R
HIF5
シリーズ
HIF5G‑*D‑2.54R
550‑0135‑7
HIF5BG‑GPA
550‑0133‑1
加圧ブロックA‑
01
(全極数共用)
HIF5(A)‑20D‑2.54R 550‑0070‑3
HIF5.5A‑GP20
HIF5(A)‑26D‑2.54R 550‑0067‑9
HIF5.5A‑GP26
HIF5(A)‑34D‑2.54R 550‑0054‑7
HIF5.5A‑GP34
HIF5(A)‑40D‑2.54R 550‑0068‑1
HIF5.5A‑GP50
HIF5(A)‑50D‑2.54R 550‑0065‑3
HIF5.5A‑GP50
H
I
F
5
シ
リ
I
ズ
HIF5・5A
シリーズ
HIF5(A)‑60D‑2.54R 550‑0069‑4
HIF5.5A‑GP60
550‑0133‑1
加圧ブロックA‑
01
(全極数共用)
HIF6
シリーズ
HIF6‑*D‑2.54R
(極数:20,26,34,40,50) 550‑0099‑5
HIF6‑GPA
(全極数共用)
550‑0133‑1
加圧ブロックA‑
01
(全極数共用)
HIF1 シリーズ
ディスク
リード
ワイヤー
ハーネス
HIF3 シリーズ
550‑0082‑2
HIFLEX 結線プレス
HHP502
(全シリーズ,全極数
共用)
550‑0060‑0
HIF1.3‑GPT
(HIF1,HIF3)
全極数共用
550‑0133‑1
加圧ブロックA‑
01
(全極数共用)
●ガイドプレートおよび加圧ブロックは、当社以外のコネクタの結線には使用出来ません。
●当社の結線プレスおよび適合治具以外の結線プレスその他を使用した場合のコネクタ結線品質は保証いたしかねます。
●ガイドプレートと加圧ブロックは別売です。
●IC タイプは専用で従来と同じです。
●本説明書はグレー部のみを対象としております。
Feb.1.2023Copyright2023HIROSEELECTRICCO.,LTD.AllRightsReserved.

-2-
1. Listing of the HIF Series connection jigs and applicable jigs
Table 1.
Insulation displacement (connection) press
Guide plate Pressure block
Type Product No. HRSNo. Product No. HRSNo. Product No. HRSNo. Product No.
HIF2B-1OD-2.54R(A.SA.B.SB)550-0137-2 HIF2BM-GPA 550-0138-5 HIF2BM-10PB
HIF2B-2OD-2.54R(A.SA.B.SB)550-0139-8 HIF2BM-20PB
HIF2B-26D-2.54R(A.SA.B.SB)550-0140-7 HIF2BM-26PB
HIF2B-3OD-2.54R(A.SA.B.SB)550-0141-0 HlF2BM-34PB
HIF2B-34D-2.54R(A.SA.B.SB)550-0142-2 HIF2BM-40PB
HIF2B-4OD-2.54R(A.SA.B.SB)550-0143-5 HIF2BM-50PB
HIF2B-5OD-2.54R(A.SA.B.SB)550-0144-8 HlF2BM-60PB
DIP type
HIF2B-6OD-2.54R(A.SA.B.SB)
550-0145-0 HIF2BM-30PB
HIF2B-14-2.54R(A.SA.B.SB)550-0084-8 HIF2B-GPB14-IC (exclusive pressure block is included)
HIF2B-16-2.54R(A.SA.B.SB)550-0085-0 HIF2B-GPB16-IC (exclusive pressure block is included)
HIF2B-24-2.54R(A.SA.B.SB)550-0087-6 HIF2B-GPB24-IC (exclusive pressure block is included)
HIF2B Series
IC type
HIF2B-40-2.54R(A.SA.B.SB)550-0080-7 HlF2B-GPB40-IC (exclusive pressure block is included)
HIF2C-1ODT-1.27R(S)550-0104-3 HIF2C-10PB
HIF2C-16DT-1.27R(S)550-0105-6 HIF2C-16PB
HIF2C-2ODT-1.27R(S)550-0106-9 HIF2C-20PB
HIF2C-26DT-1.27R(S)550-0107-1 HIF2C-26PB
HIF2C-3ODT-1.27R(S)550-0108-4 HIF2C-30PB
HIF2C-34DT-1.27R(S)550-0109-7 HIF2C-34PB
HIF2C-40DT-1.27R(S)550-0110-6 HIF2C-40PB
HIF2C-5ODT-1.27R(S)550-0111-9 HIF2C-50PB
HIF2 Series
HIF2C Series
HIF2C-6ODT-1.27R(S)
550-0103-0 HIF2C-GPA
(common to all
numbers of poles)
550-0112-1 HIF2C-60PB
Number of poles
Series
6
10
14
16
20
26
30
34
40
50
60
64
HIF3 −
○
−
○
○
○
○
○
○
○
○
−
HIF3A
−
○
○
○
○
○
○
○
○
○
○
−
HIF3B
○
○
○
○
○
○
○
○
○
○
○
○
HIF3BA
○
○
○
○
○
○
○
○
○
○
○
○
HIF3BB
−
−
−
−
−
−
−
−
−
○
○
○
HIF3J −
○
○
○
○
○
○
○
○
○
○
−
Socket type
HIF3N
−
○
○
○
○
○
○
○
○
○
○
−
550-0156-7
HIF3-GPA2
HIF3*Series
(*A. B. BA. BB.
J. N)
common to all
numbers of poles
550-0133-1
HIF1 Pressure block
Pressure block A-01
(common to all
numbers of poles)
HIF3-6PD-2.54R 550-0153-9 HIF3-GPD6 (exclusive pressure block is included)
HIF3-10PD-2.54R 550-0071-6 HIF3-GPD10 (exclusive pressure block is included)
HIF3-16PD-2.54R 550-0072-9 HIF3-GPD16 (exclusive pressure block is included)
HIF3-20PD-2.54R 550-0073-1 HIF3-GPD20 (exclusive pressure block is included)
HIF3-26PD-2.54R 550-0074-4 HIF3-GPD26 (exclusive pressure block is included)
HIF3-30PD-2.54R 550-0075-7 HIF3-GPD30 (exclusive pressure block is included)
HIF3-34PD-2.54R 550-0076-0 HIF3-GPD34 (exclusive pressure block is included)
HIF3-40PD-2.54R 550-0077-2 HIF3-GPD40 (exclusive pressure block is included)
HIF3-50PD-2.54R 550-0078-5 HIF3-GPD50 (exclusive pressure block is included)
HIF3 Series
Plug type
HIF3-60PD-2.54R 550-0079-8 HIF3-GPD60 (exclusive pressure block is included)
HIF4 Series
HIF4-*D-3.18R
(*Number of poles:16, 20, 26, 34, 40)550-0061-2 HIF4-GPA
(common to all
numbers of poles)
550-0133-1 Pressure block A-01
(common to all
numbers of poles)
HIF5B-*D-2.54R
HIF5C-*D-2.54R
HIF5D-*D-2.54R
HIF5E-*D-2.54R
HIF5F-*D-2.54R
HIF5 Series
HIF5G-*D-2.54R
550-0135-7 HIF5BG-GPA 550-0133-1 Pressure block A-01
(common to all
numbers of poles)
HIF5(A)-20D-2.54R 550-0070-3 HIF5.5A-GP20
HIF5(A)-26D-2.54R 550-0067-9 HIF5.5A-GP26
HIF5(A)-34D-2.54R 550-0054-7 HIF5.5A-GP34
HIF5(A)-40D-2.54R 550-0068-1 HIF5.5A-GP50
HIF5(A)-50D-2.54R 550-0065-3 HIF5.5A-GP50
HIF5 Series
HIF5・5A
Series
HIF5(A)-60D-2.54R 550-0069-4 HIF5.5A-GP60
550-0133-1 Pressure block A-01
(common to all
numbers of poles)
HIF6 Series
HIF6-*D-2.54R
(Number of poles:20, 26, 34, 40, 50)550-0099-5 HIF6-GPA
(common to all
numbers of poles)
550-0133-1 Pressure block A-01
(common to all
numbers of poles)
HIF1 Series
Disk
lead
wire
harness
HIF3 Series
550-0082-2
HIFLEX Connection
Press
HHP502
(common to all
models and all
numbers of poles)
550-0060-0
HIF1.3-GPT
(HIF1, HIF3)
(common to all
numbers of poles)
550-0133-1 Pressure block A-01
(common to all
numbers of poles)
●The guide plates and pressure blocks are only applicable for connecting the HIROSE connectors.
●HIROSE does not guarantee the connection quality of connectors if any of tools including connection presses other than those
available from HIROSE is used.
●The guide plates and pressure blocks are separately available.
●IC type connectors are exclusive as the conventional ones.
●This Manual only covers the types listed in the shaded columns.
Feb.1.2023Copyright2023HIROSEELECTRICCO.,LTD.AllRightsReserved.

-3-
2.Hi‑Flex 結線プレス各部の名称/Configuration of the Hi-Flex connection press
2‑1.結線プレス/Connection press
この結線プレスは Hi‑Flex シリーズコネクタ全機種の結線作業にご使用できます。
The connection press is applicable for connecting all types of the Hi-Flex Series connectors.
2‑2.適合治具/Applicable jigs
表‑1 適合治具一覧表を参照の上、各シリーズと極数に合わせた指定加圧ブロックとガイドプレートを準備して下さい。
A pressure block and guide plate specified according to the type of Series and the number of poles of your connector should be
prepared referring to the Listing of the HIF Series connection jigs and applicable jigs in Table 1.
ガイドプレートおよび加圧ブロックは、当社製品以外のコネクタには使用できません。また、当社結線プレスおよび
適合治具以外の結線プレスその他を使用した場合の結線完成品は、保証致しかねますのでご注意下さい。
The guide plates and pressure blocks are only applicable for connecting the HIROSE connectors.
Be sure to remember that HIROSE does not guarantee the connection quality of connectors if any of tools including connection
presses other than those available from HIROSE is used.
HRS No. Product number Height Width Depth Weight
550-0082-2 Hi-Flex Connection press
440mm 160mm 350mm
13kg
HRSNo. 製品番号 高さ 幅 奥ゆき 重畳
550‑0082‑2
Hi‑Flex結線プレス
440mm
160mm
350mm
13kg
A
B
C
D
ガイドプレート/Guide plate
各部の名称/Name of parts
A. 加圧ブロックの取付け部/Pressure-block mounting section
B. ガイドプレート取付け部/Guide-plate mounting section
C. ラチェット部/Ratchet section
D. ハンドル部/Handle section
加圧ブロック/Pressure block
Feb.1.2023Copyright2023HIROSEELECTRICCO.,LTD.AllRightsReserved.

-4-
3.適合治具取付方法およびラチェット調整方法/
Procedures for mounting an applicable jig and for adjusting the ratchet
3‑1.加圧ブロック取付け/Mounting the pressure block
2)次に M5 六角レンチ(本休プレス附属品)をロ
ックナット穴部(D)に差し込み、ブロックホ
ルダーに表示(刻印)されている L 方向にまわ
して加圧ブロックを締めつけて下さい。
(図 3‑2 参照)
2) Insert the M5 hexagonal wrench key (supplied with
the main body of press as an accessory) into the hole
(D) and turn it in direction L indicated (by
inscription) on the block holder to secure the
pressure block.
(See Fig. 3.2.)
1)取り付ける場所は図 3‑1 を参照して下さい。加
圧ブロック取付部のブロックホルダー凹部(A)
に加圧ブロックの凸部(B)をはめこんで下さ
い。但し、HIF2 の場合は加圧ブロック(C)の
品名表示(刻印白色)を手前に向けて下さい。
1) Refer to Fig. 3-1 for the location at which the
pressure block is to be mounted. Fit the projected
part (B) of the pressure block into the recessed part
(A) of the block holder at the pressure-block
mounting section. For the HIF2, however, the side on
which the product name is shown (inscribed product
name is in white) of the pressure block (C) should be
faced toward you
加圧ブロックホルダー凹部(A)
Recessed part (A) of pressure
block holder
加圧ブロックホルダー
Pressure block holder
加圧ブロック凸部(B)
Projected part (B) of
pressure block
加圧ブロック(C)
Pressure block (C)
ロックナット
Locknut
図 3‑2/Fig. 3-2
図 3‑1/Fig. 3-1
加圧ブロック
Pressure block ブロックホルダー
Block holder
ロックナット穴部(D)
Hole (D) in locknut
M5 六角レンチ
M5 Hexagon wrench key
ロックナット
Locknut
Feb.1.2023Copyright2023HIROSEELECTRICCO.,LTD.AllRightsReserved.
-5-
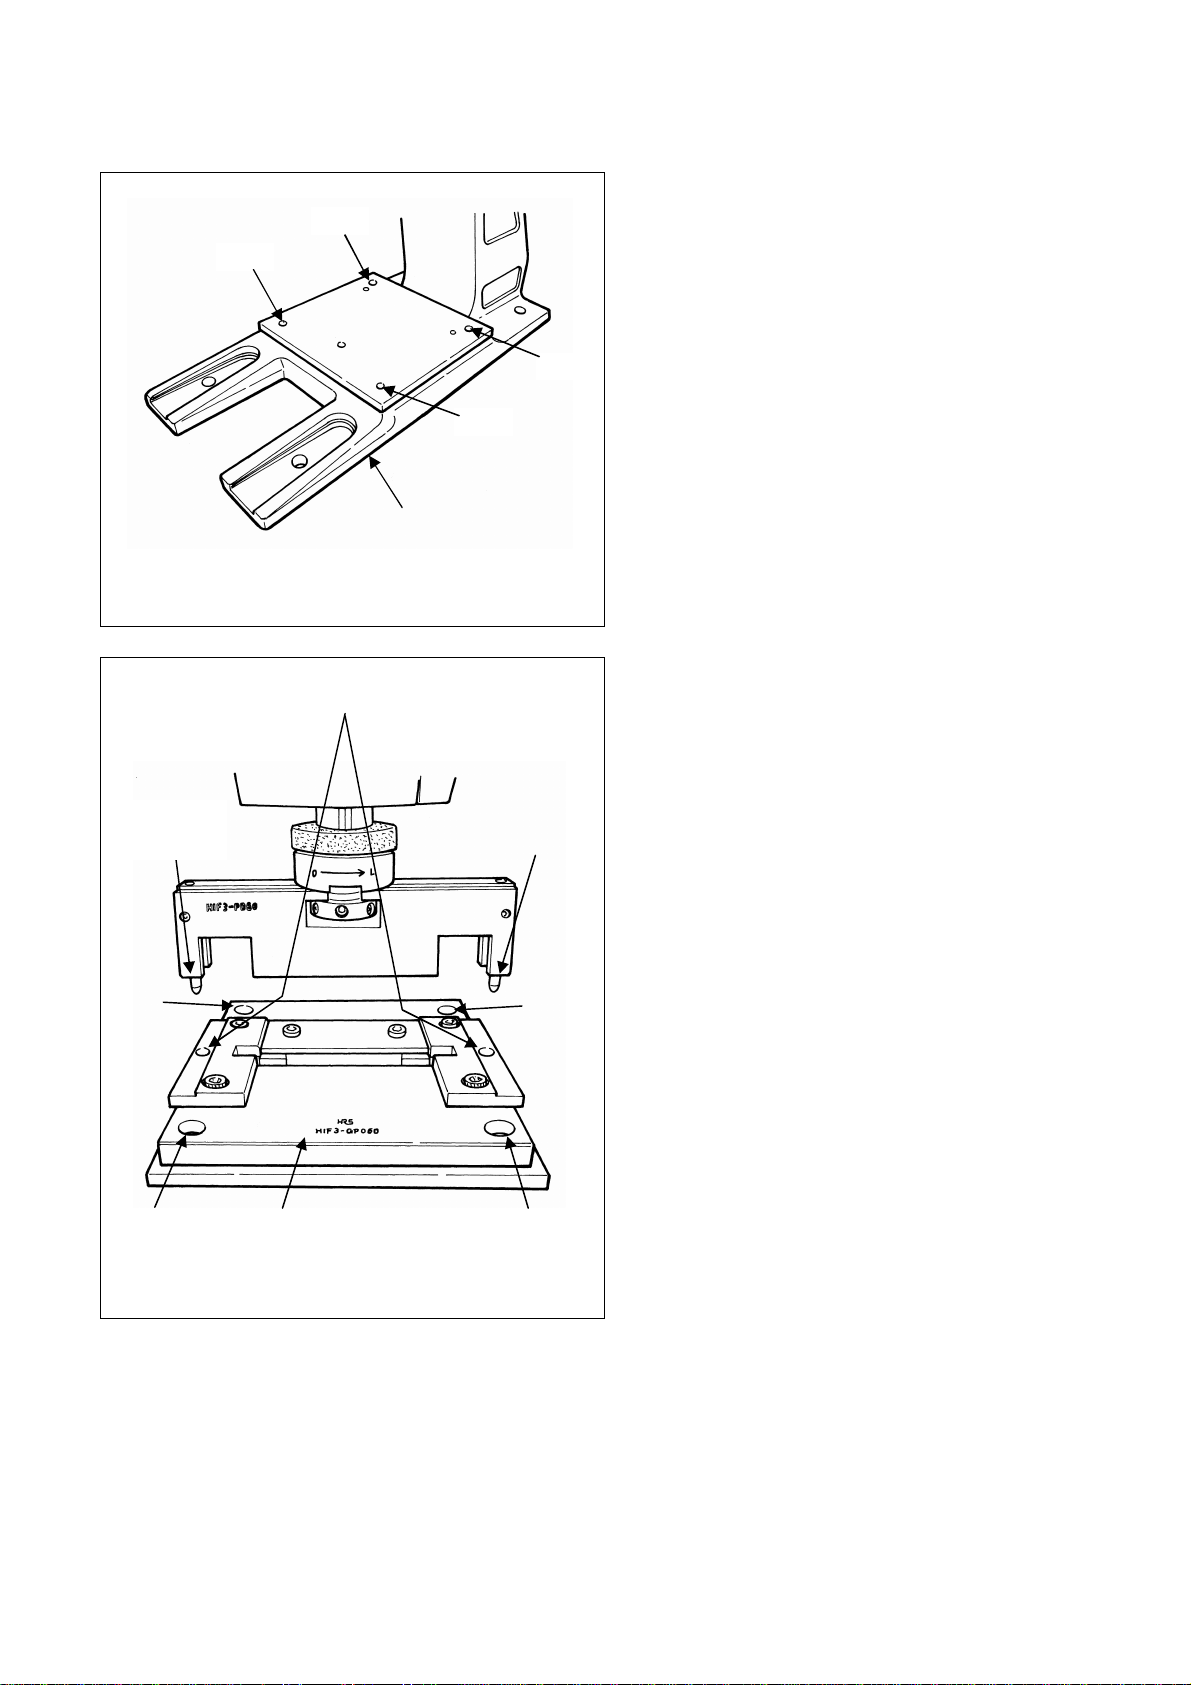
3‑2.ガイドプレートの取付け/Mounting the guide plate
1)結線プレスのガイドプレート取付部の(図 3‑3
参照)(A)(B)(C)(D)の取付穴にガイドプ
レートの(図 3‑4 参照)(a)(b)(c)(d)
の取付穴を合せて下さい。
1) Align (a), (b), (c) and (d) of the guide plate (see Fig.
3-4) with the mounting holes (A), (B), (C) and (D) of
the guide-plate mounting section of the connection
press (see Fig. 3-3).
2)次に附属の M5 六角穴付ボルトを(a)―(c)、
(b)―(d)と対角に差し込み、M5 六角レン
チで締めて固定して下さい。(図 3‑4 参照)
HIF2はあらかじめ加圧ブロックのガイドピンが
ガイドプレートのガイドピン合せ穴に入るよう
にプレスハンドルを下げ、ハンドルを軽く押した
ままボルトを締めて下さい。
2) Insert the M5 hexagon socket head bolts (supplied
accessories) diagonally as (a)-(c) and (b)-(d) and
secure them with the M5 hexagonal wrench key.
(See Fig. 3-4).
For the HIF2, lower the press handle so that the guide
pins of the pressure block fit in the guide-pin guide
holes in the guide plate in advance, then tighten the
bolts, while keeping the handle lightly depressed.
図 3‑3/Fig. 3-3
土台
Base
図 3‑4/Fig. 3-4
ガイドピン
Guide pin
(c)
(d)
(a)
(b)
ガイドピン
Guide pin
ガイドピン合せ穴
Guide-pin guide hole
(D)
(C)
(B)
(A)
ガイドプレート
Guide plate
Feb.1.2023Copyright2023HIROSEELECTRICCO.,LTD.AllRightsReserved.
-6-
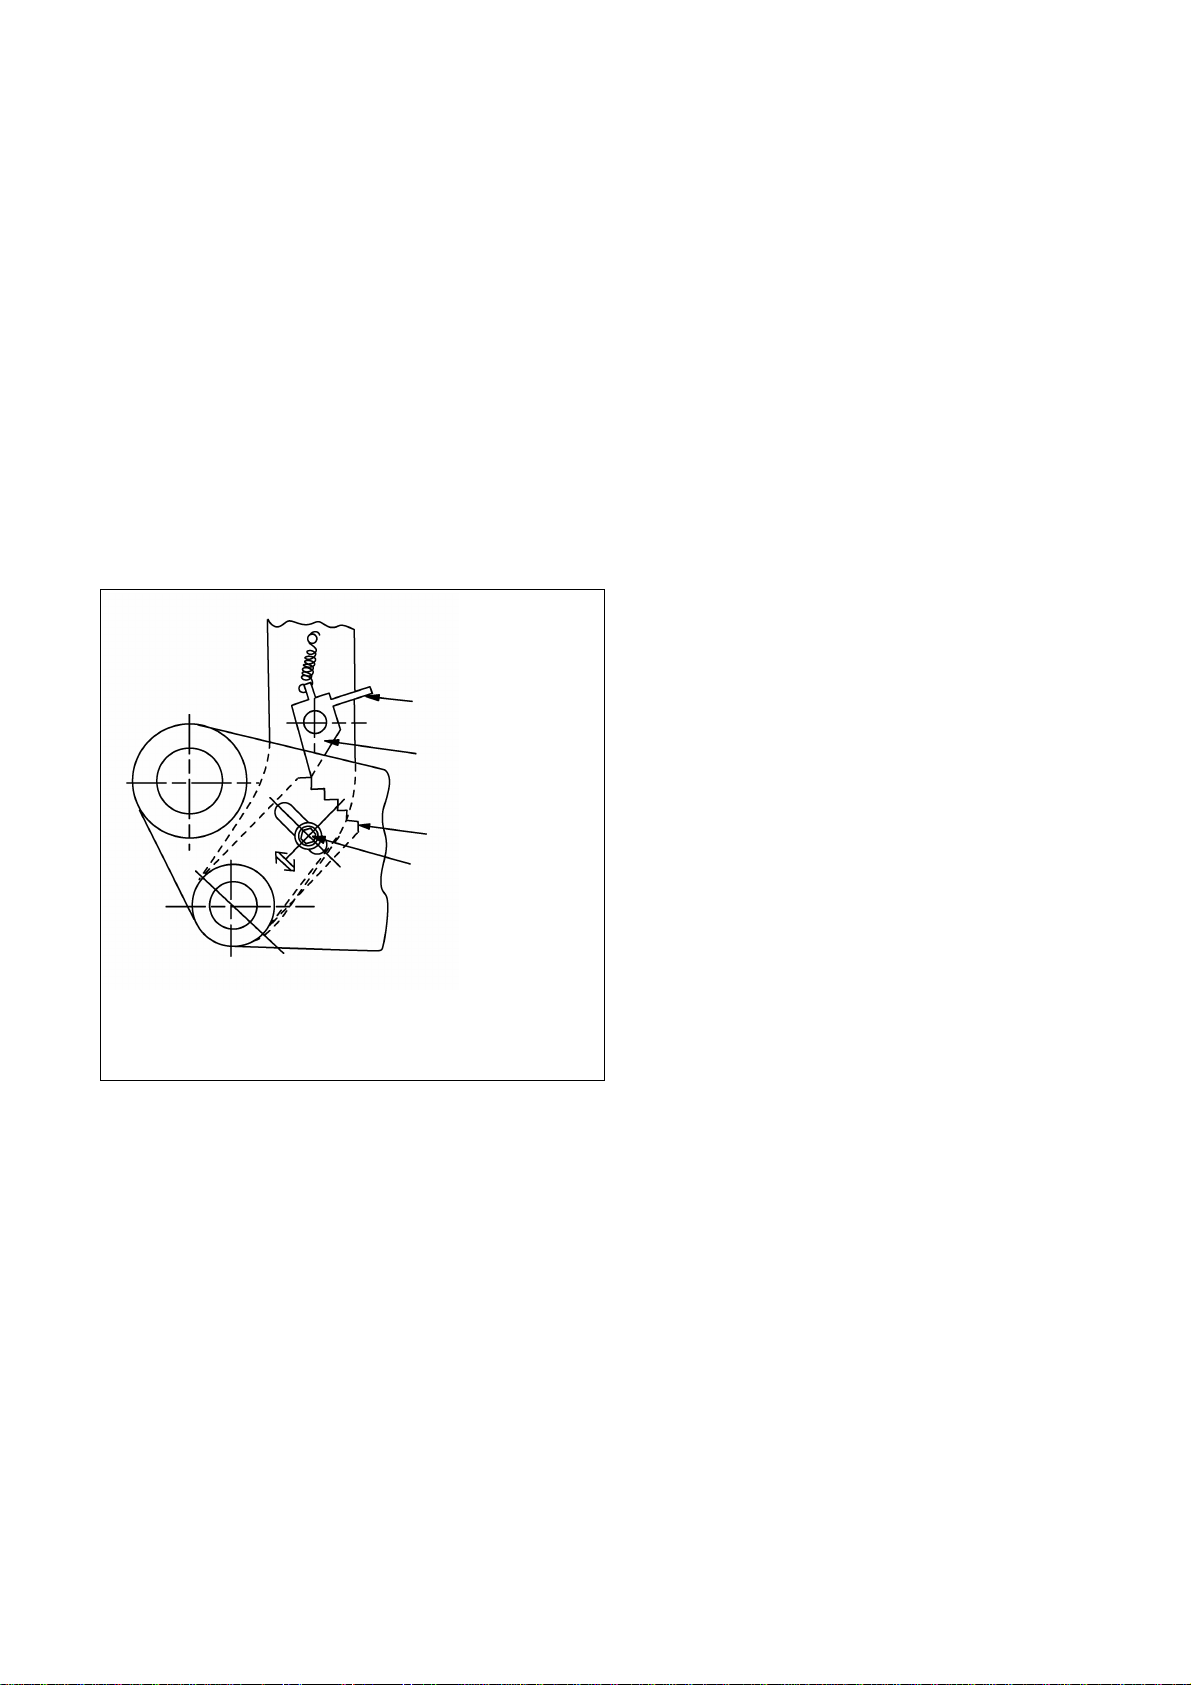
3‑3.ラチェットの調整方法/Adjusting the ratchet
このラチェット機構は結線時に確実に結線されるまでプレスのハンドルが戻らなくなることにより、ハンドルの
加圧不足による結線不足を防止する補助装置です。調整済で出荷いたしますが、調整の必要が出た場合には次の
要領でお願いします。
図 3‑5 のラチェット解除位置調整ボルトを緩め、ラチェットを矢印方法に微少に動かして調整ボルトを仮締め
し、結線時の解除状態を確認しながら固く締付けて下さい。
The ratchet mechanism is an auxiliary device which prevents the press handle from returning to its home position during the
connecting procedure until the connector is securely connected, thereby avoiding loose connection resulting from inadequate
pressurization of the handle. The ratchet has been factory-adjusted at the time of delivery. In case the ratchet needs adjustment,
follow the procedure described below.
Loosen the ratchet release-position adjusting bolt, shown in Fig. 3-5, and delicately move the ratchet in the direction of the
arrow to temporarily tighten the adjusting bolt. From this state, securely tighten the bolt while checking how the ratchet is
released.
調整の際、次の事項もご注意下さい。
During the adjustment, also check the following carefully.
1)プレスのハンドルを途中まで押し下げて途中で
ハンドルを元に戻したい場合(ラチェットを途中
で解除したい場合)、指先でツメに取付けられて
いるピンを押しながらハンドルを少し下げて下
さい。ラチェットが解除され、ハンドルは元に戻
ります。
1) When you want to return the handle to its home
position before fully depressing the press handle (i.e.,
when you want to release the ratchet midway),
slightly depress the handle while pressing the pin
mounted on the claw with your fingertips. This will
release the ratchet to allow the handle to return to its
home position.
2)ハンドルを押し下げている途中で元に戻す時(ラ
チェットが解除されないまま)、無理な力で持ち
上げないで下さい。ラチェット部の破損原因とな
ります。
2) When you want to return the handle to its home
position while depressing the handle (without
releasing the ratchet), do not lift up the handle
forcibly. This can cause a break in the ratchet section.
ツメ解除ピン
Claw release pin
ツメ
Claw
ラチェット
Ratchet
ラチェット解除位置
調整ボルト
Ratchet release
position
Adjusting bolt
図 3‑5/Fig. 3-5
Feb.1.2023Copyright2023HIROSEELECTRICCO.,LTD.AllRightsReserved.

-7-
4.ケーブルの切断割増および切断上の注意/
Cutting allowance of cables and cautions to be taken when cutting them
4‑1.切断割増/Cutting allowance
ケーブルの切断寸法は、完成時の L 寸法に対してコネクタの結線部分(結線しろ)をあらかじめ長く切断する必要
があります。コネクタの種類およびクランプ取付有無によって表‑2 を参照して割増して下さい。
It is necessary to determine the cutting length of the cable by adding the length of connector connection section (connection
allowance) to the completed dimension L. Add a length of allowance to the completed dimension L of the cable according to
the type of connector and whether the clamp is used, referring to Table 2.
表‑2/Table 2
結線 1 ヶ所(片側)に対する割増寸法
Dimension of allowance for one point of
connection (one side)
クランプ無し
Without clamp
クランプ付
With clamp
結合せ完成図 L 寸法に対する割増寸法(例)
Dimension of allowance to dimension L
in completed connection drawing (example)
HIF2
ICタイプ
HIF2
IC type
HIF2‑14→12.5mm 割増
HIF2-14 →12.5mmallowance
HIF2‑16→12.5mm 割増
HIF2-16 →12.5mm allowance
HIF2‑24→20mm 割増
HIF2-24 →20mmallowance
HIF2
ディップ
タイプ
HIF2
DIP type
9mm 割増
9mm allowance
HIF3
ソケット
タイプ
HIF3
Socket
type
クランプ無し、使用しま
せん。
6mm 割増
The type
“without-clamp type”
is not used.
6mm allowance
16mm 割増
(全極数同じ)
16mm allowance
(common to all
number of poles)
HIF2、IC タイプの組合わせ/Combination with HIF2, IC type
ケーブル/Cable
HIF2、ディップタイプの組合わせ/
Combination with the HIF2, DIP type
Lmm+18mm
HIF3、ソケットタイプの組合わせ/
Combination with the HIF3, socket type
Lmm+32mm
Lmm
Lmm
ケーブル/Cable
Lmm
14、16 極
Lmm+25mm
14- and 16-poles
L mm + 25 mm
24 極
Lmm+40mm
24-poles
L mm + 40 mm
ケーブル/Cable
Feb.1.2023Copyright2023HIROSEELECTRICCO.,LTD.AllRightsReserved.
-8-
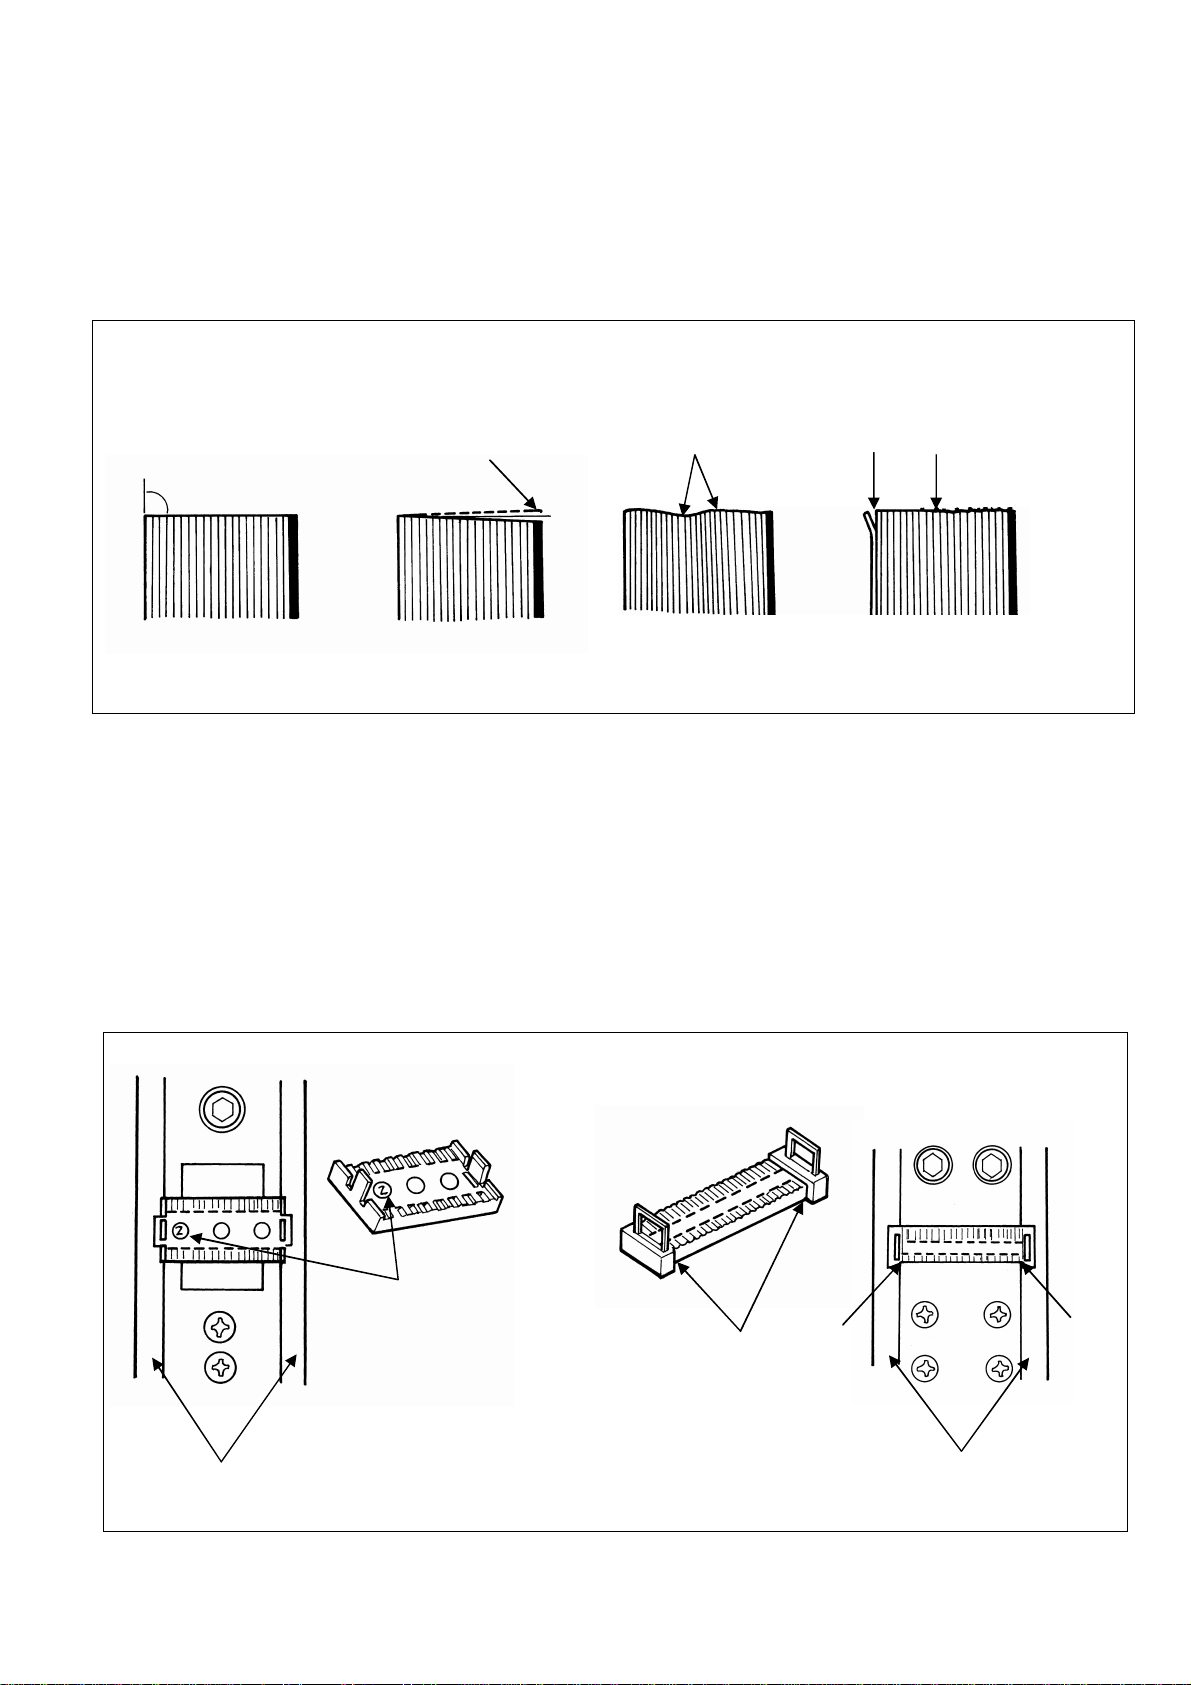
4‑2.切断上の注意/Cautions to be taken when cutting the cables
ケーブルを指定寸法に切断する時、図 4‑1 のようにケーブル切断面を正しく切って下さい。切断状態が悪いと結線
不良の原因となります。
When cutting the cable to a specified dimension, be sure to properly cut it to obtain the normal cutting plane. If the cable is
poorly cut, a connection failure can be caused.
図 4‑1/Fig. 4-1
5.HIF2 結線方法(I.C タイプ、ディップタイプ)/
Procedure for connecting the HIF2 (IC type and DIP type)
1)ガイドプレートにプロテクターをセットして下さい。セットする場合、IC タイプはプロテクター方向はどちら
でも結構です。ディップタイプはプロテクター切欠部を手前に向けてセットして下さい。(図 5‑1 参照)
1) Place a protector on the guide plate. For the IC type, the protector may be oriented in either direction. For the DIP type,
the protector has to be placed with its notched parts faced toward you. (See Fig. 5-1.)
図 5‑1/Fig. 5-1
ストッパー
Stopper
ガイド
Guide
IC型プロテクター
IC type protector
方向はどちらでも結構です
(全極数同様です)
Either orientation is acceptable.
(Common to all numbers of poles)
ストッパー
Stopper
ガイド
Guide
ディップタイププロテクター
DIP type protector
切欠部
Notched
parts
(全極数同様です)
(Common to all
numbers of pole
s)
切欠部
Notched
parts
しわのまま切らない
Do not cut without
straightening the cable
直角に切断する
Cut at right angles
ななめに切らない
(±1°以内)
Do not cut on the cross
(within ±1°)
芯線(ワイヤー)の切り残しが無いように
Take care not to leave any uncut
cable conductor.
芯線の切り残しが突出している
The uncut conductor
projects from the cutting
plane.
○
×
×××
ガイドプレート
Guide plate切欠部
Notched
parts
Feb.1.2023Copyright2023HIROSEELECTRICCO.,LTD.AllRightsReserved.

-9-
2)次にケーブルをセットして下さい。その場合、ケーブルマークの方向で A タイプ、B タイプを決めて下さい。
コネクタ方向はどちらでも結構です。(図 5‑2 参照)
*IC、ディップタイプとも同じです。
2) Place the cable. At this time, determine the type either A or B according to the direction of the cable mark. The connector
may be oriented in either direction. (See Fig. 5-2.)
*The aforementioned procedure applies to both the IC type and DIP type connectors.
3)ラチェットが切れるまでハンドルを押し下げて
結線して下さい。結線後にコネクタを取り出す時
はケーブルを引張って取り出さず、取り出しレバ
ーを押してからコネクタを持って取り出して下
さい。
3) Depress the handle until the ratchet locks in place.
After completion of connection, do not take out the
connector by pulling the cable but by pushing the
take-out lever and holding the connector.
ICタイプコネクタ
IC type connector
ディップタイプコネクタ
DIP type connector
Aタイプ
A type
図 5‑2/Fig. 5-2
図 5‑3/Fig. 5-3
取り出しレバーを押す
Push the take-put lever
ストッパー
Stopper
押し下げる
Depress
the handle
加圧ブロック
Pressure block
ストッパー
Stopp
er
ストッパー
Stopper
ストッパー
Stopper
ストッパー
Stopper
Bタイプ
B type
Aタイプ
A type Bタイプ
B type
Feb.1.2023Copyright2023HIROSEELECTRICCO.,LTD.AllRightsReserved.
-10-
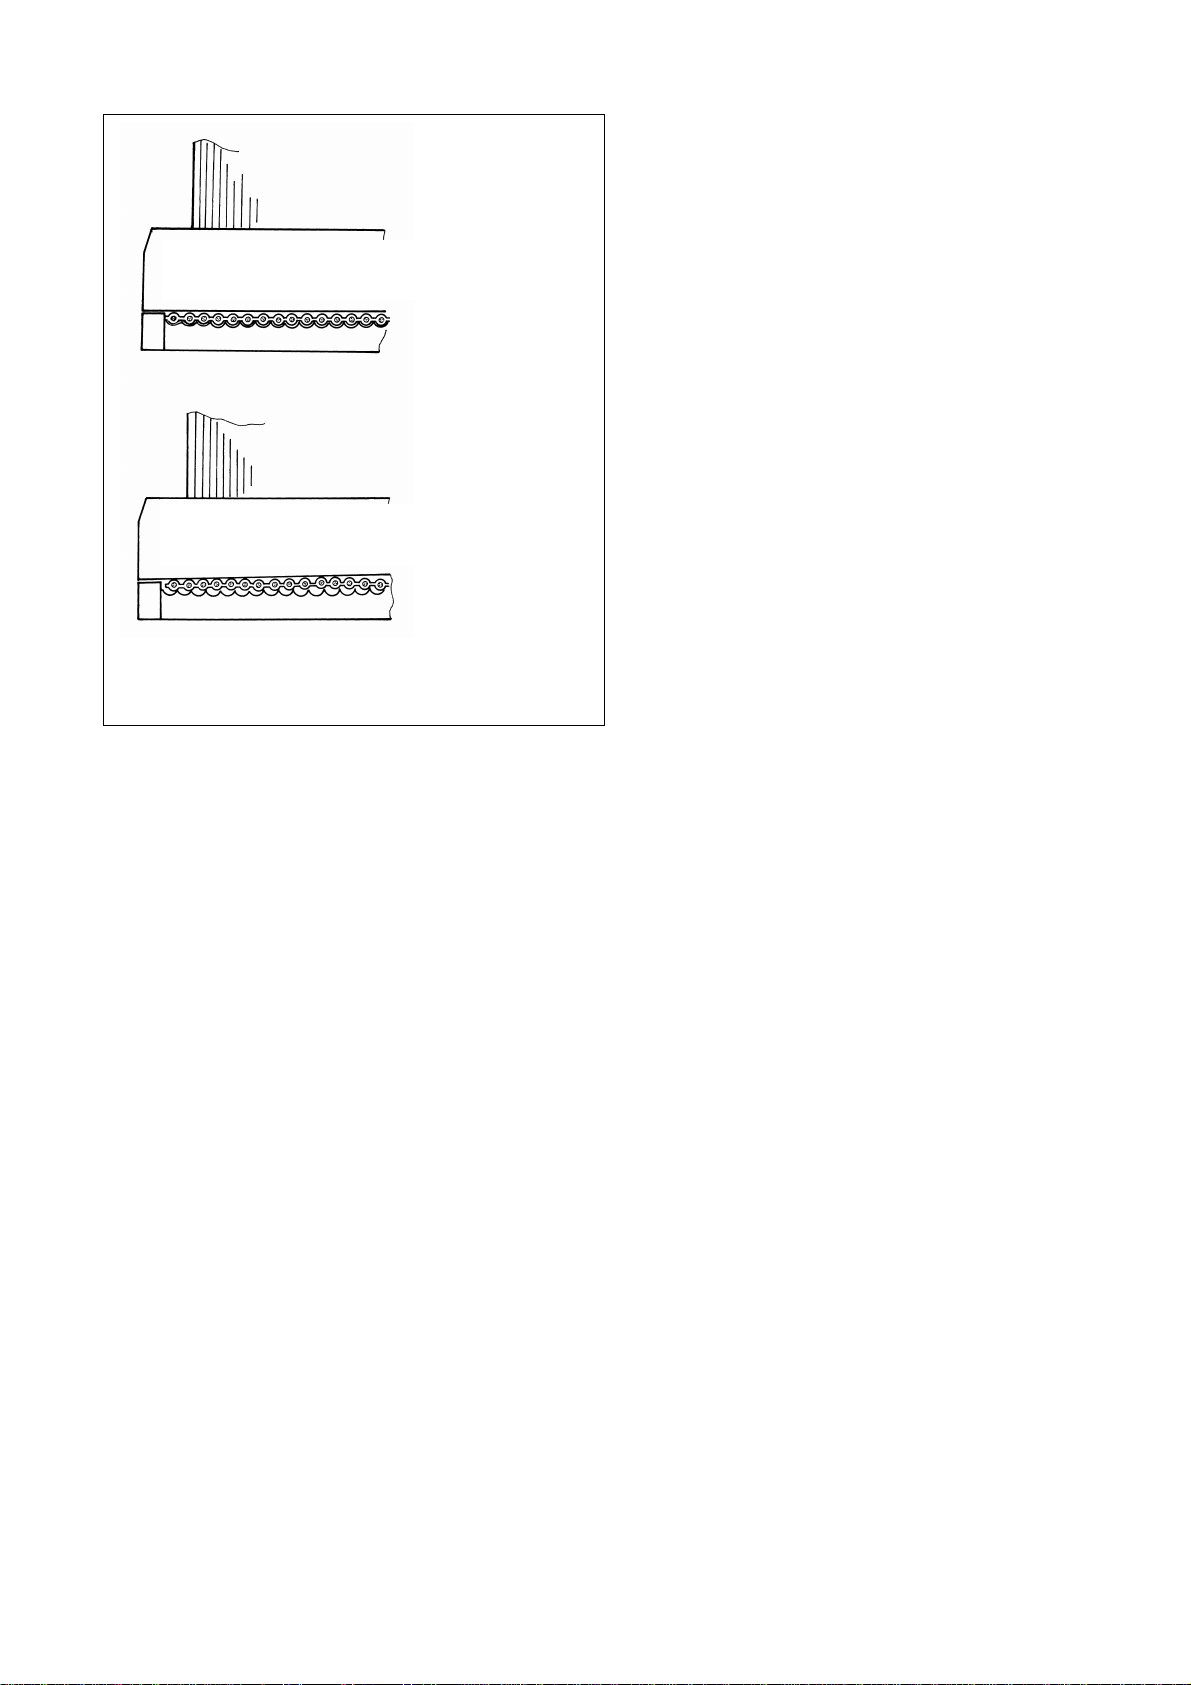
4)結線後正しく結線されているかどうか確認して
下さい。
*HIF2(IC タイプ・ディップタイプ)のクランプ付
きの使用はいたしません。
4) After the connection, check whether the cable and the
connector are properly connected.
* HIF2 (IC type, DIP type) with a clamp is not used.
図 5‑4/Fig. 5-4
良(ケーブル波部とプロテクター波溝部が合っている)
Correct (the corrugation of cable fits in
the corrugation groove of the protector)
不良(ずれている)
Wrong (the corrugation of cable does not fit in
the corrugation groove of the protector)
Feb.1.2023Copyright2023HIROSEELECTRICCO.,LTD.AllRightsReserved.

-11-
6.HIF3(ソケットタイプ)結線方法/Procedure for connecting the HIF3 (socket type)
1)ガイドプレートにプロテクターを図 6‑1 のよう
にセットして下さい。プロテクター方向はどちら
でも可能です。
1) Place the protector on the guide plate as shown in Fig.
6-1. The protector may be oriented in either direction.
2)次にケーブルを正しくセットして下さい。
(図 6‑2 参照)
2) Place the cable properly.
(See Fig. 6-2.)
プロテクター
(全極数同様です)
Protector
(common to all number
of poles)
ストッパー/
Stopper
プロテクター
Protector
図 6‑1/Fig. 6-1
図 6‑2/Fig.6-2
ストッパー
Stopper
ケーブル
Cable
×はずれる
X Comes off
ケーブル
Cable
ガイド
Guide
ガイド
Guide
しわ
Not straightened
ななめ
Not flush
不良/Wrong
ガイド
Guide
ガイド
Guides
Feb.1.2023Copyright2023HIROSEELECTRICCO.,LTD.AllRightsReserved.

-12-
図 6‑3 のコネクタの▲印は結線タイプの分類の目印
です。希望する結線タイプはケーブルマーク方向とコ
ネクタの▲印によって各タイプを決めて下さい。
The filled triangle mark on the connector, as shown in Fig.
6-3, represents the connection type classification.
Determine a desired connection type according to the
direction of the mark on the cable and the filled triangle
mark on the connector.
▲マーク
▲
mark
図 6‑3/Fig. 6-3
Aタイプ
A typeBタイプ
B type
ストッパー/
Stopper
ストッパー/
Stop
per
ガイド
Guide
ガイド
Guide
Aタイプ
A typeBタイプ
B type
Feb.1.2023Copyright2023HIROSEELECTRICCO.,LTD.AllRightsReserved.

-13-
3)ラチェットが切れるまでハンドルを押し下げて結線し
て下さい。加圧ブロックが結線ストッパーに当るまで
押し下げて下さい。(図 6‑4 参照)結線後にコネクタ
を取り出す時はケーブルを引張って取り出さず、取り
出しレバーを押してからコネクタを持って取り出して
下さい。
4)結線後に正しく結線されているか確認して下さい。
*結線後、HIF3(ソケットタイプ)はクランプを取り付
けて使用いたしますので、附属品のクランプを準備し
て下さい。
3) Depress the handle until the ratchet will turn no further in the
normal direction. Depress the handle until the pressure block
comes in contact with the connection stopper. (See Fig. 6-4.)
After completion of connection, do not take out the
connector by pulling the cable but by pushing the take-out
lever and holding the connector.
4) After the connection, check whether the cable and the
connector are properly connected
* After the connection, the HIF3 (socket type) is to be used
with a clamp attached. Prepare, therefore, the clamp
supplied with the unit as an accessory.
5)結線完了品(図 6‑5)のケーブルを図 6‑6 のよ
うに折り曲げ、コネクタの差込□(A)(B)にク
ランプの先端を押し込み、ケーブルをはさんで下
さい。(はずれないように確実に押し込んで下さ
い)クランプの HRS の彫刻文字は特に方向性を
示すものではありませんので、貴社のご仕様に合
わせてお決め下さい。
5) Fold the cable which has been connected (Fig. 6-5) as
shown in Fig. 6-6, press the top ends of the clamp into
the inlets (A) and (B) of the connector to place the
cable between them. (Be sure to press the top ends of
the clamp securely so that they do not come off.)
Since the engraved letters HRS on the clamp does not
indicate any specified orientation, you may determine
the orientation of the clamp according to your
connector specifications.
クランプ
Clamp
差込口(B)
Inlet (B)
差込口(A)
Inlet (A)
C,D タイプ方向
Direction of C and D types
A,B タイプ方向
Direction of A
and B types
彫刻文字
Engraved letters
図 6‑6/Fig. 6-6
ケーブル
Cable
図 6‑4/Fig. 6-4
取り出しレバーを押す
Push the take-out lever
ストッパー
Stopper
押しさげる
Depress the handle
加圧ブロック
Pressure block
図 6‑5/Fig. 6-5
ケーブル
Cable
Feb.1.2023Copyright2023HIROSEELECTRICCO.,LTD.AllRightsReserved.

-14-
6)クランプを押し込んでから図 6‑7 のように→印
方向にケーブルを除々に引張り、たわみをなくし
て下さい。(図 6‑8 参照)
*以上で HIF3(ソケットタイプ)の結線作業は完了
です。各タイプの基本結線方法は「リボンケーブル
用コネクタ」の総合カタログをご参照下さい。
6) After pressing the clamp into position, gradually pull
the cable in the direction of the arrow (->) as shown
in Fig. 6-7 not to allow the cable to slack.
(See Fig. 6-8.)
* The aforementioned procedure completes the connection
of HIF3 (socket type). Refer to the General Catalog of
the "Connectors for Ribbon Cables" for the standard
connecting procedure for each type of connector.
7.結線完了後の製品取扱注意/
Cautions to be taken when handling the product after the completion of connection
1)一度結線されたコネクタおよびケーブルを再使用されますと不具合の原因となりますので使用しないで下さ
い。
2)HIF2 および HIF3(ソケットタイプ)の電気的導通・耐圧等のチェックは、結線完了後に必ず行なって下さい。
3)HIF2 の場合は端子のディップ部が露出しておりますので、結線後の保管取扱いに注意して、ディップ部が変形
したり折れたりしないように取扱って下さい。
4)コネクタ、ケーブルおよび結線完了品は直射日光にあてないで下さい。
1) Do not re-use the connector and cable which have been used once since the re-use can cause a malfunction.
2) Be sure to carry out checking of electric conductivity and dielectric strength of the HIF2 and HIF3 (socket type) after the
completion of connection without exceptions.
3) For the HIF2, the DIP section of terminals are exposed. Be sure the carefully store and handle the connector to protect the
DIP section from being deformed or broken.
4) Do not expose the connectors, cables and connected products to the direct sunlight.
たわみ
Slack
ケーブル
Cable
図 6‑8/Fig. 6-8
たわみを作らない
No slack is left
良/
Correct
図 6‑7/Fig. 6-7
ケーブル
Cable
Feb.1.2023Copyright2023HIROSEELECTRICCO.,LTD.AllRightsReserved.

-15-
8.接続回路図/Connection circuit diagram
8‑1.HIF2・HIF2BRA(S)共通接続回路図/
Connection circuit diagram common to HIF2 and HIF2B RA (S)
HIF2‑**D‑2.54R(S)タイプ
HIF2B‑**D‑2.54R(S)A タイプ(図例は F2 タイプ)
HIF2-**D- 2.54R (S) type
HIF2B-**D-2.54R (S) Atype (the example diagram indicates the F2 type)
AA タイプ/AA type
ABタイプ/AB type
AA タイプ
AA type
IC タイプ
IC type
Dip タイプ
Dip type
IC タイプ
IC type
Dip タイプ
Dip type
ケーブルマーク
Cable type
ケーブルマーク
Cable mark
AA タイプ
AA type
AB タイプ
AB type
AB タイプ
AB type
Feb.1.2023Copyright2023HIROSEELECTRICCO.,LTD.AllRightsReserved.
Table of contents
Other Hirose Cables And Connectors manuals

Hirose
Hirose EnerBee DF60 Series User manual

Hirose
Hirose BM56G Series Instruction Manual

Hirose
Hirose BM10 Series User manual

Hirose
Hirose GT43 User manual

Hirose
Hirose GT16GM Series User manual

Hirose
Hirose GT16G-1S-HU User manual

Hirose
Hirose FH63 Series Manual

Hirose
Hirose DF53 Series Manual

Hirose
Hirose DF62W Series Manual
 User manual")
Hirose
Hirose DF62WZ-6P-2.2DSA(20) User manual


