manuals.online logo
Brands
  1. Home
  2. •
  3. Brands
  4. •
  5. Home Styles
  6. •
  7. Indoor Furnishing
  8. •
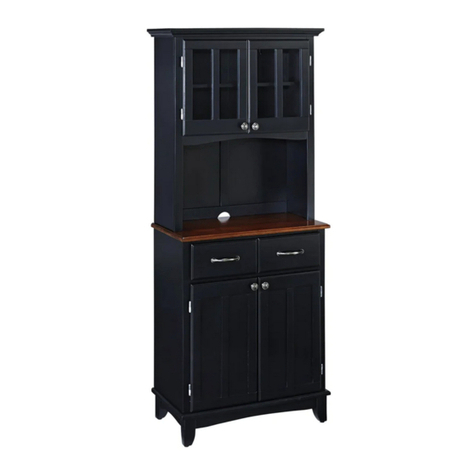
  9. Home Styles Pantry 88 5549 652 User manual

Home Styles Pantry 88 5549 652 User manual

IMPORTANT NOTE
Carefully remove all the parts from the carton and put
them individually on a soft cloth to prevent scratches
or other damage occurring to the parts.
We have taken great care in the design of this
product and request that you carefully and strictly
follow our assembly instructions to ensure a
completed product as it was designed.
Part List
Home Styles ConsumerAssistance: www.homestyles-furniture.com,
[email protected], 888-680-7460, 877-831-0319
88 5549 652
Pantry
For assembly also need the parts and hardware from carton 88 5549 651
(Please refer to the last page of these
instructions for drawer assembly steps.)
Tools required for assembly : Phillips screwdriver Tools recommended for assembly : Level
R.
Drawer
1 Pc.
O.
Back Panel
2 Pcs.
M.
Front Stretcher
1 Pc.
N.
Base
1 Pc.
S.
Leg
1 Pc.
T.
Leg
1 Pc.
U.
Leg
1 Pc.
V.
Leg
1 Pc.
E.
Back Stretcher
2 Pcs.
G.
Shelf
4 Pcs.
D.
Back Stretcher
2 Pcs.
F.
Back Panel
2 Pcs.
J.
Middle Panel
1 Pc.
A.
Top
1 Pc.
Assembly Instructions 3
IMPORTANT
* Please keep Hex Wrench in a safe place as you may need to tighten up the Head Cap Bolts in the future.
* Do not tighten up all the Head Cap Bolts until each part is properly assembled.
* Use a soft cloth between these parts and the floor.
*After assembly item must be level to work properly. Use the included adjustable levelers to level.
STEP 1
Insert Cam Lock Screws into pre-drilled holes
of Top (A), Side Panels (B), (C), (K), (L),
Middle Panel (J). (See Figure 1)
STEP 2
Attach Magnets to Top (A) and Front Stretcher (M)
with Wood Screws for Magnet.
(See Figure 2)
J
A
C
B
M
K
L
Figure 1
Figure 2
Cam Lock Screw
Cam Lock Screw
Wood Screw
for Magnet
Wood Screw
for Magnet
2/6
Assembly Instructions 4
STEP 3
Place Base (N) upside down on
a soft cloth.
Attach Legs (S), (T), (U) and (V) to
Base (N) with Flat Washers, Spring Washers
and Head Cap Bolts (long).
(See Figure 3)
STEP 4
Attach Side Panel (K) to Base (N) with Head Cap Bolts (short). (See Figure 4)
Attach Back Stretcher (E) to unit.
Slide Back Panels (O) into position.
Attach Front Stretcher (M) to unit with Cam Lock. (See Figure 5)
Attach Side Panel (L) to the unit with Cam Locks and Head Cap Bolts (short).
Figure 3
Figure 4
Figure 5
Cam Lock
Head Cap Bolt (short)
3/6
Head Cap Bolt (long)
Spring Washer
Flat Washer
S
TU
N
V
K
L
O
O
M
E
N
Assembly Instructions 5
STEP 5
Attach Back Stretchers (D) to
Side Panel (B) with Cam Locks.
Attach Back Stretcher (E) to unit.
Slide Back Panels (F) into position.
Attach Side Panel (C) to unit with
Cam Locks.
Attach Top (A) to the unit with
Cam Locks.
STEP 6
Turn the unit from Step 4 over to its’ upright
position.
Attach Middle Panel (J) to the unit from
Step 4 with Cam Locks.
Attach unit from Step 5 to unit with
Cam Locks.
Attach Pull Handles to Doors (H), (I), (P)
and (Q) with Machine Screws. (See Figure 6)
Attach Doors (H), (I), (P) and (Q) to unit by
sliding the door left hinges into the side panel
left hinges. (See Figure 7)
Cam Lock
Cam Lock
4/6
A
BD
D
J
P
HI
Q
EF
F
C
Figure 6 Figure 7
Assembly Instructions 6
STEP 8
Level the unit by adjusting the adjustable levelers
on the bottom of the legs. (See Figure 8)
Insert Wood Screws (short) into pre-drilled holes
in the back panel.
Note : Please make sure unit is level
before tightening these screws.
5/6
STEP 7
Insert Adjustable Pins into the side panels at
the desired level.
Place Shelves (G) into position.
Slide Drawer (R) into position.
Adjustable Pin
Wood Screw (short)
G
R
G
G
G
Figure 8
Assembly Instructions 7
Part List
Drawer (R)
R1
R1
R5
R5
R2
R3
R3
R4
R4
R1.
Front Part
1 Pc.
R2.
Back Part
1 Pc.
R3.
Side Part
1 Pc.
R4.
Side Part
1 Pc.
R5.
Base Part
1 Pc.
MAKE SURE ROLLER
IS ON THE BACK
STEP 1
Attach R1, R2 and R3 using a Phillips
screwdriver and long Wood Screws (4X),
tighten halfway.
Attach R1, R2 and R4 using long Wood
Screws (4X), tighten halfway.
(See Figure 1)
STEP 2
Slide R5 into grooves in R3 and R4. Be sure
to push R5 all the way forward so it meets R1.
(See Figure 2)
Figure 1
Figure 2
Figure 3
Figure 4
STEP 3
Insert short Wood Screws 6X) into the
pre-drilled holes in R5, tighten screws.
(See Figure 3)
STEP 4
Attach Pull Handle with Machine Screws.
(See Figure 4)
Tighten all screws used in drawer assembly.
6/6

Other Home Styles Indoor Furnishing manuals

Home Styles 20 05102 0692 User manual

Home Styles

Home Styles 20 05102 0692 User manual

Home Styles 88 5701 31 User manual

Home Styles

Home Styles 88 5701 31 User manual

Home Styles Upholstered Bench 88 5182 26 User manual

Home Styles

Home Styles Upholstered Bench 88 5182 26 User manual

Home Styles 5003-941 User manual

Home Styles

Home Styles 5003-941 User manual

Home Styles 885010941 User manual

Home Styles

Home Styles 885010941 User manual

Home Styles 5002-89 User manual

Home Styles

Home Styles 5002-89 User manual

Home Styles BD547-FS User manual

Home Styles

Home Styles BD547-FS User manual

Home Styles 5670-10 User manual

Home Styles

Home Styles 5670-10 User manual

Home Styles 200 -301-FB 1 80 User manual

Home Styles

Home Styles 200 -301-FB 1 80 User manual

Home Styles 20 05507 0403 User manual

Home Styles

Home Styles 20 05507 0403 User manual

Home Styles 20 08000 0089 User manual

Home Styles

Home Styles 20 08000 0089 User manual

Home Styles 5523-61 User manual

Home Styles

Home Styles 5523-61 User manual

Home Styles Hall Tree 20050640049 User manual

Home Styles

Home Styles Hall Tree 20050640049 User manual

Home Styles 20 05506 0681 User manual

Home Styles

Home Styles 20 05506 0681 User manual

Home Styles 20 06700 0055 User manual

Home Styles

Home Styles 20 06700 0055 User manual

Home Styles 88 5002 79 User manual

Home Styles

Home Styles 88 5002 79 User manual

Home Styles Cabin Creek  88 5411 49 User manual

Home Styles

Home Styles Cabin Creek 88 5411 49 User manual

Home Styles Flexsteel Mountain Lodge 20 05525 0089 User manual

Home Styles

Home Styles Flexsteel Mountain Lodge 20 05525 0089 User manual

Home Styles 20 05507 0503 User manual

Home Styles

Home Styles 20 05507 0503 User manual

Home Styles 88 5515 16 User manual

Home Styles

Home Styles 88 5515 16 User manual

Home Styles 88 5531 49 User manual

Home Styles

Home Styles 88 5531 49 User manual

Home Styles 88 5123 89C User manual

Home Styles

Home Styles 88 5123 89C User manual

Home Styles 20 05520 0772 User manual

Home Styles

Home Styles 20 05520 0772 User manual

Home Styles Pantry 5004-69 User manual

Home Styles

Home Styles Pantry 5004-69 User manual

Popular Indoor Furnishing manuals by other brands

Lopas Apogeu Assembly instructions

Lopas

Lopas Apogeu Assembly instructions

Otto 83941134 Assembly instructions

Otto

Otto 83941134 Assembly instructions

Whittier Wood Furniture 1610AUFb Assembly instructions

Whittier Wood Furniture

Whittier Wood Furniture 1610AUFb Assembly instructions

Euro-Rite Cabinets Base Cabinet with 1 Drawer Assembly instructions

Euro-Rite Cabinets

Euro-Rite Cabinets Base Cabinet with 1 Drawer Assembly instructions

FMD Furniture ALAN 7 488-007 Assembly instruction

FMD Furniture

FMD Furniture ALAN 7 488-007 Assembly instruction

Seville Classics WEB671 Assembly instructions

Seville Classics

Seville Classics WEB671 Assembly instructions

NOA & NANI King Size Dorset Bed in White Assembly instruction

NOA & NANI

NOA & NANI King Size Dorset Bed in White Assembly instruction

DentalEZ Heritage Simplicity Stool user manual

DentalEZ

DentalEZ Heritage Simplicity Stool user manual

Furniture of America Cassie CM-BK 627 Assembly instructions

Furniture of America

Furniture of America Cassie CM-BK 627 Assembly instructions

Alvin LB1218 instructions

Alvin

Alvin LB1218 instructions

Article GERA Assembly instructions

Article

Article GERA Assembly instructions

SUNON DAM6026 Assembly manual

SUNON

SUNON DAM6026 Assembly manual

Furinno 10024 Assembly instruction

Furinno

Furinno 10024 Assembly instruction

Forte KARPUR KRPR701 Assembling Instruction

Forte

Forte KARPUR KRPR701 Assembling Instruction

Woood MESA manual

Woood

Woood MESA manual

CABINETS TO GO Findley & Myers WD2442 Assembly instructions

CABINETS TO GO

CABINETS TO GO Findley & Myers WD2442 Assembly instructions

Whittier Wood Furniture 3910AST Assembly instructions

Whittier Wood Furniture

Whittier Wood Furniture 3910AST Assembly instructions

Office Star Products TV230 Assembly instructions

Office Star Products

Office Star Products TV230 Assembly instructions

manuals.online logo
manuals.online logoBrands
  • About & Mission
  • Contact us
  • Privacy Policy
  • Terms and Conditions

Copyright 2025 Manuals.Online. All Rights Reserved.