HTC VIVE Business Streaming User manual

VIVE Business Streaming User Guide

Contents
VIVE Business Streaming
About VIVE Business Streaming 4
What are the system requirements? 4
Preparing your computer for streaming 5
Preparing your headset for streaming 6
Starting a streaming session using a USB cable 7
Starting a wireless streaming session 9
Solutions and FAQs
General 11
Performance 16
Audio 19
Facial and hand tracking 19
Error messages 21
Trademarks and copyrights
2 Contents

About this guide
We use the following symbols to indicate useful and important information:
This is a note. It provides detailed information for setup, common questions, and what to do in
specific situations.
This is a tip. It will give you an alternative way to do a particular step or procedure that you may
find helpful.
This indicates important information that you need in order to accomplish a certain task or to
get a feature to work properly.
This is a warning. Take note to avoid potential problems or prevent damage to your hardware.
Information contained in this guide may have changed. For the most up-to-date information,
including the latest version of this guide, go to VIVE Business Support.
Before using the product, carefully review VIVE safety information and follow all product safety
and operating instructions on https://business.vive.com/legal/.
3 About this guide

VIVE Business Streaming
About VIVE Business Streaming
VIVE Business Streaming lets you stream, wirelessly or through a USB cable, SteamVR-
compatible content from your computer directly to your headset. This includes VIVEPORT™
content. VR content is generated on the computer, and then sent to the headset, turning your all-
in-one headset into a top-notch PC VR headset. Your VR content will use the all-in-one headset
tracking and controllers, so there's no additional hardware to set up.
What are the system requirements?
To use VIVE Business Streaming, your computer must meet the following system requirements.
Component System requirements
VR headset VIVE Focus 3
Processor §Intel®Core™i5-4590 equivalent or better
§AMD Ryzen™5 1500X equivalent or better
GPU §NVIDIA®GeForce®GTX 1060 6 GB equivalent or better
§AMD Radeon™RX 580 equivalent or better
Memory 8 GB RAM or more
Operating system Windows®11 / Windows 10
USB port 1x USB 3.0 port
(Backward compatible to USB 2.0. However, we recommend using a
USB 3.0 port or newer for better performance.)
USB cable (For wired
streaming)
1x USB 3.0 Type-C cable
(Backward compatible to USB 2.0. However, we recommend using a
USB 3.0 Type-C cable or newer like the VIVE Streaming Cable for
better performance.)
Wireless router (For
wireless streaming)
Wi-Fi 802.11ac (5 GHz) or Wi-Fi 802.11ax (5 GHz, 6 GHz)
See Connecting to a Wi-Fi network for details.
4 VIVE Business Streaming

Preparing your computer for streaming
Make sure you have all the software installed on your VR-ready computer to run VIVE Business
Streaming.
§Make sure the computer GPU driver is up-to-date.
§Connect your computer directly to your Wi-Fi router using an Ethernet cable.
1. Make sure the SteamVR software has been downloaded and launched to complete the
installation. You can get it from: https://store.steampowered.com/app/250820/
SteamVR/.
2. Install the VIVE Business Streaming software on your computer. You can get it from:
https://dl.vive.com/vbspc.
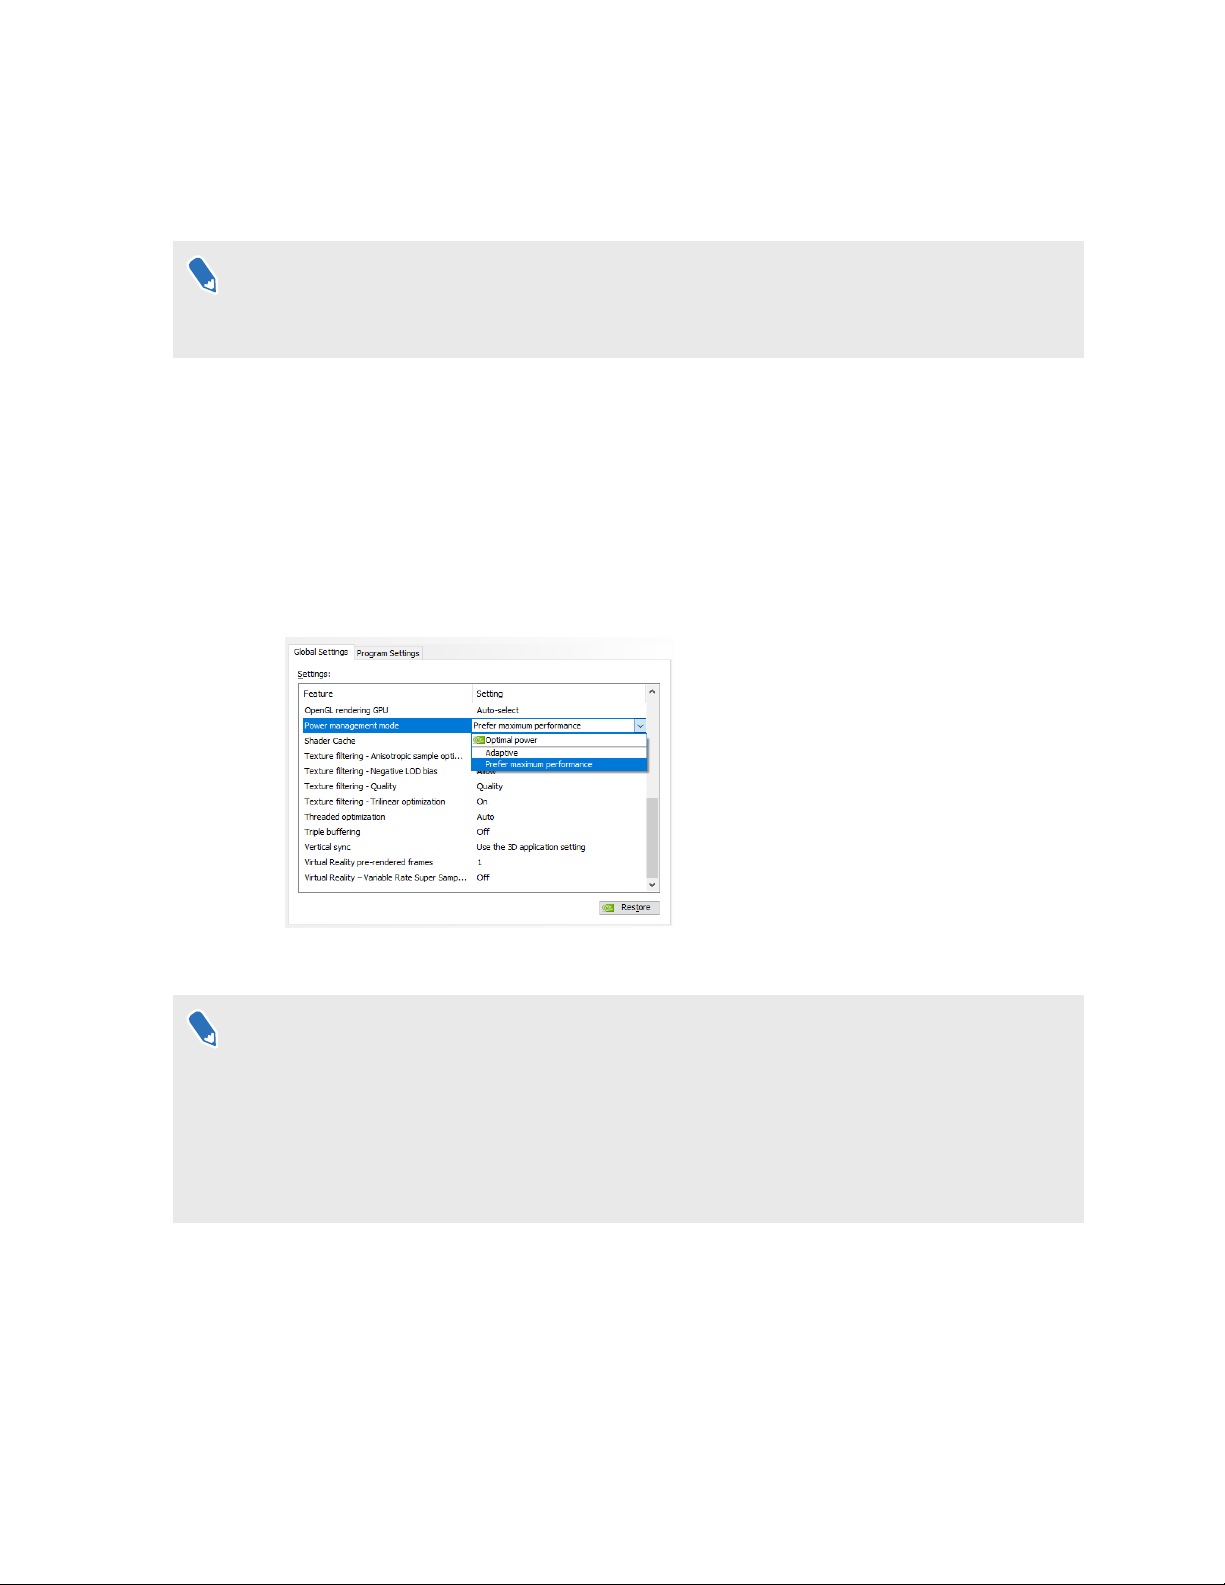
3. If you're using an NVIDIA®graphics card, on your computer, open the NVIDIA Control
Panel. Under 3D Settings, click Manage 3D settings. In the Global Settings tab, look
for Power management mode, and then set it to Prefer maximum performance.
4. Finally, make sure you've installed the VR titles on your computer.
If you're using a laptop:
§Make sure the laptop is plugged in to a power source.
§If your laptop is using an NVIDIA graphics card, open the NVIDIA Control Panel. Under 3D
Settings, click Manage 3D settings. In the Global Settings tab, look for Preferred
graphics processor, and then set it to High-performance NVIDIA processor. You don't
need to set Preferred graphics processor if your laptop only has a dGPU.
5 VIVE Business Streaming

Preparing your headset for streaming
Your headset needs to be set up before you can use VIVE Business Streaming. Here's what you
need to set up on your headset to use VIVE Business Streaming:
§Make sure you've completed room setup on your headset in the space you plan to use it.
Room setup is done on the headset, not from SteamVR or VIVE Business Streaming.
§Make sure that VIVE Business Streaming is updated to the latest version. Do any of the
following:
§On your PC, open the VIVE Business Streaming console, and then go to About.
Under Version, click Install next to VIVE Business Streaming app.
§Sign in to VIVE Business AppStore using your HTC account, and then select VIVE
Business Streaming when you see the update notification appear on the VIVE
Business Streaming tile.
§Make sure all headset settings are set correctly:
§Firmware updates
§Networking
§Audio settings
§Controller pairing
§Kiosk mode
All of these settings are managed by the headset, and cannot be overridden by SteamVR
or VIVE Business Streaming.
To find out more about your headset settings, check the user guide: https://
www.vive.com/us/support/focus3/
6 VIVE Business Streaming

Starting a streaming session using a USB cable
It's easy to start streaming SteamVR titles with VIVE Business Streaming.
Make sure your USB cable, computer, and headset have been prepared before trying to start a
session.
1. Make sure VIVE Business Streaming is installed and running on your computer, and that
your headset is on.
2. Connect the USB Type-C®end of your USB cable to your headset, and then connect the
other end to a USB port on your computer. See Attaching a USB Type-C cable to VIVE
Focus 3 on page 8.
If the headset is not recognized by the computer, USB icon is gray in the VIVE Business
Streaming console, try these:
§Unplug, and then plug the USB cable again to the USB port.
§Try connecting the USB cable to a different USB port on your computer.
3. Wear your headset.
4. In the Choose USB mode dialog box, select VIVE Business Streaming.
If you accidentally selected Take no action, go to your library in the lobby, and select VIVE
Business Streaming.
5. Open the SteamVR Dashboard by doing any of the following:
§Press the Menu button on the controller.
§With your left palm facing inward, pinch your index finger and thumb together until
the animation finishes.
6. Select the VR title you want to stream.
When you're done, you can quit VIVE Business Streaming just like any other title by pressing the
VIVE button on your controller, and then selecting Back to Lobby.
7 VIVE Business Streaming

Attaching a USB Type-C cable to VIVE Focus 3
Connect your VIVE Focus 3 to your computer using a USB Type-C cable.
If you don't have a long USB Type-C cable, go to the VIVE accessories page and purchase the
VIVE Streaming Cable.
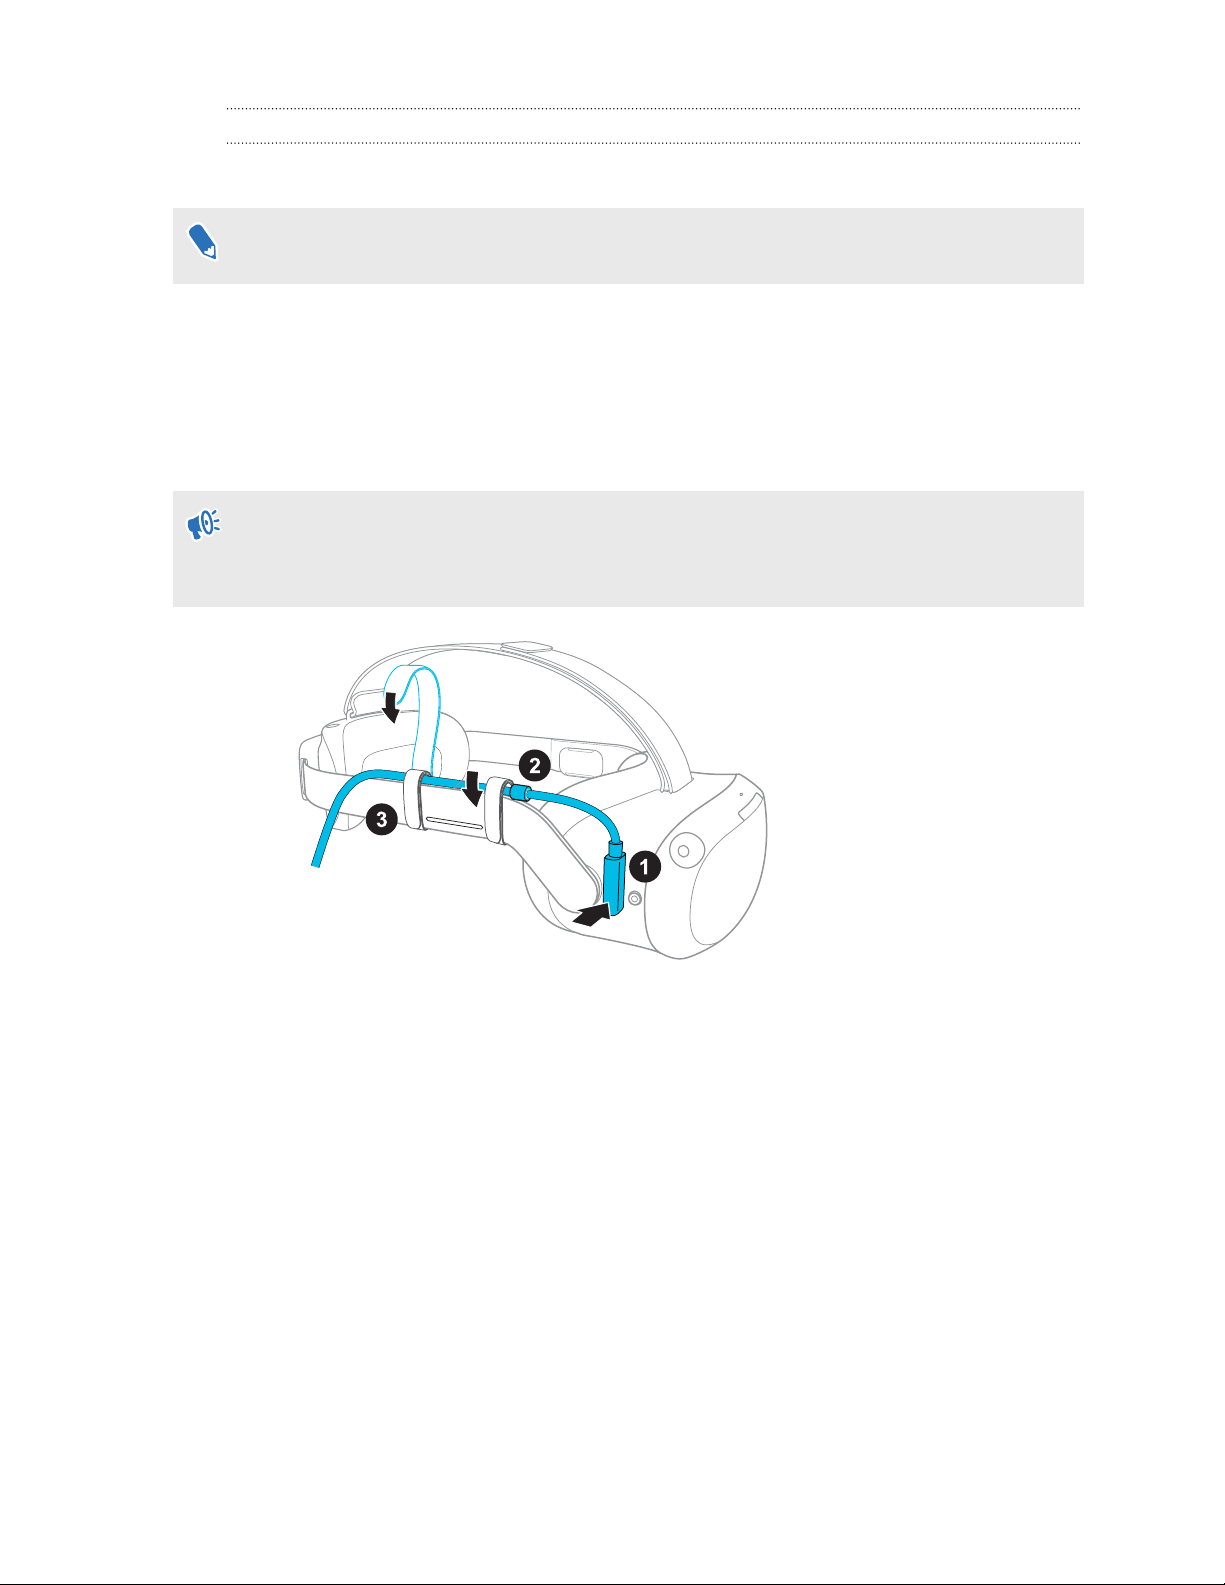
1. Attach the USB Type-C end of your cable to the USB Type-C port on the side of the
headset.
2. Run the USB cable along the top of headset band.
3. Fasten the velcro cable wraps on either side of the built-in speaker. Make sure to fasten
them with the fuzzy side out to avoid tangling with hair.
§Make sure to fasten the first cable wrap behind the rubber stopper.
§Make sure the cable wraps don't cover the speakers.
4. Connect the other end of the USB cable to a USB port on your computer.
8 VIVE Business Streaming

Starting a wireless streaming session
It's easy to start streaming SteamVR titles wirelessly with VIVE Business Streaming.
Make sure your computer and headset have been prepared before trying to start a session.
1. Make sure VIVE Business Streaming is installed and running on your computer, and that
your headset is on.
2. Connect your computer directly to your Wi-Fi router using an Ethernet cable.
§Make sure the Wi-Fi router that the headset connects to supports 802.11ac (5 GHz) or
802.11ax (5 GHz, 6 GHz)
§Have the headset and Wi-Fi router in the same room and try to have a clear line of sight
between the headset and Wi-Fi router.
3. Wear your headset.
4. Turn on the Wi-Fi on the headset and connect it to the same network as your computer.
§The headset and computer must be connected to the same network for wireless streaming to
work.
§If you need to assign a fixed VIVE Business Streaming server IP address to your headset, see
Can I assign a fixed VIVE Business Streaming server IP address to my VIVE Focus 3? on page
13. If you have other enterprise needs, contact your enterprise support.
5. Go to your library in the lobby, and then select VIVE Business Streaming.
§Sign in using your HTC account. After signing in, you'll see the update notification appear on
the VIVE Business Streaming tile. Select the tile to update VIVE Business Streaming.
§You can also update the VIVE Business Streaming app on the headset through the VIVE
Business Streaming console. Connect the headset to your computer using a USB Type-C
cable, and then in the VIVE Business Streaming console, go to Settings About. Under
Version, click Install next to VIVE Business Streaming app.
§Make sure to always update VIVE Business Streaming when an update is available to get the
best streaming performance.
6. In Select Streaming PC, select the computer you want to stream content from.
§The headset and computer must be connected to the same network for the computer to
appear in Select Streaming PC.
§If you've assigned a fixed IP address to your headset, VIVE Business Streaming will
automatically connect to the assigned IP address. The Select Streaming PC window will not
show.
9 VIVE Business Streaming

7. Open the SteamVR Dashboard by doing any of the following:
§Press the Menu button on the controller.
§With your left palm facing inward, pinch your index finger and thumb together until
the animation finishes.
8. Select the VR title you want to stream.
When you're done, you can quit VIVE Business Streaming just like any other title by pressing the
VIVE button on your controller, and then selecting Back to Lobby.
10 VIVE Business Streaming

Solutions and FAQs
General
VIVE Business Streaming doesn't want to launch on my computer. What can I do?
If VIVE Business Streaming doesn't open on your computer, make sure the VIVE Business
Streaming server is running on dGPU instead of iGPU.
§If you're using an NVIDIA graphics card, open the NVIDIA Control Panel, and go to
Manage 3D settings. In the Global Settings tab, set Preferred graphics processor to
High-performance NVIDIA processor.
§If you're using an AMD Radeon graphics card, right-click on your desktop, and then click
AMD Radeon Settings System Switchable Graphics. Look for and click
RRServer.exe, and then select High Performance.
I've started streaming but I don't see anything in the headset except for a loading
animation. What should I do?
If the title doesn't start streaming in the headset, try these:
§Make sure the VIVE Business Streaming software is installed on your computer. You can
get it from: https://dl.vive.com/vbspc.
§If doing a wired streaming session, unplug the USB cable from your computer and then
plug it again. If the streaming still doesn't start, unplug the USB cable from your computer
and plug it to a different USB port on your computer.
§If you've just updated the graphics driver, restart your computer, and try again.
My computer doesn't recognize the headset and the USB icon on VIVE Business
Streaming console is gray. What can I do?
If your computer doesn't recognize the headset, try these:
§Unplug, and then plug the VIVE Streaming Cable again to the USB port.
§Try connecting the VIVE Streaming Cable to a different USB port on your computer.
§If you've connected the VIVE Streaming Cable to all the USB ports on your computer, and
it still doesn't recognize the headset, try this:
1. In VIVE Focus 3, go to Settings Advanced.
2. Turn on the USB compatibility mode On/Off switch.
I can't get wireless streaming to work, what can I do?
If wireless streaming is not working for you, try these:
11 Solutions and FAQs

§Connect your computer directly to the network router using an ethernet cable.
§Make sure the Wi-Fi router the headset connects to supports 802.11ac or 802.11ax (5
GHz).
§If possible, don't connect to a Wi-Fi mesh network.
§Have the Wi-Fi router and the headset in the same room and try to have a clear line of sight
between the headset and Wi-Fi router.
§Don't use a mobile hotspot as your Wi-Fi router.
§Make sure your firewall is not blocking connections from VIVE Business Streaming.
§If you keep seeing "No computer found", consult your network administrator about
allowing devices to broadcast messages on the network.
Can I do mixed reality (MR) with PC VR titles?
If the PC VR title supports MR, yes you can. In the VIVE Business Streaming console, make sure
[Experimental] MR with passthrough in Settings Graphics is turned on.
If you're a developer, check out the forum to learn how to create MR content for VIVE Business
Streaming.
How do I show others what's inside the headset while doing wireless streaming?
We suggest to let others watch the content mirror on the computer monitor. Screen casting while
doing wireless streaming is not recommended as it may affect wireless streaming performance.
After starting my streaming session on my headset, I see a green screen. What
should I do?
Open SteamVR settings, and then go to General. Show the Advanced Settings, and then turn
off the Pause VR when computer is locked On/Off switch.
VIVE Business Streaming can't update successfully. What should I do?
If VIVE Business Streaming fails to finish updating, do the following:
1. Close the VIVE Business Streaming console.
2. Open the Windows Task Manager.
12 Solutions and FAQs

3. In the Processes tab, end the following tasks:
§RRUpdateManager
§RRServer
§RRConsole
§vrserver
§vrmonitor
§vrcompositor
4. Open the VIVE Business Streaming console and restart the update.
If VIVE Business Streaming still fails to update, restart your computer, open the VIVE Business
Streaming console, and restart the update again.
Can I assign a fixed VIVE Business Streaming server IP address to my VIVE Focus 3?
Starting from VIVE Business Streaming version 1.07, you can use the IP setting tool to set a fixed
VIVE Business Streaming server IP address for your VIVE Focus 3.
1. On your computer, go to the folder where VIVE Business Streaming is installed.
2. Go to RRTools VBSIpSetting.
3. Double-click VBSIpSetting.exe.
4. Follow the instructions on the VIVE Business Streaming Server IP Setting window to
assign a fixed VIVE Business Streaming server IP address to your VIVE Focus 3.
Consult your network administrator for the VIVE Business Streaming server IP address. The
server IP address shown on the VIVE Business Streaming console may not be accurate as
there might be network address translation in your network.
How do I make VIVE Business Streaming communicate through Windows Defender
Firewall?
You may need to remove VIVE Business Streaming in Windows Defender Firewall for it be
allowed through.
1. On your computer, go to Control Panel System and Security Windows Defender
Firewall Allow an app or feature through Windows Defender Firewall., and check if
VIVE Remote Render Server is in the Allowed apps and features list.
2. Click Change settings.
13 Solutions and FAQs

3. In the Allowed apps and features list, remove all instances of VIVE Remote Render
Server. Select a VIVE Remote Render Server instance, and click Remove.
Make sure to remove all VIVE Remote Render Server instances in the list.
4. Restart VIVE Business Streaming.
5. In the dialog box where it asks for permission to allow network access, click Allow access.
What should I do if I have trouble running OpenXR titles?
If you're having problems running OpenXR™titles with VIVE Business Streaming, check the
SteamVR settings.
Make sure VIVE Business Streaming is running on both your headset and computer and that the
headset is detected in the SteamVR window.
1. On your computer, open SteamVR settings.
2. Under Advanced Settings, click Show.
3. Click Developer.
14 Solutions and FAQs

4. Check if Current OpenXR Runtime is set to SteamVR. If Current OpenXR Runtime is
not set to SteamVR, click SET STEAMVR AS OPENXR RUNTIME.
5. Run the OpenXR title again.
What do I do if controllers don't work properly when streaming apps?
If the controls and buttons on the controllers are not working properly when streaming apps, try
changing the controller option in the VIVE Business Streaming settings.
We recommend updating your SteamVR to version 1.26 or later.
1. In the VIVE Business Streaming console, open settings and go to Input.
2. Under Controller, check if Compatibility mode is selected or not. If Compatibility
mode is selected, clear the option; if Compatibility mode is not selected, select it.
3. Restart SteamVR, open the app, and check if the controllers are working properly.
4. If the controllers are still not working properly, open the SteamVR settings on your
computer or in VR.
5. Click Controllers MANAGE CONTROLLER BINDINGS.
6. Under Manage Controller Bindings For, select the app where the controllers are not
working properly.
7. In Active Controller Binding, click Custom EDIT THIS BINDING.
15 Solutions and FAQs

8. In the upper right, click OPTIONS.
9. In BINDING OPTIONS, click None next to Compatibility Mode and do the following:
§For Compatibility Mode, select Oculus Touch Controller.
§Select Simulate HMD.
We recommend restarting the app after editing the controller binding.
Does the VIVE Streaming Cable provide power to the headset?
No, it doesn't. You need to use the AC adapter that came in the VIVE Focus 3 box to charge the
headset battery.
Performance
How do I improve VIVE Business Streaming performance?
VIVE Business Streaming performance is affected by your computer's system settings whether
you're using a USB or wireless connection to stream.
General
Check the tips below to help improve the performance of VIVE Business Streaming.
§If your computer is using an NVIDIA graphics card, open the NVIDIA Control Panel. Under
3D Settings, click Manage 3D settings. In the Global Settings tab, look for Power
management mode, and then set it to Prefer maximum performance.
§If you're experiencing frame drops, check if you're going beyond your play area's
boundary. If you're constantly hitting your play area's boundary, reset your play area's
boundary.
Streaming using a laptop
Try these tips if you're using VIVE Business Streaming on a laptop.
§Make sure the laptop is plugged in to a power source.
§If your laptop is using an NVIDIA graphics card, open the NVIDIA Control Panel. Under 3D
Settings, click Manage 3D settings. In the Global Settings tab, look for Preferred
graphics processor, and then set it to High-performance NVIDIA processor.
§Try to keep the laptop cool. If the laptop gets too hot, it affects the performance of VIVE
Business Streaming.
VIVE Business Streaming console
Try these options in the VIVE Business Streaming console.
16 Solutions and FAQs

§The render resolution might be too high for your computer's GPU. Go to Settings
Graphics. Under Graphic settings, set Streaming graphics preferences to
Performance.
§If you're doing a wireless streaming session, the streaming bitrate may be too high for your
network's bandwidth. Lower the bitrate in the VIVE Business Streaming console. You can
also enable Dynamic bitrate in Settings Performance. Dynamic bitrate automatically
adjusts the streaming bitrate based on your network’s bandwidth and the bitrate set in the
VIVE Business Streaming console to give you the best wireless streaming experience.
You can also change these settings directly in VR by pressing the Menu button on the left
controller twice.
This feature is only available when using VIVE Business Streaming console 1.11.8b or later
and VIVE Business Streaming app 1.0.17.13 or later. To check which versions you're using,
open the VIVE Business Streaming console and go to Settings About.
§If you're doing a wireless streaming session, go to Settings Performance, and then
under Transmission, turn on [Experimental] TCP mode.
Wireless streaming session
To optimize the performance of VIVE Business Streaming while doing a wireless streaming
session, try these:
§Connect your computer directly to your Wi-Fi router using an Ethernet cable.
§Have the headset and Wi-Fi router in the same room and try to have a clear line of sight
between the headset and Wi-Fi router.
§Dedicate one wireless router to one headset. If you have several headsets using the same
wireless router while using VIVE Business Streaming, reduce the number of headsets
connected to the wireless router.
§If you're using the same wireless router for VIVE Business Streaming and video streaming
services, stop using the video streaming service first while doing a wireless streaming
session.
§Try switching your Wi-Fi router to another channel with less overlap with other Wi-Fi
access points. Overlap caused by adjacent access points will degrade Wi-Fi performance.
There are free mobile Wi-Fi analyzer tools that you can download to check Wi-Fi signals in
your location. Consult your router's user guide to learn how to change the Wi-Fi channel.
§If possible, don’t connect to a Wi-Fi mesh network.
§If possible, don't use a mobile hotspot as your Wi-Fi router.
§Screen casting affects wireless streaming performance so it's not recommended to do
screen casting while doing a wireless streaming session. See How do I show others what's
inside the headset while doing wireless streaming? on page 12.
17 Solutions and FAQs

I'm experiencing some content jittering when streaming, what can I do?
Check if VIVE menu is open in VR. If it is open, close it.
The content seems to be stuttering a lot and the streaming experience is not what I
was expecting. What can I do?
The frame rate is not sufficient, do the following:
§In the VIVE Business Streaming console, open settings and go to Graphics. Set
Streaminig graphics preferences to Performance.
§If you're using an NVIDIA graphics card, open the NVIDIA Control Panel, and go to
Manage 3D settings. In the Global Settings tab, set Preferred graphics processor to
High-performance NVIDIA processor.
You don't need to set Preferred graphics processor if your laptop only has a dGPU.
How do I adjust graphic preferences for VIVE Business Streaming?
You can adjust graphic preferences for VIVE Business Streaming in the VIVE Business Streaming
console.
1. In the VIVE Business Streaming console, open settings and go to Graphics and
Performance.
2. Under Graphic settings and Streaming bitrate, adjust the available options according
to your preferences, network bandwidth, and computer's capabilities.
Each option affects the performance of VIVE Business Streaming. For example, while selecting
Quality for Streaming graphics preferences under Graphic settings can improve visual
quality, it may affect overall performance, resulting in a less than smooth VR experience. A higher
streaming bitrate can give you better video quality but require more bandwidth while a lower
streaming bitrate will improve performance but may compromise video quality. Experiment with
the available options until you're satisfied with the performance of VIVE Business Streaming.
18 Solutions and FAQs

Audio
The audio sounds broken and there's a lot of noise. What should I do?
In the Windows Control Panel, go to the Sound settings and check the Playback tab. Make sure
that Oculus Virtual Audio Device is not set as the default device.
The sound in the headset stutters and sounds distorted and garbled. What should I
do?
Open SteamVR settings, and then go to Audio. Make sure Audio output device is set to VIVE
Virtual Audio Device and not a Bluetooth®headset.
Is there a way not to mirror the audio from the headset?
On your computer, click the speaker icon in the taskbar, and then mute the audio by clicking the
speaker icon.
Make sure the volume is not set to 0when the computer audio is muted or the audio in the
headset will also be muted.
I've started streaming content but I don't hear any sound
If you don't hear any sound, try the following:
§Open SteamVR settings, and then select Audio. Make sure Audio output device is set to
VIVE Virtual Audio Device. If there is still no sound, try selecting another audio device
from the dropdown menu.
§Open the Windows Sound control panel by right-clicking the volume icon on the taskbar
and selecting Sounds. Go to the Playback tab and make sure that Oculus Virtual Audio
Device is not set as the default device. Then, restart VIVE Business Streaming on your
computer.
Facial and hand tracking
Are hand tracking and VIVE Wrist Tracker supported by VIVE Business Streaming?
Both hand tracking and VIVE Wrist Tracker are natively supported by VIVE Business Streaming
starting from version 1.07.
1. In the VIVE Business Streaming console, open settings and go to Input.
2. Under Tracking, select or clear the Hand tracking option to enable or disable hand
tracking.
3. If you're using a VIVE Wrist Tracker, do one of the following:
19 Solutions and FAQs

§Select the Use VIVE Wrist Tracker for hand tracking option to enhance hand
tracking precision and reliability through the VIVE Wrist Tracker.
Hand tracking must also be selected.
§Clear the Use VIVE Wrist Tracker for hand tracking option to use VIVE Wrist
Tracker to track objects, similar to how you would with VIVE Tracker (3.0).
How do I turn on facial and eye tracking in VIVE Business Streaming?
If your VIVE Business Streaming console version is 1.09 or later, facial tracking and eye tracking
are already supported, you don't need to do anything. Before using eye tracking on VIVE Focus 3,
calibrate VIVE Focus 3 Eye Tracker. In VIVE Focus 3, go to Settings Inputs Eye tracker. To
learn how to calibrate the VIVE Focus 3 Eye Tracker, go here.
Do PC VR apps support facial and eye tracking over VIVE Business Streaming?
VIVE Business Streaming supports facial and eye tracking for the following PC VR apps:
§Apps developed using OpenXR XR_EXT_eye_gaze_interaction extension and
XR_HTC_facial_tracking OpenXR extension.
§Apps developed using the VIVE Eye and Facial Tracking SDK (v. 1.3.6.8 or later).
What should I do if facial and eye tracking are not working?
If facial and eye tracking are not working when streaming PC VR apps using VIVE Business
Streaming, check the following:
§Make sure the VIVE Focus 3 Eye Tracker and VIVE Facial Tracker are properly installed on
VIVE Focus 3.
§Make sure the VIVE Focus 3 software is updated to version 5.0.999.646 or later.
§Make sure the VIVE Business Streaming console on your computer is updated to version
1.09 or later.
§Install the VIVE Business Streaming app on the headset using the VIVE Business
Streaming console.
§Check that the PC VR app were developed using supported SDKs. See Do PC VR apps
support facial and eye tracking over VIVE Business Streaming? on page 20 for details.
§Make sure your SR Runtime version is 1.3.6.7 or later. To update SR Runtime to the latest
version, download the VIVE software from the VIVE website or Steam.
If you're running OpenXR titles, check the following:
§In the VIVE Business Streaming console, go to Settings Advanced, and then click
Register under OpenXR to register required OpenXR API layers.
20 Solutions and FAQs
Table of contents
Other HTC Virtual Reality Headset manuals

HTC
HTC VIVE Focus Plus User manual

HTC
HTC Vive Focus 3 User manual

HTC
HTC VIVE Pro 2 User manual

HTC
HTC Vive Focus 3 User manual

HTC
HTC VIVE FLOW User manual

HTC
HTC Vive Pre User manual

HTC
HTC Vive Focus 3 User manual

HTC
HTC Vive Pro User manual

HTC
HTC Vive Enterprise Quick guide

HTC
HTC Vive Cosmos User manual

HTC
HTC VIVE XR ELITE User manual

HTC
HTC VIVE User manual

HTC
HTC VIVE Operating instructions

HTC
HTC Vive Cosmos User manual

HTC
HTC VIVE N CHILL User manual

HTC
HTC VIVE DEVELOPER User manual

HTC
HTC VIVE FLOW User manual

HTC
HTC Vive Pre User manual

HTC
HTC VIVE Cosmos Elite User manual

HTC
HTC VIVE Pro Eye User manual