manuals.online logo
Brands
  1. Home
  2. •
  3. Brands
  4. •
  5. HUSKY LINERS
  6. •
  7. Automobile Accessories
  8. •
  9. HUSKY LINERS 47952 User manual

HUSKY LINERS 47952 User manual

47952.doc
09/11/2006
HUSKY STORAGE BOX INSTALLATION INSTRUCTIONS
Please check contents and read instructions before beginning (some contents inside drawer of box)
You have received hardware for both Excursion and Suburban installation (not all hardware will be used)
PACKAGE CONTENTS
1- Drawer Unit
1- Cam Spacer 1- Handle Assembly
1- 3/8”-24 Lock Nut 4- 3/8” X 3_” Hex Bolts
3- #8 X 1_” Stainless Steel Wood Screw 2- _” X 1” Nut Plates
2- 4” Long Straps 1- Cargo Liner Retention Block
1- 45_” Channel Iron 1- Cargo Liner
1- Cam latch 1- Drawer Liner (Foam)
2- 8” Long Straps (2000-06 GM Products) 2- 4” Square plates (Excursion)
2- M10 X 60 Allen Bolts (2000-2007 GM Products) 2- M6 X 40 Allen Bolts (Excursion)
2- 1” Round Spacers (2000-2007 GM Products) 2- _” Flat Washers (Excursion)
4- 3/8” X 2” Hex Bolts (2007 GM Products) 6- 3/8” Flat Washers
2- 5” Long Nut Plates (2007 GM Products) 2- 3”X 6-1/4” Clamps (2007 GM Products)
2- 3/8” Flat Washers—notched edge (GM Products)
TOOLS REQUIRED
1/8” Allen Wrench 5mm Allen Wrench (Excursion)
3/8” Combination End Wrench T-30 Torx Wrench (Excursion)
9/16” Socket and Ratchet T-50 Torx Wrench (Suburban)
Phillips Head Screwdriver 8mm Allen Wrench (Suburban)
INSTALLATION
1) Before beginning installation, check factory positioning of jack and jack tools. If Storage Box will block
access to these items when installed, remove them before installing Storage Box. These items may be stored
in your Storage Box once installation is completed.
2) Remove Storage Box from packaging. Check to insure you have received all the above listed Package
Contents and that no damage has occurred during shipping.
3) Position Storage Box top side down, placing it on a flat, non-marring surface. Remove shipping blocks and
Channel Iron from bottom of drawer using Phillips Head Screwdriver. Removing block will allow drawer to
slide out so use caution and avoid tilting Drawer Unit.
4) Turn Storage Box back over (right side up and laying flat on a non-marring surface) and extend the drawer to
the full open position.
5) Remove Detent Pin from each drawer slide by applying downward pressure on Detent Pin (see note #1).
Detent Pins will be re-inserted later so do not dispose of them.
6) Remove drawer from the Storage Box and stand it vertically on its back wall (once again on a non-marring
surface). Using a 1/8” Allen Wrench and 3/8” End Wrench, remove the two 10-32 flathead bolts and nuts from
handle installation area. Note that there are spacers (thick washers) located between the front and rear
extrusions that make up the drawer face. Should the spacers move out of position when the bolts are removed,
47952.doc
09/11/2006
reposition them before completing handle installation. Repositioning a spacer that has fallen out is easily done
by resting the spacer on your finger and raising the spacer up into the handle opening from the inside of the
drawer. To avoid the spacer falling out do not tip drawer when handle bolts are removed.
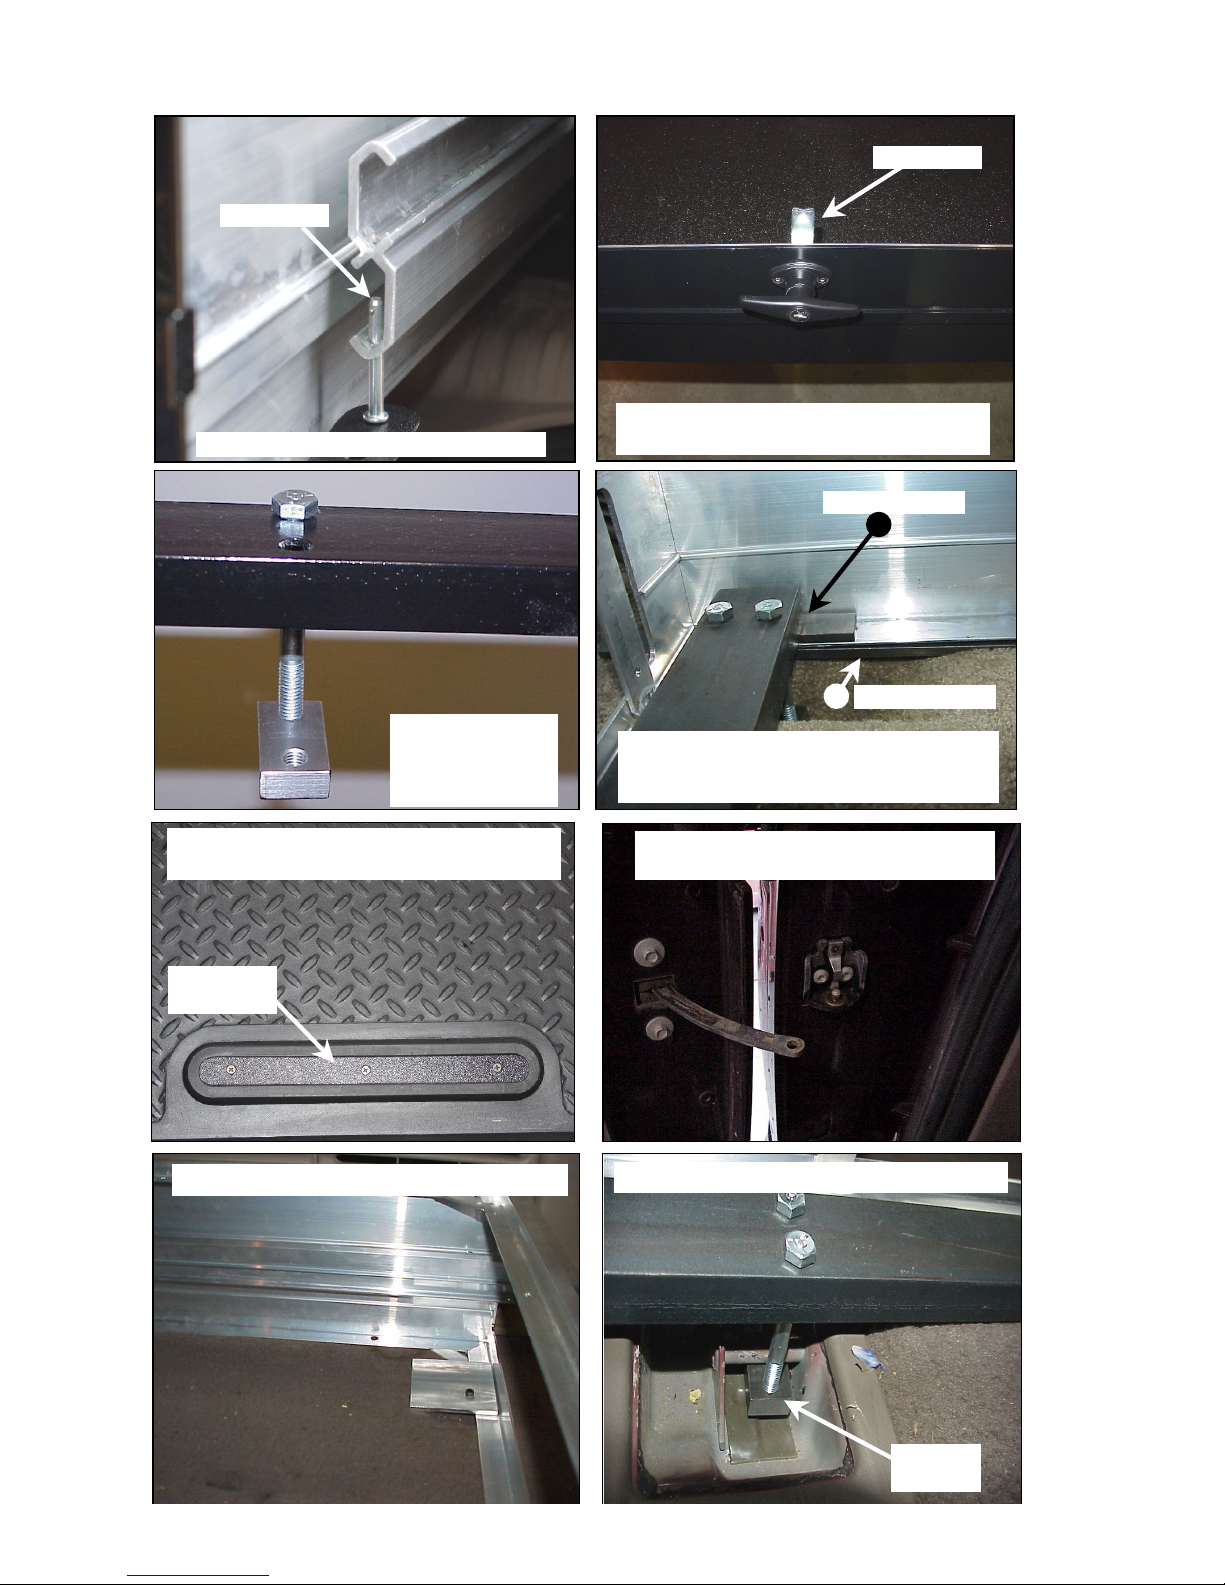
7) Remove the 3/8”-24 lock nut, cam latch and spacer from Handle Assembly. Align handle with holes (shank
will pass through opening in drawer) and re-install the 10-32 flathead bolts/nuts using 1/8” Allen Wrench. On
the inside of the drawer, re-install the spacer, cam latch and 3/8”-24 lock nut on handle shank, tighten nut only
finger tight. Turn handle and note the position of the cam latch. The cam latch should be oriented on handle
shank so that it will secure drawer unit when handle is horizontal on drawer (see note #2).
8). Remove 3rd row seat(s) from vehicle and fold second row seats forward.
The next steps are vehicle specific. Please skip down to the remaining instructions for your specific application.
2000-2006 Suburban/Yukon XL/Yukon XL Denali/Cadillac Escalade ESV: Remove the two rear cargo tie-
down loops from cargo area using a T50 Torx wrench. Position the two short 1” round spacers provided in the
recesses where tie-down loops were removed. The storage box will later be positioned over these stand-offs and
bolted into place.
9) Remove Access Panel from rear of Storage Box using a 1/8” Allen Wrench. Carefully slide drawer case into
cargo area.
10) Insert one (1) of the 3/8” X 3_” Hex Bolts through hole in either end of the channel iron. Screw a Nut Plate
onto each of the 2 bolts a few turns (see note #3).
11) Position the Channel Iron over the front set of the 3rd seat mounting rods.
12) Insert the remaining 3/8” X 3_” Hex Bolts through the remaining 2 holes in the channel iron, threading
them into Nut Plates (see note #8). The Nut Plates should be positioned so that they will be pulled against 3rd
seat mounting rod when bolts are tightened. Do not tighten at this time.
13) Position the two, 4” pieces of strap so that one piece is centered under each end of the Channel Iron (see
note 4).
14) Evenly tighten all bolts; do not over tighten.
15) Guide drawer back into drawer slides and re-insert detent pins.
16) Replace Access Panel.
17) Install Drawer Liner (foam) into drawer.
18) Install Cargo Liner by first centering liner on top of Drawer Unit. Then, insert the Cargo Liner Retention
Block into the recess molded into the cargo liner. Using the Phillips Head Screwdriver, install the three #8 X 1-
1/4” Stainless Steel Wood Screws through the holes in the Retention Block and into the top of the Storage Box
(see note #5). Take care to make sure the liner is center before attaching.
19) Your Storage Box should be treated as you would the exterior of your vehicle. Wash with gentle soap and
water and rinse well. The easiest way to clean the drawer liner or cargo liner is with a damp cloth or sponge. If
using a cleaner, 409® or Glass Plus® work well. The use or Armor All®, Son-of-a-Gun® or similar items is
discouraged as the products make the liner slick.
47952.doc
09/11/2006
20) Your Husky Storage Box comes with a limited one-year warranty. Winfield Consumer Products warrants
its SUV Storage Box to be free from defects in material and workmanship of the product for one year, from the
date of purchase, with proof of purchase.
2000-2005 Ford Excursion: Remove the four cargo tie-down loops from the cargo area. The two, 4” square
plates will be bolted down at the rear locations later to mount storage box. Disconnect hinge stop lever on both
rear doors by depressing spring and lifting lever from pin (see note #6). This will allow doors to fully open so
the Storage Box can be slid into the cargo area. Proceed to steps 9-12.
9) Remove Access Panel from rear of Storage Box using a 1/8” Allen Wrench. Carefully slide drawer case into
cargo area.
10) Insert one (1) of the 3/8” X 3_” Hex Bolts through hole in either end of the channel iron. Screw a Nut Plate
onto each of the 2 bolts a few turns (see note #3).
11) Position the Channel Iron over the front set of the 3rd seat mounting rods.
12) Insert the remaining 3/8” X 3_” Hex Bolts through the remaining 2 holes in the channel iron, threading
them into Nut Plates (see note #8). The Nut Plates should be positioned so that they will be pulled against 3rd
seat mounting rod when bolts are tightened. Do not tighten at this time.
13) Install M6 X 40 Allen bolts through 4” square aluminum plates and into threaded holes that held the rear
tie-down loops. Tighten securely (see note #7).
14) Position the two, 4” pieces of strap so that one piece is centered under each end of the Channel Iron (see
note 4).
15) Evenly tighten all bolts; do not over tighten.
16) Guide drawer back into drawer slides and re-insert detent pins.
17) Replace Access Panel.
18) Install Drawer Liner (foam) into drawer.
19) Install Cargo Liner by first centering liner on top of Drawer Unit. Then, insert the Cargo Liner Retention
Block into the recess molded into the cargo liner. Using the Phillips Head Screwdriver, install the three #8 X 1-
1/4” Stainless Steel Wood Screws through the holes in the Retention Block and into the top of the Storage Box
(see note #5). Take care to make sure the liner is center before attaching.
20) Your Storage Box should be treated as you would the exterior of your vehicle. Wash with gentle soap and
water and rinse well. The easiest way to clean the drawer liner or cargo liner is with a damp cloth or sponge. If
using a cleaner, 409® or Glass Plus® work well. The use or Armor All®, Son-of-a-Gun® or similar items is
discouraged as the products make the liner slick.
21) Your Husky Storage Box comes with a limited one-year warranty. Winfield Consumer Products warrants
its SUV Storage Box to be free from defects in material and workmanship of the product for one year, from the
date of purchase, with proof of purchase.
47952.doc
09/11/2006
2007 Suburban/Yukon XL/Yukon XL Denali/Cadillac Escalade ESV:
1) Remove the two rear cargo tie-down loops from cargo area using a T50 Torx wrench. Position the two short
1” round spacers provided, in the recesses where tie-down loops were removed. The storage box will later be
positioned over these stand-offs and bolted into place.
2) Remove Access Panel from rear of Storage Box using a 1/8” Allen Wrench then carefully slide storage box
case into cargo area.
3) Position a long nut plate under 3rd seat bracket (see note #9).
4) Place 3/8” X 3” X 6-1/4” clamp plates over 3rd seat mounting rods and nut plates, and over bottom lip of
storage box (see note #10).
5) Insert the 3/8” X 2” Hex Bolts and flat washers through the clamps, threading them into Nut Plates. The Nut
Plates should be positioned so that they will be pulled against 3rd seat mounting rod when bolts are tightened.
Do not tighten at this time.
6) Install M10 X 60 Allen bolts and washers that have flat side through case and 1” round spacers and into
threaded holes that held tie-down loops. (It may be necessary to raise the front of the box to allow bolt to start)
Tighten securely.
7) Evenly tighten all six bolts, do not over tighten.
8) Guide drawer back into drawer slides and re-insert detent pins.
9) Replace Access Panel.
10) Install Drawer Liner (foam) into drawer.
11) Install Cargo Liner by first centering liner on top of Drawer Unit. Then, insert the Cargo Liner Retention
Block into the recess molded into the cargo liner. Using the Phillips Head Screwdriver, install the three #8 X 1-
1/4” Stainless Steel Wood Screws through the holes in the Retention Block and into the top of the Storage Box
(see note #5). Take care to make sure the liner is center before attaching.
12) Your Storage Box should be treated as you would the exterior of your vehicle. Wash with gentle soap and
water and rinse well. The easiest way to clean the drawer liner or cargo liner is with a damp cloth or sponge. If
using a cleaner, 409® or Glass Plus® work well. The use or Armor All®, Son-of-a-Gun® or similar items is
discouraged as the products make the liner slick.
13) Your Husky Storage Box comes with a limited one-year warranty. Winfield Consumer Products warrants
its SUV Storage Box to be free from defects in material and workmanship of the product for one year, from the
date of purchase, with proof of purchase.
47952.doc
09/11/2006
Note 1-Detent Pin Removal
Note #2-Position Handle So Cam Latch will
be pointing up when handle is horizontal.
Note #1-Removing Detent Pin
Cam Latch
Detent Pin
Note #3- 3/8 X 3_”
Bolt through
Channel Iron with
Nut Plate attached.
Note #4-4” Strap shown positioned under
end of Channel Iron. 8” Strap used under
box rail in Suburban only
4” Strap
Retention
Block
Note 5-Retention Block shown installed. Take
care to center liner before installing block.
8” Strap
Note #6 – Remove Hinge Stop Lever to
allow placement of Storage Box
Note 7-4” Extrusion Plate shown installed.
Note 8-Positioning of Nut Plate
Nut
Plate
47952.doc
09/11/2006
Note 9-Nut plate positioned under 3rd seat mounting bracket. Nut
plate must be positioned as shown to allow .
Note 10-Clamp plates shown installed. Clamp plates should
be positioned so they overlap box edge.

Other HUSKY LINERS Automobile Accessories manuals

HUSKY LINERS 8141 Manual

HUSKY LINERS

HUSKY LINERS 8141 Manual

HUSKY LINERS 6203 Manual

HUSKY LINERS

HUSKY LINERS 6203 Manual

HUSKY LINERS 3402 Manual

HUSKY LINERS

HUSKY LINERS 3402 Manual

HUSKY LINERS 5600 User manual

HUSKY LINERS

HUSKY LINERS 5600 User manual

HUSKY LINERS 47901 User manual

HUSKY LINERS

HUSKY LINERS 47901 User manual

HUSKY LINERS 47904 User manual

HUSKY LINERS

HUSKY LINERS 47904 User manual

HUSKY LINERS 6275FR Manual

HUSKY LINERS

HUSKY LINERS 6275FR Manual

HUSKY LINERS 2358 Manual

HUSKY LINERS

HUSKY LINERS 2358 Manual

HUSKY LINERS 6077FR Manual

HUSKY LINERS

HUSKY LINERS 6077FR Manual

HUSKY LINERS 3231 Manual

HUSKY LINERS

HUSKY LINERS 3231 Manual

HUSKY LINERS BELMOR BFM1004M2 Manual

HUSKY LINERS

HUSKY LINERS BELMOR BFM1004M2 Manual

HUSKY LINERS 2179FR Manual

HUSKY LINERS

HUSKY LINERS 2179FR Manual

HUSKY LINERS 6650 Manual

HUSKY LINERS

HUSKY LINERS 6650 Manual

HUSKY LINERS 9134 Manual

HUSKY LINERS

HUSKY LINERS 9134 Manual

HUSKY LINERS 2991 Manual

HUSKY LINERS

HUSKY LINERS 2991 Manual

HUSKY LINERS 4707 User manual

HUSKY LINERS

HUSKY LINERS 4707 User manual

HUSKY LINERS 47954 User manual

HUSKY LINERS

HUSKY LINERS 47954 User manual

HUSKY LINERS BELMOR BFM1004A Manual

HUSKY LINERS

HUSKY LINERS BELMOR BFM1004A Manual

HUSKY LINERS 2053 Manual

HUSKY LINERS

HUSKY LINERS 2053 Manual

HUSKY LINERS 8931 Manual

HUSKY LINERS

HUSKY LINERS 8931 Manual

HUSKY LINERS 2995 Manual

HUSKY LINERS

HUSKY LINERS 2995 Manual

HUSKY LINERS 6365 Manual

HUSKY LINERS

HUSKY LINERS 6365 Manual

HUSKY LINERS 2628 Manual

HUSKY LINERS

HUSKY LINERS 2628 Manual

HUSKY LINERS 9178 Manual

HUSKY LINERS

HUSKY LINERS 9178 Manual

Popular Automobile Accessories manuals by other brands

BrandMotion 9002-9516 installation instructions

BrandMotion

BrandMotion 9002-9516 installation instructions

Inbay 241000-04-1 installation guide

Inbay

Inbay 241000-04-1 installation guide

Yakima PR3041 Fitting instructions

Yakima

Yakima PR3041 Fitting instructions

Uneek 4x4 JK-RB-ASM11 Fitting instructions

Uneek 4x4

Uneek 4x4 JK-RB-ASM11 Fitting instructions

Whispbar K834W Fitting instructions

Whispbar

Whispbar K834W Fitting instructions

SHO-ME 02.6216-6234-6252 Installation and maintenance instructions

SHO-ME

SHO-ME 02.6216-6234-6252 Installation and maintenance instructions

Cruz Evo Rack E28-158 Assembly instructions

Cruz

Cruz Evo Rack E28-158 Assembly instructions

Carefree of Colorado APEX Service manual

Carefree of Colorado

Carefree of Colorado APEX Service manual

weBoost Drive Reach Flex Fleet installation guide

weBoost

weBoost Drive Reach Flex Fleet installation guide

Veigel BHA00005 installation manual

Veigel

Veigel BHA00005 installation manual

SUPERTOOTH Bluetooth Handsfree Kit user guide

SUPERTOOTH

SUPERTOOTH Bluetooth Handsfree Kit user guide

Code 3 GMB-TH21 Installation and operation instruction

Code 3

Code 3 GMB-TH21 Installation and operation instruction

Motorola ATRIX MB860 user manual

Motorola

Motorola ATRIX MB860 user manual

Prorack VOYAGER TRAY manual

Prorack

Prorack VOYAGER TRAY manual

Ecco 21 Series Installation and operation instructions

Ecco

Ecco 21 Series Installation and operation instructions

Cruz Cargo SPro Assembly instructions

Cruz

Cruz Cargo SPro Assembly instructions

ACV 381094-28 installation manual

ACV

ACV 381094-28 installation manual

Atera SIGNO 045 052 User information

Atera

Atera SIGNO 045 052 User information

manuals.online logo
manuals.online logoBrands
  • About & Mission
  • Contact us
  • Privacy Policy
  • Terms and Conditions

Copyright 2025 Manuals.Online. All Rights Reserved.