Husky 000-000 User manual

Item # 000-000
Model # XXXXXXX
THANK YOU
We appreciate the trust and condence you have placed in Husky through the purchase of this [PRODUCT DESCRIPTION]. We strive to continually
create quality products designed to enhance your home. Visit us online to see our full line of products available for your home improvement needs.
Thank you for choosing Husky!
USE AND CARE GUIDE
120‐VOLT INFLATOR
Questions, problems, missing parts?
Before returning to the store, call
Husky Customer Service
8 a.m – 6 p.m., EST, Monday‐Friday
1-888-HD-HUSKY
HUSKYTOOLS.COM

2
Table of Contents
Table of Contents..........................................................2
Safety Information.........................................................2
Precautions ............................................................................2
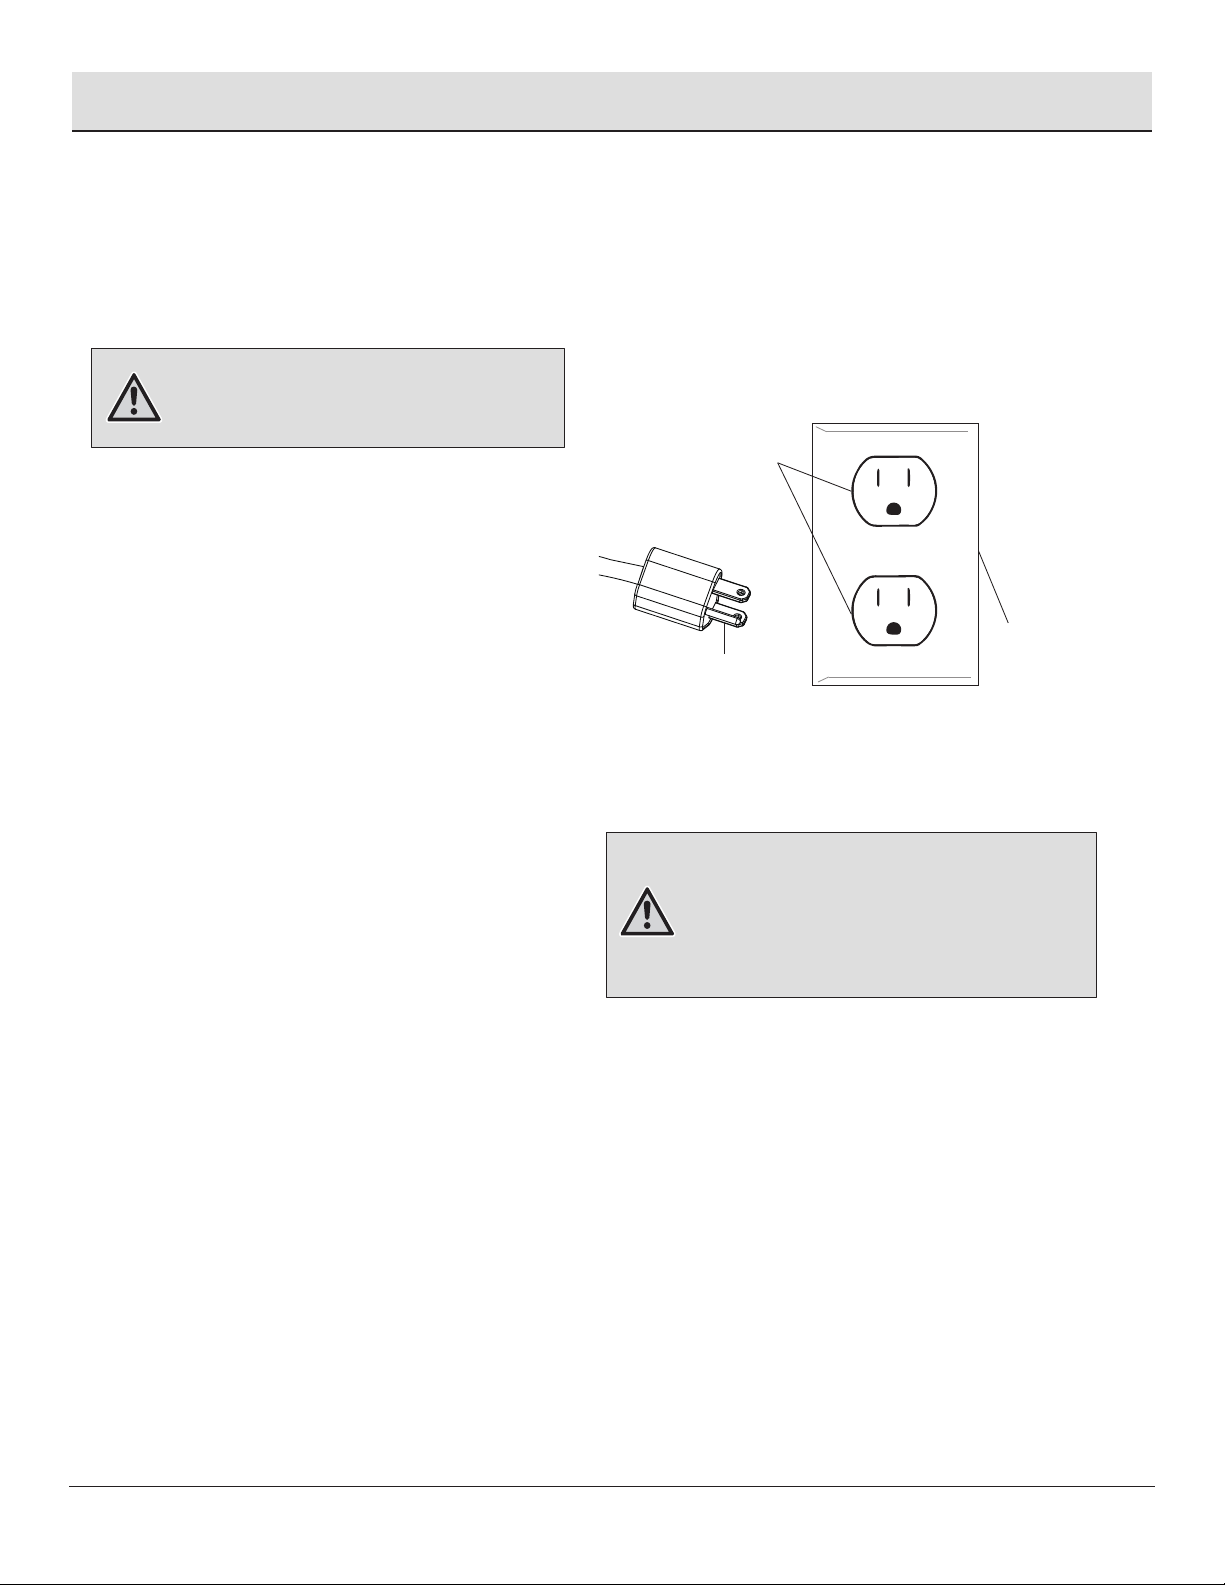
Grounding instructions ...........................................................3
Extension cords.......................................................................3
2-Year Limited Warranty ...............................................4
Pre-operation .................................................................4
Specications .... ....................................................................4
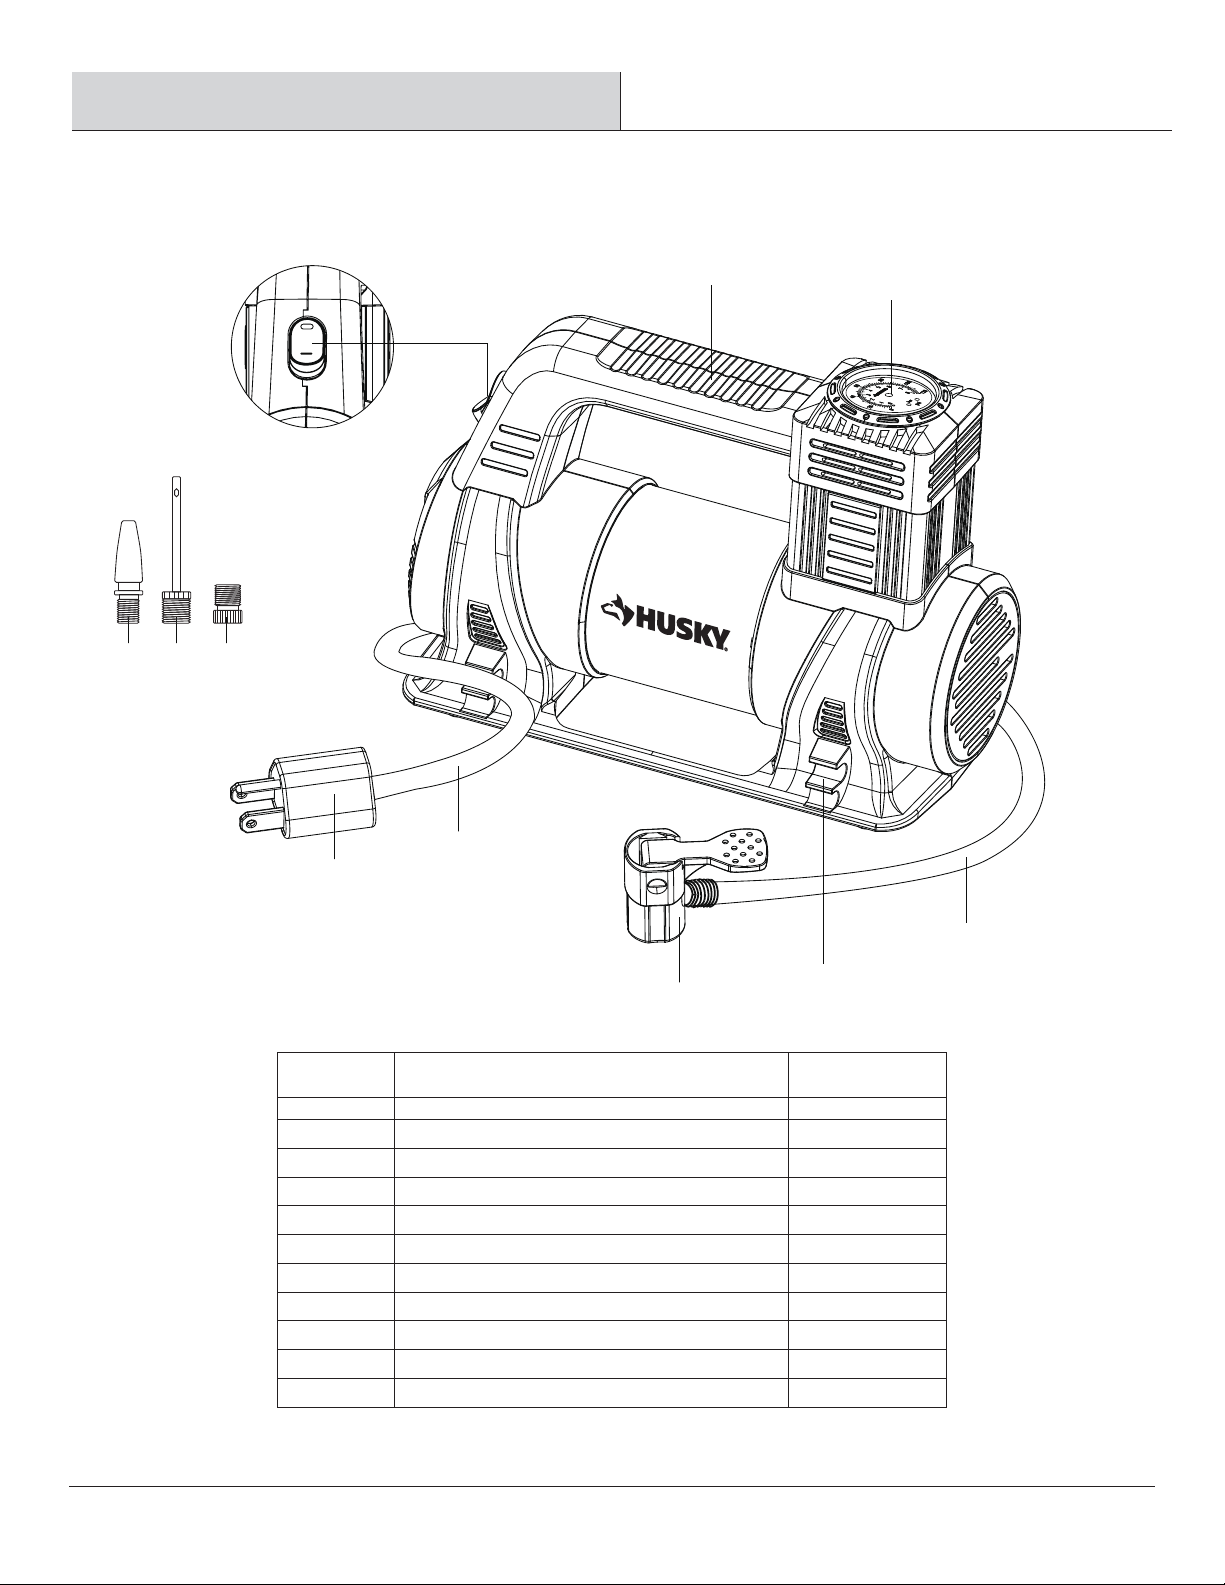
Package Contents ..................................................................5
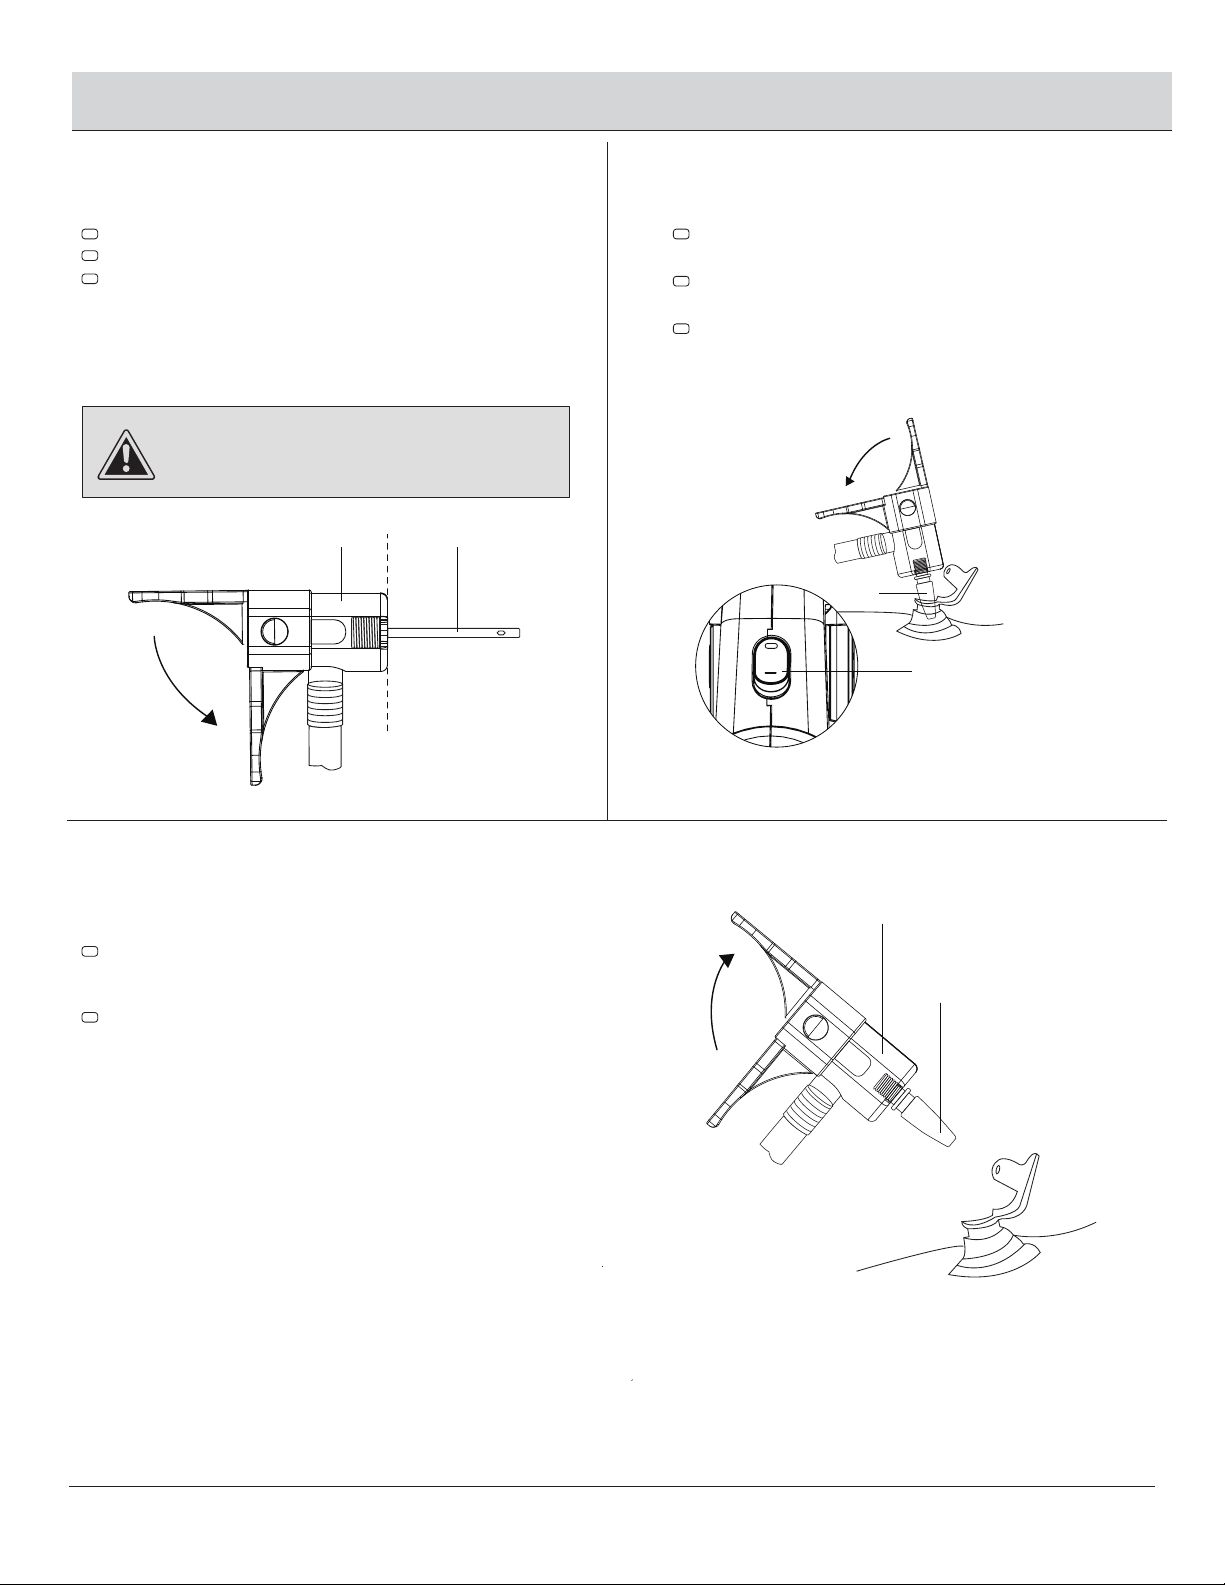
Operation – Inate Tires .............................................6
Operation – Inate Toys and Air Mattresses............ 7
Care and Cleaning.......................................................8
User maintenance instructions .............................................8
Troubleshooting .......................................................... 8
Recommended Pressure ............................................8
Safety Information
PRECAUTIONS
1. Save these instructions for future reference.
2. The safety instructions provided in this manual are
not intended to cover all possible conditions that may
occur during product operation. Always use common
sense and pay attention to all WARNING and CAUTION
statements in this manual.
3. Keep your work area clean and well lit. Cluttered
benches and dark areas increase the possibility of
personal injury or property damage.
4. Do not operate power tools in explosive atmospheres,
such as in the presence of ammable liquids, gases, or
dust.
5. Keep bystanders, children, and visitors away while
operating a power tool. Distractions can cause you to
lose control.
6. To protect against re, electric shock, and injury to
persons do not immerse the cord, plugs, or the
product in water or other liquids.
7. Close supervision is necessary when any appliance is
used by or near children.
8. Unplug from the outlet when not in use and before
cleaning.
9. Do not operate any appliance with a damaged cord or
plug or after the appliance malfunctions, or has been
damaged in any manner. Return the appliance to the
nearest authorized service facility for examination,
repair, or adjustment.
10. The use of accessory attachments not recommended
by the appliance manufacturer may result in re,
electric shock or injury to persons.
11. Do not let the supply cord hang over the edge of a table
or counter, or touch hot surfaces, such as theinatorhead.
12. Do not use the appliance for other than intended use.
13. Connect to a grounded outlet and use grounded
extension cords. Do not use a 3 to 2 adapter.
14. Risk of Injury – Do not direct the air stream towards
the body.
15. To reduce the risk of electric shock, do not expose to
rain. Store indoors when not in use.
16. Risk of Bursting – Use only recommended air‐handling
parts acceptable for pressures not less than 130 PSI.
17. This inator is designed to inate car tires, bike tires,
ATV tires, sports equipment, air mattresses, beach
toys, and other inatables. Do not use for any purpose
other than inating. If you do so, bodily harm or
personal injury can occur.
18. Allow the inator to cool down for 15 minutes after
each 5 minutes of continuous operation.
19. Turn the power off after using the ination.
20. The inator is not a toy. Keep away from children at all
times.
21. Do not carry the inator by the air hose or power cord
as damage may occur.
22. Do not leave the inator unattended while in
operation.
23. Do not over-inate the item you are inating. Follow
the manufacturer’s instructions for your item.

FOR HOUSEHOLD USE ONLY
Grounded
Outlet
Grounded
Outlet Box
Grounding
Pin
GROUNDING INSTRUCTIONS
EXTENSION CORDS
24. Keep the inator away from ammable areas/liquids at all times.
25. Do not operate the inator in wet or damp areas.
26. Operate the inator only with the accessories and or attachments that are included.
27. Always wear safety glasses when operating the inator.
MOC.SLOOTYKSUH3
aelP se contact 1-888-43-HUSKY for further assistance.
Safety Information (continued)
WARNING: Read and understand all instructions.
Failure to follow the instructions in this manual can
result in electric shock, re and/or serious personal
injury.
WARNING: Improper installation of the grounding
plug can result in a risk of electric shock. When repair
or replacement of the cord or plug is required, do not
connect the grounding wire to either at blade
terminal. The wire with insulation having an outer
surface that is green with or without yellow stripes is
the grounding wire.
This product must be grounded. In the event of an electrical
short circuit, the grounding reduces the risk of electric
shock by providing an escape wire for the electric current.
This product is equipped with a cord having a grounding
wire with an appropriate grounding plug. The plug must be
plugged into an outlet that is properly installed and
grounded in accordance with all local codes and ordinances.
Check with a qualied electrician or serviceman when the
grounding instructions are not completely understood, or
when in doubt as to whether the product is properly
grounded.
Do not modify the plug provided; if it does not t the outlet,
have the proper outlet installed by a qualied electrician.
This product is for use on a nominal 120‐V circuit and has a
grounding plug similar to the plug illustrated.
Only connect the product to an outlet having the same
conguration as the plug. Do not use an adapter with this
product.
If an extension cord must be used, use only a 3-wire extension cord that has a 3-blade grounding plug, and a 3-slot
receptacle that accepts the plug on the product. Make sure your extension cord is not damaged. When using an
extension cord, be sure to use one heavy enough to carry the current your product draws. For lengths less than 50
feet, 18 AWG extension cords shall be used.

SPECIFICATIONS
4
2-Year Limited Warranty
Pre-operation
If this Husky product fails due to a defect in material or workmanship within 2 years from date of purchase, return to any
Home Depot store for disposition.
Power Requirement
SCFM
Max.Pressure
120 VAC. 60Hz. 1.5A
0.47 SCFM @ 30psi
120 psi
Contact Customer Service at 1‐888‐HD‐HUSKY or visit www.huskytools.com

PACKAGE CONTENTS
A
MOC.SLOOTYKSUH5
aelP se contact 1-888-43-HUSKY for further assistance.
Pre-operation (continued)
C
B
D
G H I
K
JF
E
Part
A
B
C
D
E
F
G
H
I
J
K
Description
On/Off Power Switch
Grrying Handle
Backlight Analog Gauge
Power Cord
Grounded Plug
Air Hose Wrap
Mattress Nozzle
Sports Needle
Pesta Valve Adaptor
Quick Connect Valve Adaptor
Rubber Air Hose
Quantity
1
1
1
1
1
1
1
1
1
1
1

Connecting the inator
6
Operation – Inate Tires
1Operating the inator2
CAUTION: Do not over‐inate the item being inated.
Follow the manufacturer’s suggested PSI levels on the
item you are inating.
Place the inator on a at surface.
Plug the power cord into a grounded 120 volt outlet.
Connect the quick connect valve adaptor (J) to the
tire air valve by pushing the valve lever on the
adaptor (J) down until it is securely attached to the
tire air valve.
Move the On/Off switch (A) to the I position to turn
the inator on. Monitor the PSI on the pressure gauge
(C) to ll your item to the desired pressure.
Once you have reached your desired air pressure,
move the On/Off switch (A) to the Oposition.
Disconnecting the inator3
Remove the air hose (K) from the tire by lifting up on
the quick connect valve (J) lever and removing the
valve (J).
Unplug the power cord from the 120 Volt outlet and
allow the inator to cool.
A
C
J
k
J
k
+
D

MOC.SLOOTYKSUH7
aelP se contact 1-888-43-HUSKY for further assistance.
Operation – Inate Toys and Air Mattresses
J H
Connecting the inator1Operating the inator2
CAUTION: Do not over‐inate the item being inated.
Follow the manufacturer’s suggested PSI levels on the
item you are inating.
Place the inator on a at surface.
Plug the power cord into a grounded 120 volt outlet.
Select the appropriate ination accessory (G, H, or I)
and insert it onto the end of the quick connect valve
adaptor (J). Make sure that the accessory (G, H, or I) is
ush with the end of the quick connect nozzle (J) so
that the airow to the accessory is not blocked by the
tire valve pin inside the quick connect nozzle (J).
Insert the ination accessory into the desired item
you are inating.
Remove the ination accessory (G, H, or I)from the
quick connect valve adaptor (J).
Unplug the power cord from the 120 Volt outlet and
allow the inator to cool.
Move the On/Off switch (A) to the I position and
inate your item to the correct pressure.
Move the On/Off switch (A) to the O position when
you are nished inating to turn the inator off.
Disconnecting the inator3
G
A
J
G

8
Care and Cleaning
WARNING: these pressure ratings are
recommendations only. Always read and follow
manufacturers’ guidelines for specied pressure
settings.
Troubleshooting
Recommended Pressure
USER-MAINTENANCE INSTRUCTIONS
Problem
Car Tire
SUV Tire
Bike Tire
Sports Balls
25-35 psi
30-45 psi
40-110 psi
5-15 psi
Possible Cause Solution
lean the inator with a non‐abrasive slightly damp cloth as needed.
The unit will not start. The cord is not plugged in.
The circuit breaker is tripped.
Plug the cord into a working 120 Volt AC
power outlet.
Reset the circuit breaker.
1. Locate the inator in a clean, dry and well ventilated area. The inator pump and housing are designed to allow for
proper cooling. The ventilation openings on the inator are necessary to maintain proper operating temperature.
Do not place rags or other containers on or near these openings.
2. Wipe plastic parts clean using mild soap and warm water.
3. Any other servicing should be done by an authorized service representative.

Questions, problems, missing parts? Before returning to the store,
call Husky Customer Service
8 a.m. ‐ 6 p.m., EST, Monday‐Friday
1‐888‐HD‐HUSKY
HUSKYTOOLS.COM
Retain this manual for future use.
Table of contents
Other Husky Power Tools manuals

Husky
Husky HDC230 Service manual

Husky
Husky HDC230 User manual

Husky
Husky H3DETW User manual

Husky
Husky H12N User manual

Husky
Husky HDR650 User manual

Husky
Husky HSTC4150 Application guide

Husky
Husky DPFWS User manual

Husky
Husky H38CPRAT User manual

Husky
Husky HDR650 User manual

Husky
Husky H3DTWDIG User manual
Popular Power Tools manuals by other brands

Grip Rite
Grip Rite GRTS1200 Operator's manual and parts list

Ingersoll-Rand
Ingersoll-Rand MX60 Maintenance information

Fein
Fein 7 229 43 Original instructions

Huskie Tools
Huskie Tools REC-B658U Operation manual

Clarke
Clarke Air CAT217 Operating & maintenance instructions

NovoPress
NovoPress ACO203 operating manual