HUUM HIVE User manual

ELECTRIC SAUNA HEATER
HIVE
POÊLE ÉLECTRIQUE POUR SAUNA
FR
800827


3
HIVE
ELECTRIC SAUNA HEATER
Installation and operation manual
NB! The following instructions for electrical works must be carried out
by a certified electrician.
NB! This appliance is not intended for use by persons (including child-
ren) with reduced physical, sensory or mental capabilities, or lack of
experience and knowledge, unless they have been given supervision or
instruction concerning use of the appliance by a person responsible for
their safety.
NB! Children should be supervised to ensure that they do not play with
the appliance.
NB! The installation instructions for appliances for public saunas that
do not have a timer shall state that a pilot lamp showing that the heater
is switched on is to be installed in the aendant’s room. The previously
provided manual does not contain this information.
The HUUM HIVE electric sauna heater delivery set contains:
• electric heater
• installation and operation manual for the electric heater
NB! The electric heater also requires a control panel and stones.

4
THINGS TO CHECK BEFORE INSTALLATION
• Does the output (kW) match the volume (ft/m) of the sauna
room? See Table 1.
• In case there are any uninsulated brick, tile or glass walls in the
sauna room, an additional volume of 53 ft 1.5 m) should be
added to the sauna room for each such square meter of the wall.
• The suitable output of the heater will be determined based on
that volume according to Table 1.
• The producer’s warranty guarantee is invalid if the heater and
sauna room have been dimensioned incorrectly!
• Minimal safe distances between the sauna room’s ceiling and
walls to consider in installing the electric heater are listed in Table
2.
INSTALLATION
Positioning the heater
• The heater must be positioned in such a way that there is a safe
distance between flammable materials and the heater.
• The heater must be installed in a way that prevents people
from having physical contact with the heater or that dangerous
situations could emerge during the heating process.
• The heater holds approximately 550 lb 250 kg) of stones.
• The inputs of the power cable are on the boom cover of the
heater.
Table 1 Output
kW
240V)
Room Elements
kW 240V) Amps
ACircuit Brea-
ker
A
Wire
size
AWG
HIVE 6 6 176.6282 ft3
58 m3
2 25 30 10
HIVE 9 9 317.8530 ft3
915 m3
3 37,5 30 6

5
Table 1 Output
kW
240V)
Room Elements
kW 240V) Amps
ACircuit Brea-
ker
A
Wire
size
AWG
HIVE 12 12 424883 ft3
1225 m3
2 50 30 + 30 10 + 10
HIVE 15 15 5301060 ft3
1530 m3
2/3 62,5 50 + 50 6 + 6
HIVE 18 18 6361236 ft3
1835 m3
3 75 50 + 50 6 + 6
Table 2 Ø H ABWeight Quantity of stones*
HIVE 6 17.72 in
450 mm
29.53 in
750 mm
2.37 in
60 mm
22.25 in
565 mm
28.7 lb
13 kg
8x44 lb + 2x33 lb
8x20 kg + 2x15 kg
HIVE 9 17.72 in
450 mm
29.53 in
750 mm
3.55 in
90 mm
24.61 in
625 mm
33.1 lb
15 kg
8x44 lb + 2x33 lb
8x20 kg+ 2x15 kg
HIVE 12 21.85 in
555 mm
29.53 in
750 mm
4.73 in
120 mm
31.3 in
795 mm
44.1 lb
20 kg
12x44 lb + 2x33 lb
12x20 kg+ 2x15 kg
HIVE 15 21.85 in
555 mm
29.53 in
750 mm
5.91 in
150 mm
33.67 in
855 mm
46.3 lb
21 kg
12x44 lb + 2x33 lb
12x20 kg + 2x15 kg
HIVE 18 21.85 in
555 mm
29.53 in
750 mm
7.1 in
180 mm
36.03 in
915 mm
50.7 lb
23 kg
12x44 lb + 2x33 lb
12x20 kg + 2x15 kg
* Subtract two 44lb 20kg) boxes from the quantity given in the table
in case your heater has air-tunnel, as it fits less stones.

6
Connecting the heater to the power supply
• A method to disconnect all poles from the mains (a circuit
breaker) must be installed on the power circuit before the sauna
controller.
• Only a certified electrician is allowed to connect the heater to
the power supply.
• The power cable of the heater must meet the requirements of UL
62 in US and CSA 49 in Canada.
• It is recommended to connect the unit to the mains without an
earth-leakage circuit breaker.
• The maximum current intensity in the cross-sectional area of the
cable and circuit breaker are listed in Table 2.
• The cable must be secured to the clamp on the cover screw.
Aention! It is forbidden to use a non-heat-resistant cable with PVC
isolation as the power cable. The joint box must be waterproof and it
must be located up to 19.7 in 50 cm) from the floor.
• Open the cover of the heater’s electrical box.
• Aach the power cable on the terminal block according to the
circuit diagram.
• Close the cover.
• Fix the cable on the output with a cable strap.

7
Fiing the stones
• Make sure that the heating elements are not bent during the
process.
• There must be suicient air circulation around the heater
elements.
• Stack the stones sparsely between the heating elements. If the
stones have been stacked too close to each other, the heating
elements may overheat (= shorter useful life) and slow the
heating of the sauna.
• Stones with a diameter of 3.156.3 in 8–16 cm) are suitable for
the heater.
• The stones on the external surface of the heater must be
stacked close to one another. The heating elements must not be
visible.
• Using ceramic stones in the HIVE heater is allowed at the user’s
responsibility.
ATTENTION! IF THE STONE CONTAINER IS FILLED TOO SPARSELY, IT
POSES A FIRE HAZARD!
Before switching the heater on, the insulation resistance might prove
to be lower than the standard. The reason for that is the moisture that
seeped into the insulating layer during storage in the warehouse and
transportation.
The moisture evaporates after the electric heater has been heated
for 1–2 hours.
CONTROLLING THE HEATER
All certified control panels with thermal control may be used in
controlling the heater. The output of the heater must remain in the

8
interval determined by the control panel’s producer.
Product can be used only with controlunit with timer function. Inclu-
ding other than those for installation in public saunas, shall be provi-
ded with a timer. For appliances for use in blocks of flats, hotels and
similar locations, the operating period of the sauna heater shall be
limited to 12 h with a minimum rest period of 6 h before any automatic
restarting. For other appliances, the operating period of the timer
shall be limited to 6 h, automatic restarting not being allowed.
GUARD RAILS
• It is recommended to construct a guard rail around the heater.
We recommend using materials with low heat capacity and bad
thermal conductivity for the guard rail.
• Upon using flammable materials, it is necessary to leave the
specified minimal safety clearances between the heater and
flammable constructions.
ATTENTION! IF THE HEATER IS INSTALLED CLOSER TO FLAMMABLE
CONSTRUCTIONS THAN AT THE DISTANCE OF THE MINIMAL REQUIRED
PROTECTION BELT IT MAY CAUSE A FIRE HAZARD!
SAUNA ROOM
Wall materials and insulating the sauna room
In a sauna with electric heating, all massive heat accumulating wall
surfaces (brick, glass brick, rendering etc.) must be insulated to use
the electric heater with a regular output.
The sauna wall and ceiling construction is considered to be suf-
ficiently insulated:
• a carefully installed insulation wool layer of 4 in, minimum 2 in
100 mm, min. 50 mm);
• the construction is damp proofed with taped aluminium paper or

9
other reflective material;
• there is a 0.4 in 10 mm) air gap between the damp protection and
boarding
• light wooden boards with about a 0.50.65 in 12–16 mm) thick-
ness have been used for interior finishing;
• there is an air gap of at least 0.2 in 5 mm) on the edge of the
ceiling panels at the upper part of the wall panelling.
In order to use the heater with a regular output, it would be practical
to bring the ceiling of the sauna lower regular 83 - 91 in, min. height
of sauna room 75 in 2100–2300 mm, min. height of sauna room 1900
mm) so that the volume of the sauna room diminishes. The ceiling
is insulated with an insulation layer at least 4 in 100 mm) thick and
boarded according to the method described above. Wood should be
used to cover internal surfaces; an exception may be made for heat
resistant walls in the vicinity of the heater.
ATTENTION! Insulating the warm masonry wall has to be approved by a
fire inspector. It is prohibited to insulate flues that are in use!
ATTENTION! Covering the walls or floor with light protective material,
for example, mineral tiles that are installed directly on the surface of
the walls or ceiling might cause the dangerous overheating of the wall
or ceiling material.
Floor of the sauna room
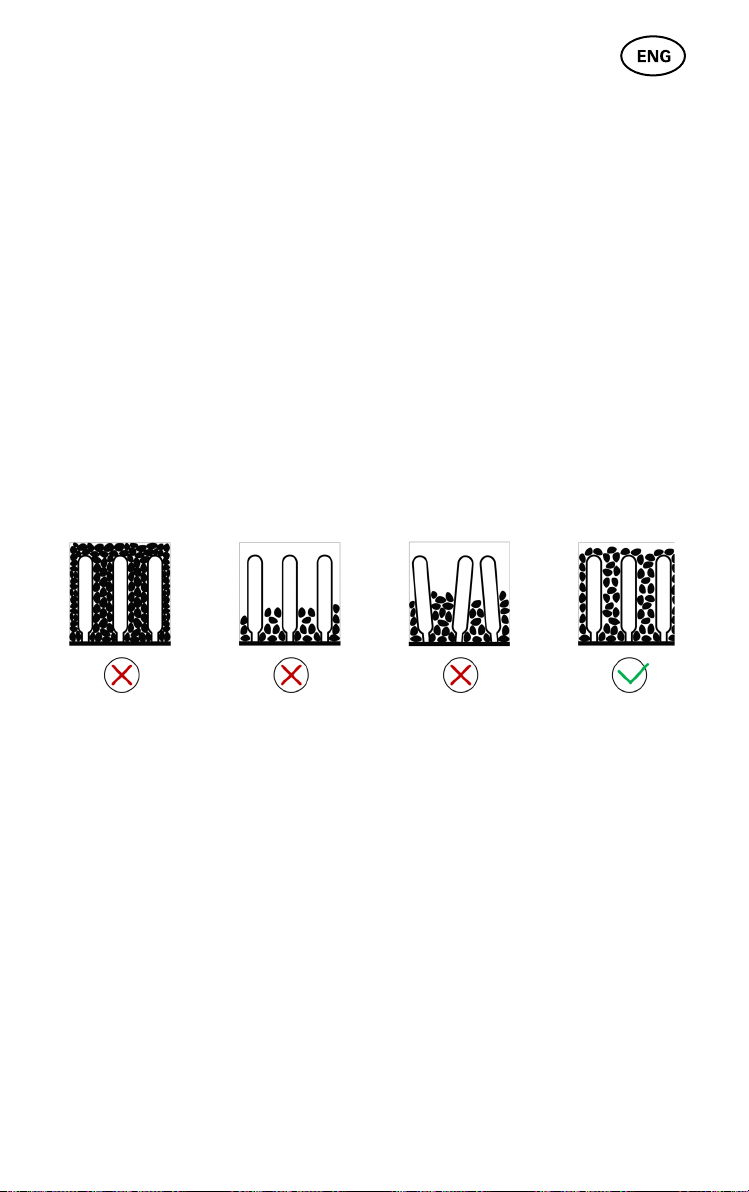
The heater stones in use crumble due to temperature changes. The
pieces breaking away from the heater stones and pebbles are was-
hed on the sauna floor with the steam-making water. Pieces of hot
stone may damage plastic flooring under and near the heater. Heater
stone particles and spray from the steam-making water (e.g., with
iron content) may absorb into the light joints of a tile floor. In order to
avoid aesthetic damage (caused by the reasons mentioned above),
ceramic tiles and dark joint filler should be used under and around
the heater.

10
Ventilation of the sauna
• In order to guarantee a suicient supply of oxygen and fresh air, the
sauna’s ventilation must be as eicient as possible. It is advisable
to direct the fresh air into the sauna room from above the heater
stones.
• As an alternative, the fresh air may be directed in from under the
heater.
• The air inlet must be equipped with an adjustable valve.
• The exhaust valve must be installed in the opposite wall from
the inlet valve at least 7.9 in 20 cm) above the height of the inlet
valve.
• It is advised to install a ventilation valve at the upper part of the
sauna room for the final ventilation.

11
WARNING!
• Before turning on the electric heater, always check the sauna
room and heater.
• The heater may be used only when it has been correctly filled
with stones.
• Do not cover the heater—this causes fire hazard.
• Do not touch a working heater, it causes burns.
• Incorrect ventilation of the sauna room may dry the wood too
much and cause a fire hazard in the sauna.
• Only tap water may be used for making steam.
• Never make steam by using a water hose.
• There must always be at least 2 in 5 cm) of fireproof heat
insulation under the boarding.
• Sauna doors must always open outwards.
• Do not use the sauna for a purpose it is not intended for.
• Do not install more than one heater into the sauna room.
• Undiluted sauna essences etc. may ignite when poured directly
onto the stones.
• Do not leave small children unaended in the sauna.
• Sudden cooling after staying in the steam room is not
recommended for people with poor health. Consult a doctor.
• Enjoy the sauna as long as it is comfortable for you.
• Keep this information at a safe place.
• The product’s warranty guarantee does not extend to heating
elements.

12

13
WARRANTY
Buyer is obligated to read user manual and follow instructions and
requirements presented. Damage to the product caused by not
following instructions and requirements will void warranty.
If any defects are found on the product, where manufacturer can be
blamed, then buyer has the right to demand fixing or replacing the
product. Demands must be made not later than 5 years after buying
the product. Purchase receipt needs to be presented when warranty
demands are made.
Warranty Terms:
• Warranty applies only to electric heaters that have been used
according to the manual.
• NB! Warranty does not cover heating elements. They are
considered as consumable parts.
• Warranty does not cover wear that occurs from natural usage.
• Warranty does not cover defects or wear caused by planned use.
• Warranty does not imply when:
• damage or defects are caused by transportation or other
actions not controlled by manufacturer.
• product has been damaged by carelessness or overload
• product has not been installed correctly
• product has been modified in any way
• warranty period is over
• product is not complete
All demands shall be presented directly to NEW WORLD
TRADING PARTNERS OÜ
address: Harjumaa, Tallinn linn, Uus tn 247, 10111


15
FR
HIVE
POÊLE ÉLECTRIQUE POUR SAUNA
Manuel d’installation et d’utilisation
NB! Les instructions mentionnées ci-après relatives aux travaux élect-
riques doivent être eectuées par un électricien agréé.
NB! Cet appareil ne doit pas être utilisé par des personnes (y compris
des enfants) dont les capacités physiques, sensorielles ou mentales
sont diminuées, ou encore qui manquent d’expérience et de connais-
sances, à moins qu’elles n’aient été supervisées ou instruites sur l’utili-
sation de l’appareil par une personne responsable de leur sécurité.
NB! Les enfants doivent être surveillés afin qu’ils ne puissent pas
jouer avec cet appareil.
NB! Les instructions concernant l’installation d’appareils pour saunas
publics qui ne sont pas équipés d’une minuterie doivent mentionner
l’obligation d’installer dans la pièce aenante du sauna un voyant
lumineux indiquant que le poêle est allumé. Le manuel qui était fourni
précédemment ne contient pas ces informations.
Le kit de livraison du poêle électrique HUUM HIVE pour sauna con-
tient:
• un poêle électrique
• un manuel d’installation et d’utilisation pour le poêle électrique
NB! Le poêle électrique nécessité une unité de commande et des pier-
res.

16
FR
POINTS À VÉRIFIER AVANT L’INSTALLATION
• La puissance (kW) est-elle adaptée au volume (ft/m) du
sauna? See Table 1. Voir tableau 1.
• Si le sauna comporte des parois non isolées en briques,
en carrelages ou en verre, il convient d’ajouter un volume
supplémentaire de 53 ft 1.5 m) au sauna pour chaque mètre
carré de paroi.
• La puissance appropriée du poêle est déterminée au tableau 1 en
fonction du volume de la pièce.
• La garantie du producteur n’est pas applicable si le poêle et le ont
mal été dimensionnés!
• Le tableau 2 indique les distances minimales de sécurité qui
doivent être respectées entre le plafond et les parois du sauna
lors de l’installation du poêle électrique.
INSTALLATION
Mise en place du poêle
• Le poêle doit être placé de manière à ce qu’il y ait une distance
de sécurité entre les matériaux inflammables et le poêle.
• Le poêle doit être installé de manière à éviter qu’il ne soit en
contact physique avec des personnes ou que des situations
dangereuses ne surviennent pendant le processus de chauage
• Le poêle peut contenir environ 550 lb 250 kg) de pierres.
• Les entrées du câble d’alimentation se trouvent sur le couvercle
inférieur du poêle.
Tab-
leau 1
Puis-
sance
kW
240V)
Pièce Éléments
kW 240V)
Ampérage
ADisjoncteur
ACalibre
du fil
AWG
HIVE 6 6 176.6282 ft3
58 m3
2 25 30 10
HIVE 9 9 317.8530 ft3
915 m3
3 37,5 30 6

17
FR
Tab-
leau 1
Puis-
sance
kW
240V)
Pièce Éléments
kW 240V)
Ampérage
ADisjoncteur
ACalibre
du fil
AWG
HIVE 12 12 424883 ft3
1225 m3
2 50 30 + 30 10 + 10
HIVE 15 15 5301060 ft3
1530 m3
2/3 62,5 50 + 50 6 + 6
HIVE 18 18 6361236 ft3
1835 m3
3 75 50 + 50 6 + 6
Tableau 2 Ø H ABPoids Quantité de pierres*
HIVE 6 17.72 in
450 mm
29.53 in
750 mm
2.37 in
60 mm
22.25 in
565 mm
28.7 lb
13 kg
8x44 lb + 2x33 lb
8x20 kg + 2x15 kg
HIVE 9 17.72 in
450 mm
29.53 in
750 mm
3.55 in
90 mm
24.61 in
625 mm
33.1 lb
15 kg
8x44 lb + 2x33 lb
8x20 kg+ 2x15 kg
HIVE 12 21.85 in
555 mm
29.53 in
750 mm
4.73 in
120 mm
31.3 in
795 mm
44.1 lb
20 kg
12x44 lb + 2x33 lb
12x20 kg+ 2x15 kg
HIVE 15 21.85 in
555 mm
29.53 in
750 mm
5.91 in
150 mm
33.67 in
855 mm
46.3 lb
21 kg
12x44 lb + 2x33 lb
12x20 kg + 2x15 kg
HIVE 18 21.85 in
555 mm
29.53 in
750 mm
7.1 in
180 mm
36.03 in
915 mm
50.7 lb
23 kg
12x44 lb + 2x33 lb
12x20 kg + 2x15 kg
* Si votre poêle est doté d’un conduit d’arrivée d’air, veuillez utiliser 2x44
lb 2x20 kg) de pierres en moins par rapport à la quantité indiquée dans le
tableau.

18
FR
Raccordement du poêle à l’alimentation électrique
• Un dispositif de déconnexion de tous les poêles du réseau
d’alimentation (un disjoncteur) doit être raccordé au circuit
électrique avant l’unité de commande du sauna.
• Seul un électricien agréé est autorisé à raccorder le poêle à
l’alimentation électrique.
• Le câble d’alimentation du poêle doit répondre aux exigences de
la norme UL 62 aux États-Unis et CSA 49 au Canada.
• Il est recommandé de raccorder l’appareil au réseau sans
dispositif à courant diérentiel résiduel.
• L’intensité maximale du courant dans la section transversale du
câble et du disjoncteur est indiquée au tableau 2.
• Le câble doit être sécurisé en le fixant à l’aide de l’aache
présente sur la vis du couvercle.
Aention! It is forbidden to use a non-heat-resistant cable with PVC
isolation as the power cable. The joint box must be waterproof and it
must be located up to 19.7 in 50 cm) from the floor.
• ouvrez le couvercle du boîtier électrique du poêle.
• Raccordez le câble d’alimentation au bornier selon le schéma
ci-dessous.
• Fermez le couvercle.
• Fixez le câble sur la sortie avec un serre-câble.

19
FR
Remplissage du poêle avec des pierres
• Veillez à ce que les éléments chauants ne soient pas
endommagés pendant le remplissage.
• Il faut qu’il y ait une circulation d’air suisante autour des éléments
chauants.
• Empilez les pierres de façon clairsemée entre les éléments
chauants. Si les pierres ont été empilées trop près les unes des
autres, les éléments chauants peuvent surchauer(= durée de
vie utile plus courte) et ralentir le chauage du sauna.
• Les pierres convenant au poêle sont d’un diamètre compris entre
3.15 et 6.3 in 816 cm)
• Sur la surface extérieure du poêle, les pierres doivent être
empilées les unes à côté des autres. Il ne faut pas que les
éléments chauants soient visibles.
• L’utilisation de pierres céramiques dans le poêle HIVE est
autorisée sous la seule responsabilité de l’utilisateur.
ATTENTION! SI LE COMPARTIMENT À PIERRES EST TROP PEU REMPLI,
ILPRÉSENTE UN RISQUE D’INCENDIE!
Avant d’allumer le poêle, la résistance d’isolement peut s’avérer
inférieure à la norme. Cela s’explique par l’humidité qui s’infiltre dans la
couche isolante lors du stockage dans l’entrepôt et le transport.
L’humidité s’évapore après avoir été chauée pendant 1 à 2 heures
par le poêle électrique.
COMMANDE DU POÊLE
Toutes les unités de commande certifiées dotées d’un contrôle ther-
mique peuvent être utilisées pour commander le poêle. La puissance
du poêle doit rester dans l’intervalle déterminé par le fabricant de

20
FR
l’unité de commande.
Le produit ne peut être utilisé qu’avec une unité de commande dotée
d’un minuteur. Ceux qui ne sont pas destinés à être installés dans
des saunas publics doivent également être munis d’un minuteur.
Pour les appareils destinés à être utilisés dans des immeubles, des
hôtels et des lieux similaires, la durée de fonctionnement du poêle
est limitée à 12 h, avec une période de repos minimale de 6 h avant
tout redémarrage automatique. Pour les autres appareils, la durée de
fonctionnement du minuteur est limitée à 6 h, le redémarrage auto-
matique n’étant pas autorisé.
BARRIÈRE DE SÉCURITÉ
• Il est recommandé d’installer une barrière de sécurité tout autour
du poêle. Nous recommandons d’utiliser des matériaux ayant une
faible capacité thermique et une mauvaise conductivité ther-
mique pour la barrière de sécurité.
• Lors de l’utilisation de matériaux inflammables, il convient de
respecter les distances de sécurité minimales imposées entre le
poêle et les constructions inflammables.
ATTENTION! LE NONRESPECT DES DISTANCES MINIMALES REQUISES
LORS DE L‘INSTALLATION D’UN POÊLE AUGMENTE LE RISQUE D’INCEN-
DIE!
SAUNA
Revêtements muraux et isolation du sauna
Dans un sauna chaué à l’électricité, toutes les surfaces murales qui
accumulent énormément de chaleur (brique, brique de verre, plâtre,
etc.)doivent être isolées pour pouvoir faire fonctionner le poêle
électrique à une puissance moyenne.
La construction des cloisons et du plafond du sauna est
considérée comme suisamment isolée lorsque:
Other manuals for HIVE
3
Table of contents
Languages:
Other HUUM Electric Heater manuals
Popular Electric Heater manuals by other brands

MrHeater
MrHeater MHBEW150FATRW Operating instructions and owner's manual

Procom
Procom MN060HBA Owner's operation & installation manual

Warmtech
Warmtech RHPM1203-48 Original instructions

Optimus
Optimus H-4439 Instruction manual and owner's guide

Costway
Costway FP10360US manual

Protemp
Protemp PT-015-120 User's manual & operating instructions