HUUM DROP 4.5 User manual

[email protected] www.huum.eu
DROP
ELECTRIC SAUNA HEATER 3–11
SAUNA ELEKTRIKERIS 13–21
SAUNA SÄHKÖKIUKAAN 23–31
ELEKTRISCHER SAUNAOFEN 33–41
ЭЛЕКТРОКАМЕНКИ 43–51
ELEKTRISKT BASTUAGGREGAT 53–61
PIEC ELEKTRYCZNYDO SAUNY 63–71
ELEKTRICKÁ SAUNOVÁ PEC 73–81
ELEKTRICKÝ OHŘÍVAČ 83–91
POÊLE ÉLECTRIQUE 93-101


3
DROP
ELECTRIC SAUNA HEATER
Installation and operation manual
NB! The following instructions for electrical works must be carried out
by a certified electrician.
The product must be installed as a complete set. The HUUM DROP
electric sauna heater delivery set contains:
• electric heater;
• installation and operation manual for the electric heater;
• the 9 kW DROP sauna heater set includes a heat guiding device.
NB! The electric heater requires a control panel and stones.

4
THINGS TO CHECK BEFORE INSTALLATION
• Does the output (kW) match the volume (m) of the sauna room?
See Table 1.
• In case there are any uninsulated brick, tile or glass walls in the
sauna room, an additional volume of 1,5 m should be added to
the sauna room for each such square meter of the wall.
• The suitable output of the heater will be determined based on
Table 1.
• The producer’s warranty guarantee is invalid if the heater and
sauna room have been dimensioned incorrectly!
• Minimal safe distances between the sauna room’s ceiling and
walls in view of installing the electric heater are listed in Table1.
INSTALLATION
Positioning the heater
• The heater must be positioned in such a way that there is a safe
distance between flammable materials and the external surfaces
of the heater. See Figure.
• In installing the heater, it must be prevented that people could
have physical contact with the heater or that other dangerous
situations could emerge during the heating process.
• Remove the protective film from the steel plate behind the
heater.
• The method of mounting the heater must guarantee that it
remains securely on the wall. The full weight of 65 kg should be
considered upon installing the heater on the wall.
• The input of the power cable is located 6.5 cm to the left of the
centre of the heater and 8 cm from the lower edge when looking
from the front.

5
Table 1
Output
kW Room
m3A
mm B
mm C
mm D
mm E
mm Min gap
mm
DROP 4.5 4.5 3–7 100 590 435 170 310 1200
DROP 6 6 5–10 120 630 455 190 310 1200
DROP 9 9 8–15 150 690 485 220 310 1200
Connecting the heater to the power supply
• Only a certified electrician is allowed to connect the heater to the
power supply.
• A rubber insulated SIHFJB cable or an equivalent cable must be
used as the connection cable.
• It is recommended to connect the unit to the mains without an
earth-leakage circuit breaker.
• The maximum current intensity in the cross-sectional area of the
cable and circuit breaker are listed in Table 2.

6
Table 2 Output
kW Elements
kW Circuit Breaker
APower cable
mm2
DROP 4.5 4.5 1.5 3 × 10 5 × 1.5
DROP 6 6 2 3 × 10 5 × 1.5
DROP 9 9 1.5 / 2 3 × 16 5 × 2.5
NB! It is forbidden to use a non-heat-resistant cable with PVC isolation
as the power cable. The joint box must be waterproof and it must be
located up to 50 cm from the floor.
• Open the cover of the heater’s electrical box.
• Aach the power cable on the terminal block according to the
circuit diagram.
• Close the cover.
• Fix the cable on the output with a cable strap.
• Install the heater on the wall frame.
Fiing the stones
Upon stacking the stones, one should monitor that the heating
elements are not bent and that there is a suicient air circulation
around the heater elements.
• The stones must be washed clean before laying.
• Stack the stones sparsely between the heating elements. When
the stones have been stacked too close to each other, the heating
elements may overheat (= shorter useful life) and slow the heating of
the sauna.
400V 3N
NL1 L2 L3

7
• Stones with a diameter of 5–10 cm are suitable for the heater.
• The stones on the external surface of the heater must fully cover
the heating elements. The heating elements must not be visible.
• The external surface of the stone container must be stacked full
as tightly as possible; the surface of the heating elements must
not be visible.
• Using ceramic stones in the DROP heater is allowed upon the
user’s responsibility.
ATTENTION!
A TOO SPARSELY FILLED STONE CONTAINER CAUSES FIRE HAZARD!
Before switching the heater on, the insulation resistance might prove
to be lower than the standard.
The reason for that is the moisture seeped into the insulating layer
during storage in the warehouse and transportation. The moisture
evaporates in 1–2 hours of heating the electric heater.
Controlling the heater
All certified control panels may be used in controlling the heater.
The output of the heater must remain in the interval determined by
the control panel’s producer.
NB! Installing the heater closer to flammable constructions than at the
distance of the minimal required protection belt may cause fire hazard.

8
SAUNA ROOM
Wall materials and insulating the sauna room
In a sauna with electric heating, all massive heat accumulating wall
surfaces (brick, glass brick, rendering etc.) must be insulated to use
the electric heater with a regular output.
The following sauna wall and ceiling construction is considered
to be suiciently insulated:
• a carefully installed insulation wool layer of 100 mm (min. 50 mm);
• the construction is damp proofed with taped aluminium paper or
other reflective material;
• there is a 10 mm air gap between the damp protection and
boarding;
• a light wooden board that is about 12–16 mm thick has been used
for interior finishing;
• there is an air gap of at least 5 mm on the edge of the ceiling
panels at the upper part of the wall panelling.
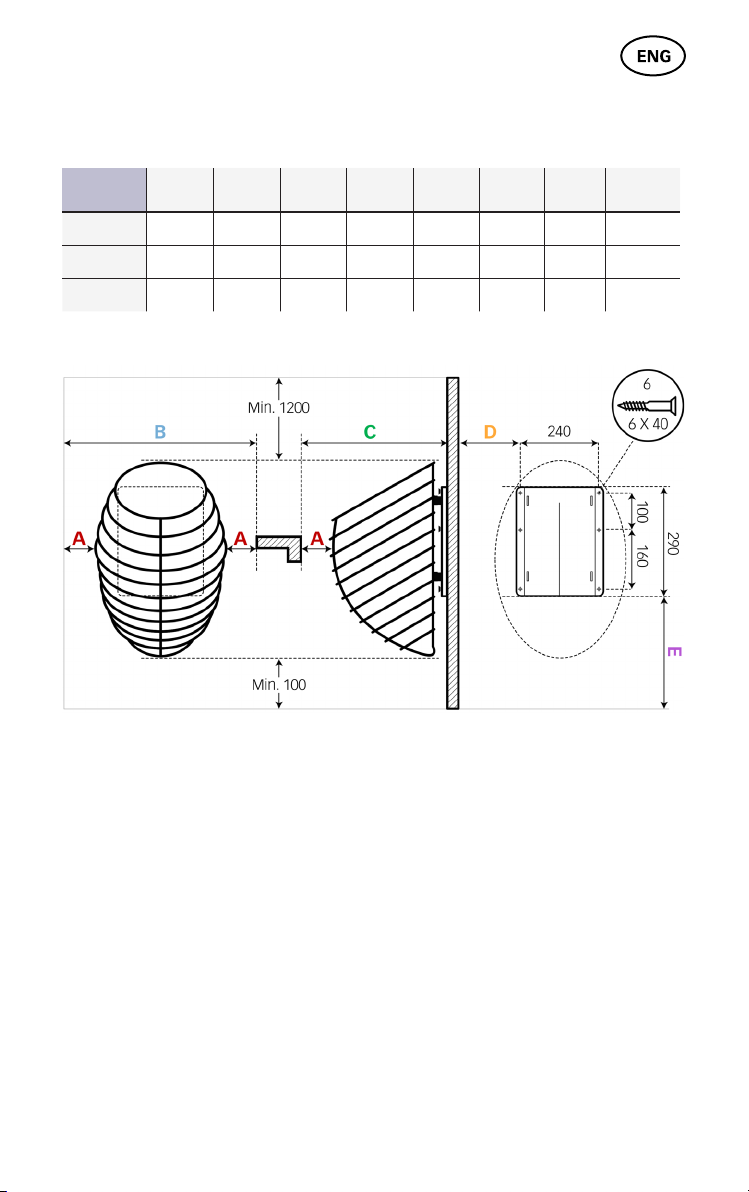
In order to use the heater with a regular output, it would be practical
to bring the ceiling of the sauna lower (regular 2100 mm – 2300 mm,
min. height of sauna room 1900 mm) so that the volume of the sauna
room diminishes. The ceiling is insulated with an insulation laer at
least 100 mm thick and boarded according to the method described
above.
Wood should be used to cover internal surfaces; an exception may be
made for heat resistant walls in the vicinity of the heater.
ATTENTION! Insulating the heat barrier has to be approved by the fire
inspector. Insulating flues in use is forbidden!
NB! Covering the walls or floor with light protective material, for
example, mineral tiles that are installed directly on the surface of the
walls or ceiling might cause the dangerous overheating of the wall or
ceiling material.

9
Darkening of the sauna room walls
Due to heat, the wood material in the sauna room darkens in time.
If you use wood protection products, you may notice that the wall
above the heater darkens before long. The darkening process is also
caused by the fine stone dust, breaking away from the heater stones
and lifted up by the airflow. If you follow the producer’s instructions
upon installing the heater, the flammable materials in the sauna room
will not heat to a dangerous level. The highest allowed temperature
for the wall and ceiling surfaces is 140˚C.
Floor of the sauna room
The heater stones in use crumble due to temperature changes.
The pieces and pebbles breaking away from the heater stones are
washed on the sauna’s floor with the steam-making water. Hot stone
parts may damage plastic flooring under and near the heater.
Heater stone particles and sprays from the steam-making water (e.g.,
with iron content) may absorb into the light joints of a tile floor. In
order to avoid aesthetic damage (caused by the reasons mentioned
above), ceramic tiles and dark joint filler should be used under and
around the heater.
Ventilation of the sauna
In order to assure a suicient oxygen supply and fresh air, the sauna’s
ventilation must be as eicient as possible. It is advisable to direct
the fresh air into the sauna room from above the heater stones. As an
alternative, the fresh air may be directed in from under the heater.
The air inlet must be equipped with an adjustable valve. The exhaust
valve must be installed in the opposite wall from the heater at least
20 cm above the inlet valve.

10
WARNING!
• Before turning on the electric heater, always check the sauna
room and heater.
• The heater may be used only when it has been correctly filled
with stones.
• Do not cover the heater—this causes fire hazard.
• Do not touch a working heater, it causes burns.
• Ventilating the sauna room incorrectly may dry the wood too
much and cause a fire hazard in the sauna.
• Only tap water may be used for making steam.
• Never make steam by using a water hose.
• There must always be at least 5 cm of fireproof heat insulation
under the boarding.
• Sauna doors must always open outward.
• Do not use the sauna for any other purpose than it is meant to be
used.
• Do not install more than one heater in the sauna room.
• Undiluted sauna essences etc. may ignite when poured directly
on the stones.
• Do not leave small children in the sauna unaended.
• Sudden cooling after staying in the steam room is not
recommended for people with poor health. Consult a doctor.
• Enjoy the sauna as long as it is comfortable for you.
• Keep this information in a secure place.
• The product’s warranty guarantee does not extend to heating
elements.

11
WARRANTY
Buyer is obligated to read user manual and follow instructions and
requirements presented. Damage to the product caused by not
following instructions and requirements will void warranty.
If any defects are found on the product, where manufacturer can be
blamed, then buyer has the right to demand fixing or replacing the
product. Demands must be made not later than 5 years after buying
the product. Purchase receipt needs to be presented when warranty
demands are made.
Warranty Terms
• Warranty applies only to electric heaters that have been used
according to the manual
• NB! Warranty does not cover heating elements. They are
considered as consumable parts.
• Warranty does not cover wear that occurs from natural usage.
• Warranty does not cover defects or wear caused by planned use.
• Warranty does not imply when:
• damage or defects are caused by transportation or other
actions not controlled by manufacturer;
• product has been damaged by carelessness or overload;
• product has not been installed correctly;
• product has been modified in any way;
• warranty period is over;
• product is not complete.
Find the latest updates on our website www.huum.eu


13
DROP
SAUNA ELEKTRIKERIS
Paigaldus- ja kasutusjuhend
NB! Käesolevas juhendis kirjeldatud elektritöid tohib teostada vaid
sertifitseeritud elektrik.
Toode peab olema paigaldatud komplektselt. HUUM DROP elektrike-
rise tarnekomplekti kuulub:
• elektrikeris;
• elektrikerise paigaldus– ja kasutusjuhend;
• 9 kW DROP kerise komplekti kuulub kuumasuunaja.
NB! Elektrikeris vajab juhtpulti ja kive.

14
ENNE PAIGALDAMIST KONTROLLIDA
• Kas kerise võimsus (kW) vastab leiliruumi ruumalale (m3)?
(Vaata tabel 1.
• Juhul, kui leiliruumis leidub isoleerimata tellis-, kahhel- või
klaasseinu, tuleb iga taolise seina ruutmeetri kohta arvestada 1,5
m3täiendavat leiliruumi ruumala. Selle järgi määratakse tabeli 1
abil kindlaks kerise sobilik võimsus.
• Leiliruumi lae ja seinte minimaalsed ohutuskaugused elektrikerise
paigutamisel on toodud tabelis 1.
• Tootja garantii ei kehti, kui keris ja leiliruum on valesti
dimensioonitud!
PAIGALDAMINE
Kerise paigutamine
• Keris tuleb paigutada nii, et oleks tagatud ohutud vahekaugused
süivate materjalide ja kerise välispindade vahel.
• Kerise paigaldusega peab olema välistatud inimese ja kerise
füüsiline kontakt kütmise ajal või muude ohtlike olukordade
tekkimine.
• Eemaldage kerise taga olevalt terasplaadilt kaitsekile.
• Kerise kinnitamise meetod peab tagama kerise seinal püsimise.
Seinale kinnitamisel tuleb arvestada vähemalt 65 kg täiskaaluga.
• Toitekaabli sisend asub kerise tsentrist eestpoolt vaadates 6,5
cm vasakul ja 8 cm alumisest servast.

15
Tabel 1 Võimsus
kW Ruum
m3A
mm B
mm C
mm D
mm E
mm Min. vahe
mm
DROP 4.5 4.5 3–7 100 590 435 170 310 1200
DROP 6 6 5–10 120 630 455 190 310 1200
DROP 9 9 8–15 150 690 485 220 310 1200
Elektrivõrguga ühendamine
• Kerist tohib elektrivõrguga ühendada ainult sertifitseeritud
elektrik.
• Ühenduskaablina tuleb kasutada kummiisolatsiooniga SIHFJB
kaablit või sellele võrdväärset.
• Kaabli ristlõikepindala ja kaitsme maksimaalne voolutugevus on
toodud tabelis 2.
• Soovitatav on seade ühendada vooluvõrku ilma rikkevoolu
kaitsmelülitita.

16
Tabel 2 Võimsus
kW Küekehad
kW Kaitselüliti
AToitekaabel
mm2
DROP 4.5 4.5 1.5 3×10 5×1.5
DROP 6 6 2 3×10 5×1.5
DROP 9 9 1.5 / 2 3×16 5×2.5
Tähelepanu! Kerise toitekaablina on keelatud kasutada kuumust
mietaluvat PVC-isolatsiooniga kaablit. Harutoos peab olema veekindel
ja see peab paiknema põrandast max 50 cm kõrgusel.
• Avage kerise elektrikarbi kaas.
• Ühendage toitekaabel vastavalt elektriskeemile klemmliistule.
• Sulgege kaas.
• Fikseerige kaabel väljaviigule kaablivitsaga.
• Paigaldage keris seinaraamile.
Kivide paigutamine
Kivide ladumisel tuleb jälgida, et küekehad ei painduks ja oleks
tagatud piisav õhuringlus.
• Enne ladumist soovitame kivid puhtaks pesta.
• Küekehade vahele laduge kivid hõredalt. Liiga tihedalt laotud kivid
põhjustavad küekehade ülekuumenemise (= lühem kasutusaeg) ja
aeglustavad sauna kuumenemist.
• Kerisele sobivad kivid, mille läbimõõt on 5–10 cm.
400V 3N
NL1 L2 L3

17
• Kerise välispinnal peavad kivid küekehasid täielikult katma.
Küekehasid ei tohi näha olla.
• Kiviruumi välispind laotakse võimalikult tihedalt, küekehade pind ei
tohi paista.
• Keraamiliste kivide kasutamine DROP kerises on lubatud omal
vastutusel.
TÄHELEPANU!
LIIGA HÕREDALT TÄIDETUD KIVIRUUM TEKITAB TULEOHTU!
Esmakordsel kerise sisselülitamisel võib isolatsioonitakistus ajutiselt
osutuda normist väiksemaks.
Selle põhjuseks on laos säilitamise ja transportimise ajal
isolatsioonikihi sisse imbunud niiskus. Niiskus aurustub elektrikerise
12 tunnise kuumutamise jooksul.
Kerise juhtimine
Kerise juhtimisel võib kasutada kõiki sertifitseeritud
juhtimisseadmeid.
Kerise võimsus peab jääma juhtimisseadme tootja poolt määratud
töövõimsuse vahemikku.
NB! Kerise paigaldamine süivatele konstruktsioonidele lähemale,
kui näevad ee minimaalsed ohutuskujad, võib põhjustada tuleohu.

18
LEILIRUUM
Leiliruumi isoleerimine ja seinamaterjalid
Elektriküega saunas tuleb kõik massiivsed soojust akumuleerivad
seinapinnad (tellis, klaastellis, krohv jm. vastavad) normaalse
võimsusega kerise kasutamiseks isoleerida.
Piisavalt isoleerituks võib pidada sauna sellist seina- ja
laekonstruktsiooni, kus:
• hoolikalt paigaldatud isolatsioonivillakiht on 100 mm (min 50 mm;
• konstruktsiooni niiskustõkkeks on teibitud alumiiniumpaber või
muu peegeldav materjal;
• niiskustõkke ja voodrilaua vahel on 10 mm õhuvahe;
• siseviimistluseks on kerge, umbes 12–16 mm paksune puidust
voodrilaud;
• seinavoodri ülaosas laepaneelide piiril on vähemalt 5 mm pikkune
õhuvahe.
Normaalse võimsusega kerise kasutamiseks oleks otstarbekas tuua
sauna lage allapoole (norm. 2100 mm – 2300 mm, min saunakõrgus
1900 mm), millega leiliruumi kubatuur väheneb. Lagi isoleeritakse
vähemalt 100 mm paksuselt ja vooderdatakse ülal kirjeldatud viisil.
Sisepindade kaeks tuleb kasutada puitu, erandiks võivad olla
kuumuskindlad seinad kerise vahetusläheduses.
TÄHELEPANU! Soojamüüride isoleerimine tuleb kooskõlastada
tuletõrjeinspektoriga. Kasutatavate lõõride isoleerimine on keelatud!
TÄHELEPANU! Seinte või lae katmine kergkaitsega, näiteks
mineraalplaadiga, mis paigaldatakse otse seina või lae pinnale, võib
põhjustada seina- või laematerjalide ohtliku ülekuumenemise.

19
Saunaseinte tumenemine
Kuumusest tulenevalt leiliruumi puitmaterjal tumeneb aja jooksul.
Puidukaitsevahendi kasutamine korral võib täheldada, et kerise
kohal olev sein tõmbub peagi tumedaks. Tumenemist põhjustab
ka kerisekividest murenev ja õhuvooluga üles tõusev peen
kivitolm. Järgides paigaldamisel tootja antud üldaktsepteeritud
paigaldusjuhendeid, ei kuumene leiliruumi põlevad materjalid
ohtlikult kuumaks. Leiliruumi seina- ja laepindade kõrgeim lubatud
temperatuur on 140˚C.
Leiliruumi põrand
Temperatuurimuudatustest tingituna kasutatavad kerisekivid
murenevad. Kividest eralduvad tükid ja peened kivid uhutakse koos
leiliveega sauna põrandale. Kuumad kiviosad võivad kerise all ja
läheduses kahjustada plastkaega põrandaid. Kerisekivide ja leilivee
pritsmed (näiteks rauasisaldus) võivad imenduda plaatpõranda
heledasse vuuki.
Esteetiliste kahjustuste ärahoidmiseks (tingituna ülalmainitud
põhjustest) tuleks kerise all ja ümbruses kasutada keraamilisi plaate
ja tumedat vuugitäidet.
Sauna ventilatsioon
Küllaldase hapnikuvarustuse ja värske õhu tagamiseks peab sauna
ventilatsioon olema võimalikult tõhus. Värske õhk on soovitatav
juhtida leiliruumi kerisekivide kohale. Alternatiivina võib värske õhu
juhtida kerise alla.
Sissetõmbeava tuleb varustada reguleeritava klapiga. Väljalaskeklapp
paigaldada kerise vastasseina sisselaskeklapist vähemalt 20 cm võrra
kõrgemale.

20
HOIATUS!
• Enne elektrikerise sisselülitamist kontrollige alati leiliruumi ja
kerist.
• Kerist võib kasutada vaid korrektselt kividega täidetuna.
• Ärge katke kerist - see tekitab tuleohtu.
• Ärge puudutage köetud kerist, see põhjustab põletust.
• Leiliruumi vale ventileerimine võib põhjustada puidu liigset
kuivamist ja luua saunas tuleohtu.
• Leili viskamiseks võib kasutada vaid kraanive.
• Ärge kunagi kasutage leili tekitamiseks veevooliku abi.
• Alati peab peale laudist olema vähemalt 5 cm tulekindlat
soojusisolatsiooni.
• Sauna uksed peavad alati avanema väljapoole.
• Ärge kasutage sauna muuks otstarbeks kui saunatamine.
• Ärge paigaldage üle ühe kerise sauna leiliruumi.
• Lahjendamata sauna lõhnaained jm võivad otse kividele valades
süida.
• Ärge jätke väikelapsi järelvalveta sauna.
• Nõrga tervise korral ei ole soovituslik järsk jahutamine peale leili.
Konsulteerige arstiga.
• Nautige saunaskäiku nii kaua kuni see on teile mugav.
• Hoidke seda teavet kindlas kohas.
• Toote garantii ei laiene küe-elementidele.
This manual suits for next models
4
Table of contents
Languages:
Other HUUM Electric Heater manuals