HUUM HIVE User manual

ELECTRIC SAUNA HEATER
SAUNA ELEKTRIKERIS
SAUNA SÄHKÖKIUKAAN
ELEKTRISCHER SAUNAOFEN
ЭЛЕКТРОКАМЕНКИ
ELEKTRISKT BASTUAGGREGAT
STUFA ELETTRICA PER SAUNA
HIVE
[email protected] www.huum.eu


3
HIVE
ELECTRIC SAUNA HEATER
Installation and operation manual
NB! The following instructions for electrical works must be carried out
by a certified electrician.
The HUUM HIVE electric sauna heater delivery set contains:
• electric heater
• installation and operation manual for the electric heater
NB! The electric heater also requires a control panel and stones.

4
THINGS TO CHECK BEFORE INSTALLATION
• Does the output (kW) match the volume (m3) of the sauna room?
See Table 1.
• In case there are any uninsulated brick, tile or glass walls in the
sauna room, an additional volume of 1.5 m³ should be added to the
sauna room for each such square meter of the wall.
• The suitable output of the heater will be determined based on that
volume according to Table 1.
• The producer’s warranty guarantee is invalid if the heater and
sauna room have been dimensioned incorrectly!
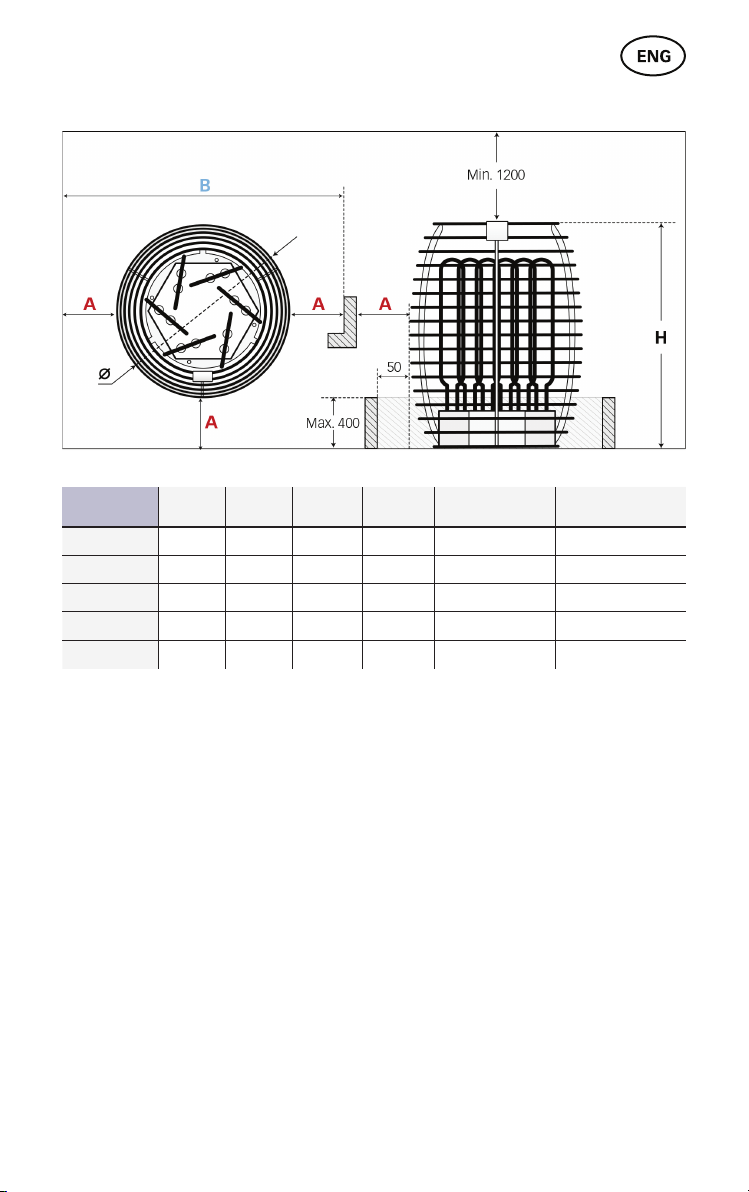
• Minimal safe distances between the sauna room’s ceiling and walls
to consider in installing the electric heater are listed in Table 2.
INSTALLATION
Positioning the heater
• The heater must be positioned in such a way that there is a safe
distance between flammable materials and the heater.
• The heater must be installed in a way that prevents people
from having physical contact with the heater or that dangerous
situations could emerge during the heating process.
• The heater holds approximately 250 kg of stones.
• The inputs of the power cable are on the bottom cover of the
heater.
Table 1 Output
kW Room
m2Weight
kg Measures
mm Quantity of stones*
kG
HIVE 6 6 5-8 13 455 x 455 x 800 8x20 + 2x15
HIVE 9 9 9-15 15 455 x 455 x 800 8x20 + 2x15
HIVE 12 12 12-25 20 555 x 555 x 800 12x20 + 2x15
HIVE 15 15 15-30 21 555 x 555 x 800 12x20 + 2x15
HIVE 18 18 18-35 23 555 x 555 x 800 12x20 + 2x15
* Subtract two 20kg boxes from the quantity given in the table in case your
heater has air-tunnel, as it fits less stones.

5
Table 2 Ø
mm H
mm A
mm B
mm Fuse
APower Cable
mm2
HIVE 6 450 750 60 570 3 x 10 / 1 x 10 5 x 2,5
HIVE 9 450 750 90 630 3 x 16 / 1 x 16 5 x 2,5
HIVE 12 555 800 120 790 3 x 20 / 1 x 20 5 x 4
HIVE 15 555 800 150 850 3 x 25 / 1 x 25 5 x 4
HIVE 18 555 800 180 910 3 x 32 / 1 x 32 5 x 6
Connecting the heater to the power supply
• Only a certified electrician is allowed to connect the heater to the
power supply.
• A rubber insulated HO7RN-F cable or an equivalent cable must be
used as the connection cable.
• It is recommended to connect the unit to the mains without an
earth-leakage circuit breaker.
• The maximum current intensity in the cross-sectional area of the
cable and circuit breaker are listed in Table 2.
Attention! It is forbidden to use a non-heat-resistant cable with PVC
isolation as the power cable. The joint box must be waterproof and it
must be located up to 50 cm from the floor.

6
• Open the cover of the heater’s electrical box.
• Attach the power cable on the terminal block according to the
circuit diagram.
• Close the cover.
• Fix the cable on the output with a cable strap.
Fitting the stones
• Make sure that the heating elements are notbent during the process.
• There must be sufficient air circulation around the heater elements.
• Stack the stones sparsely between the heating elements. If the
stones have been stacked too close to each other, the heating
elements may overheat (= shorter useful life) and slow the heating
of the sauna.
• Stones with a diameter of 8–16 cm are suitable for the heater.
• The stones on the external surface of the heater must be stacked
close to one another. The heating elements must not be visible.
• Using ceramic stones in the HIVE heater is allowed at the user’s
responsibility.
ATTENTION! IF THE STONE CONTAINER IS FILLED TOO SPARSELY, IT
POSES A FIRE HAZARD!
400V 3N

7
Before switching the heater on, the insulation resistance might prove
to be lower than the standard. The reason for that is the moisture that
seeped into the insulating layer during storage in the warehouse and
transportation.
The moisture evaporates after the electric heater has been heated for
1–2 hours.
CONTROLLING THE HEATER
All certified control panels with thermal control may be used in cont-
rolling the heater. The output of the heater must remain in the interval
determined by the control panel’s producer.
GUARD RAILS
• It is recommended to construct a guard rail around the heater. We
recommend using materials with low heat capacity and bad ther-
mal conductivity for the guard rail.
• Upon using flammable materials, it is necessary to leave the speci-
fied minimal safety clearances between the heater and flammable
constructions.
ATTENTION! IF THE HEATER IS INSTALLED CLOSER TO FLAMMABLE
CONSTRUCTIONS THAN AT THE DISTANCE OF THE MINIMAL REQUIRED
PROTECTION BELT IT MAY CAUSE A FIRE HAZARD!
SAUNA ROOM
Wall materials and insulating the sauna room
In a sauna with electric heating, all massive heat accumulating wall
surfaces (brick, glass brick, rendering etc.) must be insulated to use the
electric heater with a regular output.

8
The sauna wall and ceiling construction is considered to be
sufficiently insulated:
• a carefully installed insulation wool layer of 100 mm (min. 50 mm);
• the construction is damp proofed with taped aluminium paper or
other reflective material;
• there is a 10 mm air gap between the damp protection and boarding
• light wooden boards with about a 12–16 mm thickness have been
used for interior finishing;
• there is an air gap of at least 5 mm on the edge of the ceiling panels
at the upper part of the wall panelling.
In order to optimise the use of the heater, it would be practical to bring
the ceiling of the sauna room lower (regular 2,100–2,300, min. height of
sauna room 1,900 mm) so that the volume of the sauna room diminishes.
The ceiling should be insulated with an insulation layer at least 100 mm
thick and boarded according to the method described above. Wood
should be used to cover internal surfaces; an exception may be made
for heat resistant walls in the vicinity of the heater.
ATTENTION! Insulating the warm masonry wall has to be approved by
a fire inspector. It is prohibited to insulate flues that are in use!
ATTENTION! Covering the walls or floor with light protective material,
for example, mineral tiles that are installed directly on the surface of
the walls or ceiling might cause the dangerous overheating of the wall
or ceiling material.

9
Floor of the sauna room
The heater stones in use crumble due to temperature changes. The
pieces breaking away from the heater stones and pebbles are washed on
the sauna floor with the steam-making water. Pieces of hot stone may
damage plastic flooring under and near the heater. Heater stone par-
ticles and spray from the steam-making water (e.g., with iron content)
may absorb into the light joints of a tile floor. In order to avoid aesthetic
damage (caused by the reasons mentioned above), ceramic tiles and
dark joint filler should be used under and around the heater.
Ventilation of the sauna
• In order to guarantee a sufficient supply of oxygen and fresh air, the
sauna’s ventilation must be as efficient as possible. It is advisable to
direct the fresh air into the sauna room from above the heater stones.
• As an alternative, the fresh air may be directed in from under the heater.
• The air inlet must be equipped with an adjustable valve.
• The exhaust valve must be installed in the opposite wall from the
inlet valve at least 20 cm above the height of the inlet valve.
• It is advised to install a ventilation valve at the upper part of the
sauna room for the final ventilation.

10
WARNING!
• Always check sauna room and heater before turning on the heater.
• The heater may be used only when it has been correctly filled with stones.
• Do not cover the heater—this causes fire hazard.
• Do not touch a working heater, it causes burns.
• Incorrect ventilation of the sauna room may dry the wood too much
and cause a fire hazard in the sauna.
• Only tap water may be used for making steam.
• Never make steam by using a water hose.
• There must always be at least 5 cm of fireproof heat insulation
under the boarding.
• Sauna doors must always open outwards.
• Do not use the sauna for a purpose it is not intended for.
• Do not install more than one heater into the sauna room.
• Undiluted sauna essences etc. may ignite when poured directly
onto the stones.
• Do not leave small children unattended in the sauna.
• Sudden cooling after staying in the steam room is not recommended
for people with poor health. Consult a doctor.
• Enjoy the sauna as long as it is comfortable for you.
• Keep this information at a safe place.
• The product’s warranty guarantee does not extend to heating elements.

11
WARRANTY
Buyer is obligated to read user manual and follow instructions and
requirements presented. Damage to the product caused by not
following instructions and requirements will void warranty.
If any defects are found on the product, where manufacturer can be
blamed, then buyer has the right to demand fixing or replacing the
product. Demands must be made not later than 4 years after buying
the product. Purchase receipt needs to be presented when warranty
demands are made.
Warranty Terms:
• Warranty applies only to electric heaters that have been used
according to the manual
• NB! Warranty does not cover heating elements. They are considered
as consumable parts.
• Warranty does not cover wear that occurs from natural usage.
• Warranty does not cover defects or wear caused by planned use.
• Warranty does not imply when:
• damage or defects are caused by transportation or other
actions not controlled by manufacturer.
• product has been damaged by carelessness or overload
• product has not been installed correctly
• product has been modified in any way
• warranty period is over
• product is not complete
All demands shall be presented directly to HUUM OÜ
address: Turu põik 4, Tartu 50106, ESTONIA


13
HIVE
SAUNA ELEKTRIKERIS
Paigaldus- ja kasutusjuhend
NB! Käesolevas juhendis kirjeldatud elektritöid tohib teostada vaid
sertifitseeritud elektrik.
HUUM „HIVE“ elektrikerise tarnekomplekti kuulub:
• Elektrikeris
• Elektrikerise paigaldus– ja kasutusjuhend
NB! Elektrikeris vajab juhtpulti ja kive.

14
ENNE PAIGALDAMIST KONTROLLIDA
• Kas kerise võimsus (kW) vastab leiliruumi ruumalale (m3)? Vaata
tabel 1.
• Juhul, kui leiliruumis leidub isoleerimata tellis-, kahhel- või
klaasseinu, tuleb iga taolise seina ruutmeetri kohta arvestada 1,5
m3täiendavat leiliruumi ruumala.
• Selle järgi määratakse tabeli 1 abil kindlaks kerise sobilik võimsus.
• Tootja garantii ei kehti, kui keris ja leiliruum on valesti
dimensioneeritud!
• Leiliruumi lae ja seinte minimaalsed ohutuskaugused elektrikerise
paigutamisel on toodud tabelis 2 ja joonisel.
PAIGALDAMINE
Kerise paigutamine
• Keris tuleb paigutada nii, et oleks tagatud ohutud vahekaugused
süttivate materjalidega.
• Kerise paigaldusega peab olema välistatud inimese ja kerise
füüsiline kontakt kütmise ajal või muude ohtlike olukordade
tekkimine.
• Kerise mahutab orienteeruvalt 250 kg kive.
• Toitekaabli sisendid asuvad kerise põhjakaanel.
Tabel 1 Võimsus
kW Ruum
m2Kaal
kg Mõõdud
mm Kivide hulk*
kG
HIVE 6 6 5-8 13 455 x 455 x 800 8x20 + 2x15
HIVE 9 9 9-15 15 455 x 455 x 800 8x20 + 2x15
HIVE 12 12 12-25 20 555 x 555 x 800 12x20 + 2x15
HIVE 15 15 15-30 21 555 x 555 x 800 12x20 + 2x15
HIVE 18 18 18-35 23 555 x 555 x 800 12x20 + 2x15
* Kui kasutate õhutunnelit, siis lahutage kivide kogusest 2x20kg.

15
Tabel 2 Ø
mm H
mm A
mm B
mm Kaitse
AToitekaabel
mm2
HIVE 6 450 750 60 570 3 x 10 / 1 x 10 5 x 2,5
HIVE 9 450 750 90 630 3 x 16 / 1 x 16 5 x 2,5
HIVE 12 555 800 120 790 3 x 20 / 1 x 20 5 x 4
HIVE 15 555 800 150 850 3 x 25 / 1 x 25 5 x 4
HIVE 18 555 800 180 910 3 x 32 / 1 x 32 5 x 6
Elektrivõrguga ühendamine
• Kerist tohib elektrivõrguga ühendada ainult elektrik.
• Ühenduskaablina tuleb kasutada kummiisolatsiooniga HO7RN-F
kaablit või sellele võrdväärset.
• Kaabli ristlõikepindala ja kaitsme maksimaalne voolutugevus on
toodud tabelis 2.
• Soovitatav on seade ühendada vooluvõrku ilma rikkevoolu
kaitsmelülitita.
TÄHELEPANU! Kerise toitekaablina on keelatud kasutada kuumust
mittetaluvat isolatsiooniga kaablit. Harutoos peab olema veekindel
ning paiknema põrandast kuni 50 cm kõrgusel.

16
• Avage kerise elektrikarbi kaas.
• Ühendage toitekaabel vastavalt elektriskeemile klemmliistule.
• Sulgege kaas.
• Fikseerige kaabel väljaviigule kaabivitsaga.
Kivide paigaldamine
• Tuleb jälgida, et küttekehad ei painduks
• Oleks tagatud piisavad õhkvahed õhuringluse tarvis.
• Küttekehade vahel laduge kivid hõredalt. Liiga tihedalt laotud
kivid põhjustavad küttekehade ülekuumenemise (lühem eluiga) ja
aeglustavad sauna kuumenemist.
• Kerisele sobivad kivid, mille läbimõõt on 8–16 cm.
• Kerise välispinnal laotakse kivid võimalikult tihedalt. Küttekehasid ei
tohi näha olla.
• Keraamiliste kivide kasutamine HIVE kerises on lubatud omal
vastutusel.
TÄHELEPANU! LIIGA HÕREDALT TÄIDETUD KIVIRUUM TEKITAB TULEOHTU!
400V 3N

17
Enne kerise sisse lülitamist võib isolatsioonitakistus osutuda normist
väiksemaks. Selle põhjuseks on ladustamise ja transportimise ajal
isolatsioonikihi sisse imbunud niiskus.
Niiskus aurustub elektrikerise 1-2 tunnise kuumutamise jooksul.
KERISE JUHTIMINE
Kerise juhtimisel võib kasutada sertifitseeritud termokontrolliga juhtpulti.
Kerise võimsus peab jääma juhtimisseadme tootja poolt määratud töö-
võimsuse vahemikku.
KAITSEPIIRDED
• Soovituslik on rajada kerise ümber kaitsepiire. Kaitsepiirde mater-
jalina soovitame kasutada väikese soojusmahutavuse ja halva
soojusjuhtivusega materjale.
• Süttivate materjalide kasutamisel tuleb kindlasti järgida ettenähtud
minimaalseid ohutusvahemikke kerise ja süttivate konstruktsioo-
nide vahel
TÄHELEPANU! KERISE PAIGALDAMINE SÜTTIVATELE KONSTRUKTSIOO-
NIDELE LÄHEMALE, KUI NÄEVAD ETTE MINIMAALSED OHUTUSKUJAD,
VÕIB PÕHJUSTADA TULEOHU.
LEILIRUUM
Leiliruumi isoleerimine ja seinamaterjalid
Elektriküttega saunas tuleb kõik massiivsed soojust akumuleerivad
seinapinnad (tellis, klaastellis, krohv jne.) normaalse võimsusega kerise
kasutamiseks isoleerida.

18
Piisavalt isoleerituks võib pidada sauna sellist seina- ja lae-
konstruktsiooni, kus:
• hoolikalt paigaldatud isolatsioonivilla kiht on 100 mm (min 50 mm)
• konstruktsiooni niiskustõkeks on teibitud alumiiniumpaber või muu
peegeldav materjal
• niiskustõkke ja voodrilaua vahel on 10 mm õhkvahe
• siseviimistluseks on kerge u. 12–16 mm paksune puidust voodrilaud
• seinavoodri ülaosas laepaneelide piiril on vähemalt 5 mm õhkvahe.
Kerise võimsuse optimeerimiseks on otstarbekas tuua sauna lage alla-
poole (norm. 2100–2300, min sauna kõrgus 1900 mm), millega leiliruumi
kubatuur väheneb. Lagi isoleeritakse vähemalt 100 mm paksuselt) ja
vooderdatakse ülal kirjeldatud viisil.
Sisepindade katteks tuleb kasutada puitu, erandiks võivad olla kuumus-
kindlad seinad kerise vahetusläheduses
TÄHELEPANU! Soojamüüride isoleerimine tuleb kooskõlastada tuletõr-
jeinspektoriga. Kasutatavate lõõride isoleerimine on keelatud!
TÄHELEPANU! Seinte või lae katmine tulekindla materjali, näit. mine-
raalplaadiga, õhkvaheta, otse seina või lae pinnale, võib põhjustada
seina- või laematerjalide ohtliku ülekuumenemise

19
Leiliruumi põrand
Temperatuurimuudatustest tingituna kasutatavad kerisekivid murenevad.
Kividest eralduvad tükid ja peened kivid uhutakse koos leiliveega sauna
põrandale. Kuumad kiviosad võivad kerise all ja läheduses kahjustada
plastkattega põrandaid.
Kerisekivide ja leilivee pritsmed (näit. rauasisaldus) võivad imenduda
plaatpõranda heledasse vuuki. Eelmainitust tingituna tuleks esteetiliste
kahjustuste ärahoidmiseks kerise all ja ümbruses kasutada keraamilisi
plaate ja tumedat vuugitäidet.
Sauna ventilatsioon
• Küllaldase hapnikuvarustuse ja värske õhu tagamiseks peab sauna
ventilatsioon olema võimalikult tõhus. Värske õhk on soovitatav juhtida
leiliruumi kerisekivide kohale. Alternatiivina võib värske õhu juhtida
kerise alla.
• Sissetõmbeava tuleb varustada reguleeritava klapiga.
• Väljalaskeklapp paigaldada sisselaskeklapist vastasseina vähemalt 20
cm võrra kõrgemale.
• Soovituslik on varustada leiliruumi ülaosasse tuulutusklapp lõpptuulu-
tuse tarvis.

20
HOIATUS!
• Enne elektrikerise sisselülitamist kontrollige alati leiliruumi ja kerist.
• Kerist võib kasutada vaid korrektselt kividega täidetuna.
• Ärge katke kerist - see tekitab tuleohtu.
• Ärge puudutage köetud kerist, see põhjustab põletust.
• Leiliruumi vale ventileerimine võib põhjustada puidu liigset
kuivamist ja luua saunas tuleohtu.
• Leili viskamiseks võib kasutada vaid kraanivett.
• Ärge kunagi kasutage leili tekitamiseks veevooliku abi.
• Alati peab peale laudist olema vähemalt 5 cm tulekindlat
soojusisolatsiooni.
• Sauna uksed peavad alati avanema väljapoole.
• Ärge kasutage sauna muuks otstarbeks kui saunatamine.
• Ärge paigaldage üle ühe kerise sauna leiliruumi.
• Lahjendamata sauna lõhnaained jm võivad otse kividele valades
süttida.
• Ärge jätke väikelapsi järelvalveta sauna.
• Nõrga tervise korral ei ole soovituslik järsk jahutamine peale leili.
Konsulteerige arstiga.
• Nautige saunas käiku nii kaua kuni see on teile mugav.
• Hoidke seda teavet kindlas kohas.
• Toote garantii ei laiene kütte-elementidele.
Other manuals for HIVE
3
Table of contents
Languages:
Other HUUM Electric Heater manuals
Popular Electric Heater manuals by other brands

Noble Heat
Noble Heat Panther 2000 owner's manual

Harvia
Harvia Virta Pro HL200E Instructions for installation and use

Storch
Storch Scirocco 3000 instruction manual

DEVOLA
DEVOLA DVPW1000B instruction manual

LIFESTYLE APPLIANCES
LIFESTYLE APPLIANCES 505-112 instruction manual

Hunter
Hunter HPG15-M owner's manual