Hytera POWER446 User manual

Preface
Thank you for purchasing Hytera POWER446 portable radio. As a high–tier license free
radio (446MHz), it is equipped with reliable mechanics, superb waterproof performance,
long standby time and simple operation, enabling you to enjoy communication services
with ease!
To derive optimum performance from your product, please read this manual and the
supplied Safety Information Booklet carefully before use.

POWER446
1
Instructional Icons
The following icons are available through this manual:
Caution: indicates situations that could cause damage to your product.
Note: indicates tips that can help you make better use of your product.
Term Explanation
Please pay your attention to the following key terms:
Key Operation
Short press: to press a key and release it quickly.
Long press: to press and hold down a key for above 1.5 seconds.
Hold down: to press a key and remain holding it down.
User Mode
Refers to the mode entered after you turn on the radio directly.
CTCSS/CDCSS
The signaling can help you prevent unwanted conversations at the same frequency.
Copyright Information
Hytera and HYT are trademarks or registered trademarks of Hytera Communications Co.,
Ltd. (“Hytera”) in PRC and/or other countries or areas. Hytera retains the ownership of its
trademarks and product names.All other trademarks and/or product names that may be
used in this manual are properties of their respective owners.
The Hytera product described in this manual may include Hytera computer programs
stored in memory or other media. Laws in PRC and/or other countries or areas protect the
exclusive rights of Hytera with respect to its computer programs. The purchase of this
product shall not be deemed to grant, either directly or by implication, any rights to the
purchaser regarding Hytera computer programs.Any Hytera computer programs may not
be copied, modified, distributed, decompiled, or reverse-engineered in any manner
without the prior written consent of Hytera.

POWER446
2
Disclaimer
Hytera endeavors to achieve the accuracy and completeness of this manual, but no
warranty of accuracy or reliability is given.All the specifications and designs are subject to
change without prior notice due to continuous technology development. No part of this
manual may be copied, modified, translated, or distributed in any manner without the
express written permission of Hytera.
If you have any suggestions or would like to learn more details, please visit our website at:
http://www.hytera.cn.
RF Radiation Information
RF Radiation Profile
Radio Frequency (RF) is a frequency of electromagnetic radiation in the range at which
radio signals are transmitted. RF technology is widely used in communication, medicine,
food processing and other fields. It may generate radiation during use.
RF Radiation Safety
In order to ensure user health, experts from relevant industries including science,
engineering, medicine and health work with international organizations to develop
standards for safe exposure to RF radiation. These standards consist of:
United States Federal Communications Commission, Code of Federal Regulations;
47CFR part 2 sub-part J;
American National Standards Institute (ANSI)/Institute of Electrical and Electronic
Engineers (IEEE) C95. 1-1992;
Institute of Electrical and Electronic Engineers (IEEE) C95. 1 –1999;
International Commission on Non-Ionizing Radiation Protection (ICNIRP) 1998;
FCC Regulations
Federal Communication Commission (FCC) requires that all radio communication
products should meet the requirements set forth in the above standards before they can

POWER446
3
be marketed in the U.S, and the manufacturer shall post a RF label on the product to
inform users of operational instructions, so as to enhance their occupational health
against exposure to RF energy.
As a conscientious company centering on users, Hytera strictly complies with the
foregoing requirements from design, production and test.
Operational Instructions and Training Guidelines
To ensure optimal performance and compliance with the occupational/controlled
environment RF energy exposure limits in the above standards and guidelines, users
should transmit no more than 50% of the time and always adhere to the following
procedures:
Your radio radiates measurable RF energy only while it is transmitting (during talking),
not when it is receiving (listening) or in standby mode.
Keep the radio at least 2.5 centimeters away from your body during transmission.
EU Regulatory Conformance
As certified by the qualified laboratory, the product is in compliance with the essential
requirements and other relevant provisions of the Directive 1999/5/EC. Note:
Please note that the above information is applicable to EU countries only.

POWER446
4
Contents
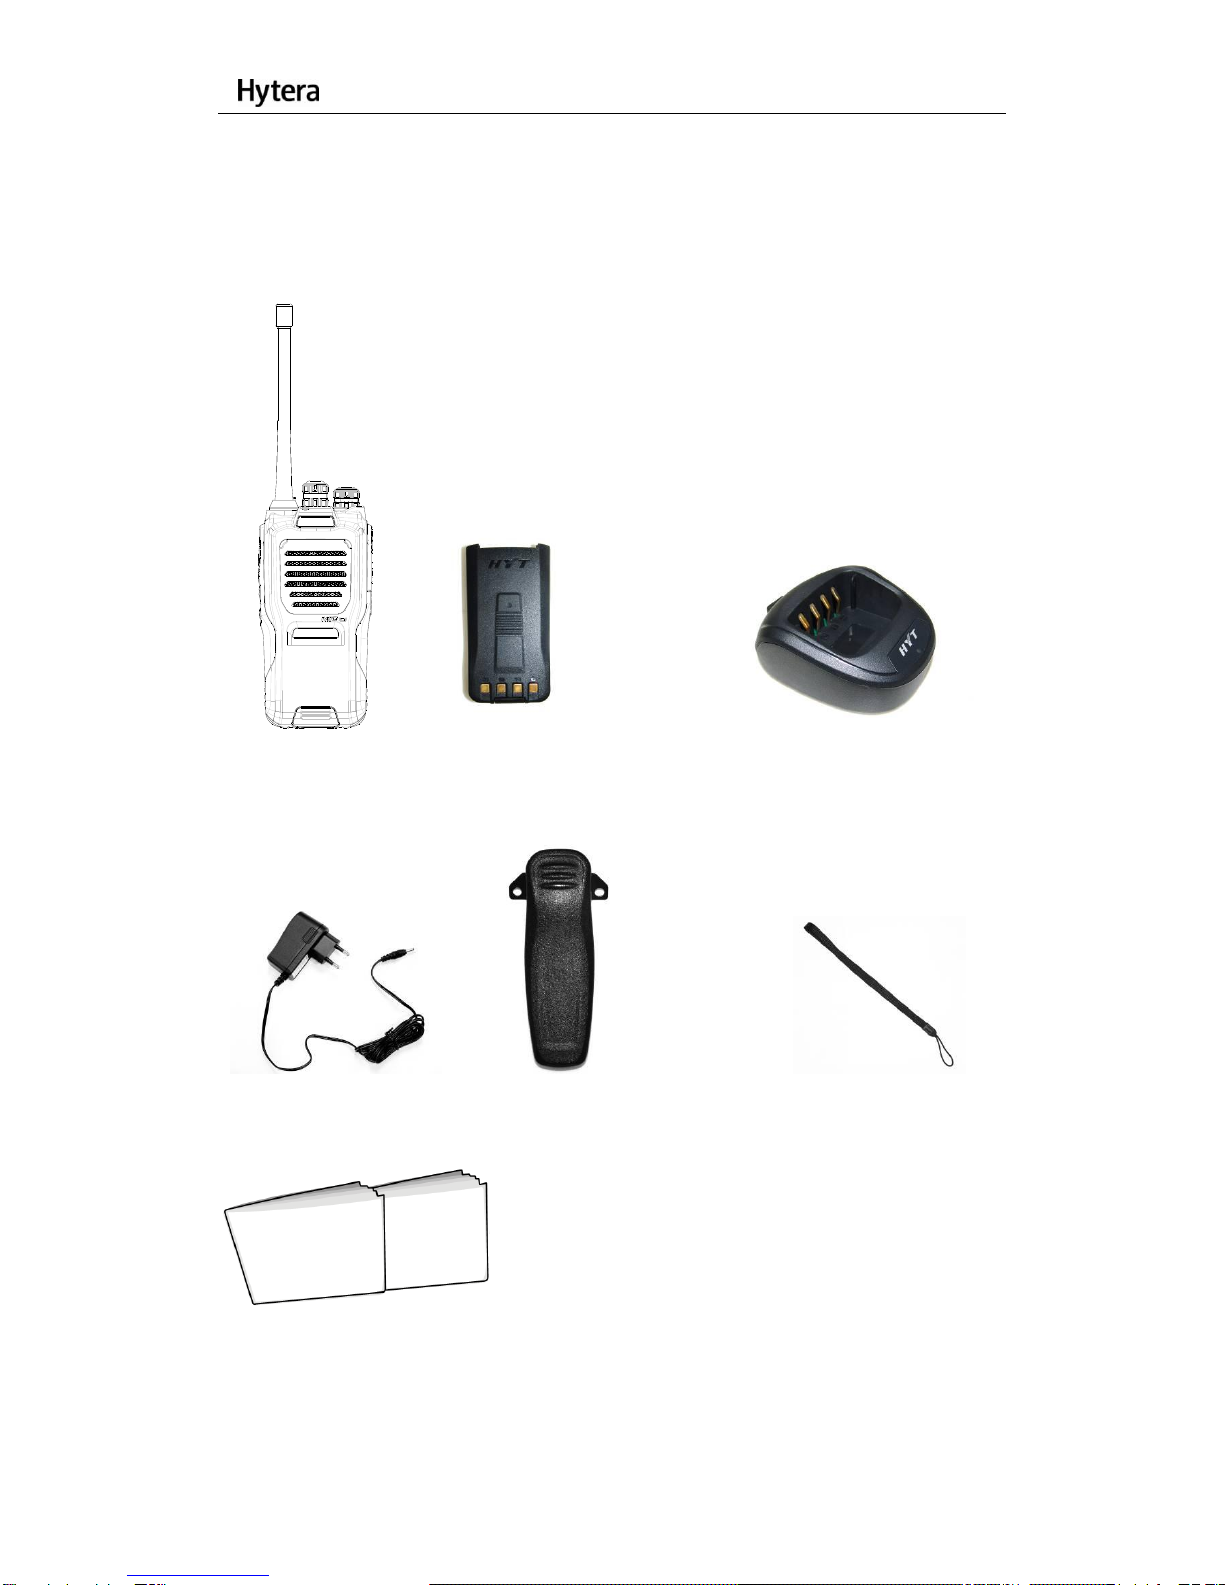
Checking Items in the Package...........................................................................................5
Product Overview.................................................................................................................7
Product Controls...........................................................................................................7
Programmable Keys.....................................................................................................8
Before Use...........................................................................................................................9
Charging the Battery.....................................................................................................9
Assembling the Accessories.......................................................................................10
Status Indication.................................................................................................................14
Basic Operations................................................................................................................15
Turning the Radio On/Off ...........................................................................................15
Adjusting the Volume..................................................................................................15
Selecting a Channel ...................................................................................................15
Transmitting/Receiving...............................................................................................15
Functions and Operations..................................................................................................16
CTCSS/CDCSS...................................................................................................16
Time-out Timer (TOT)..........................................................................................16
Monitor.................................................................................................................16
Squelch Off..........................................................................................................17
Scan ....................................................................................................................17
VOX.....................................................................................................................18
Battery Strength Indicator....................................................................................19
Channel Lock ......................................................................................................20
Battery Save........................................................................................................20
Low Battery Alert.................................................................................................20
Busy Channel Lockout........................................................................................20
Troubleshooting.................................................................................................................21
Care and Cleaning.............................................................................................................23
Optional Accessories.........................................................................................................24

POWER446
5
Checking Items in the Package
Please unpack carefully and check that all items listed below are received. If any item is
missing or damaged, please contact your dealer.
Radio Li-Ion battery Charger
Power Adapter Belt Clip Strap
Manuals

POWER446
6
Note: The above-mentioned pictures are for reference only.

POWER446
7
Product Overview
Product Controls
13
15
14
16
11
3
2
12
5
10
4
1
9
8
7
6
No.
Part Name
No.
Part Name
No.
Part Name
○
1
PTT Key
○
2
SK1 (programmable)
○
3
SK2 (programmable)
○
4
Speaker
○
5
Microphone
○
6
Antenna
○
7
LED Indicator
○
8
Channel Selector knob
○
9
Radio On-Off/Volume
Control Knob
○
10
Battery Latch
○
11
Accessory Jack
○
12
Accessory Jack Cover
○
13
Belt Clip
○
14
Battery
○
15
Screw (Belt Clip)
○
16
Charging Piece

POWER446
8
Programmable Keys
For enhanced convenience, you may request your dealer to program the keys SK1 and
SK2 as shortcuts to the functions listed below:
No.
Shortcut Key
Function
1
Monitor
To adjust the condition for incoming signal
match
2
Monitor Momentary
3
Squelch Off
To always unmute speaker no matter
whether carrier is present or not
4
Squelch Off Momentary
5
Scan
To receive signals on other channels
6
VOX
To make the radio transmit automatically
when you speak.
7
Battery Strength Indicator
To indicate the battery strength
8
Channel Lockout
The current channel will remain unchanged
in case of rotating the Channel Selector
knob accidentally.
Note: Long and short press of a key can be assigned with different functions by
your dealer.

POWER446
9
Before Use
Charging the Battery
Use only the charger and battery specified by Hytera. Charger LED can indicate the
charging process.
Charging Diagram
Procedures
1. Connect the power adapter to AC socket. See arrow ①.
2. Plug the power adapter into the rear jack of the charger. See arrow ②.
3. Place the radio with the battery attached, or the battery alone, into the charger.
See arrow ③.
4. The LED glows red in the process of charging, and glows green after the
charging is completed.
Note: To achieve optimal battery performance, please charge the battery for 5 hours
before initial use.
LED Indicator
Charge Status
LED Indicator

POWER446
10
Standby (no
load)
The LED flashes red slowly (on for
0.2S/off for 3S).
Charging
The LED glows red.
Fully charged
The LED glows green.
Error
The LED flashes red rapidly (on for
0.2S/off for 0.2S).
Caution: Be sure to read the Safety Information Booklet, to get necessary safety
information.
Assembling the Accessories
Assembling the Battery
1. Slide the battery into the radio’s slot.
Figure 1
2. Slightly press the bottom of the battery until a click is heard.
Figure 2
Disassembling the battery

POWER446
11
1. Turn off the radio first and slide the battery latch upward.
Figure 3
2. Release the latch to remove the battery.
Figure 4
Assembling the Belt Clip
1. Remove the screws.
2. Align the screw holes on the belt clip with those on the radio’s body, and then
tighten the screws.
Figure 5
3. To remove the belt clip, loosen the screws.

POWER446
12
Figure 6
Assembling the Audio Accessory/Programming Cable
1. Uncover the accessory jack.
Figure 7
2. Plug an accessory into the accessory jack (if it is an audio accessory, remember
to tighten the screw).

POWER446
13
Figure 8
3. To remove the accessories, loosen the screw at first and pull out the plug (if it is
an audio accessory, remember to loosen the screw first).
Caution: When you are using an external accessory, waterproof performance of
the radio may get affected.

POWER446
14
Status Indication
The top LED indicator will help you easily identify the current status of your radio.
LED Status
Radio Status
Red LED glows.
Transmitting
Red LED flashes.
Low battery
Green LED glows.
Receiving
Green LED flashes.
Scanning

POWER446
15
Basic Operations
Turning the Radio On/Off
Rotate the Radio On-Off/Volume Control knob clockwise/counter-clockwise until a click
is heard to turn the radio on/off.
Adjusting the Volume
You may control the volume level using the Radio On-Off/Volume Control knob. After the
radio is powered on, rotate the knob clockwise to increase the volume, or
counter-clockwise to decrease the volume.
Selecting a Channel
The radio supports up to 16 channels. Rotate the Channel Selector knob to select a
desired channel.
Note: When the radio is currently on a blank channel, it will sound beep tones
continuously.
Transmitting/Receiving
To transmit audio signals, press and hold down the PTT, and speak into the microphone.
During transmission, the LED glows red.
To receive, just release the PTT. When any audio signal is received, the LED glows
green.
Note:
1) To ensure optimal volume of the receiving radio, hold the palm microphone
approximately 2.5 to 5 centimeters away from your mouth.
2) Communication range may get affected in rainy days or forests.

POWER446
16
Functions and Operations
CTCSS/CDCSS
CDCSS/CTCSS can be used to prevent unwanted conversations at the same frequency. If
CTCSS/CDCSS is set on a certain channel, you can only receive voice calls from radios
with matching CTCSS/CDCSS. Otherwise you will receive voice calls from all users
operating at the same frequency.
You may request your dealer to program corresponding parameters on certain channels.
For detailed operation method, please consult your dealer.
Note: This radio supports 38 groups of standard CTCSS, 83 groups of standard
CDCSS, non-standard CTCSS/CDCSS, and 180 degree /120 degree CTCSS tail reverse.
Time-out Timer (TOT)
The purpose of TOT is to prevent any user from occupying a channel for an extended
period. If the preset time expires, the radio will automatically terminate transmission and
keep beeping. To stop beeping, please release the PTT key. You must wait for a certain
time period (preset by your dealer) to initiate another transmission.
If the Pre-alert function is activated by your dealer, your radio will alert you to the TOT
expiration in advance.
Monitor
This feature allows you to lower the conditions for incoming signal match.
Operation:
Press the programmed Monitor key to activate this function; press it again to
deactivate the function. Or
Press and hold down the programmed Monitor Momentary key to activate this

POWER446
17
function; release the key to exit.
Squelch Off
This feature allows you to unmute the speaker, no matter whether a carrier is present or
not.
Operation:
Press the programmed Squelch Off key to activate this function; press it again to
deactivate it. Or
Press and hold down the programmed Squelch Off Momentary key to activate this
function; release the key to deactivate it.
Note: When this function is enabled on current channel, you will hear audio signals
(if any); otherwise, background noise will be heard.
Scan
The feature allows you to listen to communication activities on other channels so that you
can keep a close track of your team members. The scan list can be set by your dealer.
Operation:
1. To activate this function, you may
press the programmed Scan key; or
switch to a channel enabled with the auto scan feature (programmed by your
dealer).
Note: The radio will not start scan if there are less than two channels in the
scan list.
2. After the feature is enabled, your radio will scan according to the scan list set for the
channel on which scanning starts. The scanning process is as follows:
The LED flashes green during scanning.

POWER446
18
When communication activities are detected on a channel, the radio will stay on
the channel to receive current activities. Meanwhile, the LED glows green.
If the Talk Back feature is enabled by your dealer, press and hold down the PTT
to reply when the radio stays on a certain channel.
You can scan the frequently used channel if the priority scan feature is enabled.
When scan stays on a non-priority channel, the radio will keep detecting activities
on the priority channel. Once any activity is detected, it will jump to the priority
channel. For more information, please consult your dealer.
3. To exit the scanning process, you may
press the Scan key again, or
switch to a channel where the auto scan feature is disabled.
Note:
The Scan Start Alert tone and the Scan End Alert tone can be enabled / disabled
by the dealer.
During scanning, the following function keys (if programmed) are available: PTT,
Squelch Off , Squelch Off Momentary , Monitor and Monitor Momentary .
VOX
This feature allows you to transmit your voice with no need to press the PTT. However,
you must employ a dedicated earpiece to realize this function.
Operation:
1. Set the PTT/VOX Switch on the earpiece to VOX;
2. Plug the earpiece into the accessory jack;
3. Press the programmed VOX key to activate this function.
4. Speak into the microphone (on the earpiece) to transmit your voice, and
transmission will stop automatically when you stop talking;
5. Power the radio off or press the VOX key again to deactivate this function.
Note:

POWER446
19
If the PTT/VOX Switch on the earpiece is set to PTT, you can only transmit by
pressing the external PTT, no matter whether VOX is activated.
When the earpiece is plugged into the accessory jack, do not switch the
PTT/VOX Switch from PTT to VOX directly if it is set to PTT; otherwise,
continuous transmission may occur. If continuous transmission occurs
unexpectedly, you can restore the radio to normal operation by toggling the
switch from VOX to PTT, or turning the radio off and back on.
You can select an appropriate VOX sensitivity according to the environment. If
VOX is activated under heavy noise, continuously transmission may occur.
Battery Strength Indicator
This feature allows you to know the current battery strength.
Operation:
Press the programmed Battery Strength Indicator key, and the LED glows to indicate
remaining battery strength by different colors .Release the key to exit. The following table
lists different colors representing different battery strength levels
LED Indicator
Battery Strength
Green LED glows.
70%-100%
Orange LED glows.
50%-70%
Red LED glows.
30%-50%
Note: 1) When the battery strength is less than 30%, the LED will flash red and the
low-pitched tone will sound periodically in standby mode. In this case,
please replace or charge the battery.
2)when the battery strength is less than l0%, transmission will be prohibited;
if you press PTT in such situations, the radio will sound an alert to warn
you.
Table of contents
Other Hytera Portable Radio manuals

Hytera
Hytera PD375 User manual

Hytera
Hytera PD48X User manual

Hytera
Hytera PD362i User manual

Hytera
Hytera HP70X User manual

Hytera
Hytera TC-508U1 User manual

Hytera
Hytera PD75X User manual

Hytera
Hytera H Series User manual

Hytera
Hytera PD50X User manual

Hytera
Hytera HP60X User manual

Hytera
Hytera HP68X User manual

Hytera
Hytera PD562i UL913 User manual

Hytera
Hytera TC610 User manual

Hytera
Hytera HM78XVHF User manual

Hytera
Hytera PD41X User manual

Hytera
Hytera PD795EX User manual

Hytera
Hytera PD78X Series User manual

Hytera
Hytera PD985/G User manual

Hytera
Hytera HP68X User manual

Hytera
Hytera Sepura STP9100 User manual

Hytera
Hytera PD602 User manual