Hytera HP50X User manual

HP50X Digital Portable Radio
User Manual
Hytera Communications Corporation Limited

Preface
Welcome to the world of Hytera and thank you for purchasing this product. This manual includes a description of
the functions and step-by-step procedures for use.
To avoid bodily injury or property loss caused by incorrect operation, please carefully read the Safety Information
Booklet before use.
This manual is applicable to the following product:
HP50X Digital Portable Radio (X may represent 2, 5, 6, 8, or 9)

Copyright Information
Hytera is the trademark or registered trademark of Hytera Communications Corporation Limited (the Company) in the
People's Republic of China (PRC) and/or other countries or areas. The Company retains the ownership of its
trademarks and product names. All other trademarks and/or product names that may be used in this manual are
properties of their respective owners.
The product described in this manual may include the Company's computer programs stored in memory or other media.
Laws in PRC and/or other countries or areas protect the exclusive rights of the Company with respect to its computer
programs. The purchase of this product shall not be deemed to grant, either directly or by implication, any rights to
the purchaser regarding the Company's computer programs. The Company's computer programs may not be copied,
modified, distributed, decompiled, or reverse-engineered in any manner without the prior written consent of the
Company.
Disclaimer
The Company endeavors to achieve the accuracy and completeness of this manual, but no warranty of accuracy or
reliability is given. All the specifications and designs are subject to change without notice due to continuous
technological development. No part of this manual may be copied, modified, translated, or distributed in any manner
without the prior written consent of the Company.
We do not guarantee, for any particular purpose, the accuracy, validity, timeliness, legitimacy or completeness of the
third-party products and contents involved in this manual.
If you have any suggestions or would like to receive more information, please visit our website at:
https://www.hytera.com.
RF Exposure Compliance and Control Guidelines and
Operating Instructions
To control your exposure and ensure compliance with the occupational/controlled environmental exposure limits,
always adhere to the following procedures.
Transmit no more than the rated duty factor of 50% of the time. To transmit (talk), push the Push-To-Talk (PTT)
key. To receive calls, release the PTT key. Transmitting 50% of the time, or less, is important because the radio
generates measurable RF energy only when transmitting (in terms of measuring for standards compliance).
Keep the radio unit at least 2.5 cm away from the face. Keeping the radio at the proper distance is important as
RF exposure decreases with distance from the antenna. The antenna should be kept away from the face and eyes.

User Manual
Contents
i
Contents
Documentation Information ........................................................................................................................ 1
1. Packing List .............................................................................................................................................. 2
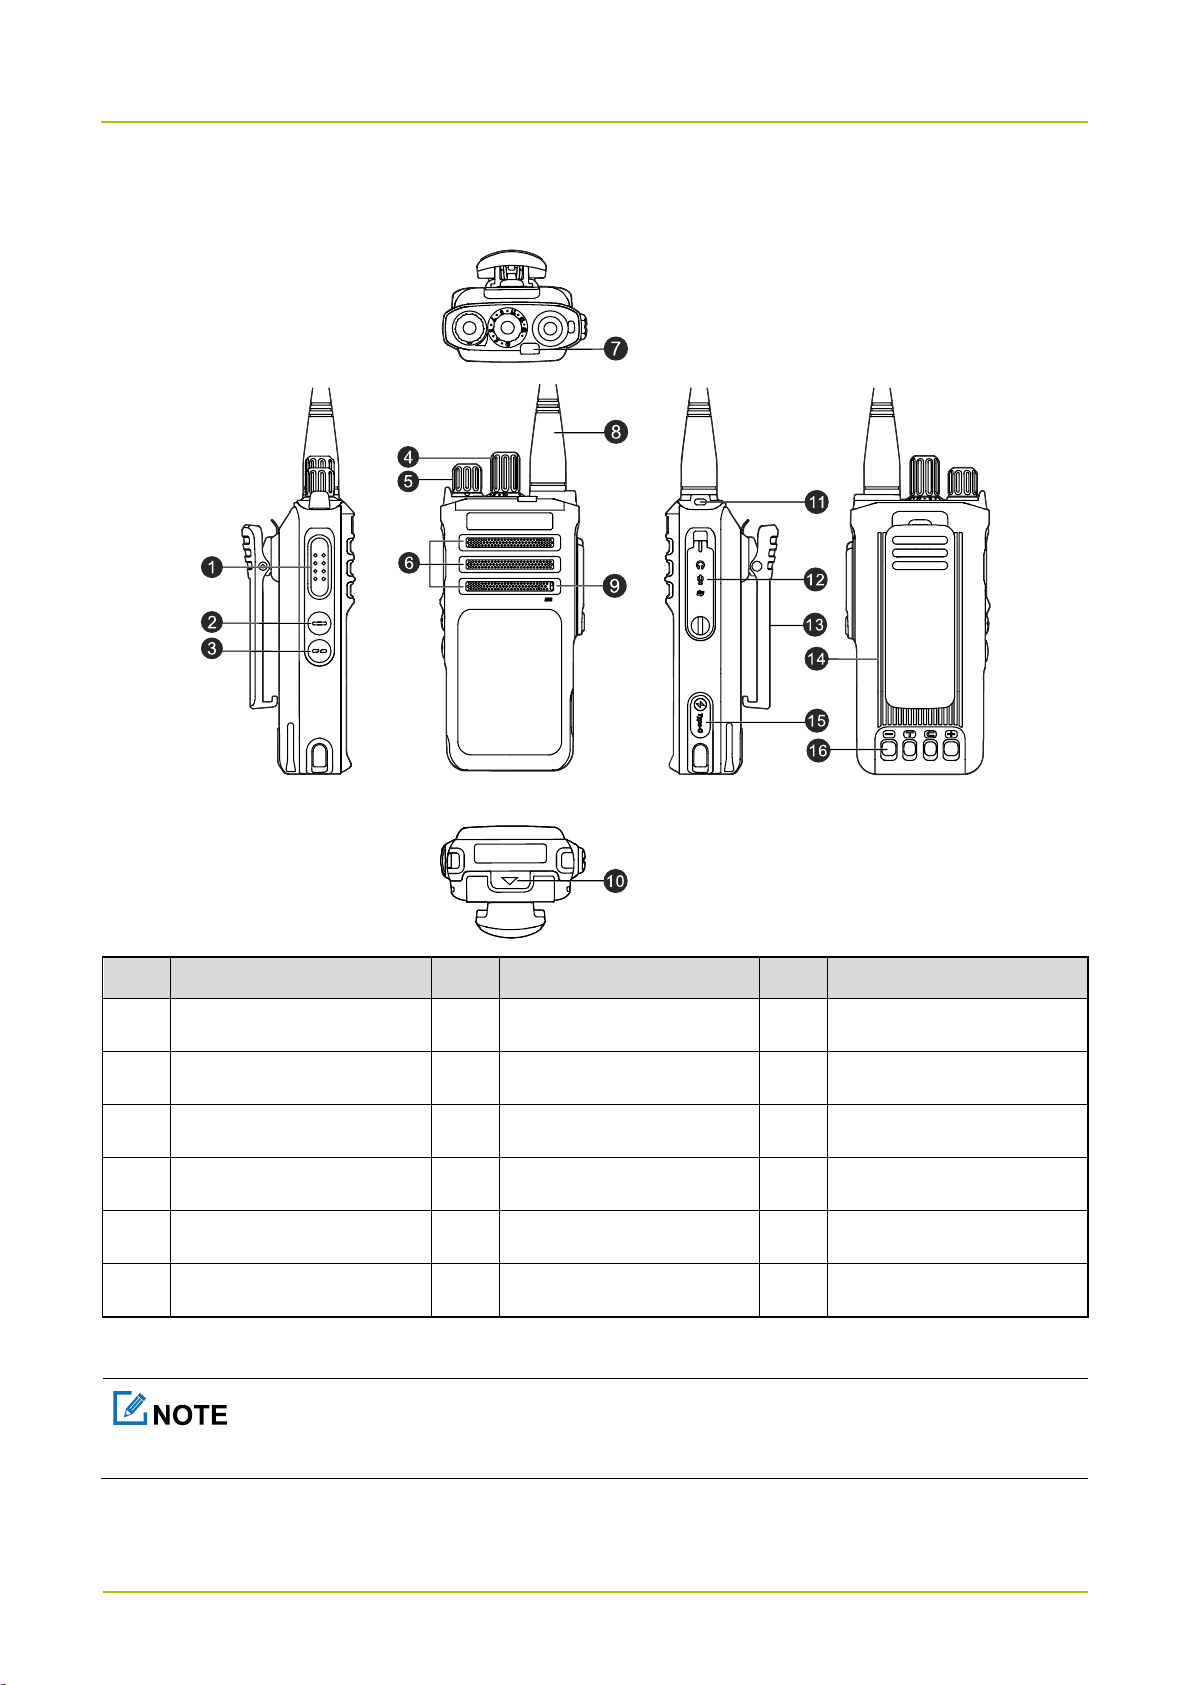
2. Product Layout......................................................................................................................................... 3
3. Before Use ................................................................................................................................................ 4
3.1 Charge the Battery ............................................................................................................................... 4
3.2 Attach the Antenna............................................................................................................................... 4
3.3 Attach the Belt Clip............................................................................................................................... 5
3.4 Attach the Battery................................................................................................................................. 5
3.5 Attach the Audio Accessory ................................................................................................................. 6
4. Basic Operations...................................................................................................................................... 8
4.1 Turn On or Off the Radio...................................................................................................................... 8
4.2 Adjust the Volume ................................................................................................................................ 8
4.3 Select a Zone ....................................................................................................................................... 8
4.4 Select a Channel .................................................................................................................................. 8
5. LED Indications ...................................................................................................................................... 10
6. Call Services........................................................................................................................................... 11
6.1 Call on Digital Channel....................................................................................................................... 11
6.1.1 Make a Call .............................................................................................................................. 11
6.1.2 Answer a Call ........................................................................................................................... 11
6.1.3 End a Call................................................................................................................................. 11
6.2 Call on Analog Channel...................................................................................................................... 11
6.2.1 Call Without Signaling.............................................................................................................. 11
6.2.2 Call with Signaling.................................................................................................................... 12
7. Safety and Security................................................................................................................................ 13
7.1 Emergency ......................................................................................................................................... 13
7.1.1 Make an Emergency Call......................................................................................................... 13
7.1.2 Receive an Emergency Call..................................................................................................... 13
7.1.3 End an Emergency Call ........................................................................................................... 14
7.2 Lone Worker ....................................................................................................................................... 14
7.3 Encryption........................................................................................................................................... 14
7.3.1 Enable Encryption .................................................................................................................... 14
7.3.2 Set Encryption.......................................................................................................................... 14
8. Basic Settings......................................................................................................................................... 16
8.1 Profiles................................................................................................................................................ 16
8.2 Audio Settings .................................................................................................................................... 16
8.2.1 Switch the Audio Routing ......................................................................................................... 16
8.2.2 Enable AI-based Noise Cancellation ....................................................................................... 16

Contents
User Manual
ii
8.3 Positioning .......................................................................................................................................... 17
8.3.1 GPS Report.............................................................................................................................. 17
8.4 BT ....................................................................................................................................................... 17
8.4.1 Enable BT................................................................................................................................. 17
8.4.2 Connect to a BT Device ........................................................................................................... 18
8.4.3 Switch the BT Audio Output Path............................................................................................. 18
9. PMR Features ......................................................................................................................................... 19
9.3 One Touch Call................................................................................................................................... 19
9.4 Roam .................................................................................................................................................. 20
9.5 Talk Around ........................................................................................................................................ 20
9.6 Squelch Level ..................................................................................................................................... 20
9.7 Priority Interrupt .................................................................................................................................. 20
9.8 XPT..................................................................................................................................................... 21
9.9 Scrambler ........................................................................................................................................... 21
10. Troubleshooting................................................................................................................................... 22
11. Radio Care ............................................................................................................................................ 24
11.1 Radio ................................................................................................................................................ 24
11.2 Battery .............................................................................................................................................. 24
11.3 Cleaning............................................................................................................................................ 25
11.4 Sterilizing .......................................................................................................................................... 25
11.5 Storing .............................................................................................................................................. 26
12. Optional Accessories .......................................................................................................................... 27
13. Abbreviations ....................................................................................................................................... 28

User Manual
Documentation Information
1
Documentation Information
Icon Conventions
Icon
Description
Indicates references that can further describe the related topics.
Indicates situations that could cause data loss or equipment damage.
Notation Conventions
Item
Description
Example
Boldface
Denotes menus, tabs, parameter names,
window names, dialogue names, and
hardware buttons.
To save the configuration, click Apply.
The Log Level Settings dialogue box appears.
Press the PTT key.
" "
Denotes messages, directories, file names,
folder names, and parameter values.
The screen displays "Invalid Battery!".
Open "PSS.exe".
Go to "D:/opt/local".
In the Port text box, enter "22".
>
Directs you to access a multi-level menu.
Go to File > New.
Italic
Denotes document titles.
For details about using the DWS, refer to
Dispatch Workstation User Guide.
Courier New
Denotes commands and their execution
results.
To set the IP address, run the following
command:
vos-cmd - m name IP

Packing List
User Manual
2
1. Packing List
Unpack carefully and check that you have received the following items. If any item is missing or damaged, contact
your dealer.
Item
Quantity (PCS)
Item
Quantity (PCS)
Radio
1
Antenna
1
Battery
1
Belt Clip
1
Charger
1
Strap
2
Power Adapter
1
Documentation Kit
1
Figures in this manual are only for reference.
Check whether the frequency band marked on the antenna label matches that on the radio label. If not,
contact your dealer.

User Manual
Product Layout
3
2. Product Layout
No.
Part Name
No.
Part Name
No.
Part Name
1
Push-to-Talk (PTT) Key
7
LED Indicator
13
Belt Clip
2
SK1 Key (Programmable)
8
Antenna
14
Battery
3
SK2 Key (Programmable)
9
Microphone
15
USB Type-C Port
4
Channel Selector Knob
10
Battery Latch
16
Charging Contacts
5
On-Off/Volume Knob
11
Strap Hole
/
/
6
Speaker
12
Accessory Connector
/
/
To assign features to programmable keys, contact your dealer.

Before Use
User Manual
4
3. Before Use
3.1 Charge the Battery
Use the approved charger to charge the battery.
Read the Safety Information Booklet before charging.
The remaining lithium-ion battery power is limited to 30% pursuant to the new lithium battery shipment
regulation approved by the International Air Transport Association (IATA).
It is recommended that the radio remains turned off during charging.
Before initial use, use the charger to charge the battery alone or the battery attached to the radio. Then, you can charge
the battery in either of the following ways:
Connect the radio with the battery to the power adapter, power bank, or PC through the USB Type-C port.
Use the charger to charge the battery alone or the battery attached to the radio.
The LED indicator on the charger shows the charging status, as described in the following table:
LED Indicator
Charging Status
Glows red
The battery is being charged.
Glows orange
The battery is charged to 90% or above.
Glows green
The battery is fully charged.
Flashes red slowly
No battery is placed on the charger.
Flashes red rapidly
The battery fails to be charged.
3.2 Attach the Antenna
Do not hold the radio by the antenna and swing it. This may affect the antenna performance and shorten the
life span of the antenna.

User Manual
Before Use
5
3.3 Attach the Belt Clip
Align the holder on the belt clip with the groove on the battery.
Press the belt clip downwards into place.
You can press and hold the belt clip spring plate and push the belt clip upwards to remove it.
3.4 Attach the Battery
Use the approved battery to avoid the risk of explosion.
Dispose of the used battery according to "Precautions for Disposal" in the Safety Information Booklet.
1. Align the battery with the battery slot.

Before Use
User Manual
6
1
2. Press and push the battery into the battery slot until a click is heard.
2
3.5 Attach the Audio Accessory
For optimal waterproof and dustproof performance, do as follows:
When attaching the accessory, do not scrape the silicone rubber surrounding the screw hole on accessory
connector.
After removing the accessory, close the accessory connector cover and fasten the screw.
Loosen the screw on the accessory connector cover, and then remove the cover.
Insert the audio accessory plug into the accessory connector.

User Manual
Before Use
7
Tighten the screw on the audio accessory plug.

Basic Operations
User Manual
8
4. Basic Operations
4.1 Turn On or Off the Radio
4.2 Adjust the Volume
4.3 Select a Zone
A zone is a group of channels within the same operational area.
To select a zone, press the preprogrammed Zone Up or Zone Down key.
4.4 Select a Channel
The radio receives and transmits voice and data on the selected channel. Before selecting a channel, make sure that
the current zone contains the channel.
To select a channel, do any of the following:

User Manual
Basic Operations
9
Rotate the Channel Selector knob.
Press the preprogrammed Channel Up or Channel Down key.
Press the preprogrammed Preset Channel key.
With Voice Broadcast enabled, the radio audibly conveys the current channel you have just changed.

LED Indications
User Manual
10
5. LED Indications
You can learn about the radio status through the LED indicator.
LED Indicator
Radio Status
Flashes green
The radio is being turned on.
Glows green
The radio is receiving.
Glows red
The radio is transmitting.
Flashes orange slowly
The radio is scanning or roaming.
Flashes orange rapidly
The radio is operating in emergency mode.
Glows orange
Digital mode: The radio is in the call hang time.
In this case, no voice is being transmitted or received during a call. Within such
a period, you can press and hold the PTT key and speak.
Analog mode: The radio is in the auto reset time.
Flashes
blue
Every 3s
BT is enabled, but no BT device is connected.
Every 1.5s
A BT device is connected.
Every 0.1s
BT is being disabled.

User Manual
Call Services
11
6. Call Services
When you are speaking during a call, keep the microphone about 2.5 cm to 5 cm away from your mouth. This ensures
optimal voice quality on the receiving radio.
6.1 Call on Digital Channel
On the digital channel, you can make the following calls to the preset contacts:
Call Type
Description
Group Call
A call from an individual user in a group to all the other members in the group.
Private Call
A call from an individual user to another individual user.
All Call
A call from an individual user to every user on the current digital channel.
6.1.1 Make a Call
Make a call to the preset contact on a channel
a. Select a digital channel according to 4.4 Select a Channel.
b. Press and hold the PTT key.
(Optional) Make a call to the preprogrammed contact
a. Press the preprogrammed One Touch Call key.
b. Press and hold the PTT key.
6.1.2 Answer a Call
You can answer a call without any operation.
6.1.3 End a Call
The private call or group call ends when the call hang time expires.
The all call ends when the caller releases the PTT key.
6.2 Call on Analog Channel
You can make or receive a call on an analog channel with or without signaling.
6.2.1 Call Without Signaling
On an analog channel without signaling, you can make a call to all the other users on the channel.

User Manual
Safety and Security
13
7. Safety and Security
7.1 Emergency
The Emergency feature allows you to seek help from your companion or the control center in case of an emergency.
You can make an emergency call with the highest priority even when your radio is transmitting or receiving.
In emergency mode, the radio transmits at high power level by default. According to the emergency type preset by
your dealer, the radio gives different indications as follows:
Emergency Type
Description
Siren Only
The radio emits a siren but does not transmit any emergency signal to the control center.
Regular
The radio gives an audible indication.
Silent
The radio gives no audible indication.
Silent w/Voice
The radio gives an audible indication only upon receiving a call. Otherwise, the radio
gives no audible indication.
Alarm w/Siren
The radio transmits the emergency signal to the control center, and then emits a siren.
In addition, you can request your dealer to set one of the following emergency modes:
Emergency Mode
Description
Note
Call Only
It allows you to make an emergency call.
If the emergency type is
Siren Only or Alarm
w/Siren, you do not need
to set the emergency
mode.
Alarm w/Call
It allows you to send an emergency alarm and make an
emergency call.
Alarm
It allows you to send an emergency alarm.
7.1.1 Make an Emergency Call
To make an emergency call to the preset contact, press the preprogrammed Emergency On key.
If Alarm w/Call To Follow is preprogrammed by your dealer, you can speak into the microphone without pressing and
holding the PTT key. If the preset voice cycles expire, you can press and hold the PTT key to make an emergency
call again.
7.1.2 Receive an Emergency Call
You can answer an emergency call without any operation.

Safety and Security
User Manual
14
7.1.3 End an Emergency Call
For Caller
Press the preprogrammed Emergency Off key.
Turn off the radio.
For Callee
Switch the channel.
Turn off the radio.
With Send Emergency Exit Message preprogrammed by your dealer, you can send an emergency exit message
to the recipient when ending an emergency alarm or emergency call initiated by mistake.
7.2 Lone Worker
Lone Worker allows the radio to automatically send an emergency alarm to your companion or the control center in
either of the following scenarios:
You do not operate the radio within the preset time.
The radio does not transmit voice within the preset time.
You can press the keys, rotate the knob, or transmit voice to exit the emergency mode.
To enable Lone Worker, press the preprogrammed Lone Worker key.
7.3 Encryption
Encryption refers to end-to-end encryption (E2EE), which protects your voice and data against eavesdropping.
7.3.1 Enable Encryption
Press the preprogrammed Encrypt key.
Encryption is valid for the current channel. When switching to the current channel, the radio automatically
enables Encryption.
7.3.2 Set Encryption
To use the encryption services, both the transmitting radio and the receiving radio must enable Encryption

User Manual
Safety and Security
15
simultaneously with matching encryption key. The encryption key is preprogrammed by your dealer.
7.4 Radio Disable and Radio Enable
Radio Disable allows you to disable the radio by sending a Radio Disable command to the radio.
The disabled radio can be monitored remotely, but is deprived of other features.
Radio Enable allows you to enable the disabled radio again by either of the following:
Send a Radio Enable command to the radio.
Program the radio again.
This manual suits for next models
2
Table of contents
Other Hytera Radio manuals

Hytera
Hytera HM65X User manual

Hytera
Hytera MD78X User manual

Hytera
Hytera PDC680 User manual

Hytera
Hytera MD78Xi User manual

Hytera
Hytera RRU3800F080 User manual

Hytera
Hytera PD562 User manual

Hytera
Hytera PD486 User manual

Hytera
Hytera HP56 Series User manual

Hytera
Hytera HP6 0X User manual

Hytera
Hytera HP70X User manual

Hytera
Hytera PTC760 User manual

Hytera
Hytera PD605 User manual

Hytera
Hytera DMR User manual

Hytera
Hytera MD78X User manual

Hytera
Hytera MNC360 User manual

Hytera
Hytera TC-518 OBR User manual

Hytera
Hytera MD78X User manual

Hytera
Hytera X1e User manual

Hytera
Hytera HM782 User manual

Hytera
Hytera MD780 User manual