Hytera MD780 User manual

Preface
Thank you for purchasing Hytera MD780 DMR digital mobile radio. As a product built to
the DMR standard, MD780 is endowed with ergonomic design and comprehensive digital
functions to deliver an advanced communication solution. With MD780, you can make use
of digital functions to top the competition!
To derive optimum performance from your radio, please read this manual and the supplied
Safety Information Booklet carefully before use.

1
Icon Information
The following icons are available through this manual:
Alert Icons
Caution: indicates situations that could cause damage to your radio.
Note: indicates tips that can help you make better use of your radio.
Function Icons
: indicates functions that are available on digital channel only.
: indicates functions that are available on analog channel only.
Functions marked with no function icons are available on both analog and digital
channels.
Term Explanation
Key Operation
Short press: to press a key and release it quickly;
Long press: to press a key and remain holding it down for a predefined period (2
seconds by default);
Hold down: to press a key and remain holding it down.
Private Call
Private call is initiated by a single user to another user, involving the calling party and
the called party only.
Group Call
Group call is initiated by a single user to a group, involving the calling party and all the
group members.
All Call
All call is a call initiated to all the users on a channel. It is used to deliver important
notices.
Squelch
This technology can remove excessive background noises, improving your

2
communication quality.
Copyright Information
Hytera and CRS are registered trademarks of Hytera in the PRC and/or other countries or
areas. Hytera retains the ownership of its trademarks and product names. All other
trademarks and/or product names that may be used in this manual are properties of their
respective owners.
The Hytera product described in this manual may include Hytera computer programs
stored in memory or other media. Laws in the PRC and/or other countries or areas
preserve for Hytera exclusive rights for Hytera computer programs. The purchase of this
product shall not be deemed to grant, either directly or by implication, any rights to the
purchaser with respect to Hytera computer programs. Any Hytera computer programs
may not be copied, modified, distributed, decompiled, or reverse-engineered in any
manner without the prior written consent of Hytera.
Disclaimer
Hytera endeavors to achieve the accuracy and completeness of this manual, but no
warranty of accuracy or reliability is given. All the specifications and designs are subject to
change without notice due to continuous technology development. No part of this manual
may be copied, modified, translated, or distributed in any manner without the express
written permission of Hytera.
If you have any suggestions or would like to learn more details, please visit our website at:
http://www.hytera.cn.
Note: Any changes or modifications not expressly approved by the party responsible for
compliance could void the user’s authority to operate the equipment

RF Energy Exposure Compliance
Your radio is designed and tested to comply with a number of national and international
standards and guidelines (listed below) regarding human exposure to radio frequency
electromagnetic energy. This radio complies with the IEEE and ICNIRP exposure limits for
occupational/controlled RF exposure environment at operating duty factors of up to 50%
transmitting and is authorized by the FCC for occupational use only. In terms of measuring
RF energy for compliance with the FCC exposure guidelines, your radio radiates
measurable RF energy only while it is transmitting (during talking), not when it is receiving
(listening) or in standby mode.
Your radio complies with the following of RF energy exposure standards and
guidelines
zUnited States Federal Communications Commission, Code of Federal
Regulations; 47CFR part 2 sub-part J
zAmerican National Standards Institute (ANSI)/Institute of Electrical and Electronic
Engineers (IEEE) C95. 1-1992
zInstitute of Electrical and Electronic Engineers (IEEE) C95. 1-1999 Edition
zInternational Commission on Non-Ionizing Radiation Protection (ICNIRP) 1998
Operational Instructions and Training Guidelines
To ensure optimal performance and compliance with the occupational/controlled
environment RF energy exposure limits in the above standards and guidelines, users
should transmit no more than 50% of the time and always adhere to the following
procedures:
Transmit and Receive
To transmit (talk), push the Push-To-Talk (PTT) key; to receive, release the PTT key.
FCC Licensing Information
Part 15 Compliance
This equipment has been tested and found to comply with the limits for a Class B digital
device, pursuant to part 15 of the FCC Rules. These limits are designed to provide

reasonable protection against harmful interference in a residential installation. This
equipment generates, uses and can radiate radio frequency energy and, if not installed
and used in accordance with the instructions, may cause harmful interference to radio
communications. However, there is no guarantee that interference will not occur in a
particular installation. If this equipment does cause harmful interference to radio or
television reception, which can be determined by turning the equipment off and on, the
user is encouraged to try to correct the interference by one or more of the following
measures:
zReorient or relocate the receiving antenna.
zIncrease the separation between the equipment and receiver.
zConnect the equipment into an outlet on a circuit different from that to which the
receiver is connected.
zConsult the dealer or an experienced radio/TV technician for help.
FCC Licensing Requirements
A license from Federal Communications Commission is required prior to use. Your dealer
will program each radio with your authorized frequencies, signaling codes, etc., and will be
there to meet your communications needs as your system expands. Contact your dealer
for more information.
1

3
Contents
Checking Items in the Package.........................................................................................4
Radio Overview.................................................................................................................5
Front Panel ................................................................................................................5
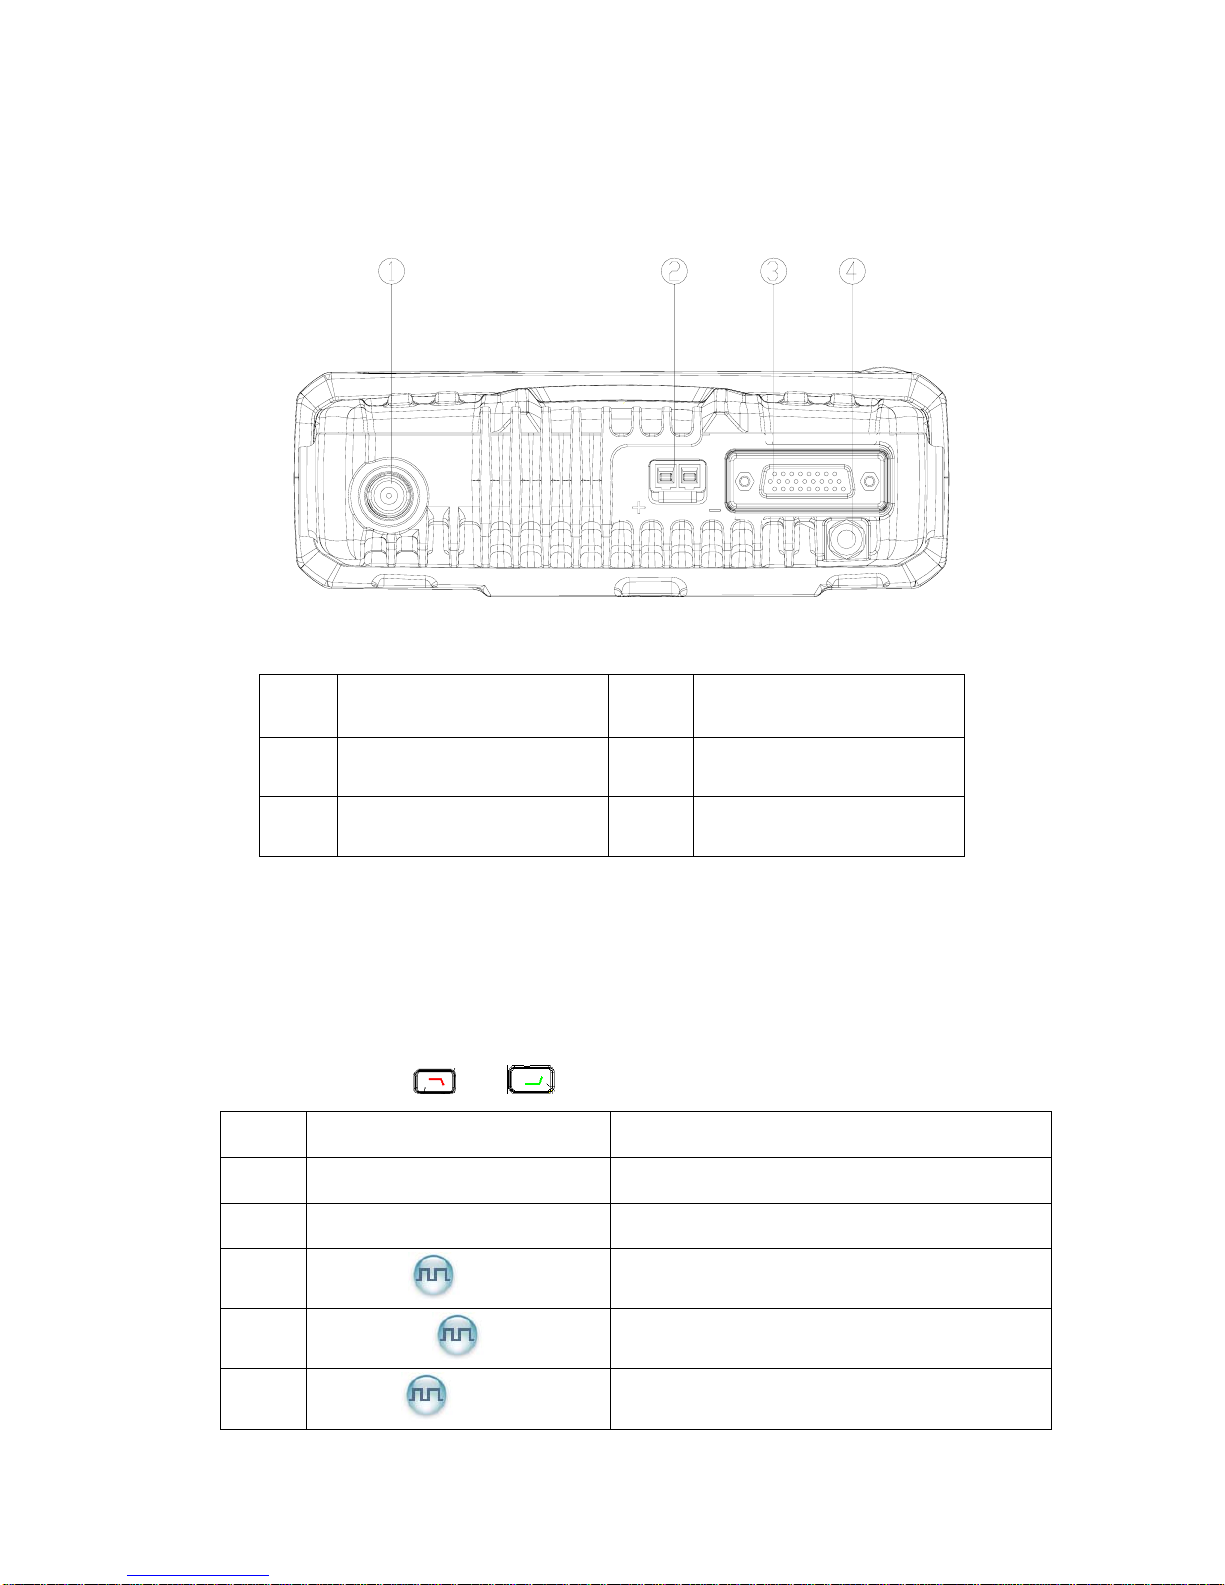
Rear Panel.................................................................................................................6
Programmable Keys .................................................................................................. 6
Installation.........................................................................................................................7
Status Indicators..............................................................................................................10
LCD Icons................................................................................................................10
LED Indicator............................................................................................................11
Basic Operations.............................................................................................................12
Turning the Radio On/Off.........................................................................................12
Adjusting the Volume...............................................................................................12
Selecting a Zone......................................................................................................12
Selecting a Channel.................................................................................................13
Digital/Analog Switch...............................................................................................13
Call...........................................................................................................................13
Menu Navigation.............................................................................................................15
Contact ...................................................................................................................15
Message ..................................................................................................................16
Call Log.................................................................................................................... 17
Scan......................................................................................................................... 18
Zone......................................................................................................................... 19
Settings....................................................................................................................19
Functions and Operations............................................................................................... 21
Scan......................................................................................................................... 21
Public Address.........................................................................................................22
Talk Around..............................................................................................................22
Monitor.....................................................................................................................22
Squelch Off..............................................................................................................23
Emergency...............................................................................................................23
Ignition Sense.......................................................................................................... 27
Busy Channel Lockout............................................................................................. 28
Time-out Timer (TOT) ..............................................................................................28
Troubleshooting .............................................................................................................. 29
Care and Cleaning..........................................................................................................31
Optional Accessories....................................................................................................... 31
Appendix: Input Method..................................................................................................32

4
Checking Items in the Package
Please unpack carefully and check that all items listed below are received. If any item is
missing or damaged, please contact your dealer.
Palm Microphone Microphone Hanger and Screws
Mounting Bracket Kit
Fuse PowerCord
Owner’s Manual Safety Information Booklet
QuickReferenceGuide RadioUnit

5
Radio Overview
Front Panel
No. Part Name No. Part Name
○
1Volume Control / Channel
Selector Knob ○
2LED Indicator
○
3LCD Display ○
4OK/Menu Key
○
5Back Key ○
6Power On/Off key
○
7Up Key ○
8Down Key
○
9Speaker ○
10 Programmable Keys
○
11 Microphone Jack ○
12 Emergency Key

6
Rear Panel
No. Part Name No. Part Name
○
1BNC Antenna Connector ○
2Power Inlet
○
3Accessory Jack ○
4Antenna Jack
Programmable Keys
For enhanced convenience, you may request your dealer to program the keys P1, P2, P3,
P4, Emergency key, and as shortcuts to the functions listed below:
No. Shortcut Keys Description
1 Zone Up Quick access to desired zone
2 Zone Down Quick access to desired zone
3 Message Quick access to the menu “Message”
4 Contact List Quick access to Contact List
5 Call Log Quick access to the menu “Call Log”

7
6 Adjusting Power Level To adjust power level through one button
press.
7 Public Address To allow public addressing via the external
speaker.
8 Talk Around To directly communicate with other radios.
9 Monitor
To adjust the condition for incoming signal
match.
10 Monitor Momentary
To adjust the condition for incoming signal
match.
11 Squelch Off
To always unmute speaker no matter whether
carrier is present or not.
12 Squelch Off Momentary
To always unmute speaker no matter whether
carrier is present or not.
13 Scan To receive signals on other channels.
14 Nuisance Temporary Delete To temporarily ignore unwanted channel
activity.
15 Emergency To summon help in emergent situations.
16 Adjusting Squelch Level
To temporarily adjust the squelch threshold
required for the radio to unmute.
Note: Long and short press of a key can be assigned with different functions by your
dealer.
Installation
Before you install the radio in a vehicle, be sure to read the following instructions carefully:

8
Instructions
zThe radio operates with negative grounded power supply of 13.2 ± 15%Vonly.
Please check polarity and voltage of the power supply on vehicle before you install
the radio.
zPlease check how long the screws will extend from the bottom surface of radio,
before you install the radio. Be sure to drill mounting hole with caution, to avoid
damage of the vehicle wiring and parts.
zPlease connect the supplied antenna and power cord to the radio, before you install
the radio in the bracket.
zInstall the radio with Hytera supplied mounting bracket, to avoid radio loose in case of
accidents. The loose radio may cause bodily injury.
zInstall the radio in a location where it’s easy to reach the front panel controls.
zPlease make sure there’s sufficient space at back of the radio for wiring.
zWhen the fuse for DC power cord needs replacement, it must be replaced by a fuse
with the same specification.
Installation Tools
zElectric drill
zCross head screwdriver
zHex socket sleeve (used for 4.8*20mm self-tapping screws)
Installation Steps
1. Install the bracket in a location where it’s easy to operate the radio.
2. Connect accessories such as antenna and power cord to the radio.
3. Slide the radio into the mounting bracket and secure it using the locking knobs.
4. Install the microphone hanger in a location where it’s easy to reach the microphone.
5. Plug the palm microphone into the microphone jack on the front panel, and then place
it on the hanger.

9
No. Part Name No. Part Name
○
1Radio Unit ○
2Locking Knobs
○
3Mounting Bracket ○
44.8 × 20 mm Self-tapping Screws
○
5Palm Microphone ○
64 × 16 mm Self-tapping Screws

10
○
7Microphone Hanger ○
8Power Inlet
○
9Black Power Cord ○
10 Red Power Cord
○
11 Fuse ○
12 BNC Antenna Connector
Status Indicators
LCD Icons
The LCD of your radio displays the radio status, text entries, and menu items. The
following are the icons that appear on the radio’s display.
Standby Interface
Status Icons
Icon Name Icon Radio Status
No signal
RSSI
More bars indicate better signal strength
New Message/Unread Message
Message Icons
Inbox is full

11
Scanning is in progress
Scanning pauses on a non-priority channel
Scanning pauses on Priority Channel 1
Scan Icons
Scanning pauses on Priority Channel 2
Low Tx power for the current channel
Tx Power Icons
High Tx power for the current channel
Monitor Icon Monitor function is active
Speaker Icon Speaker is unmuted
Emergency Icon
Emergency mode (other than secret emergency)
is active or an emergency message is received
The knob currently operates in channel selection
mode.
Knob Operation
Mode Icons
The knob currently operates in volume adjustment
mode.
Operation Mode Icons
Icon Name Icon Operation Mode
Direct Mode: Under this mode, radios
communicate with each other directly.
Operation Mode
Repeater Mode: Under this mode, radios
communicate with each other via a repeater.
LED Indicator
The LED indicator will help you easily identify current radio status.
LED Indicator Radio Status

12
LED flashes green Powering on
LED glows red Transmitting
LED glows green Receiving
LED flashes orange Scanning is in progress
Basic Operations
Turning the Radio On/Off
To turn the radio on, hold down the Power On/Off key until the following indications are
given: the radio displays “Hytera" and sounds power-up alert, and LED flashes green.
To turn the radio off, long press the Power On/Off key.
Adjusting the Volume
When the Volume Control / Channel Selector knob operates in volume adjustment
mode (the radio displays the icon ), rotate the knob clockwise to increase the
volume, or counter-clockwise to decrease the volume.
Alert tone volume is programmable by your dealer.
Selecting a Zone
A zone is a group of channels exhibiting the same property, and is programmed by your
dealer. The radio supports up to 32 zones, each with a maximum of 16 channels. You may
select a zone through any of the following methods:
1. Through menu selection
Go to the Zone menu, and use the Up/Down keys to select your desired zone.
2. Through the function keys
You may quickly toggle to your desired zone, through press of the programmed Zone Up

13
or Zone Down key.
Note: You dealer may designate the power-up zone and channel. If not, the radio will
enter the zone and channel last used.
Selecting a Channel
Press the Volume Control / Channel Selector knob to switch it to channel selection
mode (the radio displays the icon ), and then rotate the knob to select your desired
channel.
Alias of the current channel will appear on the standby screen.
Digital/Analog Switch
Each channel can be programmed as either analog channel or digital channel. If the
current zone includes both analog and digital channels, you may quickly switch between
digital and analog channels through the Volume Control / Channel Selector knob.
When switching from digital to analog mode, some features such as Message will be
unavailable.
Call
Transmitting a Private Call
You may transmit a Private Call through any of the following methods. When transmitting
a Private Call, the icon will appear.
Transmitting a call to the preset contact
In standby mode, pressing PTT key will transmit an individual call to the contact (a Private
Call number) preset for the current channel.
Note:
Your dealer may preset a contact for each digital channel. The preset contact could be a

14
Private Call number, a Group Call number or an All Call number.
Transmitting a call through Contact List or Call Log
(1) Go to Contact -> Contact List, or go to Call Log -> Call List.
(2) Use the Up/Down key to select the Private Call number you want to call.
(3) Hold down PTT key to transmit a Private Call to the selected contact.
Transmitting a call through Manual Dial
(1) Go to Contact -> Manual Dial.
(2) Input a Private Call number you want to call.
(3) Hold down PTT key to transmit a call.
Transmitting a Group Call
You may transmit a Group Call through any of the following methods. When transmitting a
Group Call, the icon will appear.
Transmitting a call to the preset contact
In standby mode, pressing PTT will transmit a Group Call to the contact (a Group Call
number) preset for the current channel.
Transmitting a call through Contact List
(1) Go to Contact -> Contact List.
(2) Use the Up/Down key to select the Group Call number you want to call.
(3) Hold down PTT to transmit a Group Call to the selected contact.
Transmitting an All Call
Methods are the same as those in Transmitting a Group Call. When transmitting an All
Call, the icon will appear.
Receiving and Responding to a Call
Receiving a Call

15
When a call is received, your radio will display the corresponding icon as follows:
for a Private Call, for a Group Call and for an All Call.
Responding to a Private/Group Call
After a Private Call or Group Call is received, you may press the PTT key within the preset
time period to call back.
If you do not respond to a received Private Call, the radio will display the missed call icon
.
Note: You cannot respond to an All Call.
Calls on Analog Channels
To transmit on an analog channel, hold down the PTT and speak into the microphone. To
receive, release the PTT.
Menu Navigation
Contact
To access this item, press Menu key in idle mode and then select “Contact”.

16
Contact List
You can save up to 200 entries in the list. To access this item, select “Contact -> Contact
List” or press the shortcut key for Contact List.
Editing a Contact
You can edit the number and alias of each private contact.
Viewing a Contact
You can view details of each contact.
Deleting a Contact
You can delete a Private Call contact. However, please note that you can not delete the
contact when there is only one entry left in the list. In addition, the individual contact preset
on the digital channel cannot be deleted either.
New Contact
You can add a Private Call contact to the contact list. The available contact number is 1 to
16776415.
Manual Dial
You can manually input the Private Call number for calling.
Message
To access this item, press Menu key in idle mode and then select “Message”, or press the
shortcut key for Message directly.

17
New Message
You can create your desired text message and send it to an individual user or to a talk
group.
Quick Text
Under this option there are some text messages (10 entries at most) preset by your dealer.
You can choose to edit and send any entry.
Inbox
The inbox can save up to 10 received messages. When the inbox is full, the icon will
appear.
For each message, you can choose to perform any of these operations: Reply, Forward,
View Details and Delete.
To delete all messages in the inbox, select “Message -> Inbox -> Delete All”.
Outbox
The outbox can save up to 10 sent messages. When the outbox is full, the oldest entry will
be overwritten by the latest one automatically.
For each message, you can choose to perform any of these operations: Resend, Forward,
View Details and Delete.
To delete all messages in the outbox, select “Message -> Outbox -> Delete All”.
Call Log
To access this item, press Menu key in idle mode and then select “Call Log”, or press the
shortcut key for Call Log directly.
Table of contents
Other Hytera Radio manuals

Hytera
Hytera MD65X User manual

Hytera
Hytera HP56 Series User manual

Hytera
Hytera PD562 User manual

Hytera
Hytera PDC760 User manual

Hytera
Hytera TC-500 User manual

Hytera
Hytera MD65X User manual

Hytera
Hytera HP6 0X User manual

Hytera
Hytera MD785 User manual

Hytera
Hytera PD752i User manual

Hytera
Hytera Jupiter TETRA User manual

Hytera
Hytera TC-320 User manual

Hytera
Hytera PD3 Series Installation and operation manual

Hytera
Hytera MD78X User manual

Hytera
Hytera MD62 Series User manual

Hytera
Hytera MD782 User manual

Hytera
Hytera PDC760 User manual

Hytera
Hytera PD486 User manual

Hytera
Hytera X1e User manual

Hytera
Hytera PNC380S User manual

Hytera
Hytera TC-518 OBR User manual