Hytera HYT TC-310 User manual

Preface
Thank you for purchasing HYT TC-310 Business Two-Way Radio. It adopts ergonomic
design to bring you excellent user experience, and is applicable for a variety of industries
such as hospitality, property management, retail, entertainment and manufacture.
This easy-to-use radio will deliver your secure, instant and reliable communication at peak
efficiency. Please read this manual carefully before use. The information presented herein
can help you to derive optimum performance from your radio.
MODELS COVERED BY THIS MANUAL:
TC-310 UHF Two-Way Radio

1
Icon Information
The following icons are available through this manual:
Warning/Caution: represents important safety information, to make users
aware of misoperations that may cause malfunction of the
radio, personal injury or property damage.
Note: indicates important information which helps you make
better use of your radio.
Copyright Information
HYT and CRS are registered trademarks of HYT in P.R.C and other countries and/or
areas. HYT retains the ownership of its trademarks and product names.All other company
and/or product names used in this manual are trademarks and/or registered trademarks of
their respective owners.
Disclaimer
HYT endeavors to achieve the accuracy and completeness of this manual, but no
warranty of accuracy or reliability is given. All the above specifications and designs are
subject to change without notice due to continuous development. No part of this manual
may be copied, reproduced, translated, stored in a retrievable system, distributed, or
transmitted in any form or by any means, electronic or mechanical, for any purpose
without the express written permission of HYT.

2
Contents
Safety Information.............................................................................................................3
Product Inspection ............................................................................................................4
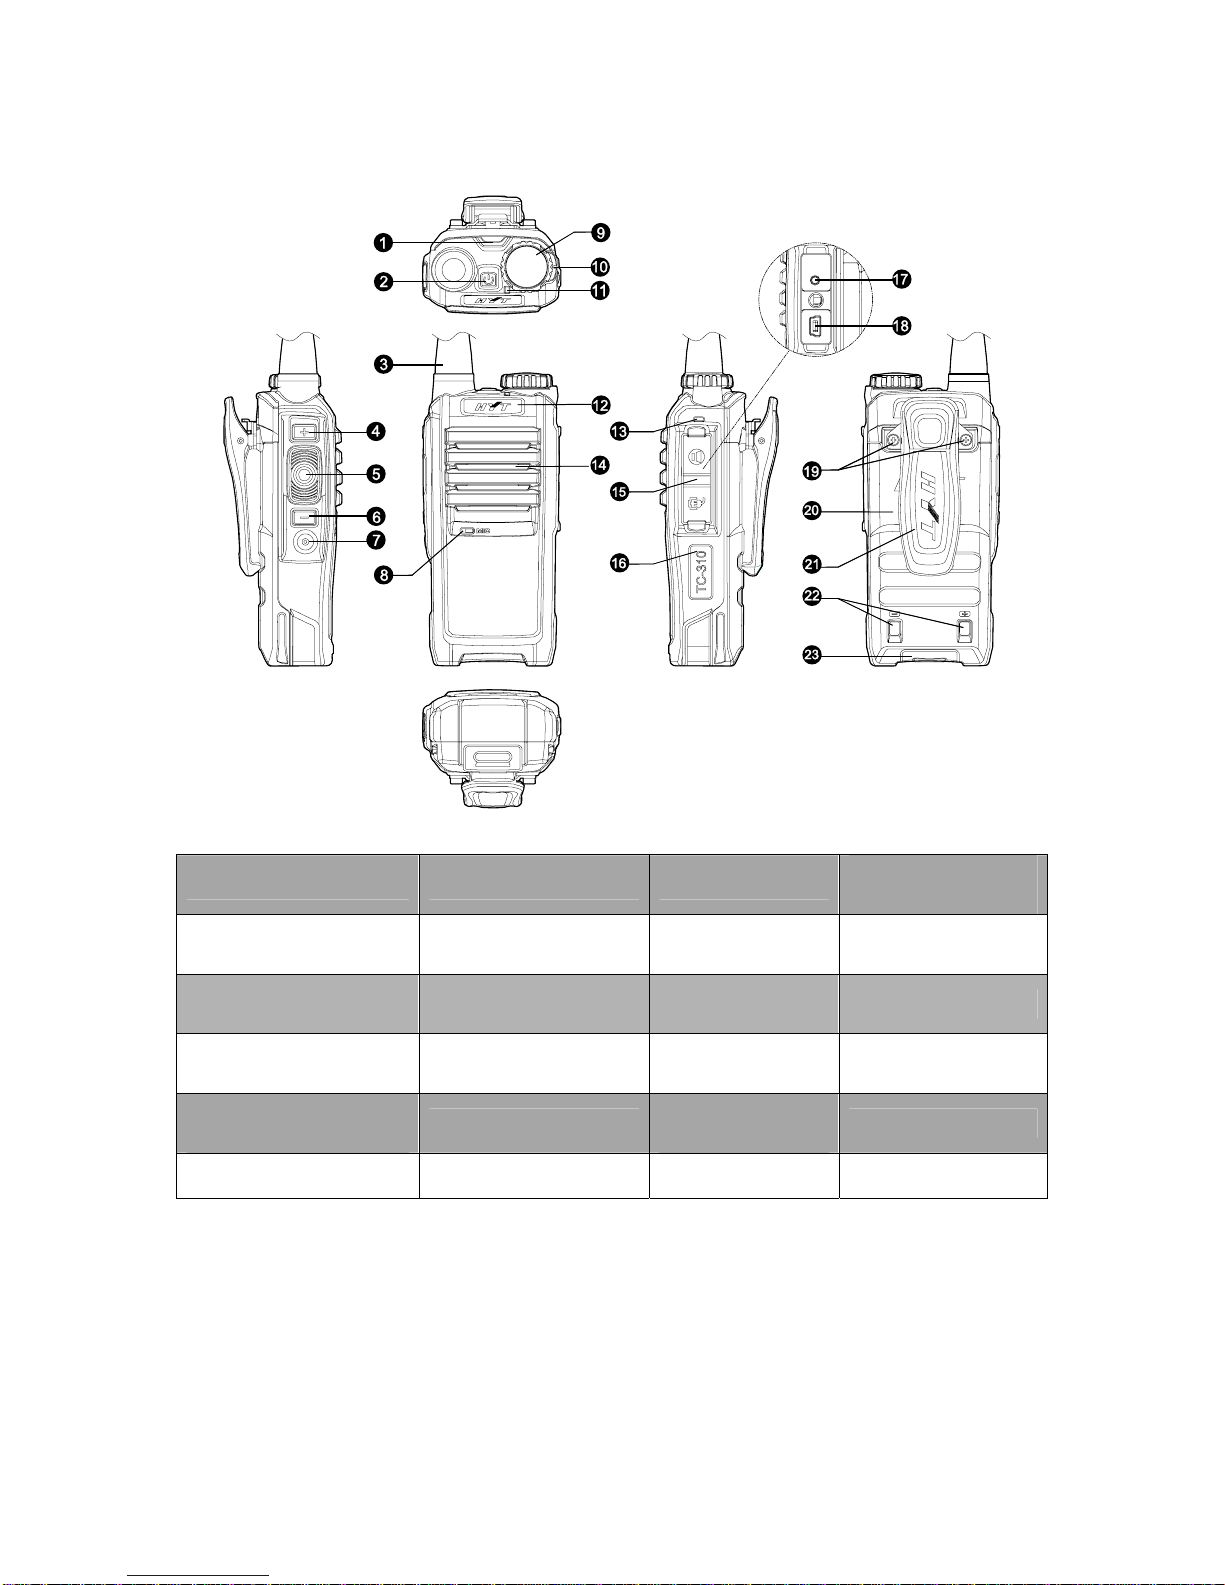
Radio Overview.................................................................................................................5
Battery Information............................................................................................................7
Antenna Information.........................................................................................................11
Assembly and Disassembly............................................................................................ 12
Attaching/Removing the Battery............................................................................... 12
Attaching/Removing the Antenna.............................................................................14
Attaching/Removing the Belt Clip............................................................................. 14
Attaching/Removing the External Earpiece/Mini USB Device..................................15
Basic Operations.............................................................................................................16
Turning the Radio On/Off.........................................................................................16
Adjusting the Volume...............................................................................................17
Selecting a Channel.................................................................................................17
Transmitting.............................................................................................................17
Receiving................................................................................................................. 17
Programmable Auxiliary Functions.................................................................................. 17
Advanced Operations...................................................................................................... 18
CTCSS/CDCSS....................................................................................................... 18
Battery Save ............................................................................................................18
Power Adjust............................................................................................................18
Time-out Timer (TOT) ..............................................................................................18
Battery Strength Indicator ........................................................................................ 19
Monitor.....................................................................................................................19
Scan......................................................................................................................... 20
Busy Channel Lockout (BCL)................................................................................... 22
Low Battery Alert...................................................................................................... 22
Voice-Operated Transmit (VOX) .............................................................................. 22
Compandor..............................................................................................................23
Scrambler ................................................................................................................23
Troubleshooting .............................................................................................................. 24
Care and Cleaning.......................................................................................................... 25
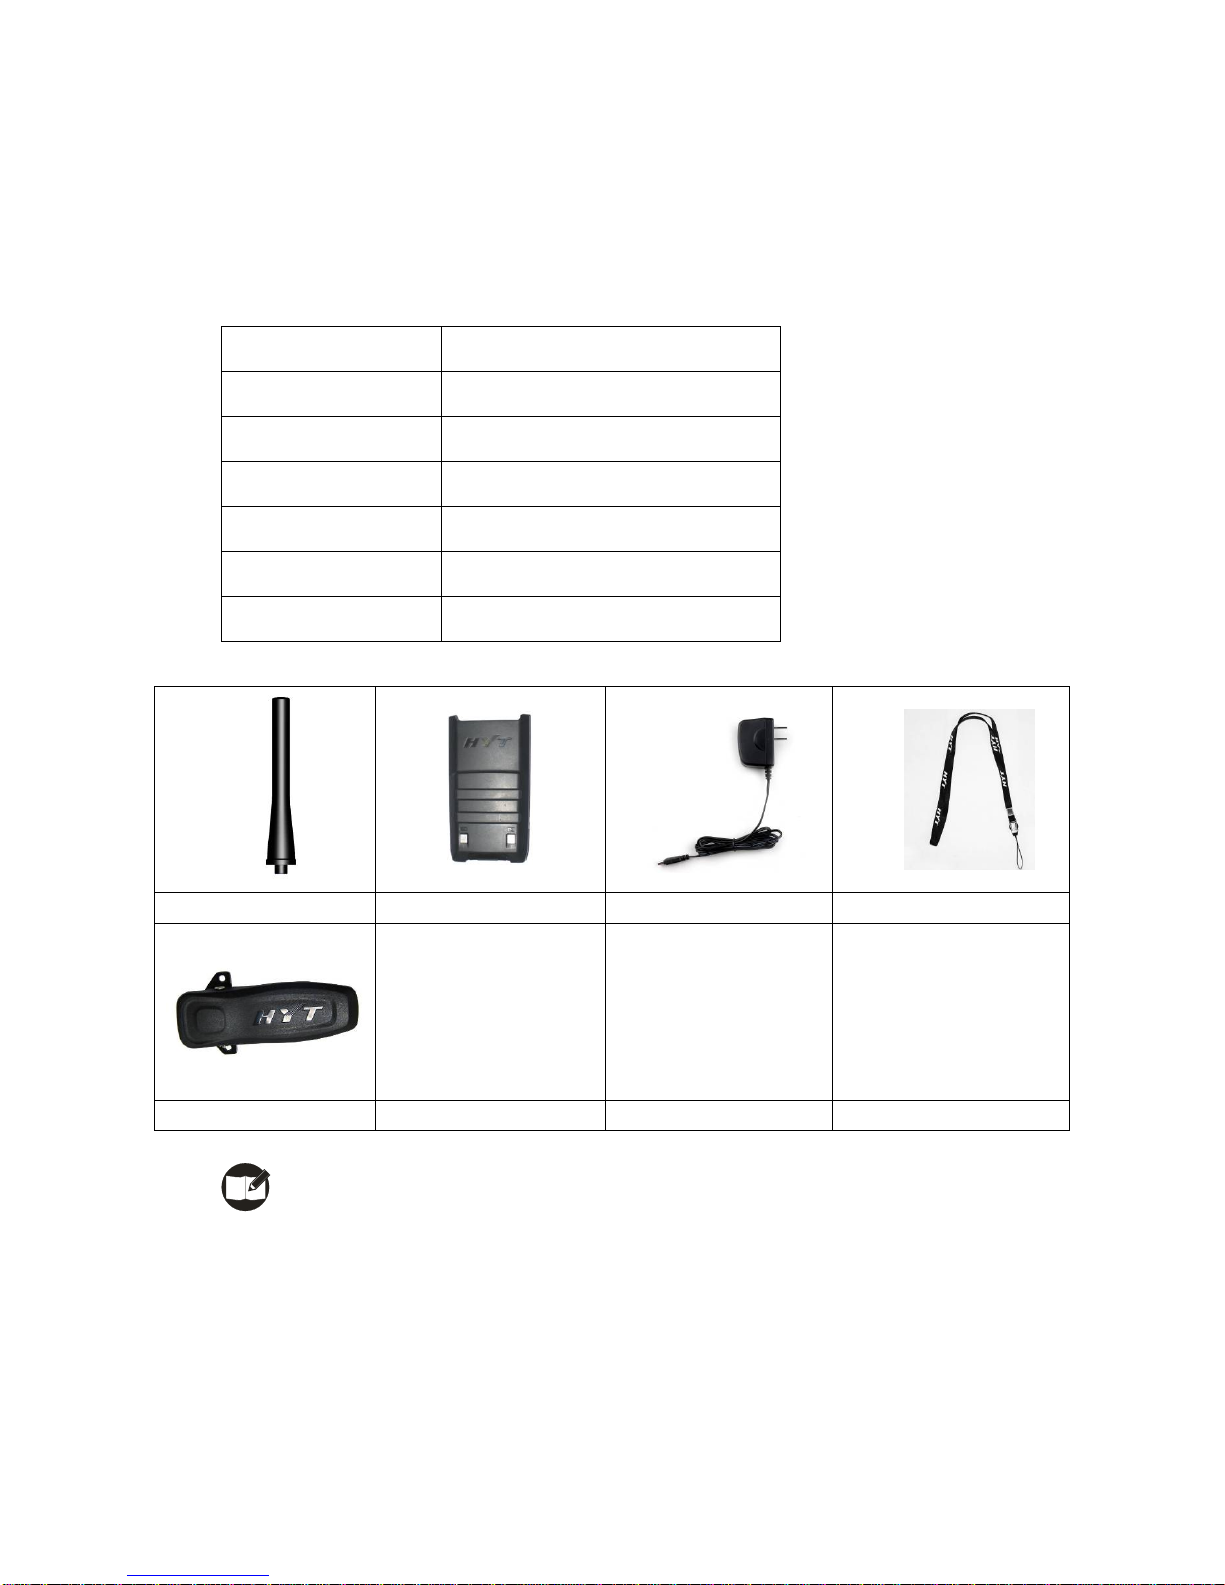
Optional Accessories....................................................................................................... 25

SAFETYTRAINING INFORMATION
Your HYT radio generates RF electromagnetic energy during
transmit mode. This radio is designed for and classified as
“Occupational Use Only”, meaning it must be used only during
the course of employment by individuals aware of the hazards,
and the ways to minimize such hazards. This radio is NOT
intended for use by the “General Population” in an uncontrolled
environment.
This radio has been tested and complies with the FCC RF exposure limits for
“Occupational Use Only”. In addition, your HYT radio complies with the following
Standards and Guidelines with regard to RF energy and electromagnetic energy levels
and evaluation of such levels for exposure to humans:
FCC OET Bulletin 65 Edition 97-01 Supplement C, Evaluating Compliance with FCC
Guidelines for Human Exposure to Radio Frequency Electromagnetic Fields.
American National Standards Institute (C95.1-1992), IEEE Standard for Safety Levels
with Respect to Human Exposure to Radio Frequency Electromagnetic Fields, 3 kHz
to 300 GHz.
American National Standards Institute (C95.3-1992), IEEE Recommended Practice
for the Measurement of Potentially Hazardous Electromagnetic Fields– RF and
Microwave.
The following accessories are authorized for use with this product. Use of accessories
other than those (listed in the instruction) specified may result in RF exposure levels
exceeding the FCC requirements for wireless RF exposure.
To ensure that your expose to RF electromagnetic
energy is within the FCC allowable limits for
occupational use, always adhere to the following
guidelines:
DO NOT operate the radio without a proper antenna attached, as this may damaged
the radio and may also cause you to exceed FCC RF exposure limits. A proper
antenna is the antenna supplied with this radio by the manufacturer or antenna
specifically authorized by the manufacturer for use with this radio.
DO NOT transmits for more than 50% of total radio use time (“50%duty cycle”).
Transmitting more than 50% of the time can cause FCC RF exposure compliance
requirements to be exceeded. The radio is transmitting when the “TX indicator” lights
red. You can cause the radio to transmit by pressing the “PTT” switch.

ALWAYS keep the antenna at least 2.5 cm (1 inch) away from the body when
transmitting and only use the HYT belt-clip which is listed in instructions when
attaching the radio to your belt, etc., to ensure FCC RF exposure compliance
requirements are not exceeded. To provide the recipients of your transmission the
best sound quality, hold the antenna at least 5 cm (2 inches) from your mouth, and
slightly off to one side.
The information listed above provides the user with the information needed to make him
or her aware of RF exposure, and what to do to as-sure that this radio operates with the
FCC RF exposure limits of this radio.
Electromagnetic Interference/Compatibility
During transmissions, your HYT radio generates RF energy that can possibly cause
interference with other devices or systems. To avoid such interference, turn off the radio in
areas where signs are posted to do so. DO NOT operate the transmitter in areas that are
sensitive to electromagnetic radiation such as hospitals, aircraft, and blasting sites.
Occupational/Controlled Use
The radio transmitter is used in situations in which persons are exposed as consequence
of their employment provided those persons are fully aware of the potential for exposure
and can exercise control over their exposure.
IMPORTANT
READ ALL INSTRUCTIONS carefully and completely before using the
transceiver
SAVE THIS INSTRUCTION MANUAL-This instruction manual contains
important operating instructions for the Two-Way Radio
EXPLICIT DEFINITIONS
WORD DEFINITION
WARNING Personal injury, fire hazard or electric shock
may occur.
CAUTION Equipment damage may occur.
NOTE If disregarded, inconvenience only. No risk
of personal injury, fire or electric shock.

OPERATING NOTES
When transmitting with a portable radio, hold the radio in a vertical position with its
microphone 5 to 10 cm (2 to 4 inches) away from your mouth. Keep the antenna at
least 2.5 cm (1 inch) from your head and body.
If you wear a portable two-way radio on your body, ensure that the antenna is at least
2.5 centimeters (1 inch) from your body when transmitting.
PRECAUTIONS
WARNING! NEVER hold the transceiver so that the antenna is very close to, or touching
exposed parts of the body, especially the face or eyes, while transmitting. The transceiver
will perform best if the microphone is 5 to 10 cm (2 to 4 inches) away from the lips and the
transceiver is vertical.
WARNING! NEVER operate the transceiver with a headset or other audio accessories at
high volume levels.
CAUTION! NEVER short the terminals of the battery pack.
NEVER connect the transceiver to a power source other than the Battery listed below
Such a connection will ruin the transceiver.
DO NOT push the PTT when not actually desiring to transmit.
AVOID using or placing the transceiver in direct sunlight or in areas with temperatures
below –30°C (–22°F) or above +60°C (+140°F).
DO NOT modify the transceiver for any reason.
MAKE SURE the flexible antenna and battery pack are securely attached to the
transceiver, and that the antenna and battery pack are dry before attachment. Exposing
the inside of the transceiver to water will result in serious damage to the transceiver.
BE CAREFUL! The series transceivers employ waterproof construction, which
corresponds to IPX7 of the international standard IEC 60529 (2001), 1 m depth for 30
minutes. However, once the transceiver has been dropped, waterproofing cannot be
guaranteed due to the fact that the transceiver may be cracked, or the waterproof seal
damaged, etc.
The use of non-HYT battery packs/chargers may impair transceiver performance and
invalidate the warranty.
FCC CAUTION:
Changes or modifications to this device, not expressly approved by HYT, could void
your authority to operate this transceiver under FCC regulations.

4
Product Inspection
Please unpack the package box carefully and check that all shipped items are received;
report any missing or damaged items to your dealer.
Accessories supplied with the radio
Item Qty. (PCS)
Antenna 1
Strap 1
Belt Clip 1
Li-Ion Battery 1
Switching Power 1
Owner’s Manual 1
Antenna Li-Ion Battery Switching Power Strap
Belt Clip
Note: Frequency band is marked on the label of antenna; if not, please refer to the
label on the radio unit for frequency band information.

5
Radio Overview
(1) Strap Hole (2) Power On/Off Key (3) Antenna (4) Volume Control
Key [+]
(5) PTT (Push-to-Talk)
Key (6) Volume Control Key
[-] (7) Programmable
Function Key (8) Microphone
(9) Channel Selector
Knob (10) Channel Mark (11) Status
Indicator (12) HYT Logo
(13) Charge Indicator (14) Speaker (15) Accessory
Cover (16) Model Label
(17) Audio Accessory
Jack (18) MINI USB Port (19) Screw for Belt
Clip (20) Battery
(21) Belt Clip (22) Charging Piece (23) Battery Latch
﹡PTT (Push-to-Talk) Key
Press and hold down the PTT key to transmit, and release it to receive.
﹡Programmable Function Key
The side keys can be programmed with long/short press functions by your dealer.

6
Note: Short Press means key press shorter than 1 second, while Long Press
means key press longer than 1 second.
﹡LED Indicator
Status indications and alert tones are shown in the table below:
Power On (to enter User Mode)
When the radio is turned on, an alert tone sounds and
the Status Indicator flashes orange once.
When the radio is currently on a blank channel, it
sounds beep tones continuously.
Power Off When the radio is turned off, the power-off alert tone
is heard.
Low Battery Alert The Status Indicator flashes red, and a low-pitched
tone sounds at an interval of 10 seconds.
Transmitting
The Status Indicator glows red.
When TOT timer expires, the radio sounds beep
tones continuously.
A TOT pre-alert tone sounds before the TOT timer
expires.
Receiving The Status Indicator glows green when carrier is
present.
Scanning
The Status Indicator flashes green once per second,
while scanning is in process.
Scan Start Alert (programmable by the dealer): one
beep is heard.
When signals are received on a certain channel, the
Status Indicator solidly glows green.
Scan End Alert (programmable by the dealer): one
beep is heard.
Power Adjustment
A low-pitched tone is heard when the radio switches
from high power to low power.
A high-pitched tone is heard when the radio switches

7
from low power to high power.
VOX
Compandor
Scrambler
Channel Lock
One beep sounds when the feature is enabled.
Two beeps sound when the feature is disabled.
﹡Battery Latch
Used to secure or remove the battery.
﹡Audio Accessory Jack
Used to connect audio accessories.
﹡Mini USB Port
Used to connect accessories such as programming cable, cloning cable and switching
power.
Battery Information
Initial Use
New batteries from the factory are not fully charged, so be sure to charge a new battery
for at least 5 hours before initial use. Three full charge-discharge cycles would optimize
the capacity and performance of your battery. When battery power runs low, it is time to
recharge or to replace the battery.
Applicable Battery Packs
Please only use the battery specified by HYT. Other batteries may burst, causing bodily
injury and property damage.
Caution:
1. Do not dispose of the battery in fire!
2. Recycling and disposal of the battery shall comply with your local regulations.
3. Never attempt to dismantle the battery.
Note:
1. Charge the battery at a temperature among 5℃-40℃. Violation of the said limit may
cause battery leakage or even damage.

8
2. When charging the battery that is attached to a radio, turn the radio off to ensure a full
charge.
3. Never charge a wet battery or a wet radio with battery attached. Please dry it with a
soft cloth prior to charge.
4. The battery will eventually wear out. When the operating time of a fully charged
battery is noticeably shorter than its normal performance, you need to buy a new one.
Please replace it ASAP.
5. If the product shuts off automatically due to low battery, please charge the battery
soon, or the battery could suffer damage.
6. If you plan not to use the radio for a long time, please remove the battery from it to
avoid any unexpected damage.
7. Do not charge fully charged batteries for an “extra boost”. This action will significantly
reduce battery life.
8. Do not charge the radio/battery (which does not require to be charged any more) with
a charger, because continuous charging may shorten the battery life. Note: Never use
a charger to hold the radio.
To Prolong Battery Life
1. Battery performance will decrease greatly at a temperature below 0℃. Therefore, a
spare battery is necessary in cold weather. However, the replaced battery that fails to
function at a low temperature may work at room temperature, so keep it in place for
later use.
2. The dust on the battery contact may make the battery work or charge abnormally.
Please use a clean and dry cloth to wipe it before charging or attaching it to the radio.
Battery Storage
1. If you plan to store a battery for a long time, please fully charge it first to avoid battery
damage due to over-discharge.
2. To avoid battery capacity reduction due to over-discharge, recharge a battery after
storing it for a certain period of time: 6 months for Li-Ion & Li-polymer batteries.
3. Store your battery in a cool and dry environment at room temperature to reduce

9
self-discharge.
Charging the Battery
With a battery-attached radio, when the Status Indicator flashes red, and an alert tone
sounds at an interval of ten seconds indicating the battery power runs low, please charge
the battery immediately. Only use the charger specified by HYT. The Charge Indicator will
indicate the charging progress as follows:
Please follow steps below to charge the radio with switching power:
1. Plug the AC connector of the switching power into an AC outlet socket.
2. Plug the Mini USB connector of the switching power into the Mini USB port at one side
of the radio unit.
3. Make sure that the battery is in good contact with the switching power. The charging
process begins when the Charge Indicator at one side of the radio unit glows orange.
4. When charging is completed, the Charge Indicator glows green. At this time, you may
remove the radio.
Status Charge Indicator of the Radio
Charging Solidly glows orange
Fully charged Solidly glows green

10
Please follow steps below to charge the radio/battery with a desktop charger:
1. Plug the AC connector of the switching power into an AC outlet socket.
2. Plug the Mini USB connector of the switching power into the Mini USB port on back of
the desktop charger.
3. Place the radio with the battery attached, or the battery alone, into the charger.
4. Make sure that the battery is in good contact with charging pieces of the desktop
charger. The charging process begins when the charger LED glows orange.
5. When charging is completed, the charger LED glows green. At this time, you may
remove the radio.
Status Charger LED
Charging Solidly glows orange
Fully charged Solidly glows green
You can also use HYT Six-Unit Switching Power to charge up to six radios/batteries
simultaneously, as shown in Figure 1. Please refer to the Owner’s Manual for Six-Unit
Switching Power for detailed operation procedures.

11
图2:六联排充充电示意图
Figure 1 Schematic Diagram of Six-Unit Charger
When multiple desktop chargers are used simultaneously, you may connect the chargers
in parallel to create a multi-unit charger.
Assembly Method: Slide the latch of a charger into the slot on the bottom of another
charger, as shown in Figure 2.
座充连接扣
Figure 2 Diagram of Multi-Unit Charger Assembly
Antenna Information
zStubby antenna is durable and ideal for communication at low transmit power.
zCommunication range may vary with terrain and your operating conditions. Rainy
Latch of Desktop Charger

12
days or forest locations may narrow your communication range, so please make full
preparations in advance to avoid potential inconvenience.
Assembly and Disassembly
Attaching/Removing the Battery
Attaching the Battery
1. Press the belt clip down (in direction of ①) to make its bottom up. Then push the
battery (in direction of ②) into the radio. See Figure 1.
Note: Make sure the battery tab is fully inserted into the radio’s slot.
Figure 1
2. Press the battery bottom (in direction of ③) gently until a click is heard, which
indicates that the battery is properly attached to the radio. See Figure 2.
Note: If the battery latch is loose or unsecured, please take it down and
attach it again.
2
1
3

13
Figure 2
Removing the Battery
1. Make sure the radio is powered off first. Press the belt clip down (in direction of ①) to
make its bottom up. Then lift the battery latch (in direction of ②). See Figure 3.
Figure 3
2. When the battery bottom gets tilted, release the latch and remove the battery (in
direction of ③) as shown in Figure 4.
Figure 4
3
2
1

14
Attaching/Removing the Antenna
Attaching the Antenna
1. Align the threaded end of the antenna with the antenna connector located on the
radio’s top side.
2. And turn the antenna clockwise to fasten it. See Figure 5.
Figure 5
Removing the Antenna
Turn the antenna counter-clockwise until you can remove it.
Attaching/Removing the Belt Clip
Attaching the Belt Clip
Unfasten the two screws for belt clip by a screwdriver, then place the belt clip on the radio
and align its two holes with two threaded holes of the radio, and secure the two screws
again. See Figure 6.

15
Figure 6
Removing the Belt Clip
Use a screwdriver to loosen the screws and remove the belt clip.
Note: Please be careful to avoid missing of screws.
Attaching/Removing the External Earpiece/Mini USB Device
Attaching the External Earpiece
Loosen the strap (①), and tie it to the strap hole (②). Uncover the accessory jack cover
(③), and insert the earpiece plug into the jack (④). Then rotate the other end of the strap
into the connector of the earpiece cable (⑤). If you want to adjust the connector’s position,
please hold the connector and draw the cable to avoid cable damage (⑥).
Figure 7
Removing the External Earpiece
Take converse steps to remove the external earpiece.

16
Note: When the earpiece is not in use, make sure the accessory jack is
properly covered to prevent intrusion of dusts.
Attaching the External Mini USB Device
Uncover (not remove) the Accessory Cover (in direction of ①), and insert the Mini USB
connector into the Mini USB port (in direction of ②). See Figure 8.
Figure 8
Removing the Mini USB Device
Pull the Mini USB connector out and remove it.
Note: When the Mini USB Device is not in use, make sure the accessory jack
is properly covered to prevent intrusion of dusts.
Basic Operations
Turning the Radio On/Off
Long press the Power On/Off Key until an alert tone is heard to turn the radio on/off.
2
1

17
Adjusting the Volume
Press [+] to increase or [-] to decrease the volume level. During volume adjustment, the
radio will sound alert tones at your selected volume level.
Selecting a Channel
Rotate the Channel Selector Knob to align the channel numbers.
Transmitting
Press and hold down the PTT key, and speak into the microphone at your normal voice
level. Hold the radio about 2.5 to 5 centimeters away from your mouth.
Receiving
Release the PTT key to receive.
Programmable Auxiliary Functions
Your dealer can program the following auxiliary functions to the programmable keys (with
long/short press).
zNone
zPower Adjustment
zMonitor
zMonitor Momentary
zScanning
zScrambler
zVoice-operated Transmit (VOX)
zCompandor
zSquelch Off
zSquelch Off Momentary
zBattery Strength
zChannel Lockout (When this function is enabled, the current locked channel can not
Table of contents
Other Hytera Two-way Radio manuals

Hytera
Hytera PD752 User manual

Hytera
Hytera PNC370 User manual

Hytera
Hytera HYT TC-500 User manual

Hytera
Hytera AP58 Series User manual

Hytera
Hytera X1p User manual

Hytera
Hytera PT790 User manual

Hytera
Hytera TC-508V2 User manual

Hytera
Hytera PD365 User manual

Hytera
Hytera BD612i User manual

Hytera
Hytera X1e User manual

Hytera
Hytera PD40X User manual

Hytera
Hytera AP51 Series User manual

Hytera
Hytera DMR User manual

Hytera
Hytera PD405 User manual

Hytera
Hytera AP58X User manual

Hytera
Hytera PD782 User manual

Hytera
Hytera PT350 User manual

Hytera
Hytera PD79X Ex User manual

Hytera
Hytera TC-320 User manual

Hytera
Hytera PD702 User manual