KEYPAD
• POWER, ON or OFF
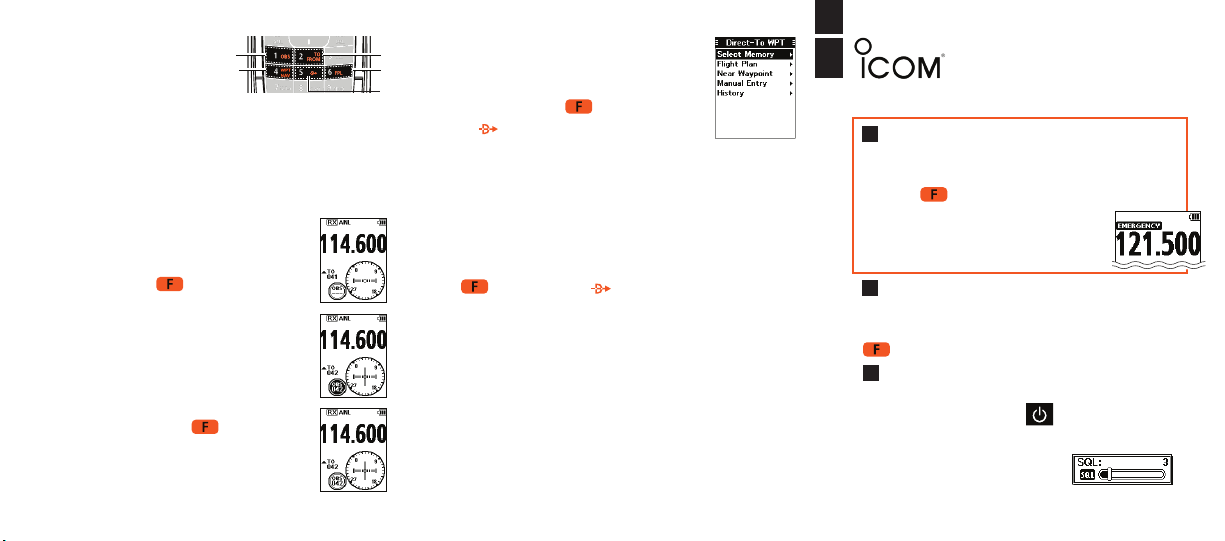
Push POWER KEY . Hold down for 1
second to turn the transceiver ON or OFF.
• SET SQUELCH
Push [SQLY]or [SQLZ]
to adust until the noise disappears.
when no signal is received.
QUICK
OPERATION GUIDE
a25C/a25n
GENERAL
If the button marking on the keypad is white,
push to activate. For secondary functions push
, then the desired orange-marked button.
• FLYING TO A VOR STATION*
Select a VOR Station’s frequency.
- CDI screen is displayed.
Next, push , then”OBS” to
enter the OBS mode.
- OBS is highlighted and the
Course Deviation is displayed.
Next, push [ENT ANL], then
conrmthe“TO/FROM”
indicatorshows“TO”.If“FROM”
is displayed, push , then push
“TO/FROM”toshow“TO”.
-Maintaintheheadingsothatthe
Course Deviation Needle comes
to the center of the CDI.
• SELECTINGAWAYPOINTFROM
MEMORYORFLIGHTPLAN
To select a waypoint from the
Memorypush , then push
[5 ]for“DirecttoWPT”screen.
Choose“SelectMemory”,thenpush
[ENT ANL]. (“GROUP LIST” SCREEN DISPLAYS)
Select a Group, then push [ENT ANL].
(“COURSETO”SCREENDISPLAYS)
Enter the course, then push [ENT ANL].
(“WAYPOINTNAVIATION”SCREENDISPLAYS)
Toselectawaypointfromaightplan,push
, then push [5 ]for“DirecttoWPT”.
Select“FlightPlan”,thenpush[ENT ANL].
Selectaightplan,thenpush[ENT ANL].
Select a waypoint, then push [ENT ANL].
Enter the course, then push [ENT ANL].**
(“WAYPOINTNAVIGATION”SCREENDISPLAYS)
*See full manual for complete information about VOR.
**The course entry is required only when the CDI type
Navagation screen is selected.
EMERGENCY
In case of emergency, you can immediately
selectthe121.5MHzemergencyfrequency.
• Push , then push [7 121.5]to select
the emergency frequency.
Push [CLR DEL]to return to the
previously selected frequency.
©2021 Icom America Inc. The Icom logo is a registered trademark of Icom Inc. 43026
1. Omni Bearing Selector
(OBS) to select course
heading.
2. To/FromSelectortoinvertOBSsettingon
CDI screen.
3. Waypoint Navigation Key to display Waypoint Screen.
4. Direct To Key to display Direct To WPT screen for
Waypoint entry.
5. FlightPlanKeytodisplaycurrentightplan.
• DIAGRAM
12
4
5
3


