IDW G-Series User manual
G-Series Cooler
Instruction Manual
G-11c/GCG-11c
UPRIGHT COOLER
Manual is for the following models:
G-11-C33EB, G-11-BC33EB
G-11-SC33EB, G-11-ZC33EB
G-11-PC33EB, G-11-WC33EB
GCG-11-C33EB, GCG-11-C233EB
G-11-C33EB-HC, GCG-11-BC33EB
GCG-11-AC33EB,G-11-SC33EB-HC
GCG-11-ZC33EB, GCG-11-ZC233EB
GCG-11-SC33EB, GCG-11-BC233EB
GCG-11-PC33EB, GCG-11-2SC33EB
GCG-11-WC33EB, GCG-11-WC233EB
GCG-11-C-C233EB-HC , GCG-11-SC33EB-HC
GCG-11-2SC33EB-HC, GCG-11-C33EB-HC

Innovative DisplayWorks
G-11c/GCG-11c
FOR YOUR FUTURE REFERENCE
• This easy-to-use manual will guide you in getting the best use of your cooler.
• Remember to record the model number and the serial number. This information can be found on the
inside of your cooler.
• Keep your receipt with this manual for future warranty service.
Model #:
Serial #:
Date of Purchase:
2
TABLE OF CONTENTS
Parts & Identication ..........................................................3
Safety Precautions ..............................................................4
Features..............................................................................5
Flammable R290 Warnings .................................................5
Instructions.........................................................................5
Ambient Environment..........................................................5
Preparation Before Operation..............................................6
Replacing the Interior Light.................................................7
Replacing the Door LED Lights.............................................8
Replacing the Canopy Light .................................................9
Startup, Operation & Temperature Adjustment...................10
Lit Door ‘Logo’ Switch........................................................ 10
Repair & Maintenance for Refrigeration Drawer.................10
Condenser Maintenance .................................................... 11
Maintenance..................................................................... 11
Cleaning Shutdown Questions & Answers........................... 11
Canopy Graphics Replacement........................................... 12
Setting Up Power Cord Holder............................................ 12
Troubleshooting ................................................................ 13
After-Sales Service............................................................. 13
GCG- Series Circuit Diagram............................................... 14
GCG-Series Electrical Wiring Diagram................................. 15
G-Series Circuit Diagram.................................................... 16
G- Series Electrical Wiring Diagram.................................... 17
G-11c
GCG-11c
Instruction Manual
Manual is for the following models:
G-11-C33EB, G-11-BC33EB
G-11-SC33EB, G-11-ZC33EB
G-11-PC33EB, G-11-WC33EB
GCG-11-C33EB, GCG-11-C233EB
G-11-C33EB-HC, GCG-11-BC33EB
GCG-11-AC33EB,G-11-SC33EB-HC
GCG-11-ZC33EB, GCG-11-ZC233EB
GCG-11-SC33EB, GCG-11-BC233EB
GCG-11-PC33EB, GCG-11-2SC33EB
GCG-11-WC33EB, GCG-11-WC233EB
GCG-11-C-C233EB-HC , GCG-11-SC33EB-HC
GCG-11-2SC33EB-HC, GCG-11-C33EB-HC

Innovative DisplayWorks
G-11c/GCG-11c
Instruction Manual
43
Innovative DisplayWorks
ofce909.447.8254•fax909.305.8756•tollfree877.307.2665•www.idw.global
GCG-11
PARTS & IDENTIFICATION
LastRevised:March28,20181:53PM
1. Glass Door
2. LED Light in the Glass Door
3. Upper and Lower Sides LED Light Cover (2)
4. Left and Right Sides LED Light Cover (2)
5. Door Gasket
6. Evaporating Fan Baseboard
7. Evaporating Fan
8. LED Light
9. Pilaster (4)
10. Shelf (6)
11. Shelf Clip (28)
12. Bottom Shelf
13. Bottom Shelf Gasket (2)
14. Control Panel
15. Thermostat Panel (2)
16. Thermostat
17. Evaporator
18. Return Pipe
19. Muffl er Connecting Pipe
20. Canopy
21. Canopy Sign
22. LED Light Inside Canopy
23. Inserts
24. Top Strip Inside Canopy
25. Low Strip Inside Canopy
26. Top Frame of Canopy
27. Low Frame of Canopy
28. Air Channel Panel
29. Upper Right Hinge
30. Upper Left Hinge
31. Upper Hinge Axle
32. Foam Cabinet
33. Bumper Block (2)
34. Electric Box
35. Electric Box Cover
36. Light Switch (2)
37. Switching Power Supply of LED Light
38. Fixing Board of LED Power Supply
39. Compressor Guard
40. Leveling Leg
41. Lower Baseboard
42. Compressor
43. Power Cord
44. Upper Baseboard
45. Drain Pipe
46. Condenser Fan Baseboard
47. Condenser Fan
48. Condenser
49. Filter Dry
50. Connecting Tube for Filter Dryer
51. Connecting Tube for Condenser
52. Fixing Bracket for Grill
53. Lower Left Hinge
54. Lower Right Hinge
55. Lower Hinge Axle
56. Plastic Fixation Column (2)
57. Grill
SAFETY PRECAUTIONS
When using this appliance, always follow the basic safety precautions:
1. Read the entire User’s Manual before operating this appliance.
2. Use this appliance only for its intended purpose as described in this User’s Manual.
3. This cooler must be properly installed in accordance with the installation instructions before being used. See grounding
instructions on page 6.
4. Never unplug your cooler by pulling on the power cord. Always grasp the plug rmly and pull it straight out from the
outlet.
5. Unplug your cooler before cleaning or making any repairs. (Note: If for any reason this product requires service, we
strongly recommend that a certi ed technician perform the service.)
6. Immediately repair or replace all electrical cords that have become frayed or otherwise damaged. Do not use a cord that
shows cracks or abrasion damage along its length, the plug or the connector end.
7. This cooler should not be recessed or built into an enclosed cabinet. It is designed for freestanding installation only.
8. Do not operate or store your cooler near or around explosive fumes, gasoline or other fl ammable vapors and liquids.
9. Setting the temperature control to the 0 position does not remove power to the light circuit, perimeter heaters, or
evaporator fans.
Please save these instructions!
DANGER!
Proper Disposal of the Refrigerator
To prevent any risk of child entrapment when discarding your cooler remove the doors and leave the shelves in place so that
children cannot easily climb inside.
PRE-CAUTION, NON-OPERATING COOLERS SHOULD HAVE:
1. Glass door removed.
2. Shelves kept in place in order to prevent any small child from climbing inside cooler.
FOR PROPER DISPOSAL OF COOLER: Distributors / retailers need to contact a quali ed service technician:
1. To recover all Freon/refrigerant from the cooler
2. To remove the compressor or remove the oil from the compressor
Then the distributor/ retailer can contact their local metal recycling center to pick up the remaining cabinet, shelves, etc. By law,
disposal of hazardous wastes may be subject to nes and imprisonment under the provisions of the environmental regulations.
For more information please visit: http://www.epa.gov/osw/hazard/index.htm
PARTS & IDENTIFICATION

Innovative DisplayWorks
G-11c/GCG-11c
Instruction Manual
65
PREPARATION PRIOR TO OPERATION
• Removeallpackagingmaterialsbeforeusingcooler.
Thisincludes:foampedestal,adhesivetape(usedtoxaccessories)andprotectivegaskets.
• Inspectcoolerforconcealeddamage.Immediatelyleaclaimwiththefreightcarrierifthereisdamage.
IDWisnotresponsiblefordamageincurredduringshipping.
• Forproperoperation,placethecooleronadry,levelsurface.
• Cleantheinteriorsurfacewithasoftclothandlukewarmwaterbeforeoperation.
• Keepcoolerinanuprightpositionfor30minutespriortouse.
• IDWrequiresthatasoleusecircuitbededicatedfortheunit.Failuretodosovoidswarranty.
WARNING:Donotuseextensioncords.
WARNING:Compressorwarrantiesarevoidifcompressorburnsoutduetolowvoltage.
WARNING:Powercordshouldnotberemovedoralteredinanyway.
Leveling
•Setunitinitsnallocation,makingcertainthereisadequateventilationintheroom.
WARNING:Warrantyisvoidifventilationisinsufcient.
•Properlevelingofthecooleriscriticaltoitoperatingcorrectly.Condensationremovalanddooroperation
willbeaffectedbyleveling.
<The cooler should be leveled front to back and side to side with a level.
•Ensurethatdrainhoseorhosesarepositionedinthepan.
•Removeplugandcordfrominsidethelowerrearofthecooler.
•Theunitshouldbeplacedcloseenoughtotheelectricalsupplysothatextension
cordsareneverused.
• Positionallfour
shelfclipsequal
indistance
fromthe
oor
forat
shelves.
• Hookshelf
clipson
shelf
strip.
• Placeshelfon
shelfclips.
FEATURES
•Designed with an elegant shape and quick refrigeration speed, this commercial-grade product is an ideal choice for
shopping malls, supermarkets, hotels, etc.
•Transparent glass doors are built with hollow, toughened glass that provides a high level of heat insulation. Clear
doors allow for high product visibility.
•The forced air system allows for fast cooling speeds, which helps maintain a consistent temperature.
•Adjustable shelves allow for a wide variety of products to be stocked.
•A built-in lock offers the ability to secure products.
•The refrigeration unit is designed for easy access, allowing for fast and simple repairs.
•This equipment is intended for storage and display of non-hazardous packaged product.
CAUTION FLAMMABLE REFRIGERANT
•WARNING – Keep clear of obstruction all ventilation openings in the appliance enclosure or in the structure for
building-in.
• WARNING – Do not use mechanical devices or other means to accelerate the defrosting process, other than those
recommended by the manufacturer.
• DO NOT damage the refrigerant circuit..
• DO NOT use electrical appliances inside the food storage compartments of the appliance, unless they are of the type
recommended by the manufacturer.
INSTRUCTIONS
Ambient Environment
•Place cooler on an even surface to reduce vibration and noise.
•To transport, do not tilt the cooler beyond a 45 degree angle.
•Do not place cooler in direct sunlight or near any heat sources.
•Do not place cooler in environment temperatures that exceed 109°F.
•Do not place cooler in below normal temperatures.
•Do not place cooler in extreme humid environments, this may cause components to rust.
•Do not place cooler near constant running or splattering water, this may cause immediate damage to refrigeration
system.
•Must allow at least 2” between rear of cooler and wall for proper ventilation and heat dissipation of cooler.
•Do not place furniture or other articles with sharp edges near the cooler in order to prevent damage to the glass door.
4”
CAUTION FLAMMABLE REFRIGERANT
• DANGER – Risk Of Fire Or Explosion. Flammable Refrigerant Used. To Be Repaired Only By Trained Service
Personnel. Do Not Puncture Refrigerant Tubing.
• CAUTION – Risk Of Fire Or Explosion. Flammable Refrigerant Used. Consult Repair Manual/Owner’s Guide
Before Attempting To Install or Service This Product. All Safety Precautions Must be Followed.
• CAUTION – Risk Of Fire Or Explosion. Dispose Of Properly In Accordance With Federal Or Local Regulations.
Flammable Refrigerant Used.
• CAUTION – Risk Of Fire Or Explosion Due To Puncture Of Refrigerant Tubing; Follow Handling Instructions
Carefully. Flammable Refrigerant Used.
DANGER – Risk Of Fire Or Explosion. Flammable Refrigerant Used. To Be
Repaired By Trained Service Personnel Only. Do Not Puncture Refrigerant Tubing.
CAUTION – Risk Of Fire Or Explosion. Flammable Refrigerant Used. Consult
Repair Manual/Owner’s Guide Before Attempting To Service This Product. All
Safety Precautions Must be Followed.
CAUTION – Risk Of Fire Or Explosion. Dispose Of Property In Accordance With
Federal Or Local Regulations. Flammable Refrigerant Used.
CAUTION – Risk Of Fire Or Explosion Due To Puncture Of Refrigerant Tubing;
Follow Handling Instructions Carefully. Flammable Refrigerant Used.
CAUTION FLAMMABLE - R600a Refrigerant
DANGER - Risque d'incendie ou d'explosion. Réfrigérant inflammable utilisé.
Pour être réparé que par un personnel de maintenance qualifié. Ne pas percer
réfrigérant Tubing.
ATTENTION - Risque d'incendie ou d'explosion. Réfrigérant inflammable utilisé.
Consultez manuel / guide de l 'utilisateur de réparation avant de tenter de
réparer ce produit. Toutes les précautions de sécurité doivent être respectées.
ATTENTION - Risque d'incendie ou d'explosion. Aliéner des biens conformé-
ment à la réglementation fédérales ou locales. Réfrigérant inflammable utilisé.
ATTENTION - Risque d'incendie ou une explosion due à la perforation de
tuyaux de réfrigérant; suivre les instructions de manipulation avec précaution.
Réfrigérant inflammable utilisé.
PRUDENCE INFLAMMABLE - R600a Réfrigérant
Shelving Installation
Innovative DisplayWorks
G-11c/GCG-11c
Instruction Manual
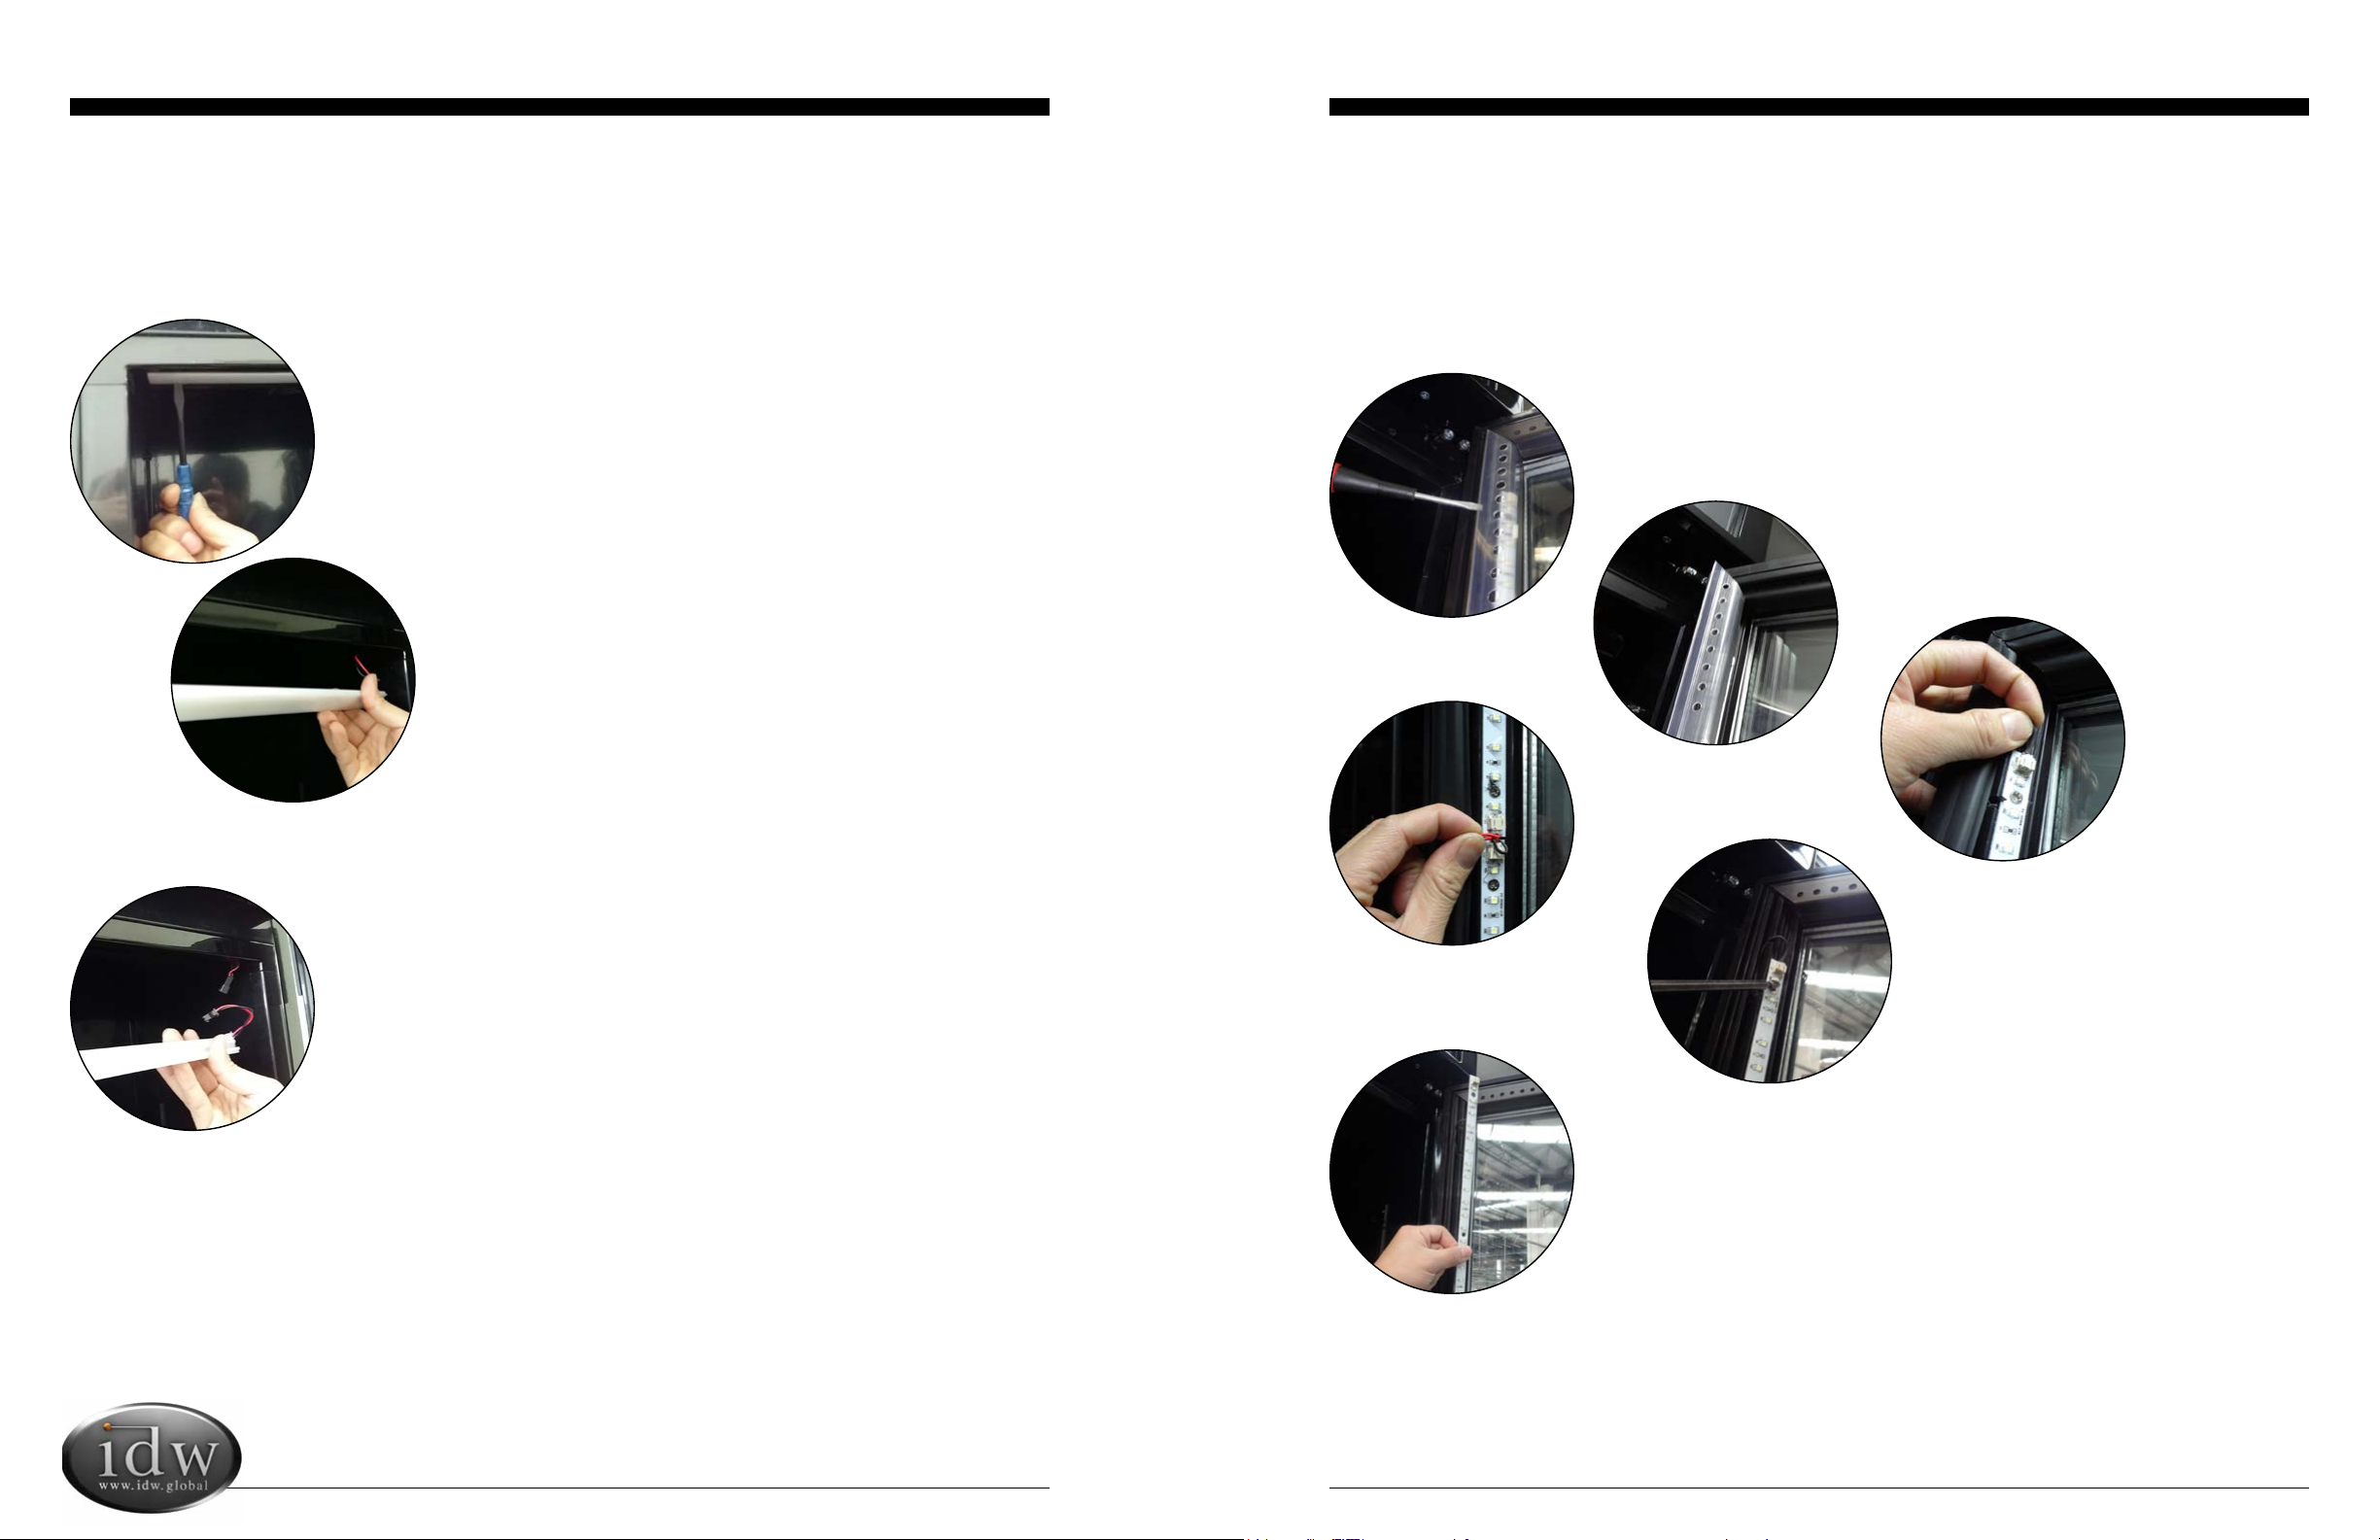
REPLACING THE DOOR LED LIGHTS
1 Unplugthecooler.
2 Removeplasticcover.
3 Disconnecttop
lightstrand.
4 Disconnectmiddlelight
strand.
5 Unscrewlightstrand.
REPLACING THE INTERIOR LIGHT
1 Squeezebothsidesoftheplasticcoverwithyourngertipstoremove.
4 ToinstallLEDlightsfollowtheabovedirectionsinreverseorder.
2 Disconnectthelights.
3 RemoveLEDlightstrand.
87
6 Removeentirelightstrand.
7 ToinstallLEDlightsfollowtheaboveinstructionsinreverseorder.
Notes:IfthereareanymalfunctionswiththemaincontrolpanelofLEDlights,
pleasecontactaprofessionalforreplacement.
Innovative DisplayWorks
G-11c/GCG-11c
Instruction Manual
STARTUP, OPERATION AND TEMPERATURE ADJUSTMENT
Operation
•Priortostockingcoolerwithproduct,itshouldbeoperatedemptyforhalfanhour.
Temperature Adjustment
Lit Door “Logo” Switch
Operation
•Thelightswitchlocatedatthebottomlefthandsideontherearofthe
cabinetistheON/OFFswitchfortheLitlogolocatedonthedoorofcooler.
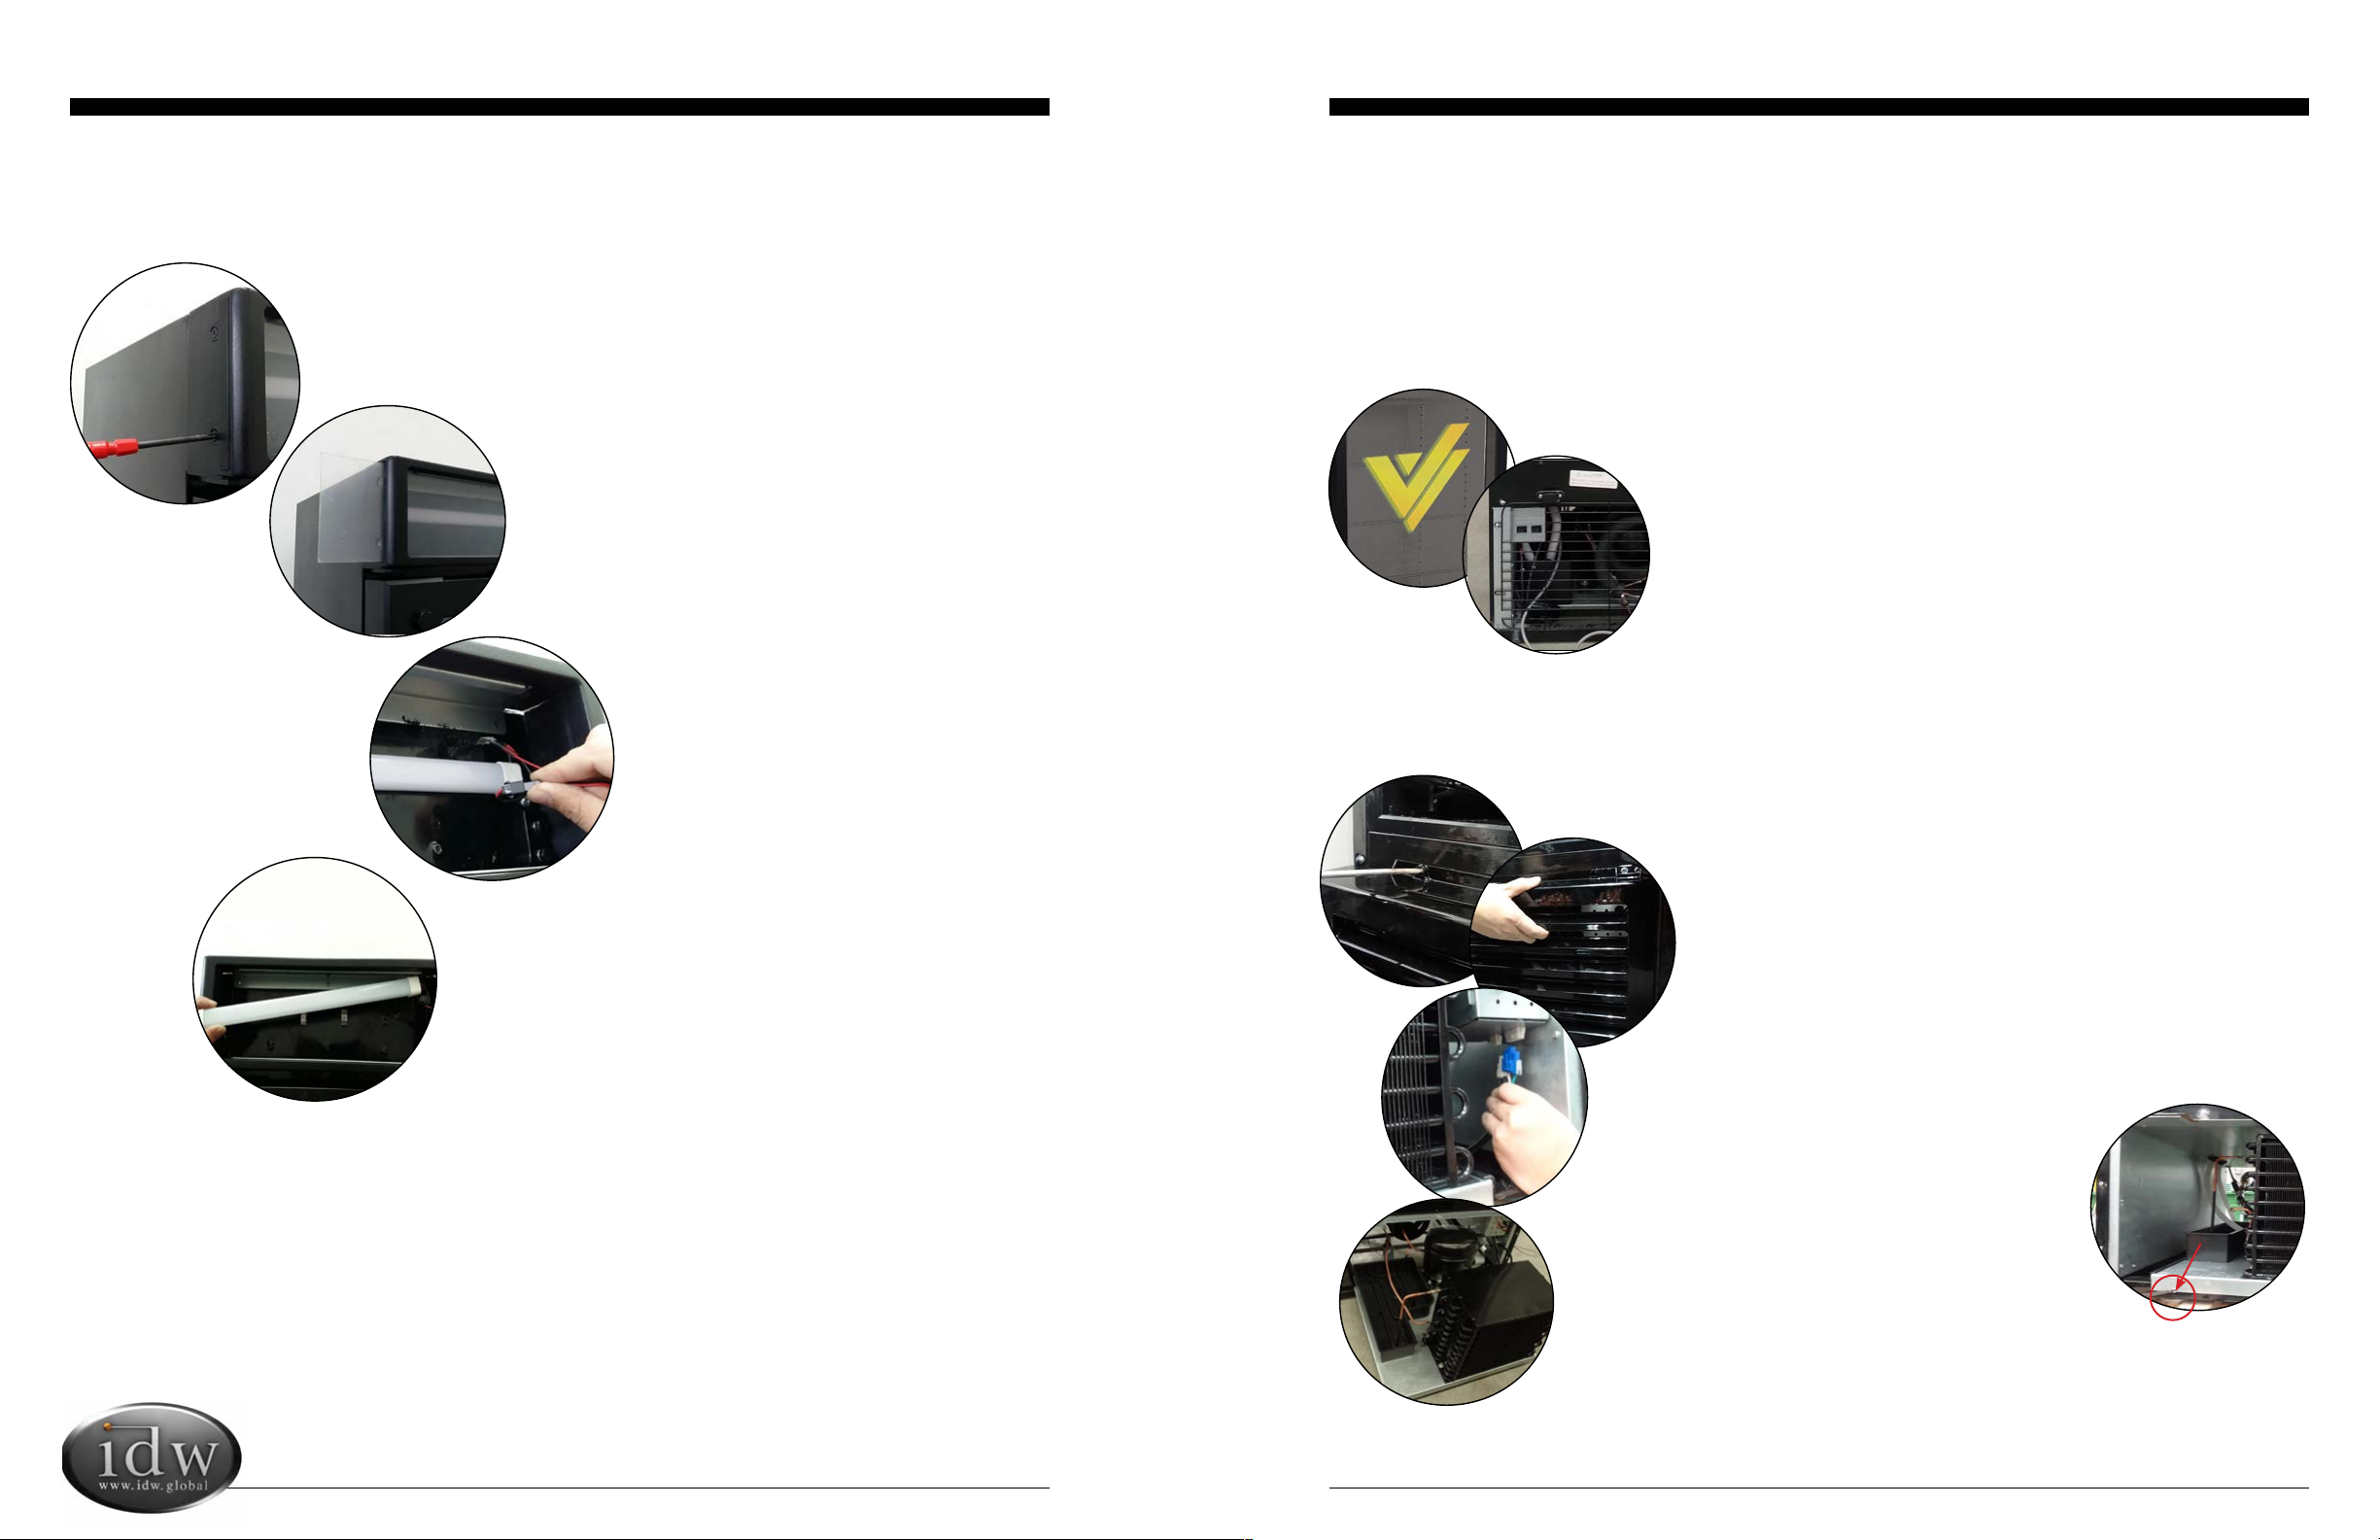
REPAIR AND MAINTENANCE FOR REFRIGERATION DRAWER
* A CERTIFIED TECHNICIAN IS REQUIRED TO REPAIR ALL REFRIGERATION COMPONENTS
FOR WARRANTY PURPOSES.
Forconvenientrepair,therefrigerationcomponents(compressor,evaporator,condenser,
evaporationfan,condensationfanandlter)aredesignedusingasplit
system;anycomponentcanbeeasilyreplaced.Replacementprocedureis
asfollows:
1 Unplugtheunit.
2 Removethescrewsfromthefrontgrill,andthenremovethegrill.
3 Unplugallconnectionsandterminalsthatareinneedofrepair.
•G-11c/GCG-11cperformancetestingpositionofthethermostatisaround4.5-6.
4 Usingascrewdriver,removescrews
fromrefrigerationdrawer.
5 SlidetheRefrigerationDrawerouttoeasilyaccess
refrigerationcomponents.Removethecomponenttoreplaceorrepair.
6 Afterrepair,re-installallpartsusingthereverseprocedure.
4 Page9
REPLACING THE CANOPY LIGHT
1UnscrewtheGraphicsHolderontheLeftHandSideoftheTopCanopy
2CarefullyslideouttheentireGraphicspiece.
6ToinstallLEDlightparts,followtheabovedirectionsinreverseorder.
3DisconnecttheLEDlightwiring.
5RemoveLEDlightparts.
4PullouttheLEDlightpartsfromthetwoclips.
109

Innovative DisplayWorks
G-11c/GCG-11c
Instruction Manual
CONDENSER MAINTENANCE
Itisessentialtokeepthecondensercoilscleanandfreeofdustanddebrisatalltimes.Itisrequiredto
periodicallycleanthecondensercoilswithasoftbristlebrushorvacuum-cleanertoproperly
maintaintherefrigerationsystem.Failuretocleanthecondenseratregularintervalsmay
causefailureoftherefrigerationsystemandcouldvoidthewarranty.
1 Removetherubbercapfromthefrontgrill.
2UsingasmallPhillipsheadscrewdriver,removethethreescrewsas
shown.
3Thefrontplasticgrillcannowberemovedbypullingitup.
4Usingplasticbristlebrush,carefullycleanthecoilbeingawarethatcoilscan
bendorbedamagediftoomuchforceisused-shownleft.
5ReplacegrillandutilizethePhillipsscrewdrivertotightenthescrewsintoplace,
replacetherubbercaps.
CANOPY GRAPHICS REPLACEMENT
1 UnscrewtheGraphicsHolderontheLeftHandSideoftheTopCanopy
2 CarefullyslideouttheentireGraphicspiece.
3 ReplacewithanewGraphicspiece.
4 CarefullyinsertandslideinthenewGraphicspiece.
5 FixtheGraphicsHolderbyfasteningthescrew.
SETTING UP SPACER & POWER CORD HOLDERS
TheG-11c/GCG-11cissuppliedwithoneset(2pieces)ofSpacerstohold
theextralengthofPowerCord(showninpicturebelow)
1TakeoutthetwoSpacersandscrewssuppliedinthe
AccessoryPackshippedwiththeCooler.
2UseaPhilipsscrewdrivertoxthetwoSpacersat
positionsasshowninpicturebelow.
1211
MAINTENANCE
Cleaning
• Unplug the cooler before cleaning.
• Use a soft cloth or sponge with water or soap (non-corrosive mild detergent). After cleaning, wipe the cooler using a
dry cloth to prevent the cooler from rusting.
• Do not spray water on the cooler, and do not use hard or steel brushes to clean the cooler.
• Do not use organic solvents, boiling water, washing powders or acids while cleaning.
• A drain or waste outlet may be provided for the draining of a display refrigerator. If the display refrigerator drains are
provided for fl ushing, they shall have a minimum internal diameter of 1˝ (25mm).
If the cooler will be in a non-operational state for a long period of time, clean as
instructed above, and keep the door open until interior is dry.
Innovative DisplayWorks
G-11c/GCG-11c
Instruction Manual
1413
TROUBLESHOOTING
The following are not Malfunctions:
Issues Solutions
Liquid fl owing noise within cooler This liquid is the sound of the cooling agent fl owing through the pipes.
Refrigeration system is shutdown for
longer periods of time while temperature
inside is still very low.
This refrigerator has a strong level of heat preservation and can main-
tain a relatively ambient temperature.
Condensation on glass door This may be due to a high indoor humidity or a low inside temperature
value may be set. Wipe the door dry with a towel.
1This refrigerator has been designed and manufactured according to National standards. If there are any questions
during use, refer to this operation manual to help troubleshoot problems.
2When disposing of the cooler, please remove the door and lock assembly to avoid children accidentally becoming
trapped inside the cooler.
AFTER SALES SERVICE
Any product has the possibility of malfunction. Please observe the cooler’s operation and any changes to product being
stored. If there are any abnormal cases, refer to the table below. If there is still no change after following the below
instructions, please inform our service center in a timely manner to avoid a further loss of the unit.
Issues Solutions
Cooler is not functioning. Please check power supply:
• The plug is not securely inserted into the wall socket
• Check for low voltage
Cooler is not keeping product cool. • Provide ample space between all products to ensure proper
circulation of air.
• Keep unit away from direct sunlight or other heating source.
• Keep door closed as often as possible.
• Be certain cooler is not touching external objects or walls.
Excessive noise • Be certain the cooler is placed on a level surface.
• Be certain cooler is not touching external objects or walls.
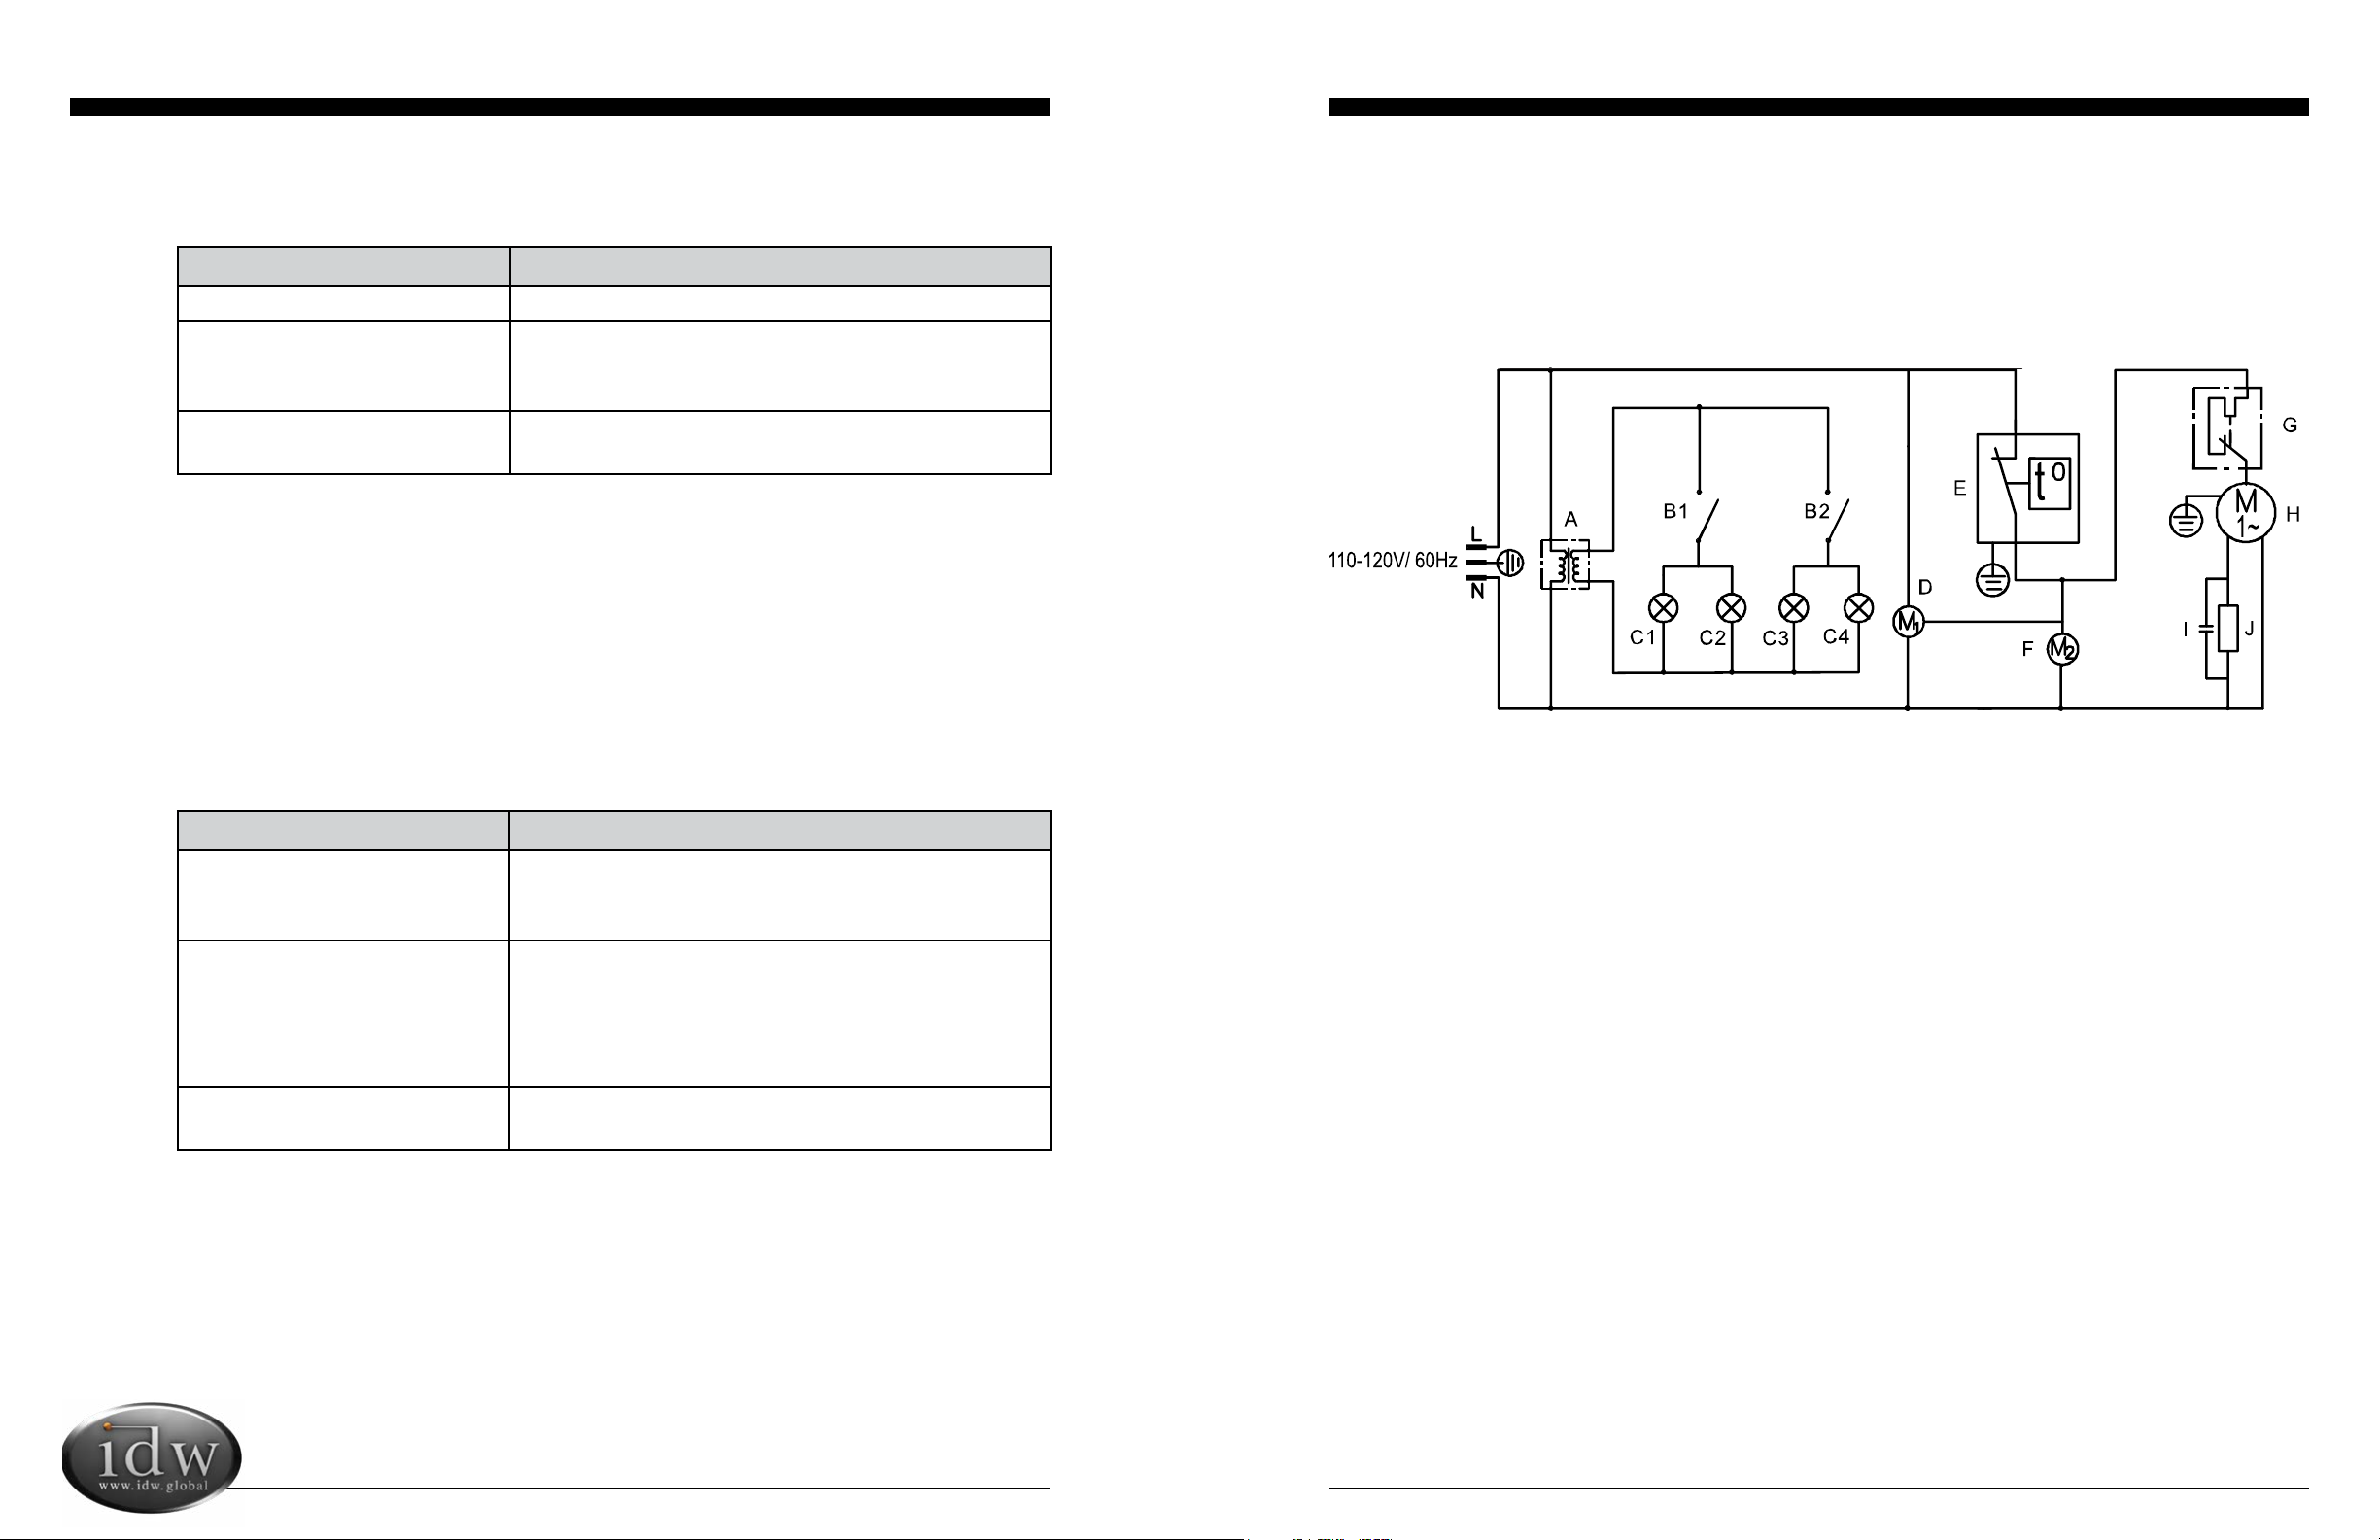
A: Power Supply for LED Lights
B1: On/Off Switch for Interior
and Door Side Light
B2: On/Off Switch for Canopy
and Door Logo Light
C1: Interior Top LED Light
C2: Door Side LED Light
C3: Canopy LED Light
C4: Door Logo LED Light
D: Evaporator Fan
E: Thermostat
F: Condenser Fan
G: Overload for Compressor
H: Compressor
I: Compressor Running Capacitor
J. Compressor PTC
GCG-11c CIRCUIT DIAGRAM
For Models: GCG-11-C33EB, GCG-11-C233EB, GCG-11-BC33EB, GCG-11-AC33EB, GCG-11-ZC33EB, GCG-11-ZC233EB, GCG-11-SC33EB,
GCG-11-BC233EB, GCG-11-PC33EB, GCG-11-2SC33EB, GCG-11-WC33EB, GCG-11-WC233EB, GCG-11-C-C233EB-HC , GCG-11-SC33EB-HC,
GCG-11-2S33EB-HC, GCG-11-2S33EB-HC

Innovative DisplayWorks
G-11c/GCG-11c
Instruction Manual
1615
A: Power Supply for LED Lights
B1: On/Off Switch for Interior
and Door Side Light
B2: On/Off Switch for Canopy
Light
C1: Interior Top LED Light
C2: Door Side LED Light
C3: Canopy LED Light
D: Evaporator Fan
E: Thermostat
F: Condenser Fan
G: Overload for Compressor
H: Compressor
I: Compressor Running Capacitor
J. Compressor PTC
G-11c CIRCUIT DIAGRAM
For Models: G-11-C33EB, G-11-BC33EB, G-11-SC33EB, G-11-ZC33EB, G-11-PC33EB, G-11-WC33EB, G-11-C33EB-HC, G-11-SC33EB-HC
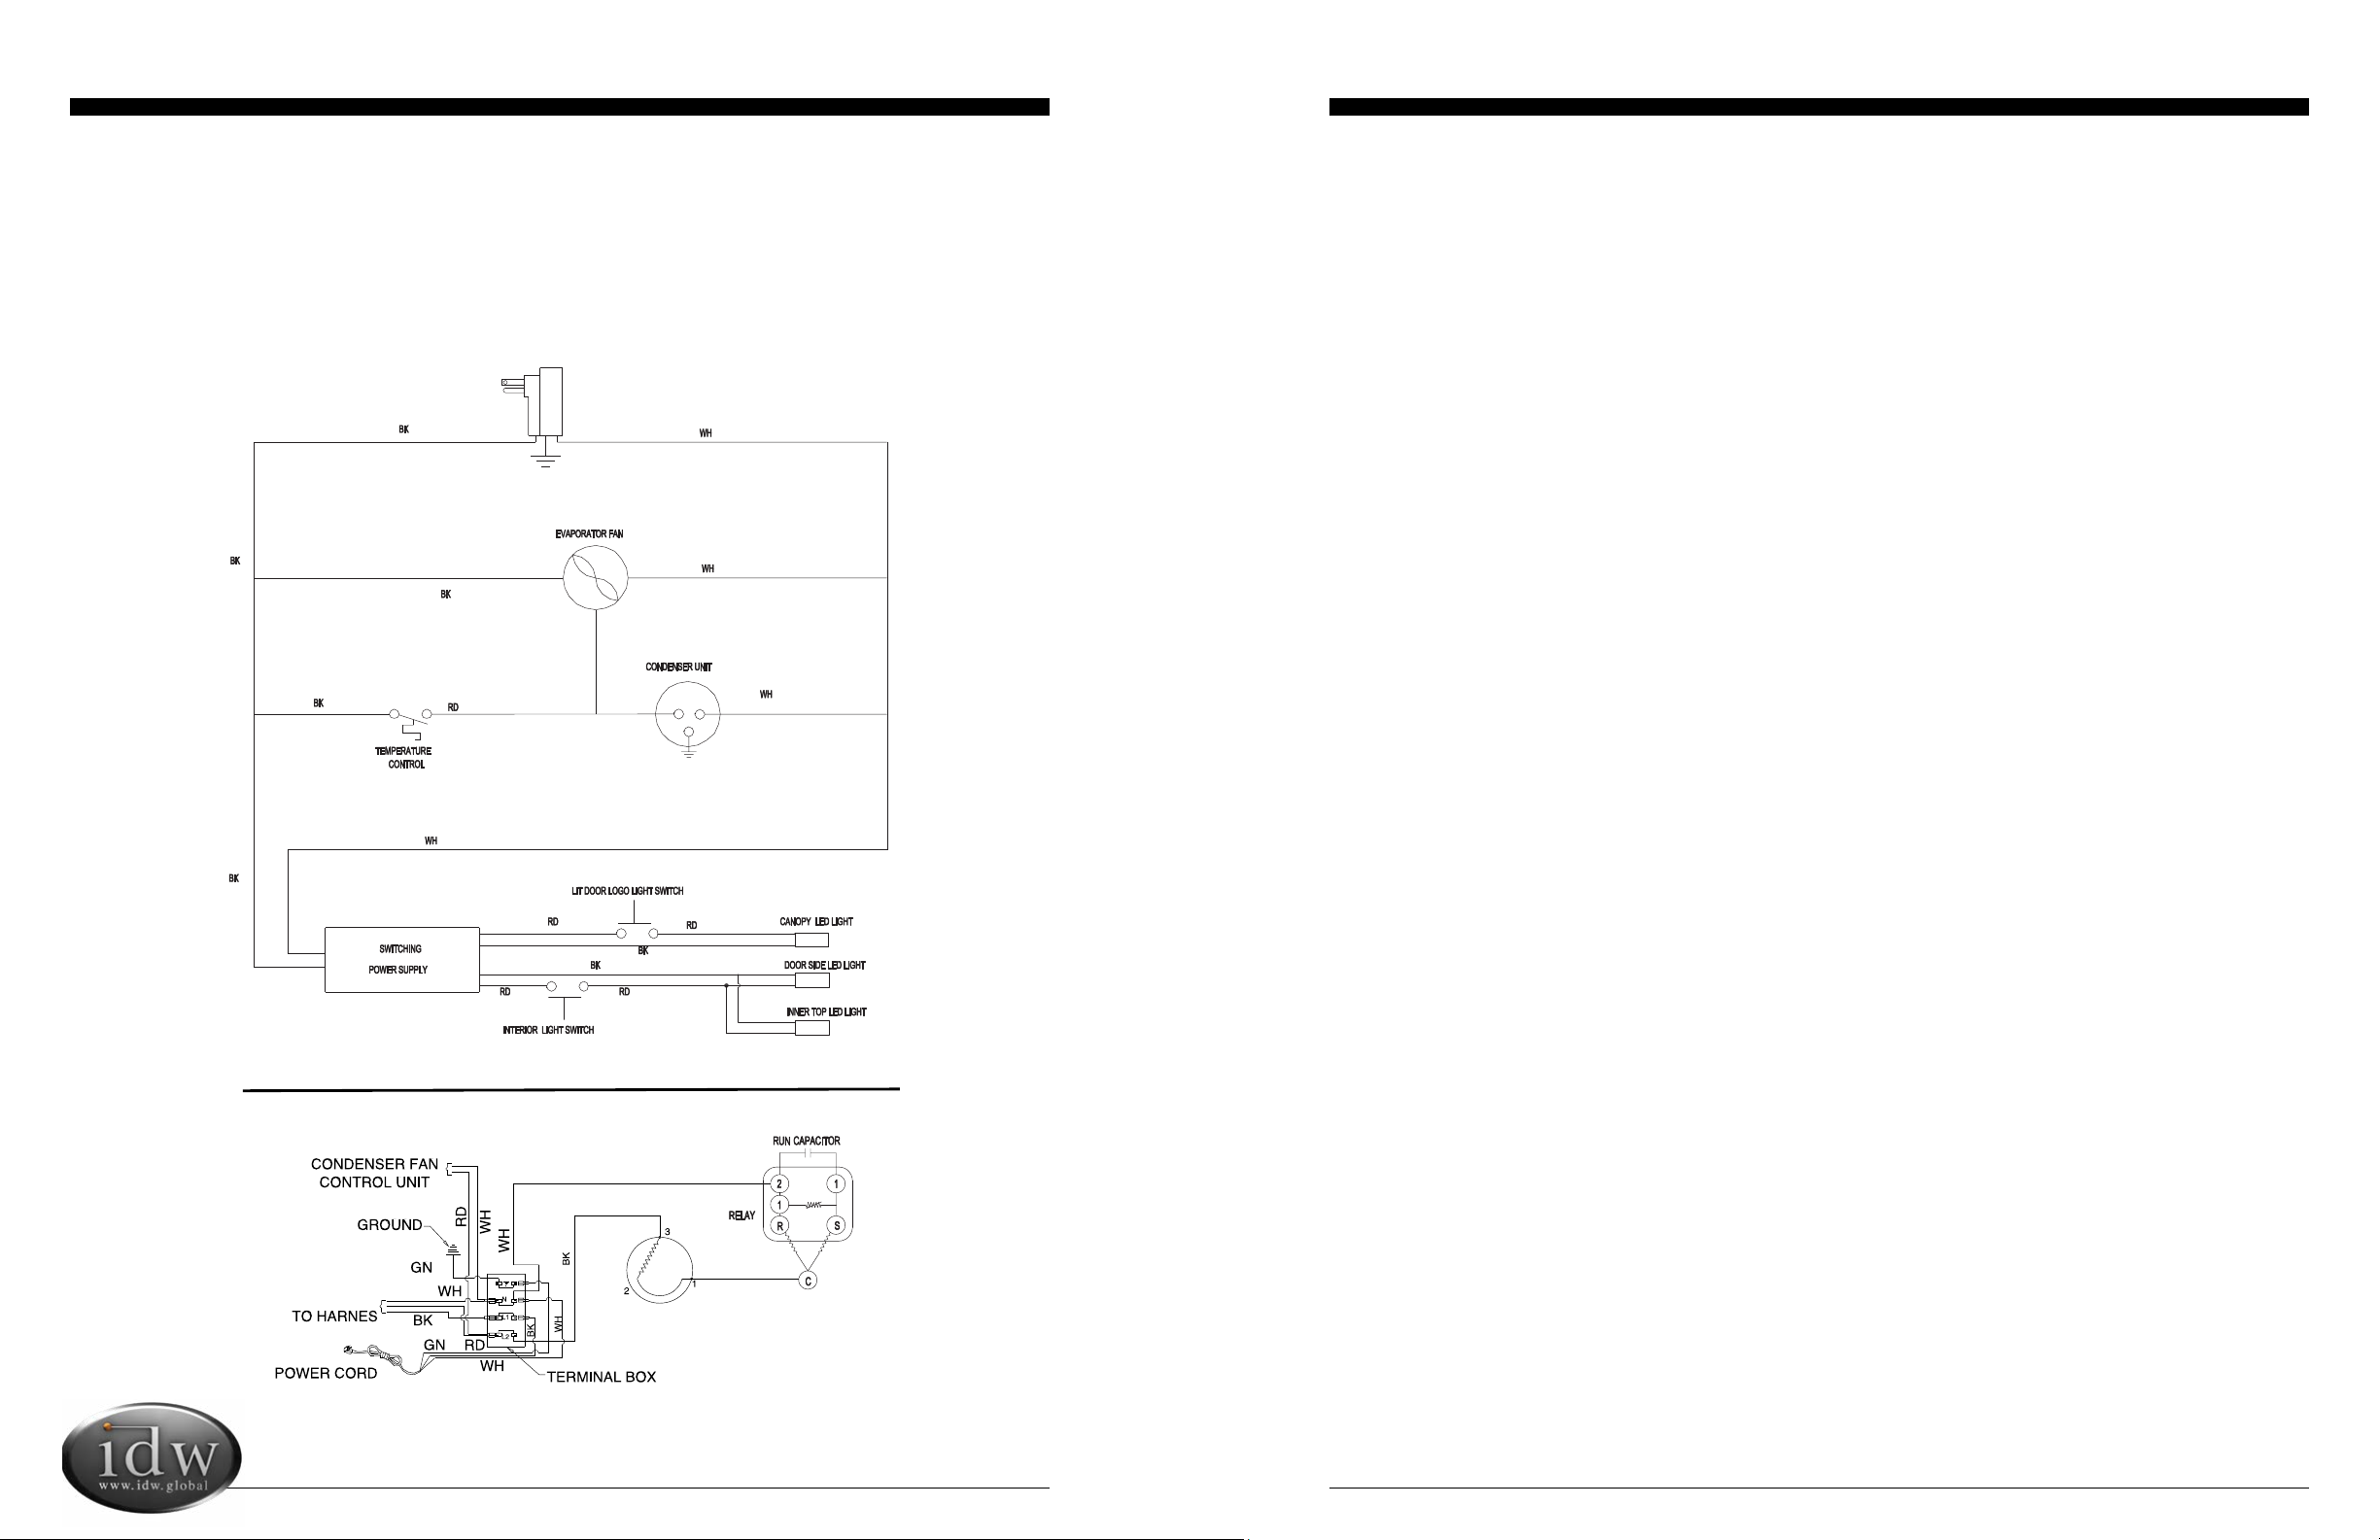
GCG-11c WIRING DIAGRAM
For Models: GCG-11-C33EB, GCG-11-C233EB, GCG-11-BC33EB, GCG-11-AC33EB, GCG-11-ZC33EB, GCG-11-ZC233EB, GCG-11-SC33EB,
GCG-11-BC233EB, GCG-11-PC33EB, GCG-11-2SC33EB, GCG-11-WC33EB, GCG-11-WC233EB, GCG-11-C-C233EB-HC , GCG-11-SC33EB-HC,
GCG-11-2S33EB-HC, GCG-11-2S33EB-HC
Innovative DisplayWorks
G-11c/GCG-11c
Instruction Manual
17
G-11c WIRING DIAGRAM
For Models: G-11-C33EB, G-11-BC33EB, G-11-SC33EB, G-11-ZC33EB, G-11-PC33EB, G-11-WC33EB, G-11-C33EB-HC, G-11-SC33EB-HC

Innovative DisplayWorks, Inc.
To locate the distributor in your area go to: http://www.idw.global/contact/#distributors
Other manuals for G-Series
12
This manual suits for next models
26
Table of contents
Other IDW Accessories manuals


Popular Accessories manuals by other brands


Saxby
Saxby 54413 Instruction leaflet

Salewa
Salewa 1174 Ultra Train 18 BP 5740 manual

Atlas Lighting Products
Atlas Lighting Products GUARDIAN PLMS user manual

System Sensor
System Sensor 52051E-RF Installation and maintenance instructions

B3Bag
B3Bag B3 bag Instructions and tips

HANK Electronics
HANK Electronics HKWL-FLD01W user manual


