IMG STAGE LINE DJP-200USB User manual

ELECTRONICS FOR SPECIALISTS ELECTRONICS FOR SPECIALISTS ELECTRONICS FOR SPECIALISTS ELECTRONICS FOR SPECIALISTS
BEDIENUNGSANLEITUNG
INSTRUCTION MANUAL
MODE D’EMPLOI
ISTRUZIONI PER L’USO
MANUAL DE INSTRUCCIONES
INSTRUKCJA OBSŁUGI
VEILIGHEIDSVOORSCHRIFTEN
SIKKERHEDSOPLYSNINGER
SÄKERHETSFÖRESKRIFTER
TURVALLISUUDESTA
Hi-Fi-Plattenspieler
mit USB-Anschluss
Hi-Fi-Turntable
with USB Port
DJP-200USB
Bestell-Nr. • Order No. 21.1460

2
Deutsch ...........Seite 4
English ............Page 6
Français ...........Page 8
Italiano............Pagina 10
Español ...........Página 12
Polski .............Strona 14
Nederlands ........Pagina 16
Dansk .............Sida 16
Svenska ...........Sidan 17
Suomi.............Sivulta 17
ELECTRONICS FOR SPECIALISTS ELECTRONICS FOR SPECIALISTS ELECTRONICS FOR SPECIALISTS ELECTRONICS FOR SPECIALISTS

3
OFF ON
AUTO STOP
LINE OUT
ON POWER OFF230V~
50 Hz
A
N
T
I
-
S
K
A
T
I
N
G
3
2
1
0
USB
DJP-200USB
33 RPM
45 RPM
1 2 3 4 5 6 7
8
9
10
11
13
14
15
16
17
12
2
33 RPM
45 RPM
a b
➁Antriebsriemen (b) um die Antriebsachse (a) legen
Wrapping the drive belt (b) around the axle (a)
Positionner la courroie d’entraînement (b) autour de l’axe d’entraînement (a)
Sistemare la cinghia motrice (b) intorno all’asse (a)
Pasar la correa de tracción (b) alrededor del eje de tracción (a)
Zakładanie paska napędowego (b) na prowadnicę (a)
➀
0
3.5
3.0
2.5
2.0
1.5
1.0
0.5
0
3.5
3.0
2.5
2.0
1.5
1.0
0.5
➂Tonarm ausbalancieren
Balancing the tone arm
Contrebalancer le bras
Bilanciare il braccio
Compensar el brazo de lectura
Ustawianie ramienia
➃Skalenring
Scale ring
Anneau avec échelle
Anello graduato
Anilla escalada
Pierścień ze skalą
➄Auflagegewicht einstellen
Adjusting the stylus pressure
Régler la force d’appui
Impostare il peso della testina
Ajuste de la presión de la aguja
Regulacja siły nacisku igły

4
Deutsch
English
English Page
Contents
Français
Français Page
Table des matières
Italiano
Italiano Pagina
Indice
Español
Español Página
Contenidos
Nederlands
Nederlands Pagina
Inhoud
Polski
Polski Strona
Spis treści
Deutsch
Deutsch Seite
Inhalt
Hi-Fi-Plattenspieler
mit USB-Anschluss
Diese Bedienungsanleitung richtet sich an
Benutzer ohne besondere Fachkenntnisse.
Bitte lesen Sie die Anleitung vor dem Betrieb
gründlich durch und heben Sie sie für ein
späteres Nachlesen auf.
Auf der ausklappbaren Seite3 finden
Sie alle beschriebenen Bedienelemente und
Anschlüsse.
1 Übersicht der Anschlüsse
und Bedienelemente
1 Adapter für Single-Platten
2 Halterung (2 ×) für die Abdeckhaube
3 Netzkabel zum Anschluss an eine Steck-
dose (230V/50Hz)
4 Ein-/Ausschalter POWER
5 Schalter AUTO STOP
OFF = Der Plattenteller dreht sich immer.
ON = Das Drehen des Plattentellers wird
durch den Tonarm (13) gestartet
und gestoppt.
6
USB-Anschluss (Typ B) zur Verbin-
dung mit einem Computer
Ein USB-Anschlusskabel liegt dem Plat-
tenspieler bei.
7
Audiokabel zum Anschluss an den Line-Ein-
gang eines Verstärkers oder Mischpults
8 Halterung für einen Ersatz-Systemträger
9
Gegengewicht zum Ausbalancieren des
Tonarms (13)
10
Drehknopf für die Antiskating-Einstellung
11 Hebel für den Tonarmlift
12 Verriegelung für den Tonarm (13)
13 Tonarm
14 Überwurfmutter zum Festschrauben des
Systemträgers
15 Systemträger
16 Tonarmgriff
17 Taste zur Wahl der Geschwindigkeit
Taste gedrückt: 45 U/min
nicht gedrückt: 33¹⁄3U/min
2 Hinweise für den
sicherenGebrauch
Das Gerät entspricht allen relevanten Richtli-
nien der EU und trägt deshalb das -Zeichen.
WARNUNG
Das Gerät wird mit lebens-
gefährlicher Netzspannung
versorgt. Nehmen Sie deshalb
niemals selbst Eingriffe daran
vor. Es besteht die Gefahr
eines elektrischen Schlages.
•
Das Gerät ist nur zur Verwendung im In-
nenbereich geeignet. Schützen Sie es vor
Tropf- und Spritzwasser sowie hoher Luft-
feuchtigkeit. Die zulässige Einsatztempera-
tur beträgt 0–40°C.
•
Stellen Sie keine mit Flüssigkeit gefüllten
Gefäße, z.B. Trinkgläser, auf das Gerät.
•
Ziehen Sie sofort den Netzstecker aus der
Steckdose,
1. wenn sichtbare Schäden am Gerät oder
am Netzkabel vorhanden sind,
2. wenn nach einem Sturz oder Ähnlichem
der Verdacht auf einen Defekt besteht,
3. wenn Funktionsstörungen auftreten.
Geben Sie das Gerät in jedem Fall zur Re-
paratur in eine Fachwerkstatt.
•
Ein beschädigtes Netzkabel darf nur durch
eine Fachwerkstatt ersetzt werden.
•
Ziehen Sie den Netzstecker nie am Kabel
aus der Steckdose, fassen Sie immer am
Stecker an.
•
Verwenden Sie für die Reinigung nur ein
trockenes, weiches Tuch, niemals Wasser
oder Chemikalien.
•
Wird das Gerät zweckentfremdet, nicht
richtig angeschlossen, falsch bedient oder
nicht fachgerecht repariert, kann keine Haf-
tung für daraus resultierende Sach- oder
Personenschäden und keine Garantie für
das Gerät übernommen werden.
Soll das Gerät endgültig aus dem
Betrieb genommen werden, über-
geben Sie es zur umweltgerechten
Entsorgung einem örtlichen Recy-
clingbetrieb.
3 Einsatzmöglichkeiten
Der Plattenspieler DJP-200USB eignet sich
sowohl für den Einsatz im privaten Bereich
als auch für den DJ-Betrieb. Er ist mit einem
Phono-Vorverstärker ausgestattet und kann
deshalb direkt an einen Line-Eingang ange-
schlossen werden.
Zum Digitalisieren der Musik von Schall-
platten lässt sich der DJP-200USB über die
USB-Schnittstelle an einen Computer anschlie-
ßen. Zusätzlich wird eine Audio-Recording-
Software benötigt. Verschiedene Programme
sind als Freeware im Internet erhältlich.
4 Montage und
Grundeinstellungen
Der Plattenteller, der Systemträger, das
Gegengewicht für den Tonarm und die Ab-
deckhaube sind separat verpackt, damit beim
Transport Schäden vermieden werden. Nach
dem Auspacken aller Geräteteile sollte die
Originalverpackung für eventuelle spätere
Transporte aufbewahrt werden.
Den Plattenspieler auf einer ebenen, waa-
gerechten Fläche aufstellen.
4.1 Plattenteller montieren
1) Den Plattenteller auf die Achse des Plat-
tenspielers stecken.
2)
Von Hand den Plattenteller so weit dre-
hen, bis sich eines der zwei äußeren Löcher
bei der Taste für die Geschwindigkeit (17)
befindet und die Antriebsachse (a) des
Motors zu sehen ist (Abb. 2).
3)
Der Gummi-Antriebsriemen (b) ist durch
das Plattentellerloch zu sehen. Den An-
triebsriemen fassen und um die An-
triebsachse legen.
4)
Die beiliegende Gummimatte auf den
Plattenteller legen. Zum Erzeugen von
Scratch-Effekten alternativ eine Filzmatte
(Slipmat) auflegen, z.B. DJP-2M.
4.2 Gegengewicht für den Tonarm
und Systemträger montieren
1) Das Gegengewicht (9) aus einem der Ver-
packungsteile herausnehmen und auf das
hintere Ende des Tonarms (13) stecken,
bis es einrastet. Mit dem Gegengewicht
wird das Auflagegewicht der Abtastnadel
eingestellt (☞Kapitel 4.3).
2)
Den Systemträger (15) aus einem der
Verpackungsteile herausnehmen, auf das
vordere Ende des Tonarms stecken und mit
der Überwurfmutter (14) festschrauben.
4.3 Auflagegewicht einstellen
1) Den Antiskating-Drehknopf (10) auf „0“
drehen.
2) Die Schutzkappe für die Abtastnadel ab-
nehmen.
3)
Den Tonarmlift-Hebel (11) in die vordere
Position stellen.
4) Die Verriegelung (12) für den Tonarm (13)
nach rechts öffnen. Den Tonarm am Griff
(16) anfassen und ihn vorsichtig bis kurz
vor den Plattenteller führen, sodass er sich
frei nach oben und unten bewegen lässt.
Vorsicht! Die Nadel nirgends anstoßen
lassen.
5) Den Tonarm mit der linken Hand seitlich
führen, damit die Nadel nicht am Platten-
teller anstößt. Mit der rechten Hand das
Gegengewicht (9) so drehen, dass der
Tonarm genau waagerecht stehen bleibt
und nicht nach oben oder unten schwingt
(Abb. 3).
– Schwingt der Tonarm nach oben: Das
Gegengewicht entgegen dem Uhrzei-
gersinn drehen.
– Schwingt der Tonarm nach unten: Das
Gegengewicht im Uhrzeigersinn drehen.
6)
Den Tonarm zurück auf die Tonarm-Halte-
rung legen und mit der Verriegelung (12)
sichern.
7)
Am Gegengewicht befindet sich ein dreh-
barer, schwarzer Ring mit einer Skala. Den
Ring, ohne das Gegengewicht zu verdre-
hen, auf „0“ drehen (Abb. 4), d.h. die „0“
muss oben stehen.
8)
Die Skala gibt das Auflagegewicht in
Gramm an. Für das mitgelieferte Abtast-
system ist ein Auflagegewicht von 2g
erforderlich. Dazu das Gegengewicht
zusammen mit dem Ring entgegen dem
Uhrzeigersinn drehen, bis die „2“ oben
steht (Abb. 5).
Für andere Abtastsysteme das Auflage-
gewicht einstellen, welches in den dazuge-
hörigen technischen Daten angegeben ist.

5
Deutsch
4.4 Antiskating einstellen
Die beim Abspielen einer Schallplatte auftre-
tende Skating-Kraft zieht den Tonarm leicht in
die Mitte. Durch die Antiskating-Einrichtung
kann dieses kompensiert werden. Dazu den
Antiskating-Drehknopf (10) so einstellen, dass
der Pfeil neben dem Drehknopf auf den Wert
zeigt, der dem Auflagegewicht entspricht, d.h.
bei dem mitgelieferten Abtastsystem auf 2.
4.5 Abdeckhaube montieren
Die zwei Scharniere für die Abdeckhaube
aus den beiden Styropor-Verpackungsteilen
herausnehmen und auf die Abdeckhaube ste-
cken. Die Abdeckhaube mit den Scharnieren
in die Halterungen (2) stecken. Sie kann jeder-
zeit wieder abgenommen werden, wenn sie
beim Betrieb stört (z.B. beim Disco-Betrieb).
5 Plattenspieler anschließen
Vor dem Anschließen oder Ändern bestehen-
der Anschlüsse den Plattenspieler ausschalten.
1)
Das Audiokabel (7) mit den Cinch-Steckern
an einen Eingang für Geräte mit Line-Pe-
gel (mögliche Beschriftung LINE, CD, AUX)
anschließen: Roter Stecker für den rechten
Kanal, weißer Stecker für den linken Kanal.
2) Sollen Musikstücke von einer Schallplatte
auf einen Computer überspielt werden,
den USB-Anschluss (6) über das beilie-
gende USB-Kabel mit einem USB-An-
schluss des Computers verbinden.
Zusätzlich wird eine Audio-Recor-
ding-Software benötigt. Falls keine ent-
sprechende Software auf Ihrem Computer
vorhanden ist, lassen sich verschiedene
Programme als Freeware aus dem Internet
herunterladen.
3)
Zum Schluss den Stecker des Netzkabels
(3) in eine Steckdose (230V/50 Hz) stecken.
6 Bedienung
1) Die Schutzkappe für die Abtastnadel ab-
nehmen.
2)
Den Plattenspieler mit dem Schalter
POWER (4) einschalten. Steht der Schalter
AUTO STOP (5) in der Position OFF, dreht
sich nach dem Einschalten der Plattenteller.
Wenn das Drehen des Plattentellers
durch den Tonarm (13) gestartet und ge-
stoppt werden soll, den Schalter AUTO
STOP in die Position ON schieben.
3)
Die Geschwindigkeit mit der Taste
33
rpm
/45
rpm
(17) wählen:
Für Langspielplatten die Taste ausrasten
=33¹⁄3Umdrehungen pro Minute
Für Single-Platten die Taste hineindrücken
= 45 U/min
4) Die Schallplatte auflegen. Bei Single-Plat-
ten den Adapter (1) mit auflegen. Der
Adapter lässt sich leicht aus seiner Mulde
entnehmen, indem man auf seine hintere
Kante drückt.
5) Die Verriegelung (12) für den Tonarm (13)
nach rechts öffnen. Zum Anheben des Ton-
arms den Hebel (11) für den Tonarm-Lift in
die hintere Position stellen.
6)
Den Tonarm am Griff (16) anfassen und
die Abtastnadel über dem Anfang bzw.
der gewünschten Stelle der Schallplatte
positionieren. Den Hebel (11) für den Ton-
arm-Lift in die vordere Position stellen.
Der Tonarm senkt sich langsam auf die
Schallplatte.
7) Zum Beenden des Abspielens den Tonarm
mit dem Tonarmlift-Hebel (11) anheben
und ihn per Hand auf den Tonarm-Halter
zurückführen.
Steht der Schalter AUTO STOP (5) in
der Position ON, stoppt der Plattenteller
automatisch nach dem Zurückführen des
Tonarms auf den Halter oder 20 s nachdem
das Ende der Schallplatte erreicht ist.
8)
Nach dem Gebrauch des Plattenspielers
den Tonarm mit der Verriegelung (12)
sichern und das Gerät mit dem Schalter
POWER (4) ausschalten.
7 Zubehör
7.1 Ersatz-Tonabnehmersystem
undErsatz-Abtastnadel
Bei Bedarf kann das Tonabnehmersystem oder
die Abtastnadel leicht ausgewechselt werden.
Im Fachhandel sind entsprechende Ersatzteile
erhältlich, z.B. von MONACOR das Tonab-
nehmer-Magnetsystem EN-24 und die dazu
passende Ersatznadel EN-24SP.
1)
Zum Wechseln der Abtastnadel die orange
Nadelhalterung nach vorne abziehen. Die
neue Nadel auf das Abtastsystem stecken.
2)
Zum Wechsel des Tonabnehmersystems
die Überwurfmutter (14) losschrauben und
den Systemträger (15) vom Tonarm (13)
abziehen.
3) Das Tonabnehmersystem vom Träger ab-
schrauben und die Anschlussdrähte ab-
ziehen.
4) Das neue Tonabnehmersystem am Träger
festschrauben und die Drähte wie folgt
aufstecken:
blau linker Kanal Pluspol
weiß linker Kanal Minuspol
grün rechter Kanal Pluspol
rot rechter Kanal Minuspol
5)
Nach dem Austausch des Tonabnehmer-
systems das Auflagegewicht und den An-
tiskating-Wert neu einstellen (
☞
Kap. 4.3
und 4.4).
7.2 Ersatz-Systemträger
Ein Ersatz-Systemträger (z.B. der Systemträ-
ger EN-120 von MONACOR) komplett mit
einem Tonabnehmersystem ermöglicht bei
Bedarf einen schnellen Austausch. Der Er-
satz-Systemträger kann zur Aufbewahrung
in die Halterung (8) gesteckt werden.
Der Systemträger (15) lässt sich einfach
durch Ab- und Anschrauben auswechseln.
Anschließend das Auflagegewicht und den
Antiskating-Wert neu einstellen (☞Kap. 4.3
und 4.4).
8 Wartung
8.1 Pflege
Das Plattenspielergehäuse mit einem trocke-
nen, weichen Tuch oder einem leicht ange-
feuchteten Lappen (nicht tropfnass!) abwi-
schen. Keinen Alkohol, keine Chemikalien
oder scharfe Reinigungsmittel verwenden!
Zum Entstauben der Abtastnadel und Schall-
platten ist im Fachhandel entsprechendes Zu-
behör erhältlich, z.B. die Carbonfaser-Platten-
bürste DC-100 von MONACOR.
8.2 Transport
Wollen Sie den Plattenspieler versenden, so
achten Sie darauf, dass der Plattenteller und
alle anderen Baugruppen des Gerätes nur ori-
ginal verpackt oder extra transportgesichert
verschickt werden. Schäden, die durch einen
unsachgemäß lose verpackten Plattenteller
(z.B. Plattenteller nicht von der Achse ge-
nommen und nicht gesichert o.Ä.) verursacht
werden, unterliegen nicht der Garantie. Ent-
sprechende Reparaturen sind deshalb kos-
tenpflichtig!
Für den Versand unbedingt beachten:
1) Die Schutzkappe für die Abtastnadel auf-
stecken.
2)
Den Tonarm (13) mit der Verriegelung (11)
sichern.
3)
Das Gegengewicht (9) für den Tonarm ab-
schrauben.
4)
Den Plattenteller von der Achse abneh-
men, einzeln verpacken und gegen Ver-
rutschen sichern.
5) Am besten den Original-Verpackungskar-
ton verwenden.
9 Technische Daten
Tonabnehmersystem: magnetisch
(Moving Magnet)
Plattenteller: . . . . . . . ⌀332mm,
Aluminiumguss
Antrieb: . . . . . . . . . . Riemenantrieb
Geschwindigkeiten: . 33¹⁄3und 45U/min
Anlaufdrehmoment: . 0,03Nm
Gleichlauf-
schwankungen: . . . . < 0,3%
Ausgang: . . . . . . . . . Line-Pegel,
Anschlusskabel mit
Cinch-Stecker
Stromversorgung: . . . 230V/50 Hz
Leistungsaufnahme: . max. 20VA
Einsatztemperatur: . . 0–40°C
Abmessungen
(B × H × T):. . . . . . . . 450 × 152 × 352mm
Gewicht:. . . . . . . . . . 3,2 kg
Änderungen vorbehalten.
Diese Bedienungsanleitung ist urheberrechtlich für
MONACOR
®INTERNATIONAL GmbH & Co. KG ge-
schützt. Eine Reproduktion für eigene kommerzielle
Zwecke – auch auszugsweise – ist untersagt.

6
English
Deutsch
Deutsch Seite
Inhalt
Français
Français Page
Table des matières
Italiano
Italiano Pagina
Indice
Español
Español Página
Contenidos
Nederlands
Nederlands Pagina
Inhoud
Polski
Polski Strona
Spis treści
English
English Page
Contents
Hi-Fi-Turntable with USB Port
These instructions are intended for users
without any specific technical knowledge.
Please read these instructions carefully prior
to operating the unit and keep them for later
reference.
All operating elements and connections
described can be found on the fold-out
page3.
1 Operating Elements
andConnections
1 Adapter for single records
2 Support (2 ×) for the cover
3
Mains cable for connection to a mains
socket (230V/50Hz)
4 POWER switch
5 AUTO STOP switch
OFF = The turntable platter rotates con-
tinuously.
ON = The rotation of the turntable platter
is started and stopped by the tone
arm (13).
6
USB port (type B) for connection to a com-
puter
A USB connection cable is supplied with
the turntable.
7
Audio cable for connection to the line
input of an amplifier or mixer
8 Support for a replacement headshell
9
Counterweight to balance the tone
arm(13)
10 Rotary knob for anti-skating adjustment
11 Lever for lifting the tone arm
12 Lock for the tone arm (13)
13 Tone arm
14 Nut to fasten the headshell
15 Headshell
16 Handle of tone arm
17 Button to select the speed:
button engaged: 45rpm
button disengaged: 33¹⁄3rpm
2 Safety Notes
This unit corresponds to all relevant directives
of the EU and is therefore marked with .
WARNING
The unit uses dangerous mains
voltage. Leave servicing to
skilled personnel only. Inex-
pert handling or modification
of the unit may result in elec-
tric shock.
•
The unit is suitable for indoor use only. Pro
-
tect it against dripping water and splash
water, high air humidity and heat (admissi-
ble ambient temperature range: 0– 40 °C).
•
Do not place any vessel filled with liquid on
the unit, e.g. a drinking glass.
•
Immediately disconnect the mains plug
from the socket
1.
if the unit or the mains cable is visibly
damaged,
2. if a defect might have occurred after the
unit was dropped or suffered a similar
accident,
3. if malfunctions occur.
In any case the unit must be repaired by
skilled personnel.
•
A damaged mains cable must be replaced
by skilled personnel only.
•
Never pull the mains cable to disconnect
the mains plug from the socket, always
seize the plug.
•
For cleaning only use a dry, soft cloth; never
use water or chemicals.
•
No guarantee claims for the unit and no li-
ability for any resulting personal damage or
material damage will be accepted if the unit
is used for other purposes than originally
intended, if it is not correctly connected
or operated, or if it is not repaired in an
expert way.
If the unit is to be put out of oper-
ation definitively, take it to a local
recycling plant for a disposal which
is not harmful to the environment.
3 Applications
The turntable DJP-200USB is suited both for
private applications and for professional DJ
applications. It is equipped with a phono pre-
amplifier; therefore it also allows for direct
connection to a line input.
For digitizing the music from records, the
DJP-200USB has a USB interface to connect a
computer. An audio recording software will
also be required. Various programs are avail-
able as freeware on the Internet.
4 Mounting and
BasicAdjustments
The turntable platter, the headshell, the coun-
terweight for the tone arm and the cover are
wrapped individually to prevent damage dur-
ing transport. After unpacking all parts of the
turntable, it is recommended to save the orig-
inal packing material for any future transport.
Place the turntable on a flat, horizontal
surface.
4.1 Assembling the turntable
1)
Put the turntable platter on the axle of
the turntable.
2) Turn the platter with your hand until one
of the two outer holes is close to the but-
ton for the speed (17) and the drive axle
(a) of the motor is visible (fig. 2).
3) The rubber drive belt (b) is visible through
the hole in the platter. Seize the drive belt
and wrap it around the drive axle.
4)
Put the supplied rubber mat on the platter.
To create scratch effects, alternatively use
a felt slipmat, e.g. DJP-2M.
4.2 Mounting the counterweight for
the tone arm and the headshell
1)
Remove the counterweight (9) from its
wrapping and put it on the rear end of
the tone arm (13) until it engages. Use the
counterweight to adjust the stylus pressure
(☞chapter 4.3).
2) Remove the headshell (15) from its wrap-
ping, put it on the front end of the tone
arm and fasten it with the nut (14).
4.3 Adjusting the stylus pressure
1) Set the anti-skating knob (10) to “0”.
2)
Remove the protective cap from the stylus.
3) Set the lever (11) for lifting the tone arm
to the front position .
4)
Open the lock (12) for the tone arm (13) to
the right. Seize the handle (16) of the tone
arm and carefully position the tone arm
just before the turntable platter so that it
will move up and down freely.
Caution! The stylus must not hit against
anything.
5) With your left hand, lead the tone arm to
the side so that the stylus will not hit the
turntable platter. With your right hand,
turn the counterweight (9) so that the tone
arm will stay exactly in a horizontal posi-
tion without moving up or down (fig. 3).
– If the tone arm moves upwards, turn the
counterweight counter-clockwise.
– If the tone arm moves downwards, turn
the counterweight clockwise.
6)
Return the tone arm to its support and
secure it with the lock (12).
7)
The counterweight is provided with a
black rotary scale ring. Without turning
the counterweight, set the ring to “0”
(fig.4), i.e. the “0” must be at the top.
8) The scale indicates the stylus pressure in
grams. The phono cartridge system pro-
vided requires a stylus pressure of 2 g. For
this purpose, turn the counterweight in-
cluding the ring counter-clockwise until
“2” is at the top (fig. 5).
For other phono cartridge systems, ad-
just the stylus pressure according to the
corresponding specifications.
4.4 Anti-skating adjustment
The skating force occurring when playing a
record will slightly pull the tone arm towards
the centre. To compensate this, use the an-
ti-skating adjustment: Turn the anti-skating
knob (10) so that the arrow next to the rotary
knob points to the value corresponding to the
stylus pressure, i.e. 2 for the phono cartridge
system provided.
4.5 Mounting the cover
Remove the two hinges for the cover from the
two polystyrene wrappings and put them on
the cover. Place the cover with its hinges in
the corresponding supports (2). If the cover
proves to be inconvenient during operation
(e.g. when used in discotheques), it can easily
be removed at any time.

7
English
5 Connecting the Turntable
Switch off the turntable before making con-
nections or changing any existing connec-
tions.
1)
Connect the audio cable (7) with RCA
plugs to an input for units with line level
(possible marking: LINE, CD, AUX): red
plug for the right channel; white plug for
the left channel.
2)
For transferring music pieces from a record
to a computer, connect the USB port (6)
via the USB cable provided to a USB port
of the computer.
An audio recording software is also re-
quired. If there is no corresponding soft-
ware on your computer, various programs
are available as freeware on the Internet.
3)
Finally connect the plug of the mains
cable(3) to a mains socket (230V/50 Hz).
6 Operation
1)
Remove the protective cap from the stylus.
2) Switch on the turntable with the POWER
switch (4). If the switch AUTO STOP (5) is
set to OFF, the turntable will start rotating
after switching on.
To start and stop the rotation of the
turntable by the tone arm (13), set the
switch AUTO STOP to ON.
3)
Select the speed with the button
33
rpm
/45
rpm
(17):
Long-playing records: disengage the but-
ton = 33¹⁄3
rpm
Single records: engage the button = 45
rpm
4) Put on the record. For single records use
the adapter (1). It is easy to remove the
adapter from its recess: simply press its
rear edge.
5)
Open the lock (12) for the tone arm (13) to
the right. To lift the tone arm, set the lever
(11) for the tone arm to the rear position .
6) Seize the handle (16) of the tone arm and
position the stylus above the beginning or
the desired spot of the record. Set the lever
(11) for lifting the tone arm to the front
position . The tone arm is slowly lowered
onto the record.
7)
To stop playing, lift the tone arm by means
of the lever (11) and return it to the tone
arm support by hand.
If the AUTO STOP switch (5) is in the
position ON, the turntable platter will au-
tomatically stop when the tone arm has
been returned to the tone arm support or
20 seconds after the end of the record has
been reached.
8)
After use, secure the tone arm with the
lock (12) and switch off the turntable with
the POWER switch (4).
7 Accessories
7.1 Replacement phono cartridge
system and replacement stylus
The phono cartridge system or the stylus is
easily replaced, if required. The correspond-
ing replacement parts are available from your
retailer, e. g. the magnetic phono cartridge
system EN-24 and the matching replacement
stylus EN-24SP from MONACOR.
1) To replace the stylus, remove the orange
support of the stylus to the front. Put the
new stylus on the phono cartridge system.
2)
To replace the phono cartridge system, un-
screw the nut (14) and remove the head-
shell (15) from the tone arm (13).
3)
Unscrew the phono cartridge system from
the support and remove the connecting
wires.
4)
Screw the new phono cartridge system
onto the support and connect the wires
as follows:
blue left channel, positive pole
white left channel, negative pole
green right channel, positive pole
red right channel, negative pole
5)
After replacing the phono cartridge sys-
tem, readjust the stylus pressure and
the anti-skating value (☞ chapters 4.3
and4.4).
7.2 Replacement headshell
A replacement headshell (e.g. the headshell
EN-120 from MONACOR) including a phono
cartridge system allows for quick replace-
ment, if necessary. For storage, you may put
the replacement headshell on the support (8).
To replace the headshell (15), simply screw it
off and the new one on. Then readjust the
stylus pressure and the anti-skating value
(☞chapters 4.3 and 4.4).
8 Maintenance
8.1 Cleaning
Clean the turntable housing with a soft cloth,
dry or slightly damp (not dripping wet). Never
use alcohol, chemicals or aggressive deter-
gents! To dust the stylus and the records,
the corresponding accessories are available
from your retailer, e.g. the carbon fibre record
cleaning brush DC-100 from MONACOR.
8.2 Transport
When dispatching the turntable, make sure
to wrap the turntable and its components
in their original packaging or to particularly
secure them for transport. Any damage due
to careless transport of the turntable (e.g.
platter not removed from the axle and not
secured or similar negligence) will not be
covered by the guarantee. Therefore, any
resulting repairs will be charged!
When dispatching the turntable, always ob-
serve the following precautions:
1) Put the protective cap on the stylus.
2)
Secure the tone arm (13) with the lock
(11).
3)
Unscrew the counterweight (9) for the
tone arm.
4)
Remove the turntable platter from the
axle, wrap it separately and secure it
against slipping.
5)
It is recommended to use the original card-
board box of the turntable.
9 Specifications
Phono
cartridge system:. . . . magnetic
(moving magnet)
Turntable platter: . . . ⌀332mm,
cast aluminium
Drive: . . . . . . . . . . . . belt drive
Speeds:. . . . . . . . . . . 33¹⁄3rpm and 45 rpm
Starting torque: . . . . 0.03Nm
Wow and flutter: . . . < 0.3%
Output:. . . . . . . . . . . line level, connection
cable with RCA plug
Power supply: . . . . . . 230 V/50 Hz
Power consumption:. 20 VA max.
Ambient
temperature:. . . . . . . 0–40°C
Dimensions
(W × H × D): . . . . . . . 450 × 152 × 352mm
Weight: . . . . . . . . . . 3.2kg
Subject to technical modification.
All rights reserved by MONACOR
®INTERNATIONAL GmbH & Co. KG. No part of this instruction manual
may be reproduced in any form or by any means for any commercial use.

8
Français
Deutsch
Deutsch Seite
Inhalt
English
English Page
Contents
Italiano
Italiano Pagina
Indice
Español
Español Página
Contenidos
Nederlands
Nederlands Pagina
Inhoud
Polski
Polski Strona
Spis treści
Français
Français Page
Table des matières
Platine Hi-Fi avec port USB
Cette notice s‘adresse aux utilisateurs sans
connaissances techniques particulières. Veuil-
lez lire la présente notice avant le fonction-
nement et conservez-la pour pouvoir vous y
reporter ultérieurement.
Vous trouverez sur la page 3, dépliable,
les éléments et branchements décrits.
1 Eléments et branchements
1 Adaptateur pour disques 45 tours
2 Support (× 2) pour le capot
3
Cordon secteur à relier à une prise
230V/50Hz
4 Interrupteur Marche/arrêt POWER
5 Interrupteur AUTO STOP
OFF = le plateau tourne toujours
ON = la rotation du plateau est démarrée
et arrêtée par le bras (13)
6
Port USB (type B) pour relier à un ordinateur
Un cordon USB de branchement est livré
avec la platine disque.
7
Cordon audio pour brancher à l’entrée
ligne d’un amplificateur ou d’une table
de mixage
8 Support pour un porte cellule de rempla-
cement
9
Contrepoids pour contrebalancer le
bras (13)
10
Bouton rotatif pour le réglage anti-skating
11 Levier pour le lève-bras
12 Verrouillage pour le bras (13)
13 Bras
14 Ecrou vissant pour visser le porte cellule
15 Porte cellule
16 Poignée du bras
17 Touches de sélection de la vitesse :
touche enfoncée : 45tr/mn
touche non enfoncée : 33¹⁄3tr/mn
2 Conseils d’utilisation
etdesécurité
Cet appareil répond à toutes les directives
nécessaires de l’Union européenne et porte
donc le symbole .
AVERTISSEMENT Cet appareil est alimenté
par une tension dange-
reuse. Ne touchez jamais
l’intérieur de l’appareil car,
en cas de mauvaise ma-
nipulation, vous pourriez
subir une décharge élec-
trique.
•
L’appareil n’est conçu que pour une utilisa-
tion en intérieur. Protégez-le de tout type
de projections d’eau, des éclaboussures,
d’une humidité élevée de l’air et de la cha-
leur (plage de température de fonctionne-
ment autorisée : 0–40°C).
•
En aucun cas, vous ne devez poser d’ob-
jet contenant du liquide ou un verre sur
l’appareil.
•
Ne faites jamais fonctionner l’appareil et
débranchez-le immédiatement lorsque :
1. des dommages visibles apparaissent sur
l’appareil et sur le cordon secteur.
2. après une chute ou accident similaire...,
vous avez un doute au sujet de l’état de
l’appareil.
3. des dysfonctionnements apparaissent.
Dans tous les cas, les dommages doivent
être réparés par un technicien spécialisé.
•
Tout cordon secteur endommagé ne doit
être remplacé que par un technicien ha-
bilité.
•
Ne débranchez jamais l’appareil en tirant
sur le cordon secteur, retirez toujours le
cordon secteur en tirant la fiche.
•
Pour nettoyer l’appareil, utilisez unique-
ment un chiffon doux et sec, en aucun cas
de produits chimiques ou d’eau.
•
Nous déclinons toute responsabilité en
cas de dommages matériels ou corporels
résultants si l’appareil est utilisé dans un
but autre que celui pour lequel il a été
conçu, s’il n’est pas correctement branché
ou utilisé ou s’il n’est pas réparé par une
personne habilitée, en outre, la garantie
deviendrait caduque.
Lorsque l’appareil est définitivement
retiré du service, vous devez le dé-
poser dans une usine de recyclage
adaptée pour contribuer à son éli-
mination non polluante.
CARTONS ET EMBALLAGE
PAPIER À TRIER
3 Possibilités d’utilisation
La platine disque DJP-200USB est bien adap-
tée pour une utilisation dans le domaine privé
et pour un fonctionnement DJ professionnel.
Elle est équipée d’un préamplificateur phono
et peut donc être reliée à une entrée ligne.
Pour digitaliser la musique de disques,
on peut relier la DJP-200USB via l’interface
USB à un ordinateur. Un logiciel d’enregistre-
ment audio est nécessaire en plus. Différents
programmes sont disponibles sur Internet en
freeware.
4 Montage et réglages de base
Le plateau, le porte cellule, le contrepoids
pour le bras et le capot sont emballés sépa-
rément de manière à éviter tout dommage
pendant le transport. Lorsque vous avez dé-
ballé tous les éléments, il est recommandé de
conserver les emballages pour tout transport
ultérieur.
Positionnez la platine disque sur une sur-
face plane et horizontale.
4.1 Montage du plateau
1)
Placez le plateau sur l’axe de la platine
disque.
2) Tournez le plateau avec la main jusqu’à ce
qu’un des deux trous extérieurs se trouve
au niveau de la touche pour la vitesse (17)
et que l’axe d’entraînement (a) du moteur
soit visible (schéma 2).
3) Vous pouvez voir la courroie caoutchouc
d’entraînement (b) via le trou du plateau.
Saisissez la courroie et positionnez-la au-
tour de l’axe d’entraînement.
4) Placez le tapis caoutchouc livré sur le pla-
teau. Pour produire des effets Scratch,
vous pouvez à la place mettre une feutrine
par exemple DJP-2M.
4.2 Montage du contrepoids pour le
bras et du porte cellule
1)
Retirez le contrepoids (9) de son embal-
lage et placez-le sur l’extrémité arrière
du bras (13) jusqu’à ce qu’il s’encastre.
Avec le contrepoids, vous pouvez régler
la force d’appui du bras de lecture
(☞chapitre 4.3).
2) Retirez le porte cellule (15) de son embal-
lage, positionnez-le sur l’extrémité avant
du bras et vissez avec l’écrou vissant (14).
4.3 Réglage du contrepoids
1)
Mettez le bouton d’anti-skating (10) sur
«0».
2)
Retirez le cache de protection pour l’ai-
guille.
3)
Mettez le levier du lève-bras (11) sur la
position avant .
4)
Ouvrez le verrouillage (12) du bras (13) vers
la droite. Saisissez le bras par la poignée
(16) et amenez-le avec précaution jusque
devant le plateau de telle sorte qu’il puisse
se déplacer librement vers le haut et vers
le bas.
Attention ! Ne faites jamais toucher l’ai-
guille.
5)
Avec la main gauche, déplacez le bras laté-
ralement pour que l’aiguille ne touche pas
le plateau. Avec la main droite, tournez le
contrepoids (9) de telle sorte que le bras
reste stable à l’horizontale et ne penche
pas vers le bas ou ne se lève vers le haut
(schéma 3).
– Si le bras se lève vers le haut : tournez
le contrepoids dans le sens inverse des
aiguilles d’une montre.
– Si le bras penche vers le bas : tournez
le contrepoids dans le sens des aiguilles
d’une montre.
6) Replacez le bras sur le support et fermez
le verrouillage (12).
7)
Un anneau noir rotatif avec une échelle
se trouve sur le contrepoids. Tournez l’an-
neau sur “0” sans tourner le contrepoids
(schéma 4), c’est-à-dire que «0» doit être
en haut.
8)
L’échelle donne la force d’appui en
grammes. Pour la cellule livrée, une force
d’appui de 2g est nécessaire. Pour ce faire,
tournez le contrepoids avec l’anneau,
dans le sens inverse des aiguilles d’une
montre jusqu’à ce que «2» soit en haut
(schéma 5).
Pour les autres cellules, réglez la force
d’appui selon les caractéristiques tech-
niques correspondantes.

9
Français
4.4 Réglage de l’anti-skating
Lors de la lecture d’un disque, la force
Skating est créée et tire le bras légèrement
vers le centre. Le réglage d’anti-skating vise
à compenser ce problème. Tournez le bouton
d’’anti-skating (10) de telle sorte que la flèche
à côté du bouton indique la valeur correspon-
dant à la force d’appui, c’est-à-dire 2 pour la
cellule livrée.
4.5 Montage du capot
Retirez les deux charnières du capot de leur
emballage et placez-les sur le capot. Mettez
le capot avec les charnières sur les supports
(2). Le capot peut être retiré à tout moment
s’il gêne l’utilisation (p. ex. en discothèque).
5 Branchements
delaplatinedisque
Avant d’effectuer ou de modifier les branche
-
ments, éteignez la platine disque.
1) Reliez le cordon audio (7) avec fiches RCA
mâles à une entrée pour appareils avec
niveau ligne (repérage possible : LINE, CD,
AUX) : fiche rouge pour le canal droit et
fiche blanche pour le canal gauche.
2) Si des morceaux de musique d’un disque
doivent être transférés sur un ordinateur,
reliez le port USB (6) via le cordon USB livré
à un port USB de l’ordinateur.
Un logiciel d’enregistrement audio
est nécessaire ; si aucun logiciel adéquat
n’est sur votre ordinateur, différents pro-
grammes sont disponibles sur Internet en
freeware.
3) Reliez enfin la fiche du cordon secteur (3)
à une prise secteur 230V/50Hz.
6 Utilisation
1)
Retirez le cache de protection de l’aiguille.
2) Allumez la platine disque avec l’interrup-
teur POWER (4). Si l’interrupteur AUTO
STOP (5) est sur la position OFF, le plateau
tourne une fois la platine allumée.
Si la rotation du plateau doit être dé-
marrée et arrêtée par le bras (13), déplacez
l’interrupteur AUTO STOP sur la position
ON.
3)
Sélectionnez la vitesse avec la touche
33
rpm
/45
rpm
(17) :
désenclenchez la touche pour des disques
33 tours =33¹⁄3tours/mn
enfoncez la touche pour des disques
45tours = 45tours/mn
4)
Positionnez le disque ; pour des disques
45tours, mettez l’adaptateur (1) en place.
On peut le retirer facilement de son en-
coche en appuyant sur son arête arrière.
5)
Ouvrez le verrouillage (12) pour le bras
(13) vers la droite. Pour soulever le bras,
mettez le levier (11) pour le lève-bras sur
la position arrière .
6) Saisissez le bras par la poignée (16) et po-
sitionnez l’aiguille au-dessus du début du
disque ou à l’endroit voulu sur le disque.
Mettez le levier (11) pour le lève-bras sur
la position avant , le bras descend lente-
ment sur le disque.
7) Pour arrêter la lecture, levez le bras avec
le levier (11) et remettez-le avec la main
sur son support.
Si l‘interrupteur AUTO STOP (5) est
sur la position ON, le plateau de la platine
s‘arrête automatiquement une fois le bras
reposé sur son support ou 20 secondes
après que la fin du disque est atteinte.
8)
Après utilisation, verrouillez le bras avec le
verrouillage (12) et arrêtez la platine disque
avec l’interrupteur POWER (4).
7 Accessoires
7.1 Cellule et
aiguillederemplacement
La cellule, l’aiguille, peuvent, si besoin, être
remplacées facilement. Vous trouverez dans le
commerce les pièces de rechange, par exemple
la cellule magnétique EN-24 et l’aiguille
EN-24SP correspondante de MONACOR.
1) Pour remplacer l’aiguille, retirez en tirant
vers l’avant le support orange. Placez la
nouvelle aiguille dans la cellule.
2) Pour remplacer la cellule, dévissez l’écrou
vissant (14) et retirez le porte cellule (15)
du bras (13).
3) Dévissez la cellule du support et retirez les
fils de branchement.
4) Vissez la nouvelle cellule sur le support et
placez les fils comme mentionné ci-des-
sous :
bleu canal gauche, pôle plus
blanc canal gauche, pôle moins
vert canal droit, pôle plus
rougecanal droit, pôle moins
5)
Après tout remplacement de la cellule,
vous devez régler à nouveau la force
d’appui et l’anti-skating. (
☞
chapitres 4.3
et4.4).
7.2 Porte cellule de remplacement
Un porte cellule de remplacement complet
avec une cellule (par exemple EN-120 de
MONACOR) permet un remplacement rapide
si besoin. Le système de remplacement peut
être placé dans le support (8).
Le porte cellule (15) peut être changé
simplement en dévissant puis vissant. Après
tout remplacement, vous devez régler à
nouveau la force d’appui et l’anti-skating.
(☞chapitres4.3 et 4.4).
8 Entretien
8.1 Nettoyage
Nettoyez le boîtier de la platine disque avec
un chiffon doux, sec ou à peine humide (pas
dégoulinant). En aucun cas, n’utilisez d’alcool,
de produits détergents puissants ou de pro-
duits chimiques. Pour dépoussiérer l’aiguille et
les disques, utilisez les produits de nettoyage
disponibles dans le commerce, par exemple
la brosse en fibres de carbone DC-100 de
MONACOR.
8.2 Transport
Si la platine disque doit être expédiée, veil-
lez à ce que les éléments de l’appareil soient
toujours placés dans leur emballage d’origine
et/ou soient emballés de manière à être très
bien protégés pour le transport. Tout dom-
mage causé par un plateau mal emballé (par
exemple plateau non retiré de l’axe et non
sécurisé) ne sera pas couvert par la garantie et
les frais engendrés sont à la charge du client.
Pour l’expédition, respectez impérativement
les points suivants :
1)
Placez le capot de protection pour l’ai-
guille.
2) Verrouillez le bras (13) avec le verrouillage
(11).
3) Dévissez le contrepoids (9) pour le bras.
4) Retirez le plateau de l’axe, emballez-le sé-
parément et assurez-vous qu’il ne glisse
pas.
5) L’idéal est d’utiliser le carton d’origine.
9 Caractéristiques techniques
Cellule : . . . . . . . . . . magnétique
(aimant mobile)
Plateau : . . . . . . . . . . ⌀332 mm,
fonte d’aluminium
Entraînement : . . . . . entraînement par
courroie
Vitesses :. . . . . . . . . . 33¹⁄3tr/mn, 45 tr/mn
Couple
de démarrage : . . . . . 0,03Nm
Pleurage et
scintillement : . . . . . . < 0,3 %
Sortie : . . . . . . . . . . . niveau ligne, cordon
de branchement avec
fiche RCA mâle
Alimentation :. . . . . . 230 V/50Hz
Consommation :. . . . 20 VA max.
Température fonc. :. . 0–40°C
Dimensions
(L × H × P) : . . . . . . . 450 × 152 × 352 mm
Poids :. . . . . . . . . . . . 3,2kg
Tout droit de modification réservé.
Notice d’utilisation protégée par le copyright de
MONACOR®INTERNATIONAL GmbH & Co. KG. Toute
reproduction même partielle à des fins commerciales
est interdite.

10
Italiano
Deutsch
Deutsch Seite
Inhalt
English
English Page
Contents
Français
Français Page
Table des matières
Español
Español Página
Contenidos
Nederlands
Nederlands Pagina
Inhoud
Polski
Polski Strona
Spis treści
Italiano
Italiano Pagina
Indice
Giradischi hi-fi con porta USB
Queste istruzioni sono rivolte all‘utente senza
conoscenze tecniche specifiche. Vi preghiamo
di leggerle attentamente prima della messa in
funzione e di conservarle per un uso futuro.
A pagina 3, se aperta completamente,
vedrete sempre gli elementi di comando e i
collegamenti descritti.
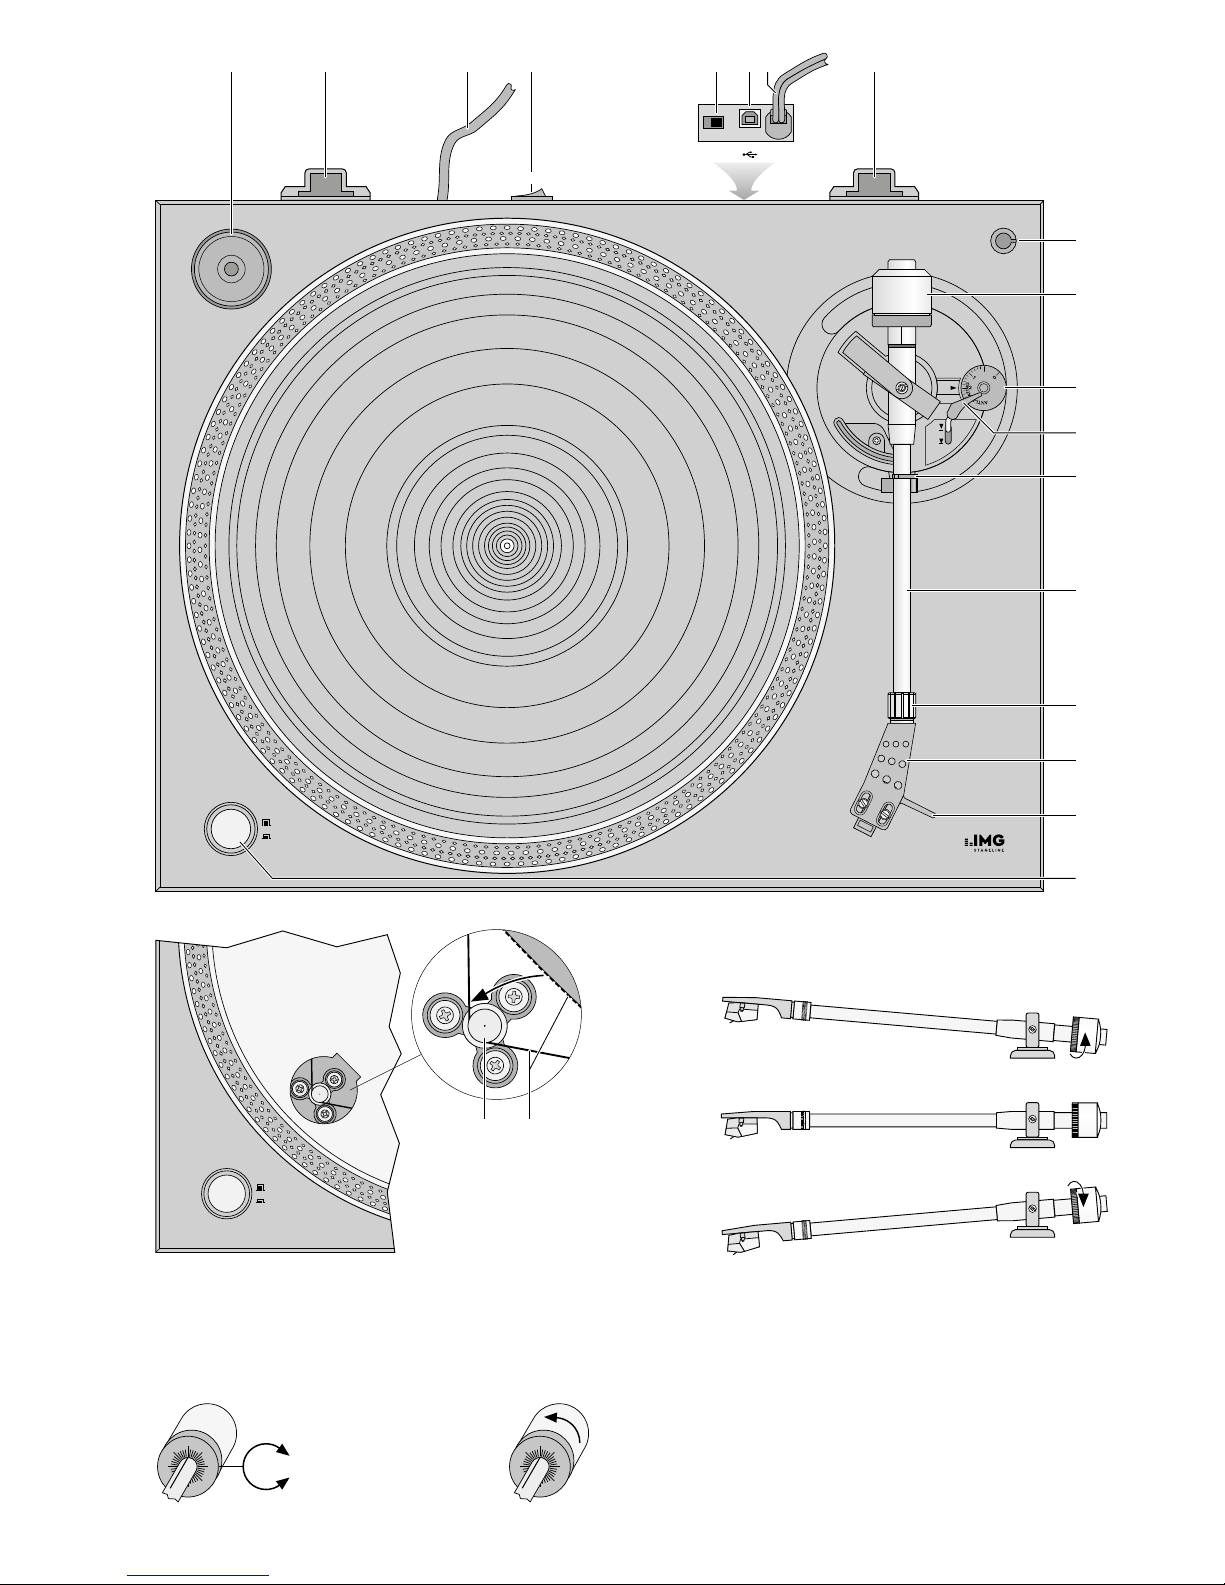
1 Elementi di comando
ecollegamenti
1 Adattatore per dischi a 45 g/min
2 Supporto (2 ×) per il coperchio
3 Cavo per il collegamento con una presa
di rete (230V/50 Hz)
4 Interruttore on/off POWER
5 Interruttore AUTO STOP
OFF = il piatto gira continuamente.
ON = la roteazione del piatto è avviata
e fermata dal braccio (13).
6
Porta USB (tipo B) per il collegamento
con un computer
Un cavo USB è in dotazione.
7 Cavo audio per il collegamento con l’in-
gresso Line di un amplificatore o mixer
8 Supporto per un portatestina di ricambio
9 Contrappeso per bilanciare il braccio (13)
10 Manopola per la regolazione antiskating
11
Leva di alzamento/abbassamento del
braccio
12 Bloccaggio del braccio (13)
13 Braccio
14
Dado di accoppiamento per avvitare il
portatestina
15 Portatestina
16 Impugnatura del braccio
17 Tasto per la scelta della velocità
tasto premuto: 45g/min
non premuto: 33¹⁄3g/min
2 Avvertenze di sicurezza
Quest’apparecchio è conforme a tutte le di-
rettive richieste dell’UE e pertanto porta la
sigla .
AVVERTIMENTO L’apparecchio funziona con
pericolosa tensione di rete.
Non intervenire mai perso-
nalmente al suo interno.
La manipolazione scorretta
può provocare delle scariche
elettriche pericolose.
•
L’apparecchio è adatto solo per l’uso all’in
-
terno di locali. Proteggerlo dall’acqua goc-
ciolante e dagli spruzzi d’acqua, da alta
umidità dell’aria e dal calore (temperatura
d’impiego ammessa fra 0 e 40°C).
•
Non depositare sull’apparecchio dei con-
tenitori riempiti di liquidi, p. es. bicchieri.
•
Non mettere in funzione l’apparecchio e
staccare subito la spina rete se:
1.
l’apparecchio o il cavo rete presentano
dei danni visibili;
2.
dopo una caduta o dopo eventi simili
sussiste il sospetto di un difetto;
3.
l’apparecchio non funziona corretta-
mente.
Per la riparazione rivolgersi sempre ad
un’officina competente.
•
Un cavo rete danneggiato deve essere so-
stituito solo da un laboratorio specializzato.
•
Staccare il cavo rete afferrando la spina,
senza tirare il cavo.
•
Per la pulizia usare solo un panno morbido,
asciutto; non impiegare in nessun caso pro-
dotti chimici o acqua.
•
Nel caso d’uso improprio, di collegamenti
sbagliati, d’impiego scorretto o di ripara-
zione non a regola d’arte dell’apparecchio,
non si assume nessuna responsabilità per
eventuali danni consequenziali a persone
o a cose e non si assume nessuna garanzia
per l’apparecchio.
Se si desidera eliminare l’apparec-
chio definitivamente, consegnarlo
per lo smaltimento ad un’istituzione
locale per il riciclaggio.
3 Possibilità d’impiego
Il giradischi DJP-200USB è adatto per l’uso
nel settore privato come anche per impie-
ghi DJ professionali. È equipaggiato con un
preamplificatore phono e perciò può essere
collegato anche con un ingresso Line.
Per digitalizzare la musica di dischi, il DJP-
200USB può essere collegato con un compu-
ter per mezzo della sua porta USB. In più è
richiesto un software audio-recording. Vari
programmi sono disponibili in Internet come
freeware.
4 Montaggio e
impostazionibase
Il piatto, il portatestina, il contrappeso del
braccio e il coperchio sono imballati separa-
tamente per escludere danni durante il tra-
sporto. Dopo aver disimballato tutte le parti,
l’imballaggio originale dovrebbe essere con-
servato per trasporti futuri.
Collocare il giradischi su una superficie
piana, orizzontale.
4.1 Montare il piatto
1)
Posizionare il piatto sull’asse del giradischi.
2)
Con la mano, girare il piatto finché uno
dei due fori esterni si trovi vicino al tasto
della velocità (17) e si veda l’asse (a) del
motore (fig. 2).
3) La cinghia motrice di gomma (b) è visibile
attraverso il foro del piatto. Afferrare la cin-
ghia e sistemarla intorno all’asse motrice.
4) Posizionare sul piatto la stuoia di gomma
in dotazione. Per produrre degli effetti di
scratching si può posizionare in alternativa
una stuoia di feltro (slipmat), p.es. DJP-2M.
4.2 Montare il contrappeso del
braccio e il portatestina
1)
Disimballare il contrappeso (9) e inserirlo sul
terminale posteriore del braccio (13) fino
allo scatto. Con il contrappeso s’imposta il
peso della puntina (☞Capitolo 4.3).
2) Disimballare il portatestina (15) e inserirlo
sul terminale anteriore del braccio e av-
vitarlo per mezzo del dado di accoppia-
mento (14).
4.3 Impostare il peso della testina
1)
Girare sullo “0” la manopola antiska-
ting(10).
2) Sfilare la protezione della puntina.
3)
Portare la leva di alzamento/abbassamento
del braccio (11) in posizione anteriore .
4) Aprire verso destra il bloccaggio (12) del
braccio (13). Afferrare il braccio con la sua
impugnatura (16) e portarlo delicatamente
vicino al piatto in modo che si possa muo-
vere liberamente in alto e in basso.
Attenzione! Evitare che la puntina tocchi
qualcosa.
5)
Tener il braccio con la mano sinistra per
escludere che la puntina tocchi il piatto.
Con la mano destra girare il contrappeso
(9) in modo tale che il braccio si fermi
perfettamente in senso orizzontale, senza
muoversi in alto o in basso (fig. 3).
– Se il braccio si muove in alto: Girare il
contrappeso in senso antiorario.
– Se il braccio si muove in basso: Girare il
contrappeso in senso orario.
6)
Posizionare il braccio sul suo supporto e
fissarlo con il relativo bloccaggio (12).
7)
Sul contrappeso si trova un anello nero,
girevole, con una scala. Girare l’anello sullo
“0”, senza spostare il contrappeso (fig. 4),
lo “0” deve trovarsi in alto.
8)
La scala indica il peso della puntina in
grammi. Per la testina in dotazione è ri-
chiesto un peso di 2g. Pertanto, girare il
contrappeso insieme all’anello in senso
antiorario finché il numero “2” si trova
in alto (fig. 5).
Per altre testine impostare il peso come
indicato nei relativi dati tecnici.
4.4 Impostare l’antiskating
La forza dello skating che si manifesta durante
la riproduzione di un disco fa si che il braccio
è attirato leggermente verso il centro. Questo
fenomeno può essere compensato per mezzo
del dispositivo antiskating. Per fare ciò, girare
la manopola antiskating (10) in modo tale che
la freccia vicino alla manopola indichi il valore
che corrisponde al peso della testina, nel caso
in dotazione quindi a 2.
4.5 Montare il coperchio
Togliere le due cerniere dalle due parti di
polistirolo e inserirle sul coperchio. Inserire
il coperchio con le cerniere sui supporti (2).
Il coperchio può essere tolto in qualsiasi mo-
mento se disturba durante il funzionamento
(p.es. in discoteca).

11
Italiano
5 Collegare il giradischi
Prima di collegare o di modificare collega-
menti esistenti, spegnere il giradischi.
1) Collegare il cavo audio (7) tramite i con-
nettori RCA con l’ingresso per apparecchi
con livello Line (indicazione possibile LINE,
CD, AUX): il connettore rosso per il canale
destro, il connettore bianco per il canale
sinistro.
2)
Se si devono trasferire dei brani musicali da
un disco a un computer, collegare la porta
USB (6) con l’ingresso USB di un computer
per mezzo del cavo USB in dotazione.
In più è richiesto un software audio-re-
cording. Se sul vostro computer non esi-
ste un software del genere, da Internet si
possono scaricare vari programmi come
freeware
3) Alla fine inserire la spina del cavo rete (3)
in una presa di rete (230V/50Hz).
6 Funzionamento
1) Togliere la protezione dalla puntina.
2)
Accendere il giradischi con l’interruttore
POWER (4). Se l’interruttore AUTO STOP
(5) si trova in posizione OFF, il piatto si
mette a girare dopo l’accensione.
Se la roteazione del piatto deve essere
avviata e arrestata per mezzo del braccio
(13), spostare l’interruttore AUTO STOP in
posizione ON.
3) Con il tasto 33
rpm
/45
rpm
(17) scegliere la
velocità:
Per dischi a 33 giri sbloccare il tasto
=33¹⁄3giri al minuto
Per dischi a 45 giri spingere il tasto
=45g/min
4) Posizionare il disco sul piatto. Per i dischi
a 45 giri usare anche l’adattatore (1).
L’adattatore si toglie comodamente dalla
sua sede esercitando una pressione sul suo
bordo posteriore.
5)
Spostare verso destra il blocco (12) del
braccio (13). Per alzare il braccio, spostare
in posizione posteriore la leva (11) di al-
zamento/abbassamento del braccio.
6) Afferrare il braccio alla sua impugnatura
(16) e posizionare la puntina sull’inizio del
disco oppure sulla la parte da dove deve
iniziare la riproduzione. Portare in posi-
zione anteriore la leva (11) per il braccio.
Il braccio si abbassa lentamente sul disco.
7) Per terminare la riproduzione, sollevare il
braccio con la leva di alzamento del braccio
(11) e riportarlo a mano sul suo supporto.
Se l‘interruttore AUTO STOP (5) è in
posizione ON, il piatto si ferma automati-
camente dopo che il braccio è stato ripor-
tato sul suo supporto, oppure dopo 20s
dalla fine del disco.
8)
Dopo l’uso del giradischi assicurare il brac-
cio con il blocco (12) e spegnere l’apparec-
chio con l’interruttore POWER (4).
7 Accessori
7.1 Testina e puntina di ricambio
Se necessario, la testina o la puntina possono
essere sostituite facilmente. Nel commercio
specializzato si trovano i relativi ricambi, p.es.
della MONACOR la testina EN-24 con la rela-
tiva puntina di ricambio EN-24SP.
1) Per sostituire la puntina sfilare in avanti il
supporto arancione della puntina. Inserire
la nuova puntina sulla testina.
2)
Per sostituire la testina svitare il dado di
accoppiamento (14) e sfilare il portatestina
(15) dal braccio (13).
3) Svitare la testina dal portatestina e sfilare
i cavetti di collegamento.
4)
Avvitare la nuova testina sul portatestina e
ricollegare i cavetti come segue:
blu canale sinistro polo positivo
bianc canale sinistro polo negativo
verde canale destro polo positivo
rosso canale destro polo negativo
5)
Dopo la sostituzione della testina impo-
stare nuovamente il suo peso e il valore
antiskating (☞Cap. 4.3 e 4.4).
7.2 Portatestina di ricambio
Un portatestina di ricambio (p. es. il porta-
testina EN-120 di MONACOR) completa di
testina permette, se necessario, una sostitu-
zione rapida. Il portatestina di ricambio può
essere sistemato nel supporto (8).
Il portatestina (15) si sostituisce como-
damente svitando e avvitandolo. Quindi im-
postare nuovamente il peso della testina e il
valore antiskating (☞Cap. 4.3 e 4.4).
8 Manutenzione
8.1 Cura
Pulire il contenitore del giradischi con un
panno asciutto, morbido oppure con uno
leggermente inumidito (non gocciolante!).
Non usare alcol, prodotti chimici o detergenti
aggressivi! Per spolverare la puntina e i di-
schi, nel commercio specializzato si trovano i
relativi accessori, p. es. la spazzola di fibra di
carbonio per dischi DC-100 di MONACOR.
8.2 Trasporto
Se si deve spedire il giradischi, fare attenzione
che il piatto e gli altri componenti siano imbal-
lati come all’origine e fissati per il trasporto.
Per i danni provocati da un piatto non imbal-
lato a regola d’arte (p.es. senza essere tolto
dalla sua asse e non fissato) non è valida la
garanzia, e le relative riparazioni sono a pa-
gamento!
Per la spedizione osservare assolutamente:
1) Rimettere la protezione sulla puntina.
2)
Fissare il braccio (13) con il bloccaggio (11).
3) Svitare il contrappeso (9) per il braccio.
4) Togliere il piatto dalla sua asse, imballarlo
singolarmente e proteggerlo contro lo
spostamento.
5)
La cosa migliore è usare il cartone origi-
nale.
9 Dati tecnici
Testina: . . . . . . . . . . . magnetica
(moving magnet)
Piatto:. . . . . . . . . . . . ⌀332 mm,
pressofuso in allu-
minio
Movimento: . . . . . . . a cinghia
Velocità: . . . . . . . . . . 33¹⁄3e 45g/min
Coppia d’avvio:. . . . . 0,03 Nm
Variazioni
della velocità: . . . . . . < 0,3%
Uscita: . . . . . . . . . . . livello Line,
cavo di collegamento
con connettori RCA
Alimentazione: . . . . . 230V/50Hz
Potenza assorbita:. . . max. 20 VA
Temperatura
d’esercizio: . . . . . . . . 0– 40 °C
Dimensioni
(l × h × p): . . . . . . . . 450 × 152 × 352 mm
Peso:. . . . . . . . . . . . . 3,2kg
Con riserva di modifiche tecniche.
La MONACOR
®INTERNATIONAL GmbH & Co. KG si
riserva ogni diritto di elaborazione in qualsiasi forma
delle presenti istruzioni per l’uso. La riproduzione
– anche parziale – per propri scopi commerciali è
vietata.

12
Español
Deutsch
Deutsch Seite
Inhalt
English
English Page
Contents
Français
Français Page
Table des matières
Italiano
Italiano Pagina
Indice
Nederlands
Nederlands Pagina
Inhoud
Polski
Polski Strona
Spis treści
Español
Español Página
Contenidos
Giradiscos HiFi con Puerto USB
Estas instrucciones van dirigidas a usuarios
sin ningún conocimiento técnico específico.
Lea atentamente estas instrucciones antes
de utilizar el aparato y guárdelas para usos
posteriores.
Puede encontrar todos los elementos de
funcionamiento y las conexiones que se des-
criben en la página 3 desplegable.
1 Elementos de
Funcionamiento y
Conexiones
1 Adaptador para singles
2 Soporte (2 ×) para la tapa
3 Cable de corriente para la conexión a un
enchufe (230V/50Hz)
4 Interruptor POWER
5 Interruptor AUTO STOP
OFF = El plato del giradiscos gira de modo
continuo.
ON = El plato del giradiscos empieza y
deja de girar mediante el brazo de
lectura (13).
6
Puerto USB (tipo B) para la conexión a
un ordenador
Con el giradiscos se entrega un cable de
conexión USB.
7 Cable de audio para conectar la entrada
de línea de un amplificador o un mez-
clador
8 Soporte para una carcasa portacélula de
repuesto
9 Contrapeso para compensar el brazo de
lectura (13)
10
Control rotatorio para ajustar el anti-
skating
11 Palanca para elevar el brazo de lectura
12 Bloqueo para el brazo de lectura (13)
13 Brazo de lectura
14 Rosca para fijar la carcasa portacélula
15 Carcasa portacélula
16 Asa del brazo de lectura
17 Botón para seleccionar la velocidad:
Botón activado: 45rpm
Botón desactivado: 33¹⁄3rpm
2 Notas de Seguridad
Este aparato cumple con todas las directivas
relevantes de la UE y por lo tanto está mar-
cado con el símbolo .
ADVERTENCIA
El aparato utiliza un voltaje
peligroso. Deje el manteni
-
miento en manos del per-
sonal cualificado. El manejo
inexperto o la modificación
del aparato pueden provocar
una descarga.
•
El aparato está adecuado sólo para utili-
zarlo en interiores. Protéjalo de goteos y
salpicaduras, elevada humedad del aire y
calor (temperatura ambiente admisible:
0–40ºC).
•
No coloque ningún recipiente con líquido
encima del aparato, p.ej. un vaso.
•
No utilice el aparato y desconecte inmedia-
tamente la toma de corriente del enchufe
si:
1. El aparato o el cable de corriente están
visiblemente dañados.
2. El aparato ha sufrido daños después de
una caída o accidente similar.
3. No funciona correctamente.
Sólo el personal cualificado puede reparar el
aparato bajo cualquier circunstancia.
•
Un cable de corriente dañado sólo puede
repararse por el personal cualificado.
•
No tire nunca del cable de corriente para
desconectarlo de la toma, tire siempre del
enchufe.
•
Utilice sólo un paño suave y seco para la
limpieza; no utilice nunca ni agua ni pro-
ductos químicos.
•
No podrá reclamarse garantía o responsa-
bilidad alguna por cualquier daño personal
o material resultante si el aparato se utiliza
para otros fines diferentes a los original-
mente concebidos, si no se conecta o se
utiliza adecuadamente o no se repara por
expertos.
Si va a poner el aparato definitiva-
mente fuera de servicio, llévelo a la
planta de reciclaje más cercana para
que su eliminación no sea perjudicial
para el medioambiente.
3 Aplicaciones
El giradiscos DJP-200USB está adecuado tanto
para particulares como para DJs profesionales.
Está equipado con un preamplificador phono,
por lo tanto se puede conectar directamente
a una entrada de línea.
Para digitalizar la música de los discos,
el DJP-200USB tiene una interfaz USB para
conectar un ordenador. Además, se necesita
un software de audio de grabación. Hay va-
rios programas disponibles como freeware
en Internet.
4 Montaje y Ajustes Básicos
El plato del giradiscos, la carcasa portacélula,
el contrapeso para el brazo de lectura y la
tapa se envuelven por separado para prevenir
daños durante el transporte. Después de des-
empaquetar todas las piezas del giradiscos, se
recomienda guardar el embalaje original para
posteriores transportes.
Coloque el giradiscos en una superficie
plana y horizontal.
4.1 Ensamblaje del giradiscos
1) Coloque el plato del giradiscos en el eje
del giradiscos.
2) Gire el plato con su mano hasta que uno
de los dos agujeros exteriores esté cerca
del botón para la velocidad (17) y el eje de
tracción (a) del motor sea visible (fig. 2).
3)
La correa de tracción de caucho (b) se
puede ver a través del agujero del plato.
Tire de la correa y colóquela alrededor del
eje de tracción.
4) Ponga el fieltro de caucho entregado en
el plato. Para crear efectos scratch, uti-
lice alternativamente un fieltro deslizante,
p.ej. DJP-2M.
4.2 Montaje del contrapeso para
el brazo de lectura y para la
carcasa portacélula
1) Extraiga el contrapeso (9) de su embalaje
y colóquelo en el borde trasero del brazo
de lectura (13) hasta que encaje. Utilice el
contrapeso para ajustar la presión de la
aguja (☞apartado 4.3).
2) Extraiga la carcasa portacélula (15) de su
embalaje, colóquela en el borde frontal del
brazo de lectura y fíjela con la rosca (14).
4.3 Ajuste de la presión de la aguja
1) Ajuste el control anti-skating (10) en “0”.
2)
Extraiga la funda de protección de la aguja.
3)
Coloque la palanca (11) para elevar el
brazo de lectura a la posición frontal .
4) Abra el bloqueo (12) para el brazo de lec-
tura (13) hacia la derecha. Tire del asa (16)
del brazo de lectura y coloque con cuidado
el brazo de lectura justo antes del plato del
giradiscos de modo que se pueda subir y
bajar con libertad.
¡Precaución! La aguja no debe golpearse
contra nada.
5) Con su mano izquierda, dirija el brazo de
lectura hacia el lateral de modo que la
aguja no golpee el plato del giradiscos.
Con su mano derecha, gire el contrapeso
(9) de modo que el brazo de lectura per-
manezca en posición horizontal sin subir
o bajar (fig. 3).
– Si el brazo de lectura se mueve hacia
arriba, gire el contrapeso en sentido ho-
rario inverso.
– Si el brazo de lectura se mueve hacia
abajo, gire el contrapeso en sentido ho-
rario.
6) Devuelva el brazo de lectura a su soporte
y asegúrelo con el bloqueo (12).
7)
El contrapeso se entrega con una anilla
escalada negra rotatoria. Sin girar el con-
trapeso, ponga la anilla en “0” (fig. 4), es
decir, el “0” tiene que estar en la parte
superior.
8)
La escala indica la presión en gramos sobre
la aguja. El sistema de cápsula phono en-
tregada necesita una presión sobre la aguja
de 2g. Para ello, gire el contrapeso con
la anilla en sentido horario inverso hasta
que “2” esté en la parte superior (fig. 5).
Para otros sistemas de cápsula phono,
ajuste la presión sobre la aguja según
corresponda con las especificaciones.

13
Español
4.4 Ajuste anti-skating
Este efecto aparece al reproducir un disco y
empuja ligeramente el brazo de lectura hacia
el centro. Para compensarlo, utilice el ajuste
anti-skating: Gire el control anti-skating (10)
de modo que la flecha junto al control rota-
torio apunte hacia el valor correspondiente a
la presión sobre la aguja, es decir, 2 para el
sistema de cápsula phono entregado.
4.5 Montaje de la tapa
Extraiga las dos bisagras para la tapa de los
dos embalajes de poliestireno y colóquelas en
la tapa. Coloque la tapa con sus bisagras en
los soportes correspondientes (2). Si la tapa
le provoca algún inconveniente durante el
funcionamiento (p. ej. cuando se utiliza en
discotecas), se puede extraer fácilmente en
cualquier momento.
5 Conexión del Giradiscos
Apague el giradiscos antes de hacer cualquier
conexión o de modificar alguna de las exis-
tentes.
1)
Conecte el cable de audio (7) con conecto-
res RCA a una entrada para aparatos con
nivel de línea (códigos posibles: LINE, CD,
AUX): conector rojo para el canal derecho;
conector blanco para el canal izquierdo.
2) Para transferir piezas musicales desde un
disco a un ordenador, conecte el puerto
USB (6) a un puerto USB de un ordenador
mediante el cable USB entregado.
También se necesita un software de
grabación de audio. Si no tiene el software
adecuado en su ordenador, hay varios
programas disponibles como freeware en
Internet.
3) Finalmente conecte el conector del cable
de corriente (3) a un enchufe (230V/50Hz).
6 Funcionamiento
1)
Extraiga la funda de protección de la aguja.
2)
Conecte el giradiscos con el interruptor
POWER (4). Si el interruptor AUTO STOP
(5) se pone en OFF, el giradiscos empezará
a girar después de la conexión.
Para iniciar y parar la rotación del gira-
discos con el brazo de lectura (13), ponga
el interruptor AUTO STOP en ON.
3)
Seleccione la velocidad con el botón
33
rpm
/45
rpm
(17):
Discos long play: Botón desactivado
=33¹⁄3
rpm
Singles: Botón activado = 45
rpm
4)
Coloque el disco. Para singles, utilice el
adaptador (1). Es muy fácil extraer el adap-
tador de su hueco: simplemente pulse su
borde trasero.
5) Abra el bloqueo (12) para el brazo de lec-
tura (13) hacia la derecha. Para elevar el
brazo de lectura, coloque la palanca (11)
para elevar el brazo de lectura en la posi-
ción posterior .
6) Tire del asa (16) del brazo de lectura y co-
loque la aguja sobre el inicio o en el punto
deseado del disco. Coloque la palanca (11)
para elevar el brazo de lectura a la posi-
ción frontal . El brazo de lectura bajará
lentamente hacia el disco.
7)
Para parar la reproducción, levante el brazo
de lectura con la palanca (11) y devuélvalo
al soporte con su mano.
Si el interruptor AUTO STOP (5) está
en la posición ON, el plato giradiscos pa-
rará automáticamente cuando el brazo de
lectura haya vuelto al soporte de brazo o
20 segundos después de finalizar el disco.
8) Después del uso, asegure el brazo de lec-
tura con el bloqueo (12) y desconecte el
giradiscos con el interruptor POWER (4).
7 Accesorios
7.1 Sistema de cápsula phono de
repuesto y aguja de repuesto
El sistema de cápsula phono o la aguja se pue-
den sustituir fácilmente, si es necesario. Las
piezas de repuesto correspondientes podrá
conseguirlas mediante su distribuidor, p. ej. el
sistema de cápsula phono magnética EN-24 y
la aguja de repuesto EN-24SP de MONACOR.
1) Para sustituir la aguja, extraiga el soporte
naranja de la aguja hacia la parte frontal.
Coloque la nueva aguja en el sistema de
cápsula phono.
2)
Para sustituir el sistema de cápsula phono,
desenrosque la rosca (14) y extraiga la
carcasa portacélula (15) del brazo de lec-
tura (13).
3) Desenrosque el sistema de cápsula phono
del soporte y extraiga los cables de co-
nexión.
4)
Enrosque el nuevo sistema de cápsula
phono en el soporte y conecte los cables
del siguiente modo:
Azul Canal izquierdo, polo positivo
Blanco Canal izquierdo, polo nega-
tivo
Verde Canal derecho, polo positivo
Rojo Canal derecho, polo negativo
5) Después de sustituir el sistema de cápsula
phono, reajuste la presión de la aguja y el
valor anti-skating (☞apartados 4.3 y 4.4).
7.2 Carcasa portacélula de repuesto
Una carcasa portacélula de repuesto (p.ej. la
EN-120 de MONACOR) con un sistema de
cápsula phono permite una sustitución rápida,
si es necesario. Para guardarla, puede colocar
la carcasa portacélula en el soporte (8).
Para sustituir la carcasa portacélula (15),
simplemente desenrósquela y enrosque la
nueva. Luego reajuste la presión de la aguja y
el valor anti-skating (☞apartados 4.3 y 4.4).
8 Mantenimiento
8.1 Limpieza
Limpie la carcasa del giradiscos con un paño
suave y seco o ligeramente húmedo (que no
gotee). No utilice alcohol, productos quími-
cos o detergentes agresivos. Para quitar el
polvo de la aguja y de los discos, puede con-
seguir los accesorios en su distribuidor, p.ej. el
cepillo de fibras de carbono para limpiar dis-
cos DC-100 de MONACOR.
8.2 Transporte
Para el envío del giradiscos, asegúrese de em-
balar el giradiscos y sus componentes con el
embalaje original o asegúrelos especialmente
para su transporte. Cualquier daño debido a
la falta de cuidado en el transporte del gira-
discos (p. ej. no extraer el plato del eje y no
asegurarlo o negligencias similares) no se cu-
brirá con la garantía. Por lo tanto, se cargará
el coste de la reparación.
Cuando envíe el giradiscos, preste atención
a los puntos siguientes:
1)
Coloque la funda de protección de la
aguja.
2)
Asegure el brazo de lectura (13) con el
bloqueo (11).
3) Desenrosque el contrapeso (9) del brazo
de lectura.
4)
Extraiga el plato del giradiscos del eje, em-
bálelo por separado y asegúrese de que no
se puede deslizar.
5)
Se recomienda utilizar la caja de transporte
original del giradiscos.
9 Especificaciones
Sistema de
cápsula phono: . . . . . Magnético (movi-
miento por imán)
Plato de giradiscos: . . ⌀332mm,
aluminio fundido
Motor: . . . . . . . . . . . Tracción por correa
Velocidades: . . . . . . . 33¹⁄3rpm y 45rpm
Par de arranque: . . . . 0,03Nm
Wow y flutter: . . . . . < 0,3%
Salida:. . . . . . . . . . . . Nivel de línea, cable
de conexión con
conector RCA
Alimentación: . . . . . . 230V/50Hz
Consumo:. . . . . . . . . 20 VA máx.
Temperatura
ambiente: . . . . . . . . . 0–40°C
Dimensiones
(B × H × P):. . . . . . . . 450 × 152 × 352mm
Peso:. . . . . . . . . . . . . 3,2kg
Sujeto a modificaciones técnicas.
Manual de instrucciones protegido por el copyright
de MONACOR
®INTERNATIONAL GmbH & Co. KG.
Toda reproducción mismo parcial para fines comer-
ciales está prohibida.

14
Polski
Deutsch
Deutsch Seite
Inhalt
English
English Page
Contents
Français
Français Page
Table des matières
Italiano
Italiano Pagina
Indice
Español
Español Página
Contenidos
Nederlands
Nederlands Pagina
Inhoud
Polski
Polski Strona
Spis treści
Gramofon HiFi z portem USB
Niniejsza instrukcja przeznaczona jest dla
użytkowników, którzy nie posiadają wiedzy i
doświadczenia technicznego. Przed rozpoczę-
ciem użytkowania proszę zapoznać się z in-
strukcją, a następnie zachować ją do wglądu.
Proszę otworzyć niniejszą instrukcję na
stronie 3. Pokazano tam rozkład elementów
operacyjnych i złączy.
1 Elementy operacyjne i złącza
1 Krążek do singli
2 Miejsce na zaczepy (2 ×) pokrywy
3
Kabel zasilający do łączenia z gniazdkiem
sieciowym (230V/50Hz)
4 Włącznik POWER
5 Przełącznik AUTO STOP
OFF = talerz gramofonu obraca się ciągle.
ON = start i zatrzymanie talerza aktywo-
wane jest przez ramię (13).
6
Port USB (typ B) do łączenia z komputerem
Kabel połączeniowy USB dostarczany jest
wraz z gramofonem.
7 Kabel audio do łączenia z wejściem linio-
wym wzmacniacza lub miksera
8 Uchwyt na wymienną wkładkę
9 Przeciwwaga ramienia (13)
10 Regulator antypoślizgowy
11 Dźwignia podnosząca ramię
12 Zaczep ramienia (13)
13 Ramię
14 Nakrętka do mocowania wkładki
15 Uchwyt na wkładkę
16 Uchwyt ramienia
17 Przycisk do wyboru prędkości obrotu ta-
lerza:
przycisk wciśnięty: 45 obr./min.
przycisk zwolniony: 33¹⁄3obr./min.
2 Środki bezpieczeństwa
Urządzenie spełnia wszystkie wymagania
norm UE dlatego zostało oznaczone symbo-
lem .
UWAGA
Urządzenie pracuje na niebez-
piecznym napięciu. Wszelkie
naprawy należy zlecić osobie
przeszkolonej; nieprawidłowa
obsługa oraz wprowadzanie
modyfikacji może spowodować
porażenie prądem elektrycznym.
•
Urządzenie przeznaczone jest wyłącznie
do użytku wewnątrz pomieszczeń. Należy
chronić je przez wodą, dużą wilgotnością
oraz wysoką temperaturą (dopuszczalny
zakres wynosi 0– 40 °C).
•
Na urządzeniu nie należy stawiać żadnych
pojemników z cieczą np. szklanek.
•
Nie wolno używać urządzenia lub na-
tychmiast odłączyć wtyczkę zasilającą z
gniazdka
1. jeżeli stwierdzono istnienie widocznego
uszkodzenia kabla zasilającego,
2.
jeżeli uszkodzenie urządzenia mogło
nastąpić w wyniku upadku lub innego
podobnego zdarzenia,
3. jeżeli urządzenie działa nieprawidłowo.
W każdym przypadku, naprawę należy zle-
cić specjaliście.
•
Wymianę kabla zasilającego należy zlecić
specjaliście.
•
Nie wolno odłączać urządzenia z gniazdka
sieciowego ciągnąc za kabel zasilania, na-
leży zawsze chwytać za wtyczkę.
•
Do czyszczenia używać suchej miękkiej
ściereczki, nie stosować wody ani środków
chemicznych.
•
Producent ani dostawca nie ponoszą od-
powiedzialności za wynikłe szkody: uszko-
dzenie sprzętu lub obrażenia użytkownika,
jeśli urządzenie było używane niezgodnie
z ich przeznaczeniem, nieprawidłowo za-
montowane, podłączone lub obsługiwane
bądź poddane nieautoryzowanej naprawie.
Po całkowitym zakończeniu eksplo-
atacji, urządzenie należy oddać do
punktu recyklingu, aby nie zaśmie-
cać środowiska.
3 Zastosowanie
Gramofon DJP-200USB przeznaczony jest
zarówno do domowych, jak i profesjonal-
nych zastosowań dla DJ. Wyposażony jest w
przedwzmacniacz phono, dzięki czemu może
być podłączany bezpośrednio do wejścia linio-
wego miksera lub wzmacniacza.
Ponadto, DJP-200USB posiada port USB
pozwalający na połączenie z komputerem.
Do rejestracji nagrań na komputerze wyma-
gane jest odpowiednie oprogramowanie. W
Internecie dostępnych jest wiele darmowych
programów nagrywających.
4 Montaż i
podstawoweustawienia
Talerz, wkładka przeciwwaga oraz pokrywa
są zapakowane osobno, dla ochrony przed
uszkodzeniem w czasie transportu. Zaleca
się zachowanie poszczególnych opakowań
w razie konieczności ponownego transpor
-
towania urządzenia
Ustawić gramofon na płaskiej, poziomej
powierzchni.
4.1 Składanie gramofonu
1)
Umieścić obrotowy talerz na osiach gra-
mofonu.
2)
Obrócić ręką talerz, aż jeden z dwóch
zewnętrznych otworów znajdzie się bli-
sko przycisku wyboru prędkości (17) i
widoczna będzie prowadnica (a) silnika
(rys. 2).
3)
Gumowy pasek napędowy (b) jest wi-
doczny poprzez otworze w talerzu. Prze-
łożyć go owijając wokół prowadnicy.
4)
Położyć gumową matę na obrotowym
talerzu. Aby móc wytworzyć efekt scratch,
zaleca się zastąpienie gumowej maty fil-
cową, np. DJP-2M.
4.2 Montaż przeciwwagi ramienia
oraz wkładki
1)
Wyjąć przeciwwagę (9) z osobnego opako-
wania i założyć na koniec ramienia (13) aż
zaskoczy. Za pomocą przeciwwagi ustawić
siłę nacisku igły (☞rozdz. 4.3).
2)
Wyjąć uchwyt na wkładkę (15) z osobnego
opakowania, założyć na drugi koniec ra-
mienia i przykręcić nakrętką (14).
4.3 Ustawić siłę nacisku igły
1)
Ustawić regulator antypoślizgowy (10)
na“0”.
2) Zdjąć osłonę wkładki.
3) Ustawić dźwignię podnoszącą ramię (11)
do przodu, na .
4)
Zwolnić blokadę zaczepu (12) ramienia
(13) przesuwając ją w prawo. Trzymając
za uchwyt (16) ostrożnie przesunąć ramię
nad talerz, aby mogło poruszać się w górę
i w dół.
Uwaga! Uważać aby wkładka z igłą o nic
nie uderzała.
5)
Lewą ręką, przesunąć ramię w bok, aby
igła nie uderzała o talerz. Prawą ręką, ob-
rócić przeciwwagę (9) tak, aby uzyskać
dokładnie poziome ustawienie ramienia
bez podtrzymywania (rys. 3).
– Jeżeli ramię podnosi się, obrócić prze-
ciwwagę w lewo.
– Jeżeli ramię opada, obrócić przeciwwagę
w prawo.
6) Umieścić ramię w zaczepie i zabezpieczyć
blokadą (12).
7) Przeciwwaga posiada czarny pierścień ze
skalą. Biała linia na ramieniu wskazuje
ustawioną wartość. Bez obracania prze-
ciwwagą ustawić pierścień na “0” (rys.4),
tzn. “0” musi znajdować się na górze.
8)
Wartości na skali oznaczają siłę nacisku
wkładki na płytę. Znajdująca się w komple-
cie wkładka wymaga siły 2g. W tym celu
należy obrócić przeciwwagą wraz ze skalą,
aby ustawić wartość “2” (rys. 5).
W przypadku stosowania innych wkła-
dek, sprawdzić ich wymagania.
4.4 Ustawianie regulatora
antypoślizgowego
Poślizg igły na płycie podczas odtwarzania,
spowodowany jest siłą ściągającą ramię do
środka. Możliwa jest kompensacja tego zja-
wiska: Obrócić regulator antypoślizgowy
(10) w taką pozycję, aby strzałka obok niego
wskazywała na wartość odpowiadającą sile
nacisku igły używanej wkładki, w tym przy-
padku wartość 2.
4.5 Montaż pokrywy
Wyjąć zaczepy z polistyrenowych opakowań
i założyć je na pokrywę. Za pomocą zacze-
pów zamontować pokrywę w odpowiednim
miejscu (2). Jeżeli pokrywa przeszkadza pod-
czas pracy (np. w dyskotece), można ją łatwo
odczepić.

15
Polski
5 Podłączanie gramofonu
Przed przystąpieniem do podłączania lub
zmiany połączeń, należy bezwzględnie wy-
łączyć gramofon oraz pozostałe urządzenia.
1) Podłączyć kabel audio (7) z wtykami RCA
do wejścia liniowego miksera lub wzmac-
niacza (możliwe oznaczenia: LINE, CD,
AUX): czerwony wtyk dla prawego, biały
wtyk dla lewego kanału.
2)
W celu zgrania utworu do postaci cyfrowej
na komputerze, połączyć port USB (6) z
portem USB komputera, za pomocą do-
łączonego kabla.
Do rejestracji nagrania na komputerze
wymagane jest odpowiednie oprogramo-
wanie. W Internecie dostępnych jest wiele
darmowych programów rejestrujących.
3) Podłączyć kabel zasilający (3) do gniazdka
sieciowego (230V/50Hz).
6 Obsługa
1) Zdjąć osłonę z wkładki.
2)
Włączyć gramofon przełącznikiem POWER
(4). Jeżeli przełącznik AUTO STOP (5) usta-
wiony jest na OFF, talerz zacznie się ob-
racać od razu po włączeniu gramofonu.
Aby start i zatrzymanie talerza akty-
wowane było przez ramię (13), ustawić
przełącznik AUTO STOP na ON.
3)
Wybrać prędkość obroty talerza przyci-
skiem 33
rpm
/45
rpm
(17):
Dla nagrań long-play: zwolnić przycisk
=33¹⁄3obrotów na minutę
Dla singli: wcisnąć przycisk = 45 obrotów
na minutę
4)
Umieścić płytę na talerzu. W przypadku
singli, użyć krążka (1). Aby wyjąć krążek
z uchwytu, lekko ścisnąć boczne ścianki.
5)
Zwolnić blokadę zaczepu (12) ramienia
(13) przesuwając ją w prawo. Aby pod-
nieść ramię, ustawić dźwignię (11) na
pozycję .
6)
Trzymając za uchwyt (16) ostrożnie przesu-
nąć ramię nad talerz, aby igła znajdowała
się nad początkiem lub nad żądanym punk-
tem na płycie. Opuścić ramię przesuwając
dźwignię (11) do przodu, na pozycje .
Ramię zostanie powoli opuszczone na płytę.
7)
Aby zatrzymać odtwarzanie, podnieść
ramię za pomocą dźwigni (11) i umieścić
je w zaczepie.
Jeżeli przełącznik AUTO STOP (5) jest
ustawiony na pozycję ON, talerz gramo-
fonu zatrzymuje się automatycznie po
umieszczeniu ramienia w zaczepie lub
20sekund po zakończeniu odtwarzania
płyty.
8)
Po zakończeniu pracy, zabezpieczyć ramię
blokadą (12) i wyłączyć gramofon przełącz-
nikiem POWER (4).
7 Akcesoria
7.1 Wymienne wkładki oraz igły
Możliwa jest wymiana zarówno całej wkładki
jak i igły. Odpowiednie elementy dostępne
są jako osobne produkty, np. wkładka ma-
gnetyczna EN-24 oraz pasująca do niej igła
EN-24SP marki MONACOR.
1)
Aby wymienić igłę, wysunąć pomarań-
czowy uchwyt igły do przodu. Założyć
nową igłę.
2) Aby wymienić całą wkładkę, odkręcić na-
krętkę (14) i zdjąć uchwyt na wkładkę (15)
z ramienia (13).
3)
Odkręcić wkładkę z uchwytu i odłączyć
przewody połączeniowe.
4) Nakręcić nową wkładkę na uchwyt i pod-
łączyć przewody:
niebieski lewy kanał, dodatni biegun
biały lewy kanał, ujemny biegun
zielony prawy kanał, dodatni biegun
czerwony prawy kanał, ujemny biegun
5) Po wymianie wkładki, ponownie ustawić
przeciwwagę oraz regulator antypośli-
zgowy (☞rozdz. 4.3 i 4.4).
7.2 Wymienny uchwyt na wkładkę
Możliwa jest wymiana także całego uchwytu
na wkładkę (np. EN-120 marki MONACOR)
wraz z wkładką. Na czas transportu oraz prze-
chowywania, można umieścić go w uchwy-
cie(8).
Aby wymienić uchwyt na wkładkę (15),
odkręcić go i zastąpić nowym. Po wymianie,
ponownie ustawić przeciwwagę oraz regu-
lator antypoślizgowy (☞rozdz. 4.3 i 4.4).
8 Konserwacja urządzenia
8.1 Czyszczenie
Zaleca się regularne czyszczenie obudowy i
pokrywy, za pomocą suchej lub lekko wil-
gotnej (nie mokrej!), miękkiej ściereczki. Nie
używać alkoholu, środków chemicznych ani
silnych detergentów! Do czyszczenia wkładki
oraz płyt winylowych, wykorzystać odpowied-
nie akcesoria, np. szczotkę DC-100 marki.
8.2 Transportowanie
Przed wysyłką lub transportowaniem gra-
mofonu upewnić się, że wszystkie elementy
zostały zapakowane w osobne opakowania,
a całość odpowiednio zabezpieczona. Uszko-
dzenia gramofonu, pokrywy oraz innych ele-
mentów, powstałe na skutek niewłaściwego
zabezpieczenia, nie podlegają gwarancji!
Należy postępować zgodnie z poniższą in-
strukcją pakowania:
1) Założyć pokrywę ochronną wkładki z igłą.
2) Zabezpieczyć ramię (13) blokadą (11).
3) Odkręcić przeciwwagę (9) od ramienia.
4) Zdjąć talerz z osi gramofonu, zapakować
go osobno i zabezpieczyć przed przemiesz-
czaniem się wewnątrz pudełka.
5)
Zaleca się zastosowanie oryginalnego opa-
kowania.
9 Specyfikacja
Wkładka
gramofonowa: . . . . . magnetyczna
(ruchomy magnes)
Talerz: . . . . . . . . . . . . ⌀332 mm,
odlew aluminiowy
Napęd: . . . . . . . . . . . paskowy
Prędkości: . . . . . . . . . 33¹⁄3obr./min. oraz
45obr./min.
Moment obrotowy:. . 0,03Nm
Drżenie i trzepotanie: < 0,3%
Wyjście: . . . . . . . . . . poziom liniowy, kabel
z wtykami RCA
Zasilanie:. . . . . . . . . . 230V/50Hz
Pobór mocy: . . . . . . . max 20VA
Zakres temperatur: . . 0–40°C
Wymiary
(S × W × D): . . . . . . . 450 × 152 × 352 mm
Waga:. . . . . . . . . . . . 3,2kg
Z zastrzeżeniem możliwości zmian.
Instrukcje obsługi są chronione prawem copyright
for MONACOR
®INTERNATIONAL GmbH & Co. KG.
Przetwarzanie całości lub części instrukcji dla osobi-
stych korzyści finansowych jest zabronione.

16
NederlandsDansk
Alle rettigheder til denne brugsvejledning tilhører MONACOR
®INTERNATIONAL GmbH & Co. KG. Ingen
dele af denne vejledning må reproduceres under ingen omstændigheder til kommerciel anvendelse.
Læs nedenstående sikkerhedsoplysninger
op-mærksomt igennem før ibrugtagning af
enheden. Bortset fra sikkerhedsoplysningerne
henvises til den engelske tekst.
Vigtige sikkerhedsoplysninger
Denne enhed overholder alle relevante EU-
direktiver, og er derfor mærket med .
ADVARSEL
Enheden benytter livsfarlig net-
spænding. For at undgå fare
for elektrisk stød må kabinettet
ikke åbnes. Overlad servicering
til autoriseret personel.
•
Enheden er kun beregnet til indendørs
brug. Beskyt den mod vanddråber og
-stænk, høj luftfugtighed og varme (tilladt
omgivelsestemperatur 0–40°C).
•
Undgå at placere væskefyldte genstande,
som f.eks. glas, ovenpå enheden.
•
Tag ikke enheden i brug eller tag straks stik-
ket ud af stikkontakten i følgende tilfælde:
1. hvis der er synlig skade på enheden eller
netkablet.
2.
hvis der kan være opstået skade, efter at
enheden er tabt eller lignende.
3. hvis der forekommer fejlfunktion.
Enheden skal altid repareres af autoriseret
personel.
•
Et skadet strømkabel skal udskiftes af for-
handleren eller uddannet personel.
•
Tag aldrig stikket ud af stikkontakten ved
at trække i kablet, tag fat i selve stikket.
•
Hvis enheden benyttes til andre formål, end
den oprindeligt er beregnet til, hvis den
ikke er korrekt tilsluttet, hvis den betjenes
forkert, eller hvis den ikke repareres af auto-
riseret personel, omfattes eventuelle skader
ikke af garantien.
Hvis enheden skal tages ud af drift
for bestandigt, skal de afleveres på
en genbrugsstation, for at undgå
skader på miljøet.
Vedligeholdelse
Rengøring
Rengør pladespillerens kasse og støvlåget
med en støvklud eller en hårdt opvredet klud.
Brug ikke sprit eller stærkere rensemidler!
Særligt rengøringstilbehør til nål og plader
kan leveres hos forhandleren, f.eks. kulfiber-
børste til plader MONACOR DC-100.
Transport
Såfremt grammofonen skai forsendes, bør der
kun anvendes original emballage til pladetal-
lerkenen og alle andre dele fra enheden. Det
bør sikres, at alle dele ligger fast i emballa-
gen. Beskadigelser af enheden som følge af
uforsvarlig forpakning (f. eks. hvis pladetal-
lerkenen ikke er fjemet fra centertappen) er
ikke dækket af garantien og reparationer vil
derfor foregå pr. regning.
Før afsendelse bør følgende punkter iagttages:
1) Monter nåle-beskyttelsen.
2)
Fastgør tonearmen (13) med låsemeka-
nismen (11).
3) Afmonter tonearmens kontravægt (9).
4) Afmonter pladetallerkenen fra centertap-
pen, placer den i særskilt emballage, som
fastgøres.
5) Anvend om muligt original emballage.
Nederlands
Nederlands Pagina
Dansk
Dansk Sida
Deze gebruiksaanwijzing is door de auteurswet beschermd eigendom van MONACOR
® INTERNATIONAL
GmbH& Co. KG. Een reproductie – ook gedeeltelijk – voor eigen commerciële doeleinden is verboden.
Lees aandachtig de onderstaande veiligheids-
voorschriften, alvorens het toestel in gebruik te
nemen. Mocht u bijkomende informatie over
de bediening van het toestel nodig hebben,
lees dan de Engelse tekst van deze handleiding.
Veiligheidsvoorschriften
Het apparaat is in overeenstemming met alle
relevante EU-Richtlijnen en is daarom geken-
merkt met .
WAARSCHUWING
De netspanning van het ap-
paraat is levensgevaarlijk.
Open het apparaat niet,
want door onzorgvuldige
ingrepen loopt u het risico
van elektrische schokken.
•
Het apparaat is enkel geschikt voor gebruik
binnenshuis. Vermijd druip- en spatwater,
uitzonderlijk warme plaatsen en plaatsen
met een hoge vochtigheid (toegestaan
omgevingstemperatuurbereik: 0– 40 °C).
•
Plaats geen bekers met vloeistof zoals
drinkglazen etc. op het apparaat.
•
Schakel het apparaat niet in resp. trek on-
middellijk de stekker uit het stopcontact:
1.
wanneer het apparaat of het netsnoer
zichtbaar beschadigd is,
2. wanneer er een defect zou kunnen op-
treden nadat het apparaat bijvoorbeeld
is gevallen,
3.
wanneer het apparaat slecht functioneert.
Het apparaat moet in elk geval hersteld
worden door een gekwalificeerd vakman.
•
Een beschadigd netsnoer mag alleen in een
werkplaats worden vervangen.
•
Trek de stekker nooit met het snoer uit het
stopcontact, maar met de stekker zelf.
•
In geval van ongeoorloofd of verkeerd ge-
bruik, verkeerde aansluiting, foutieve be-
diening of van herstelling door een niet-ge-
kwalificeerd persoon vervalt de garantie en
de verantwoordelijkheid voor hieruit resul-
terende materiële of lichamelijke schade.
Wanneer het apparaat definitief uit
bedrijf wordt genomen, bezorg het
dan voor milieuvriendelijke verwerking
aan een plaatselijk recyclagebedrijf.
Onderhoud
Reiniging
U maakt de behuizing van de platenspeler
en de stofkap het best schoon met enkel
een stofdoek of een bevochtigde doek (niet
druipnat!). Gebruik geen alcohol, chemica-
liën of agressieve detergenten! Om het stof
van de naald en de platen te verwijderen,
zijn geschikte toebehoren verkrijgbaar in de
vakhandel, bv.: de platenreiniger met kool-
stofvezels DC-100 van MONACOR.
Transport
Indien u de platenspeler wenst te verzenden,
zorg er dan voor dat de draaitafel en alle
andere componenten van het toestel in de
originele verpakking of speciale transportver-
pakking verzonden worden. Bij beschadiging
van behuizing of toestel als gevolg van ontoe-
reikende verpakking (bv. draaitafel werd niet
van de as genomen en niet verpakt) vervalt
elke garantie en zijn de kosten ten laste van
de verzender!
Let er bij verzending in ieder geval op dat:
1)
de beschermkap van de naald gemonteerd
is.
2) de toonarm (13) met de toonarmvergren-
deling (11) vastgezet is.
3) het contragewicht (9) van de toonarm af-
genomen is.
4)
de draaitafel van de as genomen en afzon-
derlijk verpakt is, en niet kan wegglijden.
5)
Het gebruik van de originele verpakking
is aanbevolen.

17
Svenska
Kaikki oikeudet pidätetään MONACOR
®INTERNATIONAL GmbH & Co. KG. Mitään tämän käyttöohjeen
osaa ei saa jäljentää miltään osin käytettäväksi mihinkään kaupallisiin tarkoituksiin.
Tämä laite täyttää kaikki siihen kohdistuvat
EU-direktiivit ja sille on myönnetty hyväk-
syntä.
VAROITUS
Tämä laite toimii vaarallisella
230V~ jännitteellä. Älä kos-
kaan tee mitään muutoksia lait-
teeseen taikka asenna mitään
ilmanvaihto aukkoihin, koska
siitä saattaa seurata sähköisku.
•
Tämä laite soveltuu vain sisätilakäyttöön. Suo-
jele laitetta kosteudelta, vedeltä ja kuumuu-
delta (sallittu ympäröivä lämpötila 0–40°C).
•
Älä sijoita laitteen päälle mitään nestettä
sisältävää, kuten vesilasia tms.
•
Irrota virtajohto pistorasiasta, äläkä käyn-
nistä laitetta, jos:
1. laitteessa tai virtajohdossa on havaittava
vaurio
2.
putoaminen tai muu vastaava vahinko
on saattanut aiheuttaa vaurion
3. laitteessa esiintyy toimintahäiriöitä
Kaikissa näissä tapauksissa laite tulee huol-
lattaa valtuutetussa huollossa.
•
Virtajohdon saa vaihtaa vain valtuutettu
huoltohenkilö.
•
Älä koskaan irrota virtajohtoa pistorasiasta
johdosta vetämällä.
•
Laitteen takuu raukeaa, eikä valmistaja,
maahantuoja tai myyjä ota vastuuta mah-
dollisista välittömistä tai välillisistä vahin-
goista, jos laitetta on käytetty muuhun kuin
alkuperäiseen käyttötarkoitukseen, laitetta
on taitamattomasti käytetty tai kytketty tai
jos laitetta on huollettu muussa kuin valtuu-
tetussa huollossa.
Kun laite poistetaan lopullisesti käy-
töstä, vie se paikalliseen kierrätys-
keskukseen jälkikäsittelyä varten.
Huolto
Puhdistus
Pyyhi levysoittimen kotelo ja kansi kuivalla tai
kostealla kankaalla. Älä käytä alkoholia, kemi-
kaaleja tai vahvoja puhdistusaineita! Neulan ja
levyjen pudistukseen saat tarvittavat välineet
kauppiaaltasi, esim. levyille hiilikuituisen har-
jan DC-100, MONACOR.
Kuljetus
Kuljetuksen aikana kiinnitä huomiota siihen,
että levysoitin on pakattu alkupe-äisiin pakka-
uksiinsa ja on erityisesti suojattu kuljetuksessa.
Takuu ei vastaa kuljetuksen aikana kotelolle
tai levysoittimen muille osille aiheutuneita va-
hinkoja, kuten, jos levysoitinta ei ole pakattu
edellä mainitulla tavalla, levylautasta ei ole ir-
rotettu akselistaan ja pakattu jne. Huolimatto-
man kuljetuksen aiheuttamien vahinkojen kor-
jaukset joudutaan veloittamaan asiakkaalta.
Seuraavat kuljetusta koskevat ohjeet on vält-
tämättä huomioitava:
1) Aseta neulan suojus paikoilleen.
2)
Varmista, että äänivarsi on lukittu vivulla (11).
3)
Irrota äänivarren vastapaino (9) kiertämällä
myötäpäivään.
4)
Irrota levylautanen akselistaan ja pakkaa
se erikseen ja varmistu, että se ei pääse
kuljetuksen aikana liikkumaan.
5) Alkuperäisen pakkauksen käyttö on suo-
siteltavaa.
Ole hyvä ja huomioi joka tapauksessa seu-
raavat turvallisuuteen liittyvät seikat ennen
laitteen käyttöä. Laitteen toiminnasta saa
lisätietoa tarvittaessa tämän laitteen muun-
kielisistä käyttöohjeista.
Turvallisuudesta
Svenska
Svenska Sidan
Suomi
Suomi Sivulta
Alla rättigheter är reserverade av MONACOR
®INTERNATIONAL GmbH & Co. KG. Ingen del av denna
instruktionsmanual får eftertryckas i någon form eller på något sätt användas i kommersiellt syfte.
Ge akt på säkerhetsinformationen innan en-
heten tas i bruk. Skulle ytterliggare informa-
tion behövas kan den återfinnas i Manualen
för andra språk.
Säkerhetsföreskrifter
Enheten uppfyller relevanta Eu-direktiv och
har därför försetts med symbolen .
VARNING
Enheten använder högspän-
ning internt. For att undvika
en elektrisk stöt, öppna ald-
rig chassit på egen hand utan
överlåt all service till auktorise-
rad verkstad.
•
Enheten är endast avsedd för inomhusbruk.
Skydda enheten mot vätskor, hög luftfuk-
tighet och hög värme (tillåten omgivnings-
temperatur 0–40°C).
•
Placera inte föremål innehållande vätskor,
t.ex. dricksglas, på enheten.
•
Använd inte enheten eller ta omedelbart
kontakten ur eluttaget om något av föl-
jande fel uppstår:
1.
Enheten eller elsladden har synliga skador.
2. Enheten är skadad av fall e.d.
3. Enheten har andra felfunktioner.
Enheten skall alltid lagas på verkstad av ut-
bildad personal.
•
En skadad elsladd skall endast bytas på
verkstad eller hos tillverkaren.
•
Drag aldrig ut kontakten genom att dra i
sladden utan ta tag i kontaktkroppen.
•
Om enheten används på annat sätt än som
avses, om den inte kopplas in ordentligt, om
den används på fel sätt eller inte repareras
av auktoriserad personal upphör alla garan-
tier att gäll. I dessa fall tas inget ansvar för
uppkommen skada på person eller materiel.
Om enheten ska tas ur drift slutgil-
tigt, ta den till en lokal återvinnings-
anläggning för en avyttring som inte
är skadligt för miljön.
Underhåll
Rengöring
Vi rekommenderar rengöring av skivtallrik
samt skyddshuv med en dammborste eller
en fuktig trasa (inte drypande våt). Använd
inte alkohol eller lösningsmedel då dessa kan
förstöra locket. För att rengöra nålen bör en
korthårig borte användas. Denna dras baki-
från och framåt, aldrig omvänt eller från sida
till sida då detta definitivt förstör nålen, vilket
inte omfattas av fabriksgarantin. Lämpliga
verktyg för detta sälj hos lokal återförsäljare
av Monacors produkter. Lämplig skivborste är
DC-100 ur Monacors sortiment.
Transport
Om skivspelaren skall transporteras bör den
packas ner i originalkartongen för att ge bästa
möjliga skydd. Om skador uppkommer p.g. a.
felaktig packning, felaktig kartong eller annat
som kan härledas till användaren, gäller inte
garanti för dessa skador utan dessa debiteras
som vanliga reparationer på verkstad.
Följande bör iakttas med noggrannhet:
1) Sätt nålskyddet på pickupen.
2)
Säkra tonarmen (13) med tonarmslåset
(11).
3) Tag loss motvikten (9) från tonarmen.
4)
Tag loss tallriken från axeln och packa den
separat och se till att den inte kan lossna.
5) Använd alltid originalpörpackningen.
Suomi

MONACOR INTERNATIONAL GmbH & Co. KG • Zum Falsch 36 • 28307 Bremen • Germany
Copyright©by MONACOR INTERNATIONAL. All rights reserved.
A-1418.99.03.06.2017
Table of contents
Languages:
Other IMG STAGE LINE Turntable manuals

IMG STAGE LINE
IMG STAGE LINE DJP-150 User manual

IMG STAGE LINE
IMG STAGE LINE DJP-400/SI User manual

IMG STAGE LINE
IMG STAGE LINE DJP-104P User manual

IMG STAGE LINE
IMG STAGE LINE DJP-200 User manual

IMG STAGE LINE
IMG STAGE LINE DMP-100T User manual

IMG STAGE LINE
IMG STAGE LINE DJP-122 User manual

IMG STAGE LINE
IMG STAGE LINE DJP-250/SI User manual

IMG STAGE LINE
IMG STAGE LINE DJP-106SD User manual

IMG STAGE LINE
IMG STAGE LINE DJP-202 User manual

IMG STAGE LINE
IMG STAGE LINE DJP-102/SI User manual