IMG STAGE LINE DMP-100T User manual

Audiospieler-Einbau-
modul mit FM-Tuner
Bitte lesen Sie diese Anleitung vor dem Betrieb
gründlich durch und heben Sie sie für ein späteres
Nachlesen auf.
1 Verwendungsmöglichkeiten
Dieses kompakte Audiospieler-Modul mit UKW-
Empfänger ist zum Einbau in ein vorhandenes Gerät
oder in ein eigenes Gehäuse vorgesehen. Es wird
mit einer Gleichspannung von 12 V versorgt.
Mit dem Audiospieler lassen sich Audiodateien
im Format MP3 abspielen von:
– USB-Speicher-Sticks
– USB-Festplatten mit eigener Stromversorgung
– SD/SDHC/MMC-Speicherkarten
Hinweis: Aufgrund der Vielfalt von Speicher-Herstellern
und Gerätetreibern kann nicht garantiert werden, dass alle
Speichermedien mit dem DMP-100T kompatibel sind.
2 Wichtige Hinweise
für den Gebrauch
Das Modul entspricht allen relevanten Richtlinien
der EU und ist deshalb mit gekennzeichnet.
GDas Modul ist nur zur Verwendung im Innenbe-
reich geeignet. Schützen Sie es vor Tropf- und
Spritzwasser, hoher Luftfeuchtigkeit und Hitze
(zulässiger Einsatztemperaturbereich 0 – 40 °C).
GVerwenden Sie zum Reinigen nur ein trockenes,
weiches Tuch, nie Wasser oder Chemikalien.
GWird das Modul zweckentfremdet, nicht richtig
angeschlossen, falsch bedient oder nicht fachge-
recht repariert, kann keine Haftung für daraus
resultierende Sach- oder Personenschäden und
keine Garantie für das Modul übernommen
werden.
3 Einbau und Anschluss
1) Wenn das Gerät, in welches das Modul einge-
baut werden soll, mit Netzspannung versorgt
wird, das Gerät unbedingt vom 230-V-Stromnetz
trennen.
2) Für die Aufnahme des Moduls ist ein Ausschnitt
von 106 mm × 19 mm erforderlich. Die Einbau-
tiefe beträgt 55 mm. Das Modul in die Einbauöff-
nung schieben und über seine Frontplatte mit
vier Schrauben befestigen.
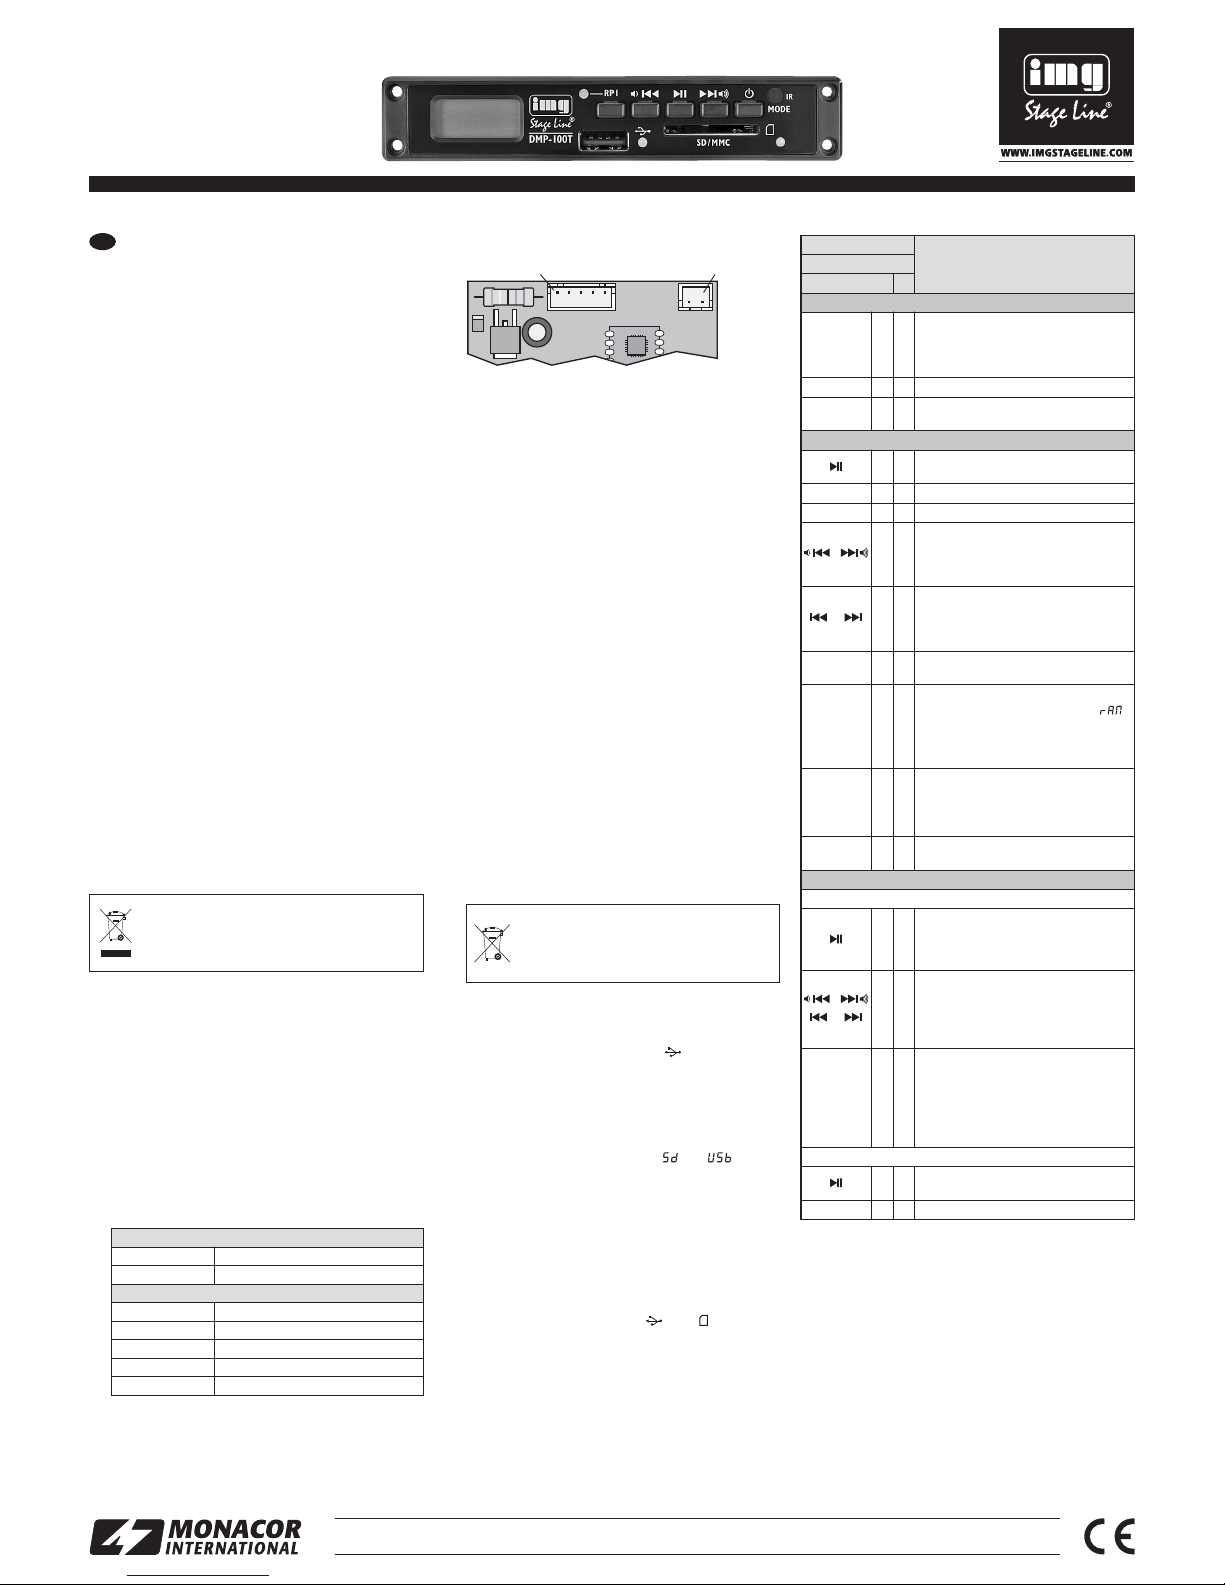
3) Der elektrische Anschluss erfolgt über die zwei
Stiftleisten CN1 (2-polig) und CN2 (5-polig). Die
Kontaktbelegung ist auf der Unterseite der Lei-
terplatte angegeben:
Leiterplatte mit den Anschlüssen
Dem Modul liegen ein 38-cm-Anschlusskabel mit
5-poligen Steckern und eine UKW-Drahtantenne
bei. Alternativ zum Anschlusskabel kann auch
das als Zubehör erhältliche Adapterkabel DMP-
12CC verwendet werden. Es ist mit zwei Cinch-
Kupplungen und einer Kleinspannungskupplung
(5,5 mm/2,1 mm, Pluspol = Mittelkontakt) konfek-
tioniert.
4 Bedienung
4.1 Fernbedienung
1) Zum Einsetzen der Batterien (2 × 1,5 V, Größe
AAA = Micro) auf der Rückseite der Fernbedie-
nung den Batteriefachdeckel abnehmen. Die
Batterien, wie im Batteriefach angegeben, ein-
setzen. Das Fach mit dem Deckel wieder schlie-
ßen.
Bei längerem Nichtgebrauch die Batterien
herausnehmen, damit die Fernbedienung bei
einem eventuellen Auslaufen der Batterien nicht
beschädigt wird.
2) Die Fernbedienung beim Drücken einer Taste
immer in Richtung des Moduls halten. Dabei
muss Sichtverbindung zwischen der Fernbedie-
nung und dem Modul bestehen.
3) Lässt die Reichweite der Fernbedienung nach,
sind die Batterien verbraucht und müssen ausge-
wechselt werden.
4.2 Audiospieler
Einen USB-Stick in den USB-Anschluss stecken
oder eine Festplatte mit eigener Stromversorgung
mit dem USB-Anschluss verbinden und/oder
eine Speicherkarte in den Steckplatz SD/MMC ste-
cken. Dabei muss die abgeschrägte Ecke der Karte
nach links und zum Gerät zeigen. Soll die Karte wie-
der entnommen werden, sie etwas hineindrücken,
sodass sie ausrastet.
Zum Einschalten des Audiospielers die Taste
am Modul oder die Taste MODE auf der Fernbedie-
nung so oft drücken, bis das Display kurz oder
anzeigt. Nach dem Einschalten startet automa-
tisch der zuletzt gespielte Titel. Alle weiteren Bedien-
möglichkeiten sind in der folgenden Tabelle aufge-
führt.
4.3 FM-Tuner
Zum Einschalten des Tuners die Taste am Modul
oder die Taste MODE auf der Fernbedienung so oft
drücken, bis die beiden LEDs und gleichzeitig
leuchten. Der Tuner ist automatisch angewähIt,
wenn keine Speicherkarte und kein USB-Speicher
eingesteckt ist. Alle weiteren Bedienmöglichkeiten
sind in der folgenden Tabelle aufgeführt.
5 Technische Daten
Audiospieler
Frequenzgang: . . . . . . . 20 – 20000 Hz
Klirrfaktor: . . . . . . . . . . . < 0,2 %
Kanaltrennung: . . . . . . . > 60 dB
Störabstand: . . . . . . . . . > 75 dB (A-bewertet)
Tuner
Empfangsfrequenz: . . . . 87,5 – 108 MHz
Abstimmschritt: . . . . . . . 50 kHz
Allgemeine Daten
Ausgangspegel: . . . . . . 500 mV
Stromversorgung: . . . . . 12 V±2 V, 100 mA
Maße, Gewicht: . . . . . . . 120 × 22 × 58 mm, 48 g
Änderungen vorbehalten.
Verbrauchte Batterien dürfen nicht in
den Hausmüll geworfen werden. Geben
Sie sie zur umweltgerechten Entsor-
gung nur in den Sondermüll (z. B. Sam-
melbehälter im Einzelhandel).
CN 1 Anschluss für die beiliegende Antenne
FM-ANT Antennensignal
FM-GND Masse
CN 2 Signalausgang und Stromversorgung
+12V Betriebsspannung 12 V, 100 mA
GND Masse
L-CH Ausgang linker Kanal
S-GND Masse
R-CH Ausgang rechter Kanal
5807P
+12V
CN 2
R-CH
GND
L-CH
S-GND
100
6V
78M05
0X1301
CN 1
FM-ANT
FM-GND
Soll das Modul endgültig aus dem Betrieb
genommen werden, übergeben Sie es zur
umweltgerechten Entsorgung einem örtli-
chen Recyclingbetrieb.
MONACOR INTERNATIONAL GmbH & Co. KG • Zum Falsch 36 • 28307 Bremen • Germany
Copyright©by MONACOR INTERNATIONAL. All rights reserved. A-1582.99.01.06.2014
®
DMP-100T
Bestellnummer 17.3520
ELECTRONICS FOR SPECIALISTS ELECTRONICS FOR SPECIALISTS ELECTRONICS FOR SPECIALISTS ELECTRONICS FOR SPECIALISTS ELECTRONICS FOR SPECIALISTS ELECTRONICS FOR SPECIALISTS ELECTRONICS FOR SPECIALISTS
D A CH
Taste
Funktion
Fernbedienung
am Gerät
Ein-/Ausschalten, Betriebsmodus
MODE
Einschalten, Umschalten zwischen
USB-Anschluss, Speicherkarte und
Tuner;
Ausschalten: 3 s gedrückt halten
Ein- und Ausschalten
MODE Umschalten zwischen USB-Anschluss,
Speicherkarte und Tuner
Audiospieler
Wiedergabe starten und Umschalten
zwischen Wiedergabe und Pause
0…9 Direktwahl eines Titels
+10 10 Titel weiterspringen
vorheriger/nächster Titel:
Taste kurz drücken
Lautstärke verringern/erhöhen:
Taste gedrückt halten
vorheriger/nächster Titel:
Taste kurz drücken
schneller Vor-/Rücklauf: Taste
gedrückt halten (Ton dabei stumm)
VOL+
VOL− Lautstärke erhöhen/verringern:
Taste (mehrfach) kurz drücken
RAND
Abspielen in zufälliger Reihenfolge
– einschalten, Anzeige kurz ,
REPEAT 1 / ALL wird ausgeblendet
– ausschalten, REPEAT 1 / ALL ist wieder
eingeblendet
RP1
REPEAT
Den laufenden Titel endlos wieder-
holen
– einschalten, Anzeige: REPEAT 1
– ausschalten, Anzeige: REPEAT ALL
Wiedergabe beenden; das Display
zeigt die Anzahl der Titel an
Tuner
Sender speichern
Alle Sender suchen und nacheinander
automatisch speichern:
Taste 2 s gedrückt halten, bis die Zah-
len im Display durchlaufen
Sendersuchlauf:
Taste gedrückt halten, bis die Zahlen
im Display durchlaufen
Feinabstimmung:
Taste (mehrfach) kurz drücken
RP1
REPEAT
Sender manuell speichern:
1. freie Stationsnummer wählen
(
Gespeicherte Sender aufrufen)
2. Sender einstellen (
Sendersuch-
lauf und Feinabstimmung)
3. Taste RP1 bzw. REPEAT drücken
Gespeicherte Sender aufrufen
Zur nächsten Stationsnummer
springen: Taste kurz drücken
0…9 Direktwahl der Stationsnummer

Audio Player Insertion Module
with FM Tuner
Please read these operating instructions carefully
prior to operation and keep them for later reference.
1 Applications
This compact audio player module with FM receiver
is designed for installation into an existing unit or into
a separate housing. It is supplied with 12 V DC volt-
age.
The audio player is able to replay audio files in
MP3 format from:
– USB flash drives
– USB hard disks with separate power supply
– SD/SDHC/MMC memory cards
Note: Due to the large number of storage device manu-
facturers and device drivers, it cannot be guaranteed that
all storage media are compatible with the DMP-100T.
2 Important Notes
The module corresponds to all relevant directives of
the EU and is therefore marked with .
GThe module is suitable for indoor use only. Protect
it against dripping water and splash water, high air
humidity and heat (admissible ambient tempera-
ture range: 0 – 40 °C).
GFor cleaning only use a dry, soft cloth; never use
water or chemicals.
GNo guarantee claims for the module and no liabil-
ity for any resulting personal damage or material
damage will be accepted if the module is used for
other purposes than originally intended, if it is not
correctly connected or operated, or if it is not
repaired in an expert way.
3 Installation and Connection
1) If the unit into which the module is to be installed
is supplied with mains voltage, disconnect the
unit from the 230 V mains.
2) To install the module, a cutout of 106 mm ×
19 mm is required. The installation depth is
55 mm. Push the module into the cutout and fas-
ten it via its front panel using four screws.
3) Electrical connection is made via the two pin con-
nectors CN1 (2 poles) and CN2 (5 poles). The pin
configuration can be found on the lower side of
the PCB:
PCB with connectors
The module is supplied with a 38 cm connection
cable with 5-pole plugs and an FM wire antenna.
As an alternative, use the adapter cable DMP-
12CC available as an accessory. The adapter
cable is fitted with two RCA inline jacks and a low-
voltage inline jack (5.5 mm/2.1 mm, positive pole
= centre contact).
4 Operation
4.1 Remote control
1) To insert the batteries (2 × 1.5 V, size AAA), re-
move the battery compartment cover on the rear
of the remote control. Insert the batteries as indi-
cated in the compartment, and then close the
compartment with the cover.
If the remote control is not to be used for a
longer period of time, remove the batteries to pre-
vent damage due to battery leakage.
2) When you press a button on the remote control,
always point the remote control at the module.
Make sure that there are no obstacles between
the remote control and the module.
3) If the operating range of the remote control
decreases, the batteries are discharged and
must be replaced.
4.2 Audio player
Connect a USB flash drive or a hard disk with sepa-
rate power supply to the USB port and/or insert a
memory card into the slot SD/MMC (notched corner
pointing to the left and facing the unit). To remove the
card, push the card into the slot until it disengages.
To switch on the audio player, press the
button on the module or the button MODE on the
remote control repeatedly until or briefly
appears on the display. When the audio player is
switched on, the first title will start automatically. All
the other operating options can be found in the fol-
lowing table.
4.3 FM tuner
To switch on the tuner, press the button on the
module or the button MODE on the remote control
repeatedly until the two LEDs and light up at
the same time. The tuner will be automatically
selected when no memory card is inserted and no
USB storage device is connected. All the other oper-
ating options can be found in the following table.
5 Specifications
Audio player
Frequency range: . . . . . 20 – 20 000 Hz
THD: . . . . . . . . . . . . . . . < 0.2 %
Channel separation: . . . > 60 dB
S/N ratio: . . . . . . . . . . . . 75 dB (A weighted)
Tuner
Received frequency: . . 87.5 – 108 MHz
Tuning increment: . . . . . 50 kHz
General information
Output level: . . . . . . . . . 500 mV
Power supply: . . . . . . . . 12 V±2 V, 100 mA
Dimensions, weight: . . . 120 × 22 × 58 mm, 48 g
Subject to technical modification.
Never put discharged batteries in the
household waste; always take them to a
special waste disposal, e. g. collection
container at your retailer.
5807P
+12V
CN 2
R-CH
GND
L-CH
S-GND
100
6V
78M05
0X1301
CN 1
FM-ANT
FM-GND
CN 1 connection for antenna supplied
FM-ANT antenna signal
FM-GND ground
CN 2 signal output and power supply
+12V 12 V operating voltage, 100 mA
GND ground
L-CH output left channel
S-GND ground
R-CH output right channel
If the module is to be put out of operation
definitively, take it to a local recycling plant
for a disposal which is not harmful to the
environment.
MONACOR INTERNATIONAL GmbH & Co. KG • Zum Falsch 36 • 28307 Bremen • Germany
Copyright©by MONACOR INTERNATIONAL. All rights reserved. A-1582.99.01.06.2014
®
DMP-100T
Order number 17.3520
ELECTRONICS FOR SPECIALISTS ELECTRONICS FOR SPECIALISTS ELECTRONICS FOR SPECIALISTS ELECTRONICS FOR SPECIALISTS ELECTRONICS FOR SPECIALISTS ELECTRONICS FOR SPECIALISTS ELECTRONICS FOR SPECIALISTS
GB
Button
Function
remote control
on the unit
Switching on/off, operating mode
MODE
to switch on, to switch between USB
port, memory card and tuner;
to switch off: keep button pressed for
3 seconds
to switch on and off
MODE to switch between USB port,
memory card and tuner
Audio player
to start the replay and to switch
between replay and pause
0…9 direct title selection
+10 to skip 10 titles
previous/next title:
Press button briefly.
to increase/decrease the volume:
Keep button pressed.
previous/next title: Press button briefly.
fast forward/reverse:
Keep button pressed (sound muted
during the process).
VOL+
VOL− to increase/decrease the volume:
Press button briefly (repeatedly).
RAND
replay in random order
– when activated, brief indication ,
REPEAT 1 / ALL will disappear
– when deactivated, REPEAT 1 / ALL will
reappear
RP1
REPEAT
continuous repeat of the current title
– when activated, indication REPEAT 1
– when deactivated,
indication REPEAT ALL
to stop the replay; the display will indi-
cate the number of titles
Tuner
Storing stations
to scan all stations and automatically
store them one after the other: Keep but-
ton pressed for 2 s until the figures start
to appear on the frequency indication.
station scan:
Keep button pressed until the figures start
to appear on the frequency indication.
fine tuning:
Briefly press button (repeatedly).
RP1
REPEAT
to store the stations manually:
1. Select an available station number
(
Calling up stored stations).
2. Set the stations (
Station scan-
ning and Fine tuning).
3. Press the button RP1 or REPEAT.
Calling up stored stations
to go to the next station number:
Press button briefly.
0…9 direct selection of the station number

Module lecteur audio en-
castrable avec tuner FM
Veuillez lire la présente notice avec attention avant
le fonctionnement et conservez-la pour pouvoir vous
y reporter ultérieurement.
1 Possibilités dʼutilisation
Ce module lecteur audio compact avec récepteur
FM est conçu pour une intégration dans un appareil
existant ou dans un boîtier propre. Il est alimenté par
une tension continue 12 V.
Avec le lecteur audio, il est possible de lire des
fichiers audio au format MP3 venant de :
– clés USB
– disques durs USB avec alimentation propre
– cartes de mémoire SD/SDHC/MMC
Remarque : En raison de la multitude de fabricants de
supports de mémoire et de drivers dʼappareils, il nʼest pas
possible de garantir que tous les supports de mémoire
soient compatibles avec le DMP-100T.
2 Conseils importants d'utilisation
Le module répond à toutes les directives néces-
saires de lʼUnion européenne et porte donc le sym-
bole .
GLe module n'est conçu que pour une utilisation en
intérieur. Protégez-le de tout type de projections
d'eau, des éclaboussures, d'une humidité élevée
de l'air et de la chaleur (plage de température de
fonctionnement autorisée : 0 – 40° C).
GPour le nettoyage, utilisez uniquement un chiffon
sec et doux, en aucun cas de produits chimiques
ou d'eau.
GNous déclinons toute responsabilité en cas de
dommages matériels ou corporels résultants si le
module est utilisé dans un but autre que celui pour
lequel il a été conçu, s'il n'est pas correctement
branché ou utilisé ou s'il n'est pas réparé par une
personne habilitée, en outre, la garantie devien-
drait caduque.
3 Installation et branchement
1)
Si lʼappareil dans lequel le module doit être installé,
est alimenté par une tension secteur, débranchez
impérativement lʼappareil du secteur 230 V.
2)
Pour lʼinstallation du module, une découpe de
106 mm × 19 mm est nécessaire. La profondeur de
montage est de 55 mm. Poussez le module dans
lʼouverture et fixez-le via sa façade avec quatre vis.
3) Le branchement électrique se fait via les deux
barrettes CN1 (2 pôles) et CN2 (5 pôles). La
configuration des contacts est présentée sur la
partie inférieure du circuit imprimé :
Circuit imprimé avec les branchements
Un cordon de branchement de 38 cm avec fiches
5 pôles et une antenne FM sont livrés avec le
module. On peut utiliser à la place du cordon
5 pôles, le cordon adaptateur DMP-12CC, dispo-
nible en option. Il est équipé de deux fiches RCA
femelles et dʼune fiche femelle basse tension
(5,5 mm/2,1 mm, pôle plus = contact médian).
4 Utilisation
4.1 Télécommande
1) Pour insérer les batteries (2 × 1,5 V, type R03),
retirez le couvercle du compartiment batterie sur
la face arrière de la télécommande. Insérez les
batteries comme indiqué dans le compartiment.
Refermez le compartiment avec le couvercle.
En cas de non utilisation prolongée, retirez les
batteries, elles pourraient couler et endommager
la télécommande.
2) Tenez la télécommande toujours en direction du
lecteur audio lorsque vous activez une touche. Il
ne doit pas y avoir dʼobstacle entre la télécom-
mande et le lecteur audio.
3) Si la portée de la télécommande faiblit, les batte-
ries sont mortes et doivent être remplacées.
4.2 Lecteur audio
Mettez une clé USB dans le port USB ou reliez
un disque dur avec alimentation propre au port USB
et/ou insérez une carte mémoire dans la fente SD/
MMC. Veillez à ce que le coin oblique de la carte soit
positionné sur la gauche et vers lʼappareil. Pour reti-
rer la carte, enfoncez-la un peu pour quʼelle se dés-
enclenche.
Pour allumer le lecteur audio, appuyez sur la
touche sur le module ou sur la touche MODE sur
la télécommande jusquʼà ce que ou sʼaffiche
brièvement. Lorsque le lecteur audio est allumé, le
premier titre démarre automatiquement. Vous trou-
verez toutes les possibilités dʼutilisation sur le
tableau suivant.
4.3 Tuner FM
Pour allumer le tuner, appuyez sur la touche sur le
module ou sur la touche MODE sur la télécom-
mande jusquʼà ce que les deux LEDs et brillent
en même temps. Le tuner est automatiquement
sélectionné si aucune carte mémoire et aucun sup-
port USB nʼest inséré. Vous trouverez toutes les pos-
sibilités dʼutilisation sur le tableau suivant.
Ne jetez pas les batteries usagées dans
la poubelle domestique. Vous devez les
déposer dans un container spécifique
ou les ramenez à votre revendeur.
5807P
+12V
CN 2
R-CH
GND
L-CH
S-GND
100
6V
78M05
0X1301
CN 1
FM-ANT
FM-GND
CN 1 branchement pour lʼantenne livrée
FM-ANT signal antenne
FM-GND masse
CN 2 sortie signal et alimentation
+12V tension fonctionnement 12 V, 100 mA
GND masse
L-CH sortie canal gauche
S-GND masse
R-CH sortie canal droit
Lorsque le module est définitivement retiré
du service, vous devez le déposer dans une
usine de recyclage adaptée pour contribuer
à son élimination non polluante.
MONACOR INTERNATIONAL GmbH & Co. KG • Zum Falsch 36 • 28307 Bremen • Germany
Copyright©by MONACOR INTERNATIONAL. All rights reserved. A-1582.99.01.06.2014
®
DMP-100T
Référence numérique 17.3520
ELECTRONICS FOR SPECIALISTS ELECTRONICS FOR SPECIALISTS ELECTRONICS FOR SPECIALISTS ELECTRONICS FOR SPECIALISTS ELECTRONICS FOR SPECIALISTS ELECTRONICS FOR SPECIALISTS ELECTRONICS FOR SPECIALISTS
F B CH
Touche
Fonction
sur la
télécommande
sur lʼappareil
Marche/Arrêt, mode de fonctionnement
MODE
Allumer ; commutation entre port USB,
carte mémoire et tuner ;
Arrêt : Maintenez la touche enfoncée
pendant 3 secondes
Marche/Arrêt
MODE Commutation entre port USB, carte
mémoire et tuner
Lecteur audio
Démarrer la lecture et commutation
entre lecture et pause
0…9 Sélection directe dʼun titre
+10 Sauter 10 titres
Titre précédent/suivant :
Enfoncez la touche brièvement
Diminuer/augmenter le volume :
Maintenez la touche enfoncée
Titre précédent/suivant :
Enfoncez la touche brièvement
Avance et retour rapide : Maintenez la
touche enfoncée (son coupé)
VOL+
VOL−
Augmenter/diminuer le volume :
Appuyez brièvement sur la touche
(plusieurs fois)
RAND
Lecture en ordre aléatoire
– activation, affichage bref ,
REPEAT 1 / ALL ne s'affiche plus
– désactivation, REPEAT 1 / ALL est à
nouveau affiché
RP1
REPEAT
Répétition continue du titre en cours
– activation, affichage : REPEAT 1
– désactivation, affichage : REPEAT ALL
Arrêter la lecture : lʼaffichage indique le
nombre de titres
Tuner
Mémoriser des stations
Recherche de toutes les stations et mé-
morisation automatique les unes après
les autres : Maintenez la touche enfon-
cée pendant 2 secondes jusquʼà ce
que les chiffres défilent sur lʼaffichage
Recherche de station :
Maintenez la touche enfoncée jusquʼà
ce que les chiffres défilent
Réglage précis : Appuyez brièvement
sur la touche (plusieurs fois)
RP1
REPEAT
Mémoriser manuellement une station :
1. Sélectionnez un numéro libre de
station (
Appeler les stations
mémorisées)
2. Réglez la station (
Recherche de
station et Réglage précis)
3. Appuyez sur la touche RP1 ou
REPEAT
Appeler les stations mémorisées
Pour aller au numéro suivant de station :
Appuyez brièvement sur la touche
0…9 Sélection directe du numéro de station
5 Caractéristiques techniques
Lecteur audio
Bande passante : . . . . . 20 – 20 000 Hz
Taux de distorsion : . . . . < 0,2 %
Séparation des canaux : > 60 dB
Rapport signal/bruit : . . . > 75 dB (A pondéré)
Tuner
Fréquence réception : . . 87,5 – 108 MHz
Palier réglage : . . . . . . . 50 kHz
Généralités
Niveau de sortie : . . . . . 500 mV
Alimentation : . . . . . . . . 12 V±2 V, 100 mA
Dimensions, poids : . . . 120 × 22 × 58 mm, 48 g
Tout droit de modification réservé.

Modulo da inserto di lettore audio
con tuner FM
Vi preghiamo di leggere attentamente le presenti
istruzioni prima della messa in funzione e di conser-
varle per un uso futuro.
1 Possibilità dʼimpiego
Questo modulo compatto di lettore audio con tuner
FM è previsto per lʼinserimento in un apparecchio
esistente oppure in un suo contenitore. È alimentato
con una tensione continua di 12 V.
Con il lettore audio si possono riprodurre dei file
audio nel formato MP3 provenienti da:
– chiavette USB
– dischi rigidi USB con alimentazione propria
– schede di memoria SD/SDHC/MMC
N. B.: Data la molteplicità di produttori di memorie e di
driver non si può garantire che tutti i mezzi di memoria
siano compatibili con il DMP-100T.
2 Avvertenze importanti per lʼuso
Il modulo è conforme a tutte le direttive rilevanti del-
lʼUE e pertanto porta la sigla .
GIl modulo è previsto solo per lʼuso allʼinterno di
locali. Proteggerlo dall'acqua gocciolante e dagli
spruzzi d'acqua, da alta umidità dell'aria e dal calore
(temperatura dʼimpiego ammessa fra 0 e 40 °C).
GPer la pulizia usare solo un panno morbido,
asciutto; non impiegare in nessun caso acqua o
prodotti chimici.
GNel caso dʼuso improprio, di collegamenti sba-
gliati, dʼimpiego scorretto o di riparazione non a
regola dʼarte del modulo, non si assume nessuna
responsabilità per eventuali danni consequenziali
a persone o a cose e non si assume nessuna
garanzia per l'apparecchio.
3 Montaggio e collegamento
1) Se lʼapparecchio nel quale si deve montare il
modulo, è alimentato con tensione di rete, sepa-
rarlo assolutamente dalla rete di 230 V.
2) Per lʼinserimento del modulo è richiesta unʼaper-
tura di 106 mm × 19 mm. La profondità di mon-
taggio è di 55 mm. Inserire il modulo nellʼapertura
e fissarlo alla piastra frontale per mezzo di quat-
tro viti.
3) Il collegamento elettrico avviene tramite i due
pinheader CN1 (2 poli) e CN2 (5 poli). La piedi-
natura e indicata sulla parte inferiore del circuito
stampato:
Circuito stampato con collegamenti
Il modulo ha in dotazione un cavo di collega-
mento di 38 cm con connettori a 5 poli e unʼan-
tenna a filo FM. In alternativa al cavo di collega-
mento si può usare anche il cavo adattatore
DMP-12CC disponibile come opzione. È preas-
semblato con due connettori femmina RCA e con
una presa DC (5,5 mm/2,1 mmm polo positivo =
contatto centrale).
4 Funzionamento
4.1 Telecomando
1) Per inserire le batterie (2 × 1,5 V, AAA = ministilo),
togliere sul retro del telecomando il coperchio del
vano batterie. Inserire le batterie come indicato
nel vano batterie. Richiudere il vano con il suo
coperchio.
In caso di mancato uso prolungato togliere le
batterie per escludere che perdendo possano
danneggiare il telecomando.
2) Azionando un tasto, orientare il telecomando
sempre in direzione del modulo. Non ci devono
essere degli ostacoli fra il telecomando e il
modulo.
3) Se la portata del telecomando si riduce, significa
che le batterie sono scariche e che devono
essere sostituite.
4.2 Lettore audio
Inserire una chiavetta USB nella porta USB
oppure collegare un disco rigido con alimentazione
propria con la porta USB e/o inserire una scheda di
memoria nello slot SD/MMC. Lʼangolo smussato
della scheda deve essere rivolto a sinistra e verso
lʼapparecchio. Per togliere nuovamente la scheda,
spingerla leggermente indentro per sbloccarla.
Per accendere il lettore audio, spingere il tasto
sul modulo oppure il tasto MODE sul telecomando
tante volte finché il display indica brevemente o
. Dopo lʼaccensione si avvia automaticamente il
titolo riprodotto per ultimo. Tutte le ulteriori possibilità
dʼuso sono elencate nella seguente tabella.
4.3 Tuner FM
Per accendere il tuner, premere il tasto sul modulo
oppure il tasto MODE sul telecomando tante volte
finché i due LED e si accendono contempora-
neamente. Il tuner è attivo automaticamente se non
è inserita nessuna scheda di memoria o nessuna
memoria USB. Tutte le ulteriori possibilità dʼuso sono
elencate nella seguente tabella.
Non gettare le batterie scariche o difet-
tose nelle immondizie di casa bensì
negli appositi contenitori (p. es. presso il
vostro rivenditore).
5807P
+12V
CN 2
R-CH
GND
L-CH
S-GND
100
6V
78M05
0X1301
CN 1
FM-ANT
FM-GND
CN 1 Collegamento per lʼantenna in dotazione
FM-ANT Segnale dellʼantenna
FM-GND Masse
CN 2 Uscita dei segnali e alimentazione
+12V Tensione dʼesercizio 12 V, 100 mA
GND Massa
L-CH Uscita canale sinistro
S-GND Massa
R-CH Uscita canale destro
Se si desidera eliminare l'apparecchio defi-
nitivamente, consegnarlo per lo smalti-
mento ad un'istituzione locale per il rici-
claggio.
MONACOR INTERNATIONAL GmbH & Co. KG • Zum Falsch 36 • 28307 Bremen • Germany
Copyright©by MONACOR INTERNATIONAL. All rights reserved. A-1582.99.01.06.2014
®
DMP-100T
Numero d’ordine 17.3520
ELECTRONICS FOR SPECIALISTS ELECTRONICS FOR SPECIALISTS ELECTRONICS FOR SPECIALISTS ELECTRONICS FOR SPECIALISTS ELECTRONICS FOR SPECIALISTS ELECTRONICS FOR SPECIALISTS ELECTRONICS FOR SPECIALISTS
I
Tasto
Funzione
telecomando
sul-
lʼapparecchio
Accendere/spegnere, modo di funzionamento
MODE
Accendere, cambiare fra porta USB,
scheda di memoria e tuner;
Spegnere: tener premuto per 3 sec.
Accendere e spegnere
MODE Cambiare fra porta USB, scheda di
memoria e tuner
Lettore audio
Avviare la riproduzione e cambiare fra
riproduzione e pausa
0…9 Selezione diretta di un titolo
+10 Saltare avanti di 10 titoli
Titolo precedente/successivo:
premere brevemente il tasto
Ridurre/aumentare il volume:
tener premuto il tasto
Titolo precedente/successivo:
premere brevemente il tasto
Avanzamento/ritorno veloce: tener
premuto il tasto (lʼaudio rimane muto)
VOL+
VOL− Aumentare/ridurre il volume:
premere (più volte) il tasto brevemente
RAND
Riproduzione in ordine casuale
– attivare, indicazione breve ,
REPEAT 1 / ALL non si vede più
– disattivare, REPEAT 1 / ALL si vede di
nuovo
RP1
REPEAT
Ripetizione senza fine del titolo attuale
– attivare, indicazione: REPEAT 1
– disattivare, indicazione: REPEAT ALL
Terminare la riproduzione; il display
visualizza il numero dei titoli
Tuner
Memorizzare le stazioni
Ricerca di tutte le stazioni e memoriz-
zazione automatica una dopo lʼaltra:
tener premuto il tasto per 2 sec., finché
i numeri scorrono sul display
Ricerca automatica delle stazioni:
tener premuto il tasto, finché i numeri
scorrono sul display
Sintonizzazione fine:
premere (più volte) il tasto brevemente
RP1
REPEAT
Memorizzazione manuale delle stazioni:
1. scegliere un numero libero per la
stazione (
Aprire le stazioni
memorizzate)
2. impostare la stazione (
Ricerca
automatica delle stazioni e Sintoniz-
zazione fine)
3. premere il tasto RP1 o REPEAT
Aprire le stazioni memorizzate
Saltare al numero della stazione suc-
cessiva: premere brevemente il tasto
0…9 Scelta diretta del numero della stazione
5 Dati tecnici
Lettore audio
Risposta in frequenza: . . . 20 – 20 000 Hz
Fattore di distorsione: . . . < 0,2 %
Separazione canali: . . . . . > 60 dB
Rapporto S/R: . . . . . . . . . > 75 dB (valutato A)
Tuner
Frequenza di ricezione: . . 87,5 – 108 MHz
Sintonizzazione a passi di: 50 Hz
Dati generali
Livello dʼuscita: . . . . . . . . 500 mV
Alimentazione: . . . . . . . . . 12 V±2 V, 100 mA
Dimensioni, peso: . . . . . . 120 × 22 × 58 mm, 48 g
Con riserva di modifiche tecniche.
Table of contents
Languages:
Other IMG STAGE LINE Turntable manuals

IMG STAGE LINE
IMG STAGE LINE DJP-122 User manual

IMG STAGE LINE
IMG STAGE LINE DJP-200USB User manual

IMG STAGE LINE
IMG STAGE LINE DJP-202 User manual

IMG STAGE LINE
IMG STAGE LINE DJP-200 User manual

IMG STAGE LINE
IMG STAGE LINE DJP-250/SI User manual

IMG STAGE LINE
IMG STAGE LINE DJP-106BT User manual

IMG STAGE LINE
IMG STAGE LINE DJP-150 User manual

IMG STAGE LINE
IMG STAGE LINE DJP-102/SI User manual

IMG STAGE LINE
IMG STAGE LINE DJP-106SD User manual

IMG STAGE LINE
IMG STAGE LINE DJP-104P User manual