Indel B SAFE 10 BOX User manual

istruzioni per l’uso
instructions for use
instrucciones para el uso
mode d'emploi
gebrauchsanweisung
SAFE 10 BOX
SAFE 30 BOX
SAFE_10_30_BOX_IM_20190507


1
SAFE 10 BOX
SAFE 30 BOX
SAFE_10_30_BOX_IM_20190507
ITALIANO
ENGLISH
ESPAÑOL
FRANÇAIS
DEUTSCH
3 - 9
10 - 16
17 - 23
24 - 30
31 - 37

2
SAFE 10/30 BOX
SAFE_10_30_BOX_IM_20190507

3
ITALIANO
AVVERTENZA
L’apparecchio non è destinato ad essere usato da persone (bambini compresi) le cui capacità fisiche,
sensoriali o mentali siano ridotte, oppure con mancanza di esperienza o di conoscenza, a meno
che esse abbiano potuto beneficiare, attraverso l’intermediazione di una persona responsabile
della loro sicurezza, di una sorveglianza o di istruzioni riguardanti l’uso dell’apparecchio.
I bambini devono essere sorvegliati per sincerarsi che non giochino con l’apparecchio.
DIMENSIONI D’INGOMBRO
SAFE 10 BOX
SAFE 30 BOX
LOCK
12
0
RESET
9
8
7
6
5
4
3
LOCK
12
0
RESET
9
8
7
6
5
4
3
31 cm 20 cm
19,5 cm
43 cm 37 cm
20 cm

4
SAFE 10/30 BOX
SAFE_10_30_BOX_IM_20190507
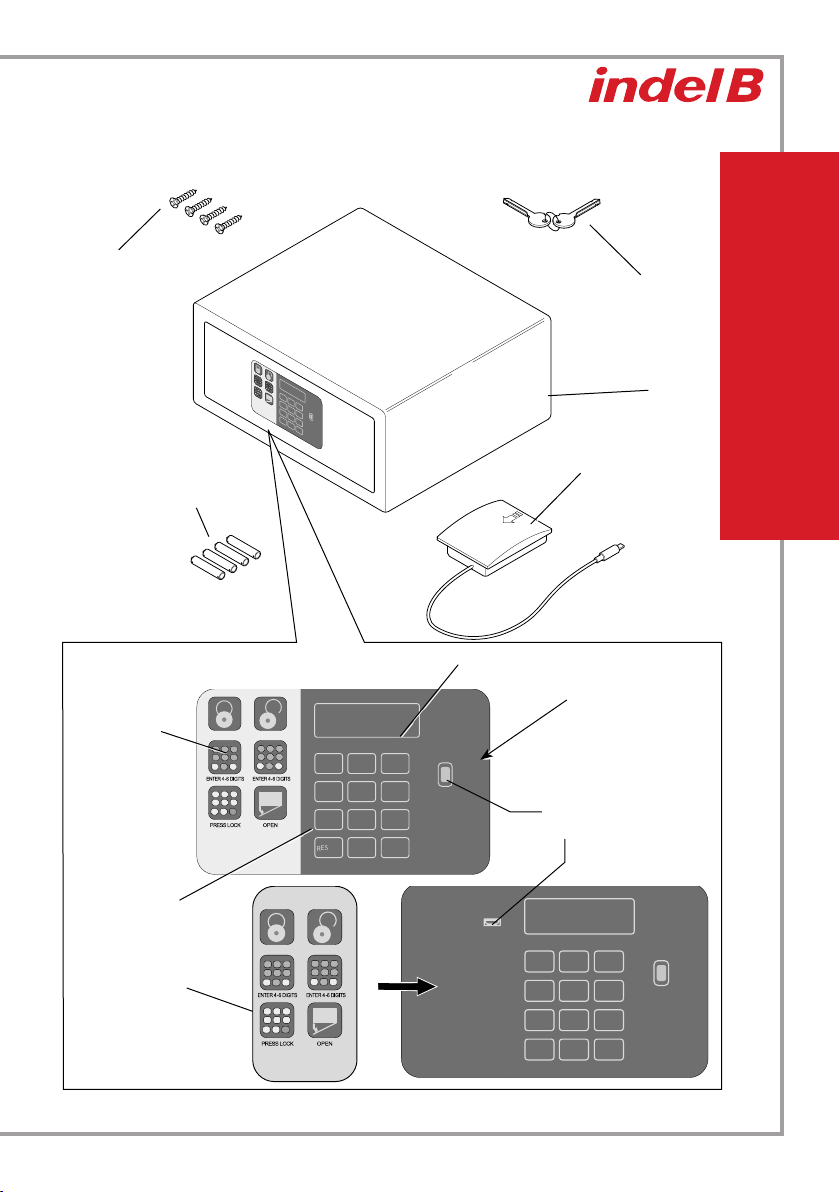
MATERIALE CONTENUTO ALL’INTERNO DELL’IMBALLO
LOCK
12
0
RESET
9
8
7
6
5
4
3
ALIMENTATORE ESTERNO
CHIAVE MECCANICA
VITI DI
FISSAGGIO
CASSAFORTE
BATTERIE
(TIPO AA)
PANNELLO DI CONTROLLO
ISTRUZIONI
APERTURA
E
CHIUSURA
LOCK
12
0
RESET
9
8
7
6
5
4
3
LOCK
12
0
RESET
9
8
7
6
5
4
3
SAFE 30 BOX
SAFE 10 BOX
DISPLAY VANO BATTERIE
TASTIERA
NUMERICA
ETICHETTA
REMOVIBILE
PRESA
MINI USB
5
ITALIANO
LOCK
12
0
RESET
9
8
7
6
5
4
3
INSTALLAZIONE
Al ricevimento della Cassaforte, quest’ultima si presenta all’Utilizzatore con la porta APERTA.
Occorre procedere all’installazione della Cassaforte effettuando alcune semplici operazioni, per
renderne possibile l’utilizzo.
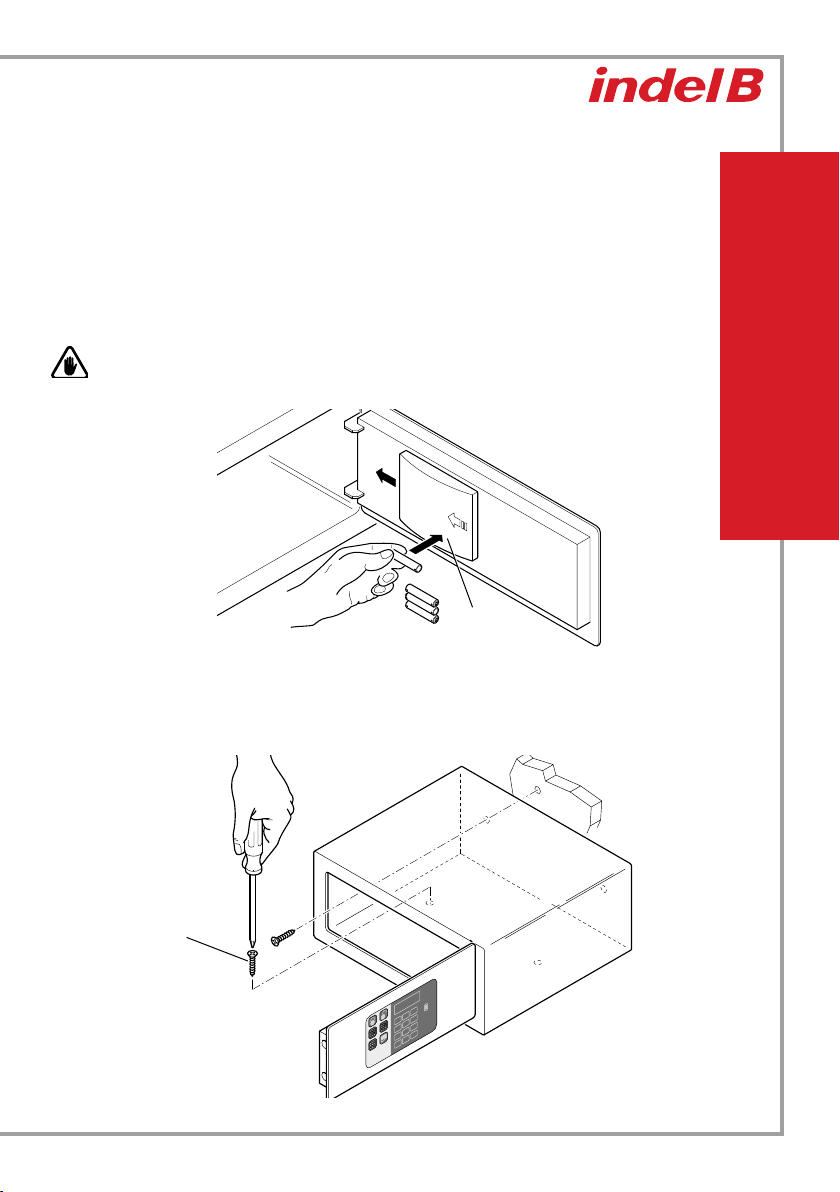
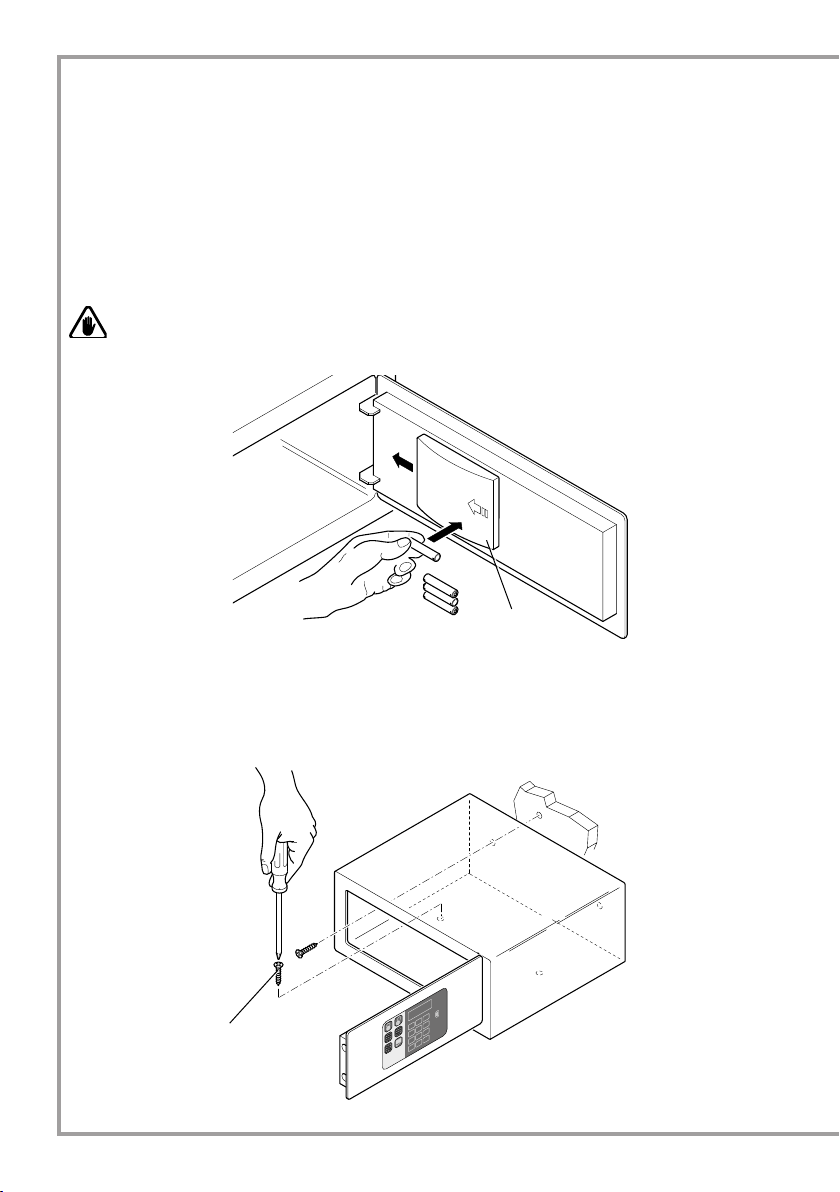
INSERIMENTO DELLE BATTERIE
Prima di utilizzare la Cassaforte è necessario inserire nell’apposito vano, posto nel lato interno
della porta stessa, le quattro batterie di tipo AA, in dotazione. Rispettare le polarità indicate nel
vano stesso.
AVVERTENZA
Le batterie sono fornite gratuitamente per il test di funzionamento e sono da sostituire in breve tempo.
VITI DI
FISSAGGIO
VANO
BATTERIE
POSIZIONAMENTO
Posizionare la Cassaforte sopra un mobile o dentro un armadio, bloccandola con le quattro viti di
fissaggio fornite in dotazione.
La Cassaforte è dotata, per il fissaggio, di 4 fori passanti, 2 sulla parete posteriore e 2 sul piano
orizzontale, da utilizzare, a discrezione dell’installatore, a seconda del luogo in cui verrà installata
la Cassaforte stessa.

6
SAFE 10/30 BOX
SAFE_10_30_BOX_IM_20190507
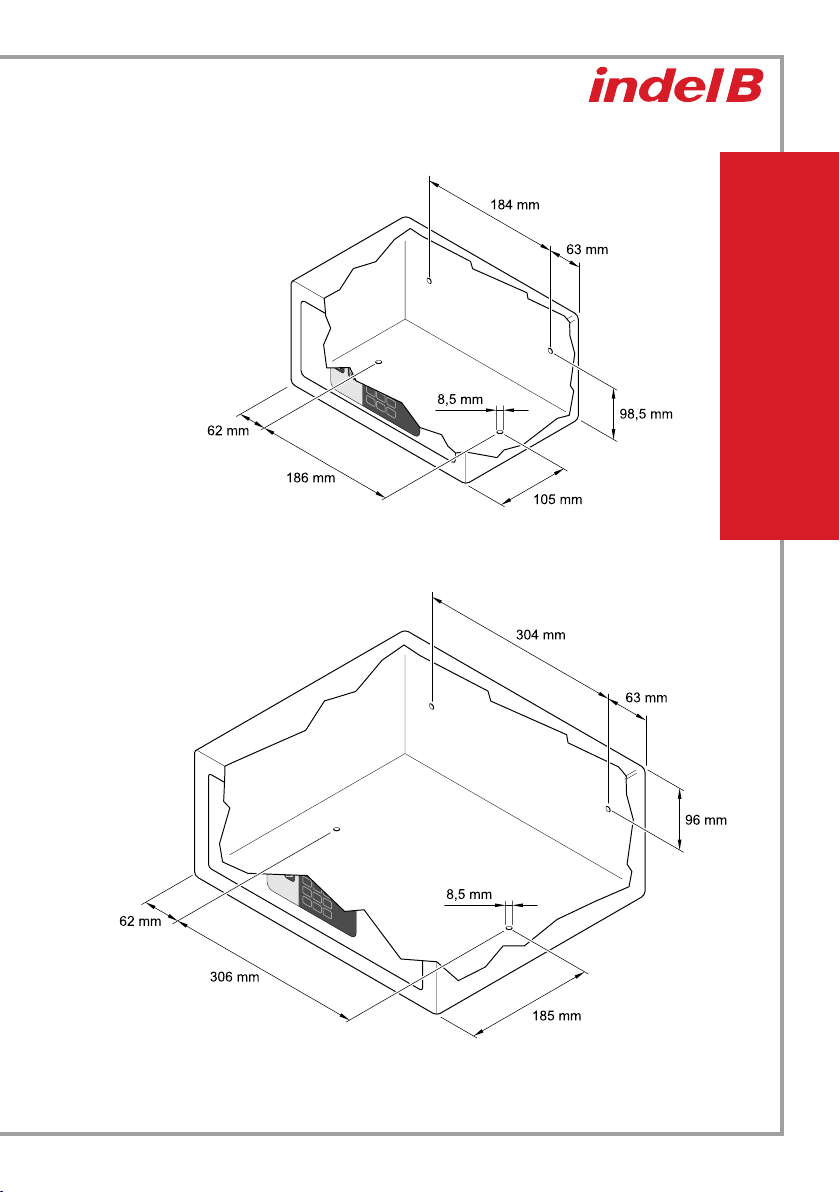
SCHEMI DI FORATURA
SAFE 10 BOX
SAFE 30 BOX
LOCK
12
0
RESET
9
8
7
6
5
4
3
LOCK
12
0
RESET
9
8
7
6
5
4
3

7
ITALIANO
ISTRUZIONI D’USO
La Cassaforte, dopo l’installazione, si presenta all’utilizzatore con lo sportello aperto e con Sistema
a doppio codice già impostato dal Costruttore.
Codice Personale (di 4 cifre, per uso quotidiano) e Codice Master (di 6 cifre, per aperture di
emergenza).
Attenersi alle seguenti indicazioni per l’Utilizzo Quotidiano.
CHIUSURA DELLA CASSAFORTE
Inserire un Codice Personale formato da 4 a 6 cifre e premere il tasto LOCK. Il display mostrerà
la scritta CLOSE. Quando la porta sarà chiusa il display mostrerà la scritta CLOSED e di seguito il
Codice Personale digitato, come pro-memoria all’utilizzatore.
Nel pannello frontale della Cassaforte è riportata una breve sequenza illustrata, che indica le
procedure di apertura e chiusura della porta.
APERTURA DELLA CASSAFORTE
Per aprire la Cassaforte è sufficiente digitare il Codice Personale formato da 4 a 6 cifre.
Se vengono digitati sulla tastiera uno o più numeri errati, è possibile cancellarli premendo il tasto
RESET.
AVVERTENZA
Se viene digitato per tre volte consecutive il Codice Personale (formato da 4 a 6 cifre) errato, la
Cassaforte resterà inattiva per 15 minuti, durante i quali se viene premuto qualsiasi tasto, comparirà
sul display la scritta HOLD+DIGIT.
Trascorsi i 15 minuti la Cassaforte potrà essere riutilizzata.
AVVERTENZA
In caso di batterie scariche (voltaggio inferiore a 5V) comparirà sul display la scritta LO-BAT; in tal
caso sostituire le batterie, come indicato nel Paragrafo INSERIMENTO DELLE BATTERIE.

8
SAFE 10/30 BOX
SAFE_10_30_BOX_IM_20190507
SOSTITUZIONE CODICI
SOSTITUZIONE CODICE PERSONALE
Inserire il nuovo Codice Personale, formato da 4 a 6 cifre, chiudere la porta della Cassaforte e premere il
tasto LOCK.
Il display mostrerà la scritta CLOSE, poi la scritta CLOSED e di seguito il Codice Personale appena sostituito,
per pro-memoria all’utilizzatore.
SOSTITUZIONE MASTER CODE
AVVERTENZA
È raccomandato sostituire il Codice Master di default, poiché è impostato il medesimo in tutte le casseforti
al momento della loro produzione. Una volta sostituito il Codice Master, annotare il nuovo codice e
conservarlo in un luogo sicuro.
Con la porta della Cassaforte aperta, inserire il Master Code originale (codice a 6 cifre: 848711) e premere il tasto
RESET. Sul display appare la scritta NEW, a questo punto si può digitare il nuovo Master Code, sempre a 6 cifre.
Dopo aver inserito il nuovo Master Code premere nuovamente il tasto LOCK, il display mostrerà la scritta
AGAIN, quindi digitare una seconda volta il nuovo Master Code e premere nuovamente LOCK.
Se il Master Code è stato sostituito correttamente, sul display comparirà la scritta DONED.
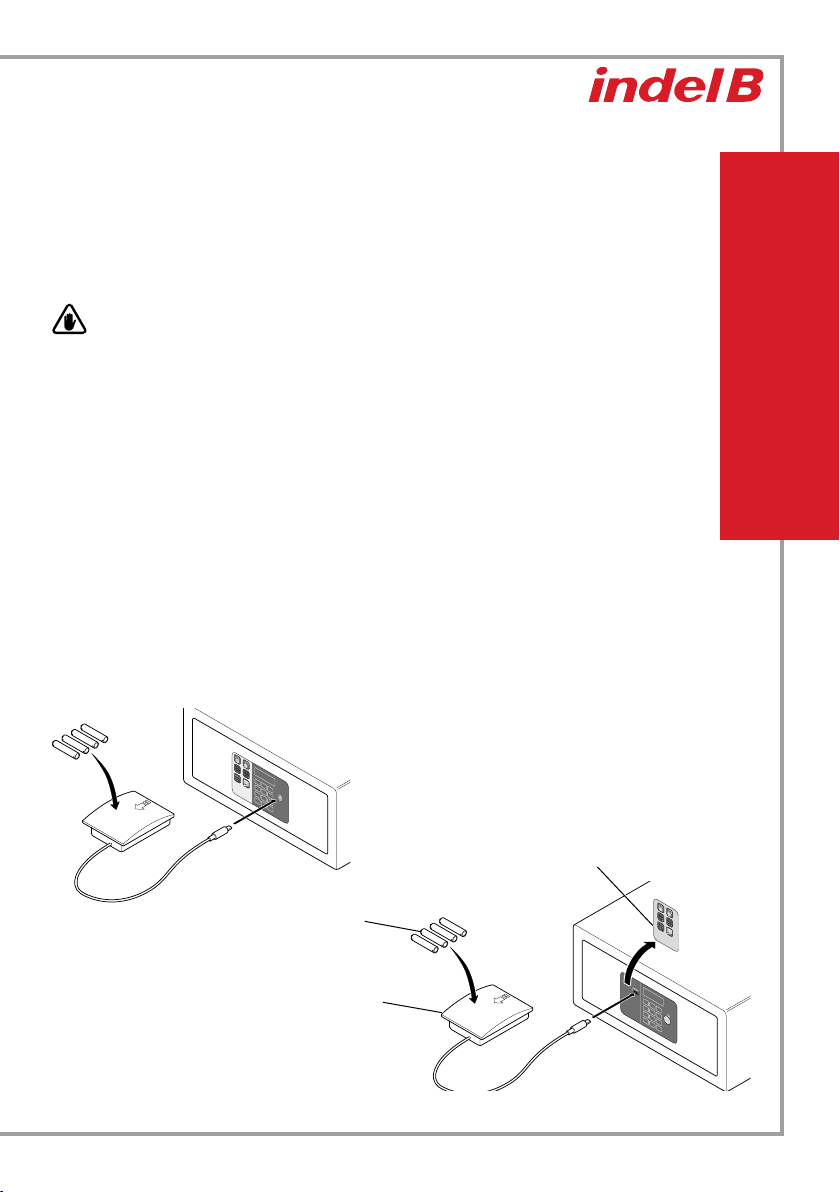
UTILIZZO DELL’ALIMENTATORE ESTERNO
In caso di esaurimento delle batterie con Cassaforte chiusa, è possibile aprire la Cassaforte stessa utilizzando
l’Alimentatore esterno.
Inserire quattro batterie di tipo AA in dotazione, rispettando le polarità indicate nel vano dell’Alimentatore,
collegare lo spinotto dell’Alimentatore stesso alla presa della Cassaforte indicata in figura.
A questo punto la Cassaforte riprenderà il normale funzionamento e potrà essere aperta per la sostituzione
delle batterie interne.
LOCK
12
0
RESET
9
8
7
6
5
4
3
LOCK
12
0
RESET
9
8
7
6
5
4
3
SAFE 30 BOX
SAFE 10 BOX
BATTERIE
ALIMENTATORE
ESTERNO
ETICHETTA
REMOVIBILE

9
ITALIANO
APERTURA DI EMERGENZA DELLA CASSAFORTE
Se viene dimenticato il Codice Personale, oppure non si riesce, per qualsiasi motivo, ad aprire la
Cassaforte, si può:
- aprire la Cassaforte digitando il Master Code (a 6 cifre)
- aprire la Cassaforte utilizzando la Chiave di Emergenza
Per l’uso della Chiave di Emergenza è necessario rimuovere la parte sinistra della copertura
adesiva del pannello frontale, ed inserire la chiave nell’apposita serratura, come indicato in figura.
LOCK
12
0
RESET
9
8
7
6
5
4
3
FUNZIONE “CODICE NASCOSTO”
Con questa funzione è possibile, per motivi di sicurezza, mantere occultati i codici durante il loro
inserimento.
Per attivare la funzione si deve premere due volte il tasto RESET, poi di seguito il tasto LOCK.
In questo modo si entra nella funzione “CODICE NASCOSTO” e quando verranno digitati i codici
sulla tastiera nel display compariranno solamente questi simboli: .
CHIAVE DI
EMERGENZA
FRONTALE
REMOVIBILE

10
SAFE 10/30 BOX
SAFE_10_30_BOX_IM_20190507
WARNING
This equipment is not intended for use by people (including children) with limited physical, sensorial, or
mental capacity, or that lack experience or knowledge of the same, unless they have had the benefit of
supervision of instruction on use of the equipment by someone that is responsible for their safety.
Children must be watched to ensure that they do not play with the equipment.
OVERALL DIMENSIONS
SAFE 10 BOX
SAFE 30 BOX
LOCK
12
0
RESET
9
8
7
6
5
4
3
LOCK
12
0
RESET
9
8
7
6
5
4
3
31 cm 20 cm
19,5 cm
43 cm 37 cm
20 cm
11
ENGLISH
LOCK
12
0
RESET
9
8
7
6
5
4
3
MATERIAL CONTAINED IN THE PACK
LOCK
12
0
RESET
9
8
7
6
5
4
3
EXTERNAL POWER SUPPLY
UNIT
KEYS
FIXING
SCREWS
SAFE
BATTERIES
(AA TYPE)
DISPLAY
BATTERY
COMPARTMENT
CONTROL PANEL
OPENING AND
CLOSING
INSTRUCTIONS
SAFE 30 BOX
SAFE 10 BOX
LOCK
12
0
RESET
9
8
7
6
5
4
3
NUMERICAL
KEYPAD
REMOVABLE
FRONT PANEL
MINI USB
SOCKET
12
SAFE 10/30 BOX
SAFE_10_30_BOX_IM_20190507
LOCK
12
0
RESET
9
8
7
6
5
4
3
INSTALLATION
On receiving the Safe it must be installed by carrying out a few simple operations, in order to make it possible
to use it.
BATTERY INSERTION
Before using the Safe, it is necessary to insert the 4 AA batteries supplied with the package in their
compartment, located inside the door. Respect the polarities indicated in the compartment.
WARNING
Batteries are delivered free of charge for the operating test and must be replaced in a short time.
FIXING
SCREWS
BATTERY
COMPARTMENT
POSITIONING
Position the Safe on a piece of furniture or inside a cupboard, securing it by means of the four fixing screws
provided.
The Safe is supplied with 4 fixing holes, 2 in the back panel and 2 in the horizontal panel, that the installer
can use as required, according to the position of the safe itself.
13
ENGLISH
SAFE 10 BOX
SAFE 30 BOX
LOCK
12
0
RESET
9
8
7
6
5
4
3
LOCK
12
0
RESET
9
8
7
6
5
4
3
DRILLING DIAGRAMS

14
SAFE 10/30 BOX
SAFE_10_30_BOX_IM_20190507
INSTRUCTIONS FOR USE
The Safe, after the installation, appears to the user with the door open and with the Double code system
already set by the Manufacturer.
Personal code (of 4 digits, for ordinary use) and Master code (of 6 digits, for emergency openings).
Adhere to the following instructions for Ordinary use.
SAFE CLOSURE
Enter a Personal code (from 4 to 6 digits) and press the LOCK key. The display will show the message “CLOSE”.
When the door is closed, the display will show the message “CLOSED” and subsequently the Personal code
entered, as a memorandum to the user.
In the front panel of the Safe, a short illustrated sequence is reported describing the door opening and
closure procedures.
SAFE OPENING
In order to open the Safe, simply enter the Personal Code (from 4 to 6 digits).
If one or more wrong numbers are typed on the keyboard, it is possible to delete them by pressing the
RESET key.
WARNING
If a wrong Personal code (from 4 to 6 digits) is entered for three consecutive times, the Safe will be inactive
for 15 minutes, during this period, if any key is pressed, the display will show the message “HOLD+DIGIT”
After 15 minutes, the Safe can be re-used.
WARNING
In case of dead batteries (voltage lower than 5V) the message “LO-BAT” will appear on the display; in this
case replace the batteries, as indicated in the section “BATTERY INSERTION”.
15
ENGLISH
BATTERIES
EXTERNAL POWER
SUPPLY UNIT
CHANGING CODES
CHANGING THE PERSONAL CODE
Enter the new Personal Code, from 4 to 6 digits, close the Safe door and push the LOCK key.
The display will read CLOSE, which will change to CLOSED and then the Personal Code will be
displayed as a reminder for the user.
CHANGING THE MASTER CODE
WARNING
We recommend changing the default Master Code as the same code is set forl the safes in the
factory.
Once you have changed the Master Code, make a note of the new Code and keep it in a safe
place.
With the Safe door open, key in the original Master Code (6 digit code: 848711) and press the RESET
key. The display will read NEW and you can then enter the new Master Code, also 6 digits long.
Once you have entered the new Master Code, press the LOCK key again. The display will read
AGAIN, so key in the new Master Code a second time and press LOCK again.
If the Master Code has been changed correctly, the display will read DONED.
USE OF AN EXTERNAL FEEDER
In case of battery exhaustion, while the Safe is closed, it is possible to open it using the External Feeder.
Insert the 4 AA batteries supplied with the package, respecting the polarities indicated on the
feeder compartment; connect the feeder plug to the socket of the Safe displayed in the figure.
At this point the Safe will go back to standard operating mode and you will be able to open it for
the replacement of the internal batteries.
LOCK
12
0
RESET
9
8
7
6
5
4
3
LOCK
12
0
RESET
9
8
7
6
5
4
3
SAFE 30 BOX
SAFE 10 BOX
REMOVABLE
FRONT PANEL

16
SAFE 10/30 BOX
SAFE_10_30_BOX_IM_20190507
LOCK
12
0
RESET
9
8
7
6
5
4
3
OPENING THE SAFE IN AN EMERGENCY
If you forget the Personal Code or are unable to open the Safe for any reason, you can:
- Open the Safe using the (6 digit) Master Code
- Open the Safe using the Emergency Key
To use the Emergency Key remove the left hand part of the adhesive cover on the front panel and insert the
key in the lock as shown in the figure.
“HIDDEN CODE” FUNCTION
This function can be used to keep the codes hidden after they have been entered, for security reasons.
To activate this function, push the RESET key twice followed by the LOCK key.
This will activate the “HIDDEN CODE” function, and when codes are keyed in on the keypad the display will
only show these symbols:
EMERGENCY KEY
REMOVABLE
FRONT PANEL

17
ESPAÑOL
ADVERTENCIA
El aparato no está destinado para ser utilizado por personas (niños incluidos) que tengan
capacidades físicas, sensoriales o mentales reducidas, o bien con falta de experiencia o
conocimiento, a no ser que se puedan beneficiar, mediante la intermediación de una persona
responsable de su seguridad, de una vigilancia o de instrucciones relativas al aparato.
Los niños tienen que estar vigilados para cerciorarse que no estén jugando con el aparato.
DIMENSIONES
SAFE 10 BOX
SAFE 30 BOX
LOCK
12
0
RESET
9
8
7
6
5
4
3
LOCK
12
0
RESET
9
8
7
6
5
4
3
31 cm 20 cm
19,5 cm
43 cm 37 cm
20 cm

18
SAFE 10/30 BOX
SAFE_10_30_BOX_IM_20190507
LOCK
12
0
RESET
9
8
7
6
5
4
3
MATERIAL CONTENIDO DENTRO DEL EMBALAJE
ALIMENTADOR EXTERIOR
LLAVE MECÁNICA
TORNILLOS
DE FIJACIÓN
CAJA FUERTE
BATERÍAS
(TIPO AA)
LOCK
12
0
RESET
9
8
7
6
5
4
3
LOCK
12
0
RESET
9
8
7
6
5
4
3
PANTALLA
TECLADO NUMÉRICO
COMPARTIMIENTO
BATERÍAS
TABLERO DE MANDO
INSTRUCCIONES
APERTURA
Y
CIERRE
SAFE 30 BOX
SAFE 10 BOX
PANEL FRONTAL
EXTRAÍBLE
TOMA
MINI USB
This manual suits for next models
1
Table of contents
Languages:
Other Indel B Safe manuals


