iNels RFMD-100 User manual

ON
1 2 3
+
+
ON
1 2 3
+
+
ON
1 2 3
+
+
ON
1 2 3
+
+
+
-
AA
+
-
AA
Characteristics /
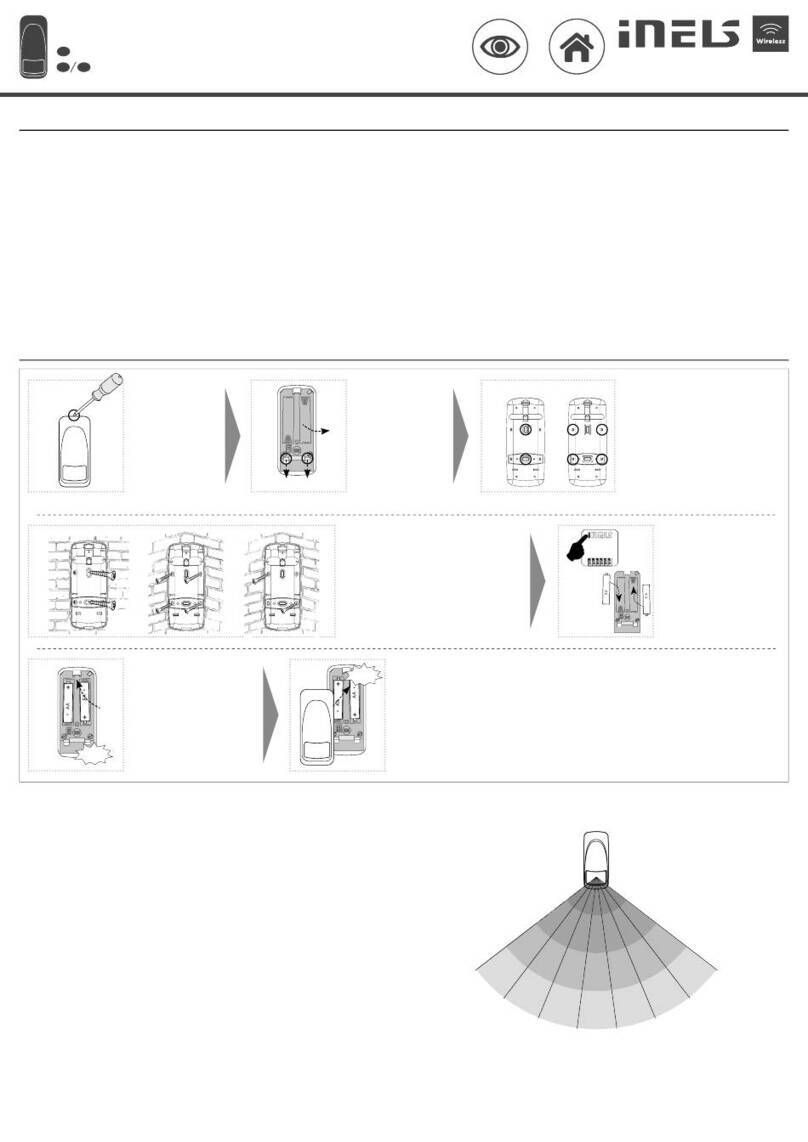
Assembly /
12
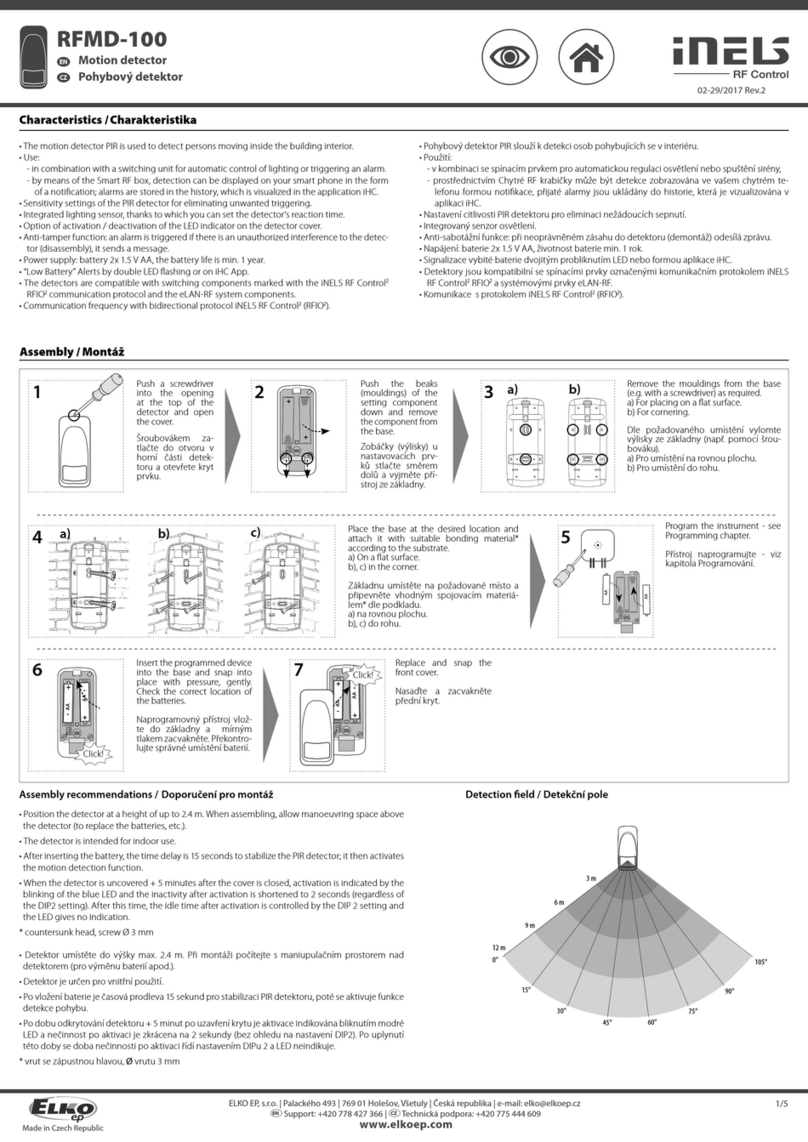
Push a screwdriver
into the opening
at the top of the
detector and open
the cover.
Push the beaks
(mouldings) of the
setting component
down and remove
the component
from
the base.
3Remove the mouldings from the base
(e.g. with a screwdriver) as required.
a) For placing on a at surface.
b) For cornering.
4
Insert the programmed device
into the base and snap into
place with pressure, gently.
Check the correct location of
the batteries.
Replace and snap the
front cover.
5
6
+
-
AA
+
-
AA
AA
AA
Click!
• Position the detector at a height of up to 2.5 m. When assembling, allow manoeuvring space above
the detector (to replace the batteries, etc.).
• The detector is intended for indoor use.
• After inserting the battery, the time delay is 15 seconds to stabilize the PIR detector; it then activates
the motion detection function.
• When the detector is uncovered + 5 minutes after the cover is closed, activation is indicated by the
blinking of the red LED and the inactivity after activation is shortened to 2 seconds (regardless of
the DIP2 setting). After this time, the idle time after activation is controlled by the DIP 2 setting and
the LED gives no indication.
* countersunk head, screw Ø 3 mm
Detection eld /
a) b)
Place the base at the desired location and
attach it with suitable bonding material*
according to the substrate.
a) On a at surface.
b), c) in the corner.
a) b) c)
7
Click!
Assembly recommendations /
1/5
Program the instrument - see
Programming chapter.
• The motion detector PIR is used to detect persons moving inside the building interior.
• Use:
- in combination with a switching unit for automatic control of lighting or triggering an alarm.
- by means of the Smart RF gate, detection can be displayed on your smart phone in the form
of a notication; alarms are stored in the history, which is visualized in the iNELS application.
• Sensitivity settings of the PIR detector for eliminating unwanted triggering.
• Integrated lighting sensor, thanks to which you can set the detector‘s reaction time.
• Option of activation/deactivation of the LED indicator on the detector cover.
• Anti-tamper function: an alarm is triggered if there is an unauthorized interference to detector.
• Power supply: 2x 1.5 V AA batteries, the battery life is around 1 year.
• “Low Battery” Alerts by double LED ashing or on iHC App.
• The detectors are compatible with switching components marked with the RFIO2 communica-
tion protocol and the eLAN-Wireless system components.
02-78/2023
RFMD-100
Motion detector
EN
0°
15°
30°
45° 60°
75°
90°
110°
9.5 m
7.5 m
5 m
2.5 m
HU
Jellemzők
Telepítés
Nyomja a csavarhú-
zót az érzékelő tete-
jén lévő nyílásba, és
nyissa fel az egység
burkolatát.
Nyomja le a panelt
rögzítő műanyag
befogókat és távo-
lítsa el a panelt az
alaplapról.
Törje ki a felszerelés helyének megfelelő
csavarhelyeket az alaplapból (pl. egy
csavarhúzóval).
a) Sík felületre szereléshez
b) Sarokra szereléshez
Helyezze a programozott esz-
közt az alaplapba és óvatosan
nyomja a helyére. Ellenőrizze
az elemek megfelelő helyét.
Helyezze fel és pattintsa
a helyére az előlapot.
Programozza be az eszközt
- lásd a Programozás fejezet-
ben.
Helyezze az alaplapot a kívánt helyre és
rögzítse fel az aljzatnak megfelelő rögzítő
anyaggal*.
a) Sima felületre.
b), c) Sarokra.
Érzékelési területSzerelési ajánlások
• Az érzékelőt max. 2.5 m magasságig helyezze el. A felszerelés helyének megválasztásakor hagyjon
helyet az érzékelő felett (elemek cseréje, stb.).
• Az érzékelő beltéri használatra szolgál.
• Az elemek behelyezését követően15 másodperc késleltetés után stabilizálódik a PIR érzékelő; Ezután
aktiválja a mozgásérzékelő funkciót.
• Ha a fedél nélküli érzékelőre +5 perc eltelte után kerül vissza a fedél, akkor az aktiválást a piros LED
villogása jelzi és az aktiválás utáni inaktivitás 2 másodpercre rövidül (függetlenül a DIP2 beállítása-
itól). Ezután az aktiválás utáni üresjárati időt a DIP2 beállítása szabályozza, és a LED nem ad jelzést.
* Süllyesztett fejű csavar, Ø 3 mm
• A PIR mozgásérzékelő mozgó személyek érzékelésére alkalmas eszköz beltéri hazsnálatra
• Felhasználás:
- kapcsolóegységgel kombinálva automatikusan vezérelheti a világítást vagy aktiválhatja a
szirénát.
- az Intelligens RF Box segítségével az érzékelő aktiválódása megjelenithető az okostelefon
kijelzőjén értesítés formájában; a riasztások naplóban tárolódnak, mely látható az iHC
alkalmazásban.
• A PIR detektor érzékenységének beállításával elkerülhetők a téves riasztások.
• Beépített fényérzékelővel rendelkezik, beállítható reakcióidővel.
• Az érzékelő burkolatán lévő LED jelzés be- és kikapcsolható.
• Szabotázs elleni funkció: a készülék riasztást vált ki, ha illetéktelen beavatkozás történik a
detektorokba.
• Tápellátás: 2x 1.5 V AA elem, az elem élettartama kb. 1 év.
• „Alacsony elemszint“ jelzése dupla LED villogással vagy az IHC alkalmazásban látható jelzéssel.
• Az érzékelők kompatibilisek az RFIO2 kommunikációs protokollal jelölt egységekkel és az eLAN-
RF rendszereszközökkel.
HU
Mozgásérzékelő

ON
1 2 3
+
+
ON
1 2 3
+
+
ON
1 2 3
+
+
60 - 90 % 80 - 95 % 20 - 60 % 0 - 10 % 80- 90 %
brick walls wooden structures
with plaster boards reinforced concrete metal partitions common glass
Radio frequence signal penetration through various construction materials /
RFRP-20
Indications, settings, functions /
Before starting to program, open the detector cover using a screwdriver.
Indicators and adjustment components are located inside the box.
• Red LED - 1x blinks - indication when battery is inserted.
• Red LED - 2x blinks - motion detection - low battery indication (if the detector is connected to a (eLAN,
RF Touch, iNELS) system, the battery level is indicated in the system).
TAMPER
SENS
LUX
motion sensor
LUX
SENS
ON
1 2 3
battery holders
DIP
LED
+
-
AA
+
-
AA
1
Save the DIP switch settings /
Set the DIP switch (e.g. with a
screwdriver). Insert the batteries into the
battery holder in the detector.
Beware of polarity. The red
LED on the detector will blink -
setting the DIP switch setting.
2
2/5
• LUX adjustment component
- Adjustment of the level of response to the light intensity
• Setting the DIP switch
DIP1:
OFF - normal PIR sensor function
ON - light sensor function: when lighting is lower than the potentiometer setting, LUX
sends a command to activate the actuator (setting range is 0 - 500 Lx)
DIP2:
OFF - inactivity after 1 minute activation
ON - inactivity after activation for 5 minutes
DIP3:
OFF - The detector is paired with a compatible component - it does not periodically
send information about the current status
ON - The detector is connected to the system (eLAN, RF Touch, iNELS headquarters) - it
sends information in case of a change in status and periodically after 120 minutes.
• Any change to the DIP setting must be saved.
• SENS setting component
- PIR sensor sensitivity setting
• Settings can be made at any time.
For more information, see“Installation manual iNELS Wireless Control”:
http://www.elkoep.com/catalogs-and-brochures
HU
Visszajelzések, beállítások, funkciók
A rádiófrekvenciás jel átvitele különböző építőanyagokon keresztül
téglafal fa és gipszkarton
szerkezetek vasbeton fém válaszfalak normál üveg
A programozás megkezdése előtt csavarhúzóval nyissa fel az érzékelő fedelét.
A visszajelzők és a beállító elemek a doboz belsejében találhatók.
• Piros LED - 1x villog - az elemek behelyezésének jelzése.
• Piros LED - 2x villog, ha mozgást észlel. - alacsony elemszint kijelzés (ha az érzékelő rendszerhez csatlako-
zik (eLAN, RF Touch, iNELS), akkor a gyenge elemszintet a rendszer jelzi).
• LUX beállító potenciométer:
- A fényerősség reakció szintjének beállítása.
• A DIP kapcsolók beállítása
DIP1:
OFF - normál PIR érzékelő funkció.
ON - fényérzékelő funkció: ha a megvilágítás alacsonyabb, mint a LUX potenciomé-
teren beállított, akkor parancsot küld a párosított egység aktiválására (beállítható
tartomány: 0 - 500 Lx)
DIP2:
OFF - inaktivitás 1 perces aktiválás után
ON - inaktivitás az aktiválás után 5 percig
DIP3:
OFF - az érzékelő párosítva van egy kompatibilis egységgel - nem küld információt
rendszeres időközönként az aktuális állapotáról.
ON - az érzékelő rendszerhez csatlakozik (eLAN, RF Touch, iNELS központ) - informáci-
ót küld állapotváltozáskor és rendszeresen 120 perces időközönként.
• A DIP beállítás minden módosítását menteni kell.
• SENS beállító potenciométer:
- A PIR érzékelő érzékenységének beállítása
• A beállítások bármikor elvégezhetők.
mozgásérzékelő
elemtartók
A DIP kapcsolók beállításainak mentése
Állítsa be a DIP kapcsolókat
(pl. egy csavarhúzóval).
Helyezze be az elemeket az
érzékelő elemtartójába. Ügyeljen
a helyes polaritásra. Az érzékelőn
a piros LED villogni kezd - A DIP
kapcsolók beállításai tárolódtak.
További információk az iNELS Wireless telepítési kézikönyvekben találhatók:
https://webshop.elkoep.hu/termekek/inels-wireless

ON
1 2 3
+
+
ON
1 2 3
+
+
ON
1 2 3
+
+
ON
1 2 3
+
+
ON
1 2 3
+
+
+
-
AA
+
-
AA
3
PROG < 1s
1 x
Functions and programming with compatible switches /
Function "Fixed-time delayed return" /
Description of the delayed return feature with xed time /
The output contact of the switching component switches on when the detector activates, it will
open for 1s.
Programming /
Press of programming button
on compatible actuator for
1 second will activate actuator
into programming mode. LED
is ashing in 1s interval.
Slide the battery into the battery
holder in the detector. Beware
of polarity. The red LED on the
detector will blink. The LED on
a compatible component will
blink at a faster interval - thereby
assigning the detector to the
component.
Press of programming button
on compatible actuator
shorter then 1 second will
nish programming mode,
LED switches o.
2
1
PROG > 1s
1 x
Function "delayed return with time setting" /
Description of the delayed return function with time setting /
The output contact of the switching component switches on when the detector activates, it
opens after the set time interval has elapsed.
Programming /
Press of programming button
on compatible actuator for
1 second will activate actuator
into programming mode. LED
is ashing in 1s interval.
Slide the battery into the
battery holder in the detector.
Beware of polarity. The red
LED on the detector will blink.
The LED on a compatible
component will blink at a faster
interval - thereby assigning the
detector to the component.
Remove one of the batteries
from the detector and insert it
back after 30 seconds. The red
LED on the detector will blink.
The LED on a compatible
component will blink at a
faster interval.
1
PROG > 1s
1 x
2
+
-
AA
+
-
AA
Remove the battery from the detector again. After
30 seconds, press the programming button for more than
5 seconds to bring the compatible component into timer
mode. LED 2x blinks at second intervals. When the button is
released, delayed return time is retrieved.
After setting the desired time (within 2s ...
60 min), the timer mode ends by inserting
the battery into the detector. The red LED
on the detector will blink. This saves the
time interval stored in the memory of the
component, the LED on the compatible
component blinks.
3
+
-
AA
+
-
AA
30 s
4
PROG > 5s
1 x
+
-
AA
+
-
AA
30 s
t = 2s . . . 60min
5
+
-
AA
+
-
AA
3/5
6
PROG < 1s
1 x
Press of programming button
on compatible actuator
shorter then 1 second will
nish programming mode,
LED switches o.
HU
Tartsa nyomva a kompatibilis
egység programozó gombját
1 másodpercig a programozási
üzemmódba történő belépés-
hez. A LED 1 mp-es ütemben
villog.
Helyezze be az elemeket az ér-
zékelő elemtartójába. Ügyeljen
a helyes polaritásra. Az érzékelőn
villogni fog a piros LED. A kom-
patibilis egység LED-je gyorsab-
ban villog - ezzel hozzárendelte
az érzékelőt az egységhez.
Nyomja meg 1 mp-nél rö-
videbb ideig a kompatibilis
egység programozó gombját
a programozási üzemmódból
történő kilépéshez, a LED ki-
kapcsol.
Funkciók és programozás kompatibilis kapcsolókkal
"Fix idejű késleltetett visszakapcsolás" funkció
Az érzékelő aktiválódásakor a kapcsoló egység kimeneti érintkezője zár, majd 1 másodperc múlva
bont.
Programozás
A x idejű késleltetett visszakapcsolás funkció leírása
"Késleltetett visszakapcsolás idő beállítással" funkció
A késleltetett visszakapcsolás idő beállítással funkció leírása
Az érzékelő aktiválódásakor a kapcsoló egység kimeneti érintkezője zár, majd a beállított idő el-
teltével bont.
Tartsa nyomva a kompatibilis
egység programozó gombját
1 másodpercig a programozási
üzemmódba történő belépés-
hez. A LED 1 mp-es ütemben
villog.
Helyezze be az elemeket az
érzékelő elemtartójába. Ügyel-
jen a helyes polaritásra. Az
érzékelőn villogni fog a piros
LED. A kompatibilis egység
LED-je gyorsabban villog - ez-
zel hozzárendelte az érzékelőt
az egységhez.
Vegye ki az elemek egyikét az
érzékelőből, és helyezze vissza
30 másodperc múlva. Az érzé-
kelő piros LED-je villogni fog. A
kompatibilis komponens LED-
je gyorsabban fog villogni.
Távolítsa el az elemet az érzékelőből. 30 másodperc elteltével
nyomja meg több mint 5 másodpercig a programozó gom-
bot, hogy a kompatibilis egység időzítő üzemmódra álljon. A
LED másodpercenként 2x villog. A gomb felengedése után
elkezdődik a késleltetett visszakapcsolási idő mérése.
Ha a kívánt idő eltelt (2 mp ... 60 perc között),
akkor az időmérés befejezéséhez helyezze
vissza az elemet az érzékelőbe. Az érzékelő
piros LED-je villogni kezd. Ezzel az időinterval-
lum tárolódik a kompatibilis egység memóriá-
jában - LED-je villogni kezd.
Programozás
Nyomja meg 1 mp-nél rö-
videbb ideig a kompatibilis
egység programozó gombját
a programozási üzemmódból
történő kilépéshez, a LED ki-
kapcsol.

ON
1 2 3
+
+
ON
1 2 3
+
+
When inserting the RFRP-20
into an electrical socket (upon
power-up), the programming
button must be pressed. The
green LED ashes. Then when
the red LED button illuminates,
release the button.
By one short press of the
programming button on
the RFRP-20, you move to the
position for input into
the additional learning mode.
The red LED ashes - after
5s the RFRP-20 enters the
additional learning mode. The
LED stops ashing.
2
PROG < 1s
1 x
1
End learning mode by a short
press of the programming
button on the RFRP-20. By
doing so, the programmed
address detector is stored
in the memory. The red LED
will ash for 1 second, then
the green LED will remain
illuminated.
4
PROG <1s
1 x
Insert the battery into the
battery holder in the detector
(beware of the polarity, the
red LED on the detector will
blink). A ashing green LED on
the RFRP-20 indicates that the
RFMD-1 has been recorded in
the RFRP-20 memory.
3
+
-
AA
+
-
AA
Programming with the RF control units /
address /
For the programming and communication of the detector with the
system components, the address shown on the underside of the
detector or in the left upper part of the open device is used.
xxxxxx
XXXXXX
4/5
Detector communication through a repeater /
RFRP-20
You can set repeat functions for all components marked with iNELS Wireless using the RFAF/
USB service key.
RFAF/USB
ON
1 2 3
+
+
ON
1 2 3
+
+
Replacement of a battery /
Push a screwdriver into the
opening at the top of the
detector and open the cover.
Remove the original battery
and insert new batteries into
the battery holder (never
mix old and new batteries).
Beware of the polarity.
The blue LED on the detector
will blink.
Replace and snap the front
cover.
1 2
+
-
AA
+
-
AA
3
+
-
AA
+
-
AA
Click!
HU
Programozás, párosítás rendszereszközökkel
Az érzékelő rendszereszközökkel történő programozásához és kom-
munikációjához az érzékelő alsó részén vagy a nyitott eszköz bal felső
részén lévő címet kell használni.
Tartsa nyomva az RFRP-20
programozó gombját, miköz-
ben a hálózati aljzatba dugja
(tápfeszültség ráadása). A zöld
LED villog. Amikor a piros LED
világít, engedje fel a gombot.
A programozó gomb egyszeri
rövid megnyomásával lépjen
be az RFRP-20 tanítási üzem-
módjába. A piros LED villog - 5
másodperc múlva az RFRP-20
tanítási módba lép. A LED ki-
alszik.
Az RFRP-20 programozó
gombjának rövid megnyo-
másával lépjen ki a tanítási
üzemmódból. A beprogra-
mozott érzékelő címe ezzel
tárolva van a memóriában. A
piros LED 1 mp-ig villog, majd
a zöld LED világít.
Helyezze be az elemeket
az érzékelő elemtartójába
(ügyeljen a helyes polaritás-
ra, az érzékelő piros LED-je
villog). Az érzékelő küld egy
jelet. Az RFRP-20 zöld LED dió-
dájának villogása jelzi, hogy az
érzékelőt az RFRP-20 tárolta a
memóriájában.
Az érzékelő kommunikációja jelismétlővel
A jelismétlő funkció az összes iNELS RF Wireless jelölésű eszközhöz beállítható az RFAF/USB
szervízkulcson keresztül.
cím
Nyomja a csavarhúzót az ér-
zékelő tetején lévő nyílásba,
és nyissa fel az egység bur-
kolatát. Vegye ki a régi elemeket az
elemtartóból és helyezzen be
új elemeket (soha ne keverje a
régi és új elemeket). Ügyeljen
a polaritásra.
Az érzékelő piros LED-je vil-
logni fog.
Helyezze fel és pattintsa a he-
lyére az előlapot.
Elemek cseréje

Warning
Instruction manual is designated for mounting and also for user of the device. It is always a part of its packing. Instal-
lation and connection can be carried out only by a person with adequate professional qualication upon under-
standing this instruction manual and functions of the device, and while observing all valid regulations. Trouble-free
function of the device also depends on transportation, storing and handling. In case you notice any sign of damage,
deformation, malfunction or missing part, do not install this device and return it to its seller. It is necessary to treat
this product and its parts as electronic waste after its lifetime is terminated. Before starting installation, make sure
that all wires, connected parts or terminals are de-energized. While mounting and servicing observe safety regula-
tions, norms, directives and professional, and export regulations for working with electrical devices. Do not touch
parts of the device that are energized – life threat. Due to transmissivity of RF signal, observe correct location of
RF components in a building where the installation is taking place. RF Control is designated only for mounting in
interiors. Devices are not designated for installation into exteriors and humid spaces. The must not be installed into
metal switchboards and into plastic switchboards with metal door – transmissivity of RF signal is then impossible.
RF Control is not recommended for pulleys etc. – radiofrequency signal can be shielded by an obstruction, inter-
fered, battery of the transceiver can get at etc. and thus disable remote control.
Technical parameters /
Attention:
When you instal iNELS Wireless system, you have to keep minimal distance 1 cm between each
units.
Between the individual commands must be an interval of at least 1s.
Power supply:
Battery life:
Drained battery indicator:
Transmission frequency:
Communication protocol:
Repeater function:
Detection angle:
Detection distance:
Recommended working height:
Working temperature:
Protection:
Color:
Dimension:
Weight:
5/5
When handling a device unboxed it is important to avoid contact with liquids. Never
place the device on the conductive pads or objects, avoid unnecessary contact with the
components of the device.
Safe handling /
Made in Czech Republic
HU
2x 1.5 baterry / elem AA
min. 1 year, according to the number of activations /
min. 1 év, az aktiválások számától függően
yes / igen
866 MHz, 868 MHz, 916 MHz
RFIO
no / nem
110°
max.9.5 m
max. 2.5 m
-10.. +50 °C
IP20
white / fehér
46 x 105 x 43 mm
57 g
A tájékoztató útmutatást ad az ezközök üzembehelyezéséről és beállítási lehetőségeiről. A felszerelést és az
üzembehelyezést csak olyan személy végezheti, aki rendelkezik a megfelelő ismeretekkel és tisztában van az esz-
közök működésével, funkcióival, valamint az útmutató adataival. Ha az eszköz bármilyen okból megsérült, elde-
formálódott, hiányos, vagy hibásan működik, ne szerelje fel és ne használja azt, juttassa vissza a vásárlás helyére.
Az eszköz élettartamának lejártakor gondoskodjon annak környezetvédelmi szempontból megfelelő elhelyezésé-
ről. Csak feszültségmentes állapotban szereljen és a vezetékeket stabilan kösse be. Feszültség alatt lévő részeket
érinteni életveszélyes. A vezérlőjel átvitele rádiófrekvencián történik (RF), ezért szükséges az eszközök megfelelő
elhelyezését biztosítani az épületben történő felszereléskor. Az RF átvitel minősége, a jel erőssége függ az RF esz-
közök környezetében felhasznált anyagoktól és az eszközök elhelyezési módjától. Ne használja erős rádiófrekven-
ciás zavarforrások közelében. Csak beltéri alkalmazások esetében használhatók, nem alkalmazhatók kültéren, vagy
magas páratartalmú környezetben. Kerülje a fém kapcsolószekrénybe, vagy fémajtós kapcsolószekrénybe történő
felszerelését, mert a fém felületek gátolják a rádióhullámok terjedését. Az RF rendszer használata nem ajánlott olyan
területeken, ahol a rádiófrekvenciás átvitel gátolt, vagy ahol interferenciák léphetnek fel.
Figyelmeztetés
Technikai paraméterek
Figyelem:
Az iNELS RF Control rendszer telepítésénél ügyeljen az egyes egységek között kötelezően betar-
tandó minimum 1 cm távolságra.
Az egyes parancsok között legalább 1mp időköznek kell lennie.
Tápellátás:
Elemek élettartama:
Alacsony elemszint jelzése:
Átviteli frekvencia:
Kommunikációs protokoll:
Jelismétlő funkció:
Érzékelési szög:
Érzékelési távolság:
Javasolt munkamagasság:
Üzemi hőmérséklet:
Védettség:
Szín:
Méretek:
Tömeg:
Ha a dobozból kivett panellal dolgozik, akkor ügyeljen arra, hogy semmiképpen ne érint-
kezzen folyadékkal. Soha ne tegye elektromosan vezető alátétekre, tárgyakra és ne érintse
meg feleslegesen a panel elektromos alkatrészeit.
Az eszköz biztonságos kezelése
ELKO EP, s.r.o. | Palackého 493 | 769 01 Holešov, Všetuly | Czech Republic | e-mail: [email protected] | Support: +420 777 356 466
ELKO EP Hungary Kft. | Hungária krt. 69 | 1143 Budapest | Magyarország | e-mail: info@elkoep.hu | Technikai támogatás: +36 1 40 30 132
www.elkoep.com / www.elkoep.hu
Table of contents
Other iNels Security Sensor manuals

iNels
iNels RF KEY-40 User manual

iNels
iNels RFMD-100 User manual

iNels
iNels RFSF-1B User manual

iNels
iNels Elko AirSF-100S User manual

iNels
iNels RFSF-1B User manual

iNels
iNels Elko AirSF-100L User manual

iNels
iNels RFSF-1B User manual

iNels
iNels RFMD-100 User manual

iNels
iNels RFSF-100 User manual

iNels
iNels RFSF-100 User manual
Popular Security Sensor manuals by other brands

Chloride
Chloride CMFIC Series Installation and operating instructions

UTC Fire and Security
UTC Fire and Security Interlogix EV1012 Series Installation sheet

Qazqa
Qazqa Motion V CL 14W LED PIR manual

UTC
UTC 5845GBW-OEM user manual

EnOcean
EnOcean Easyfit EMDC user manual

Pfeiffer Vacuum
Pfeiffer Vacuum ASM 390 Maintenance instructions