ISHIDA iwq-150/30 User manual

Manual No. 0142A
・Do not carry out installation, operation, service or mainte-
nance until thoroughly understanding the contents of this
manual.
・Keep this manual available at all times for installation, oper-
ation, service, and maintenance. ISHIDA CO., LTD.

IWX Operation Manual Kg Version Manual No. 0149A
You can help improve this manual by call-
ing attention to errors and by recommend-
ing improvements.
Please convey your comments to the near-
est Ishida Company regional representa-
tive.
Thank you!
Copyright c 2001 by Ishida Co., Ltd. All Rights Reserved.
No part of this manual may be reproduced in any form, by mimeograph or any
other means, without written permission of the publisher.

Manual No. 0142A IWQ Operation Manual Kg Version
SAFETY CONSIDERATIONS
To ensure the safe operation of this machine, the general safety considerations below must be followed:
Grounding
This instrument is a Class 1 device which requires protective grounding for safe operation.
To avoid potential shock hazards, a protective grounding conductor for the instrument must be securely connected
to the main grounding provision by qualified service personnel.
Do not remove covers or enclosures.
To avoid personal injury and shock, do not open or remove any covers or enclosures of the instrument unless
specified in the manual.
Do not perform unspecified maintenance.
For your own personal safety, do not perform any maintenance procedures which are not specified in the manual.
Diconnect the power supply before servicing.
To ensure your personal safety, disconnect the power supply before servicing.
Power supply to the machine is disconnected only when the electrical
plug is removed from the electrical outlet. For safe operation of this
machine, connect the plug to the nearest and most accessible outlet.
The following symbols are used to alert service personnel of potential danger or
special circumstances related to the safe and proper servicing of this machine:
Precautions which must be followed to prevent the possibility of death or
serious injury.
Precautions which must be followed to prevent the possibility of light or
moderately severe injury to personnel or damage to the equipment.
Important information for the operation of the machine.

IWQ Operation Manual Kg Version Manual No. 0142A
1) Always operate the scale with the same rated AC power supply shown
on the specification plate.
2) To disconnect the power supply, remove the electrical plug from the
electrical outlet.
CAUTIONS FOR USE
Always operate the scale on a level surface.
Do not drop or apply a strong shock to the
scale.
Do not expose the scale to direct sunlight for
long period.
Do not disassemble the scale.
When cleaning the scale, only use a soft dry
cloth wetted with a neutral cleanser. Never
use thinner or other volatile liquids.
Do not allow any liquids to come into contact
with the scale.

Manual No. 0142A IWQ Operation Manual Kg Version
Avoid Locating the Scale in the Following Places:
A place of low temperature, high temperature or high humidity
A place exposed to direct sunlight
A place frequently exposed to vibration
On an unstable floor or table.
A place directly exposed to cold or hot air
A place directly exposed to cold air from a cooler or refrigerator. A place exposed to hot air from an air condi-
tioner or heater. A place exposed to wind from a fan or other pneumatic device.
A dusty place
A place provided with fluctuating power supply voltage
Use of an electrical outlet also being used with a vibrator, radio, or other noise sources may affect the perfor-
mance of the scale. Be sure to provide an outlet exclusively for use by the scale. Also avoid putting many loads
on one electrical outlet.
Power Supply
Use a power supply that conforms to product specifications.
Provide a power line to be exclusively used for the scale.
If the power supply voltage fluctuates, the scale may malfunction.
Do not tread on or place a heavy load on the power cable.
The cable will be damaged. Continued use of the cable under such conditions may lead to an accident or prob-
lems with the scale.
Be sure to ground the scale to avoid electricity leakage.

Manual No. 0142A IWQ Operation Manual Kg Version
1. Before Using Your Scale . . . . . . . . . . . . . . . . . . . 7
1-1 Cautions for Handling . . . . . . . . . . . . . . . . . . . . . . . . . 7
2. Name and Function of Each Component . . . . . . 8
2-1 External View of the Scale . . . . . . . . . . . . . . . . . . . . . . 8
2-2 Function of Each Key . . . . . . . . . . . . . . . . . . . . . . . . . 8
3. Preparing the Scale . . . . . . . . . . . . . . . . . . . . . . . 9
3-1 Fitting the Display Pole and Setting Up the Scale . . . . 9
3-2 Vertical Adjustment of the Display Unit . . . . . . . . . . . 12
4. Weighing . . . . . . . . . . . . . . . . . . . . . . . . . . . . . . . 13
4-1 Operation . . . . . . . . . . . . . . . . . . . . . . . . . . . . . . . . . . 13
5. Confirming the Preset Numbers . . . . . . . . . . . . 15
5-1 Operation . . . . . . . . . . . . . . . . . . . . . . . . . . . . . . . . . . 15
6. Using the Preset Function . . . . . . . . . . . . . . . . . 16
6-1 Presetting . . . . . . . . . . . . . . . . . . . . . . . . . . . . . . . . . 16
6-2 Calling a Preset Value . . . . . . . . . . . . . . . . . . . . . . . . 19
7. Counting Function . . . . . . . . . . . . . . . . . . . . . . . 20
7-1 Normal Mode . . . . . . . . . . . . . . . . . . . . . . . . . . . . . . . 20
7-1-1 Basic Procedure . . . . . . . . . . . . . . . . . . . . . . . . . . . . . . . . 20
7-1-2 For Setting the Upper and Lower Limit Values . . . . . . . . . 21
7-1-3 For Calling Preset Value . . . . . . . . . . . . . . . . . . . . . . . . . . 22
7-2 Registration of Preset Value . . . . . . . . . . . . . . . . . . . 22
8. Setting Mode . . . . . . . . . . . . . . . . . . . . . . . . . . . . 26
8-1 Setting Method . . . . . . . . . . . . . . . . . . . . . . . . . . . . . 26
8-2 Set Values List . . . . . . . . . . . . . . . . . . . . . . . . . . . . . . 27
9. Routing Servicing and Cleaning . . . . . . . . . . . . 31
9-1 Routine Servicing . . . . . . . . . . . . . . . . . . . . . . . . . . . 31
9-2 Cleaning Methods . . . . . . . . . . . . . . . . . . . . . . . . . . . 31
10. Troubleshooting Guide . . . . . . . . . . . . . . . . . . 32
11. Specifications . . . . . . . . . . . . . . . . . . . . . . . . . . 33
Table of Contents

Manual No. 0142A IWQOperation Manual Kg Version 7
• Do not disassemble or reconstruct
your scale.
Incorrect disassembly may lead to scale failure.
Reconstructing the scale, disassembling part(s), or
fitting unspecified part(s) may cause serious acci-
dents or personal injuries. This scale is waterproof.
Do not loosen the cover fixing screws to remove the
cover on the rear side of the display unit. Once the
cover is removed, waterproofing may deteriorate. If
disassembled or reconstructed the scale may not be
allowed to be reused as an approved scale.
• Do not use your scale in abnormal
conditions.
If smoke, disgusting smell, or any other abnormality
is detected from the scale, immediately disconnect
the power supply cable plug from the outlet and con-
tact the nearest ISHIDA regional representative for
repair. Continued use of the scale under such abnor-
mal conditions may cause a fire or electric shock.
For your personal safety, never repair the scale by
yourself.
• Your scale is a precision machine. Do
not give the scale any shock.
The scale may be impaired or its weighing perfor-
mance may be deteriorated.
• Do not insert/remove the plug in/from
the outlet with wet fingers.
An electric shock or short-circuit may occur.
• Do not remake the electrical plug or
power cable.
A fire or electric shock may occur.
• Do not pull strongly, break, or remake
the power cable.
The core wires may be cut and cause a fire, electric
shock, or defective functioning of the scale.
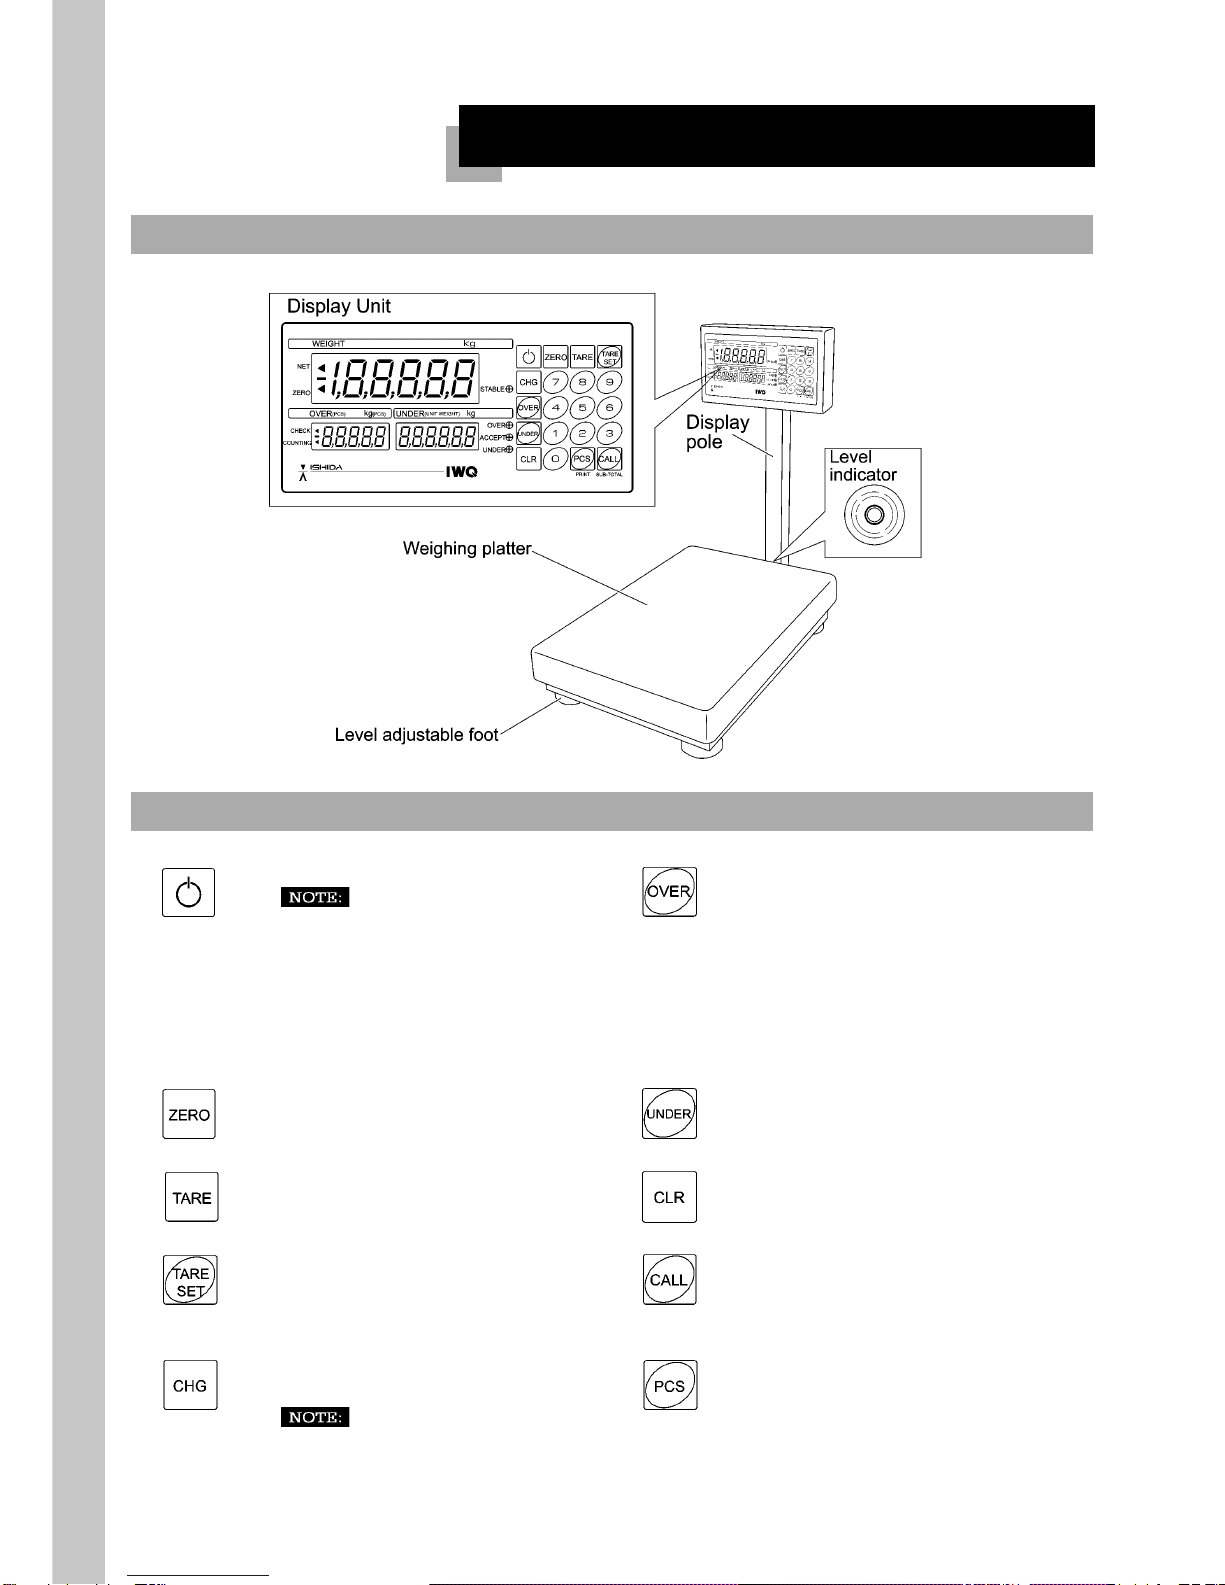
• Be sure to insert the load cell into the
display pole.
Do not pour an excessive amount of water or high
pressure water on the scale.
• Do not leave any items on the weigh-
ing platter.
• Before using the scale, be sure to
level the scale body.
Otherwise, the scale may malfunction.
• Never use thinner or other volatile
agent for servicing the scale.
Discoloration may result. Wipe the scale body gen-
tly with a soft dry cloth, or use a neutral detergent.
• When carrying the scale, be sure to
hold it at the bottom.
Do not move the scale by holding only the display
unit or display pole.
• Never peel off the seal affixed to the
scale body.
1. Before Using Your Scale
1-1 Cautions for Handling

8IWQ Operation Manual Kg Version Manual No. 0142A
2-1 External View of the Scale
Used to turn ON/OFF display function of scale.
The ON/OFF key turns ON or OFF the dis-
play function of the scale. Power to the
scale is still active even when the key is
switched OFF. When moving the scale or
leaving it for a long period without use, be
sure to disconnect the power by removing
the electrical plug from the outlet.
Used to set upper limit value.
Used for zero adjustment to reset weight indica-
tor to zero.
Used to set lower limit value.
Used to set tare weight. Used to clear keyed-in numeric value.
Used to set tare weight with ten-key pad. (1) Used to call registered tare weight and
upper/lower limit weights.
(2) Used to print out weight data when
printer is connected.
Used to change to counting mode/checker
mode.
Turning the power ON will resume the pre-
vious mode.
(1) Used to set unit weight in counting
mode.
(2) Used to print out subtotal data when
printer is connected.
2-2 Function of Each Key
2. Name and Function of Each Component

Manual No. 0142A IWQ Operation Manual Kg Version 9
3-1 Fitting the Display Pole and Setting Up the Scale
The display unit and display pole are fitted together with a tightening knob. The display pole
and the bracket pipe base are separated.
1. Remove the Bracket Pipe.
Remove the bracket pipe from the bracket pipe base (by loosening the four hex head
screws).
2. Pass the Load Cell Cable through the Display Pole.
Push the extra length of cable protruding from the bracket pipe base into the display pole.
Do not pull strongly on the load cell cable
when pushing it into the display pole. Other-
wise, it may be cut.
If the cable covering material is scratched,
water may penetrate into the cable and cause
unreliable weighing, or the core material may
corrode and cause the scale to fail.
3. Stand the Display Pole against the Bracket Pipe Base.
Stand the display pole against the bracket pipe base by fitting it at its load cell cable side into
the tongue of the bracket pipe base.
3. Preparing the Scale
The following describes the procedure for preparing the scale before operation.

10 IWQ Operation Manual Kg Version Manual No. 0142A
4. Fix the Display Pole with the Bracket Pipe.
After confirming the screw holes are aligned, fix the display pole to the scale body with the
bracket pipe (at four points with plain washers and hex head screws).
Fit the bracket pipe with its larger radius cor-
ners facing upward. Securely tighten the
screws until the display pole becomes steady.
5. Store the Load Cell Cable inside the Display Pole.
Fold up the extra length of load cell cable and store it inside the display pole.
Push the load cell cable deeply into the dis-
play pole at least 15 mm away from the pole
end.
6. Install the Weighing Platter.
Make sure that nothing has been placed on the
weighing platter.

Manual No. 0142A IWQ Operation Manual Kg Version 11
7. Level the Scale.
Adjust the level adjustable feet until the air bubble inside the level remains at the center of
the circle.
8. Supply the Power.
Insert the power supply plug into the outlet. Grounding is recommended if the scale will be
used in a place with a chance of electrical leakage.
To disconnect the power supply, remove the
electrical plug from the electrical outlet.
9. Turn on the Power Switch. (Display: for 150 kg version)
With nothing placed on the weighing platter, press the key, and then the key.
The display unit will turn on.
Make sure that display indicates all "0"s.

12 IWQ Operation Manual Kg Version Manual No. 0142A
10. Adjust the Zero Point.
If the zero indicator does not light, press the key.
3-2 Vertical Adjustment of the Display Unit
After loosening the display unit tightening knob, adjust the unit at an easy-to-see angle.
Then, retighten the knob.

Manual No. 0142A IWQ Operation Manual Kg Version 13
4. Weighing
Display: for 150 kg version
4-1 Operation
1. Subtract the Tare Weight. (if necessary)
After keying in the tare weight, press the key.
The tare weight can also be subtracted by
pressing the key after placing a tare
weight on the weighing platter. Tare weight
subtraction is also available by calling a pre-
set weight. (Operation: Ref., 6-2 Calling a
Preset Value)
• For a tare weight of 0.05 kg
2. Key in the Upper Limit Weight. (if necessary)
After keying in the upper limit weight, press the key.
The upper and lower limit weights can also be
set by calling preset values. To change a pre-
set value temporarily, key in a new value and
then press the key or key.
To reset the input, enter "0" and then press the
or key. (Operation: Ref., 6-2 Call-
ing a Preset Value)
• For an upper limit weight of 11.00 kg

14 IWQ Operation Manual Kg Version Manual No. 0142A
3. Key in the Lower Limit Weight. (if necessary)
After keying in the lower limit weight, press the key.
The upper and lower limit weights can also be
set by calling preset values. To change a pre-
set value temporarily, key in a new value and
then press the key or key.
To reset the input, enter "0" and then press the
or key. (Operation: Ref., 6-2 Call-
ing a Preset Value)
• For a lower limit weight of 10.00 kg
4. Weigh an Item.
Place the item to be weighed on the weighing platter together with the tare weight.
• For a 10-kg bag of rice
Weighing
result Weighing condition Indication on scale
Over Weight > upper limit weight Upper limit weight indi-
cator flashes.
OVER indicator lamp
(orange LED) lights.
Under Weight < lower limit weight Lower limit weight indi-
cator flashes.
UNDER indicator lamp
(red LED) lights.
ACCEPT Lower limit weight ≤weight
≤upper limit weight --- ACCEPT indicator lamp
(green LED) lights.

Manual No. 0142A IWQ Operation Manual Kg Version 15
5. Confirming the Preset Numbers
5-1 Operation
1. Confirm the Preset Number during Operation.
The preset number can be confirmed while pressing the key (Example: Preset No. 1).
• For Preset No. 1

16 IWQ Operation Manual Kg Version Manual No. 0142A
6. Using the Preset Function
6-1 Presetting
1. Power on by Pressing the Key. Then, Press the
Key.
Press the key while all displays are ON
(while the buzzer is sounding).
The upper limit value for Preset No. 1 will be displayed.
2. Preset the Upper Limit Value.
Enter the upper limit value by using the ten-key pad.
If the lower limit value has already been pre-
set, only values equal to or lager than this
limit value can be set.
• For an upper limit value of 1 kg

Manual No. 0142A IWQ Operation Manual Kg Version 17
Press the key.
If the lower limit value has already been pre-
set, only values equal to or larger than this
limit value can be set.
"OVER" LED will illuminate.
3. Preset the Lower Limit Value.
Enter the lower limit value by using the ten-key pad.
If the upper limit value has already been pre-
set, only values equal to or less than this limit
value can be set. If the upper limit value has
been set to “0,” then only the lower limit
value can be set.
"UNDER" LED will illuminate.
• For a lower limit value of 0.5 kg
Press the key.
If the upper limit value has already been pre-
set, only values equal to or less than this limit
value can be set. If the upper limit value has
been set to “0,” then only the lower limit
value can be set.

18 IWQ Operation Manual Kg Version Manual No. 0142A
4. Set the Tare Weight.
Enter the tare weight by using the ten-key pad.
• For a tare weight of 0.25 kg
Press the key.
5. Set the Values for the Other Preset Numbers.
After entering a desired preset number, press the key (Example: Preset number 2).
The upper limit value for Preset No. 2 will be displayed. Return to step 2 in the above pro-
cedure.

Manual No. 0142A IWQ Operation Manual Kg Version 19
6. Finish the Setting Procedure.
Disconnect the power by pressing the key.
6-2 Calling a Preset Value
1. Enter a Preset Number by Using the Ten-Key Pad.
• For Preset No. 1
2. Press the Key.
If no tare weight has been set, or if neither the
upper limit value nor lower limit value has
been set, the values before pressing the
key will remain active.
If Preset No. 0 (zero calling) is called, the tare
weight, upper limit value, lower limit value,
and preset numbers will be cleared.
(Example) Tare weight : 0.25 kg
Upper limit value: 1.00 kg
Lower limit value: 0.50 kg

20 IWQ Operation Manual Kg Version Manual No. 0142A
7-1 Normal Mode
7-1-1 Basic Procedure
1. Press Key to Switch to the Counting Mode.
2. Place the Items to Be Weighed on the Weighing Platter
(Sampling).
3. Enter the Quantity of Items to Be Weighed. (Example: 50)
7. Counting Function
Table of contents
Other ISHIDA Scale manuals

ISHIDA
ISHIDA INS-100 User manual

ISHIDA
ISHIDA UNI-7 User manual

ISHIDA
ISHIDA Uni-3 User manual

ISHIDA
ISHIDA NOVA-II User guide

ISHIDA
ISHIDA SR-2000 alpha User manual

ISHIDA
ISHIDA AC-4000 Series User manual

ISHIDA
ISHIDA IWB Series User manual

ISHIDA
ISHIDA CB-300 Electronic balance User manual

ISHIDA
ISHIDA QB-150E Use and care manual

ISHIDA
ISHIDA IPC 3kg User manual

ISHIDA
ISHIDA Uni-5 User manual

ISHIDA
ISHIDA IWQ-150 User manual

ISHIDA
ISHIDA IP-EMZ User manual

ISHIDA
ISHIDA IGB-60 User manual

ISHIDA
ISHIDA SR-2000 alpha User manual

ISHIDA
ISHIDA Astra Instruction Manual

ISHIDA
ISHIDA AC-2000 User manual

ISHIDA
ISHIDA AC-3000 User manual

ISHIDA
ISHIDA Uni-3 User manual

ISHIDA
ISHIDA CWS-02 Quick guide