ITATOOLS ITA 27 User manual

Ed.09-18
MANUALE D’USO – OPERATION MANUAL –NOTICE D’INSTRUCTIONS
BETRIEBSANLEITUNG –MANUAL DE USO
ITA 27
TENDIREGGIA A BATTERIA PER REGGIA IN PLASTICA
BATTERY POWERED PLASTIC STRAPPING TOOL
APPAREIL DE CERCLAGE À BATTERIE POUR FEUILLARD EN PLASTIQUE
AKKU KUNSTSTOFFBAND UMREIFUNGSGERÄT
FLEJADORA CON BATERÍA PARA FLEJE DE PLÁSTICO
LEGGERE LE ISTRUZIONI PRIMA DI UTILIZZARE L’APPARECCHIO
READ ALL INSTRUCTIONS BEFORE OPERATING THE TOOL
AVANT D’UTILISER L'APPAREIL LIRE LA NOTICE D’INSTRUCTIONS
VOR DER INBETRIEBNAHME DES GERÄTES DIE BEDIENUNGSANLEITUNG LESEN
LEA LAS INSTRUCCIONES ANTES DE UTILIZAR EL APARATO

2
INDICE Pagina TABLE OF CONTENTS Page
1 Istruzioni di sicurezza……………………..…..….…4 1 Safety instructions………………………….…………..….4
1.1 Informazioni relative allo smaltimento…………..…6 1.1 Dsiposal Information………………………..………….….6
2 Dati tecnici…………………………………….……...7 2 Technical data……………………..…..….….….…..…….7
3 Garanzia e responsabilità……………….……...…..8 3 Warranty and liability….…………..………….…….….…..8
4 Installazione…………..………………………..........9 4 Installation…………………..…..………….…….…………9
4.1 Accessori…………………………………….……...144.1 Accessories…………………….…………………..….….14
5 Elementi principali e regolazioni………….............16 5 Operating elem.ts / adjustment..….…………….…..….16
5.1 Regolazione tensionamento e saldatura….….…..175.1 Tension and welding adjustment..………….……….....17
5.2 Regolazione modi operativi…………………….…..175.2 Operating mode adjustment..………………...……..….17
5.3 Regolazione larghezza reggia……….……….…....195.3 Size strap conversion.………………………….…....….19
6 Istruzioni per l’uso…………………………………...20 6 Operation………………………………….…….….…….20
6.1 Controllo della saldatura ………………...………....23 6.1 Seal check……………………………………….……...23
7 Manutenzione e pulizia……………………………...25 7 Servicing and cleaning………………………….………25
7.1 Pulizia e sostituzione rullo…………………………..25 7.1 Cleaning and replacement feedwheel………..…...….25
7.2 Pulizia e sostituzione piastrina bloccareggia…..….26 7.2 Cleaning and replacement strap locker plate…….….26
7.3 Sostituzione piedino e piastrina saldatura………....26 7.3 Welding plate and foot replacement..……………..….26
7.4 Sostituzione lama…………………………….……....27 7.4 Blade replacement.……………………………………..27
7.5 Reset servocomando………………………………...27 7.5 Servo control reset.…………………………………..…27
8 Risoluzione problemi………………………………....28 8 Troubleshooting…………………………………….......28
9 Distinta ricambi……………………………..………...32 9 Spare parts list………………………………….………32
Esploso…………………………………………...……34 Layout…...……………………………..…………..……34
TABLE DES MATIERES Page INHALTSVERZEICHNIS Seite
1 Normes de sécurité…………………………………….4 1 Sicherheitsvorschriften………….…….………….….….4
1.1 Information sur l’élimination……………………….….6 1.1 Entsorgung…………………………….………….….…..6
2 Données technique……………………………………7 2 Technische Daten…………………….……....….….…..7
3 Garantie et responsabilité…………………………….8 3 Garantie und Verantwortung……….………….….……8
4 Installation……………..……………………………….9 4 Installation….………..……………….………….….……9
4.1 Accesoires…………………………………………….14 4.1 Zubehör………………..………………………..………14
5 Modules prin. / réglages……………………………..16 5 Beschreibung und Einstellungen………………….....16
5.1 Ajustement tensionement et soudure………………17 5.1 Einstellen der spannung und Schweissarbeiten……17
5.2 Reglage mode d’exploitation…………………….…..17 5.2 Betriebsarten einstellen…………………….……..…..17
5.3 Reglage de la largeur de la bande……….………...19 5.3 Einstellen der band breite……………….…………...19
6 Mode d’emploi……………………………..………....20 6 Bedienanleitung .......................................................20
6.1 Controle de la soudure…………………………....…23 6.1 Schweißkontrolle......................................................23
7 Entretien et nettoyage………….……………….……25 7 Wartung und reinigen................................................25
7.1 Nettoyage et replacement molette…………….……25 7.1 Spannrad reinigen-ersetzen………………….…….…25
7.2 Nettoyage et replacem. plaquette de blocage.........26 7.2 Azahnplatte reinigen-ersetzen……………………….26
7.3 Remplacement de pied et plaque de soudure….…26 7.3 Heizplatte ersetzen……………………………….……26
7.4 Remplacement du couteau…………………………..27 7.4 Messer ersetzen…………………………………..……27
7.5 Servo-commandé reset………………………………27 7.5 Servo steuerung reset…………………………………27
8 Solution des problems………………….…………….28 8 Problemlösungen......................................................28
9 Liste pieces……………………..……………………..32 9 Teileliste…...……………………………………..……..32
Vue éclatée…………………………………………….34 Zeichnungen……...……………………………….….…34
CONTENIDO Pagina
1 Instrucciones de seguridad………………….…….….4
1.1 Indicaciones ecologicas…………………….…….…..6
2 Datos técnicos……………………………….…….…..7
3 Garantía y responsabilidad……………….……….....8
4 Instalación………………………………….…….….....9
4.1 Accessorios……………………………….……….….14
5 Elementos principales……………………..………...16
5.1 Ajuste de tension y soldadura…………….…….…..17
5.2 Regular tipo de funcionamento…………….…….....17
5.3 Ajuste de la zona de soldadura……………….…....19
6 Instrucciones de uso................................................20
6.1 Control de la soldadura............................................23
7 Mantenimiento y limpieza.........................................25
7.1 Limpieza y reemplazo de la rueda...........................25
7.2 Limpieza y sustitucion plaquita bloqueo fleje..........26
7.3 Sustitucion plaquita de soldadura y oscilante.........26
7.4 Sustitucion de la cuchilla..........................................27
7.5 Reset Servomando...................................................27
8 Localización de averías.............................................28
9 Lista de recambio..……………………………….…...32
Diseños……………………………………..…..……...34

3

4
I - L’apparecchio deve essere utilizzato esclusivamente da personale adeguatamente formato. Non osservare le istruzioni
contenute nel manuale e/o un improprio uso possono causare la rottura della reggia con conseguenze per il personale ed i
materiali confezionati. Controllare giornalmente l’apparecchio e non utilizzarlo con parti usurate / danneggiate, ma sostituirle
prontamente con personale qualificato utilizzando parti originali. Non modificare l’apparecchio nelle sue parti.
Non mettere mai dita, mani e altre parti del corpo tra la reggia ed il materiale da imballare. Voi siete pienamente responsabili di
controllare la sigillatura della reggia, una adeguata preparazione è indispensabile per riconoscere una sigillatura difettosa e per
evitare incidenti anche gravi. Non movimentare mai il materiale con sigillature difettose della reggia. Per lo svolgimento della
reggia utilizzare solo gli appositi dispenser. Tenere pulita l’area di lavoro ed utilizzare l’apparecchio solo in situazioni di stabilità e
sicurezza. Non movimentare MAI i materiali utilizzando per il sollevamento la reggia applicata. Per il taglio della reggia utilizzare
esclusivamente cesoie di sicurezza. Assicurarsi che durante il taglio non ci sia nessuno sulla traiettoria della reggia; rimanere a
distanza di sicurezza. Tenere premuta la parte superiore in modo che la parte inferiore recisa si allontani dall’operatore. Utilizzare
in modo errato l’apparecchio, tensionare eccessivamente la reggia, utilizzarne una qualità / sezione non prevista e spigoli taglienti
sul materiale da legare possono causare una improvvisa perdita di tensione e/o la rottura della reggia con conseguente
sbilanciamento, caduta del materiale ed anche un repentino e violento allontanamento della reggia stessa.
Si consiglia di proteggere gli spigoli taglienti, di posizionare in modo corretto la reggia intorno la carico, di mettere un numero
adeguato di regge, di rimanere in posizione di sicurezza (lateralmente alla reggia) durante il ciclo di legatura, di controllare
adeguatamente la qualità della sigillatura e di rispettare scrupolosamente le caratteristiche consigliate per la reggia da utilizzare.
Non pulire l’apparecchio con acqua né con vapore acqueo. In caso di utilizzo all’aperto, proteggere l’apparecchio dalla pioggia.
L’apparecchio non deve essere utilizzato nelle aree in cui può esserci una atmosfera esplosiva. Conservare il presente manuale di
istruzioni completo.
GB - The tool must not be used by people not properly trained. Failure to follow the operating instructions or improper use could
cause strap breakage, injuries, package damages. Check tool daily, do not use tool with worn or damaged parts, promptly replace
them by trained people and use original spare parts. Never modify any tool part. Do not put fingers, hands or other body parts
between the strap and package during the cycle. It is your full responsibility to check the joints made by your tool, seal control and a
suitable training about adjustment will be useful to check the seal quality in order to avoid severe injury. Never move goods with
bad quality seals. Use only specific strap dispenser to dispense the strap. Keep tidy your working area and always use the tool in
good balance and safety conditions. Never use straps as a means of pulling or lifting goods. To cut the straps use always proper
safety strap cutter and keep other people and yourself at safe distance from strap, always stand to side of strap, away from
direction of strap trajectory once loosen. Hold the upper strap portion and pay attention that the lower strap will snap forward away
from you. Improper operation, excessive tensioning, use of not recommended strap, sharp corners on the package could cause in
a sudden loss of strap tension and/or strap breakage that could lead to package fall and to violent movement of the strap against
the operator. It is recommended to use edge protectors if package has sharp corners, to place the strap correctly around a
properly positioned package, to remain in safety position (on one side of strap) during strapping cycle, to use the correct strap
quality, width, thickness, and strength as recommended in this manual. Please preserve this booklet, it is as a part of the tool. This
tool is manufactured without any substances which could be dangerous to health. Do not clean the tool with water or steam. When
using the tool outdoors, protect it from rain. The tool must not be used in areas where explosios can occur as a result of the
environment or products being used.
1) ISTRUZIONI DI SICUREZZA / SAFETY INSTRUCTIONS / NORMES DE SECURITE /
SICHERHEITSVORSCHRIFTEN / INSTRUCCIONES DE SEGURIDAD
DURANTE IL LAVORO, UTILIZZARE GUANTI E OCCHIALI
PROTETTIVI E SCARPE DI SICUREZZA
WHEN OPERATING THE TOOL, WEAR EYE AND HAND
SAFETY PROTECTORS AND SAFETY SHOES
PENDANT LE TRAVAIL, PORTER DES PROTECTIONS POUR
LEX YEUX, LES MAINS ET CHAUSSURES DE SECURITE
WÄHREND DES BETRIEBES SCHUTZHANDSCHUHE, BRILLE
BENUTZEN UND SICHERHEITSSCHUHE TRAGEN
DURANTE EL TRABAJO, UTILICE GUANTES PROTECTORES,
GAFAS DE SEGURIDAD Y ZAPATOS DE SEGURIDAD
NORME GENERALI DI SICUREZZA
GENERAL SAFETY INSTRUCTIONS
INSTRUCTIONS GÉNÉRALES DE SÉCURITÉ
ALLGEMEINE SICHERHEITSVORSCHRIFTEN
NORMAS GENERALES DE SEGURIDAD
LEGGERE LE ISTRUZIONI PRIMA DELL’USO
READ THE OPERATING INSTRUCTION CAREFULLY
AVANT L’UTILISATION CONSULTER LE MODE D’EMPLOI
VOR DER INBETRIEBNAHME BETRIEBSANLEITUNG GENAU LESEN
LEA LAS INSTRUCCIONES ANTES DEL USO

5
F - L’appareil de cerclage devra être utilisé par un opérateur ayant reçu une formation sur les instructions et le mode d’emploi. Le
fait de ne pas suivre les instructions et/ou l'emploi incorrect de l’appareil peuvent causer la rupture du feuillard avec des
conséquences dangereuses pour les opérateurs et le matériel à cercler. Il est indispensable de contrôler l'appareil tous les jours et
de ne jamais l'utiliser s’il présente des parties usées / endommagées. Le cas échéant il sera nécessaire de les faire remplacer avec
des pièces originales par des opérateurs qualifiés. Ne pas modifier l'appareil. Éviter absolument de mettre les doigts, mains et
autres parties du corps entre le feuillard et le matériel à cercler. Vous êtes entièrement responsable du contrôle de la soudure du
feuillard; dans ce but une préparation appropriée est indispensable pour pouvoir reconnaître les soudures défectueuses et éviter
des accidents graves. Ne jamais déplacer le matériel avec le feuillard mal soudé. Le déroulement du feuillard doit être effectué en
utilisant des dévidoirs prévus à cet effet.
Garder bien propre la zone de travail et utiliser l'appareil seulement dans des situations de stabilité et de sécurité.Ne jamais
déplacer les matériels cerclés en utilisant le feuillard pour le soulèvement. La coupe du feuillard doit être effectuée exclusivement
avec des ciseaux appropriés. Pendant la coupe il est indispensable de garder une distance de sécurité et de s'assurer que
personne ne se trouve dans la trajectoire du feuillard. Pour la coupe garder la partie supérieure du feuillard contre l’opérateur de
façon à ce que la partie inférieure coupée s'éloigne de ce dernier. L'emploi incorrect de l’appareil, la tension excessive du feuillard,
la qualité et la section impropres du feuillard, les bords tranchants du matériel à cercler peuvent causer une perte de tension
inattendue et/ou la rupture du feuillard avec une chute éventuelle du matériel et un échappement violent du feuillard. Il est conseillé
de se protéger contre les bords tranchants, d'appliquer correctement le feuillard sur le paquet, d'utiliser un nombre de feuillards
approprié, de se mettre en position de sécurité (à coté du feuillard) pendant le cycle de cerclage, de bien contrôler la qualité de la
soudure du feuillard et de respecter scrupuleusement les caractéristiques conseillées pour le feuillard à utiliser. Ne pas nettoyer
l’appareil avec de l’eau ou de la vapeur de d’eau. En case d’utilisation en plen air, protege l’appareil contre la pluie. L’appareil ne
doit pas ètre utilisè dans des zones à risque d’explosion. Bien conserver toute cette notice d'instructions.
D - Das Gerät darf nur von ausgebildetem Personal bedient werden. Das nicht Beachten dieser Betriebsanleitung und/oder das
Missbrauchen des Gerätes kann zu Schäden am Kunststoffband führen und es besteht Verletzungsgefahr für den/die
Bedienperson(en), sowie die Gefahr, dass Ihre Ware beschädigt wird. Das Gerät täglich auf Funktion kontrollieren (Instandhalten)
und nicht mit abgenutzten oder defekten Teilen benutzen, sondern diese sofort durch qualifiziertes Personal mit Originalteilen
austauschen lassen. Keine Änderungen am Gerät vornehmen. Nie Finger, Hand sowie andere Körperteile zwischen Band und der
zu Umreifenden Ware stecken. Sie tragen die volle Verantwortung für das richtige Schweißen und um Unfälle zu vermeiden,
kontrollieren Sie jede Umreifung. Kein Materialtransport bei einer nicht sicheren Umreifung durchführen. Für das Abrollen des
Umreifungsband nur die dazu geeigneten Rollwagen benutzen. NIE das Umreifungsband als Lastanschlagmittel zum Heben von
Lasten oder Paketen verwenden. Arbeitsplatz immer sauber halten und das Gerät nur bei Standsicherheit benutzen. Für das
Schneiden des Umreifungsbandes nur die dazu geeignete Bandschere benutzen. Vergewissern Sie sich, dass niemand oder nichts
im Weg während des Bandschneidens ist, bitte einen Sicherheitsabstand einhalten. Das unbefugte oder nicht korrekte Benutzen
des Gerätes, sowie das zu straffe Anziehen des Bandes auch an scharfkantigen Stellen, und das Benutzen eines nicht geeigneten
Bandes (zu dünn oder zu schmal), kann ein plötzliches Zerreißen/Platzen des Kunststoffbandes mit gefährlichen Folgen nicht nur
materiell sondern auch für die beteiligten Personen zur Folge haben. Deshalb wird geraten, das Kunststoffband vor scharfkantigen
Ecken zu schützen, das Kunststoffband richtig positionieren und ausreichende Umreifungen für die entsprechende Verpackung zu
benutzen und während der Umreifung in Sicherheitsposition zu stehen (seitlich der Umreifung). Kontrollieren Sie immer den
Verschweißpunkt auf Richtigkeit und beachten Sie immer gewissenhaft die technischen Merkmale des eingesetzten
Kunststoffbandes. Diese Betriebsanleitung bitte sorgfältig aufbewahren. Dieses Gerät wurde ohne gesundheitsschädliche Stoffe
gebaut. Gerat nicht mit wasser oder wasserdampf reinigen. Gerat bei Anwendung im Freien vor Regen schutzen. Das Gerat darf
nicht in Bereichen benutzt werden, in welchen eine explosionsfahige Atmosphare auftreten kann. Bewahren Sie die folgende
vollständige Bedienungsanleitung auf.
E - El aparato debe ser utilizado exclusivamente por personal debidamente formado. El incumplimiento de las instrucciones
recogidas en el manual o un uso indebido pueden causar la ruptura del fleje y provocar lesiones al personal o daños al material
empacado. Revise a diario el aparato y no lo use si presenta partes desgastadas o dañadas; en este caso, haga que personal
cualificado las sustituya de inmediato utilizando piezas de recambio originales. No modifique los componentes del aparato.
No introduzca por ningún motivo los dedos, las manos u otras partes del cuerpo entre el fleje y el material que se va a embalar.
Usted es plenamente responsable del control del sellado del fleje; es indispensable estar preparados para reconocer los flejes
defectuosos y para evitar así accidentes graves. No maneje por ningún motivo el material que presente flejes con sellados
defectuosos. Para el desbobinado del fleje, use únicamente los dispensadores correspondientes. Mantenga el área de trabajo
limpia y utilice el aparato sólo en condiciones estables y seguras. NUNCA desplace el material levantándolo por el fleje aplicado.
Para el corte del fleje use únicamente cortadores de seguridad. Asegúrese que durante el corte no haya personas presentes en el
trayecto del fleje; mantenga una distancia de seguridad. Mantenga presionada la parte superior de manera que la parte inferior
cortada se aleje del operador. El uso incorrecto del aparato, el excesivo tensado del fleje, el uso de calidades o secciones no
previstas o con aristas cortantes en el material por atar, pueden causar una pérdida improvisa de tensión y/o la ruptura del fleje y
provocar así desequilibrio, caída del material e incluso un alejamiento repentino y violento del fleje mismo. Se recomienda proteger
las aristas cortantes, colocar correctamente el fleje alrededor de la carga, poner un número adecuado de flejes, permanecer en
una posición segura (lateralmente respecto al fleje) durante el ciclo de flejado, controlar apropiadamente la calidad del sellado y
respetar rigurosamente las características recomendadas para el fleje que se va a utilizar. Conserve este manual de instrucciones
íntegro. Para la fabricación del aparato no se usan sustancias nocivas para la salud. No limpiar el aparato con agua ni con vapor
de agua. Proteger el aparato de la lluvia cuando se utilice al aire libre. Mantenga el siguiente manual de instrucciones completo.

6
1.1 INFORMAZIONI RELATIVE ALLO SMALTIMENTO / DISPOSAL INFORMATION / INFORMATION SUR
L'ÉLIMINATION / ENTSORGUNG / INDICACIONES ECOLOGICAS :
I - Per lo smaltimento dell’apparecchio rispettare le normative locali vigenti, separare le parti elettriche dalle parti meccaniche in
modo che possano essere smaltite separatamente. Per lo smaltimento delle batterie e del caricabatteria rispettare le normative
vigenti di riciclaggio ecologico. Osservare le indicazioni, le avvertenze e le istruzioni del produttore della batteria. Non gettare tra i
rifiuti.
GB –The legal regulations for disposal of all tool parts must be observed. Please dismantled the electrical parts from mechanical
parts so can be disposed separately. The battery and charger must be collected, recycled or disposed of in an environmentally
friendly way. Observe the battery manufacturer’s directions, instruction and warnings. Don’t throw into waste.
F –Se dèbarrasser de l’outil d'une manière respectueuse de l'environnement et dans les plein respect des directives
nationales/locales sur l’élimination. Séparer les parts mecaniques et celles électriques pour une correcte élimination des déchets.
Respectez les instructions et les avertissements du fabricant de la batterie.
D - Für die Entsorgung sind die gültigen Entsorgungsvorschriften zu berücksichtigen. Die elektrischen und mechanischen Teile
sind so zu zerlegen, dass sie separat entsorgt werden können. Für die Entsorgung von
Akku und Ladegerät sind die gültigen Recycling-Vorschriften zu berücksichtigen. Nicht in den
Hausmüll werfen. Beachten Sie die Anweisungen und warnungen des Herstellers der batterie.
E - Para eliminar el aparato, respete las normas vigentes, separe las partes eléctricas de las
partes mecánicas para poder desecharlas separadamente. Para eliminar las baterías y el
cargador, respete las normas de reciclaje ecológico vigentes. No eliminar entre otros residuos
Respete las instrucciones e advertencias del fabricante de la bateria.

7
ALIMENTAZIONE
FEED REQUIR.
ALIMENTATION
VERSORGUNG
ALIMENTACIÓN
Batteria
Battery
Batterie
Batterie/Akku
Batería
36V –2 A/h Li-Ion
PRESTAZIONI
PERFORMANCES
PERFORMANCES
LEISTUNG
PRESTACIONES
Tensione max. :
Max.Tension :
Tension max. :
Max. Bandspannung :
Tensión máx. :
7000 N
Tensione min. :
Min. Tension
Tension min. :
Min. Bandspunning :
Tension min. :
2700 N
Velocità tensione :
Tensioning speed:
Vitesse de tension:
Spannge-Schwindigkeit :
Vel.dad del tensado:
8 mt/m
Tipo chiusura:
Sealing:
Soudure:
Schweißart:
Tipo de cierre:
Saldatura vibrazione
Friction weld seal
Soudage a friction
Reibschweißverschluß
Resistenza chiusura
circa:
Joint strength approx.:
Résistance environ:
Verschluß-
Festigkeit etwa:
Resistencia de cierre
aprox.:
75% carico di rottura *
75% plastic strap strength*
75% charge de rupture*
75% Kunststoffbandbelast.*
75% de la carga máxima*
Livello pressione
sonora,Misura
tipo A
(2003/10/CE)
Level sound
pression.
Measurement type
A (2003/10/CE)
Niveau de pression
sonore. Mesure de
type A (2003/10/CE)
Schalldruckpegel. Typ
A messung
(2003/10/CE)
Nivel de presiòn
acustica. Medida
de tipo A
(2003/10/CE)
86 dB (A)
Livello di potenza
sonora,Misura
tipo A
(2003/10/CE)
Level sound power.
Measurement type
A (2003/10/CE)
Niveau de puissance
sonore. Mesure de
type A (2003/10/CE)
Schalleistungspegel.
Typ A messung
(2003/10/CE)
Nivel de potencia
acustica. Medida
de tipo A
(2003/10/CE)
95 dB (A)
Vibrazioni
all’impugnatura
(2002/44/CE)
Vibrations at handle
(2002/44/CE)
Vibrations au niveau des
poignéès (2002/44/CE)
Hand Arm Schwingungen
(2002/44/CE)
Las vibraciones en la
empuñadura
(2002/44/CE)
< 2.5 ms2
* variabile in funzione del tipo di reggia / depends of strap quality / varie en fonction type de feuillard / je nach Bandqualität / Variable según el tipo
de fleje
I- Temperatura di lavoro: utilizzare l’apparecchio tra i 0C° ed i +45C°. Con l’impiego a bassa temperatura può succedere che il
display segnali batteria scarica. In questo caso è sufficiente inserire la batteria per ca. 2 min. nel caricabatteria per un “refreshing”
GB - Working temperature: the tool should be used between 0C° ( 32F) and +45C° (+113 F). With the use to low temperature
it may happen that the displaysignals low battery. Inthis case itsuffices to insert the battery for 2 mins. in charger fora "refreshing"
F- Température d’exercice: Utiliser l’appareil entre 0C° (32F) et +45C° (+113F). Avec les basses températures l’afficheur peut signaler
batterie déchargée. Dans cecas il suffit de mettre la batterie pendant environ2 min. dans lechargeur de batterie pour un “refreshing”
D- Betriebstemperatur: Gerät zwischen 0C° und + 45C° benutzen. Wenn der Akku bei niedrigen Temperaturen lagert kann es
vorkommen, dass das Gerät den Leerzustand des Akku’s meldet, in diesem Fall den Akku für 2 Minuten in das Ladegerät stecken.
E- Temperatura de trabajo: utilice el aparato con una temp. entre 0C° y +45C°. Con el uso a baja temperatura, es posible que la pantalla
indique que la batería está descargada. Eneste caso es suficiente cargarla batería en el cargador durante unos 2 min. paraun“refreshing”.
MODELLI / CHART OF TYPES / MODÈLES / GERÄTELISTE / MODELOS
CODICE / ITEM /
CODES / BESTELLNR /
CÓDIGO
TIPO / MODEL /
APPAREILS / TYP
/ TIPO
REGGIA/STRAP/FEUILLIARD/
BANDART / FLEJE
SPESSORE /THICKNESS /
EPAISSEUR / DICKE / ESPESOR
T279997
ITA27
PP/PET 19mm (3/4”)
PP/PET 25/32 mm (1 - 1/4”)
0.8 mm ÷ 1.4 mm (0.031” ÷ 0.041”)
1 mm ÷ 1.30 mm (0.031” ÷ 0.050”)
DIMENSIONI
DIMENSIONS
ENCOMBREMENT
ABMESSUNGEN
DIMENSIONES
Lunghezza:
Length:
Longeur:
Länge:
Longitud:
300 mm –11.8”
Larghezza:
Width:
Largeur:
Breite:
Anchura:
150 mm –5.9”
Altezza:
Height:
Hauteur total:
Höhe:
Altura:
200 mm –7.9”
Peso con batteria:
Weight with battery:
Poids avec accum.:
Gewicht m. Akku:
Peso con batería:
6.4 kgs –14.2 lbs
2) DATI TECNICI / TECHNICAL DATA / DONNEES TECHNIQUES / TECHNISCHE DATEN / DATOS TÉCNICOS

8
I- Il periodo di garanzia per ogni apparecchio Itatools e per ogni caricabatteria è pari a 12 mesi a partire dalla data di
spedizione indicata sul documento di accompagnamento.
La società Itatools srl si impegna per il periodo di garanzia a sostituire gratuitamente tutte le parti che a suo insindacabile giudizio
dovessero presentare difetti che li rendano non idonei all’uso. La sistemazione in garanzia è franco ns. stabilimento. I termini di
garanzia decadono per gravi carenze di manutenzione, manomissione dell’apparecchio, riparazioni arbitrarie, uso improprio dello
stesso, la non osservanza delle norme indicate nel manuale, uso di parti non originali, mancanza del numero di serie impresso
durante la produzione, eventi eccezionali. Restano escluse dalla garanzia le parti ad usura espressamente identificate nella lista
ricambi. Non possono essere rivendicate dalla clientela richieste di risarcimenti, nei confronti di Itatools srl, per fermi di produzione,
danni ad oggetti e persone derivanti da deficienze dell’apparecchio perché nei termini di garanzia. La società Itatools srl si riserva il
diritto di modificare i prodotti e la documentazione senza l’obbligo di aggiornarne i precedenti.
Il periodo di garanzia per ogni batteria è pari a 60 giorni, a partire dalla data di spedizione indicata sul documento di
accompagnamento, Itatools si impegna a sostituire a suo insindacabile giudizio gratuitamente la batteria solo nel caso in cui siano
presenti difetti di fabbricazione che la rendano non idonea all’uso
GB - Itatools srl warrants all its tools and battery charger during a period of 12 months from the shipping date document.
Warranty includes free replacement of faulty parts ex works. The society Itatools srl undertakes for the warranty period to
replace free of charge that, at its sole discretion, have faults that make them unsuitable for use. The warranty is not valid in case of
improper use, lack of maintenance, tampering, arbitrary modifications and reparations, use of not original parts, disregard of
instructions of the operation manual, and missing serial number, exceptional events. The warranty excludes the wearing parts
specifically indicated in the spare parts list. No compensation can be claimed for production shutdowns and for damages to people
and objects due to tools defects. Itatools srl reserves the right to modify the tools and documentation without any obligation to
update previous ones.
Itatools srl warrants any battery during a period of 60 days from the shipping date document.
The manufacturer is committed to replace it with a free battery, at its sole discretion, only when there are manufacturing defects
that make it unfit for use.
F- Chaque appareil Itatools est garanti pour une période de 12 mois, à partir de la date indiquée sur le document de
livraison. . La société ITATOOLS srl est engagée à la période de garantie pour remplacer gratuitement toutes les parties à sa
propre discrétion rencontrent tous les défauts qui les rendent impropres à l'usage. La garantie n'est pas valable en cas d'emploi
incorrect de l'appareil, manque d'entretien, manipulations non autorisées, réparations arbitraires, non-observation des instructions
du fabriquant, emploi de pièces non conformes, manque du numéro de série imprimé pendant la production, événements
exceptionnels. Les pièces d'usure indiquées sur la liste ne sont pas couvertes par la garantie. Le client ne peut demander aucune
compensation ni pour arrêts de production, ni pour dommage à personnes et objets causés par des défauts de l'appareil. La Sté.
Itatools se réserve le droit de modifier les produits et la documentation sans l'obligation de mettre à jour les précédents.
Chaque batterie Itatools est garantie pour une période de 60 jour à partir de la date indiquée sur le document de livraison.
ITATOOLS s'engage à remplacer à sa discrétion la batterie gratuitement uniquement dans le cas où il y a des défauts de
abrication qui le rendent impropre à l'usage.
D- Die Gewährleistungszeit und Ladezeit aller Itatools Geräte ist 12 Monate und beginnt ab dem Datum des
Lieferscheins. Die Fa. ITATOOLS Das Unternehmen ist auf die Garantiezeit verpflichtet alle Teile nach eigenem Ermessen treffen
etwaige Mängel kostenlos zu ersetzen, die sie für den Gebrauch ungeeignet machen Ausgenommen sind Defekte, die auf
unsachgemäßen Gebrauch, sowie mutwillige Beschädigungen zurückzuführen sind, sowie Verschleißteile generell. Keine
Gewährleistung kann übernommen werden, bei nicht Beachten der Wartungsanweisungen und Hinweisvorschriften sowie der
Bedienungsanleitung. Es dürfen ausschließlich Original Ersatzteile verwendet werden. Die Instandsetzung darf ausschließlich
durch von Itatools autorisierten Partnern durchgeführt werden. Fehlt die Seriennummer auf dem Gerät, kann ebenfalls keine
Gewährleistung geltend gemacht werden. Es kann kein Schadenersatz, wie Produktionsausfall oder auch Schaden an Personen
sowie Sachen an Itatools srl erhoben werden. Die Fa. Itatools behält sich das Gerecht vor, seine Produkte sowie auch die
Dokumentationen zu ändern, ohne verpflichtet zu sein, die vorhergehenden Versionen zu modifizieren.
Itatools Srl Optionsscheine allen seinen Akku während eines Zeitraums von 60 Tagen vom Zeitpunkt der Zustellung
Dokument.
ITATOOLS verpflichtet sich nach eigenem Ermessen die Batterie kostenfrei nur in dem Fall zu ersetzen, wo es Mängel
produzieren, die sie für die Verwendung ungeeignet machen
E- El período de la garantía de cada aparato y cargador de batteria Itatools es de 12 meses a partir de la fecha de envío
indicada en el documento de acompañamiento. La empresa Itatools srl se compromete, durante el período de garantía, a
sustituir sin costo alguno todas las partes que a su entero juicio presenten defectos que afecten su correcto funcionamiento. Las
reparaciones que cubre la garantía se realizan en nuestro establecimiento (Ex-works). La garantía pierde validez debido a la seria
falta de mantenimiento, a la manipulación indebida del aparato, a las reparaciones no autorizadas, a un uso incorrecto del mismo,
al incumplimiento de las normas indicadas en el manual, al uso de recambios no originales, a la falta del número de serie aplicado
durante la producción y a eventos excepcionales. La garantía no cubre las piezas sujetas a desgaste específicamente indicadas
en la lista de recambios. No se efectúan reembolsos, bajo ninguna circunstancia, en caso de paradas de producción, daños a
objetos o lesiones a personas, causados por un mal funcionamiento del aparato, por fuera de los términos de garantía. La
empresa Itatools srl se reserva el derecho a modificar los productos y los documentos sin la obligación de actualizar las versiones
anteriores.
El período de garantía para cada batería es de 60 días, a partir de la fecha de envío indicada en el documento adjunto.
Itatools se compromete a sustituir a su discreción la batería de forma gratuita sólo en el caso en el que hay por defecto de
fabricación que lo hacen inadecuado para su uso
3)
GARANZIA E RESPONSABILITA’ / WARRANTY CONDITIONS AND LIABILITY / CONDITIONS DE GARANTIE ET
RESPONSABILITÉ / GARANTIE UND VERANTWORTUNG / GARANTÍA Y RESPONSABILIDAD

9
BATTERIA/BATTERY/BATTERIE/ AKKU/ BATERÍA :
I - ISTRUZIONI DI SICUREZZA : Per iniziare ad usare la macchina inserire la batteria fino a che non si sente il clic del bottone di
bloccaggio come mostrato in figura e premere il tasto 1. Non osservare le istruzioni contenute nel manuale e/o un improprio uso
possono causarne il danneggiamento e pericoli al personale. La batteria viene fornita già parzialmente carica. La batteria
ricaricabile LI-Ion può essere ricaricata in qualsiasi momento senza che se ne riduca la durata; anche se viene interrotta la carica
della batteria non si danneggia. Per l’uso e la ricarica seguire le specifiche norme riportate negli apparecchi. Controllare
giornalmente la batteria e non utilizzarla se danneggiata. Non disassemblare o modificare la batteria, non connettere il polo positivo
(+) con il polo negativo (–) ,si crea un cortocircuito che danneggia in modo irreparabile la stessa. Non invertire la polarità durante
l’uso o la ricarica. Non trasportare e/o stoccare la batteria insieme ad oggetti metallici, se toccano i contatti possono provocare un
cortocircuito. Prima dell’uso controllare che i contatti siano puliti ed integri. Non inserire oggetti metallici tra i contatti.
Non lasciare in carica la batteria senza supervisione. Non gettare nel fuoco e non porre vicino a sorgenti di calore, non lasciarla
esposta al sole, non metterla in forni a microonde o recipienti riscaldanti a pressione, verrebbe danneggiata irreparabilmente. Non
avvicinare la batteria a fiamme libere. Proteggerla dall’umidità e non immergerla in acqua. Evitare urti e cadute, non forare,
schiacciare, nel caso provarla con cautela, se si produce calore, fumo etc., non utilizzarla.
In caso di grave danneggiamento con fuoriuscita dell’elettrolita evitare di manipolarla (lavare le mani con acqua e sapone), ed in
caso di contatto con gli occhi lavare immediatamente con acqua e consultare un medico.
Nel caso si manifestino deformazioni dell’involucro, surriscaldamenti, emissione di fumo od altro fenomeno anormale, interrompere
l’uso o la ricarica, non fumare e porre in luogo areato. Evitare temperature della batteria inferiori a 0C° e superiori a 45C° durante il
processo di ricarica.
CONTROLLO DELLA CARICA DELLA BATTERIA : Premendo il tasto “ON” lo stato di carica della batteria verrà visualizzato
attravero 3 led. Se tutti i led sono accesi la batteria è completamente carica. Se solamente un led è acceso allora a breve la
batteria dovrà essere ricaricata.
DATI TECNICI : Li-Ion (Litio-Ioni) 36 V –2/4 Ah Peso : 700 gr. Cod.B800477
Tempo di carica 40 min. Temperatura ideale durante ricarica: 15C° (32F) e +45C° (+113 F)
GB - SAFETY INSTRUCTIONS : To start working put the battery until you hear the click of the lock button, as shown in the image
and press button 1. The battery should be used by people properly trained. Failure to follow the operating instructions or improper
use could cause injuries and battery damages. The battery is supplied partially charged. The Lithium-Ion rechargeable battery can
be charged at any time without reducing its service life; interrupting the charging procedure doesn’t damage it. To use and charge
the battery please follow the operating devices instruction. Check battery daily, do not use it with worn or damaged parts. Do not
disassemble it, never modify any part, do not connect the positive (+) and negative (-), may result a full damaging short circuit. Do
not invert the right polarity during the use or charge. Do not transport or store the battery with metal objects, may result a short
circuit. Do not try to charge with different charger not allowed, the battery could be seriously damaged. Before use check the
contacts. Do not put metal keys between contacts. Do not use the battery for purposes other than those specified. Battery must
not be left in charging mode without supervision. Do not throw the battery into a fire or heat it, do not store at high temperature,
direct sunlight, do not put in microwave oven or a pressure cooker. Keep it away from any exposed flame. Do not dip the battery in
the water, protect it from humidity. Do not apply impact to the battery, or throw, drop, drill it, if happened try it with care . In case of
heat generation, smoke emission, or ignition stop immediately to use and replace it. In case electrolyte comes into contact with
eyes, rinse thoroughly with clean water immediatly and consult a physician; for hands contact use clean water too. Avoid battery
temperatures below 0C° and higher than 45C° during charging process.
CONTROL BATTERY LEVEL : Pressing “on” button the state of charge will be displayed trough 3 led. If all the led is lightning the
battery is fully charge. If only one led is lightning then shortly the battery needs to be recharged.
TECHNICAL DATA : Li-Ion (Lithium-Ion) 36V –2 Ah Weight : 700 gr Cod. B800477
Time of charging 40 min. Ideal temperature during charging: 15C° ( 32F) and +45C° (+113 F)
4) INSTALLAZIONE / INSTALLATION / INSTALLATION / INSTALLATION / INSTALACIÓN

10
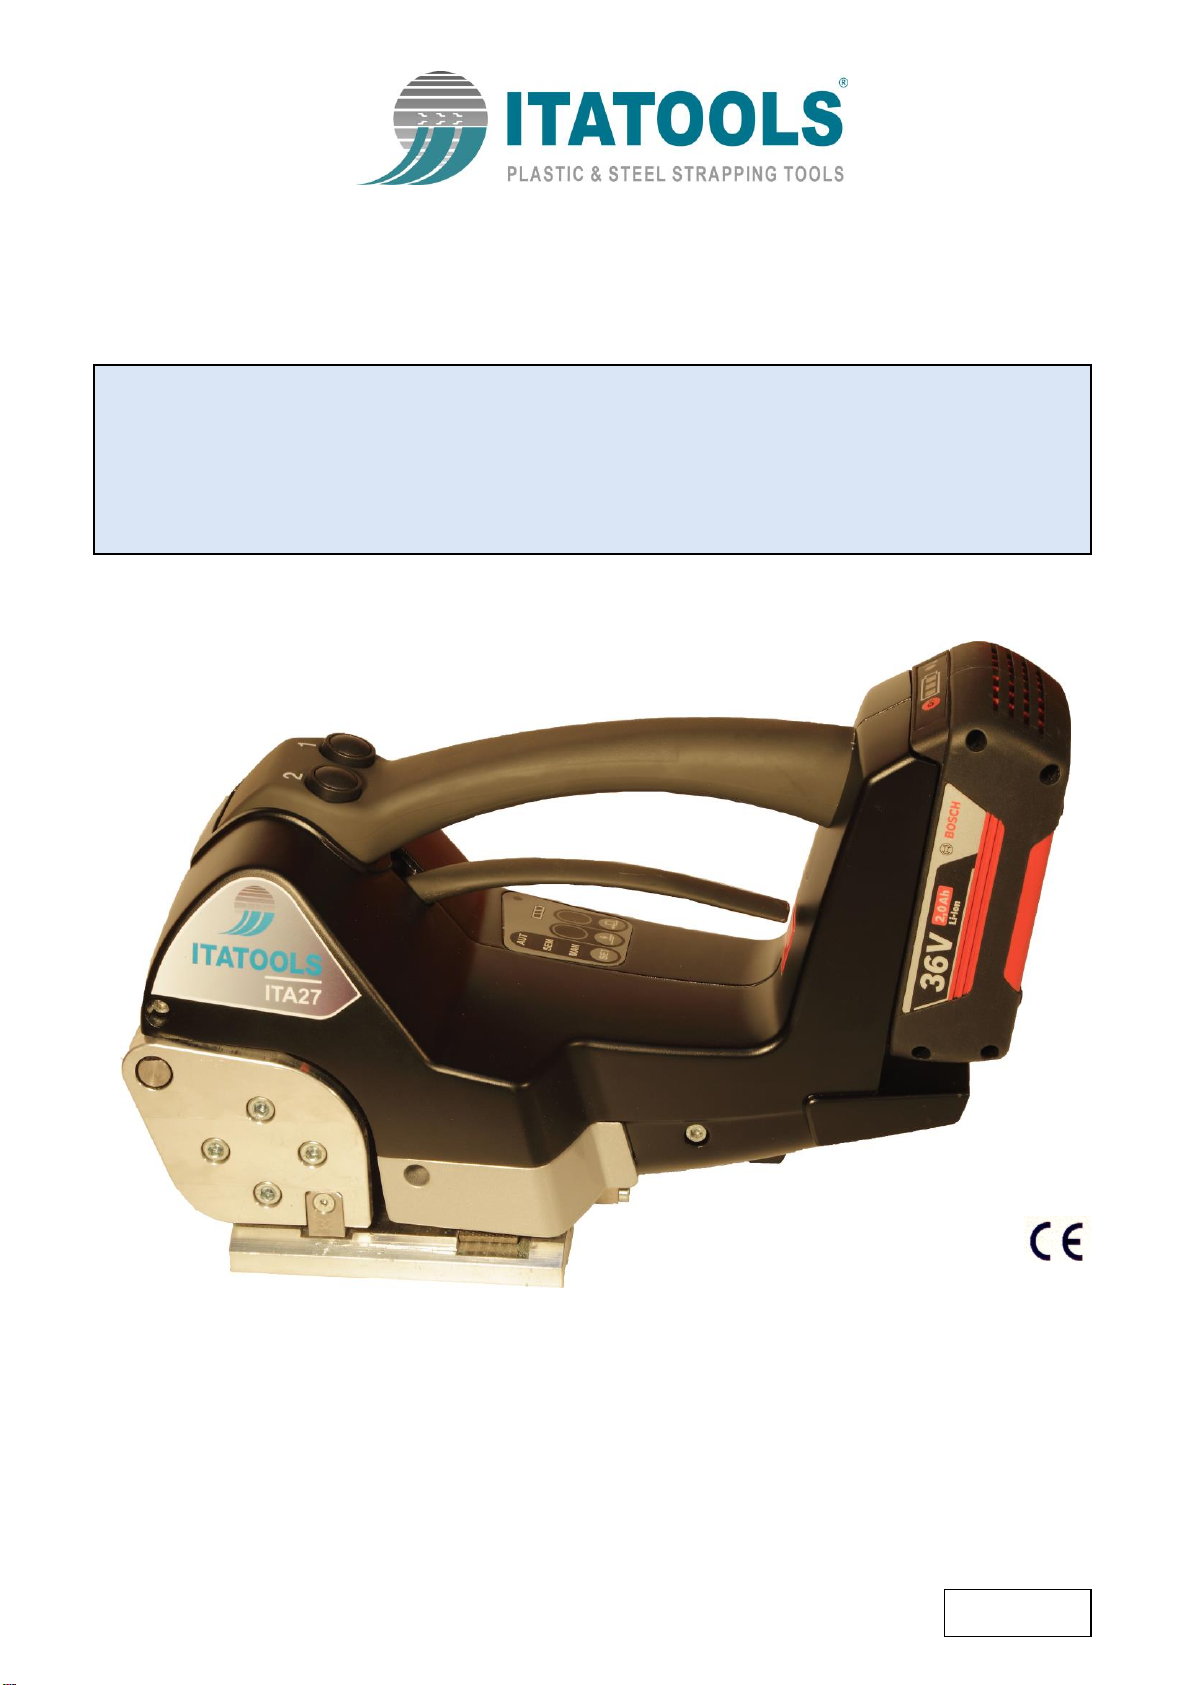
F- NORMES DE SECURITE : Pour commencer à travailler mettre la batterie jusqu’à entendre le clic du bouton de blocage,
comme montré avec l’image et appuyer sur 1. La batterie doit être utilisée seulement pour notre outil de cerclage et être rechargée
seulement par notre dispositif de chargeur de batterie, parce que d'autres buts ou applications notre garantie et responsabilité n'est
pas valide. La batterie devrait être employée par des personnes correctement qualifiées. Le manque de suivre les consignes
d'utilisation ou l'utilisation inexacte a pu endommager des dommages et de batterie. La batterie est fournie a partiellement chargé.
La batterie rechargeable de ions de lithium peut être chargée à tout moment sans réduire sa durée de vie ; l'interruption du procédé
de remplissage ne l'endommage pas. Utiliser et charger la batterie suivent svp l'instruction de dispositifs de fonctionnement.
Vérifier le journal de batterie, ne pas l'employer avec les pièces usées ou endommagées. Ne pas le démonter, ne modifient jamais
toute partie, ne relient pas le positif (+) et négatif (-), peut résulter un plein court-circuit préjudiciable. Ne pas inverser la bonne
polarité pendant l'utilisation ou ne pas charger. Ne pas transporter ou stocker la batterie avec des objets en métal, peut résulter un
court-circuit. Ne pas essayer de charger du chargeur différent non permis, la batterie pourrait être sérieusement endommagé.
Vérifier avant emploi les contacts. Ne pas mettre les clefs en métal entre les contacts. Ne pas utiliser la batterie pour des buts
autres que ceux indiqués. La batterie ne doit pas être laissée dans le mode de remplissage sans surveillance. Ne pas jeter la
batterie dans un feu ou le chauffer, ne pas stocker à température élevée, lumière du soleil directe, ne pas mettre dans le four à
micro-ondes ou une chaudière à pression. Le maintenir parti de n'importe quelle flamme exposée. Ne pas plonger la batterie dans
l'eau, la protègent contre l'humidité. Ne pas appliquer l'impact à la batterie, ou la jeter ou laisser tomber ou forer, si essai produit il
avec soin. En cas de génération de la chaleur, fumer l'émission, ou l'arrêt d'allumage immédiatement pour l'employer et remplacer.
Au cas où l'électrolyte entrerait en contact avec des yeux, rincer complètement avec de l'eau propre immediatly et consulter un
médecin ; pour des mains entrer en contact avec l'utilisation nettoient l'eau aussi. Evitez les temperature de la batterie inferieures à
0C° et superieures à 45C° pendant la charge.
COMMANDE DE BATTERIE NIVEAU : En appuyant sur "on" touche l'état de charge sera affiché auge 3 led . Si tout le led est la
foudre la batterie est complètement chargée. Si une seule led est la foudre puis peu de temps la batterie doit être rechargée.
DONNEES TECHNIQUES : Li-Ion (Lithium-Ion) 36V - 2 Ah Poids : 700 gr. Cod. B800477
Temps de charge 40 min. Temperature ideale pendant la charge: 15C° ( 32F) et +45C° (+113 F)
D–SICHERHEITSHINWEISE : Um anfangen zu arbeiten, entfernen Sie den Abstandshalter und setzen Sie den Akku, bis die
Sicherheitstaste klickt wie im Bild gezeigt und drucken sie 1. Der Akku sollte, die von den Menschen richtig ausgebildet.
Nichtbeachtung der Bedienungsanleitung oder unsachgemäße Verwendung könnte dazu führen, dass Verletzungen und Schäden
Batterie. Die Batterie ist teilweise belastet. Die Lithium Ionen Akku aufgeladen werden können jederzeit ohne Verringerung der
Lebensdauer; Unterbrechung der Erhebung Verfahren nicht beschädigt werden. Zu verwenden und den Akku folgen Sie bitte den
Anweisungen Bedienelemente. Wählen Batterie täglich, benutze es nicht mit abgenutzten oder beschädigten Teile. Nicht zu
zerlegen, nie einen beliebigen Teil davon, nicht mit den positiven (+) und negative (-), kann eine vollständige schädlich
Kurzschluss. Nicht invertieren die richtige Polarität während des Einsatzes oder der Ladung. Nicht Transport oder lagern Sie den
Akku mit metallischen Gegenständen, kann zu einem Kurzschluss. Versuchen Sie nicht, kostenlos mit verschiedenen Ladegerät
nicht erlaubt, die Batterie könnte ernsthaft beschädigt werden. Vor der Verwendung überprüfen Sie die Kontakte. Geben Sie keine
Metall Schlüssel zwischen Kontakten. Verwenden Sie nicht die Batterie für andere Zwecke als die angegebene. Batterie darf nicht
in der Erhebung ohne Aufsicht. Nicht werfen Sie den Akku nicht ins Feuer oder Hitze es, nicht bei hohen Temperaturen,
direktem Sonnenlicht, die nicht in der Mikrowelle oder ein Dampfkochtopf. Halten Sie es von einer Flamme ausgesetzt. Nicht
tauchen die Batterie in den Bereichen Wasser, Schutz vor Feuchtigkeit. Gelten nicht für Auswirkungen auf die Batterie, oder
werfen, fallen, bohren, wenn sie versuchen, sich mit Vorsicht. Im Falle der Wärmeerzeugung, Rauch Emission, oder Zündung
sofort zu verwenden und zu ersetzen. Im Falle Elektrolyten in Kontakt kommt mit den Augen, spülen Sie gründlich mit sauberem
Wasser und sofort einen Arzt konsultieren, für die Hände Kontakt sauberes Wasser zu verwenden. Vermeiden Sie
Batterietemperaturen unter 0 ° C und höher als 45 ° C während des Ladevorgangs.
KONTROLLE LADEKONTROLL : Durch Drücken "auf " Taste wird der Ladezustand Wanne 3 geführt werden angezeigt. Wenn
alle LED ist Blitz ist die Batterie vollständig aufgeladen ist. Wenn nur eine LED Blitz ist dann kurz muss die Batterie wieder
aufgeladen werden.
TECHNISCHE DATEN : Li-Ion (Lithium-Ion) 36V –2 Ah Gewicht: 700 gr. Cod. B800477
Time tarifering 40 min. Ideale Ladetemperatur: 15C° (32F) und +45C° (+113 F)
E- INSTRUCCIONES DE SEGURIDAD : Para empezar a trabajar, retire el separador e inserte la batería hasta que el botón de
seguridad clicks como se muestra en la imagen y prensa la tecla 1. El no seguir las instrucciones de operación o uso inadecuado
puede causar lesiones y daños batería. La batería se suministra parcialmente cargada. La batería recargable de ion de litio se
puede cargar en cualquier momento y sin reducción de su vida útil; interrumpir el procedimiento de carga no dañarlo. Para utilizar y
cargar la batería, por favor siga las instrucciones de funcionamiento los dispositivos. Compruebe la batería a diario, no lo use con
las piezas dañadas o gastadas. No desarme, nunca modificar cualquier parte, no conecte el positivo (+) y negativo (-), puede
provocar un corto circuito perjudicial. No invierta la polaridad derecho durante el empleo o cargo. No transporte o almacene la
batería con objetos metálicos, puede provocar un corto circuito. No trate de cargar con diferentes cargador no permitido, la batería
puede verse seriamente dañada. Antes de comprobar la utilización de contactos. No ponga claves entre los contactos de metal.
No la use para fines distintos de los especificados. La batería no se debe dejar en el modo de carga sin supervisión. No tires
la batería en el fuego o calor, no tienda a la alta temperatura, la luz directa del sol, no ponga en el horno de microondas o una olla
a presión. Mantener lejos de cualquier llama expuesta. No sumerja la pila en el agua, protegerlo de la humedad. No se aplican a
efectos de la batería, o tirar, gota, taladro, si ocurrió probarlo con cuidado. En caso de la generación de calor, el humo de emisión,
o de encendido por detener inmediatamente de utilizar y reemplazar. En el caso de electrolito entra en contacto con los ojos,
enjuáguelos bien con agua limpia y consulte inmediatamente a un médico; manos para uso en contacto con el agua potable
también. Evite las temperaturas de la batería por debajo de 0 ° C y superiores a 45 ° C durante la carga.
CONTROL DE NIVEL DE BATERÍA : Al pulsar botón "on" el estado de carga se mostrará cubeta 3 led. Si todos los LED es un
rayo que la batería está totalmente gratuita. Si sólo hay un LED es un rayo poco después que la batería necesita ser recargada.
DATOS TECNICOS : Li-Ion (Iones de Litio) 36 V –2 Ah Peso: 700 gr. Cod. B800477
Tiempo de carga 40 min. Temperatura ideal durante la carga: 15C° (32F) y +45° C (+113 F)

11
CARICABATTERIA/BATTERY CHARGER/ CHARGEUR / LADEGERÄT / CARGADOR DE BATERÍA:
I -ISTRUZIONI DI SICUREZZA : Il caricabatteria deve essere utilizzato esclusivamente da personale adeguatamente formato.
Non osservare le istruzioni contenute nel manuale e/o un improprio uso possono causarne il danneggiamento e pericoli al
personale. Ricaricare esclusivamente batterie ricaricabili agli ioni di litio Bosch oppure batterie ricaricabili montate nei
prodotti Bosch con le tensioni indicate nei dati tecnici. Controllare giornalmente l’apparecchio ed il cavo di alimentazione, non
utilizzarlo se danneggiato. Non disassemblare o modificare il caricabatteria, non connettere tra loro i contatti, si crea un
cortocircuito che danneggia in modo irreparabile il circuito elettronico. Non invertire la polarità durante l’uso o la ricarica. Prima
dell’uso controllare che i contatti siano puliti, integri e non vi siano oggetti metallici nell’alloggiamento batteria. NON LASCIARE IN
CARICA LA BATTERIA SENZA SUPERVISIONE. Non porre vicino a sorgenti di calore, non lasciarlo esposto al sole. Non coprire le
feritoie di ventilazione. Proteggerlo dall’umidità, non immergerlo in acqua e non farvi gocciolare alcun liquido. Evitare urti, cadute,
rotture, nel caso provarlo con cautela, se si produce calore, fumo etc., non utilizzarlo. Il caricabatteria va posto in modo stabile su
una superficie piana, non infiammabile e resistente al calore. Tenere lontano dalla zona di carica ogni tipo di sostanza infiammabile
o volatile. Scollegare sempre l’apparecchio dalla rete se non utilizzato. Per ogni intervento rivolgersi solo a personale qualificato od
ai centri assistenza autorizzati.
PROCESSO DI RICARICA : L’operazione veloce di ricarica viene segnalata tramite lampeggio dell’indicatore di carica della
batteria verde . La batteria puo essere prelevata e utilizzata in qualunque momento.
Nota bene: L’operazione di ricarica e possibile solo quando la temperatura della batteria ricaricabile si trova entro il campo
di temperatura di ricarica consentito. Una volta raggiunto l’80 % circa della capacita della batteria, la frequenza di lampeggio
dell’indicatore di carica della batteria verde rallenta. A questo punto si conclude il processo di ricarica rapida. Se la batteria rimane
inserita nel caricabatteria il processo di ricarica viene portato a termine in modalita Long Life.
La luce continua dell’indicatore di carica della batteria verde segnala che la batteria e stata ricaricata completamente.
Una volta terminata l’operazione, la batteria puo essere estratta ed e pronta per l’uso immediato.
Quando la batteria ricaricabile non e inserita, la luce continua del led indicatore di carica della batteria sta ad indicare che
la spina di collegamento alla rete e inserita nella presa di alimentazione e che la stazione di ricarica e pronta per l’esercizio.
MALFUNZIONAMENTO: La luce fissa dell’indicatore di carica della batteria rosso segnala che la temperatura della
batteria si trova al di fuori del campo consentito. Non appena viene raggiunto il campo di temperatura consentito, inizia il
processo di ricarica. La luce intermittente dell’indicatore di carica della batteria rosso segnala un altro guasto
dell’operazione di ricarica. Se durante l’inserimento della batteria nella stazione di ricarica e illuminato l’indicatore rosso per il
controllo della temperatura sulla batteria stessa, la temperatura della batteria e al di fuori del campo di temperatura di ricarica.
DATI TECNICI : Bosch GAL 3680 CV 220 V Cod. B800483 / Bosch BC3680 110 V Cod. B800535
Alimentazione : da 14,4 V a 36 V Uscita : 8A ATTENZIONE : Il caricabatteria è utilizzabile solo con batterie Bosch Li-Ion
GB - SAFETY INSTRUCTIONS: The charger must only be used by properly trained personnel. Do not follow the instructions in
the manual and / or improper use can cause damage and danger to personnel. Charge only rechargeable batteries for Bosch
lithium ion or rechargeable batteries installed in Bosch products with the voltages indicated in the specifications. Daily check the
device and the power cord, do not use if damaged. Do not disassemble or modify the charger, do not connect to each other
contacts, creating a short circuit that would irreparably damage the electronic circuit. Do not reverse the polarity when using or
recharging. Before use, check that the contacts are clean, intact and there is no metal objects in the battery case. DO NOT LEAVE
IN CHARGE BATTERY WITHOUT SUPERVISION. Do not place near heat sources, do not leave it exposed to the sun. Do not
cover the ventilation slits. Protect it from moisture, do not immerse in water and do not let any liquid drip. Avoid shocks, falls,
fractures, should try it with caution, if it produces heat, smoke, etc., do not use it. The battery charger must be placed in a stable
manner on a flat surface, non-flammable and heat resistant. Keep away from the charging area every type of flammable or volatile
substance. Always unplug the appliance from the mains when not in use. Any action contact qualified personnel or an authorized
service center.
CHARGING PROCESS: The fast charging operation is indicated by the flashing charge indicator of battery green. The battery can
be taken out and used at any time. Note: The charging operation is possible only when the temperature of the rechargeable battery
is located within the range of allowable charging temperature. Once reached 80% of the battery capacity, the indicator flashes
frequency slows. At this point ends the rapid charging process. If the battery is inserted into the charger the charging process is
completed in a mode Long Life.
The continuous charge indicator of the battery green, indicates that the battery is fully charged.
Once finished, the battery can be pulled out and is ready for immediate use.
When the rechargeable battery is not inserted, the continuous charge indicator of the battery green indicates that the plug is
connected to the network and inserted into the power outlet and the charging station and ready for operation.
MALFUNCTION: The fixed charge indicator of the battery red indicates that the temperature of the
Battery is outside the allowed range. As soon as it reaches the permissible temperature range, begins
charging process. The indicator flicker of battery red indicates another failure
operation of charging. If when inserting the battery in the charging station and lit the red indicator for the temperature control on the
battery, the battery temperature and outside the charging temperature range.
TECHNICAL DATA: Bosch GAL 3680 CV 220 V Cod. B800483 / Bosch BC3680 110 V Cod. B800535
Power supply: from 14.4 V to 36 V Output: 8A WARNING: The battery charger can only be used with battery Bosch Li-Ion
F- NORMES DE SECURITE : Le chargeur doit être utilisé que par du personnel formé. Ne pas suivre les instructions du manuel et
/ ou une mauvaise utilisation peut causer des dommages et de danger pour le personnel. Chargez uniquement des batteries
rechargeables pour Bosch lithium-ion ou piles rechargeables installées dans les produits Bosch avec les tensions indiquées dans
les spécifications. Vérifiez quotidiennement l'appareil et le cordon d'alimentation, ne pas utiliser si elles sont endommagées. Ne pas
démonter ni modifier le chargeur, ne pas se connecter les uns aux autres contacts, la création d'un court-circuit qui serait
irrémédiablement endommager le circuit électronique. Ne pas inverser la polarité lors de l'utilisation ou la recharge. Avant

12
l'utilisation, vérifiez que les contacts sont propres, intacts et il n'y a pas de batterie dans les objets métalliques. NE LAISSEZ PAS
EN CHARGE BATTERIE SANS SURVEILLANCE. Ne placez pas à proximité de sources de chaleur, ne le laissez pas exposé
ausoleil. Ne pas couvrir les fentes d'aération. Protéger de l'humidité, ne pas plonger dans l'eau et ne laissez pas couler de liquide.
Évitez les chocs, les chutes, les fractures, devraient essayer avec prudence, si elle produit de la chaleur, la fumée, etc., ne l'utilisez
pas. Le chargeur de batterie doit être placé de manière stable sur une surface plane résistante, non inflammable et de la chaleur.
Tenir à l'écart de la zone de charge tous les types de substance inflammable ou volatile. Toujours débrancher l'appareil du secteur
lorsqu'ils ne sont pas utilisés. Tout contact d'action personnel qualifié ou un centre de service autorisé.
PROCESSUS DE CHARGE : L'opération de recharge rapide est indiquée par l'indicateur de charge clignotant batterie verte . La
batterie peut être retirée et utilisée à tout moment . Remarque: L'opération de recharge est possible uniquement lorsque la
température de l'accumulateur se trouve dans la plage la température de la charge admissible . Une fois atteint 80 % de la capacité
de la batterie , la fréquence témoin clignote de charge de la batterie verte ralentit . À ce stade, se termine le processus de charge
rapide. Si la batterie est insérée dans le chargeur le processus de charge est terminé dans un mode Long Life.
La batterie verte témoin de charge continue indique que la batterie est complètement chargée. Une fois terminé, la batterie peut
être retiré et est prêt pour une utilisation immédiate. Lorsque la batterie rechargeable est pas insérée, l'éclairage continu de
l'indicateur de batterie LED indique que la fiche de connexion au réseau et inséré dans la prise de courant et que la station de
charge et prêt à fonctionner.
PROBLEME: Le voyant rouge de la batterie de charge fixe, la température de la La batterie est en dehors de la plage autorisée.
Dès qu'il atteint la plage de température admissible, commence processus de charge. L'indicateur scintillement caricadella batterie
rouge indique un autre échec le fonctionnement de la charge. Si, lors de l'insertion de la pile dans la station de charge et allume le
voyant rouge pour le contrôle de la température de la batterie, la température de la batterie et en dehors de la plage de
température de charge.
FICHE TECHNIQUE: Bosch GAL 3680 CV 220 V Cod. B800483 / Bosch BC3680 110 V Cod. B800535
Supply: de 14.4 V a 36 V Sortie: 8A AVERTISSEMENT: Le chargeur de ne peut être utilisé avec la batterie Bosch Li-Po
D–SICHERHEITSHINWEISE : Das Ladegerät darf nur von entsprechend geschultem Personal bedient werden. Folgen Sie nicht
den Anweisungen im Handbuch und / oder unsachgemäße Verwendung kann zu Schäden und zu Personenschäden führen. Akkus
nur für Bosch Lithium-Ionen-oder wiederaufladbare Batterien installiert in Bosch-Produkte mit den Spannungen in den
Spezifikationen angegeben. Täglich überprüfen Sie das Gerät und das Netzkabel nicht verwenden, wenn sie beschädigt. Nicht
zerlegen oder modifizieren Sie das Ladegerät, schließen nicht miteinander Kontakte, um einen Kurzschluss zu schaffen, die die
elektronische Schaltung irreparabel beschädigen würde. Sie nicht die Polarität umgekehrt bei der Verwendung oder
Wiederaufladen. Vor dem Gebrauch überprüfen, dass die Kontakte sind sauber, intakt und es gibt keine Batterie in den
Metallobjekten. NICHT IN CHARGE BATTERY OHNE AUFSICHT LASSEN. Nicht in der Nähe von Wärmequellen, lassen Sie sie
nicht der Sonne ausgesetzt. Decken Sie die Lüftungsschlitze abdecken. Schützen Sie es vor Feuchtigkeit, tauchen Sie nicht im
Wasser und lassen Sie keine Flüssigkeiten tropfen. Vermeiden Sie Stöße, Stürze, Knochenbrüche, sollten versuchen, es mit
Vorsicht, wenn es Wärme erzeugt, Rauch, etc., verwenden Sie es nicht. Das Batterieladegerät muss auf stabile Weise auf einer
flachen Oberfläche beständig, nicht brennbar und Wärme gestellt werden. jede Art von brennbaren oder flüchtigen Substanz halten
von der Lade entfernt. Ziehen Sie immer das Gerät vom Stromnetz, wenn sie nicht in Gebrauch ist. Jede Aktion Kontakt
qualifiziertes Personal oder einem autorisierten Service-Center.
LADEPROZESS: Die schnelle Ladevorgang durch das Blinken Ladeanzeige angezeigt grüne Batterie. Die Batterie kann jederzeit
entnommen und verwendet werden.
Hinweis: Der Ladebetrieb ist nur möglich, wenn die Temperatur der wiederaufladbaren Batterie innerhalb des Bereichs befindet,
der zulässigen Ladetemperatur. Sobald 80% der Batteriekapazität erreicht, blinkt die Anzeige Frequenz, um die grüne Batterie
Lade verlangsamt. An diesem Punkt endet die Schnellladung. Wenn die Batterie in das Ladegerät der Ladevorgang eingeführt
wird, wird in einem Modus Long Life abgeschlossen.
Die kontinuierliche Ladekontrollanzeige grün Batterie zeigt an, dass die Batterie vollständig geladen ist.
Sobald Sie fertig sind, kann die Batterie herausgezogen werden und ist sofort einsatzbereit.
Wenn der Akku nicht eingesetzt ist, zeigt die kontinuierliche Beleuchtung der Batterieanzeige LED an, dass
Stecker die Verbindung zum Netzwerk und in die Steckdose eingesteckt und dass die Ladestation und betriebsbereit.
PROBLEM: Die feste Ladekontrollleuchte rot -Batterie, die Temperatur der Akku ist außerhalb des zulässigen Bereichs . Sobald es
die zulässige Temperaturbereich erreicht, beginnt ladevorgang .
Die Anzeige flimmern die rote Batterie aufzuladen zeigt ein weiteres Scheitern Betrieb des Ladens . Wenn bei der in der
Ladestation Einlegen der Batterie und leuchtet die rote Anzeige für die Temperaturregelung an der Batterie , der Batterietemperatur
und außerhalb des Ladetemperaturbereich.
TECHNISCHE DATEN: Bosch GAL 3680 CV 220 V Cod. B800483 / Bosch BC3680 110 V Cod. B800535
Versorgung: von 14,4 V bis 36 V Ausgang: 8A WARNUNG: Das Ladegerät kann nur mit Bosch Akku Li-Ion
E -INSTRUCCIONES DE SEGURIDAD : El cargador debe ser utilizado sólo por personal debidamente capacitado. No seguir las
instrucciones del manual y / o el uso inadecuado puede causar daño y peligro para el personal. Sólo cargue pilas recargables de
iones de litio de Bosch o baterías recargables instaladas en productos de Bosch con los voltajes indicados en las especificaciones.
Se controla diariamente el dispositivo y el cable de alimentación, no utilice si está dañado. No desmonte ni modifique el cargador,
no conecte entre sí los contactos, creando un cortocircuito que podría ocasionar daños irreparables en el circuito electrónico. No
invierta la polaridad cuando se utiliza o recarga. Antes de usar, compruebe que los contactos están limpios, intactos y no hay
batería en los objetos de metal. NO DEJE EN CARGA DE LA BATERÍA SIN SUPERVISIÓN. No coloque cerca de fuentes de
calor, no deje expuesto al sol. No cubra las ranuras de ventilación. Protegerlo de la humedad, no sumerja en agua y no dejar que
gotee líquido. Evitar golpes, caídas, fracturas, deben tratar con precaución, si se produce calor, humo, etc., no lo use. El cargador
de baterías se debe colocar de manera estable sobre una superficie plana, no inflamable y resistente al calor. Mantener alejado de
la zona de carga de todo tipo de sustancias inflamables o volátiles. Siempre desconecte el aparato de la red cuando no esté en
uso. Cualquier acción de personal cualificado o un centro de servicio autorizado.
CARGA DE PROCESO: El proceso de carga rápida se indica mediante el indicador de carga

13
verde de la batería. La batería se puede sacar y utilizar en cualquier momento.
Nota: La operación de carga sólo es posible cuando la temperatura de la batería recargable se encuentra dentro de la gama
de la temperatura de carga permisible. Una vez que alcanzó el 80% de la capacidad de la batería, la frecuencia parpadea de carga
de la batería verde ralentiza. En este punto termina el proceso de carga rápida. Si la batería está insertada en el cargador el
proceso de carga se ha completado en un modo de Long Life.
La batería de color verde claro indicador de carga continua indica que la batería está completamente cargada. Una vez terminada,
la batería se puede sacar y está listo para su uso inmediato. Cuando no se ha insertado la batería recargable, la iluminación
continua del indicador de batería LED indica que la conexión de enchufe a la red y se inserta en la toma de corriente y que la
estación de carga y listo para funcionar.
MAL FUNCIONAMIENTO: El rojo de la batería indicador luminoso de carga fija, la temperatura de la La batería está fuera del
rango permitido. Tan pronto como se alcanza el intervalo de temperatura permitido, comienza el proceso de carga. El parpadeo
indicador de cargar la batería de color rojo indica un nuevo fracaso la operación de carga. Si al insertar la batería en la estación de
carga y encendido el indicador rojo para el control de la temperatura de la batería, la temperatura de la batería y fuera de la gama
de temperatura de carga.
DATOS TÉCNICOS: Bosch GAL 3680 CV 220 V Cod. B800483 / Bosch BC3680 110 V Cod. B800535
Alimentación: desde 14,4 V haste 36 V Salida: 8A ADVERTENCIA: El cargador sólo se puede utilizar con la batería Li-Ion
SEGNALAZIONI LUMINOSE
LED DI SEGNALAZIONE STATO
OPERAZIONE
LED VERDE ACCESO
STAND-BY o BATTERIA COMPETAMENTE CARICA
LED VERDE LAMPEGGIANTE
BATTERIA IN CARICA FINALE (80%-99%)
LED ROSSO ACCESO
BATTERIA IN CARICA ALLA MASSIMA CORRENTE
LED ROSSO LAMPEGGIANTE
BATTERIA DIFETTOSA- BASSA o ALTA TENSIONE
SEGNALAZIONI ACUSTICHE
SEGNALE EMESSO
OPERAZIONE
DUE BREVI BEEPS
BATTERIA OK- INIZIO CARICA
SINGOLO BEEP LUNGO
CARICA TERMINATA –BATTERIA PRONTA
DUE BREVI BEEPS OGNI MINUTO DOPO IL TERMINE
DELLA CARICA
BATTERIA CARICA –PRONTA ALL’USO MA ANCORA INSERITA NEL
CARICABATTERIE
BEEPS RAPIDI E INTERMITTENTI CONTINUI
BATTERIA CON PROBLEMI –CARICA NON CONSENTITA
VISUAL SIGNAL
LED OF SIGNALLING STATUS
OPERATION
GREEN LED STEADY LIGHT
STAND-BY or FULL LOADED BATTERY
BLINKING GREEN LED
BATTERY QUITE LOADED (80%-99%)
RED LED STEADY LIGHT
BATTERY IN CHARGE AT MAX CURRENT
BLINKING RED LED
BATTERY DEFECT- LOW or OVER VOLTAGE
SOUND SIGNAL
SIGNAL ISSUED
OPERATION
TWO SHORT BEEPS
BATTERY OK- STARTS TO CHARGE
SINGLE LONG BEEP
BATTERY FULL LOADED - READY
DOUBLE SHORT BEEPS EVERY ONE MINUTE AFTER FULL CHARGE
REACHED
BATTERY FULL LOADED –READY TO USE BUT STILL
HOUSED INTO CHARGER
FAST INTERMITTENT CONTINUOS BEEPS
BATTERY HAS TROUBLE –CHARGE DIDN’T ALLOW

14
4.1 ACCESSORI / ACCESSORIES / ACCESSOIRES / ZUBEHÖR / ACCESORIO
SOSPENSIONE / SUSPENSION / LEVAGE/ AUFZUGHAKEN / SUSPENSIÓN :
I- La macchina può essere equipaggiata con un gancio di sospensione fisso a due posizioni. Il gancio deve essere fissato al
tendireggia tramite due viti in verticale o in orizzontale come nella figura seguente. Codice di ordinazione A000155 (viti comprese)
GB –The tool can be equipped with a fixed two-position suspension hook. The hook must be fixed to the tool by two screws in
vertically or horizontally position as in the following figure. Ordering code A000155 (including screws)
F–L'outil peut être équipé d'un crochet de suspension fixe à deux positions. Le crochet doit être fixé à l'outil par deux vis en
position verticale ou horizontale, comme dans la figure suivante. Code de commande A000155 (y compris les vis)
D –Das Werkzeug kann mit einem festen Zweistellungs-Aufhängehaken ausgestattet werden. Der Haken muss wie in der
folgenden Abbildung vertikal oder horizontal fixiert sein. Bestellnummer A000155 (einschließlich Schrauben)
E–La herramienta puede equiparse con un gancho de suspensión de dos posiciones fijo. El gancho debe fijarse a la
herramienta con dos tornillos en posición vertical u horizontal, como se muestra en la siguiente figura.
Código de pedido A000155 (incluyendo tornillos)
I–Se si lavora in differenti posizioni, la macchina può essere equipaggiata con un gancio di sospensione girevole.
Codice di ordinazione A000160.
GB –If you work in different positions, the tool can be equipped with a rotating suspension hook.
Ordering code A000160.
F–Si vous travaillez dans différentes positions, l'outil peut être équipé d'un crochet de suspension rotatif.
Code de commande A000160
D –Wenn Sie in verschiedenen Positionen arbeiten, kann das Werkzeug mit einem drehbaren Aufhängehaken ausgestattet
werden. Bestellnummer A000160
E–Si trabaja en diferentes posiciones, la herramienta puede equiparse con un gancho de suspensión giratorio.
Código de pedido A000160

15
PIASTRA ANTIUSURA / WEARING PLATE / LEVAGE/ AUFZUGHAKEN / SUSPENSIÓN :
I–Quando si utilizza la ITA 27 su pacchi con superficie abrasiva, si consiglia l’utilizzo di una piastra di protezione in inox per non
rovinare prematuramente il telaio. Codice di ordinazione A000158.
GB –When using ITA 27 on packages with an abrasive surface, it is advisable to use a stainless steel protection plate in order not to
damage the frame prematurely. Ordering code A000158.
F–Lors de l'utilisation d'ITA 27 sur des emballages avec une surface abrasive, il est conseillé d'utiliser une plaque de protection en acier
inoxydable afin de ne pas endommager prématurément le cadre. Code de commande A000158.
D –Bei Verwendung von ITA 27 auf Packungen mit abrasiver Oberfläche ist es ratsam, eine Edelstahlschutzplatte zu verwenden, um den
Rahmen nicht vorzeitig zu beschädigen. Bestellnummer A000158.
E–Cuando use ITA 27 en paquetes con una superficie abrasiva, es aconsejable utilizar una placa de protección de acero inoxidable
para no dañar el armazón prematuramente. Código de pedido A000158.

16
I - NON AZIONARE L’APPARECCHIO SENZA REGGIA, SI POTREBBERO DANNEGGIARE RULLO O
DISPOSIVO DI SALDATURA / TAGLIO
GB - DO NOT OPERATE THE TOOL WITHOUT STRAP, YOU COULD DAMAGE THE FEEDWHEEL AND THE
WELDING / CUTTING GROUP
F - NE PAS ACTIONNER L'APPAREIL SANS FEUILLARD, VOUS POURRIEZ ENDOMMAGER LE ROULEAU
D’ENTRAÎNEMENT ET LE GROUPE DE SOUDURE/ COUPURE
D - NIE DAS GERÄT OHNE KUNSTSTOFFBAND BETREIBEN, SPANNWALZE UND SCHWEIß-VORRICHTUNG
SOWIE SCHNEIDKLINGE KÖNNTEN BESCHÄDIT WERDEN
E - NUNCA ACCIONE EL APARATO SIN FLEJE YA QUE PODRÍA DAÑARSE EL RODILLO Y EL DISPOSITIVO
DE SOLDADURA / CORTE
LED DI SEGNALAZIONE
VERDE
MACCHINA IN OPERA
VERDE LAMPEGGIANTE
MACCHINA IN STAND-BY
INDICADOR LUMINOSO
VERDE
MÁQUINA EN MARCHA
VERDE INTERMITENTE
MÁQUINA EN STAND-BY
DEL DE SIGNALISATION
VERT
MACHINE EN MARCHE
CLIGNOTEMENT VERT
MACHINE EN ATTENTE
LED OF SIGNALLING
GREEN
TOOL IN WORK
GREEN BLINKING
STAND-BY TOOL
LED - LEUCHTSIGNAL
GRüN
GERÄT IM EINSATZ
BLINKT GRüN
GERÄT IST IN STAND-BY
5) ELEMENTI PRINCIPALI EREGOLAZIONI /OPERATING ELEMENTS AND ADJUSTMENTS/MODULES PRINCIPAUX
ETRÉGLAGES/ BESCHREIBUNGUNDEINSTELLUNGEN / ELEMENTOS PRINCIPALES Y AJUSTES
CARICA DELLA BATTERIA
BATTERY CHARGE
CHARGE DE LA BATTERIE
BATTERIELADEZUSTANDLED
CARGA DE LA BATERIA
LED DI SEGNALAZIONE
LED OF SIGNALLING
DEL DE
SIGNALISATION
LED LEUCHTSIGNAL
INDICADOR LUMINOSO
LEVA 3 –LEVA SBLOCCO
LEVER 3 –RELEASE LEVER
LEVIER 3 –LEVIER DE DÉVERROUILLAGE
HEBEL 3 –BLOCKIEREN/LÖSEN
PALANCA 3 –PALANCA DE DESBLOQUEO
PULSANTE 2 –SALDATURA / TAGLIO (SEM - MAN)
STOP TENSIONE (AUT)
BUTTON 2 –CUTTING / WELDING (SEM - MAN)
TENSIONING STOP (AUT)
BOUTON 2 –SOUDURE / COUPURE (SEM - MAN)
ARRET TENSIONMENT (AUT)
TASTER 2 –SCHWEIßEN / SCHNEIDEN (SEM - MAN)
STOP BAND SPANNEN (AUT)
BOTÓN 2 –SOLDADURA / CORTE (SEM - MAN)
PARADA DE TENSADO (AUT)
PULSANTE 1 –AZIONAMENTO TENSIONE (AUT –SEM - MAN)
STOP TENSIONE (AUT)
BUTTON 1 –TENSIONING (AUT –SEM - MAN)
TENSIONING STOP (AUT)
BOUTON 1 –TENSIONNEMENT (AUT –SEM - MAN)
ARRET TENSIONNEMENT (AUT)
DRUCKTASTER 1 –BAND SPANNEN (AUT –SEM - MAN)
STOP BAND SPANNEN (AUT)
BOTÓN 1 –ACCIONAMIENTO TENSADO (AUT –SEM - MAN)
PARADA DE TENSADO (AUT)

17
5.1 REGOLAZIONE TENSIONAMENTO E SALDATURA / ADJUSTING TENSION AND WELDING / AJUSTEMENT
TENSIONEMENT ET SOUDURE / EINSTELLEN DER SPANNUNG UND SCHWEIßARBEITEN / AJUSTE DE
TENSION Y SOLDADURA
I - Per poter effettuare ogni tipo di regolazione (saldatura/taglio e tensionamento) occore innanzitutto che la macchina sia accesa.
Premere il tasto settaggio tensione come illustrato in figura A per 3 sec., inizierà a lampeggiare il numero pari alla forza di
tensionamento dopodiché è possibile selezionare il valore desiderato. Una volta rilasciato il pulsante, il numero smetterà di
lampeggiare dopo 3 sec. ed il valore impostato sarà memorizzato. La stessa procedura deve essere fatta per poter impostare il
valore di saldatura utilizzando l’apposito tasto come in figura B.
GB - In order to do any kind of adjustment (welding / cutting and tensioning) first of all that the machine shoul be switch on, then
press the adjust tension button as shown in picture A for 3 sec., the number equal to the tension force will flash and after you can
select the desired value. Once you release the button, the number will stop flashing after 3 seconds and the set value will be
stored. The same procedure must be done in order to set the welding value using the button as shown in picture B.
F- Pour pouvoir effectuer tous les types de réglage (soudure/coupure et tension) il faut avant tout que la machine soit allumée.
Après quoi appuyer la touche de tension pendant 3 sec., comme montré par la figure A. Le numéro correspondant à la tension
actuellement réglée clignotera et à ce point il est possible de choisir une valeur differente. Une fois relaché la touche, le numèro ne
clignotera plus et après 3 sec. la tension sera enregistrée. La meme procedure pour réglér la puissance de soudure (voir figure B).
D- Damit alle Einstellungen vorgenommen werden können (Verschweißen/Abschneiden und Spannen) muss das Gerät zunächst
einmal eingeschaltet sein. Danach die Setting-Taste für die Bandspannung, wie in Abb. A dargestellt, etwa 3 Sekunden lang
gedrückt halten, bis die Zahl der Spannkraft aufblinkt und auf den gewünschten Wert eingestellt werden kann. Sobald die Taste
losgelassen wird, hört der eingestellte Wert nach 3 Sekunden auf zu blinken und ist eingespeichert. Derselbe Vorgang ist zur
Einstellung des Verschweißungswertes durch Drücken der entsprechenden Taste, wie in Abb. B dargestellt, zu wiederholen.
E- Para poder efectuar cualquier tipo de regulación (soldadura/corte y tensado) en primer lugar es necesario que la máquina esté
encendida; después, debe presionar la tecla de configuración de tensión como ilustra la figura A durante 3 seg. comenzará a
parpadear el número según la fuerza de tensado. Después, es posible seleccionar el valor deseado. Una vez que se suelte el
pulsador, después de 3 seg. el número dejará de parpadear y será memorizado el valor configurado. Debe efectuarse el mismo
procedimiento para poder configurar el valor de soldadura usando la tecla correspondiente como indica la figura B.
5.2 MODI OPERATIVI / OPERATING MODE / MODE D’EXPLOITATION / BETRIEBSARTEN / FUNCIONAMENTO
I–Tenere premuto per circa 3 sec. il tasto SET per poter accedere ai vari modi operativi (automatico, semiautomatico e manuale)
Fig. C. Iniziarà a lampeggiare il led in corrispondenza del modo operativo in uso, dopodiché è possibile selezionare quello
desiderato. Una volta rilasciato il pulsante il led smetterà di lampeggiare dopo circa 3 sec. ed il modo impostato sarà memorizzato.
REGGIATURA AUTOMATICA : La reggiatura si ottiene premendo due volte in tempo ravvicinato il tasto 1 di tensionamento.
Tensione, saldatura e taglio avvengono in automatico. PER INTERROMPERE LA TENSIONE AUTOMATICA PREMERE I TASTI
1 O 2. Attenzione : dopo 15 sec. il tensionamento si interrompe da solo se non raggiunta la massima tensione
REGGIATURA SEMI-AUTOMATICA : La reggiatura si ottiene tenendo premuto il tasto 1 di tensionamento, quando la reggia e
tirata al massimo del valore impostato viene automaticamente saldata e tagliata. Durante la fase di tensionamento se il pulsante 1
viene rilasciato la tensione si ferma.
REGGIATURA MANUALE : La tensione si ottiene premendo il tasto 1, quando la reggia è tesa a sufficienza premere il tasto 2 per
effettuare saldatura e taglio.
GB - Press and hold for 3 sec. the SET button to access the various modes of operation (automatic, semiautomatic and manual)
Fig C. Iniziarà to flash the led corresponding to the mode in use, then you can select the one you want, when you release the
button, the LED will stop blinking after about 3 sec. and the mode you set will be stored.
AUTOMATIC STRAPPING: The strapping is obtained by pressing twice within a short time key 1 retirement. Voltage, welding and
cutting are automatic. TO STOP AUTOMATIC TENSION PRESS 1 OR 2.
Warning: after 15 sec. the tension is automatically stopped if the max tension is not reached
SEMI-AUTOMATIC STRAPPING: The strapping is achieved by holding down the 1 key of retirement, when the palace and pulled
up to the set value is automatically sealed and cut. During the retirement stage if the button 1 is released the voltage stops.
STRAPPING MANUAL: The strapping is obtained by pressing the button 1, when the strap is tight enough to press the 2 key to
welding and cutting.
F -Appuyer la touche SET pendant environs 3 sec. pour accéder aux differentes modalités (automatique, semi-automatiique et
manuel) voire Fig. C. Le voyant clignotera en correspondance de la modalité de la dérnière utilisation et successivement il sera
possible de selectioner une differente modalité; aprés 3 sec. que la touche a eté relachée le voyant ne clignotera plus et la
modalité choisie sera mémorisée.
CERCLAGE AUTOMATIQUE s’obtient appuyant deux fois en rapide succession sur la touche 1 . Tension, soudure et coupe du
feuillard ont place automatiquement. POUR ARRETER LA TENSION ATOMATIQUE APPUYER SUR 1 OU 2.
CERCLAGE SEMI-AUTOMATIQUE s’obtient en tenant la touche 1 de tension appuyée; quand le feuillard est tensionné à la valeur
mémorisée ,il vient automatiquement soudé et coupé. Pendant la phase de tension, si la touche 1 est relachée, la tension s’arrete.
CERCLAGE MANUEL se deroule en deux phases: La tension s’obtient en appuyant sur la touche 1, quand le feuillard est
suffisament tendu appuyer la touche 2 pour que la soudure et la coupe aillent lieu.

18
D - Die Taste SET etwa 3 Sekunden lang gedrückt halten, um in die Auswahl der verschiedenen Betriebsarten (automatisch,
halbautomatisch und manuell) zu gelangen (Abb. C. Die LED-Lampe der entsprechenden Betriebsart, die im Gebrauch ist, beginnt
aufzublinken. Danach kann eine neue Auswahl getroffen werden und sobald die Taste losgelassen wird, hört die eingestellte
Betriebsart nach etwa 3 Sekunden auf zu blinken und ist eingespeichert.
AUTOMATISCHE UMREIFUNG: Die Umreifung erfolgt durch Doppelklick der Spann-Taste 1. Das Spannen, Verschweißen und
Abschneiden erfolgt automatisch. UM DIE AUTOMATISCHE ABFOLGE ZU UNTERBRECHEN, DIE TASTE 1 ODER 2
DRUCKEN. Achtung: nach 15 sec. die Spannung wird automatisch gestoppt, wenn die maximale Spannung nicht erreicht wird
HALBAUTOMATISCHE UMREIFUNG: Die Umreifung erfolgt durch Gedrückthalten der Spann-Taste 1. Wenn das Band maximal
auf den eingestellten Wert gespannt ist, wird es automatisch verschweißt und abgeschnitten. Bei Loslassen der Taste 1 während
der Spannphase wird der Spannvorgang gestoppt.
MANUELLE UMREIFUNG: Das Spannen erfolgt durch Drücken der Taste 1. Wenn das Band ausreichend gespannt ist, Taste 2
zum Verschweißen und Abschneiden drücken.
E -Mantenga presionada la tecla SET durante 3 segundos para poder acceder a los diferentes modos de operación (automático,
semiautomático y manual) Fig. C. Comenzará a parpadear el LED según el modo operativo en uso. Después, es posible
seleccionar el modo deseado. Una vez que se suelte el pulsador, el LED dejará de parpadear después de 3 segundos y se
memorizará el modo configurado.
PRECINTADO AUTOMÁTICO: El precintado automático se obtiene presionando dos veces consecutivas la tecla 1 de tensado. El
tensado, la soldadura y el corte se realizan automáticamente. PARA INTERRUMPIR LA SECUENCIA AUTOMATICA, PRESIONE
LASTECLAS1O2.Advertencia: después de 15 seg. la tensión se detiene automáticamente si no se alcanza la tensión máxima
PRECINTADO SEMI-AUTOMÁTICO: El precintado se obtiene manteniendo presionada la tecla 1 de tensado; cuando el precinto
se tensina al máximo valor configurado, se suelda y se corta automáticamente. Durante la fase de tensado, si se suelta el pulsador
1, se detiene el tensado.
PRECINTADO MANUAL: El tensado se obtiene presionando la tecla 1, cuando el precinto está lo suficientemente tenso, presione
la tecla 2 para efectuar la soldadura y el corte
( A ) ( B ) ( C )

19
5.3 REGOLAZIONE LARGHEZZA REGGIA / STRAP SIZE CONVERSION / REGLAGE DE LA LARGEUR DE LA
BANDE / EINSTELLEN DER BANDBREITE / AJUSTE DE LA ANCHURA DEL FLEJE
I- E’ possibile convertire l’apparecchio per le misure di reggia 19/25/32 mm sostituendo i guidareggia anteriore, laterale e
spostando il perno del guidareggia posteriore D006510 (25/32 mm) o sostituendolo (19mm) come nella figura seguente :
UK –It’s possible to convert the unit for 19mm 5/8” - 25mm 1” – 32mm 1 1/4” strap sizes replacing front and lateral strapguide
and moving the pin of the rear strapguide D006510 (25/32mm 1”/1 1/4”) or replace it (19mm 3/4”) as in the following picture :
F- Il est possible de changer la taille du feuillard de 19/25/32 mm en replaçant les cliquets de guidage avant et cotè, et movement
la goupille de guidage arrière D006510 (25/32 mm) ou le remplacer (19 mm) comme dans la figure suivante :
D- Es ist möglich, die Einheit für 19 mm 5/8 "- 25 mm 1" - 32 mm 1 1/4 "Gurtgrößen umzubauen, die vorderen und seitlichen
Gurtführungen ersetzen und den Stift der hinteren Gurtführung D006510 (25/32 mm 1" / 1 1/4 ") Oder ersetzen Sie es (19 mm 3/4")
wie in der folgenden Abbildung :
E- Es posible convertir el equipo para las medidas de correa de 19/25/32 mm sustituyendo la guía de precintos anterior, lateral y
desplazando el pasador de la guía de trasera D006510 (25/32 mm) o reemplazarlo (19 mm) como en la siguiente figura :

20
I -L’apparecchio modello ITA27 è concepito per reggiare imballi con reggette in plastica. La reggia deve essere avvolta intorno
all’imballo manualmente e quindi inserita, secondo le istruzioni, nell’apparecchio che eseguirà il tensionamento, il taglio e la
saldatura a vibrazione della stessa. Avvolgere la reggia intorno al materiale da legare, tenendo l’estremità con la mano sinistra e
sovrapponendo la reggia con la mano destra (attenzione che la reggia sia pulita da olio, grasso e sporco); aprire la reggiatrice
premendo la leva sblocco, inserire le regge sovrapposte e ben allineate tra il corpo e la base dell’apparecchio spingendole contro i
guidareggia anteriore e posteriore (fig.E1). Premere il tasto 1 per effettuare il tensionamento fino al raggiungimento della tensione
desiderata o impostata (fig.E2) (una volta raggiunta la massima tensione la macchina permette di effettuare altri 2 tensionamenti
dopo i quali deve avvenire la saldatura). Premendo il tasto 2, la macchina effettuerà la saldatura ed il taglio della reggia (fig.E3). Al
termine del countdown (3-2-1), indicante il tempo di raffreddamento, ed il conseguente suono di fine ciclo, sarà possibile estrarre la
reggia premendo la leva sblocco. (fig.E4).
CONTROLLO DELLA CARICA DELLA BATTERIA : Durante l’uso della macchina è possibile visualizzare sempre lo stato di
carica della batteria. Batteria carica (fig.E5) –batteria metà carica (fig.E6) –batteria quasi scarica (fig.E7). Quando la batteria si sta
per scaricare del tutto il primo led lampeggerà.
BLOCCAGGIO E SBLOCCAGGIO TASTI : E’ possibile attivare il blocco dei tasti per evitare la modifica accidentale delle
impostazioni. Premere ogni tasto del pannello di controllo due volte, a partire dal tasto SET (fig.E8), automaticamente il pannello si
bloccherà ed apparirà la lettera L che significa "LOCK - BLOCCATO" (fig.E9). In questo modo l'operatore non potrà modificare i
parametri. Per sbloccare il pannello ripetere la procedura dall'inizio.
GB - The tool model ITA27 is designed to strap packages with plastic strap. The strap is fed around the package manually and
inserted in the tool, as showed in the instructions, tensioned, cutted and friction welded by the tool.
Wrap the parcel to be bound with the strap, as showed in pic.E1, holding the tip of the strap with left hand and winding over the
strap by right hand ( beware that the strap will be clean, oil and grease free); to open the tool pressing the lever release, to insert
very resists to them overlapping and aligned between the body and the base of the front and posterior apparatus pushing them
against the strap. To press button 1 in order to carry out the tensioning until the attainment of the tension wished or set up (pic.E2).
(once caught up the maximum tension the machine allows to carry out others 3 tensionament after which the welding must happen)
Pressing the button 2, the tool will carry out therefore the welding and the cut of the strap (pic.E3). At the end of the countdown
(3-2-1), indicating the cooling time, with the contemporary end of cycle sound, it will be possible to extract the strap, pressing the
opening lever (pic.E4).
CONTROL BATTERY LEVEL : During use of the tool it’s possible to always view the charge status of the battery. Battery charging
(pic.E5) - battery charge half (pic.E6) - Low Battery (pic.E7). When the battery is about to run out of all the first led flash.
LOCKING AND RELEASE KEYS : The touch-pad lock can be activated to prevent accidental changes to the settings. Push every
button twice, starting from SET button as in pic.E8, automatically the panel will lock and the letter Lwill appear that means “LOCK”
(pic.E9). In this way the operator can not change any parameters. To unlock the panel repeat the procedure from the beginning.
F -L’outil modèle ITA27 est developpé pour cercler des colis avec du feuillard en plastique. Le feuillard doit etre passé autour du
colis et place dans l’outil - voir instructions –afin qu’il puisse tensioner, souder à friction et couper le feuillard.
S’ assurer que le feuillard soit bien propre, en particulier sans trace d’huile ou de graisse. Cercler le colis avec le feuillard,et, en
tenant les deux extremitées superposées avec la main gauche , comme montré en photo E1 les inserer dans l’outil tenu dans la
main droite et qui aura eté ouvert en utilisant le levier. Le feuillard devra etre inseré en s’assurant que les deux bouts soient bien
alignés et bien à fond contre les cliquets de guidance, avant et arrière. A ce point appuyez la touché 1 pour tensioner le feuillard
jusqu’à la tension au moment necessaire ou auparavant reglée (voir photo E2). Une fois que la tension MAX a eté rejointe il sera
possible de l’adjuster trois fois, après la soudure doit etre absolument effectuée. En appuyant sur la touche 2, l’outil effectuera la
soudure et la coupe du feuillard (photo E3). A la fin du compte à rebours (3-2-1), indiquant le temps refroidissement, et le son de fin
de cycle qui en rèsulte, il sera possible d’extraire la feuillard en appuyant sur le levier de déverrouillage (photo. E4)
CONTROLE DU NIVEAU DE CHARGE DE LA BATTERIE : Pendant l’utilisation de l’outil il est toujours possible de controler l’etat
de charge de la batterie. En photos les differents niveaux: completement chargé (photo E5) –moitié de recharge (photo E6) –
niveau bas (photo E7). Quand la batterie est en train de se décharger completement, le premier voyant clignotte.
VERROUILLAGE DES PANNEAU : Le verrouillage des touches peut etre enclenché afin d’empecher un déréglage intempestif
des ajustements. Appuyer sur chacque touche deux fois, en commençant par la touche SET (voire photo E8) –le panneau se
bloquera automatiquement et la lettre L sera montrée, à signifier “LOCK” (comme en photo E9).
De cette façon il sera impossible de modifier les réglages. Pour débloquer le panneau, repetez la procedure dès le dèbut.
D- Das Gerät Modell ITA27 ist für die Umreifung mit Kunststoffbändern konzipiert worden. Das Umreifungsmaterial wird von
Hand um das Packgut gelegt und dann, gemäß Anleitung, in das Gerät eingeführt, welches das Spannen, Abschneiden und
Verschweißen durch erzeugte Vibration erledigt. Das Band um das Packstück legen, dabei den Bandanfang mit der linken Hand
halten und das Band mit der rechten Hand über den Bandanfang legen (darauf achten, dass das Band frei von Öl, Fett und
Schmutz ist); das Umreifungsgerät durch Drücken des Entriegelungshebels öffnen, die übereinanderliegenden und genau
zwischen Gerätekörper und -basis ausgerichteten Bänder durch Schieben gegen den vorderen und hinteren Bandanschlag
einführen (Abb.E1). Zum Spannen Taste 1 drücken, bis die gewünschte bzw. eingestellte Bandspannung erreicht ist (Abb.E2) (mit
Erreichen der maximalen Bandspannung lässt das Gerät 3 weitere Spannvorgänge zu, nach denen das Verschweißen erfolgen
muss). Betätigen von Knopf 2 lößt das Verschweißen und Abschneiden des Bandes aus (Bild E3). Ein Piepton am Ende des
Contdown (3-2-1) signalisiert das Ende der Ankühlzeit und damit auch das Ende des Zyklus. Das Drücken des Öffnungshebels
ermöglicht das entfernen des Gerätes (Bild E4).'
KONTROLLE DER AKKU-LADUNG : Während des Gebrauchs des Gerätes ist der Ladezustand des Akkus ständig sichtbar. Akku
voll (Abb.E5) –Akku halbvoll (Abb.E6) –Akku beinahe leer (Abb.E7). Entlädt sich der Akku vollständig, blinkt die erste LED-Lampe
6) ISTRUZIONI D’USO / OPERATION / MODE D’EMPLOI / BEDIENANLEITUNG / INSTRUCCIONES DE USO
Table of contents
Other ITATOOLS Packaging Equipment manuals