ITATOOLS ITA21 User manual

MANUALE D’USO – DISTINTA RICAMBI
OPERATION MANUAL – SPARE PARTS LIST
NOTICE D’INSTRUCTIONS – PIECES DE RECHANGE
BETRIEBSANLEITUNG – ERSATZTEILLISTE
MANUAL DE USO – LISTA DE RECAMBIOS
ITA21
REGGIATRICE A BATTERIA PER REGGIA IN PLASTICA
BATTERY POWERED PLASTIC STRAPPING TOOL
APPAREIL DE CERCLAGE À BATTERIE POUR FEUILLARD EN PLASTIQUE
AKKU KUNSTSTOFFBAND UMREIFUNGSGERÄT
FLEJADORA CON BATERÍA PARA FLEJE DE PLÁSTICO
ITATOOLS s.r.l.
Via Rossini,340 - 21042 Caronno Pertusella (VA) - ITALY
LEGGERE LE ISTRUZIONI PRIMA DI UTILIZZARE L’APPARECCHIO
READ ALL INSTRUCTIONS BEFORE OPERATING THE TOOL
AVANT D’UTILISER L'APPAREIL LIRE LA NOTICE D’INSTRUCTIONS
VOR DER INBETRIEBNAHME DES GERÄTES DIE BEDIENUNGSANLEITUNG LESEN
LEA LAS INSTRUCCIONES ANTES DE UTILIZAR EL APARATO
Ed. 10/12


INDICE TABLE OF CONTENTS TABLE DES MATIERES
1) Istruzioni di sicurezza 1) Safety instructions 1) Normes de sécurité
2) Dati tecnici 2) Technical data 2) Données techniques
3) Garanzia e responsabilità 3) Warranty and liability 3) Garantie et responsab.
4) Installazione-accessori 4) Installation-accessories 4) Installation-accessories
5) Descrizione e regolazioni 5) Operating elem.ts / adjustments 5) Modules prin. / réglages
6) Istruzioni per l’uso 6) Operation 6) Mode d’emploi
7) Manutenzione e pulizia 7) Servicing and cleaning 7) Entretien et nettoyage
8) Risoluzione problemi 8) Troubleshooting 8) Solution des problems
9) Esplosi – distinta ricambi 9) Layout – spare parts list 9) Vue éclatée-Liste piéces
INHALTSVERZEICHNIS ÍNDICE
1) Sicherheitsvorschriften 1) Instrucciones de seguridad
2) Technische Daten 2) Datos técnicos
3) Garantie und Verantwortung 3) Garantía y responsabilidad
4) Zubehöranweisungen 4) Instalación-accesorios
5) Beschreibung und Einstellungen 5) Descripción y ajustes
6) Betriebsanweisungen 6) Instrucciones de uso
7) Instandhaltung und Wartung 7) Mantenimiento y limpieza
8) Problemlösungen 8) Localización de averías
9) Zeichnungen-Ersatzteilliste 9) Diseños – lista de recambios
1) ISTRUZIONI DI SICUREZZA / SAFETY INSTRUCTIONS / NORMES DE SECURITE /
SICHERHEITSVORSCHRIFTEN / INSTRUCCIONES DE SEGURIDAD
I - L’apparecchio deve essere utilizzato esclusivamente da personale adeguatamente formato. Non osservare le istruzioni
contenute nel manuale e/o un improprio uso possono causare la rottura della reggia con conseguenze per il personale ed i materiali
confezionati.
Controllare giornalmente l’apparecchio e non utilizzarlo con parti usurate / danneggiate, ma sostituirle prontamente con personale
qualificato utilizzando parti originali. Non modificare l’apparecchio nelle sue parti.
Non mettere mai dita, mani e altre parti del corpo tra la reggia ed il materiale da imballare.
Voi siete pienamente responsabili di controllare la sigillatura della reggia, una adeguata preparazione è indispensabile per
riconoscere una sigillatura difettosa e per evitare incidenti anche gravi. Non movimentare mai il materiale con sigillature difettose
della reggia. Per lo svolgimento della reggia utilizzare solo gli appositi dispenser.
Tenere pulita l’area di lavoro ed utilizzare l’apparecchio solo in situazioni di stabilità e sicurezza.
Non movimentare MAI i materiali utilizzando per il sollevamento la reggia applicata.
Per il taglio della reggia utilizzare esclusivamente cesoie di sicurezza. Assicurarsi che durante il taglio non ci sia nessuno sulla
traiettoria della reggia; rimanere a distanza di sicurezza. Tenere premuta la parte superiore in modo che la parte inferiore recisa si
allontani dall’operatore. Utilizzare in modo errato l’apparecchio, tensionare eccessivamente la reggia, utilizzarne una qualità / sezione
non prevista e spigoli taglienti sul materiale da legare possono causare una improvvisa perdita di tensione e/o la rottura della reggia
con conseguente sbilanciamento, caduta del materiale ed anche un repentino e violento allontanamento della reggia stessa.
Si consiglia di proteggere gli spigoli taglienti, di posizionare in modo corretto la reggia intorno la carico, di mettere un numero
adeguato di regge, di rimanere in posizione di sicurezza (lateralmente alla reggia) durante il ciclo di legatura, di controllare
adeguatamente la qualità della sigillatura e di rispettare scrupolosamente le caratteristiche consigliate per la reggia da utilizzare.
Conservare il presente manuale di istruzioni completo. Per la costruzione dell’apparecchio non vengono utilizzate sostanze nocive
per la salute. Per lo smaltimento rispettare le normative vigenti.
GB - The tool must not be used by people not properly trained. Failure to follow the operating instructions or improper use could
cause strap breakage, injuries, package damages.
Check tool daily, do not use tool with worn or damaged parts, promptly replace them by trained people and use original spare parts.
Never modify any tool part. Do not put fingers, hands or other body parts between the strap and package during the cycle.
It is your full responsibility to check the joints made by your tool, seal control and a suitable training about adjustment will be useful to
check the seal quality in order to avoid severe injury. Never move goods with bad quality seals. Use only specific strap dispenser to
dispense the strap. Keep tidy your working area and always use the tool in good balance and safety conditions. Never use straps as
a means of pulling or lifting goods.
To cut the straps use always proper safety strap cutter and keep other people and yourself at safe distance from strap, always stand
to side of strap, away from direction of strap trajectory once loosen. Hold the upper strap portion and pay attention that the lower
strap will snap forward away from you.Improper operation, excessive tensioning, use of not recommended strap, sharp corners on
LEGGERE LE ISTRUZIONI PRIMA DELL’USO
READ THE OPERATING INSTRUCTION CAREFULLY
AVANT L’UTILISATION CONSULTER LE MODE D’EMPLOI
VOR DER INBETRIEBNAHME BETRIEBSANLEITUNG GENAU LESEN
LEA LAS INSTRUCCIONES ANTES DEL USO
DURANTE IL LAVORO UTILIZZARE GUANTI PROTETTIVI E OCCHIALI / VISIERE DI SICUREZZA
WHEN OPERATING THE TOOL, WEAR EYE, FACE AND HAND SAFETY PROTECTORS PENDANT LE TRAVAIL, PORTER DES
PROTECTIONS POUR LEX YEUX, LE VISAGE ET LES MAINS
WÄHREND DES BETRIEBES SCHUTZHANDSCHUHE UND BRILLE BENUTZEN
DURANTE EL TRABAJO UTILICE GUANTES PROTECTORES Y GAFAS / MÁSCARAS DE SEGURIDAD
NORME GENERALI DI SICUREZZA :
GENERAL SAFETY INSTRUCTIONS :
INSTRUCTIONS GÉNÉRALES DE SÉCURITÉ :
ALLGEMEINE SICHERHEITSVORSCHRIFTEN :
NORMAS GENERALES DE SEGURIDAD :

the package could cause in a sudden loss of strap tension and/or strap breakage that could lead to package fall and to violent
movement of the strap against the operator. It is recommended to use edge protectors if package has sharp corners, to place the
strap correctly around a properly positioned package, to remain in safety position (on one side of strap) during strapping cycle, to use
the correct strap quality, width, thickness, and strength as recommended in this manual.
Please preserve this booklet, it is as a part of the tool. This tool is manufactured without any substances which could be dangerous to
health. National instructions must be observed for disposal of all the parts.
F - L’appareil de cerclage devra être utilisé par un opérateur ayant reçu une formation sur les instructions et le mode d’emploi. Le
fait de ne pas suivre les instructions et/ou l'emploi incorrect de l’appareil peuvent causer la rupture du feuillard avec des
conséquences dangereuses pour les opérateurs et le matériel à cercler.
Il est indispensable de contrôler l'appareil tous les jours et de ne jamais l'utiliser s’il présente des parties usées / endommagées. Le
cas échéant il sera nécessaire de les faire remplacer avec des pièces originales par des opérateurs qualifiés. Ne pas modifier
l'appareil. Éviter absolument de mettre les doigts, mains et autres parties du corps entre le feuillard et le matériel à cercler.
Vous êtes entièrement responsable du contrôle de la soudure du feuillard; dans ce but une préparation appropriée est indispensable
pour pouvoir reconnaître les soudures défectueuses et éviter des accidents graves. Ne jamais déplacer le matériel avec le feuillard
mal soudé. Le déroulement du feuillard doit être effectué en utilisant des dévidoirs prévus à cet effet.
Garder bien propre la zone de travail et utiliser l'appareil seulement dans des situations de stabilité et de sécurité.
Ne jamais déplacer les matériels cerclés en utilisant le feuillard pour le soulèvement.
La coupe du feuillard doit être effectuée exclusivement avec des ciseaux appropriés. Pendant la coupe il est indispensable de garder
une distance de sécurité et de s'assurer que personne ne se trouve dans la trajectoire du feuillard. Pour la coupe garder la partie
supérieure du feuillard contre l’opérateur de façon à ce que la partie inférieure coupée s'éloigne de ce dernier.
L'emploi incorrect de l’appareil, la tension excessive du feuillard, la qualité et la section impropres du feuillard, les bords tranchants
du matériel à cercler peuvent causer une perte de tension inattendue et/ou la rupture du feuillard avec une chute éventuelle du
matériel et un échappement violent du feuillard. Il est conseillé de se protéger contre les bords tranchants, d'appliquer correctement
le feuillard sur le paquet, d'utiliser un nombre de feuillards approprié, de se mettre en position de sécurité (à coté du feuillard)
pendant le cycle de cerclage, de bien contrôler la qualité de la soudure du feuillard et de respecter scrupuleusement les
caractéristiques conseillées pour le feuillard à utiliser. Bien conserver toute cette notice d'instructions. Pour l'élimination des
matériaux il est indispensable de respecter les normes en vigueur.
D - Das Gerät darf nur von ausgebildetem Personal bedient werden. Das nicht Beachten dieser Betriebsanleitung und/oder das
Missbrauchen des Gerätes kann zu Schäden am Kunststoffband führen und es besteht Verletzungsgefahr für den/die
Bedienperson(en), sowie die Gefahr, dass Ihre Ware beschädigt wird.
Das Gerät täglich auf Funktion kontrollieren (Instandhalten) und nicht mit abgenutzten oder defekten Teilen benutzen, sondern diese
sofort durch qualifiziertes Personal mit Originalteilen austauschen lassen. Keine Änderungen am Gerät vornehmen. Nie Finger, Hand
sowie andere Körperteile zwischen Band und der zu Umreifenden Ware stecken. Sie tragen die volle Verantwortung für das richtige
Schweißen und um Unfälle zu vermeiden, kontrollieren Sie jede Umreifung. Kein Materialtransport bei einer nicht sicheren Umreifung
durchführen. Für das Abrollen des Umreifungsband nur die dazu geeigneten Rollwagen benutzen.
NIE das Umreifungsband als Lastanschlagmittel zum Heben von Lasten oder Paketen verwenden.
Arbeitsplatz immer sauber halten und das Gerät nur bei Standsicherheit benutzen.
Für das Schneiden des Umreifungsbandes nur die dazu geeignete Bandschere benutzen.
Vergewissern Sie sich, dass niemand oder nichts im Weg während des Bandschneidens ist, bitte einen Sicherheitsabstand einhalten.
Das unbefugte oder nicht korrekte Benutzen des Gerätes, sowie das zu straffe Anziehen des Bandes auch an scharfkantigen Stellen,
und das Benutzen eines nicht geeigneten Bandes (zu dünn oder zu schmal), kann ein plötzliches Zerreißen/Platzen des
Kunststoffbandes mit gefährlichen Folgen nicht nur materiell sondern auch für die beteiligten Personen zur Folge haben.
Deshalb wird geraten, das Kunststoffband vor scharfkantigen Ecken zu schützen, das Kunststoffband richtig positionieren und
ausreichende Umreifungen für die entsprechende Verpackung zu benutzen und während der Umreifung in Sicherheitsposition zu
stehen (seitlich der Umreifung). Kontrollieren Sie immer den Verschweißpunkt auf Richtigkeit und beachten Sie immer gewissenhaft
die technischen Merkmale des eingesetzten Kunststoffbandes. Diese Betriebsanleitung bitte sorgfältig aufbewahren. Dieses Gerät
wurde ohne gesundheitsschädliche Stoffe gebaut. Für die Entsorgung des Gerätes die gültigen Vorschriften beachten.
E - El aparato debe ser utilizado exclusivamente por personal debidamente formado. El incumplimiento de las instrucciones
recogidas en el manual o un uso indebido pueden causar la ruptura del fleje y provocar lesiones al personal o daños al material
empacado.
Revise a diario el aparato y no lo use si presenta partes desgastadas o dañadas; en este caso, haga que personal cualificado las
sustituya de inmediato utilizando piezas de recambio originales. No modifique los componentes del aparato.
No introduzca por ningún motivo los dedos, las manos u otras partes del cuerpo entre el fleje y el material que se va a embalar.
Usted es plenamente responsable del control del sellado del fleje; es indispensable estar preparados para reconocer los flejes
defectuosos y para evitar así accidentes graves. No maneje por ningún motivo el material que presente flejes con sellados
defectuosos. Para el desbobinado del fleje, use únicamente los dispensadores correspondientes.
Mantenga el área de trabajo limpia y utilice el aparato sólo en condiciones estables y seguras.
NUNCA desplace el material levantándolo por el fleje aplicado. Para el corte del fleje use únicamente cortadores de seguridad.
Asegúrese que durante el corte no haya personas presentes en el trayecto del fleje; mantenga una distancia de seguridad.
Mantenga presionada la parte superior de manera que la parte inferior cortada se aleje del operador.
El uso incorrecto del aparato, el excesivo tensado del fleje, el uso de calidades o secciones no previstas o con aristas cortantes en el
material por atar, pueden causar una pérdida improvisa de tensión y/o la ruptura del fleje y provocar así desequilibrio, caída del
material e incluso un alejamiento repentino y violento del fleje mismo. Se recomienda proteger las aristas cortantes, colocar
correctamente el fleje alrededor de la carga, poner un número adecuado de flejes, permanecer en una posición segura (lateralmente
respecto al fleje) durante el ciclo de flejado, controlar apropiadamente la calidad del sellado y respetar rigurosamente las
características recomendadas para el fleje que se va a utilizar.
Conserve este manual de instrucciones íntegro. Para la fabricación del aparato no se usan sustancias nocivas para la salud. Para su
eliminación, respete las normas vigentes.

2) DATI TECNICI / TECHNICAL DATA / DONNEES TECHNIQUES / TECHNISCHE DATEN / DATOS TÉCNICOS
ALIMENTAZIONE FEED REQUIR. ALIMENTATION VERSORGUNG ALIMENTACIÓN
Batteria Battery Batterie Batterie/Akku Batería 14.8V - 3A/h LI-PO
PRESTAZIONI PERFORMANCES PERFORMANCES LEISTUNG PRESTACIONES
Tensione max.
reggia: Max.Tension
force: Tension max.
feuillard: Max.
Bandspannung: Tensión máx.
del fleje: 3500N
Velocità
tensionamento Tensioning
speed: Vitesse de tension: Spannge-
schwindigkeit Velocidad del
tensado: 12mt/m
Tipo chiusura: Sealing: Soudure: Schweißart: Tipo de cierre: Saldatura vibrazione
Friction weld seal
Soudage a friction
Reibschweißverschluß
Resistenza
chiusura: Joint strength: Résistance: Verschluß-
festigkeit: Resistencia de
cierre: 80% carico di rottura *
80% plastic strap strength*
80% charge de rupture*
80% Kunststoffbandbelast.*
80% de la carga máxima*
Livello emissione
sonora.Misura
tipo A
(2003/10/CE)
Level sound
emission.
Measurement type
A (2003/10/CE)
Niveau d’émission
sonore type A
(2003/10/CE)
Schallemission. Die
Messung des Typs A
(2003/10/CE)
Nivel de emisión
de sonido.
Medición de tipo A
(2003/10/CE) 81 dB (A)
Vibrazioni
all’impugnatura
(2002/44/CE)
Vibrations at handle
(2002/44/CE)
Vibrations au niveau
des poignéès
(2002/44/CE)
Hand Arm
Schwingungen
(2002/44/CE)
Las vibraciones en
la empuñadura
(2002/44/CE) 2.2 ms2
* variabile in funzione del tipo di reggia / depends of strap quality / varie en fonction type de feuillard / je nach Bandqualität / Variable según el tipo de
fleje
I- Temperatura di lavoro: utilizzare l’apparecchio tra i 0C° ed i +45C°. Con l’impiego a bassa temperatura
può succedere che il display segnali batteria scarica. In questo caso è sufficiente inserire la batteria per
ca. 2 min. nel caricabatteria per un “refreshing”
GB - Working temperature: the tool should be used between 0C° ( 32F) and +45C° (+113 F). With the use to low temperature
it may happen that the display signals low battery. In this case it suffices to insert the battery for 2 mins. in charger for a "refreshing"
F - Température d’exercice: Utiliser l’appareil entre 0C° (32F) et +45C° (+113 F). Avec les basses températures l’afficheur peut
signaler batterie déchargée. Dans ce cas il suffit de mettre la batterie pendant
environ 2 min. dans le chargeur de batterie pour un “refreshing”
D - Betriebstemperatur: Gerät zwischen 0C° und + 45C° benutzen. Wenn der Akku bei niedrigen Temperaturen lagert kann es
vorkommen, dass das Gerät den Leerzustand des Akku’s meldet, in diesem Fall den Akku für 2 Minuten in das Ladegerät
stecken.(Auffrischzyklus)
E - Temperatura de trabajo: utilice el aparato con una temperatura entre 0C° y +45C°. Con el uso a baja temperatura, es posible
que la pantalla indique que la batería está descargada. En este caso, es suficiente cargar la batería en el cargador durante unos 2
minutos a modo de “refreshing”.
MODELLI / CHART OF TYPES / MODÈLES / GERÄTELISTE / MODELOS
CODICE / ITEM / CODES
/
BESTELLNR: / CÓDIGO TIPO / MODEL /
APPAREILS / TYP / TIPO REGGIA/STRAP
/
FEUILLI
ARD/BANDART / FLEJE SPESSORE /THICKNESS /
EPAISSEUR / DICKE / ESPESOR
T219997 ITA21 -16/19mm 5/8”-3/4” PP-PET 16mm - 5/8”
PET 19mm – 3/4” 0.8mm 0.031” ÷ 1.05mm 0.041”
0.7mm 0.027” ÷ 1.27mm 0.050
DIMENSIONI TOOL SIZE ENCOMBREMENT
A
BMESSUNGEN DIMENSIONES
Lunghezza: Length: Longeur: Länge: Longitud: 315mm – 12.4”
Larghezza: Width: Largeur: Breite: Anchura: 140mm – 5.5”
Altezza: Height: Hauteur total: Höhe: Altura: 183mm – 7.2”
Peso con batteria: Weight with battery: Poids avec accum.: Gewicht m. Akku: Peso con batería: 4 kgs – 8.8 lbs

3) GARANZIA E RESPONSABILITA’ / WARRANTY CONDITIONS AND LIABILITY / CONDITIONS DE GARANTIE
ET RESPONSABILITÉ / GEWÄHRLEISTUNG UND HAFTPFLICHT / GARANTÍA Y RESPONSABILIDAD
I - Il periodo di garanzia per ogni apparecchio Itatools e per ogni caricabatteria è pari a 12 mesi a partire dalla data di
spedizione indicata sul documento di accompagnamento.
La società Itatools srl si impegna per il periodo di garanzia a sostituire gratuitamente tutte le parti che a suo insindacabile giudizio
dovessero presentare difetti che li rendano non idonei all’uso. La sistemazione in garanzia è franco ns. stabilimento. I termini di
garanzia decadono per gravi carenze di manutenzione, manomissione dell’apparecchio, riparazioni arbitrarie, uso improprio dello
stesso, la non osservanza delle norme indicate nel manuale, uso di parti non originali, mancanza del numero di serie impresso
durante la produzione,eventi eccezionali. Restano escluse dalla garanzia le parti ad usura espressamente identificate nella lista
ricambi. Non possono essere rivendicate dalla clientela richieste di risarcimenti, nei confronti di Itatools srl, per fermi di produzione,
danni ad oggetti e persone derivanti da deficienze dell’apparecchio perché nei termini di garanzia. La società Itatools srl si riserva il
diritto di modificare i prodotti e la documentazione senza l’obbligo di aggiornarne i precedenti.
Il periodo di garanzia per ogni batteria è pari a 60 giorni, a partire dalla data di spedizione indicata sul documento di
accompagnamento. Itatools si impegna a sostituire a suo insindacabile giudizio gratuitamente la batteria solo nel caso in cui siano
presenti difetti di fabbricazione che la rendano non idonea all’uso
GB - Itatools srl warrants all its tools and battery charger during a period of 12 months from the shipping date document.
Warranty includes free replacement of faulty parts ex works.The warranty is not valid in case of improper use, lack of
maintenance, tampering, arbitrary modifications and reparations, use of not original parts, disregard of instructions of the operation
manual, and missing serial number, exceptional events. The warranty excludes the wearing parts shown on spare parts list.No
compensation can be claimed for production shutdowns and for damages to people and objects due to tools defects. Itatools srl
reserves the right to modify the tools and documentation without any obligation to update previous ones.
Itatools srl warrants all its battery during a period of 60 days from the shipping date document.
The manufacturer is committed to replace it with the free battery only when there are manufacturing defects that make it unfit for use.
F - Chaque appareil Itatools est garanti pour une période de 12 mois, à partir de la date indiquée sur le document de
livraison. Pendant cette période la Sté. Itatools s'engage à remplacer gratuitement franco départ toutes les pièces qui se sont
démontrées défectueuses. La garantie n'est pas valable en cas d'emploi incorrect de l'appareil, manque d'entretien, manipulations
non autorisée, réparations arbitraires, non-observation des instructions du fabriquant, emploi de pièces non originales, manque du
numéro de série imprimé pendant la production, événements exceptionnels. Les pièces d'usure indiquées sur la liste ne sont pas
couvertes par la garantie. Le client ne peut demander aucun dédommagement pour des arrêts de production et des dommages à des
personnes et objets causés par des défauts de l'appareil. La Sté. Itatools se réserve le droit de modifier les produits et la
documentation sans l'obligation de mettre à jour les précédents.
Chaque batterie Itatools est garanti pour une période de 60 jour à partir de la date indiquée sur le document de livraison.
Le fabricant s'engage à le remplacer par la libre batterie que quand il ya des défauts de fabrication qui la rendent impropre à l'usage.
D - Die Gewährleistungszeit und Ladezeit aller Itatools Geräte ist 12 Monate und beginnt ab dem Datum des Lieferscheins.
Die Fa. Itatools verpflichtet sich, alle nachweisbar defekten Teile, die das Gerät unbrauchbar machen, innerhalb dieser Zeit,
kostenlos auszutauschen. Ausgenommen sind Defekte, die auf unsachgemäßen Gebrauch, sowie mutwillige Beschädigungen
zurückzuführen sind, sowie Verschleißteile generell. Keine Gewährleistung kann übernommen werden, bei nicht Beachten der
Wartungsanweisungen und Hinweisvorschriften sowie der Bedienungsanleitung. Es dürfen ausschließlich Original Ersatzteile
verwendet werden. Die Instandsetzung darf ausschließlich durch von Itatools autorisierten Partnern durchgeführt werden. Fehlt die
Seriennummer auf dem Gerät, kann ebenfalls keine Gewährleistung geltend gemacht werden. Es kann kein Schadenersatz, wie
Produktionsausfall oder auch Schaden an Personen sowie Sachen an Itatools srl erhoben werden. Die Fa. Itatools behält sich das
Gerecht vor, seine Produkte sowie auch die Dokumentationen zu ändern, ohne verpflichtet zu sein, die vorhergehenden Versionen
zu modifizieren.
Itatools Srl Optionsscheine allen seinen Akku während eines Zeitraums von 60 Tagen vom Zeitpunkt der Zustellung
Dokument.
Der Hersteller ist verpflichtet, zu ersetzen, mit dem kostenlosen Akku nur, wenn es um die Herstellung Mängel, die es für den Einsatz
ungeeignet.
E - El período de la garantía de cada aparato y cargador de batteria Itatools es de 12 meses a partir de la fecha de envío
indicada en el documento de acompañamiento. La empresa Itatools srl se compromete, durante el período de garantía, a sustituir
sin costo alguno todas las partes que a su entero juicio presenten defectos que afecten su correcto funcionamiento. Las
reparaciones que cubre la garantía se realizan en nuestro establecimiento (Ex-works). La garantía pierde validez debido a la seria
falta de mantenimiento, a la manipulación indebida del aparato, a las reparaciones no autorizadas, a un uso incorrecto del mismo, al
incumplimiento de las normas indicadas en el manual, al uso de recambios no originales, a la falta del número de serie aplicado
durante la producción y a eventos excepcionales. La garantía no cubre las piezas sujetas a desgaste específicamente indicadas en
la lista de recambios. No se efectúan reembolsos, bajo ninguna circunstancia, en caso de paradas de producción, daños a objetos o
lesiones a personas, causados por un mal funcionamiento del aparato, por fuera de los términos de garantía. La empresa Itatools srl
se reserva el derecho a modificar los productos y los documentos sin la obligación de actualizar las versiones anteriores.
Itatools SRL todos los órdenes de su batería durante un período de 60 días a partir de la fecha de envío el documento.
El fabricante se ha comprometido a reemplazarla con la batería sólo cuando hay defectos de fabricación que la hacen no apta para
el uso.

4) INSTALLAZIONE / INSTALLATION / INSTALLATION / INSTALLATION / INSTALACIÓN
I - La batteria al LI-PO (Litio-Polimeri) viene fornita direttamente carica. Per iniziare a lavorare inserire la batteria nella macchina fino
a far scattare la levetta di sicurezza come illustrato nella figura seguente.
GB - The battery to the LI-PO (Lithium-Polymer) it comes supplied directly loads. In order to begin to work to insert the battery in
the machine until making to release the security lever of illustrated in the following figure.
F - La batterie au LI-PO (Lithium-Polymère) est fournie déjà chargée. Pour commencer à travailler insérer la batterie dans la
machine jusqu'à provoquer le déclenchement du levier de sécurité illustré dans la figure suivante
D - Der LI-PO Akku wird schon geladen geliefert. Für die Inbetriebnahme den Akku in das Gerät bis zum Sicherheitshebel (siehe
Bild) hineinstecken.
E - La batería LI-PO (Litio Polímero) se suministra cargada. Para iniciar a trabajar, introduzca la batería en la máquina y asegúrese
de que se oiga el clic de la palanquita de seguridad como se muestra en la figura a continuación
ACCESSORI/TOOL ACCESSORIES/ACCESOIRES / ZUBEHÖR / ACCESORIOS
SI RACCOMANDA DI UTILIZZARE SOLO ACCESSORI ORIGINALI ITATOOLS / IT IS RECOMMENDED TO ONLY USE
ACCESSORIES ITATOOLS / IL EST RECOMMANDE D'UTILISER SEULEMENT LES ACCESSOIRES ITATOOLS / MAN
EMPFIEHLT NUR ORGINAL-ZUBEHÖR VON ITATOOLS ZU VERWENDEN / SE RECOMIENDA UTILIZAR ÚNICAMENTE
ACCESORIOS ORIGINALES ITATOOLS
BATTERIA/BATTERY/BATTERIE/ AKKU/ BATERÍA:
I - ISTRUZIONI DI SICUREZZA : Questa batteria deve essere utilizzata esclusivamente con i ns. apparecchi tendireggia e ricaricata
unicamente con il nostro caricabatteria, ogni altro uso e/o applicazione fa decadere immediatamente ogni responsabilità e garanzia.
La batteria deve essere utilizzata esclusivamente da personale adeguatamente formato. Non osservare le istruzioni contenute nel
manuale e/o un improprio uso possono causarne il danneggiamento e pericoli al personale. La batteria viene fornita già parzialmente
carica. La batteria ricaricabile LI-PO può essere ricaricata in qualsiasi momento senza che se ne riduca la durata; anche se viene
interrotta la carica la batteria non si danneggia. Per l’uso e la ricarica seguire le specifiche norme riportate negli apparecchi.
Controllare giornalmente la batteria e non utilizzarla se danneggiata. Non disassemblare o modificare la batteria, non connettere il
polo + con il polo – si crea un cortocircuito che danneggia in modo irreparabile la stessa. Non invertire la polarità durante l’uso o la
ricarica.
Non trasportare e/o stoccare la batteria insieme ad oggetti metallici, se toccano i contatti possono provocare un cortocircuito. Prima
dell’uso controllare che i contatti siano puliti ed integri. Non inserire oggetti metallici tra i contatti.
Non tentare di ricaricare con attrezzature diverse dal ns. caricabatteria, la batteria può danneggiarsi irreparabilmente.
Non utilizzare per scopi diversi dall’azionamento del ns. tendireggia
Non lasciare in carica la batteria senza supervisione. Non scaricare la batteria al di sotto dei 10.8V, si può danneggiare
seriamente. Non gettare nel fuoco e non porre vicino a sorgenti di calore, non lasciarla esposta al sole, non metterla in forni a
microonde o recipienti riscaldanti a pressione, verrebbe danneggiata irreparabilmente.
Non avvicinare la batteria a fiamme libere. Proteggerla dall’umidità e non immergerla in acqua. Evitare urti e cadute, non forare,
schiacciare, nel caso provarla con cautela, se si produce calore, fumo etc., non utilizzarla.
In caso di grave danneggiamento con fuoriuscita dell’elettrolita evitare di manipolarla (lavare le mani con acqua e sapone), ed in caso
di contatto con gli occhi lavare immediatamente con acqua e consultare un medico.
Nel caso si manifestino deformazioni dell’involucro, surriscaldamenti, emissione di fumo od altro fenomeno anormale, interrompere
l’uso o la ricarica, non fumare e porre in luogo areato.
Per lo smaltimento delle batterie esauste rispettare le normative nazionali vigenti. Non gettare tra I rifiuti.Non disperdere
nell’ambiente.
DATI TECNICI : Li-Po (Litio-Polimeri) 14.8V – 3.0 Ah Peso : 410 gr. Cod.A000115
Tempo di carica 40 min. Temperatura carica e utilizzo : 0C° ( 32F) e +45C° (+113 F)
GB - SAFETY INSTRUCTIONS : The battery must be used only for our strapping tool and recharged only by our battery charger
device, for other purposes or applications our warranty and liability isn’t valid. The battery should be used by people properly trained.
Failure to follow the operating instructions or improper use could cause injuries and battery damages.
LEVETTA DI SICUREZZA
SECURITY LEVER
LEVIER DE SÉCURITÉ
SICHERHEITSHEBEL
PALANQUITA DE SEGURIDAD

The battery is supplied partially charged. The lithium polymer rechargeable battery can be charged at any time without reducing its
service life; interrupting the charging procedure doesn’t damage it. To use and charge the battery please follow the operating devices
instruction.
Check battery daily, do not use it with worn or damaged parts.
Do not disassemble it, never modify any part, do not connect the positive (+) and negative (-), may result a full damaging short circuit.
Do not invert the right polarity during the use or charge. Do not transport or store the battery with metal objects, may result a short
circuit. Do not try to charge with different charger not allowed, the battery could be seriously damaged. Before use check the
contacts. Do not put metal keys between contacts. Do not use the battery for purposes other than those specified.
Battery must not be left in charging mode without supervision. Do not discharge the battery at less 10.8V, it could be
damaged. Do not throw the battery into a fire or heat it, do not store at high temperature, direct sunlight, do not put in microwave
oven or a pressure cooker. Keep it away from any exposed flame. Do not dip the battery in the water, protect it from humidity. Do
not apply impact to the battery, or throw , drop, drill it, if happened try it with care . In case of heat generation, smoke emission, or
ignition stop immediately to use and replace it.
In case electrolyte comes into contact with eyes, rinse thoroughly with clean water immediatly and consult a physician; for hands
contact use clean water too.
The battery must be collected, recycled or disposed of in an environmentally friendly way. Detective or dead batteries must be
recycled accordino to the national / local guidelines.
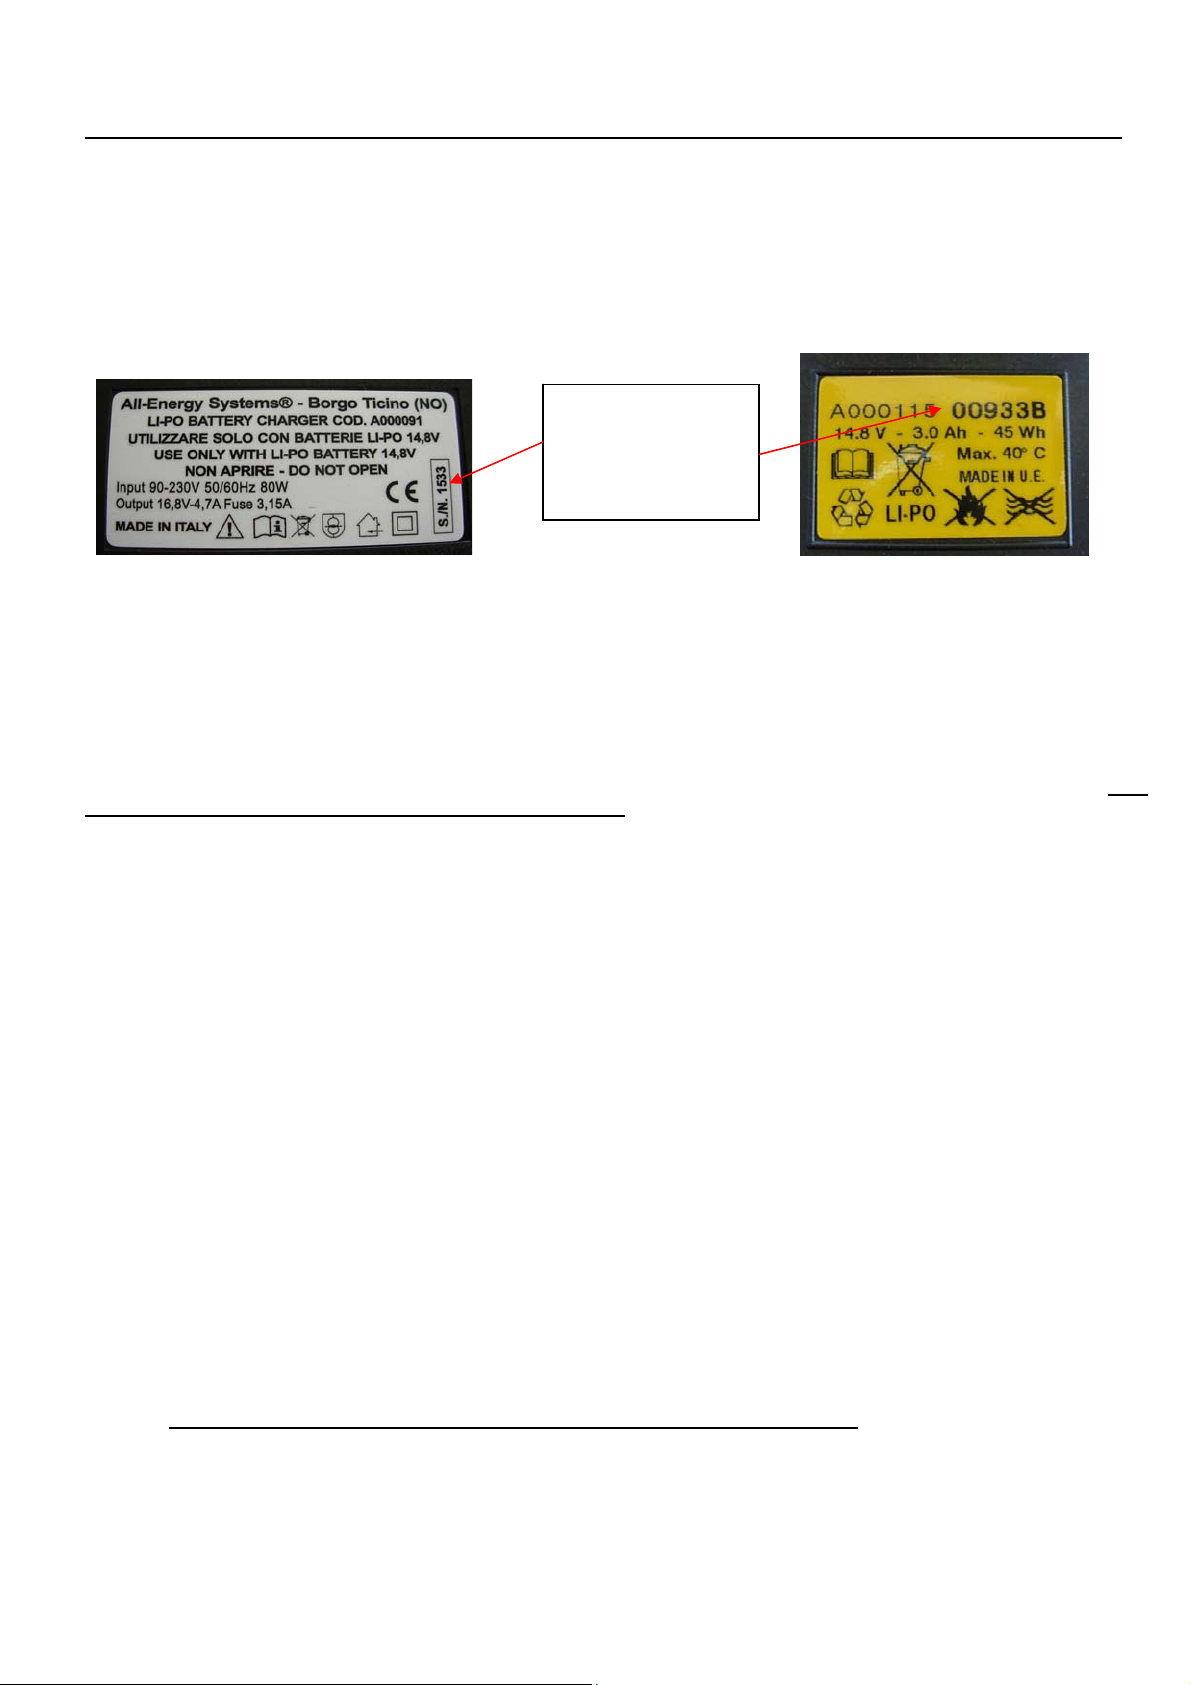
TECHNICAL DATA : Li-Po (Lithium-Polymer) 14.8V – 3.0 Ah Weight : 410 gr Cod.A000115
Time of charging 45 min. Temperature charging and discharging : 0C° ( 32F) and +45C° (+113 F)
F - NORMES DE SECURITE : La batterie doit être utilisée seulement pour notre outil de cerclage et être rechargée seulement par
notre dispositif de chargeur de batterie, parce que d'autres buts ou applications notre garantie et responsabilité n'est pas valide. La
batterie devrait être employée par des personnes correctement qualifiées. Le manque de suivre les consignes d'utilisation ou
l'utilisation inexacte a pu endommager des dommages et de batterie. La batterie est fournie a partiellement chargé. La batterie
rechargeable de polymère de lithium peut être chargée à tout moment sans réduire sa durée de vie ; l'interruption du procédé de
remplissage ne l'endommage pas. Utiliser et charger la batterie suivent svp l'instruction de dispositifs de fonctionnement. Vérifier le
journal de batterie, ne pas l'employer avec les pièces usées ou endommagées. Ne pas le démonter, ne modifient jamais toute partie,
ne relient pas le positif (+) et négatif (-), peut résulter un plein court-circuit préjudiciable. Ne pas inverser la bonne polarité pendant
l'utilisation ou ne pas charger. Ne pas transporter ou stocker la batterie avec des objets en métal, peut résulter un court-circuit. Ne
pas essayer de charger du chargeur différent non permis, la batterie pourrait être sérieusement endommagé. Vérifier avant emploi
les contacts. Ne pas mettre les clefs en métal entre les contacts. Ne pas utiliser la batterie pour des buts autres que ceux indiqués.
La batterie ne doit pas être laissée dans le mode de remplissage sans surveillance Ne pas décharger la batterie à moins de
10.8V, il pourrait être endommagé. Ne pas jeter la batterie dans un feu ou le chauffer, ne pas stocker à température élevée,
lumière du soleil directe, ne pas mettre dans le four à micro-ondes ou une chaudière à pression. Le maintenir parti de n'importe
quelle flamme exposée. Ne pas plonger la batterie dans l'eau, la protègent contre l'humidité. Ne pas appliquer l'impact à la batterie,
ou la jeter ou laisser tomber ou forer, si essai produit il avec soin. En cas de génération de la chaleur, fumer l'émission, ou l'arrêt
d'allumage immédiatement pour l'employer et remplacer. Au cas où l'électrolyte entrerait en contact avec des yeux, rincer
complètement avec de l'eau propre immediatly et consulter un médecin ; pour des mains entrer en contact avec l'utilisation nettoient
l'eau aussi. La batterie doit être rassemblée, réutilisée ou débarassée d'une manière dans l'environnement amicale. Les batteries
révélatrices ou mortes doivent être accordino réutilisé à directives nationales/locales.
DONNEES TECHNIQUES : Li-PO (Lithium-Polymère) 14.8V - 2.0 Ah Poids : 410 gr. Code A000115
Temps de charge 40 min. Temperature charge et utilization : 0C° ( 32F) et +45C° (+113 F)
D – SICHERHEITSHINWEISE : Die Batterie muss nur verwendet werden, für unsere Umreifung Werkzeug und wieder nur durch
unser Batterieladegerät Gerät, auch für andere Zwecke oder Anwendungen unserer Gewährleistung und Haftung ist nicht gültig. Der
Akku sollte, die von den Menschen richtig ausgebildet. Nichtbeachtung der Bedienungsanleitung oder unsachgemäße Verwendung
könnte dazu führen, dass Verletzungen und Schäden Batterie.
Die Batterie ist teilweise belastet. Die Lithium Polymer Akku aufgeladen werden können jederzeit ohne Verringerung der
Lebensdauer; Unterbrechung der Erhebung Verfahren nicht beschädigt werden. Zu verwenden und den Akku folgen Sie bitte den
Anweisungen Bedienelemente. Wählen Batterie täglich, benutze es nicht mit abgenutzten oder beschädigten Teile.
Nicht zu zerlegen, nie einen beliebigen Teil davon, nicht mit den positiven (+) und negative (-), kann eine vollständige schädlich
Kurzschluss. Nicht invertieren die richtige Polarität während des Einsatzes oder der Ladung. Nicht Transport oder lagern Sie den
Akku mit metallischen Gegenständen, kann zu einem Kurzschluss. Versuchen Sie nicht, kostenlos mit verschiedenen Ladegerät nicht
erlaubt, die Batterie könnte ernsthaft beschädigt werden. Vor der Verwendung überprüfen Sie die Kontakte. Geben Sie keine Metall
Schlüssel zwischen Kontakten. Verwenden Sie nicht die Batterie für andere Zwecke als die angegebene. Batterie darf nicht in der
Erhebung ohne Aufsicht. Nicht die Batterie auf weniger 10.8V, es könnte beschädigt werden. Nicht werfen Sie den Akku nicht
ins Feuer oder Hitze es, nicht bei hohen Temperaturen, direktem Sonnenlicht, die nicht in der Mikrowelle oder ein Dampfkochtopf.
Halten Sie es von einer Flamme ausgesetzt. Nicht tauchen die Batterie in den Bereichen Wasser, Schutz vor Feuchtigkeit. Gelten
nicht für Auswirkungen auf die Batterie, oder werfen, fallen, bohren, wenn sie versuchen, sich mit Vorsicht. Im Falle der
Wärmeerzeugung, Rauch Emission, oder Zündung sofort zu verwenden und zu ersetzen. Im Falle Elektrolyten in Kontakt kommt mit
den Augen, spülen Sie gründlich mit sauberem Wasser und sofort einen Arzt konsultieren, für die Hände Kontakt sauberes Wasser
zu verwenden.
Die Batterie muss gesammelt, verwertet oder entsorgt werden, eine umweltfreundliche Art und Weise. Detektiv oder toten Batterien
müssen recycelt werden accordino zu den nationalen / lokalen Richtlinien.
TECHNISCHE DATEN : Li-Po (Lithium-Polymer) 14.8V – 3.0 Ah Gewicht: 410 gr. cod. A000115
Time tarifering 40 min. Tarifering und entladen : 0C° ( 32F) und +45C° (+113 F)
E - INSTRUCCIONES DE SEGURIDAD : La batería debe ser utilizado únicamente para el tirante nuestra herramienta y recarga
sólo por nuestro cargador de batería del dispositivo, para otros fines o usos de nuestra garantía y la responsabilidad no es válida. La
batería debe ser utilizado por personas con una formación adecuada. El no seguir las instrucciones de operación o uso inadecuado
puede causar lesiones y daños batería. La batería se suministra parcialmente cargada. La batería recargable de polímeros de litio se
puede cargar en cualquier momento y sin reducción de su vida útil; interrumpir el procedimiento de carga no dañarlo. Para utilizar y
cargar la batería, por favor siga las instrucciones de funcionamiento los dispositivos.
Compruebe la batería a diario, no lo use con las piezas dañadas o gastadas. No desarme, nunca modificar cualquier parte, no
conecte el positivo (+) y negativo (-), puede provocar un corto circuito perjudicial. No invierta la polaridad derecho durante el empleo

o cargo. No transporte o almacene la batería con objetos metálicos, puede provocar un corto circuito. No trate de cargar con
diferentes cargador no permitido, la batería puede verse seriamente dañada. Antes de comprobar la utilización de contactos. No
ponga claves entre los contactos de metal. No la use para fines distintos de los especificados.
La batería no se debe dejar en el modo de carga sin supervisión No descargar la batería en menos 10.8V, podría dañarse.
No tires la batería en el fuego o calor, no tienda a la alta temperatura, la luz directa del sol, no ponga en el horno de microondas o
una olla a presión. Mantener lejos de cualquier llama expuesta. No sumerja la pila en el agua, protegerlo de la humedad. No se
aplican a efectos de la batería, o tirar, gota, taladro, si ocurrió probarlo con cuidado. En caso de la generación de calor, el humo de
emisión, o de encendido por detener inmediatamente de utilizar y reemplazar. En el caso de electrolito entra en contacto con los
ojos, enjuáguelos bien con agua limpia y consulte inmediatamente a un médico; manos para uso en contacto con el agua potable
también. La batería debe recogerse, reciclarse o eliminarse de manera favorable al medio ambiente. Detective o muertos baterías
deben reciclarse accordino a la nacional y local directrices.
DATOS TECNICOS : Li-Po (Litio Polímero) 14.8 V – 3.0 Ah Peso:410 gr. cód. A000115
Tiempo de carga 40 min. Medio Ambiente de carga y descarga : 0C° (32F) y +45° C (+113 F)
CARICABATTERIA/BATTERY CHARGER/ CHARGEUR / LADEGERÄT / CARGADOR DE BATERÍA:
I - ISTRUZIONI DI SICUREZZA : Questo apparecchio deve essere utilizzato esclusivamente per caricare le apposite batterie litio
polimeri per nostri apparecchi tendireggia, ogni altro uso e/o applicazione fa decadere immediatamente ogni responsabilità e
garanzia. Il caricabatteria deve essere utilizzato esclusivamente da personale adeguatamente formato. Non osservare le istruzioni
contenute nel manuale e/o un improprio uso possono causarne il danneggiamento e pericoli al personale. Controllare giornalmente
l’apparecchio ed il cavo di alimentazione, non utilizzarlo se danneggiato. Non disassemblare o modificare il caricabatteria, non
connettere tra loro i contatti, si crea un cortocircuito che danneggia in modo irreparabile il circuito elettronico. Non invertire la polarità
durante l’uso o la ricarica. Prima dell’uso controllare che i contatti siano puliti, integri e non vi siano oggetti metallici
nell’alloggiamento batteria. Non utilizzare per scopi diversi dalla carica dell’apposita batteria litio polimeri di ns. fornitura. NON
LASCIARE IN CARICA LA BATTERIA SENZA SUPERVISIONE.Non porre vicino a sorgenti di calore, non lasciarlo esposto al
sole. Non coprire le feritoie di ventilazione. Proteggerlo dall’umidità, non immergerlo in acqua e non farvi gocciolare alcun liquido.
Evitare urti, cadute, rotture, nel caso provarlo con cautela, se si produce calore, fumo etc., non utilizzarlo. Il caricabatteria va posto in
modo stabile su una superficie piana, non infiammabile e resistente al calore. Tenere lontano dalla zona di carica ogni tipo di
sostanza infiammabile o volatile. Scollegare sempre l’apparecchio dalla rete se non utilizzato. Per ogni intervento rivolgersi solo a
personale qualificato od ai centri assistenza autorizzati. Per lo smaltimento rispettare le normative nazionali vigenti. Non gettare tra I
rifiuti. Non disperdere nell’ambiente.
PROCESSO DI RICARICA : Prima di collegare il caricabatterie alla rete elettrica verificare che il valore della tensione sia corretto (vedere
l’etichetta posizionata sotto il caricabatterie), questo caricabatterie è autoswitching. Il led VERDE di stand-by si illumina.
Inserire la batteria nel caricabatterie in modo corretto (non invertire la polarità), la carica partirà automaticamente, viene emessa la
segnalazione acustica e il led ROSSO si illumina (consultare la tabella “SEGNALAZIONI LUMINOSE” e “SEGNALAZIONI ACUSTICHE”)
La batteria rimarrà in questa condizione fino all’80% della carica, e quando verrà superata il led diventa VERDE lampeggiante, per indicare
che la carica è quasi completa (dall’80% al 99%).
La carica della batteria è completa quando il led VERDE è acceso con luce fissa e viene emessa la segnalazione acustica di fine carica.
Estrarre la batteria dal caricabatterie.
MALFUNZIONAMENTO : Il led lampeggiante ROSSO segnala che la temperatura della batteria non è compatibile con il processo di
ricarica od il suo voltaggio è inferiore a 10.4V e pertanto la ricarica è interdetta; questa indicazione è utilizzata per qualsiasi altro caso
di malfunzionamento, es: batteria difettosa,contatti sporchi etc.. Controllare ed attendere l’eventuale ripristino della temperatura; se la
ricarica non avviene contattare il centro assistenza.
DATI TECNICI : Cod.A000091 Alimentazione : 90V - 230V – 50/60Hz – 80W Uscita : 16.8V – 4.7A
ATTENZIONE : Il caricabatteria è utilizzabile solo con batterie Li-Po 14.8V
GB - SAFETY INSTRUCTIONS : The charger must be used only to charge our strapping tool lithium polymer battery, for other
purposes or applications our warranty and liability isn’t valid. The charger should be used by people properly trained. Failure to follow
the operating instructions or improper use could cause injuries and battery damages. To use the battery please follow the operating
strapping tool instruction. Check charger and main supply cable daily, do not use it with worn or damaged parts. Do not disassemble
it, never modify any part, do not connect the contacts, may result a full damaging short circuit. Do not invert the right polarity during
the use or charge. Before use check the contacts. Do not put metal keys between contacts. Do not use for purposes other than those
specified. BATTERY MUST NOT BE LEFT IN CHARGING MODE WITHOUT SUPERVISION. Do not store at high temperature,
direct sunlight, do not cover fan clefts. Do not dip it in the water, protect from humidity. Do not apply impact, or throw or drop or drill
it, if happened test it with care . In case of heat generation, smoke emission, or ignition stop immediately to use and replace it. Place
the charger on flat, not flamable and heat resistance surface. Keep away from any volatile and flamable substance. Disconnect from
main supply when is not used, to get service and maintenace use only authorized dealers. The Charger must be collected, recycled
or disposed of in an environmentally friendly way according to the national / local guidelines.
CHARING PROCEDURE : Before connect to main supply line please check that the tension value is correct (see label) this charger
is autoswitching. Stand-by green led lights.
Put the battery into the charger in right way (do not invert the polarity), the load will start automatically, the acoustic signal is emitted
and the led becomes RED (see "LIGHT SIGNALS" and "ACOUSTIC SIGNALS”). It will remain in this condition up to 80% of loading,
NUMERO DI SERIE
SERIAL NUMBER
NUMÉRO DE SÉRIE
SERIENNUMMER
NÚMERO DE SERIE

overtaking it the signalling led will become blinking GREEN, the loading process is quite complete ( from 80% to 99%). The loading
process is complete when the signalling led is GREEN and the acoustic signal is emitted from the end of charge; remove the battery
from charger.
FAILURE : Led the RED blinking marks it that the temperature of the battery is not compatible with the process of recharges or its
voltage is lower than 10.4V and therefore recharges isn’t permitted; this indication is used for whichever other case of malfunctioning,
es: defective battery, dirty contacts etc. Check and wait the eventual restoration of the temperature; if the recharge doesn’t happen
contact the service center.
TECHNICAL DATA: Cod.A000091 Input : 90V - 230V – 50/60Hz – 80W Output : 16.8V – 4.7A
ATTENTION: The battery charger is usable only Li-Po 14.8V battery
F - NORMES DE SECURITE : Le chargeur doit être employé pour charger seulement notre batterie de cerclage de polymère de
lithium d'outil, parce que d'autres buts ou applications notre garantie et responsabilité n'est pas valide. Le chargeur devrait être
employé par des personnes correctement qualifiées. Le manque de suivre les consignes d'utilisation ou l'utilisation inexacte a pu
endommager des dommages et de batterie. La batterie rechargeable de polymère de lithium peut être chargée à tout moment sans
réduire sa durée de vie ; l'interruption du procédé de remplissage ne l'endommage pas. Pour utiliser la batterie suivre svp l'instruction
de cerclage fonctionnante d'outil. Vérifier le chargeur et le journal principal de câble d'approvisionnement, ne l'emploient pas avec les
pièces usées ou endommagées. Ne pas le démonter, ne modifient jamais toute partie, ne relient pas les contacts, peut résulter un
plein court-circuit préjudiciable. Ne pas inverser la bonne polarité pendant l'utilisation ou ne pas charger. Vérifier avant emploi les
contacts. Ne pas mettre les clefs en métal entre les contacts. Ne pas employer le chargeur pour des buts autres que ceux indiqués.
LA BATTERIE NE DOIT PAS ETRE LAISSEE DANS LE MODE DE REMPLISSAGE SANS SURVEILLANCE. Ne pas stocker à
température élevée, lumière du soleil directe, ne couvrent pas des fissures de ventilateur. Ne pas le plonger dans l'eau, la protègent
contre l'humidité. Ne pas appliquer l'impact, ou le jeter ou laisser tomber ou forer, si essai produit il avec soin. En cas de génération
de la chaleur, fumer l'émission, ou l'arrêt d'allumage immédiatement pour l'employer et remplacer. Placer le chargeur sur plat,
surface de résistance non flamable et thermique. Garder loin de n'importe quelle substance volatile et flamable Démonter de
l'approvisionnement principal quand n'est pas employé, pour obtenir les marchands autorisés d'utilisation de service et de
maintenace seulement. Le chargeur doit être rassemblé, réutilisé ou débarassé d'une manière dans l'environnement amicale selon
directives nationales/locales.
PROCÉDÉ DE CHARING : Avant relier à la canalisation d'alimentation principale vérifient svp que la valeur de tension est correcte -
voient qu'étiquette que ce chargeur autoswitching. Stand-by led verte s’allume.
Mettre la batterie dans le chargeur de la bonne manière (ne pas inverser le polaritè), la charge commencera automatiquement, le
signal acoustique est émis et la signalisation menée devient ROUGE (voir LIGHT SIGNALS et ACOUSTIC SIGNALS). Elle restera dans
cette condition jusqu'à 80% de chargement, le rattrapant que la signalisation menée deviendra VERT de clingnotement, le procédé
de chargement est tout à fait complète (de 80% à 99%). Le procédé de chargement est complet quand la signalisation menée est
VERTE et le signal acoustique est émis à partir de la fin de charge; enlever la batterie du chargeur
PROBLEM : A mené le clingnotement ROUGE le marque que la température de la batterie n'est pas compatible avec le processus
des recharges ou sa tension est inférieure que 10.4V et donc des recharges n'est pas autorisées ; cette indication est employée pour
celui que l'autre cas du défaut de fonctionnement, es : batterie défectueuse, contacts sales etc. Vérifier et attendre la restauration
certaine de la température ; si la recharge ne se produit pas contact le centre des assistance.
DONNEES TECHNIQUES : Code A000091 Entrée : 90V - 230V - 50/60Hz - 80W Rendement : 16.8V – 4.7A
ATTENTION : Le chargeur de batterie ne peut être utilisé qu’avec les batteries Li-PO 14.8V
D – SICHERHEITSHINWEISE : Das Ladegerät darf nur verwendet werden, um von unserer Umreifung Werkzeug Lithium Polymer
Akku, auch für andere Zwecke oder Anwendungen unserer Gewährleistung und Haftung ist nicht gültig. Das Ladegerät sollte, die von
den Menschen richtig ausgebildet. Nichtbeachtung der Bedienungsanleitung oder unsachgemäße Verwendung könnte dazu führen,
dass Verletzungen und Schäden Batterie. Die Lithium Polymer Akku aufgeladen werden können jederzeit ohne Verringerung der
Lebensdauer; Unterbrechung der Erhebung Verfahren nicht beschädigt werden. So verwenden Sie den Akku folgen Sie bitte den
Anweisungen Betrieb Umreifung Werkzeug. Wählen Ladegerät und der Lieferung Kabel täglich, benutze es nicht mit abgenutzten
oder beschädigten Teile. Nicht zu zerlegen, nie einen beliebigen Teil davon, nicht mit den Kontakten, kann zu einer vollständigen
schädlich Kurzschluss. Nicht invertieren die richtige Polarität während des Einsatzes oder der Ladung. Vor der Verwendung
überprüfen Sie die Kontakte. Geben Sie keine Metall Schlüssel zwischen Kontakten. Benutzen Sie nicht für andere Zwecke als die
angegebene. BATTERIE DARF NICHT IN DER ERHEBUNG OHNE AUFSICHT. Nicht bei hohen Temperaturen, direktem
Sonnenlicht nicht Deckenventilator Spalten. Nicht tauchen sie in das Wasser, zum Schutz vor Feuchtigkeit. Nicht anwendbar
Auswirkungen, oder werfen oder fallen und bohren sie, wenn es passiert Test mit Sorgfalt behandelt. Im Falle der Wärmeerzeugung,
Rauch Emission, oder Zündung sofort zu verwenden und zu ersetzen. Legen Sie das Ladegerät auf flachen, nicht leicht
entzündlichen und Hitzebeständigkeit Oberfläche. Halten Sie weg von einer flüchtigen und leicht entzündlichen Stoff. Trennen Sie die
wichtigsten, wenn nicht verwendet wird, um Service und Wartung nur autorisierten Händlern. Das Ladegerät muss gesammelt,
verwertet oder entsorgt werden in einer umweltfreundlichen Art und Weise nach den nationalen / lokalen Richtlinien.
PREIS VERFAHREN : Bevor eine Verbindung zum wichtigsten Netzzuleitung Sie bitte, dass die Spannung Wert korrekt ist - siehe
Etikett - das Ladegerät ist autoswitching. Stand-by-grüne LED leuchtet.
Legen Sie den Akku in das Ladegerät in der rechten Weise (nicht invertieren die polarità), die Belastung wird automatisch gestartet,
das akustische Signal wird ausgesendet und die Signalisierung RED geführt wird (siehe "LIGHT SIGNALS" und "ACOUSTIC SIGNALS").
Es bleibt in diesem Zustand bis zu 80% der Laden, überholen sie die Signalisierung geführt wird blinkt GRÜNE, der Laden ist
ziemlich komplett (von 80% auf 99%). Der Ladevorgang abgeschlossen ist, wenn die Signalisierung geführt wird GRÜNE und das
akustische Signal wird von dem Ladeende emittierten, entfernen Sie den Akku aus Ladegerät
MAßNAHMEN : Führte die Marken RED blinkt es, dass die Temperatur der Batterie ist nicht kompatibel mit dem Prozess der
Anreicherungen oder seine Spannung ist niedriger als 10.4V und lädt daher ist nicht gestattet; dieser Indikation wird für welche
anderen Fall von Störungen, Or. es: defekt Batterie, schmutzige, Kontakte usw. prüfen und warten die spätere Wiederherstellung der
Temperatur, wenn die Anreicherung nicht passieren, mit dem Service Center.
TECHNISCHE DATEN : Bestellnr. A000091 Eingang : 90V - 230V – 50/60Hz – 80W Ausgang : 16.8V – 4.7A
ACHTUNG : Das Ladegerät darf nur für Li-Po Akku’s 14.8V benutzt werden
E - INSTRUCCIONES DE SEGURIDAD : El cargador debe ser utilizado únicamente para cobrar el tirante nuestra herramienta de la

batería de polímero de litio, para otros fines o usos de nuestra garantía y la responsabilidad no es válida. El cargador debe ser
utilizado por personas con una formación adecuada. El no seguir las instrucciones de operación o uso inadecuado puede causar
lesiones y daños batería. La batería recargable de polímeros de litio se puede cargar en cualquier momento y sin reducción de su
vida útil; interrumpir el procedimiento de carga no dañarlo. Para usar la batería, por favor siga las instrucciones de funcionamiento
tirante herramienta. Compruebe el cargador y el cable principal de abastecimiento a diario, no lo use con las piezas dañadas o
gastadas. No desarme, nunca modificar cualquier parte, no conecte los contactos, puede provocar un corto circuito perjudicial. No
invierta la polaridad derecho durante el empleo o cargo. Antes de comprobar la utilización de contactos. No ponga claves entre los
contactos de metal. No utilizar con otros fines distintos de los especificados. LA BATERÍA NO SE DEBE DEJAR EN EL MODO DE
CARGA SIN SUPERVISIÓN. No conservar a alta temperatura, la luz solar directa, no cubren ventilador fisuras. No sumerja en el
agua, proteger de la humedad. No aplique impacto, o tirar o gota o taladro, si ocurrió probarlo con cuidado. En caso de la generación
de calor, el humo de emisión, o de encendido por detener inmediatamente de utilizar y reemplazar. Coloque el cargador sobre plano,
no fácilmente inflamables y resistencia al calor de superficie. Manténgase lejos de cualquier sustancia volátiles y fácilmente
inflamables. Desconectarse de la red eléctrica cuando no se utiliza, para obtener servicios de mantenimiento y uso sólo un
distribuidor autorizado. El cargador debe recogerse, reciclarse o eliminarse de manera favorable al medio ambiente de acuerdo con
los planos nacional y local directrices.
CHARING PROCEDIMIENTO : Antes de conectarse a la red eléctrica línea compruebe que la tensión de valor es correcta - véase la
etiqueta - Cargador autoswitching. El ledverde stand-by esta llevado.
Coloque la batería en el cargador en forma correcta (no invertir el polarità), la carga se iniciará automáticamente, la señal acústica y
el LED rojo está encendido (consulte la tabla " LIGHT SIGNALS " y " ACOUSTIC SIGNALS "). Y se mantendrá en estas condiciones hasta
el 80% de la carga, superando a que la señalización será llevado a parpadear VERDE, el proceso de carga es bastante completa
(de 80% a 99%). El proceso de carga es completa cuando la señalización es llevado VERDE y la señal acústica es emitida desde el
final de la carga; quitar el cargador de batería
FALLO : Lideró las marcas rojas parpadeantes lo que la temperatura de la batería no es compatible con el proceso de recarga o su
voltaje es inferior a 10.4V y recarga, por lo tanto, no está permitido; esta indicación se utiliza para lo que otro caso de mal
funcionamiento, es: Indice defectuosos Batería, etc Check contactos sucios y esperar el eventual restablecimiento de la temperatura;
si la recarga no se produce contacto con el centro de servicio
DATOS TECNICOS : Cód. A000091 Alimentación : 90V – 230V – 50/60 Hz – 80W Salida : 16.8V – 4.7A
ATENCIÓN: El cargador de batería puede utilizarse sólo con baterías Li-Po de 14.8 V
SEGNALAZIONI LUMINOSE
LED DI SEGNALAZIONE STATO OPERAZIONE
LED VERDE ACCESO STAND-BY o BATTERIA COMPETAMENTE CARICA
LED VERDE LAMPEGGIANTE BATTERIA IN CARICA FINALE (80%-99%)
LED ROSSO ACCESO BATTERIA IN CARICA ALLA MASSIMA CORRENTE
LED ROSSO LAMPEGGIANTE BATTERIA DIFETTOSA- BASSA o ALTA TENSIONE
SEGNALAZIONI ACUSTICHE
SEGNALE EMESSO OPERAZIONE
DUE BREVI BEEPS BATTERIA OK- INIZIO CARICA
SINGOLO BEEP LUNGO CARICA TERMINATA – BATTERIA PRONTA
DUE BREVI BEEPS OGNI MINUTO DOPO IL TERMINE
DELLA CARICA BATTERIA CARICA – PRONTA ALL’USO MA ANCORA INSERITA
NEL CARICABATTERIE
BEEPS RAPIDI E INTERMITTENTI CONTINUI BATTERIA CON PROBLEMI – CARICA NON CONSENTITA
VISUAL SIGNAL
LED OF SIGNALLING STATUS OPERATION
GREEN LED STEADY LIGHT STAND-BY or FULL LOADED BATTERY
BLINKING GREEN LED BATTERY QUITE LOADED (80%-99%)
RED LED STEADY LIGHT BATTERY IN CHARGE AT MAX CURRENT
BLINKING RED LED BATTERY DEFECT- LOW or OVER VOLTAGE
SOUND SIGNAL
SIGNAL ISSUED OPERATION
TWO SHORT BEEPS BATTERY OK- STARTS TO CHARGE
SINGLE LONG BEEP BATTERY FULL LOADED - READY
DOUBLE SHORT BEEPS EVERY ONE MINUTE AFTER FULL
CHARGE REACHED BATTERY FULL LOADED – READY TO USE BUT STILL
HOUSED INTO CHARGER
FAST INTERMITTENT CONTINUOS BEEPS BATTERY HAS TROUBLE – CHARGE DIDN’T ALLOW

PIASTRA ANTIUSURA / WEARING PLATE / PLAQUE / SCHLEIßBLECHES / PLACA DE USO :
I - La macchina può essere equipaggiata con una piastra in acciaio inox per la protezione della base contro un’eccessiva usura in
caso di utilizzo dell’apparecchio su superfici abrasive tipo mattoni, cemento, pietre ecc…
Il kit deve essere ordinato con il codice A000137.
GB – The tool can be equipped with a stainless steel plate to protect the base against excessive wear when using it on abrasive
surfaces like bricks, concrete, stones, etc ... The kit can be ordered with item A000137
F – L’appareil de cerclage peut être équipée d'une plaque en acier inoxydable pour protéger la base contre l'usure excessive
lorsqu'il est utilisé sur des surfaces abrasives des briques type d'appareil, béton, pierre, etc ...
Le kit doit être commandé avec le code A000137
D – Bei Umreifungen von rauhen Oberflaechen wie bei Backsteinen, Betonplatten oder Aehnlichem dient die Edelstahlplatte zum
Schutz gegen Verschleiss der Geraetegrundplatte. Das Zubehoer ist unter der Bestellnummer A000137 erhaeltlich
E – La máquina puede ser equipada con una placa de acero inoxidable para proteger la base contra el desgaste excesivo cuando
se use sobre superficies rugosas de los ladrillos aparato tipo, hormigón, piedras, etc ...
El kit se debe pedir con el código A000137
GANCIO SOSPENSIONE / SUSPENSION HOOK / CROCHET DE LEVAGE/ AUFZUGHAKEN / GANCHO PARA
ESLINGA :
I - La macchina può essere equipaggiata con un gancio di sospensione a due posizioni (verticale op. orizzontale). Il gancio deve
essere fissato al tendireggia tramite due viti (compreso nella fornitura) come illustrato in figura sotto.
Il codice di ordinazione è A000116.
GB – The tool could be equipped with a two position suspension hook (orizzontal or vertical). The hook must be fix to the tool by
two screw ( included ) like in picture below. Item for oreder is A000116
F – L’ appareil peut être équipée d'un crochet de suspension à deux positions (verticale op. Horizontal). Le crochet doit être réglé à
sangle canons avec deux vis (fournies) comme illustré ci-dessous. La commande est A000116.
D – Das Geraet kann durch einen Aufhaengebuegel an einen Federzug aufgehaengt werden und ermoeglicht das Umreifen in zwei
Positionen. Das Zubehoer ist unter der Bestellnummer A000116 erhaeltlich
E – La máquina puede ser equipada con un gancho de suspensión en dos posiciones ( vertical / Horizontal). El gancho se debe
establecer en correa de armas de fuego con dos tornillos (incluidos) como se muestra a continuación.
El orden es A000116.

5) ELEMENTI PRINCIPALI E REGOLAZIONI / OPERATING ELEMENTS AND ADJUSTMENTS / MODULES
PRINCIPAUX ET RÉGLAGES / WICHTIGE HINWEISE UND EINSTELLUNGEN / ELEMENTOS PRINCIPALES
Y AJUSTES
I - NON AZIONARE MAI L’APPARECCHIO SENZA REGGIA, SI PUO’ DANNEGGIARE IL RULLO ED IL DISPOSIVO DI
SALDATURA / TAGLIO
GB - DO NOT OPERATE THE TOOL WITHOUT STRAP, YOU COULD DAMAGE THE FEEDWHEEL AND THE WELDING /
CUTTING GROUP
F - NE PAS ACTIONNER L'APPAREIL SANS FEUILLARD, VOUS POURRIEZ ENDOMMAGER LE ROULEAU
D’ENTRAÎNEMENT ET LE GROUPE DE SOUDURE/ COUPURE
D - NIE DAS GERÄT OHNE KUNSTSTOFFBAND BETREIBEN, SPANNWALZE UND SCHWEIß-VORRICHTUNG SOWIE
SCHNEIDKLINGE KÖNNTEN BESCHÄDIT WERDEN
E - NUNCA ACCIONE EL APARATO SIN FLEJE YA QUE PODRÍA DAÑARSE EL RODILLO Y EL DISPOSITIVO DE
SOLDADURA / CORTE
LED DI SEGNALAZIONE
AMBRA MACCHINA IN OPERA
AMBRA LAMPEGGIANTE MACCHINA IN STAND-BY
LED OF SIGNALLING
AMBER TOOL IN WORK
AMBER BLINKING STAND-BY TOOL
DEL DE SIGNALISATION
AMBRE MACHINE EN MARCHE
CLIGNOTEMENT AMBRE MACHINE EN ATTENTE
LED - LEUCHTSIGNAL
LEUCHTET GERÄT IM EINSATZ
BLINKT GERÄT IST IN STAND-BY
INDICADOR LUMINOSO
ÁMBAR MÁQUINA EN MARCHA
ÁMBAR INTERMITENTE MÁQUINA EN STAND-BY
LED DI SEGNALAZIONE
LED OF SIGNALLING
DEL DE SIGNALISATION
LED LEUCHTSIGNAL
INDICADOR LUMINOSO
LEVA 2 – AZIONAMENTO SALDATURA / TAGLIO
LEVER 2 – CUTTING / WELDING
LEVIER 2 – ACTIONNEMENT SOUDURE/COUPURE
HEBEL 2 – SCHWEIßEN / SCHNEIDEN
PALANCA 2 – ACCIONAMIENTO SOLDADURA / CORTE
LEVA 3 – LEVA SBLOCCO
LEVER 3 – RELEASE LEVER
LEVIER 3 –LEVIER DE DÉVERROUILLAGE
HEBEL 3 – BLOCKIEREN/LÖSEN
PALANCA 3 – PALANCA DE DESBLOQUEO
TASTO 1 – AZIONAMENTO TENSIONE
BUTTON 1 – TENSIONING
BOUTON 1 – TENSIONNEMENT
DRUCKTASTER 1 – BAND SPANNEN
TECLA 1
–
ACCIONAMIENTO TENSADO

Programmazione (fig.A) / Programming (pic.A) / Programmation (image A) / Programmieren (bild A) /
Programación (fig.A) :
I - Per poter effettuare ogni tipo di regolazione (saldatura/taglio e tensionamento) occore innanzitutto che la macchina sia accesa,
dopodichè premere contemporaneamente i tasti S+ (Saldatura) e T+ (Tensionamento) per circa 10 sec. come illustrato in figura
A,all’attivazione della procedura di programmazione il led illuminato indica il valore della saldatura,per passare al tensionamento
basterà premere T+ o T-
GB - For being able to carry out every type of regulation in the first place (welding/cut and tensionamento) that the machine is
ignited, after at the same time to press the S+ (Welding) and T+ (Tensionamento) keys for approximately 10 sec. like illustrated in
pic.A, to the activation of the illuminated procedure of programming the led it indicates the value of the welding, in order to pass to the
retirement it will be enough to press T+ or T-
F - Pour pouvoir effectuer tous les types de réglage (soudure/coupure et tensionnement) il faut avant tout que la machine soit
allumée, après quoi appuyer en même temps sur les touches de S+ (soudure) et de T+ (tensionnement) pendant environ 10 sec.
comme illustré dans la fig. A, à l'activation de la procédure de programmation la DEL éclairée indique la valeur de soudure, pour
passer au tensionnement il suffit d’appuyer sur T+ ou T-
D - Für das Einstellen der Schweißzeit/Schneiden oder der Bandspannung, muß das Gerät eingeschaltet sein (Drucktaster 1 kurz
betätigen, LED Leuchtsignal muss leuchten), danach die beiden Plus-Tasten der Tastatur S+ (Schweissen) und T+ (Bandspannen)
gleichzeitig für ca. 10 Sek. drücken s. Bild A. Dann leuchtet ein LED auf der Tastaturanzeige und je nach Bedarf die gewünschte
Taste S+/S- (Schweißzeit) oder T+/T- (Bandspannung) betätigen.
E - Para poder efectuar todo tipo de ajustes (soldadura/corte y tensado), es necesario antes que nada asegúrese de que la
máquina esté encendida y pulsar a continuación contemporáneamente las teclas S+ (Soldadura) y T+ (Tensado) durante 10 seg.
aproximadamente, como se muestra en la figura A. Al activar el procedimiento de programación, el led encendido indica el valor de
la soldadura; para pasar a tensado es suficiente pulsar T+ o T-.
Regolazione tempo di saldatura/taglio (fig.B) / Welding - cutting time adjustment (pic.B) / Reglage de la durée
de soudage / Einstellen der Schweißzeit/Schneiden (bild B) / Ajuste del tiempo de soldadura/corte (Fig. B):
I - La durata del tempo di saldatura/taglio può essere regolata premendo sui tasti + o – a seconda della qualità e delle dimensioni
della reggia, premendo il tasto + il tempo di saldatura aumenta, premendo il tasto – il tempo diminuisce. Trascorsi 10 sec. dalla
pressione dei tasti, i dati verranno archiviati nella memoria della macchina e la procedura di programmazione abbandonata
GB - The duration of the time of welding/cut can be regulated pressing on key + or - to second of the quality and the dimensions of
the strap, pressing key + the time of welding it increases, pressing the key - the time dimishing 10 sec. passed from the pressure of
the keys, the data will come inserted in the memory of the machine and the procedure of abandoned programming
F - La durée du temps de soudure/coupure peut être réglée en appuyant sur les touches + ou - selon la qualité et les dimensions du
feuillard, en appuyant sur la touche + le temps de soudure augmente, en appuyant sur la touche – il diminue. Lorsque 10 sec. se
sont écoulées après avoir appuyé sur les touches, les données seront insérées dans la mémoire de la machine et la procédure de
programmation abandonnée
D - Die Schweißzeit/Schneiden wird mit dem Taster + oder – je nach Abmeßung des Bandes eingestellt.
Mit + erhöt sich Zeit und mit – wird die Zeit kürzer. Nach ca.10 Sekunden ohne Tastendruck wird der Programmmodus verlassen und
das Gerät speichert somit den lezten Wert..
E - La duración del tiempo de soldadura/corte puede ajustarse pulsando las teclas + o – a según la calidad y las dimensiones del
fleje; al pulsar la tecla + el tiempo de soldadura aumenta, al pulsar la tecla – el tiempo disminuye. Tras 10 seg. de la presión de las
teclas, la memoria de la máquina archiva los datos y se sale del procedimiento de programación.
Regolazione tensione reggia (fig.C) / Adjusting strap tension (pic.C) / Reglage de la tension / Einstellen der
Bandspannung (bild C) / Ajuste del tensado del fleje (Fig. C)
I - La tensione massima della reggia può essere regolata, a seconda della qualità e delle dimensioni premendo i tasti + o –
Premendo il tasto + il livello di tensionamento aumenta, premendo il tasto – diminuisce. Trascorsi 10 sec. dalla pressione dei tasti, i
dati verranno archiviati nella memoria della macchina e la procedura di programmazione abbandonata.
GB - The maximum tension of the strap can be regulated, to second of the quality and of the dimensions pressing keys + or -
Pressing key + the level of tensioning it increases, pressing the key - diminish. 10 sec. passed from the pressure of the keys, the data
will come inserted in the memory of the machine and the procedure of abandoned programming.
F - La tension maximum du feuillard peut être réglée en appuyant sur les touches + ou - selon la qualité et les dimensions du
feuillard, en appuyant sur la touche + le tensionnement augmente, en appuyant sur la touche – il diminue. Lorsque 10 sec. se sont
écoulées après avoir appuyé sur les touches, les données seront insérées dans la mémoire de la machine et la procédure de
programmation abandonnée.
D - Die Bandspannkraft wird mit dem Taster + oder – eingestellt und ist Abhängig von Art und Abmeßung des Kunststoffbandes. Mit
+ erhöt sich Spannkraft und mit – wird die Spannkraft kleiner. Nach ca.10 Sekunden ohne Tastendruck wird der Programmmodus
verlassen und das Gerät speichert somit den lezten Wert.
E- El tensado máximo del fleje puede ajustarse, de acuerdo a la calidad y a las dimensiones, pulsando las teclas + o -; al pulsar la
tecla +, el nivel de tensado aumenta; al pulsar la tecla -, disminuye. Tras 10 seg. de la presión de las teclas, la memoria de la
máquina archiva los datos y se sale del procedimiento de programación.

( A ) ( B )
( C )
Regolazione grani area saldatura / Adjusting welding area / Ajustement du secteur de soudure / Einstellen der
Schweißoberfläche / Ajuste de la zona de soldadura :
I - Durante l’utilizzo di regge con diverse misure,si possono verificare saldature non uniformi. Se ciò dovesse accadere basterà agire
sulla regolazione dei grani area saldatura (fig.E1-E2).
Nel caso la saldatura si presenti prevalentemente nel lato esterno (fig.E3) svitare leggermente il grano esterno e se non fosse
sufficiente avvitare leggermente il grano interno fino ad ottenere una saldatura uniforme (fig.E4).
Nel caso invece si presenti prevalentemente nel lato interno (fig.E5), svitare leggermente il grano interno e se non fosse sufficiente
avvitare leggermente il grano esterno fino ad ottenere una saldatura uniforme (fig.E6).
GB - During use various width strap, can happen that the welding is not uniform. If it had happen you can set the welding area
adjusting the screw (pic.E1-E2)
If welding is mostly on the external strap side (pic.E3) to unscrew slightly the external grub screw and if it need screw slightly the
internal grub screw for to have a uniform welding (pic.E4)
If welding is mostly on the internal strap side (pic.E5) to unscrew slightly the internal grub screw and if it need screw slightly the
external grub screw for to have a uniform welding (pic.E6)
F - Pendant la diverse courroie de largeur d'utilisation, peut se produire que la soudure n'est pas uniforme. Si elle avait pour se
produire vous pouvez placer le secteur de soudure ajustant la vis (figure E1-E2).
Si la soudure est décalée vers l’extérieur (figure E3), desserrer la vis externe et si vous avez besoin serrer la vis intern afin d’obtenir
une soudure centrée (figure E4). Si la soudure est décalée vers l’intérieur (figure E5),desserrer la vis interne et si vous avez besoin
serrer la vis externe jusqu’à obtenir une soudure centrée (figure E6).
D - Durch Verwenden von Kunststoffbändern mit verschiedenen Banddicken, kann es vorkommen, daß die Oberfläche nicht
gleichmäßig ist (Bild E1-E2)
Falls die Schweißstelle nach der äußeren Seite geht (Bild E3), den äußeren Gewindestift leicht lösen und den inneren Gewindstift
leicht anziehen, bis eine gleichförmige Schweißstelle erreicht wird.(Bild E4)
Falls aber die Schweißstelle nach der inneren Seite geht (Bild E5), den inneren Gewindstift leicht lösen und den äußeren Gewindstift
leicht anziehen (Bild E6) und auch hier soweit vorgehen bis eine gleichförmige Schweißstelle erreicht wird.
E - Durante varia correa de la anchura del uso, puede suceder que la soldadura no es uniforme. Si tenía suceder puedes fijar el
área de la soldadura que ajusta el tornillo (fig. E1-E2)
En el de caso de que la soldadura presente más material en el lado externo (fig. E3)aflojar ligeramente el tornillo externo y si es
necesario atornillar el interno hasta obtener una soldadura uniforme (fig. E4). Si por el contrario la soldadura presenta más material
en el lado interno (fig. E5), aflojar el tornillo interno y si es necesario atornillar ligeramente el externo hasta obtener una soldadura
uniforme (fig. E6).
TASTI REGOLAZIONE SALDATURA
ADJUST WELDING BUTTON
TOUCHE DE RÉGLAGE DE LA SOUDURE
TASTE ZUM EINSTELLEN DER
SCHWEIßZEIT
TECLAS DE AJUSTE DE LA SOLDADURA
TASTI REGOLAZIONE TENSIONAMENTO
TENSIONING WELDING BUTTON
TOUCHE DE RÉGLAGE DU TENSIONNEMENT
TASTE ZUM EINSTELLEN DER BANDSPANNKRAFT
TECLAS DE AJUSTE DEL TENSADO

(E1) (E2) (E3)
(E4) (E5) (E6)
6) ISTRUZIONI D’USO / OPERATION / MODE D’EMPLOI / BEDIENANLEITUNG / INSTRUCCIONES DE USO
I - L’apparecchio modello ITA21 è concepito per reggiare imballi con reggette in plastica. La reggia deve essere avvolta intorno
all’imballo manualmente e quindi inserita, secondo le istruzioni, nell’apparecchio che eseguirà il tensionamento, il taglio e la saldatura
a vibrazione della stessa. Avvolgere la reggia intorno al materiale da legare, tenendo l’estremità con la mano sinistra e
sovrapponendo la reggia con la mano destra (attenzione che la reggia sia pulita da olio, grasso e sporco); aprire la reggiatrice
premendo la leva sblocco, inserire le regge sovrapposte e ben allineate tra il corpo e la base dell’apparecchio spingendole contro i
guidareggia anteriore e posteriore (fig.F1). Premere il tasto 1 per effettuare il tensionamento fino al raggiungimento della tensione
desiderata o impostata (fig.F2) (una volta raggiunta la massima tensione la macchina permette di effettuare altri 3 tensionamenti
dopo i quali deve avvenire la saldatura). Per effettuare la saldatura premere la leva 2, la macchina effettuerà così la saldatura,il taglio
ed il raffreddamento della reggia (fig.F3). Dopo l’accensione del led ambra ed il contemporaneo suono della macchina che indicano
la fine del ciclo di saldatura è possibile estrarre la reggia (fig.F4). Durante il segnale di fine saldatura sui led del tastierino è possibile
controllare il livello della batteria,che verrà aggiornato ogni ciclo di saldatura. Esempio: batteria carica (fig. F5) – batteria quasi
scarica con un’autonomia di circa 2 cicli di chiusura (fig.F6). Lo stato di carica della batteria verrà visualizzato anche quando si
accende la macchina. La batteria scarica viene visualizzata tramite i 2 ultimi led del tastierino (fig. F7). Sostituire la batteria con una
carica o ricaricare la stessa,per taglierla dalla macchina premere il tasto di sicurezza e tirarla verso l’alto (fig.F8)
GB - The tool model ITA21 is designed to strap packages with plastic strap. The strap is fed around the package manually and
inserted in the tool, as showed in the instructions, tensioned, cutted and friction welded by the tool.
Wrap the parcel to be bound with the strap, as showed in pic.F1, holding the tip of the strap with left hand and winding over the strap
by right hand ( beware that the strap will be clean, oil and grease free); to open the tool pressing the lever release, to insert very
resists to them overlapping and aligned between the body and the base of the front and posterior apparatus pushing them against the
strap (fig. F1). To press key 1 in order to carry out the tensioning until the attainment of the tension wished or set up (once caught up
the maximum tension the machine allows to carry out others 3 tensionament after which the welding must happen) (fig. F2). In order
to carry out the welding to press lever 2, the machine tool will carry out therefore the welding, the cut and the cooling of the strap (fig.
F3). After the ignition of led the amber and the contemporary sound of the tool that indicate the end of the welding cycle it is possible
to extract the strap (fig. F4)
During it marks them of fine welding on the led of the keyboard is possible to control the level of the battery, that she will come
change every cycle of welding. Example: loaded battery (fig. F5) - battery nearly discharge with an autonomy of approximately 2
cycles of closing (fig. F6). The battery level will also appear when the operator swich on the tool.
The battery discharge comes visualized through the 2 last ones led of the keyboard (fig. F7). To replace the battery with loads or to
recharge the same one, for output the battery of the machine to press the emergency key and to pull it towards the high (fig. F8)
F - L’appareil modèle ITA20 a été conçu pour cercler des emballages avec des feuillards en plastique. Le feuillard doit être enroulé
manuellement autour de l’emballage et être inséré ensuite dans l’appareil qui exécutera le tension, la coupe et la soudure par
vibration de celui-ci en suivant les instructions fournies. Enrouler le feuillard autour du matériel à cercler, comme illustré sur la figure
F1, en tenant le bout du feuillard avec la main gauche et en superposant l’autre extrémité avec la main droite (le feuillard doit être
propre sans traces d’huile, graisse ou saleté) ; ouvrir l'appareil à cercler en appuyant sur le levier de déblocage, insérer les
extrémités du feuillard superposées et bien alignées entre le corps et la base de l’appareil en les poussant contre les cliquets de
guidage du feuillard avant et arrière (fig. F1). Appuyer sur la touche 1 pour déclencher l’opération de tension jusqu'à obtenir la
tension souhaitée ou programmée (une fois atteinte la tension maximum la machine permet d’effectuer 3 autres tension après quoi la
soudure doit être effectuée) (fig. F2). Afin d'effectuer la soudure appuyer sur le levier 2, la machine exécutera la soudure, la coupe et
le refroidissement du feuillard (fig.F3). Attendre le BIP sonore pour degager le feuillard de l’appareil (fig.F4). Pendant le signal qui
indique la fin de la soudure sur les LEDS du clavier il est possible de contrôler le niveau de la batterie qui sera réinitialisé à chaque

cycle de soudure. Exemple : batterie chargée (fig.F5) - batterie presque déchargée avec une autonomie de 2 cycles de fermeture
environ (fig.F6). Le niveau de la batterie apparaît également lorsque l 'interrupteur opérateur sur l'outil.
La batterie déchargée est affichée par les 2 dernières touches du clavier (fig.F7). Pour remplacer la batterie avec une charge ou pour
la recharger, l’extraire de la machine en appuyant sur la touche de sécurité et tirer vers le haut (fig. F8)
D - Das Gerät ITA21 wurde für das Umreifen mit Kunststoffverpackungsband entwickelt. Das Kunststoffband muss von Hand
umführt werden, um dann laut Bedienungseinleitung in das Gerät eingelegt zu werden, wo es dann gespannt, geschweißt und
geschnitten wird. Das Kunstoffband um die Ware umführen, das Ende mit der linken Hand halten und mit der rechten Hand das Band
übereinander legen (Band muß sauber und nicht mit Fett oder Öl beschmiert sein). Das Gerät durch Anziehen des Hebels öffnen,
das übereinander liegende Band bis zum Anschlag hinein schieben und dabei darauf achten, daß vorne sowie hinten das
Kunstoffband gut (parallel) in dem Gerät liegt.(Bild F1). Hebel los lassen und mit Druckknopf 1 das Band so wie gewünscht oder wie
eingestellt spannen.(Bild F2).(Nach los lassen des Drucktasters 1 kann man diesen noch max. 3 mal betätigen (spannen), danach ist
der Schweißvorgang erforderlich). Um den Schweissvorgang einzuleiten ist es erforderlich den Hebel 2 zu ziehen, das Gerät
schweißt und schneidet das Kunstoffband (Bild F3). Die oben positionierte LED leuchtet und nach einigen Sekunden vermittelt ein
hörbares Tonsignal das Ende des Zyklusses und durch Anheben des Hebels 3 geht zur gleichen Zeit der Hebel 2 für Schweißen in
die Anfangsposition, das Gerät öffnet sich und das erlaubt das Entfernen vom Kunststoffband (Bild F4).Während jedem Tonsignal
wird auf der LED-Anzeige der Tastatur der Ladezustand des Akku’s angezeigt. Beispiel: Akku voll geladen (Bild F5) – Akku fast leer
(Bild F6) d.h. noch ca. 2 Zyklen sind möglich. Der Akku wird auch angezeigt, wenn die Betreiber swich auf das Werkzeug
Bei Akku ganz leer bleiben die letzten 2 LED’s an (Bild F7).Der Austausch des Akku’s erfolgt durch drücken des Sicherheitsknopfes.
Den Akku dann nach oben herausziehen. (Bild F8).
E - El aparato modelo ITA21 ha sido concebido para envolver embalajes con flejes de plástico. El fleje debe enrollarse en el
embalaje manualmente y a continuación, introducirse, conforme a las instrucciones, en el aparato que lo tensa, lo corta y lo suelda
por vibración. Envuelva el fleje alrededor del material que se va a atar, sosteniendo el extremo con la mano izquierda y
sobreponiendo el fleje con la mano derecha (asegúrese de que el fleje no tenga residuos de aceite, grasa o suciedad); abra la
flejadora apretando la palanca de desbloqueo, introduzca los flejes sobrepuestos y bien alineados entre el cuerpo y la base del
aparato, empujándolos contra las guías anterior y posterior (Fig. F1). Pulse la tecla 1 para efectuar el tensado hasta alcanzar la
tensión deseada o configurada (Fig. F2) (una vez alcanzada la tensión máxima, la máquina permite efectuar otros 3 tensados tras
los cuales debe llevarse a cabo soldadura).Para efectuar la soldadura, presione la palanca 2, la máquina realizará de este modo la
soldadura, el corte y el enfriamiento del fleje (Fig. F3). Tras el encendido del led ámbar y el contemporáneo sonido de la máquina
que indican el final del ciclo de soldadura, se puede extraer el fleje (Fig. F4). Durante la señal de final de la soldadura, en los leds del
teclado es posible controlar el nivel de la batería, que se actualiza con cada ciclo de soldadura. Ejemplo: batería cargada (Fig. F5) –
batería casi descargada con una autonomía de casi 2 ciclos de cierre (Fig. F6). El nivel de la batería también aparecen cuando el
interruptor de operador en la herramienta.La batería descargada se visualiza mediante los 2 últimos leds del teclado (Fig. F7).
Sustituir la batería por una cargada, o cargarla. Para quitarla de la máquina, pulse la tecla de seguridad y tire de ella hacia arriba
(Fig. F8).
( F1 ) ( F2 )
( F3 ) ( F4 )

( F5 ) ( F6 ) ( F7 ) ( F8 )
Controllo della saldatura / Seal check / Contrôle de la soudure / Schweißkontrolle / Control de la soldadura :
I - Un controllo regolare della qualità della saldatura è fondamentale e può essere eseguito visivamente:
GB - A regular seal quality control is very important and it could be examinated visually as follow:
F - Un contrôle régulier de la qualité de la soudure est très important et il peut être effectué visuellement de la manière suivante:
D - Die Qualität der Schweißstelle ist sehr wichtig und kann durch Sehkontrolle erfolgen
E - Un control regular de la calidad de la soldadura es imprescindible y puede llevarse a cabo visualmente:
G1) tempo di saldatura corto/ insufficiente – short sealing time/ not enough – temps de soudure trop
court/insuffisant - Schweißzeit zu kurz/ nicht genug / tiempo de soldadura corto/insuficiente
G2) tempo di saldatura corretto – right sealing time – temps de soudure correct –
Schweißzeit in Ordnung - tiempo de soldadura correcto
G3) tempo di saldatura lungo/ eccessivo – too long sealing time/ wrong – temps de soudure trop long /
excessif - Schweißzeit zu lang - tiempo de soldadura largo/excesivo
( G1 )
( G2 )
( G3 )
NO – resistenza sigillatura insufficiente
NO – seal strength insufficient
NON – force de scellage insuffisante
NEIN- Schweißzeit zu kurz
NO – resistencia de sellado insuficiente
NO – resistenza sigillatura dubbia
NO – seal strength affected
NON – force de scellage douteuse
NEIN- Schweißzeit zu lang
NO – resistencia de sellado dudosa
SI – corretta
Yes -- right
Oui – correct
Ja – gut
SI – correcta

7) MANUTENZIONE E PULIZIA / SERVICING - CLEANING / ENTRETIEN ET NETTOYAGE /
WARTUNG UND REINIGEN / MANTENIMIENTO Y LIMPIEZA
I - PRIMA DI QUALUNQUE INTERVENTO SULL’APPARECCHIO TOGLIERE LA BATTERIA DALLA MACCHINA
Pulire periodicamente l’apparecchio dai residui di reggia, in particolare il rullo di tensionamento, le piastrine dentate del gruppo
saldatura e trazione, la cesoia utilizzando esclusivamente aria compressa
GB - BEFORE ANY INTERVENTION ON THE TOOL, TO REMOVE THE BATTERY OF THE TOOL
Clean periodically the tool from strap dusty, particulary the feedwheel, the gripper plates and the cutter using exclusively compressed
air
F - AVANT D’EFFECTUER N’IMPORTE QUELLE INTERVENTION SUL L’APPAREIL, ENLEVER LA BATTERIE DE LA
MACHINE
Nettoyer périodiquement l'appareil pour éliminer les résidus de feuillard, surtout le rouleau d’entraînement, les plaquettes dentées du
groupe de soudure et d’entraînement et la lame en utilisant seulement de l'air comprimé
D - VOR JEDER REPARATUR ODER WARTUNG IMMER DEN AKKU AUS DEM GERÄT ZIEHEN
Das Gerät des öfteren je nach Gebrauch nur mit DRUCKLUFT von Resten des Kunststoffbandes an der Spannrolle,
Schweißplätchen und Spannplätchen reinigen.
E - ANTES DE LLEVAR A CABO CUALQUIER INTERVENCIÓN EN EL APARATO, QUITE LA BATERÍA DE LA MÁQUINA
Limpie periódicamente los residuos de fleje del aparato, especialmente del rodillo de tensado, de las plaquitas dentadas de la unidad
de soldadura y tracción y del cortador, exclusivamente con aire comprimido.
Sostituzione piastrina blocca reggia / Bottom plate gripper replacement / Remplacement de la plaquette de
blocage du feuillard / Austausch des Halteplätchen für Kunststoffband / Sustitución de la plaquita de bloqueo
del fleje
I - Per la sostituzione della piastrina blocca reggia proseguire come segue: Svitare la vite di bloccaggio guidareggia anteriore
(fig.H1),svitare le due viti di bloccaggio piastrina (fig.H2),sfilare dalla parte anteriore la piastrina bloccareggia (fig.H3).Infilare quella nuova
e ripetere tutte le operazioni al contario per il rimontaggio.
GB - For the substitution of the gripper to continue as it follows : To remove screw of blocking front strap guide (fig. H1), to remove two
screw of blocking gripper (fig. H2), to parade from the front part the gripper (fig. H3). To thread that new and to repeat all the operations
to the contrary for the assembly.
F- Pour remplacer la plaquette de blocage du feuillard effectuer les opérations suivantes : dévisser la vis de blocage du cliquet de
guidage du feuillard (figure H1), dévisser les deux vis qui bloquent la plaquette (figure H2), dégager la partie avant de la plaquette de
blocage du feuillard (figure H3).Enfiler la nouvelle plaquette et répéter toutes les opérations dans le sens contraire pour le remontage.
D - Den Austausch des Kunststoffband-Halteplätchen wie folgt ausführen : Die Schraube der Band-Fuehrungsplatte loesen (Bild H1),
loesen der Schrauben (Bild H2) und das Haltebandplaettchen nach vorne raus entnehmen ( Bild H3), diese mit einer neuen
austauschen den Vorgang umgekehrt nachvollziehen.
E- Para la sustitución de la plaquita de bloqueo del fleje, lleve a cabo el siguiente procedimiento:Desenrosque el tornillo de fijación de
la guía anterior del fleje (Fig. H1), desenrosque los dos tornillos de fijación de la plaquita (Fig. H2), extraiga de la parte anterior la
plaquita de bloqueo del fleje (Fig. H3). Introduzca la nueva y repita todas las operaciones al contrario para el remontaje.
( H1 ) ( H2 ) ( H3 )

Sostituzione piedino saldante oscillante / Welding foot replacement / Remplacement de pied de soudure /
Austausch des Schwinger-Schweißplätchen / Sustitución de la plaquita de soldadura oscilante
I - Per la sostituzione del piedino saldante oscillante proseguire come segue:
Togliere il carter di copertura svitando la vite di fissaggio (fig.L1),rimuovere il perno piede oscillante (fig.L2),
togliere il piede con l’aiuto di una pinza e sostituirlo (fig.L3). Per il rimontaggio effettuare tutte le operazioni nel senso contrario.
GB - For the substitution of welding foot to continue as it follows:
To remove cover unscrewing the block screw (pic. L1), to remove the pin oscillating foot (pic. L2), to remove the foot with the aid of
one clamp and to replace it (pic. L3). For the assembly to carry out all the operations in the contrary sense.
F - Pour la substitution du pied de soudure continuer en tant que lui suit : Pour enlever la couverture dévissant le bloc visser (image
L1), pour enlever la goupille pied de oscillation (image L2), pour enlever le pied à l'aide d'une bride et pour le remplacer (image L3).
Pour l'assemblée pour effectuer toutes opérations dans le sens contraire.
D - Für den Austausch des Schwinger-Schweissplätchen wie folgt vorgehen:
Den Schutzdeckel (Bild L1) abschrauben, das Plätchen (Bild L2) durch abschrauben des Schraubbolzen entfernen und mit einer
kleinen Zange das Plätchen entfernen und austauschen (Bild L3). Den Vorgang wie am Anfang umgekehrt widerholen.
E - Para la sustitución de la plaquita de soldadura oscilante, lleve a cabo el siguiente procedimiento:
Quite la cubierta de protección, desenroscando el tornillo de fijación (Fig. L1), quite el perno de la placa oscilante (Fig. L2),
quite la placa usando una pinza, y sustitúyalo (Fig. L3). Para el remontaje, lleve a cabo las mismas operaciones en sentido contrario.
( L1 ) ( L2 ) ( L3 )
8) RISOLUZIONE PROBLEMI / TROUBLESHOOTING / SOLUTION DES PROBLEMS /
PROBLEMLÖSUNGEN / LOCALIZACIÓN DE AVERÍAS
PROBLEMA / TROUBLE / PROBLEM / PROBLEM / PROBLEMA
SOLUZIONE / REMEDY / SOLUTION / LÖSUNG / SOLUCIÓN
Inserendo la batteria e premendo il pulsante di tensionamento l’apparecchio non si attiva /
After battery fitting and pushing the tension button the tool doesn’t work / Après avoir inséré la
batterie et appuyé sur le bouton de tensionnement l'appareil ne marche pas / Akku wird ins Gerät
eingeschoben und Gerät startet nicht /Al introducir la batería y presionar el pulsador de tensado, el
aparato no se activa
I Verificare accoppiamento contatti scheda / batteria ( verificare se non si sono deformati e / o piegati) - verificare
che non vi siano fili staccati- Verificare funzionamento del microwsith sotto il pulsante
Controllare lo stato di carica della batteria (ultimi led illuminati sulla tastiera)
GB Check the battery contacts in the rear tool part and / or if there are disconnected wires
Check if the microswitch under the push button – check the battery charge status (led lights on keyboard)
F Contrôler le couplage contacts carte / batterie (contrôler s’ils ne sont pas déformés et / ou pliés) – contrôler s’il
n’y a pas de fils débranchés- Contrôler le fonctionnement du microswitch sous le bouton
Contrôler l’état de charge de la batterie (derniers dels éclairées sur le clavier)
D Prüfen ob Verbindunskontakte nicht verbogen oder sogar verschmuzt sind – Kontrollieren ob nicht Kabel gelöst
sind- ob der Micro-switch funktioniert- Ladezustand des Akku’s überprüfen, wenn nur die letzten LED leuchten.
E Revise acoplamiento contactos tarjeta / batería (asegúrese de que no estén deformados o doblados) –
compruebe que no haya cables desconectados- Revise el funcionamiento del microinterruptor bajo el pulsador.
Controle el estado de carga de la batería (últimos leds encendidos en el teclado)
La tensione della reggia è insufficiente / The tension of strap isn’t enough / La tension du feuillard est
insuffisante / Das Kunststoffband wird nicht genügend gespannt / El tensado del fleje es insuficiente
IControllare la regolazione del valore di tensione impostata; lo stato di carica / efficienza della batteria
Motore di tensionamento guasto o usurato (contattare centro assistenza)
Eventuale problema al gruppo riduttore / trasmissione meccanica (contattare centro assistenza)
Controllare che la scheda elettronica non sia guasta (contattare centro assistenza)
GB Check the set tension value on keypad; Check the battery charge / efficiency
Check if the tension motor isn’t damaged or worn out (contact the after sale service)
Check the gearbox (contact the after sale service)
Check the electronic card (contact the after sale service)
F Contrôler la valeur de tension programmée; l’état de charge / efficacité de la batterie
Moteur de tensionnement en panne ou usé (contacter le service après-vente)
Table of contents
Other ITATOOLS Packaging Equipment manuals
Popular Packaging Equipment manuals by other brands

Francotyp-Postalia
Francotyp-Postalia FPi 5020 Operator's manual

Better Packages
Better Packages PS2A Operator's manual

Rice Lake
Rice Lake 920i FlexWeigh Systems 201 Operation manual

Polychem
Polychem B1200 Operation manual

Fimap
Fimap FV9+ B Use and maintenance manual

XtraVac
XtraVac CM430 Operations & parts manual

Strapack
Strapack i-10 Original instruction manual

McLaughlin
McLaughlin V_VSK250 parts manual

Advanced Poly-Packaging
Advanced Poly-Packaging Advanced Poly-Bagger T-1000-S14 Operation manuals

CYKLOP
CYKLOP M-Pac PLT Operation

Minipack-Torre
Minipack-Torre Minimini instruction manual

Transpak
Transpak TP-6000 Technical Questions and Answers