Jack JK-T1790 User manual

i
重要安全事项
IMPORTANT SAFETY INSTRUCTIONS
此缝纫机在有的国家(设置场所)由于该国的安全规定而被禁止使用。同时,技术服务也同样被禁止。
Putting sewing systems into operation is prohibited until it has been ascertained that the sewing systems in which these
sewing machines will be built into, have conformed with the safety regulations in your country. Technical service for those
sewing systems is also prohibited.
1. 使用此缝纫机时,必须遵守包括如下项目的基本安全措施。
Observe the basic safety measures, including, but not limited to the following ones, whenever you use the machine.
2. 使用此缝纫机之前,请阅读本使用说明书在内的所有指示文件。同时应将此使用说明书妥善保管,以便能够随时查阅。
Read all the instructions, including, but not limited to this Instruction Manual before you use the machine.In addition,
keep this Instruction Manual so that you may read it at anytime when necessary.
3. 此缝纫机应与贵国的有关安全规定一起使用。
Use the machine after it has been ascertained that it conforms with safety rules/standards valid in your country.
4. 使用此缝纫机和缝纫机动作中,所有的安全装置应安装到规定的位置。没有安装规定的安全装置的缝纫机禁止使用。
All safety devices must be in position when the machine is ready for work or in operation.The operation without the
specified safety devices is not allowed.
5. 此缝纫机应由接受过培训的操作人员来操作。
This machine shall be operated by appropriately-trained operators.
6. 使用缝纫机时,建议戴安全防护眼镜。
For your personal protection, we recommend that you wear safety glasses.
7. 发生下列情况时,应立即关掉电源开关,或拔下电源线插头。
For the following, turn off the power switch or disconnect the power plug of the machine from the receptacle.
7-1 机针、弯针、分离器等穿线和更换旋梭时。
For threading needle(s), looper, spreader etc. and replacing bobbin.
7-2 更换机针、压脚、针板、弯针、分离器、送布牙、护针器、支架、布导向器等时。
For replacing part(s) of needle, presser foot, throat plate, looper, spreader, feed dog, needle guard, folder,
clothguideetc.
7-3 修理时。
For repair work.
7-4 工作场所无人了或离开工作场所时。
When leaving the working place or when the working place is unattended.
7-5 使用离合马达时,请等待马达完全停止之后再进行。
When using clutch motors without applying brake, it has to be waited until the motor stopped totally.
8. 缝纫机以及附属装置使用的机油、润滑脂等液体流入眼睛或沾到皮肤上时,或被误饮时,应立即清洗有关部分并
去医院治疗。
If you should allow oil, grease, etc. used with the machine and devices to come in contact with your eyes or skin or
swallow any of such liquid by mistake, immediately wash the contacted areas and consult a medical doctor.
9. 禁止用手触摸打开了缝纫机开关通电的零件或装置。
Tampering with the live parts and devices, regardless of whether the machine is powered, is prohibited.
10. 有关缝纫机的修理、改造、调整应由受过专门训练的技术人员或专家来进行。
Repair, remodeling and adjustment works must only be done by appropriately trained technicians or specially skilled
personnel. Only spare parts designated by JUKI can be used for repairs.
11. 一般的维修保养应由受过训练的人员来进行。
General maintenance and inspection works have to be done by appropriately trained personnel.
12. 有关缝纫机的电气方面的修理、维修应由有资格的电气技术人员或专家的监督和指导下进行。

ii
19. 本使用说明书上采用以下2 个警告符号。
Warning hints are marked with the two shown symbols.
有损伤操作人员、维修人员的危险。
Danger of injury to operator or service staff
安全上需要特别加以注意的事项。
Items requiring special attention
Repair and maintenance works of electrical components shall be conducted by qualified electric technicians or under the
audit and guidance of specially skilled personnel.Whenever you find a failure of any of electrical components,
immediately stop the machine.
13. 修理、保养有关空气、气缸等压缩空气的零件时,应切断空气压缩机供气源后再进行。如有残留压缩空气时,应
放掉压缩空气。但,受过相当训练的技术人员或专家进行有关调整或确认动作时除外。
Before making repair and maintenance works on the machine equipped with pneumatic parts such as an air cylinder, the
air compressor has to be detached from the machine and the compressed air supply has to be cut off. Existing residual
air pressure after disconnecting the air compressor from the machine has to be expelled. Exceptions to this are only
adjustments and performance checks done by appropriately trained technicians or specially skilled personnel.
14. 缝纫机的使用期间应定期进行清扫。
Periodically clean the machine throughout the period of use.
15. 为了正常安全运转,应安装地线。同时应在不受高频焊接机等强噪音源影响的环境下使用。
Grounding the machine is always necessary for the normal operation of the machine. The machine has to be operated in
an environment that is free from strong noise sources such as high-frequency welder.
16. 电源插头应用具有电气专门知识的人来安装。电源插头必须连接到接地插座上。
An appropriate power plug has to be attached to the machine by electric technicians. Power plug has to be connected to
a grounded receptacle.
17. 缝纫机指定用途以外不能使用。
The machine is only allowed to be used for the purpose intended. Other used are not allowed.
18. 对缝纫机的改造、变更应符合安全规格,并采取有效的安全措施。另外,对于有关改造和变更,本公司概不负责。
Remodel or modify the machine in accordance with the safety rules/standards while taking all the effective safety
measures. assumes no responsibility for damage caused by remodeling or modification of the machine.
1 ・有发生中轻度伤害、重伤、死亡的危险。
There is the possibility that slight to serious injury or death may be caused.
・触摸了活动部分的话,有发生负伤的危险。
There is the possibility that injury may be caused by touching moving part.
2 ・应安装安全防护器,然后再进行缝制。
To perform sewing work with safety guard.
・应安装安全护罩,然后再进行缝制。
To perform sewing work with safety cover.
・应安装保护装置,然后再进行缝制。
To perform sewing work with safety protection device.
3 ・应关掉电源之后,再进行「穿线」、「更换梭芯、机针」、「清扫」、
「调整」、「加油」。
Turn OFF the power and perform “threading”, “replacement of bobbin or
“needle”, “cleaning”, “adjustment” and “lubrication”.

iii
为了安全地使用本缝纫机的注意事项
FOR SAFE OPERATION
危险
DANGER
1. 为了防止触电事故, 打开电源时, 请不要打开马达电气箱盖, 也不要触摸电气箱内
的零件。
To prevent possible accidents due to electric shocks, neither open the cover of
motor electrical box nor touch the component(s) inside the electrical box.
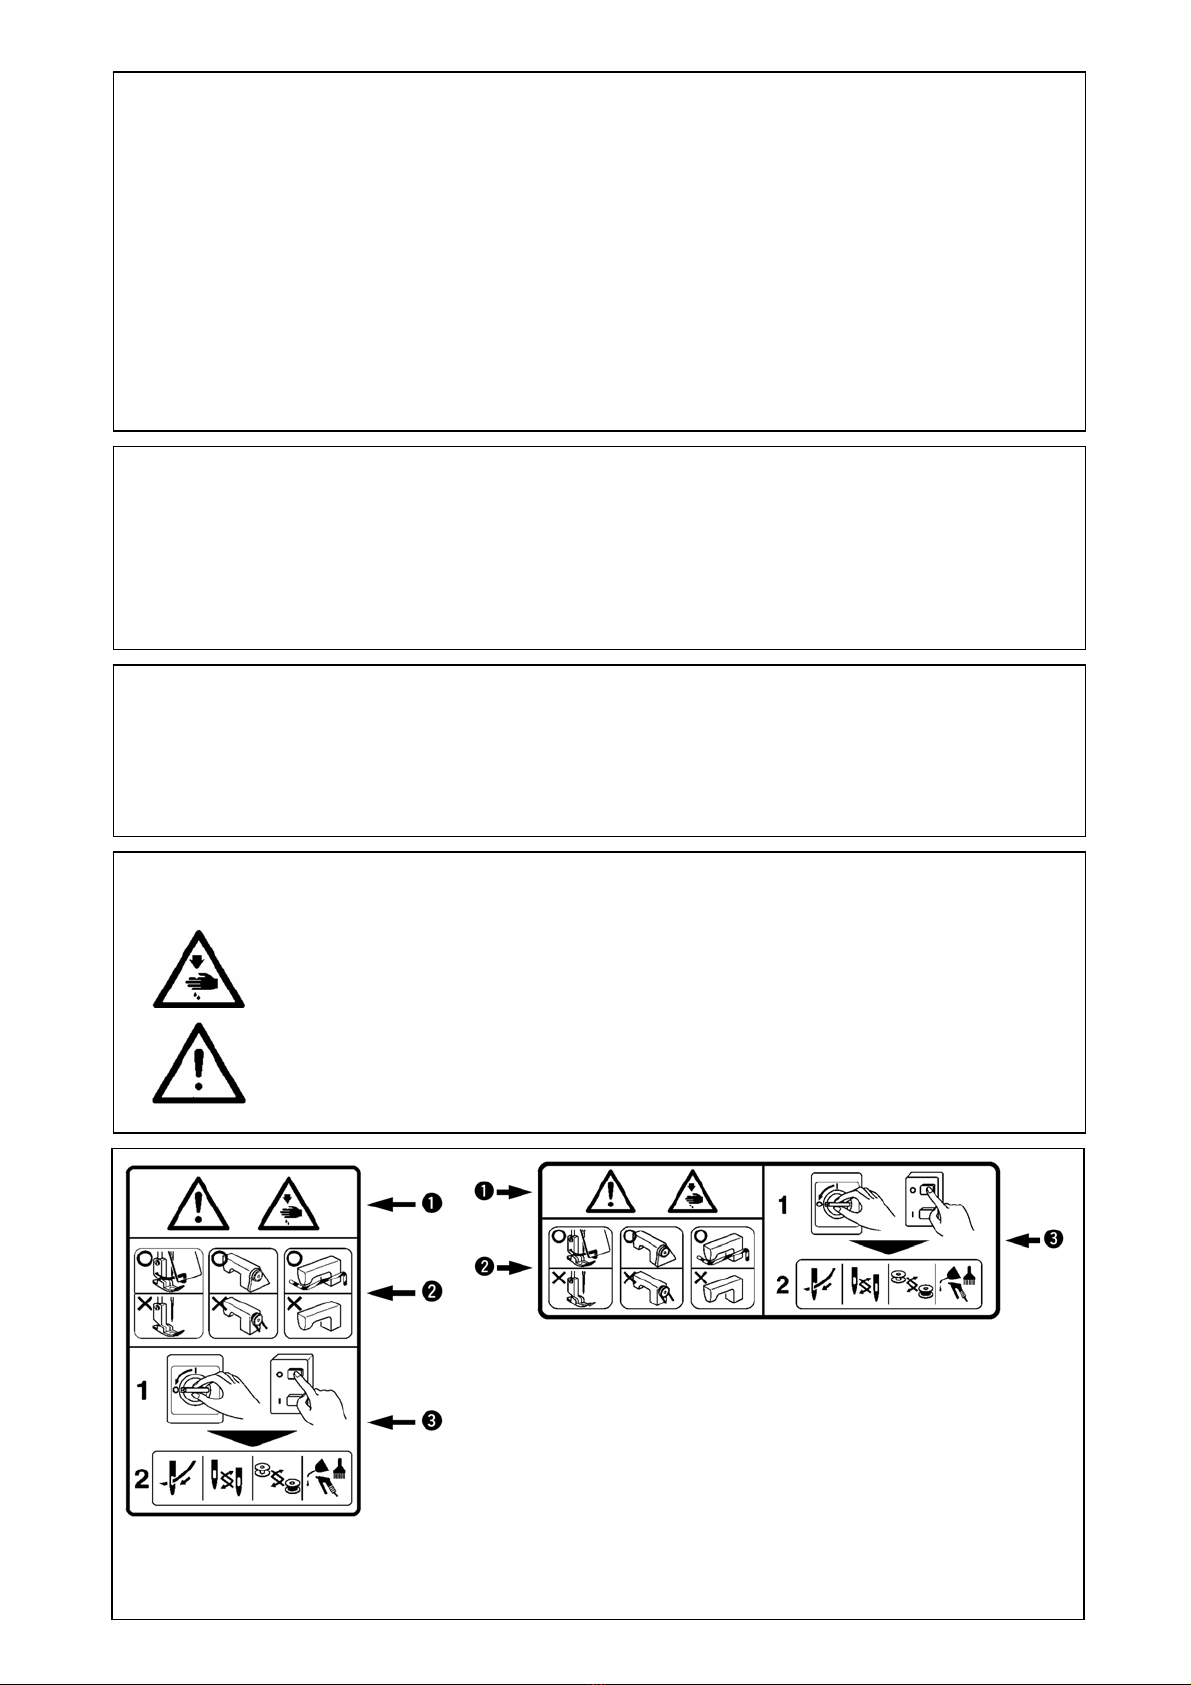
2. 变更图案后, 请确认落针位置。万一压脚超越图案范围, 缝制中有可能机针与压脚相
碰,发生断针的危险。另外, 请确认被设定的压脚和安装到缝纫机的压脚是否一致。
Make sure of the needle entry after changing the pattern. Should the pattern protrude
from the work clamp check, needle interferes with the work clamp check resulting in
the danger of occurrence of needle breakage or the like. In addition, check that the
work clamp check which has been set corresponds to that which has been installed
on the sewing machine.
注意
WARNING
1. 打开(ON) 电源开关后, 操作盘上什么也不显示时, 请关闭(OFF) 电源开关, 然后确
认电源电压和电源规格。
In case nothing is displayed in the operation panel even when the power switch is
turned ON, turn OFF the power switch and check the power voltage and phase.
2. 为了防止造成人身事故, 打开电源时和缝纫机运转途中, 请不要把手指放到挑线杆、
布压脚、布切刀以及机针下面的附近。
To avoid personal injury, never put your fingers under the thread take-up lever, cloth
presser, cloth cutting knife, or needle when you turn the power switch ON or operate
the sewing machine.
3. 为了防止突然的起动造成人身事故, 放倒缝纫机时, 拆卸马达外罩时, 请关掉电源。
To protect against possible accidents due to abrupt startup of the machine, turn OFF
the power switch before tilting the machine head or removing the motor cover.
4. 为了防止卷入机器的人身事故, 缝纫机运转中请不要把手指、头发、衣服靠近马达、
切刀等驱动部分, 也不要把物品放到机器的上面。
To avoid personal injury, never bring your fingers, hair or clothing close to V belt,
cloth cutting knife or motor during operation, and never place anything on any of
these parts.
5. 为了防止对人身的伤害, 请不要在卸下马达外罩、眼睛保护罩等安全装置的状态下运
转缝纫机。
To avoid personal injury, never operate the machine with the motor cover, eye
protection cover, or any other safety devices removed.
6. 为了防止对人身的伤害, 放倒缝纫机时和返回到原来的位置时, 请注意不要夹到手
指
等。
To avoid personal injury, be careful never to allow your fingers to go inside the
machine when tilting or raising the machine head.
7. 为了防止触电和损坏电气零件的事故, 插拔电源插头之前请一定关掉电源开关。
To prevent possible accidents due to electric shocks or damaged electrical
component(s), always turn OFF the power switch before connecting or
disconnecting the power plug.
8. 为了防止损坏电气零件的事故, 打雷时, 请停止操作, 拔下电源插头, 以保证安全。
During thunder and lightning storms, stop your work and disconnect the power from
the outlet to ensure safety and prevent possible accidents due to damaged electrical
component(s).
9. 为了防止损坏电气零件的事故, 从寒冷的地方移动到暖和的地方等时, 容易发生结
露现象, 所以请待水滴完全干燥之后再打开电源。
If the machine is suddenly moved from a cold place to a warm place, dew
condensation may result. If this occurs, be sure to confirm that there are no
potentially dangerous water drops in the machine before turning it on in order to
prevent possible accidents due to damaged electrical component(s).
10. 为了防止损坏电气零件的事故, 停电时, 请一定关掉电源。
In the event of a power failure, be sure to turn OFF the power to the machine to
protect against damaged electrical components.
11. 本装置请在工业用环境下使用。在一般家庭里使用时如果靠近电视机或收音机使用
的话, 有发生接收不良的故障。
This is a Class A product. In a domestic environment this product may cause radio
interference in which case the user may be required to take adequate measures.

iv
目 录
CONTENTS
Ⅰ.使用时的注意事项 …………………………………………………1
IMPORTANT SAFETY INSTRUCTION
Ⅱ.规格 …………………………………………………………………1
SPECIFICATIONS
1. 派生级机种 ……………………………………………………………………………1
SUBCLASS
2. 规格 ……………………………………………………………………………………2
SPECIFICATIONS
3. 标准缝制形状一览表 …………………………………………………………………3
STANDARD SEWING SHAPE LIST
4. 构成 ……………………………………………………………………………………4
CONTIGURATION
Ⅲ.安装 …………………………………………………………………5
INSTALLATION
Ⅳ.缝纫机的运转前……………………………………………………12
PREPARATION BEFORE OPERATION
1. 加油……………………………………………………………………………………12
LUBRIOATION
2. 机针的安装……………………………………………………………………………13
INSERTING THE NEEDLE
3. 上线的穿线方法………………………………………………………………………13
THREADING THE NEEDLE-THREAD
4. 梭壳的穿线方法………………………………………………………………………14
THREADING THE BOBBIN CASE

v
5. 底线的张力的调整……………………………………………………………………14
ADJUSTING THE BOBBIN THREAD TENSION
6. 梭壳的安装方法………………………………………………………………………15
INSTALLATION OF BOBBIN CASE
7. 切刀的安装方法………………………………………………………………………16
INSTALLING THE KNIFE
Ⅴ.缝纫机的操作………………………………………………………17
OPERATION OF THE SEWING MACHINE
1. 缝纫机的基本操作 ..................................................................................- 17 -
BASIC OPERATION OF THE SEWING MACHINE
2. 单独缝制时的液晶显示部.....................................................................................- 19 -
LCD DISPLAY SECTION AT THE TIME OF INDEPENDENT SEWING
3.踏板的使用方法 ...............................................................................................- 25 -
HOW TO USE THE PEDAL
4.设定压脚类型 ....................................................................................................- 29 -
SETTING THE PRESSER TYPE
5. 新建登记文件.......................................................................................................- 32 -
BUILDNG NEW REGISTER FILE
6. 线张力设置 ..........................................................................................................- 58 -
CHANGING NEEDLE THREAD TENSION
7. 重新缝制时 ..........................................................................................................- 61 -
PERFORMING RE-SEWING
8. 绕底线.................................................................................................................- 64 -
WINDING BOBBIN THREAD

vi
9. 使用计数器..........................................................................................................- 65 -
USING COUNTER
10. 缝制形状一览 .....................................................................................................- 70 -
SEWING SHAPE LIST
11. 连续缝制 ............................................................................................................- 71 -
CONTINUOUS STITCHING
12. 循环缝制............................................................................................................- 86 -
CYCLE STITCHING
13. 变更用户参数数据 ............................................................................................- 101 -
CHANGING USER PARAMETER DATA
14. 切刀数次动作的说明 ........................................................................................- 113 -
EXPLANATION OF PLURAL MOTIONS OF KNIFE
15. 文件的读出、运行以及管理..............................................................................- 118 -
READING、 OPERATING AND MANAGING FILE
16. 中英文切换时 ...................................................................................................- 128 -
PERFORMING SWITCHING CHINESE AND ENGLISH VERSION
17. 异常代码一览 ...................................................................................................- 129 -
ERROR CODE LIST
18. 显示版本信息时 ...............................................................................................- 133 -
DISPLAYING VERSION INFORMATION
19. 使用检查程序时 ...............................................................................................- 135 -
USING CHECK PROGRAM

vii
Ⅵ. 维修 ……………………………………………………………140
MAINTENANCE
1. 机针和旋梭的同步调整……………………………………………………………140
ADJUSTING THE NEEDLE-TO-HOOK RELATION
2. 上线切刀的调整……………………………………………………………………141
ADJUSTING THE NEEDLE THREAD TRIMMER
3. 布压脚压力的调整…………………………………………………………………142
ADJUSTING THE PRESSER BAR PRESSURE
4. 旋梭压片装置的调整………………………………………………………………143
ADJUSTIMENT OF THE BOBBIN PREWWER UNIT
5. 线张力………………………………………………………………………………143
THREAD TENSION
6. 滤清器的清扫………………………………………………………………………144
CLEANING THE FILTER

- 1 -
派生级机种
Subclass S K
主要用途
Major
application
衬衣、衬衫、工作服、女
装等棉布钮扣眼
Buttonholing of
cloth such as men’s
shirts,blouses,
work uniforms,
ladies' wear, etc.
针织内衣、毛衣、羊毛衫、平针针
织物等针织品的钮扣眼
Buttonholing of knits such
as knitted underwear,
sweaters,cardigans, jersey,
etc.
钮扣扣眼尺寸
Buttonholing
size
标准:最大 5mm
特别规格零件:最大 10mm
Standard : Max. 5 mm
Special type part : Max. 10 mm
使用切刀尺寸
6.4 ~ 31.8mm(1/4' ~ 1-1/4')
Knife size used :
6.4 to 31.8 mm (1/4' to 1-1/4')
开孔缝制长度
标准:最大 41mm
特别规格零件:最大 120mm
Buttonholing sewing length
Standard : Max. 41 mm
Special type part : Max. 120 mm
Ⅰ.使用时的注意事项
IMPORTANT SAFETY INSTRUCTIONS
1)没有往油箱加油时,请绝对不要运转缝纫机。
Never operate the machine unless the oiling tank has been properly lubricated.
2)作业结束之后,请清扫旋梭、切刀部的灰尘。并确认油量是否充足。
Be sure to remove any dust from the hook or bobbin thread cutting knife section at the end
of the day,and check the amount of oil remaining.
3)使用起动踏板时,缝纫机起动后请把踏板返回到原来的位置。
Be sure to return the activating pedal to the home position after the machine has started to
run.
4)本缝纫机的机头部装有缝纫机头放倒时,不让缝纫机运转的安全开关。
运转缝纫机时,请把缝纫机头正确地设置到机台上之后,再打开电源开关。
A safety switch is installed so that this sewing machine can not be operated in the state that
the machine head is tilted. When operating this sewing machine, turn the power switch ON after
setting the sewing machine to the bed base properly.
Ⅱ.规格 SPECIFICATIONS
1.派生级机种 Subclass
1790 平缝电子锁扣眼缝纫机有以下的派生级机种。
Computer-controlled, high-speed, lockstitch buttonholing machine, 1790, has the subclass machines
below.

- 2 -
缝纫速度
Sewing speed
标准速度:3600rpm(最高:4200rpm)(使用干式旋梭时,最高:3300rpm)
Standard speed : 3,600 rpm (Max. : 4,200 rpm) (Max. : 3,300 rpm when dry hook is used)
使用机针
Needle
DP×5 # 11J ~# 14J
使用旋梭
Hook
DP type full-rotary hook
摆针驱动方式
Needle rocking drive
method
驱动脉冲马达
Drive by stepping motor
送针驱动方式
Feed drive method
驱动脉冲马达
Drive by stepping motor
压脚提升驱动方式
Presser lifting drive
method
驱动脉冲马达
Drive by stepping motor
压脚提升量
Lift of presser foot
14mm(可以任意设定)最大:17mm(倒转针提升时)
14 mm (Optional setting available) Max. : 17 mm (At the time of needle up by reverse
run)
切布刀驱动方式
Cloth cutting knife
drive method
复数电磁驱动
By double-acting solenoid drive
标准缝制形状
Standard sewing shape
30 种
30 kinds
记忆图案数
Number of patterns
stored in memory
99 图案
99 patterns
电源
Power used
单相220/230/240V、1000VA
Single phase 220/230/240 V, 1000 VA
2.规格 S
p
ecifications

3
(1)角型
S
quare type
(2)圆型
R
ound type
(3)辐射角型
R
adial square type
(4)辐射型
R
adial type
(5)辐射直线加固型
R
adial straight
b
artacking type
(6)辐射锥形加固型
R
adial taper
b
ar-tacking type
液晶显示
PANEL DISPLAY
液晶显示
PANEL DISPLAY
液晶显示
PANEL DISPLAY
液晶显示
PANEL DISPLAY
液晶显示
PANEL DISPLAY
液晶显示
PANEL DISPLAY
(7)圆头扣眼角型
Eyelet square type
(8)圆头扣眼辐射型
Eyelet radial type
(9)圆头扣眼直线加
固型
Eyelet straight
b
artacking Type
(10)圆头扣眼锥形加
固型
Eyelet taper
b
artacking type
(11)半月型
S
emilunar type
(12)圆角型
R
ound square type
液晶显示
PANEL DISPLAY
液晶显示
PANEL DISPLAY
液晶显示
PANEL DISPLAY
液晶显示
PANEL DISPLAY
液晶显示
PANEL DISPLAY
液晶显示
PANEL DISPLAY
(13)半月角型
S
emilunar square
t
ype
(14)半月直线加固型
S
emilunar straight
b
ar-tacking type
(15)半月锥形加固型
S
emilunar taper
b
artacking type
(16)圆头扣眼半月型
Eyelet semilunar
t
ype
(17)圆头扣眼圆型
Eyelet round type
(18)角辐射型
S
quare radial type
液晶显示
PANEL DISPLAY
液晶显示
PANEL DISPLAY
液晶显示
PANEL DISPLAY
液晶显示
PANEL DISPLAY
液晶显示
PANEL DISPLAY
液晶显示
PANEL DISPLAY
(19)角半月型
S
quare semilunar
t
ype
(20)角圆型
S
quare round type
(21)角直线加固型
S
quare straight
b
artacking type
(22)角锥形加固型
S
quare taper
b
artacking type
(23)辐射半月型
R
adial semilunar
t
ype
(24)辐射圆型
R
adial round type
液晶显示
PANEL DISPLAY
液晶显示
PANEL DISPLAY
液晶显示
PANEL DISPLAY
液晶显示
PANEL DISPLAY
液晶显示
PANEL DISPLAY
液晶显示
PANEL DISPLAY
(25)半月辐射型
S
emilunar radial
t
ype
(26)半月圆型
S
emilunar round
t
ype
(27)加固缝
B
ar-tacking
(28)加固右切断
B
ar-tacking, right
c
ut
(29)加固左切断
B
ar-tacking, left
c
ut
(30)加固中央切断
B
ar-tacking, center
c
ut
液晶显示
PANEL DISPLAY
液晶显示
PANEL DISPLAY
液晶显示
PANEL DISPLAY
液晶显示
PANEL DISPLAY
液晶显示
PANEL DISPLAY
液晶显示
PANEL DISPLAY
3. 标准缝制形状一览表 Standard sewin
g
sha
p
e list

- 4 -
1790 由以下部分所构成。1790 consists of the following components
1 电源ON/OFF 开关 Power ON/OFF switch
2 缝纫机机头 Machine head
3 操作盘 Operation panel
4 电气箱 Control box
5 压脚提升踏板 Presser lifting pedal
6 起动踏板 Starting pedal
7 线架装置 Thread stand device
4. 构成 Confi
g
uration

- 5 -
危险
DANGER
搬运缝纫机时,请至少2人以上进行。
To prevent possible accidents caused by the fall of the sewing machine, perform the
work by two persons or more when the machine is moved.
Ⅲ.安装 INSTALLATION
1) 把控制箱○
2、电源开关○
3固定到机台○
1上。
Securely install control box○
2and power switch○
3on table○
1.
2) 用固定条把电源开关○
3的电缆线固定起来。
Securely fix the respective power cables of power switch○
3.
3) 把机台固定螺丝○
11 (4 个)穿过机头座○
4。
Pass four bed base fixed screws○
11 through bed base○
4.
4) 把减震橡胶○
5安装到机台的机头座固定孔○
6(4 处),然后固定机头座○
4。
Set rubber cushions○
5to holes○
6(4 places) for fixing bed base and fix bed base○
4.
5) 把机头支撑杆○
7固定到机台○
1上。
Fix head support bar○
7on table○
1.
6) 把缝纫机主机放到机台○
4上后,把踏板(右侧)和踏板开关○
9、踏板(左侧)和电气踏板传感器○
10
用附属的连接杆○
8分别连接起来。
After placing the sewing machine main unit on bed base○
4, connect pedal (right side) to pedal switch
○
9, and pedal (left side) to pedal sensor○
10 respectively with connecting rods i which have been
supplied as accessories.
(1) 机台的组装 Set-up of the table
请调整踏板位置,不让连接杆○8 和控制箱○2 相碰。
Adjust the positions of the pedals so that connecting rods○8 and control
box○2 do not come in contact with each other.

- 6 -
· 单相200V、220V、230V 和240V 的连接 Connecting single phase 200V, 220V, 230V and 240V
(2)电源线的连接 Connecting the power source cord
· 电压规格
规格请参看电压注意标签和额定规格标牌。
请根据规格选接电线。
Power source specifications are indicated on
the voltage caution seal and the rating label.
Connect the cord in accordance with the
specifications.
在电压规格不同的状态下绝对不能使用。
Never use under the wrong voltage.

- 7 -
(4)缝纫机的放倒方法 Tilting the sewing machine head
(3)缝纫机主体的安装 Installing the sewing machine main unit
放倒缝纫机时,请轻轻地放倒,让缝纫机被机头
支撑杆○
1支撑住。
When tilting the sewing machine head, tilt
quietly the sewing machine until head
support bar○
1comes in contact with it.
1.放倒缝纫机之前,请先确认机台
上是否装有机头支撑杆○
1。
Make sure that sewing machine
head support bar○
1is placed on
the table before tilting the
sewing machine.
2.为了防止缝纫机突然倒下,请一
定把缝纫机放到水平的地方,再放
倒缝纫机。
To protect fall-down, be sure to
tilt the sewing machine in a
level place.
请不要把橡胶铰链和金属铰
链安装反了,否则放倒缝纫机
时会发生危险。
When the rubber hinge and
metal fitting hinge are
installed in reverse order, it
is dangerous since the
sewing machine shakes
when it is tilted. So, be
careful.
注意WARNING:
搬运缝纫机时,请一定2人以上进行。
To prevent possible accidents caused by the fall of
the sewing machine, perform the work by two
persons or more when the machine is moved.
把绞链○
1和轴承座○
2(○
2-1:橡胶,○
2-2:金属)
装到机头位置的○
2处,然后用固定螺丝○
3把绞链
板固定到缝纫机机头部。
Place hinge plates ○
1and shaft bearings ○
2
-1(rubber) and ○
2-2 (metal) in two places on the
head base and fix the hinge plates to the machine
head with setscrews ○
3in two places.
危险WARNING:
放倒或抬起缝纫机时,请注意不要被缝纫机夹住手指。
为了防止突然的起动造成的事故,请关掉电源之后再进行操作。
When tilting/raising the sewing machine head, perform the work so as not to allow your fingers to
be caught in the machine. In addition, to avoid possible accidents caused by abrupt start of the
machine, turn OFF the power to the machine before starting the work.

- 8 -
(7)操作盘的安装 Installing the operation panel
把安全开关插头○
1连接到机头侧的插
头○
2上。
Connect safety switch connector○
1
with connector ○
2 located on the
machine head side.
(6)旋梭防油板的安装 Installing the hook oil shield plate
(5)安全开关的连接 Connecting the safety switch connector
用固定螺丝○
2把旋梭防油板○
1安装到机台座○
3上。
Install hook oil shield plate ○
1 onto bed base ○
3
with setscrew○
2.
放倒缝纫机或抬起缝纫机时,请注意固
定好不要碰到旋梭防油板○
1。
Fix the sewing machine so that it does
not come in contact with hook oil shield
plate○
1when raising/tilting the sewing
machine.
请把操作盘安装板○
1用木螺丝○
2固定
到机台上,然后把电缆线穿过机台孔
○
3。
Fix operation panel attaching
plate ○
1on the table with
woodscrew ○
2and pass the cable
through hole○
3in the table.

- 9 -
(8)电缆的连接 Connecting the cords
请按照下图所示的那样连接电缆。
Perform the connection of the cords as shown in the figure below.
用紧固螺丝○
1固定好地线○
2。
Fix the earth wire ○
2 with the setscrew ○
1.

- 10 -
(9)电线的处理 Managing the cord
1) 请一边慢慢地放倒缝纫机,一边确认电缆没有被勾住。
Slowly tilting the sewing machine, check that the cords are not forcibly pulled.
2) 如图所示,用电线固定板○
1固定电线。
放倒缝纫机时,请确纫机头支杆○
2安装在机台上。
When you tilt the sewing machine, make sure that the sewing machine head
(10)眼睛保护罩的安装 Installing the eye protection cover
危险 DANGER:
为了保护断针飞起弄伤眼睛,请一定安装起来。
Be sure to attach this cover to protect the eyes from the disperse of needle breakage.
请一定安装眼睛保护罩○
1后再使用缝纫机。
Be sure to install and use eye protection cover ○
1 and use the sewing machine.

出货时,暂停开关为 A 的状态,请拧松固定螺丝○
1,变更为 B 状态,然后用附属的固定螺丝○
2 和
固定螺丝○
1固定好。
The temporary stop switch has been in the state as shown in figure A at the time of delivery.
Loosen setscrew ○
1 and set the switch in the state as shown in figure B, and fix it with
setscrew ○
1 together with setscrew ○
2 supplied with the machine.
(11)暂停开关的固定 Fixing the temporary stop switch
请把线导向杆朝向正面插到 2 个的横孔。
Securely fit the thread guide rod so that two
side holes in the thread guide rod face the
thread guide.
(12)导线杆 Thread guide rod
1) 安装线架装置,把它安装到机台右上的
孔里。
Assemble the thread stand, and set it in
the hole in the top right corner of the
machine table.
2)拧紧固定螺母○
1,不让线架装置松动。
Tighten locknut ○
1 to fix the thread
stand.
3)如果顶部可以配线时,请把电源线从线
架杆○
2中穿过去。
When ceiling wiring is possible, pass
the power cable through spool rest rod
○
2.
(13)线架装置的安装 Installing the thread stand
- 11-

- 12 -
Ⅳ.缝纫
机
的运
转前
PREPARATION BEFORE OPERATION
1.加油 Lubrioation
警告
WARNING:
为了防止突然起动造成人身事故,请关掉电源,确认马达确实停止转动后再进行操作。
To protect against possible personal injury due to abrupt start of the machine, be sure to start
the following work after turning the power off and ascertaining that the motor is at rest.
1)向加油罐里加油 Lubricating oil to oiling tank
把 New Flex Oil No.1 机油加满到 MAX 记号的位置○
1。
Fill the oiling tank with New Defrix Oil No.1 up to the level indicated by “MAX”○
1
2)旋梭油量的调整 Adjusting the lubrication for the sewing hook
拧松油量调节固定螺母○
2,然后用油量调整螺丝○
3进行调节。
Adjust the amount of oil supplied to the sewing hook by loosening lock nut ○
2 and turning
oil amount adjusting screw ○
3.
调节旋梭的油量时,拧紧油量调节螺丝○
3则油量减少。
Amount of supplied oil is reduced when turning the screws ○
3 clockwise.
油量调节后,请用固定螺母○
2进行固定。
Fix the screw with lock nut ○
2 after adjusting the lubrication for the sewing hook.
新装缝纫机或较长时间没有用过的缝纫机,使用之前请取下梭壳,在旋梭边槽加 2 ~ 3 滴机油。另
外,向下轴前金属部件○
4的加油孔○
5加几滴油,把油浸润到里面的毛毡里。
When you first operate your sewing machine after set-up or after an extended period of
disuse, remove the bobbin case and apply a few drops of oil to the hook race. In addition,
apply a few drops oil from oiling hole ○
5 in hook driving shaft front metal ○
4 to soak
the inside felt in oil.

- 13 -
2.机针的安装 Insertin
g
the needle
警告
WARNING:
为了防止突然起动造成人身事故,请关掉电源,确认马达确实停止转动后再进行操作。
To protect against possible personal injury due to abrupt start of the machine, be sure to start
the following work after turning the power off and ascertaining that the motor is at rest.
从缝纫机正面看,把机针凹部横向转到前侧 A。然后把机针插进针
杆孔的深处,拧紧机针固定螺丝○
1。机针使用 DP×5-(#11J、#14J)。
Hold needle with its recessed part facing toward the operator
side A,insert the needle fully into the needle clamping hole,
and tighten needle setscrew ○
1. Use a DPx5-(#11J, #14J).
安装机针时,请一定关掉电源。
When attaching the needle, turn OFF the power to
the motor.
3.上线的穿线方法 Threading the needle-thread
上线如图所示○
1~○
12 的顺序进行穿线。
Pass the needle thread in the order ○
1 to ○
12 as shown in the figures.
把线穿针时,使用附属的穿线器非常方便。
The threading can be done easily by using the needle threader supplied with the machine.
使用机线不同,导线器的穿线方法也不同。
Change the thread guide threading method according to the thread to be used.
警告
WARNING:
为了防止突然起动造成人身事故,请关掉电源,确认马达确实停止转动后再进行操作。
To protect against possible personal injury due to abrupt start of the machine, be sure to start
the following work after turning the power off and ascertaining that the motor is at rest.
Table of contents
Other Jack Sewing Machine manuals