Jack W4 Series User manual

W4 系列使用说明
(W4 series User Guide)

一、 规格(Specification)
机种名称(machine
description)
平台式高速绷缝机(High speed flatbed interlock machine)
型式(machine Model)
W4
缝迹形式(stitch type)
ISO 标准:406/407/602/605(ISO standard:406/407/602/605)
用途(use)
针织、编织产品的包边缝、包缠缝(Knit, knit product package edge
seam, wrapped around the seam)
缝纫速度(sewing speed)
最高转速(Max speed):5500RPM
出厂转速(Factory set speed):4000RPM
针幅(needle width)
3 根针(needle):5.6mm、6.4mm
2 根针(needle):2.8mm、3.2mm、5.6mm、6.4mm
差动送布比(differential
feed ratio)
0.65-1.3
缝迹长度(stitch length)
1.5mm-4.4mm
使用机针(needle type)
UY128GAS 11#、14#(标准:11#)
针杆行程(needle bar
stroke)
33.4mm
压脚高度(max.presser
foot height)
6.2mm
体积(volume)
纸箱体积(carton volume):670mm×445mm×59.5mm
机器体积(machine volume):500mm×380mm×260mm
重量(weight)
净重(Net weight):48Kg 毛重(Gross weight):58Kg
表 1(Table 1)

二、各部分的名称
图2-1(Figure 2-1)
压脚护罩:Presser foot guard,挑线防护罩:thread take-up guard,玻璃
护罩:glass guard,压脚调节螺杆:Foot adjusting screw,针杆护罩:Pin guard,
油窗:oil window,加油窗口:Refueling window, 操作面板:operation panel,
过线:line cross,夹线器:yarn trapper
W4机器电控与机械一体,可以在机器上调节电控相关参数,实现了人性化的
人机交换模式,操作便利!( W4 machine electric control and mechanical
integration, can adjust the electric control related parameters on the
machine, realized humanized man-machine exchange mode, the operation
is convenient!)

三、安装方法(Installation method)
1、台板尺寸及其安装方法(Platform size and installation method)
图 3-1
2、链条的安装(Installation of the chain)
挂钩:hook up,链条 Chain
图 3-2(Figure 3-2)
链条
挂钩

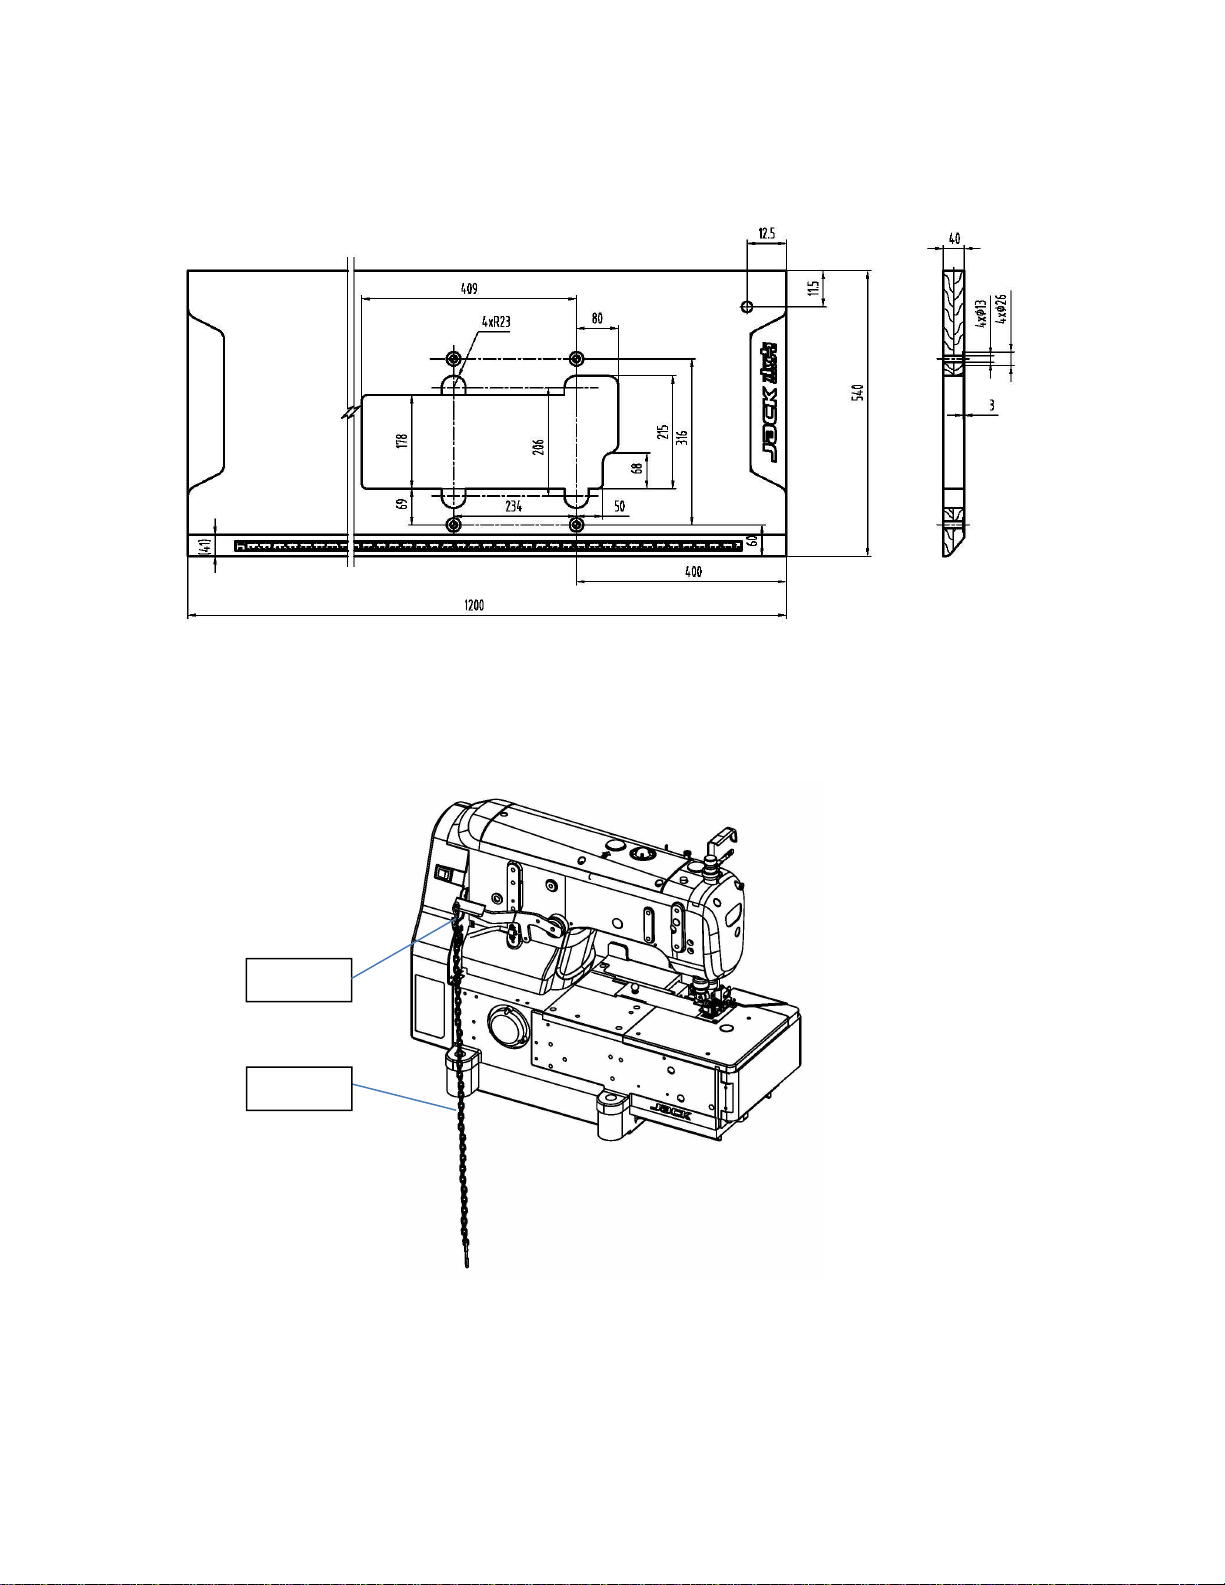
脚踏板链条如上图所示安装(The pedal chain is installed as shown in the figure
above)
四、关于加油、注油(About refueling and filling)
注意:为了防止机器突然启动造成人身事故,请关掉电源,确认电机确实停止转动
后再进行操作!(Note: In order to prevent personal accident caused by the
sudden start of the machine, please turn off the power, make sure the
motor does stop running and then operate!)
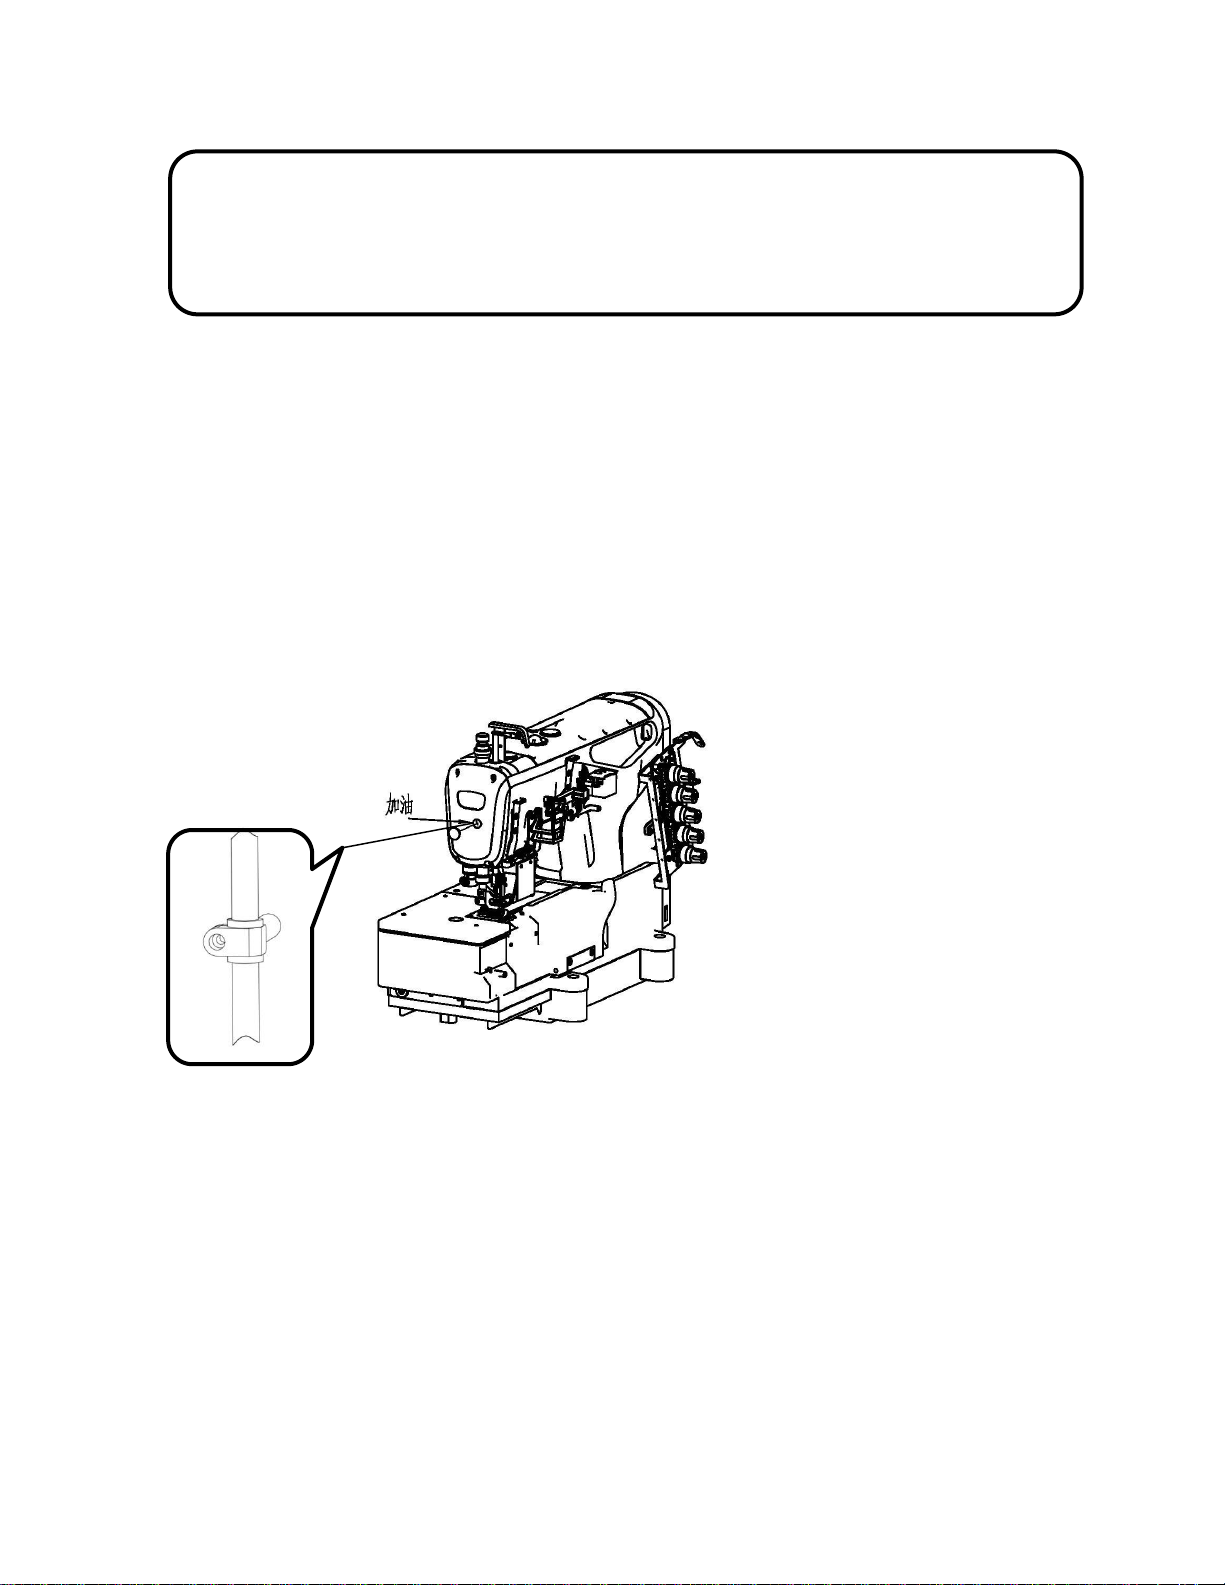
1、出厂加油(The factory refueling)
机器出厂时,机油均被排放,因初次使用缝纫机前,请一定要加入机油,推荐
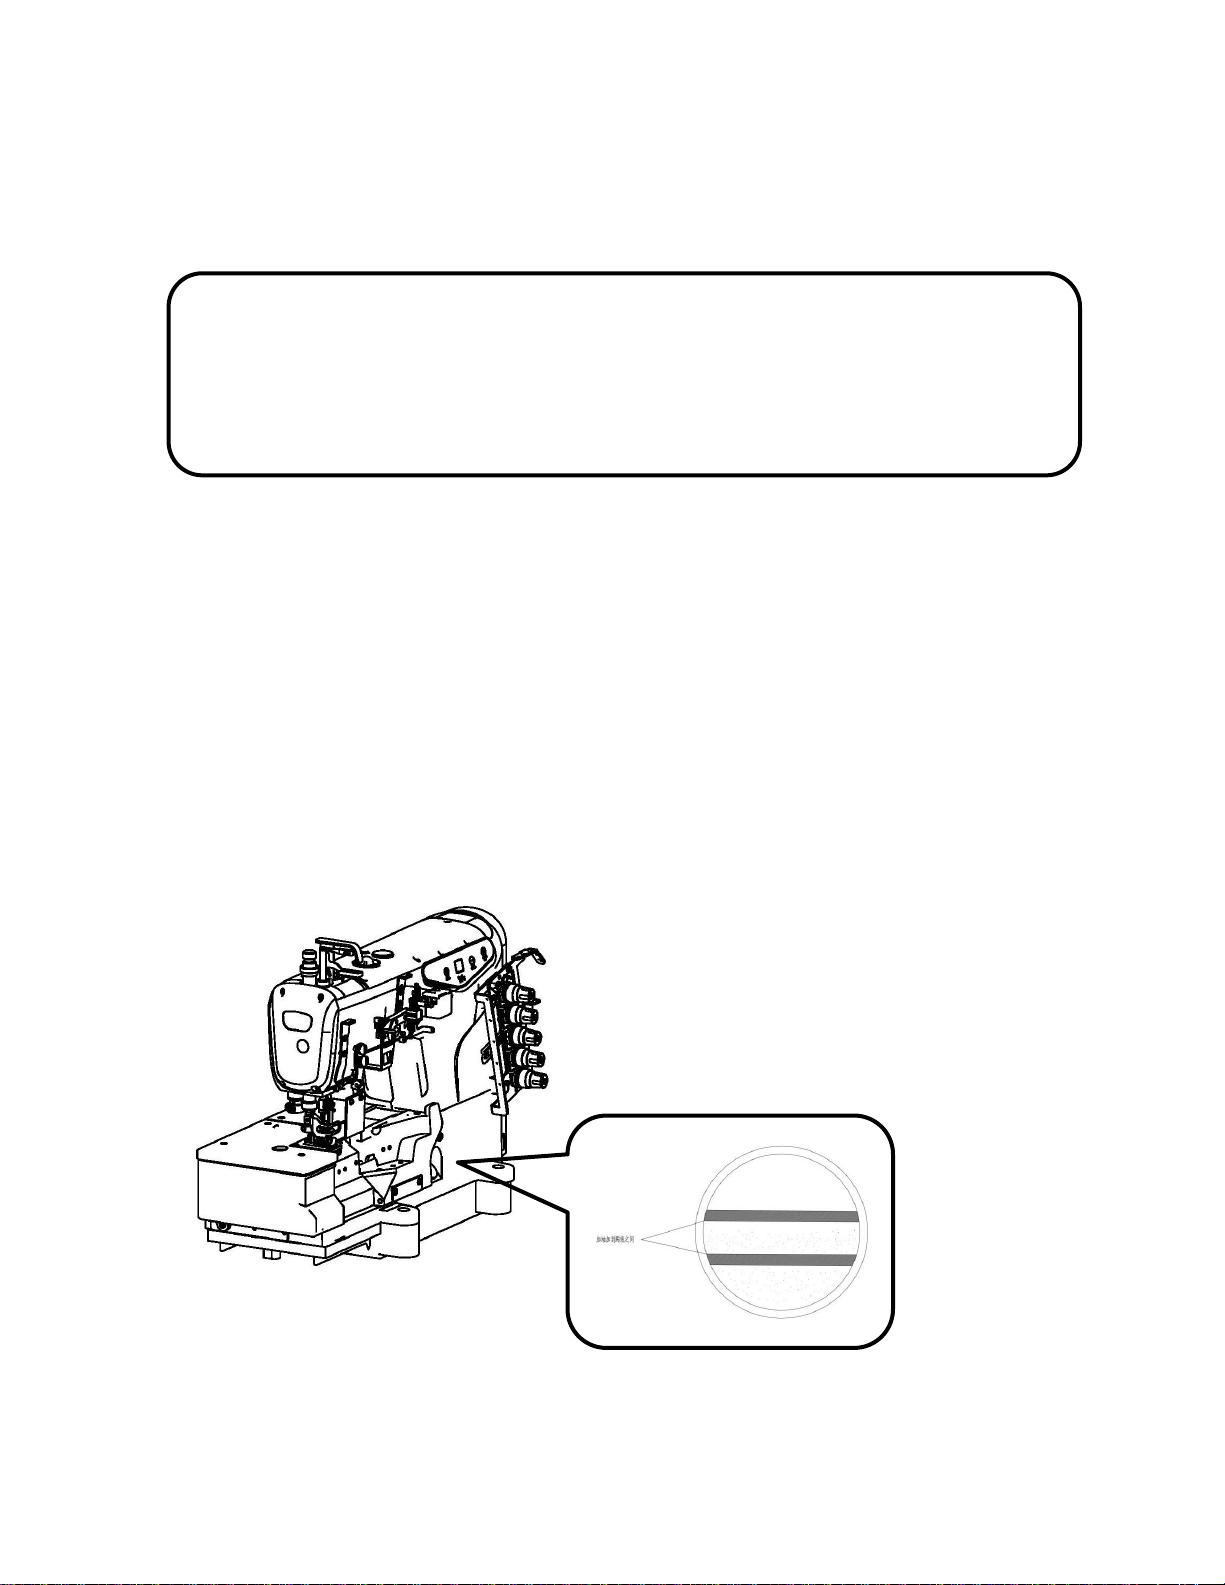
使用机油:,加油时请拿开标有 OIL 的加油口盖子,把机油加到油尺的上下刻线之
间,加油完成后转动缝纫机,看油窗是否有机油喷出,如果没有机油喷出,请进行
检修。(When the machine is delivered from the factory, the oil is discharged.
Be sure to add the oil before using the sewing machine for the first time. It
is recommended to use the oil. When filling, open the filler cap marked with
OIL and add the oil between the upper and lower engraved lines. Turn the
sewing machine after finish to see if there is any oil spilled in the oil window.
If there is no oil spilled, please carry out overhaul.)
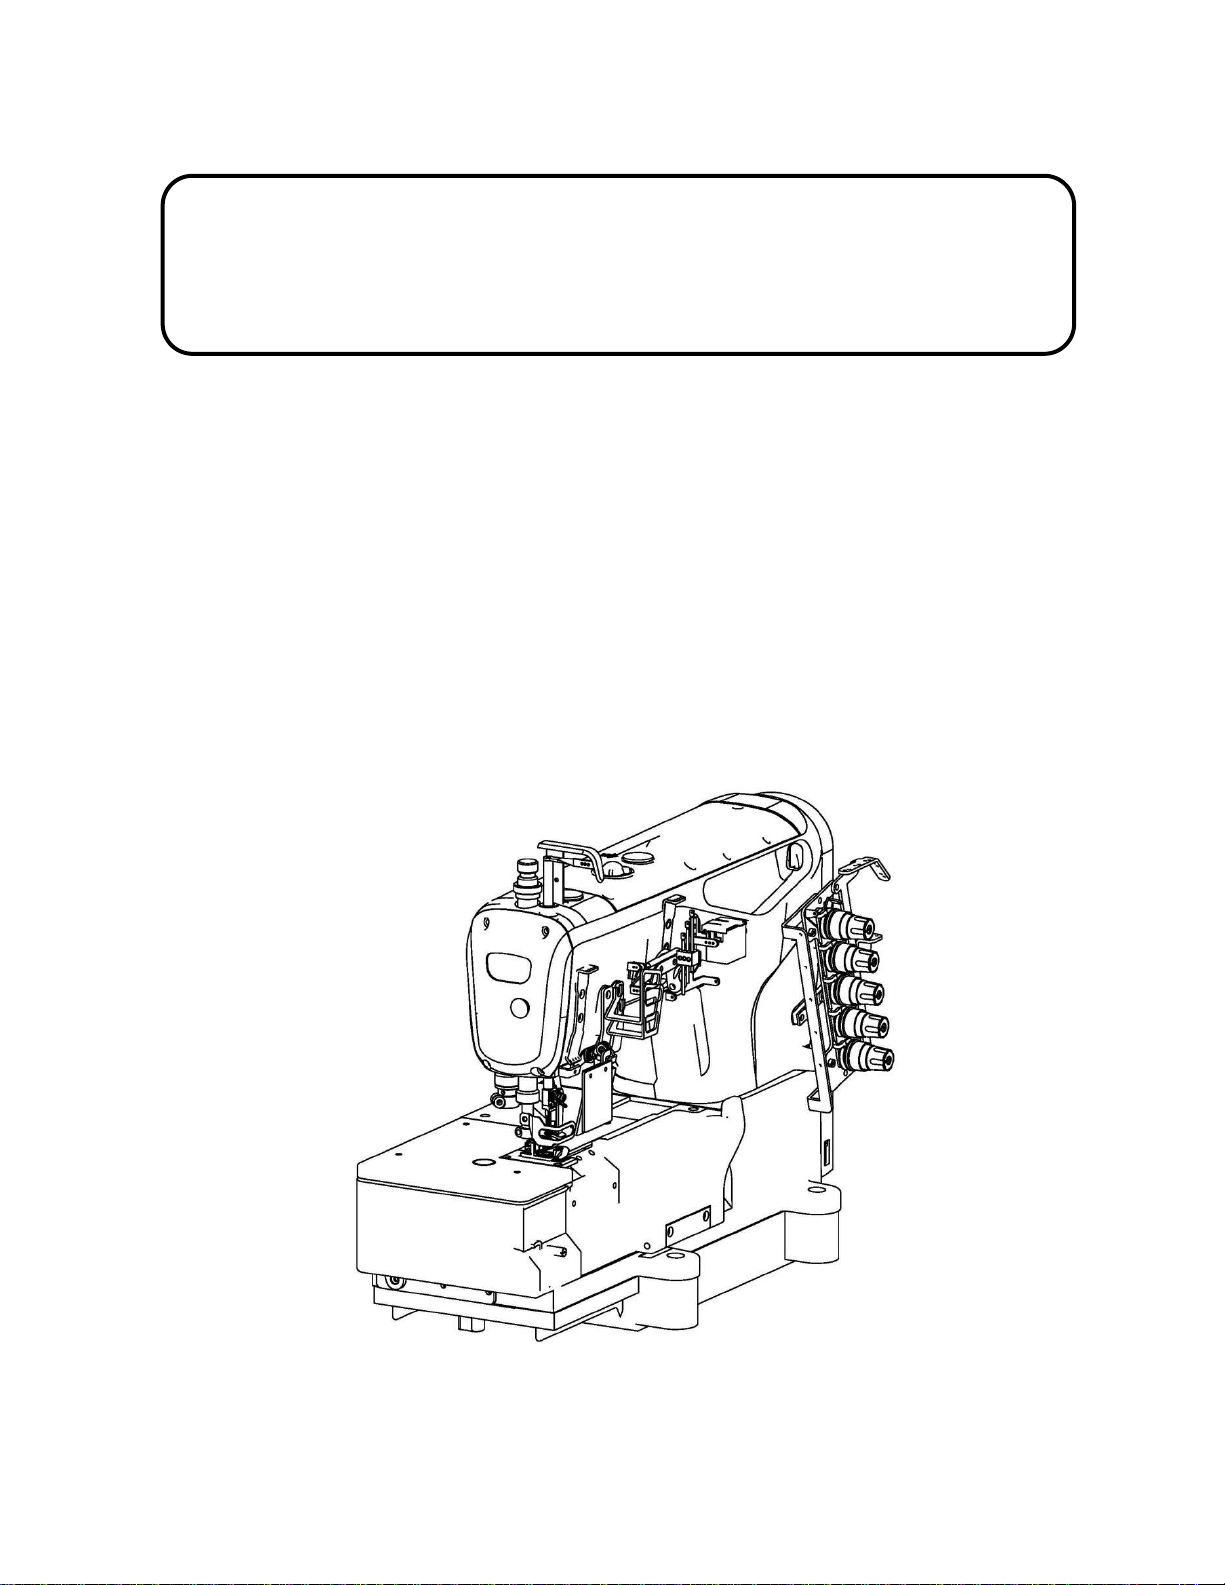
图4-1 (Figure 4-1)

注意:为了防止机器突然启动造成人身事故,请关掉电源,确认电机确实停止转动
后再进行操作!(Note: In order to prevent personal accident caused by the
sudden start of the machine, please turn off the power, make sure the
motor does stop running and then operate!)
2、出厂注油(Adding oil)
机器出厂首次使用或较长时间没有使用缝纫机时,请一定向针杆滴 2-3 滴机油,
滴在针杆扎头与针杆的连接处,确保针杆机构润滑。(When the machine is used
for the first time or when the sewing machine is not used for a long time, be
sure to drop 2-3 drops of oil to the needle bar and drop it at the junction of
the bar head and needle bar to ensure the needle bar mechanism is
lubricated.)
被加油机构(Oiled mechanism)
图 4-2( Figure 4-2)

五、缝纫机的使用方法(Methods to use sewing machine)
注意:为了防止机器突然启动造成人身事故,请关掉电源,确认电机确实停止转动
后再进行操作!(Note: In order to prevent personal accident caused by the
sudden start of the machine, please turn off the power, make sure the
motor does stop running and then operate!)
1、机针的安装方法(Needle installation method)
安装机针时,机针头部需要完全插入针古里,且机针凹槽部位向里侧。(When
installing the needle, the needle head needs to be completely inserted into
the needle, and the needle groove is to the inside.)
图 5-1( Figure 5-1)
注意:为了防止机器突然启动造成人身事故,请关掉电源,确认电机确实停止转动
后再进行操作!(Note: In order to prevent personal accident caused by the
sudden start of the machine, please turn off the power, make sure the
motor does stop running and then operate!)

2、穿线方法(Threading method)
①、标准穿线法(Standard threading method):
图 5-2
当机针线伸缩量较大时(When the expansion and contraction quantity of the
needle thread is big:):
图 5-3(Figure 5-3)
当机针线伸缩量较大时(When the expansion and contraction quantity of the
needle thread is big:):
图 5-4(Figure 5-4)
1

注意:为了防止机器突然启动造成人身事故,请关掉电源,确认电机确实停止转动
后再进行操作!(Note: In order to prevent personal accident caused by the
sudden start of the machine, please turn off the power, make sure the
motor does stop running and then operate!)
3、针距调节(Stitch length adjustment)
机器针距可以在 1.5mm-4.5mm 范围内任意调整(实际缝料线迹长度,随布
料的种类和厚度有所不同),缝纫机针距的调节是通过旋转针距调节旋钮调节的,
顺时针旋转,针距变大,逆时针旋转,针距变小。(Machine stitch length can be
adjusted within the range of 1.5mm-4.5mm (actual sewing stitch length,
depending on the type and thickness of the cloth). The sewing machine
stitch length is adjusted by rotating the stitch length adjusting knob.
Clockwise Rotation, stitch length becomes larger, counterclockwise rotation,
stitch length becomes smaller.)
图 5-5 (Figure 5-5)

注意:为了防止机器突然启动造成人身事故,请关掉电源,确认电机确实停止转动
后再进行操作!(Warning: In order to avoid any accident, before operating
please make sure power is off and motor is stopped. )
4、差动的调节(differential ratio adjustment)
差动调节范围在 0.65-1.3 内,松开调节螺钉,上下扳动,往上是顺差动,往下是逆
差动。(differential ratio adjustment range from 0.65-1.3, release the adjust
screw, move up or down to adjust. )
图 5-6(Figure 5-6)
注意:为了防止机器突然启动造成人身事故,请关掉电源,确认电机确实停止转动
后再进行操作!(Warning: In order to avoid any accident, before operating
please make sure power is off and motor is stopped.)

5、压脚压力调节(Presser foot pressure adjustment )
请把压脚压力在缝迹稳定范围内尽量调弱
调节压脚压力时,拧松压脚调节螺母,并将压脚调节螺杆顺时针或逆时针旋转,顺
时针旋转则压脚压力变大,逆时针旋转,则压脚压力变小。(Please keep the
presser foot pressure as light as possible within the stable stitching.
When adjust the presser foot pressure, loosen the presser foot adjusting
nut and adjust the presser foot adjusting screw clockwise or anticlockwise, If
clockwise, presser foot pressure becomes bigger, if anticlockwise, presser
foot pressure becomes smaller)
图 5-7
注意:为了防止机器突然启动造成人身事故,请关掉电源,确认电机确实停止转动
后再进行操作!(Warning: In order to avoid any accident, before operating
please make sure power is off and motor is stopped.)
6、线张力调节(Thread tension adjustment.)
夹线器按照布料、线、线迹宽度的不同,及使用条件的变化而变化。对照使用条件,
调整夹线器的螺母,顺时针方向转,线紧;逆时针方向转,线松。
(Thread tension changes according to the different material thread and
stitch. According to different condition, adjust the thread clamp nut, turn
clockwise, tight thread tension; anticlockwise turn, loose thread tension.)

图 5-8(Figure 5-8)
7、滤油器的检查和更换(oil filter inspection and replacement)
过滤器有灰尘在上面,不能正常使用,每使用 6 个月后请进行检查或更换。
注:如果油按规定的油量加入,油窗喷出的油量异常、过弱、有气泡等现象时,请
及时更换或清扫过滤器(Oil filter, can't work smoothly with dust on it. Please
check or replace every 6 months.
Note: If the add the oil according to the provisions, but in the oil window
the oil shows abnormally, too weak, with bubbles, please promptly replace
or clean the oil filter.)
图 5-9( Figure 5-9)
注意:为了防止机器突然启动造成人身事故,请关掉电源,确认电机确实停止转动
后再进行操作!(Warning: In order to avoid any accident, before operating
please make sure power is off and motor is stopped.)
)

六、电控操作
1、W4-D 电控操作
Instructions of W4-D Interlock sewing machine panel operation
本控制器使用双位数码管显示实现参数调整。在 P主界面,第一个数码管显示“P”,第二个数码管显示当前设
定的停针位置,上、下停针如图所示(图 1).
In P interface, the first tube display “P”, the second tube display shows the current needle position, picture 1 shows
the upper and lower needle position.
图1上、下停针显示界面
1.转速的修改 Modify speed
在待机 P界面按+键或者-键,显示当前转速,按▲键速度递增 100RPM(数值递增 1),按▼键速度递减
100RPM(数值递减 1),长按▲键(▼键)可实现快速递增(递减),停止按▲键或者▼键后约 3秒,自动保存
设定的速度参数,并回退到 P界面。
The panel shows “P”. Then press or to adjust speed up and down, short-press or to adjust
speed up 100RPM and down 100RPM, long-press ( ) speed rapidly up (down). After 3 seconds, the parameter
saved and the panel back to the “P”.
2.停针位修改 Needle Position Adjust
在P界面下,长按▲键约 3秒不松开,可以调节上下停针位。
The panel shows “P”, press for 3 seconds, then set the position up or down.
3.恢复出厂设置 Factory reset
在P界面,长按▼键 3 秒,参数将恢复出厂设置。(J4、J5、J6 的监控数据除外)
4.操作参数说明表 Parameter description
序号
NO.
参数定义 parameter
范围
range
默认值
Default
参数说明
Description
在P界面,长按 和 组合键 3s,可进入技术员界面,并显示 F
The panel shows “P”, press and for 3 seconds, inter engineers interface, and it shows “F”
K
机头灯亮度调节
LED light adjustment
0-3
2
0:灭 off
1~3:亮度 1~3 level 1~3
L
缝纫限制速
Limited sewing speed
05 - 55
50
以500rpm 为单位递减
Decline by 500rpm every time
M
停针位开关
Switch of needle position
0-1
1
0:关闭 off 1:开启 on
H
休眠时间 Dormancy time
0-6
3
0:关闭 off unit:10min
V
速度显示使能 Speed display
0-1
0
0:关闭 off 1:开启 on
在F界面,长按 键 3s,进入监控参数,并显示 J
The panel shows “P”, press for 3 seconds, inter monitoring parameter, and it shows “J”
J1
实时速度 Real-time Speed
显 示 的 数 × 100= 实 际 速 度 the showing number
multiples by 100 equal to the real speed.
J2
实时功率 Real-time Power
显示的数×10= 实 际 功 率 the showing number
multiples by 10 equal to the real power.
J3
输入电压 Input Voltage
显 示 的 数 × 10= 实 际电 压 the showing number
multiples by 10 equal to the real voltage.
J4
历史电压 Historical Voltage
显示历史输入最低电压和最高电压 Display the
historical lowest input voltage and highest input
voltage.

5.错误码说明表 Error code description
错误
Error
code
内容
Reasons
对策 Solutions
E1
电机堵转
Motor stuck
请转动手轮检查机头是否卡住或者干涩转动困难;请检查电
机插件是否松动或者脱落;请检查加工物料是否过厚,电机
因扭力不足而无法贯穿;请检查机器是否缺少润滑油。
The motor run out of load capacity, please reduce the load
capacity for the motor and then restart the motor;
Please check if the plug of motor loose or drop;
Please check if the sewing material is too heavy;
Please check if the machine needs lubrication.
E2
软件过流
software
over-current
请关电后重新上电,如果不能消除报警,请检查:电机负荷
过大,请减轻负荷后重启电机;Motor used too much, Restart
machine after several minutes, then please check if the fabric
much too heavy.
E3
参数保存异常
Parameter save
abnormal
出现此种状况,需要关闭电源,稍后再打开电源开关即可;
恢复出厂设置(长按 键约 3s 不松开);
若重启或者恢复出厂设置后也不能解决,建议联系经销商解
决 。 Restart machine after several minutes or reset
machine(press 3s ); If the problem unsolved, please
contact dealers.
E4
电机霍尔信号异
常Hall of the
motor with
problem
请检查电机编码器插头连接是否可靠,编码器信号线是否有
断线,插针是否退出或者变形。Please check if the 10core line
connect well or not, please check if the connect line of hall is
well or not.
E5
定位器信号异常
The synchronizer
signal
请检查定位器是否连接电控;请检查上下定位信号是否正常。
Forget to insert the synchronizer cable before turn on the
machine To check the both up needle position signal and the
down needle position signal is working.
E6
调速器异常
Speed governor
abnormal
请检查压脚机构是否回到正确位置,压脚安全开关是否损坏,
插座是否正常。To check if the presser foot back to the correct
position or not , to check if the safety switch button is damaged
or not, the outlet is abnormal or not.
E7
电流检测电路故
障Current
detection and
circuit fault
请检查电路板是否干净清洁;请检测电源电压是否正常;
请等待电源重新开启/复位(请仔细检查电源板各项机能)。
Please check whether the circuit board is clean;
Please check whether the power voltage is normal;
Please wait after restarting the power or reset(please carefully
check each function of the power board).
EA
硬件过流
Hardware
over-current
请关电后重新上电;请检查供电电压是否正常;请尝试恢复
出厂设置。Please cut off the power and restart;Please check
whether the supply voltage is normal;Please try to restore
factory defaults.
Eb
系统过电压
System
over-voltage
立即切断电源,并检查供电电压是否过高,如果是,请调整
供电电压到额定电压后再开机工作(额定 电 压 :220V) 。
Immediately cut off the power, and check whether the supply
voltage is too high, if yes,please adjust the rated voltage, then
start to work(rated voltage:220v).
EC
系统欠电压
System
请检查供电电压是否正常;请等待电源重新开启/复位(请仔细检查
电源板各项机能)。Mean the voltage abnormal, please check if the
voltage is normal or not; Means waiting for the power, and need to
J5
历史错误代码 Historical Error
显 示 最 新 的 5个 错 误 代 码 Display historical error
code(only show the latest 5 ).
J6
累计运行时间 Cumulative
Running Time
显示的数×100=实际时间(Hour)the showing
number multiples by 10 equal to the real time(hour).

under-voltage
restart again or recover to the factory reset.
Ed
刹车电阻保护
Brake resistor
protection
请检查刹车电阻插头是否松动或脱落;请检查供电电压是否
正常;请尝试恢复出厂设置或将电源重启;Please check
whether the plug of brake resistor is loose or drop off;Please
check whether the supply voltage is normal;Please try to restore
factory defaults or restart.
2、W4-UT 电控操作(W4-UT Electric control box operation)
·在使用本产品之前,请先阅读《操作手册》及所搭配的缝纫机机械说明书。
·本产品必须由接受过专业培训的人员来安装或操作。
·请尽量远离电弧焊接设备,以免产生的电磁波干扰本控制器而发生误动作。
·请不要在室温 45℃以上或者 0℃以下的场所使用。
·请不要在湿度 30%以下或者 95%以上或者有露水和酸雾的场所使用。
·安装控制箱及其他部件时,请先关闭电源并拔掉电源插头。
·为防止干扰或漏电事故,请做好接地工程,电源线的接地线必须牢固的方式与大地有效连接。
·所有维修用的零部件,须由本公司提供或认可,方可使用。
·在进行任何保养维修动作前,必须关闭电源并拔掉电源插头。控制箱里有高压危险,必须关闭电源五分钟
后方可打开控制箱。
·本手册中标有 符号之处为安全注意点,必须注意并严格遵守,以免造成不必要的损害。
Before using this product, please read the operation manual and the collocation of sewing
machine instructions.
This product must be installed or operated by professional training personnel .
Please stay away from arc welding equipment,In order to avoid the electromagnetic
interference of this controller and produce false action.
Please don't use at the temperature above 45 ℃or below 0 ℃indoor.
Please don't use in the humidity below 30% or more than 95% at the places where the
dew and fog.
Installing a control box and other components, please turn the power off and pull the plug
To prevent interference or leakage accident, please get the grounding engineering, power
cord grounding wire must be solid way to connect with the earth effectively.
All spare parts for maintenance, before using should to be supplied by the company or
recognition.
Before any maintenance action, must turn the power off and pull the plug.Control box has
a high pressure risk, it is necessary to open the control box after turning the power off five
minutes later.
Marked symbol in this manual is safety attention point, must pay attention and strictly
abide by, In order to avoid unnecessary damage.
安全事项

第 1 章 产品安装(The product installation)
1.1 产品规格(Product specification)
品型号(Model)
AHE59
电源电压(Supply
voltage)
AC 220±20% V
电源频率( Supply
frequency)
50Hz/60Hz
最大输出功率(Maximum
output)
550W
1.2 接口插头的连接( Connection of interface plug)
将脚踏板及机头的各连接插头安插到控制器后面对应的插座上,各插座名称如图 1-2 所示。连接好,请检
查插头是否插牢。(Connect the pedal and the nose of the plug placed behind the controller corresponding
to the socket, the name of the socket as shown in figure 1-2.After connection,please check whether the
plug is stuck or not.)
图 1-1 AHE 系列控制器图(Figure 1-1 AHE series controller diagram)
1抬压脚电磁铁插座( presser foot electromagnet);②自动电磁铁插座(automatic electromagnet
socket);③脚踏板插座(the pedals socket);
(When using normal power plug could not in, please check whether the plug and socket is matched,and
if the direction of the needle and insertion direction is right or not!)
图 1-2 控制器接口定义(Figure 1-2 The controller interface definitions)
1.3 接线与接地(Wiring and grounding)
必须要做好系统的接地工程,请合格的电气工程人员予以施工。产品通电及投入使用前,必须确保电源插座AC
输入端已安全可靠的接地。系统的接地线为黄绿线,该地线请务必可靠连接至电网安全保护接地上,以保证安
全使用,并可防止出现异常情况。(Must be prepared system grounding engineering well, please ask qualified
electrical engineer to construct. Before product power and put into use,must ensure that the power plug。)
:使用正常的力量插不进去时,请检查插头与插座是否匹配,插入方向或针的方向是否正确!

:所有电源线、信号线、接地线等接线时不要被其它物体压到或过度扭曲,以确保使用安全!
(Do not press or over-distort all the power cables, signal cables, grounding cables, etc. to ensure safe
operation!)
第 2 章 操作面板使用说明( Operation panel instruction)
2.1 操作面板的显示说明( operation panel display instruction.)
根据系统工作状态,操作面板的液晶屏模块将显示当前的缝纫模式、各种参数,以及抬压脚、停针位、剪
线、慢速起缝等液晶字符。(Depends on the working status of system, the LCD screen of operation panel
will display the current sewing model and parameters, and LCD legend such as auto press foot,
trimmer, needle position, etc. )
操作面板上的功能图标显示说明如下所示。(The function icons on the operation panel are displayed
below)
图 2-1 操作面板外观界面(Figure 2-1 Operation panel interface)
图 2-2 操作面板液晶显示屏图示(Figure 2-2 Operation panel LCD representation)
索引 index
图标 icon
描述 Description
索引
index
图标 icon
描述 description
1
中间停针下停针
Mid-lower needle position
11
W 缝纫(无此功能)W
sewing (Not in use)
2
中间停针上停针
Mid-upper needle position
12
四段缝(无此功能)
4stage
sewing(not in use)
3
自动剪线功能 Auto
trimmer
13
记切线次数 Trim Count
4
中间停针抬压脚 Mid
needle position presser
lifting
14
无线信号(无此功能)
Wireless signal(not in
use)
5
剪线后抬压脚 Presser
lifting after trim
15
语音播报 Speak Service
6
抬压脚 Presser foot
lifting
16
ABCD
针数段落 Needle stage
7
计剪数 Counter
17
88888888
计数/参数值显示
Count/parameter display
8
灯光亮暗 Light
9
感应自动抬压脚 Auto
sense presser foot
10
软启动功能 Soft start

2.2 操作面板各按键功能说明
序
号
NO
外观
Appa
rance
名称 Name
功能描述 Function Description
1
参数进入
及返回键
Parameter
Enter and
Exit
在开机状态下,长按 键进入参数模式。修改参数后按一下 键储存,再按 键退
出参数模式。In state of power on,press and hold button to enter parameter model。
Press button to save, and press again to exit。
2
抬压脚键
Presser foot
chain
在正常缝纫模式下,按 键,循环切换缝纫中途停车时抬压脚与缝纫结束后自动切线
抬压脚。Under normal sewing model, press button. Switch between presser lift when
sewing pause and auto trim/presser lift after sewing process end.
3
灯按键等
级以及剪
线键 LED
light level
and trim
按下 ,灯的等级会发生变化;长按 ,循环切换是否剪线。press ,the LED light
level will change;long press ,switch between whether auto trim or not.。
4
喇叭键
speaker
在报错的时候,短按一下,将会报故障原因;长按,循环切换喇叭开关。When error
report, press once to report error reason;long press to switch speaker,
5
参数递增
键Increase
parameter
参数设定中,参数值递增键。In parameter setting,increase parameter
6
参 数 递 减
键Decrease
parameter
参数设定中,参数值递减键。In parameter setting, decrease parameter
7
向 左 选 择
键Select
left side
参数设定中,向左选择参数范围。
In parameter setting,
select parameter scale in left side
8
向右选择
键Select
right side
参数设定中,向右选择参数范围。In parameter setting,select parameter scale in right
side。
9
恢复出厂
设置 Reset
长按 3S 触动开关恢复出厂程序。Press and hold 3 seconds to Reset。
2.2 复合按键说明( composite button description)
序号
No.
外观组合
Appearance
名称
Name
功能描述 Description
1
+
计剪线快捷
键Trim
counter
shortcut
快速进入计剪线模式,按下按键 或 ,可以自动切换成计针数模式;按
下 或 时可以退出计针数计剪数模式。Quick enter in trim counter mode,
press or ,switch between trim counter and stitch counter mode ;
press or to quit。
2
+
监控模式捷
键Monitoring
Mode shortcut
快速的进入监控模式,对一些参数进行监控。Quick enter in monitoring mode,
monitor some parameter。

第 3 章 系统参数设置说明(Chapter 3 System parameter description)
3.1 参数模式(parameter mode)
1、 待机状态下,按 键进入参数模式;(under standby mode,press button to enter parameter mode;)
2、 按 键和 键修改相对应的参数。(press button and button to adjust the parameter。)
3、 当参数值有修改时,参数界面闪烁。此时,短按 键,保存修改后的参数,再长按 键退出参数界面,返回
待机页面。( When parameter change, the interface will flicker. Press button and save the change of parameter,press and
hold button to quit the parameter interface and back to standby mode. )
参数编号
Parameter
No.
参数范围
Parameter
scale
出厂值
Default
Value
参数描述 Description
P 9 9
0/1/2
1
语音选择(Voice choice)
0:语音关闭(close voice);1:中文( Chinese)2:英文(English)
默认 1 中文(Default 1 Chinese)
P 0 1
200~5500
4000
自由缝最高速度(全局最高速度)
Free sewing Maximum Seed
(overall highest
speed)
P 0 3
0/1
0
上下停针选择(Needle position)
(0:为上停针;1:为下停针)(0:upper;1:lower)
P 0 4
200~3000
1800
前加密缝速度(Front encryption sewing speed)
P 0 5
200~3000
1800
后加密缝速度(Back encryption sewing speed)
P 0 7
0~200
0
前加密缝针数(0 没有加密缝功能,如果有针数为有加密缝功能)Front
encryption sewing stitch amount (0 no encryption sewing function, If it have
number this means have encryption sewing function)
P 0 8
0~200
0
后加密缝针数(0 没有加密缝功能,如果有针数为有加密缝功能)Back
encryption sewing stitch amount (0 no encryption sewing function, If it have
number this means have encryption sewing function)
P 0 9
0/1
0
慢速起缝开关(0 为关闭,1 开启)Slow up seam (0 off,1 on)
P 1 0
0~4
0
计件数调节 Counter adjustment
P 1 6
1~3000
50
调节响应时间,感应压脚检测到有布之后相应时间 Response time
adjustment,the response time of sense presser foot detect the fabric .
P 1 7
0~99
0
自动感应抬压脚灵敏度设置(在参数 02C 显示的参数最大值和最小值之间)
Auto sense presser foot sensitive adjustment(Between the min and max value
of 02C parameter )
P 2 4
0~1024
150
踏板剪线位置(Footboard trim position)
P 2 7
0~3
1
抬压脚感应模式选择(0/1/2),0:关闭;1:剪线后有效;2:都有效
Presser foot sense mode(0/1/2),0:close;1:after trim;2:always
P 3 0
0~31
0
电机低速加力功能开关:(Motor low speed high power mode:)
0:正常功能(Norma) 1~31:低速加力过厚能力档位(Low speed high
power mode(for heavy duty)
P 3 2
1~500
60
加密缝电磁铁全出力时间 ms(Encryption sewing magnet full capacity time
ms)
P 3 3
0~100
6
加密缝电铁每周期关闭时间 ms(encryption sewing magnet close time in a
period ms)
P 3 7
0~100
5
加密缝电磁铁每周期开通时间 ms(夹线力度)
encryption sewing magnet open
time in a period ms
P 3 8
1~999
120
绷缝剪线速度(下刀维持时间)--------下刀
Interlock trim speed(trimer holding time)--------bottom cut
P 3 9
1~999
160
扫线延迟动作时间----------上刀(注意:此项也是绷缝机上剪线)
Sweep thread holding time---------top cut(note: this is interlock top cut, too)
P 4 0
1~9999
30
扫线速度(扫线持续时间)--------上刀(注意:此项也是绷缝机上剪线)
Sweep speed(sweep holding time)--------上刀(note: this is top cut, too)
P 4 1
0~9999
120
吹风开始延迟时间 ms(Air delay time ms)
P 4 2
1~9999
300
吹风持续时间 ms(Air holding time ms)

P 4 3
0~25
2
扫线、吹风选择功能(2 为扫线;8 为吹风)
Sweep or Air(2 is sweep;8 is air)
P 4 5
0~100
1
剪线电磁铁每周期开通时间 ms
trimmer magnet open time in a period ms
P 4 6
0~100
2
剪线电磁铁每周期关闭时间 ms
trimmer magnet close time in a period ms
P 4 9
100~500
300
剪线速度 Trim speed
P 5 0
1~500
100
抬压脚电磁铁全出力时间 ms
Presser foot magnet full capacity time ms
P 5 1
0~100
15
抬压脚电磁铁每周期开通时间 ms
Presser foot magnet open time in a period ms
P 5 2
1~800
150
放压脚延迟时间(ms)Presser lifting delay time(ms)
P 5 3
0/1
1
抬压脚开关:Presser foot switch:
0:不抬 not lift
1:抬 lift
P 5 4
0~100
35
抬压脚电磁铁每周期关闭时间 ms
Presser foot magnet close time in a period ms
P 5 6
0/1
1
上电自动找上针位:Auto upper needle position when plug in:
0:不找(off) 1:找(on)
P 5 7
0~600
200
抬压脚电磁铁保护时间 100ms
Presser foot magnet protection time100ms
P 6 0
200~5500
4000
定长缝最高速(自动测试速度)
Given length tacking maximum speed(Auto test speed)
P 6 2
0~4
0
特殊运行模式:(Special operation mode:)
0:操作工选择(正常)working mode(normal)
1:简易缝模式(easy seam)
2:测电机初始角(不再需要取下皮带)motor angle test (no need to take
belt down)
3:计算传动比模式(需要有停针传感器,且不能取下皮带)
transmission ration test mode (need needle position sensor, and cannot
take belt down)
4:自动测试模式 1(带停针位的自动测试,运行 5S,停止 5S)
Auto test mode(with needle position testing,operate 5S,pause 5S)
P 6 6
0~2
0
0:关闭 close;2:打开安全开关
open safety switch
P 7 1
0~50
0
缓放压脚级别调整,数值越小放的越快;(超频打开时间)
Release presser foot level adjustment, when number get smaller, the release
speed become quicker;(over frequency open time)
P 7 6
1~500
60
剪线电磁铁全出力时间 ms
Trimmer magnet full capacity time ms
P 9 8
0~4
4
音量调节(0-4)4 为音量最大
Volume adjustment(0-4)4 is the highest
P 9 9
0/1/2
1
语音选择 0:语音关闭,1:中文,2:英文
Voice option 0:close,1:Chinese,2:English
P A 0
0~9999
0
感应开启时,撤除布料后放压脚延迟时间,单位 ms
When sensor open,presser foot delay time after remove fabric,Unit: ms
P A 1
0~9999
50
感应开启时,带布料放压脚延迟时间,单位 0.1s
When sensor open,presser foot delay time when put fabric,单位 0.1s
P A 5
0~3
0
0:开机语音,按键语音,参数语音,故障语音;1:仅为开机语音;2:
仅为按键语音及故障语音;3:开机语音,按键语音,故障语音
0:starting up voice,press button voice, parameter voice,error voice;1:only
start up voice;2:press button and parameter voice;3:All these three
P A 6
1~100
1
计底线针数比例 Bobbin thread proportion
P A 7
1~9999
1
底线总针数设置 Bobbin thread amount setting
Other Jack Sewing Machine manuals

Jack
Jack ZB-A2S User manual

Jack
Jack JK-797 Product guide

Jack
Jack JK-T9270D Product guide

Jack
Jack JK-T1377E User manual

Jack
Jack k4 Series Mounting instructions

Jack
Jack JK-SHIRLEYIIE User manual

Jack
Jack JK-1000Q6 User manual

Jack
Jack JK-T718E Product guide

Jack
Jack A4 User manual

Jack
Jack JK-T781E User manual