manuals.online logo
Brands
  1. Home
  2. •
  3. Brands
  4. •
  5. Jamara
  6. •
  7. Transmitter
  8. •
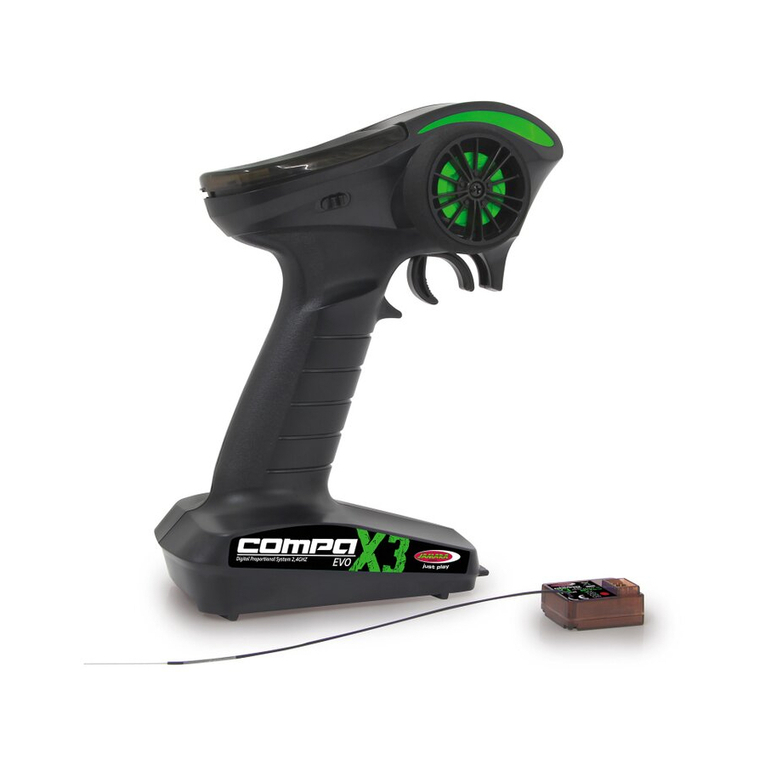
  9. Jamara Compa X3 Evo User manual

Jamara Compa X3 Evo User manual

ES - Información general
JAMARA K. no se hace responsable de los daños causados al producto en sí o por medio de
esto, a menos que esto se debe al mal funcionamiento o errores de manejo. El cliente solo tiene la
responsabilidad completa para el uso y manejo adecuado, incluyendo, sin limitaciones, el montaje,
el proceso de carga, el uso de hasta la elección de la zona de aplicación. Por favor, consulte las
instrucciones de uso y funcionamiento, contiene información y avisos importantes.
GB - General information
Jamara e.K. is not liable for any damage caused to the product itself or through this, provided this
is due to improper operation or handling errors. The Customer alone bears the full responsibility for
the proper use and handling, including without limitation, the assembly, the charging process, the
use and choice of the operation area. Please refer to the operating and user instructions, it contains
important information and warnings.
No. 061222
Compa X3 Evo
Emisora | Transmitter
28/20
ES - Instrucciones
GB - Instruction
Contenido del kit:
• Emisora • Receptor • Instrucciones
Accesorios:
4 x pilas AA, Ref. 140267 (4 Uds.)
Características:
• 3 canales
• Sistema 2,4 GHz
• Dual Rate
• Servo inversa
• Ajustable del servo central
• Ajuste del punto nal de servo
• Tipo de modulación FHSS
• Tipo de modelo Carbo, coche
• Rango de temperaturas - 10 a + 40° C
• Tensión de trabajo 4,8 - 6 V
• Aviso por bajo voltaje
• Longitud de la antena de recepción aprox. 20 cm
• Dimensiones 175 x 90 x 210 mm
• Peso 277,4 g
• Fail-Safe en el receptor (Acelerador y dirección)
Receptor Compa X3 Evo 2,4 GHz
Ref. 061223
Datos técnicos:
Banda 2,4 GHz
Tipo de modulación FHSS
Tensión de trabajo 4,5 - 7,4 V DC
Dimensiones 34 x 13 x 26 mm
Peso 11,8 g
Box contents:
• Transmitter • Receiver • Instruction
Accessories:
4 x AA 1,5 V batteries, No. 140267 (4 pieces)
Features:
• 3 channel
• 2,4 GHz System
• Dual Rate
• Servo reverse
• Adjustment of servo centre
• Servo end point adjustment
• Modulation FHSS
• Model types Car, boat
• Temperature range - 10 to + 40° C
• Operating range 4,8 - 6 V
• Low-Voltage warning
• Receiver antenna length app. 20 cm
• Size 175 x 90 x 210 mm
• Weight 277,4 g
• Fail Safe on receiver (For gas and steering)
Receiver Compa X3 Evo 2,4 GHz
Ord. No. 061223
Technical data:
Frequency 2,4 GHz
Modulation FHSS
Operating voltage 4,5 - 7,4 V DC
Size 34 x 13 x 26 mm
Weight 11,8 g
Se debe cumplir estrictamente lo siguiente:
• Antes de encender el sistema, asegúrese de que el acelerador esté en la posición de
apagado.
• Compruebe que el transmisor y el receptor son compatibles y están unidos entre sí.
• Siempre encienda primero el transmisor y luego el receptor.
• Siempre apague el receptor primero y luego el transmisor.
• Complete una prueba completa de rango y función antes de cada despegue.
• Nunca sobrevuele personas y no permita que su modelo ponga en peligro a personas o
animales.
• No vuele cerca de cables aéreos, edicios o aeródromos.
• El sistema no debe funcionar bajo lluvia o tormentas eléctricas.
• Si no tiene la intención de utilizar el transmisor durante un período prolongado, retire las
baterías.
Following should be strictly adhered to:
• Before Switching on the system ensure that throttle stick is in the o󰀨 position.
• Check that the transmitter and receiver are compatible and bonded to one another.
• Always switch the transmitter on rst and then the receiver.
• Always switch the receiver o󰀨 rst and then the transmitter .
• Complete a full range and function test before every take-o󰀨.
• Never over-y people and do not allow your model to endanger people or animals.
• Do not y near to over-head cables, buildings or airelds.
• The system must not be operated in rain, or thunder storms.
• If you do not intend to use the transmitter for a long period, remove the batteries.
Declaración de conformidad
Por la presente JAMARA e.K. declara que los producto‚ “Emisora Compa X3 Evo,
No. 061222“ cumplen con las Directivas 2014/53/EU y 2011/65/EU.
El texto completo de la declaración de conformidad de la UE está disponible en la
siguiente dirección de Internet: www.jamara-shop.com/Conformity
Certicate of Conformity
Hereby JAMARA e.K. declares that the product “Fernsteuerung Compa X3 Evo, No. 061222“ com-
plies with Directive 2014/53/EU, 2011/65/EU.
The full text of the EU Declaration of Conformity is available at the following Internet address:
www.jamara-shop.com/Conformity
Modelo de articulo de contrucción- ¡No es un juguete!
Lea atentamente la instruccion completa y seguridad antes de poner el modelo
en funcionamiento
Atención! Leer completamente las notas de advertencia / instrucciones de
seguridad estos son para su seguridad y puede evitar accidentes / lesiones.
For model building only - Not a toy!
Read the complete instructions and security instructions carefully before using the
model.
Caution! Please fully and carefully read warnings/ safety instructions. These are
for our own security and can avoid accidents/injuries.
Frequency bands: 2,4 GHz | Frequency range: 2,405 MHz - 2,450 MHz | EIRP: < 100 mW (max. power transmitted)
2
ES - Controle
1. Canal 3
2. Volante
3. Pedal Pulso
4. Compartimiento de las baterías
GB - Controls
1. Channel 3
2. Steering Wheel
3. Throttle Trigger
4. Battery Compartment
ES - Campo de programación
1. Inversa (Canal 2 & 1)
2. Canal 2 ajuste de punto  nal
3. Dual Rate direccion
4. Trim Canal 1 & 2
5. Power LED
6. Interuptor On/O󰀨
7. Botón de binding
GB - Programming Panel
1. Reverse (CH2 & CH1)
2. CH2 EPA
3. Steering Dual Rate
4. Trim Channel 1 & 2
5. Power LED
6. On/O󰀨 Switch
7. Bind Button
12
3
4
1
2
4
3
5
6
7
3
Advertencia sobre las baterías:
Las baterías no recargables no se pueden cargar!
No abrir!
No arrojar al fuego!
No mezcle baterías nueva y viejas!
No mezcle baterías alcalinas, estándar (carbono-zinc) o baterías recargables!
Las baterías recargables deben retirarse del juguete!
Las baterías recargables sólo pueden cargarse bajo la supervisión de un adulto!
Los conectores de conexión no deben estar en cortocircuito!
Battery warning:
Non-rechargeable batteries are not to be recharged!
Do not open!
Do not dispose of in re!
Do not mix old and new batteries!
Do not mix alkaline batteries, standard (carbon-zinc) or rechargeable batteries!
Rechargeable batteries are to be removed from the toy before being charged!
Rechargeable batteries are only to be charged under adult supervision!
The supply terminals are not to be short-circuited!
ES - Receptor
1 Antena
2 Setup
Asignación de las salidas del receptor:
A CH 1: Servo de dirección
B CH 2: Servo de gas
C CH 3: canale 3
D Bat: Batería
GB - Receiver
1 Antenna wire
2 Setup button
Receiver Conguration:
A CH 1: Steering Servo
B CH 2: Throttle Servo
C CH 3: Channel 3
D Bat: Battery
1
2
A
B
C
D
ES - Colocar pilas a la emisora
1. Retire la tapa del compartimiento de la batería.
2. Inserte 4 pilas “AA” (o baterías) en el compartimiento de la batería. Preste atención a la
polaridad (+ y - Pol), como se muestra en el compartimento de la batería.
3. Reemplace la tapa del compartimiento de la batería.
GB - Fitting the batteries
1. Remove the battery compartment cover.
2. Install 4 „AA“ batteries (or battery pack) into the battery compartment.
Pay attention to the correct polarity (+ & - Pol) as shown in the battery compartment.
3. Replace the battery compartment cover and close it.
4x AA
Para encender el transmisor y el receptor
Atención!
Antes de comenzar el proceso del binding, tienen que conectar todos los componentes,
servos, regulador etc. y asegúrese de que la emisora y receptor estan apagado.
1. Encender la emisora.
La LED roja en la emisora se ilumina de forma continua.
2. Pulse el botón de receptor setup y mantenerlo pulsado.
Encender el receptor. El LED en el receptror comienza a parpadear rápidamente.
Deja el botón Setup después de un segundo.
3. Pulse el botón de Binding en la emisora y mantener el botón para un segundo hasta que
el LED en el receptor brilla constante brilla.
Atención!
Cuando el proceso de Binding se ha realizado
correctamente, el LED en el receptor brilla constante caundo el receptor y emisora estan
encendidas. Si el LED no brilla o empieza a parpadear, el proceso binding no ha funcionado. En
este caso, repita el proceso de binding.
Binding of transmitter and receiver
Attention!
Before beginning the binding process, connect the switch harness, servos, and the battery
to your receiver. Make sure that both the transmitter and the receiver are turned OFF.
1. Turn the transmitter ON.
The Power Indicator on the transmitter will illuminate solid red.
2. Press and hold the receiver setup button.
Now switch on the receiver.
The receiver LED will ash quickly.
Release the setup button.
3. Press and hold the binding button on the transmitter until the LED
on the receiver is continuously lit.
Attention!
When the binding process is successful, the Bind LED on the receiver will stay solid red when
both the transmitter and receiver are turned ON. If the Bind LED on the receiver is ashing rapidly
or not illuminated at all, the transmitter and receiver are not paired. In this case, turn both the
transmitter and receiver OFF, then repeat the binding process.
Montaje del sistema de recepción
Atención!
Al conectar los cables, asegúrese de que la polaridad (polo + y -) es correcta, de lo contrario el
receptor se cortocircuitará.
Antena
Montar la antena de 2,4 GHz verticalmente. Sin embargo, no debe jar la antena a objetos metáli-
cos, el alcance disminuiría.
Connecting to the receiver
Warning!
To avoid any short-circuit in your receiver, please make sure to connect
the cables with correct polarity (+ & - Pol) in mind.
Antenna
Mount the 2.4 GHz antenna vertically. Do not allow any metal object to come into contact with the
antenna or to shield it as this will reduce the range.
S + -
JAMARA e.K.
Inh. Manuel Natterer
Am Lauerbühl 5 - DE-88317 Aichstetten
Tel. +49 (0) 75 65/94 12-0 - Fax +49 (0) 75 65/94 12-23
[email protected] ●www.jamara.com
Service - Tel. +49 (0) 75 65/94 12-777
kundenservice@ jamara.com
Irrtum und technische Änderungen vorbehalten. Copyright JAMARA e.K. 2020
Kopie und Nachdruck, auch auszugsweise, nur mit Genehmigung von JAMARA e. K.
All rights reserved. Copyright JAMARA e.K. 2020
Copying or reproduction in whole or part, only with the expressed permission of JAMARA e.K.
ES - Notas sobre el reciclado
Baterías y acumuladores no deben desecharse en la basura doméstica, pero se
deben desechar de forma separada. Usted está obligado, a realizar la eliminación
profesional de las baterías viejas (recogida selectiva). Es posible devolver las ba-
terías después de su uso de forma gratuita en las actividades comerciales. Dado
que las baterías contienen sustancias que causan irritación, pueden causar alergias
o son altamente reactivos, la recogida selectiva y el reciclaje son importantes para
el ambiente y su salud. Si las baterías, por debajo del “bidón con ruedas borrado”
están marcados con un símbolo químico, Hg, Cd o Pb, signica que contiene más de
un 0,0005 % de Mercurio (Hg), más de 0,002 % de Cadmio (Cd) o más de 0,004 %
de Plomo (Pb).
GB - Disposal restrictions
Batteries and accumulators must not be disposed of in domestic waste. You are obliged to dispose
of batteries (seperate collection) appropriately. After use you can return batteries free of charge
to the retail store. As batteries contain substances that can be irritant, can cause allergy and are
highly reactive, separate collections and proper recycling is important to the environment and to
your health. If the batteries are marked with a chemical symbol Hg, Cd or Pb below the crossed-
out waste bin on wheels it refers to that more than 0.0005% of mercury (Hg), more than 0.002%
of cadmium (Cd) or more than 0.004% Lead (Pb) is included.
ES - Notas sobre el reciclado
Aparatos eléctricos no pueden desecharse en la basura doméstica, pero se deben
desechar de forma separada. Usted está obligado, a quitar las baterías y llevar los
aparatos eléctricos viejos en los puntos de recogida comunales. En caso de que hay
datos personales en el aparato eléctrico se deben remover de usted mismo.
GB - Disposal restrictions
Electrical appliances must not be disposed of in dome stic waste and must be disposed of separa-
tely. You are obliged to take out the batteries, if possible, and to dispose of the electrical equipment
at the communal coll ection points. Should personal data be stored on the
electrical appliance you must remove them by yourself.
ES - Fail safe setup (Acelerador y dirección)
La función Fail Safe normalmente se congura ya desde la fábrica. Se deben familiarizarse
y antes del uso revisar las funciones.
1. Encender la emisora.
Encender el receptor. Pulse el botón Setup en el recptor hasta que el LED empieze a
parpadear en el receptor.
2. Posicionar la palanca de gas en la posicion deseada y pulse de nuevo el botón Setup en el
receptro hasta que el LED brilla constante.
3. Compruebe la función durante el uso, apagar brevemente la emisora. El servo o reguldar
conectado controla en la posicion programada.
Atención! En el caso de un motor de combustión, siempre debe ajustar el Failsafe en la
posición máxima de frenado. Cuando use un regulador, siempre en la posición neutral.
GB - Fail safe setup (For gas and steering)
The fail-safe function is usually not set up already from the factory. You should get familiar
with it anyway and check before using the function.
1. Turn on the transmitter.
Turn on the receiver.
Press the Setup button on the receiver until the LED on the receiver starts to ash.
2. Set the throttle and the Steering Wheel to the desired position and press again the
Setup button until the receiver LED is constantly lit.
3. Check the function by turning shortly o󰀨 the transmitter during operation.
The servo or ESC goes to the programmed position.
Attention! At Nitromodels, you should always set the failsafe on maximum braking position.
If you using an ESC, always choose neutral for setting up the failsafe.
Medidas de Seguridad
Esta estación fue hecha especialmente para los modelos de coches / de barcos. La Compañía
Jamara no se hace responsable por cualquier pérdida o defecto de mal uso.
Los modelos de control remoto no son juguetes, por lo que no se puede dar a las manos de los
niños sin un adulto presente.
Para el funcionamiento del producto se requiere conocimientos técnicos y buena habilidad con
las manos. Fallos o dejar que se moje, el producto puede dañarse y hacer daño.
Para el funcionamiento del producto e requiere conocimientos técnicos y buena habilidad con las
manos. Fallos o dejar que se moje, el producto puede dañarse y hacer daño. También es posible
que incluso si la emisora esta desconectada, pueda causar problemas con el receptor y causar
daños.
Tenga mucho cuidado al utilizar la estación de Compa 2.4 GHz. Preste atención a las medidas de
seguridad, en primer lugar encender la emisora y luego la estación del modelo. Cuando quieras
apagar hacer exactamente lo contrario, el modelo y luego el receptor de la emissora. Utilize sólo
el receptor original. Si utiliza otro receptor no tendrá ningún vínculo con la banda de 2.4 GHz.
Proteger la red contra el polvo, la suciedad y la humedad. No lo deje en un lugar cálido y no muy
calientes o muy frío o en lugar del autor vibração. Usarlo sólo en lugares de no más de tempera-
tura ES -10 a 40C °. Use el cargador de alta calidad, se encuentra en el catálogo. Declaraciones
correcta de nuestro fabricante recomienda.
Evitar golpes y presiónes. Controlar regularmente la emisora y el receptor si tienen daños en la
caja, conectores y cables. Los componentes dañados o mojado, no se tienen que utlizar mas,
aunque si estan seco. O comprobar en nuestro servicio o tienes que cambiar las piezas.
Safety Information
This remote control system is designed and approved exclusively for the operation of remote-
controlled car/boat models. The company Jamara assumes no liability for any other use.
Radio Controlled models, are not toys and as such and should only be operated by children or
youths if closely supervised by a responsible adult.
Building and operating such models requires a degree of skill, understanding and technical know-
how as well as a responsible attitude. Faults in the construction or irresponsible behaviour could
lead to serious damage or injury.
As neither the manufacturer or retailer has any inuence over the correct use of modelling pro-
ducts we wish to emphasise these safety instructions and will in no way be held responsible for
the misuse of our products.
Please be aware that the receiver system can also create a danger if operated when the trans-
mitter is not switched on. Always operate the Transmitter with extreme caution and follow the
instructions listed here. Always switch the transmitter on before the receiver and switch o󰀨 in the
opposite order. Only use our original receivers as any other brand of 2.4 GHz receivers will not
bond to our transmitters.
Protect the system from dust, dirt and moisture. Never expose the system to extreme heat, cold
or vibration. The system should only be operated between - 10 and + 40°C. Use a good quality
charger selected from our range and follow the battery manufacturers instructions.
Avoid exposing the system to impact or vibration and inspect all of the components regularly for
damage to the casing, plugs, sockets and cables. If any component gets damaged or is exposed
to water do not use it even if it has been dried out! Any such component should be replaced or
returned to our service department.
This manual suits for next models

1

Other Jamara Transmitter manuals

Jamara CCX Lipo User manual

Jamara

Jamara CCX Lipo User manual

Jamara Compa X3 Evo User manual

Jamara

Jamara Compa X3 Evo User manual

Jamara Compa X3 Evo User manual

Jamara

Jamara Compa X3 Evo User manual

Jamara FCX6 Pro Tel User manual

Jamara

Jamara FCX6 Pro Tel User manual

Jamara SCX User manual

Jamara

Jamara SCX User manual

Jamara CCX Pro 2,4 GHz User manual

Jamara

Jamara CCX Pro 2,4 GHz User manual

Jamara SCX 2,4 GHz User manual

Jamara

Jamara SCX 2,4 GHz User manual

Jamara SCX 2,4 GHz User manual

Jamara

Jamara SCX 2,4 GHz User manual

Jamara SCX User manual

Jamara

Jamara SCX User manual

Jamara Compa X3 Evo User manual

Jamara

Jamara Compa X3 Evo User manual

Jamara CCX Pro 2,4 GHz User manual

Jamara

Jamara CCX Pro 2,4 GHz User manual

Jamara SCX 2,4 GHz User manual

Jamara

Jamara SCX 2,4 GHz User manual

Jamara FCX6 Pro Tel User manual

Jamara

Jamara FCX6 Pro Tel User manual

Jamara CCX Pro 2,4 GHz User manual

Jamara

Jamara CCX Pro 2,4 GHz User manual

Jamara SCX User manual

Jamara

Jamara SCX User manual

Jamara FCX6 Pro Tel User manual

Jamara

Jamara FCX6 Pro Tel User manual

Jamara CCX Lipo 2,4 GHz 3 CH User manual

Jamara

Jamara CCX Lipo 2,4 GHz 3 CH User manual

Jamara CCX Lipo User manual

Jamara

Jamara CCX Lipo User manual

Jamara FCX6 Pro Tel User manual

Jamara

Jamara FCX6 Pro Tel User manual

Jamara FCX6 Pro Tel User manual

Jamara

Jamara FCX6 Pro Tel User manual

Jamara CCX Pro 2,4 GHz User manual

Jamara

Jamara CCX Pro 2,4 GHz User manual

Jamara CCX Pro User manual

Jamara

Jamara CCX Pro User manual

Jamara CCX Lipo 2,4 GHz 3 CH User manual

Jamara

Jamara CCX Lipo 2,4 GHz 3 CH User manual

Jamara CX 2,4 GHz User manual

Jamara

Jamara CX 2,4 GHz User manual

Popular Transmitter manuals by other brands

SONBEST SM1635B-1 user manual

SONBEST

SONBEST SM1635B-1 user manual

Ashcroft G2 instruction sheet

Ashcroft

Ashcroft G2 instruction sheet

PR electronics 6331 Series manual

PR electronics

PR electronics 6331 Series manual

Cinelex DESK-TX8 Operation guide

Cinelex

Cinelex DESK-TX8 Operation guide

elero MonoTel-915 operating instructions

elero

elero MonoTel-915 operating instructions

AMG AMG4647BR instruction manual

AMG

AMG AMG4647BR instruction manual

Greystone Energy Systems CMD5B1 010 Series installation instructions

Greystone Energy Systems

Greystone Energy Systems CMD5B1 010 Series installation instructions

Evikon PluraSens E2227 user manual

Evikon

Evikon PluraSens E2227 user manual

CMOSTEK CMT21 Series Design guide

CMOSTEK

CMOSTEK CMT21 Series Design guide

Hall Research Technologies Mini-Cat Series user manual

Hall Research Technologies

Hall Research Technologies Mini-Cat Series user manual

Orolia KANNAD 406 AS installation manual

Orolia

Orolia KANNAD 406 AS installation manual

Zaxcom TRXLT3 user manual

Zaxcom

Zaxcom TRXLT3 user manual

JUMO CTI-750 operating manual

JUMO

JUMO CTI-750 operating manual

Katronic Technologies KATflow 150 Quick start guides

Katronic Technologies

Katronic Technologies KATflow 150 Quick start guides

GoMax Electronics SP-9018 user manual

GoMax Electronics

GoMax Electronics SP-9018 user manual

Mil-Ram Technology, Inc. TA-2102 instruction manual

Mil-Ram Technology, Inc.

Mil-Ram Technology, Inc. TA-2102 instruction manual

TeknikSat Satellite Systems TPF 11-2 user guide

TeknikSat Satellite Systems

TeknikSat Satellite Systems TPF 11-2 user guide

ATX QFOT1L Installation & operation manual

ATX

ATX QFOT1L Installation & operation manual

manuals.online logo
manuals.online logoBrands
  • About & Mission
  • Contact us
  • Privacy Policy
  • Terms and Conditions

Copyright 2025 Manuals.Online. All Rights Reserved.