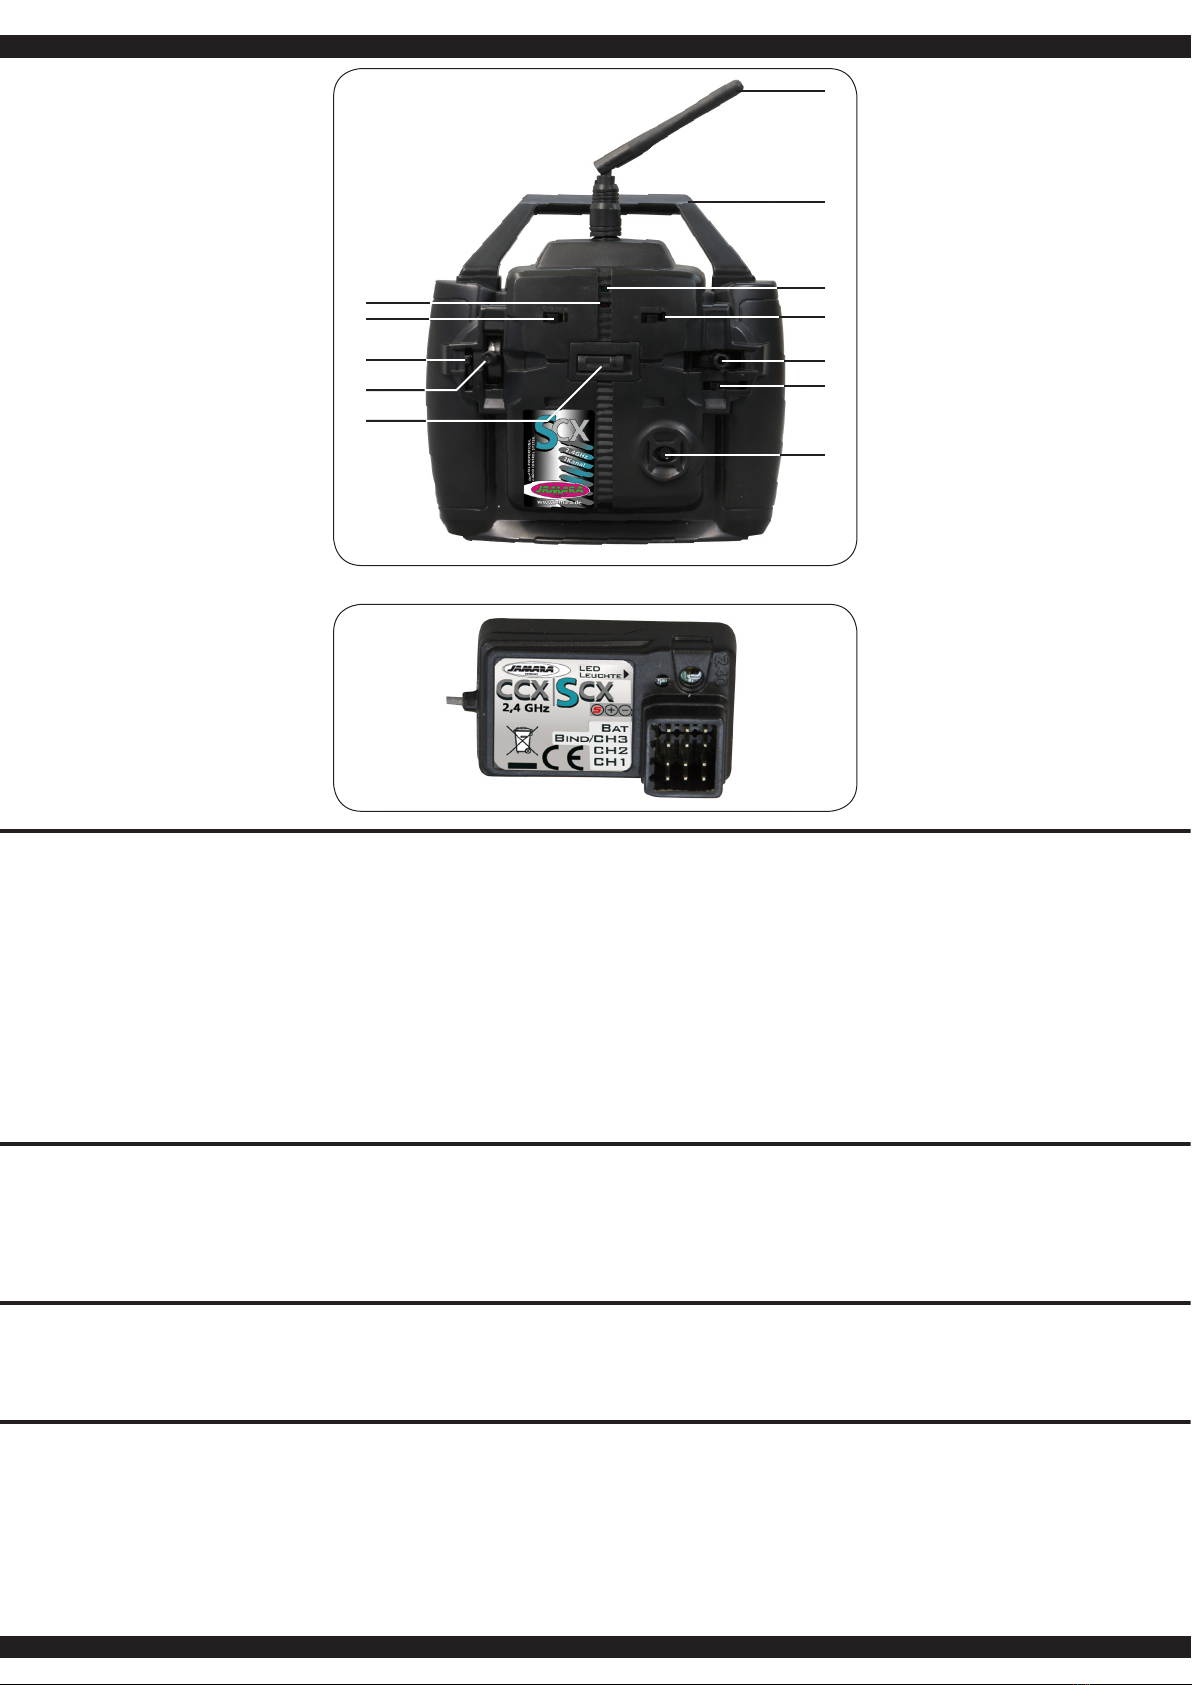
manuals.online logo
Brands
  1. Home
  2. •
  3. Brands
  4. •
  5. Jamara
  6. •
  7. Transmitter
  8. •
  9. Jamara SCX 2,4 GHz User manual

Jamara SCX 2,4 GHz User manual

FR - Notice d’utilisation
GB - Instruction
SCX 2,4 GHz
Emetteur | Transmitter
No. 061172
16/16
FR - Remarques générales
La société Jamara e. K. n’est pas respon-
sable de dommages, que ce soit au niveau
du modèle ou causé par celui-ci, résultant
d’une utilisation non appropriée. Seul le
client est responsable concernant la mise
en oeuvre et l’utilisation conforme du ma-
tériel; cela va de l’assemblage, en passant
par la charge des accus et allant jusqu’au
choix du lieu d’utilisation. Pour cela, veillez
à lire attentivement la notice d’utilisation,
elle contient d’importantes informations
ainsi que les consignes de sécurité.
GB - General information
JAMARA e.K. is not liable for any damage
caused to the product itself or by it, if this
is due to improper operation or handling
errors. The customer alone bears the full
responsibility for the proper use and hand-
ling, including in particular, assembling,
charging and using the model, and selec-
ting the area in which to use it. Please re-
fer to the operating and user instructions,
which contain important information and
warnings.
Déclaration de conformité
Par la présente, la société Jamara e.K. déclare que le modèle réduit‚ “SCX 2,4 GHz, No. 061172“ est
conforme en tous points avec les exigences fondamentales et les autres dispositions concernées
des directives 2014/30/EU et 2011/65/EU.
Vos pourrez également trouver des informations sur notre site Internet:
www.jamara-shop.com/Konformitaet
GB - Certicate of Conformity
JAMARA e.K. hereby declares that “CSCX 2,4 GHz, No. 061172“ follow the regulations and requi-
rements as well as any ther relivant directives of the EEC directive 2014/53/EU and 2011/65/EU.
Further information can also be found at: www.jamara-shop.com/Conformity
Consignes de recyclage
Veillez à respecter les consignes de recyclage des appareils électroniques (radiocom-
mande, chargeur ou modèle, …) en fonction des directives en vigueurs. Jetez uniquement
ceux-ci dans les poubelles les bacs de ramassages que vous trouverez dans les magasins
ou dans votre commune.
Disposal instructions
All parts of this model should be disposed of correctly, in particular electronic components may be
subject to local restrictions. Your dealer will advise you.
¡Este modelo no es ningún juguete!
¡No apropiado para menores de 14 años!
Atención: No es recomendable para los niños menores de 36 meses. ASFIXIA!
Contiene piezas pequeñas. Mantenga necesariamente lejosde los niños.
This model is not a toy!
Not suitable for people under 14 year.
Warning: Keep away necessarily children under 36 months. RISK OF SUFFOCATION!
Contains small parts which can be swallowed.
Accessoires recommandés:
8 x AA piles No.14 0267 (UV. 4pcs)
Recommended Accessories
8 x AA Batteries No. 14 0267 (4 pieces)
Contenu du kit
• Radiocommande
• Récepteur
• Notice
Box contents:
• Transmitter
• Receiver
• Instruction
Highlights
Données techniques:
Bande de fréquence 2,4 GHz
Type de modulation GFSK
Résolution Servo 10 Bit (1024 pas)
Type de modèle Auto, bateau, avions (CX)
Fonctions de commande 2/4 voies
Gamme de température - 15 bis + 58° C
Longueur d’antenne de réception env. 26 cm
Tension d’alimentation 12 V DC (8 éléments)
Charge de l’accu au travers la prise de charge
Dimensions 190 x 210 x 81 mm
Poids 614 g
Récepteur SCX 2,4 GHz
Art.-Nr. 06 1171
Données techniques:
Bande de fréquence 2,4 GHz
Type de modulation GFSK
Résolution Servo 10 Bit (1024 pas)
Tension d’alimentation 4,5 - 7,4 V DC
Dimensions 38 x 22 x 13 mm
Poids 6 g
Porté: ~ 400 m
Features:
Features:
Frequency 2,4 GHz
Modulation GFSK
Servo resolution 10 Bit (1024 Steps)
Model types Car, boat
Functions 2/4 channel
Temperature range - 15 to + 58° C
Receiver antenna length ~ 26 cm
Operating voltage 12 V DC (8 cells)
Charging Via charging socket
Size ~190 x 210 x 81 mm
Weight ~614 g
Receiver SCX 2,4 GHz:
Ord.No. 06 1171
Technical data:
Frequency 2,4 GHz
Modulation GFSK
Servo resolution 10 Bit (1024 steps)
Operating voltage 4,5 - 7,4 V DC
Size 38 x 22 x 13 mm
Weight ~6 g
Range: ~ 400 m
2
FR - Emetteur
1 Antenne
2 Poignée
3 LED d’alimentation
4 Inversion de sens de rotation du
servo CH1
5 Manche de commande
6 Trim de manche de commande
7 Touche de synchronisation
8 Interrupteur On/Off
9 Manche des gaz
10 Trim du manche des gaz
11 Inversion de sens de rotation
du servo CH2
12 LED d’état
Compartiment de piles
Au dos de l’émetteur se trouve le compartiment
des piles. Pour l’ouverture du compartiment il
faut appuyer sur le couvercle aux endroits no-
tés ‘push’ et de le faire glisser. Lors de la mise
en place des piles veillez respecter la bonne
polarité.
Récepteur
Le récepteur permet le branchement direct de
deux servos.
Affectation des sorties du récepteur:
Canal 1 direction
Canal 2 Gaz
Bind/Canal 3 câble de synchronisation
Receiver
2 Servos can be connected directly to the re-
ceiver.
Receiver Channel Allocation:
Channel 1: Steering
Channel 2: Throttle
Binding Channel 3: Binding Cable
GB - Transmitter
1 Antenna
2 Handle
3 Power LED
4 Servo Reverse CH 1
5 Left/Right Stick
6 Left/Right Trim
7 Binding Button
8 ON/OFF Switch
9 Throttle Stick
10 Throttle Trim
11 Servo Reverse CH 2
12 Indicator LED
Battery Hatch
The battery hatch is located on the rear side
of the transmitter and to open it simply push
down on the position marked ‚Push‘ and slide
the cover away. When tting the batteries al-
ways be very careful not to short circuit them
by observing the correct polarity.
Synchronisation du récepteur
Comme pour chaque système 2,4GHz il faut également synchroniser votre émetteur SCX 2,4GHz
avec le récepteur. Ce procédez est vital, sans effectuer le processus décrit ci-dessous votre ensem-
ble ne fonctionnera pas. De ce fait procédez comme suit :
1. branchez le câble de synchronisation sur la sortie 3 de votre récepteur. Ensuite alimentez votre
récepteur. La LED d’état du récepteur clignote.
2. maintenez la touche de synchronisation de votre émetteur appuyée et allumez celui-ci. L’émetteur
passe en mode synchronisation ou Binding
3. Dès que le processus de synchronisation est terminé la LED d’état du récepteur brillent.
4. Eteignez l’émetteur et le récepteur.
5. Enlevez le câble de synchronisation.
Remarque importante
La radiocommande ne fonctionne pas avec la touche de synchronisation appuyée. De plus, assurez
vous que l’ensemble ne reste pas trop longtemps en mode synchronisation.
Binding
As with all 2,4 GHz systems the transmitter and the receiver must be bound together and this process is
vital. Before the system is bound together it will not function and therefore cannot be used and so the
following steps must be followed before you attempt to operate the system:
1. Fit the binding plug to socket 3 on the receiver and connect the power supply.
The receiver LED will begin to blink:
2. Press and hold down the binding button on the transmitter and switch the power on.
This will put the transmitter into binding mode.
3. Once the binding process has finished the LED will shine.
4. Switch the transmitter and receiver off.
5. Remove the binding plug.
Important Information
The system will not function whilst the binding button is pressed. Also, the system should not be left in
binding mode for long periods of time.
Réglages
Avant d’utiliser votre modèle, vériez soigneusement si les servos bougent dans le bon sens. Si cela
ne devait pas être le cas, inversez le sens de rotation du servo concerné en manipulant le commuta-
teur sur la partie avant de l’émetteur. Ensuite réglez pour toutes les fonctions la position de neutre en
ajustant mécaniquement les tringles de commandes. Les leviers de commandes des différents ser-
vos doivent êtres en position centrale ainsi que les trims de l’émetteur. Il ne faut effectuer que de
petites corrections avec les trims. Pour l’utilisation d’un moteur thermique il est conseillé d’ajuster
parfaitement la tringle de commande du carburateur. Les servos ne doivent pas entrer en butée
mécanique en n de course.
GB - Settings
Before you operate your model carefully check that the servo operate in the correct direction.
If they do not rotate in the correct direction use the servo reverse switches located on the front of
the transmitter to change the direction. The servo neutral positions should then be set by moving the
servo arms until they are at exactly 900 with the trim central. The trim should only be used to make
ne adjustments when operating the model. If you are using this system with an Internal Combus-
tion engine make sure that the linkage cannot bind in either the full throttle or tick-over positions.
Séquence de mise en marche
1. Branchez tous les composants du système de réception
2. Mettez en marche l’émetteur
3. Branchez l’accu de réception/BEC avec le récepteur
4. Vériez que la LED de l’émetteur et du récepteur s’allument en permanence
5. Le système est actif et peut être utilisé
Switching On
1. Connect all of the components together.
2. Switch ion the transmitter.
3. Connect the power supply to the receiver and switch on if required.
4. Check that all of the LEDs are correctly illuminated.
5. The system is now switched on and ready to operate.
Séquence d’arrêt
1. Débranchez l’accu de réception
2. Eteignez l’émetteur
Switching Off
1. Switch off and unplug the receiver power supply.
2. Switch off the transmitter.
12
11
10
9
8
1
2
3
7
4
5
6
33
Direction
Avec cette fonction vous déterminez la direction que prendra votre modèle. Lorsque vous bougez
votre manche de commande vers la droite ou vers la gauche, les roues de l’axe avant de votre
voiture ou le gouvernail de votre bateau devront s’incliner dans la même direction. Si vous bougez
le manche à droite la direction ou le gouvernail devra également s’incliner à droite.
Steering
This function is used to steer the model in the correct direction. Moving the steering stick to the left
or right will make the wheels, or hull if operating a boat, move in that direction. Moving the stick to
the left should make the model steer to the left.
FR - Pilotage du modèles GB - Operating The Model
Gaz
Avec cette fonction vous commandez la vitesse des mouvements en avant et en arrière. Si vous
poussez le manche des gaz en avant votre modèle avancera. Si vous bougez le manche des gaz en
arrière vous allez freiner votre modèle dans un premier temps puis celui-ci va reculer.
Throttle
This function is used to make the model move forward or in revers and it also is used to control the
model‘s speed. Pushing the stick forwards makes the model accelerate forwards and pulling it to
the rear will make the model brake rst and then to accelerate in reverse.
JAMARA e.K.
Inh. Manuel Natterer
Am Lauerbühl 5 - DE-88317 Aichstetten
Tel. +49 (0) 75 65/94 12-0 - Fax +49 (0) 75 65/94 12-23
[email protected] ●www.jamara.com
Service - Tel. +49 (0) 75 65/94 12-66
kundenservice@ jamara.com
Sous réserve de toute erreur ou modication technique. Copyright JAMARA e. K. 2015
Toute copie ou reproduction, même partielle n‘est possible qu‘avec l‘autorisation de la société JAMARA e. K
All rights reserved. Copyright JAMARA e.K. 2016
Copying or reproduction in whole or part, only with the expressed permission of JAMARA e.K.
Reitter Modellbau Versand
Patricia Reitter
Degerfeldstrasse 11
72461 Albstadt
Tel 07432 9802700
Fax 07432 2009594
Mail [email protected]
Web www.modellbauversand.de
Extra Trade
Rudolf Müller & Gerrit Müller GdbR
Lindenstraße 82
66787 Wadgassen
Tel 06834 9604952
Fax 06834 9604963
Mail [email protected]
Web www.extra-trade.de
Sigi‘s Modellbau Shop
Siegfried Costa
Bundesstr. 30
AT -6923 Lauterach
Tel +43 557483657
Fax +43 557483657
Mail [email protected]
Web www.playland-modellbau.at
Modellbau Zentral
Peter Hofer
Bresteneggstrasse 2
CH -6460 Altdorf
Tel +41 794296225
Fax +41 418700213
Mail [email protected]
Web www.modellbau-zentral.ch
Bay-Tec Modelltechnik
Martin Schaaf
Am Bahndamm 6
86650 Wemding
Tel 07151 5002192
Fax 07151 5002193
Mail [email protected]
Web www.bay-tec.de
DE DE
DE
Aigner Modellbau
Edmund Aigner
Graben 2
AT -3300 Amstetten
Tel +43 747224655
Fax +43 747223358
Mail of[email protected]
Web www.modellbau-amstetten.at
CH
AT AT
FR - Revendeur de service GB - Service centre

This manual suits for next models

1

Other Jamara Transmitter manuals

Jamara Compa X3 Evo User manual

Jamara

Jamara Compa X3 Evo User manual

Jamara CCX Lipo 2,4 GHz 3 CH User manual

Jamara

Jamara CCX Lipo 2,4 GHz 3 CH User manual

Jamara SCX User manual

Jamara

Jamara SCX User manual

Jamara Compa XR3 User manual

Jamara

Jamara Compa XR3 User manual

Jamara CCX Pro User manual

Jamara

Jamara CCX Pro User manual

Jamara CCX Lipo 2,4 GHz 3 CH User manual

Jamara

Jamara CCX Lipo 2,4 GHz 3 CH User manual

Jamara Compa User manual

Jamara

Jamara Compa User manual

Jamara Compa 2,4 GHz User manual

Jamara

Jamara Compa 2,4 GHz User manual

Jamara CCX Lipo User manual

Jamara

Jamara CCX Lipo User manual

Jamara Compa X3 Evo User manual

Jamara

Jamara Compa X3 Evo User manual

Jamara FCX6 Pro Tel User manual

Jamara

Jamara FCX6 Pro Tel User manual

Jamara FCX6 Pro Tel User manual

Jamara

Jamara FCX6 Pro Tel User manual

Jamara SCX User manual

Jamara

Jamara SCX User manual

Jamara CCX Pro 2,4 GHz User manual

Jamara

Jamara CCX Pro 2,4 GHz User manual

Jamara CCX Pro User manual

Jamara

Jamara CCX Pro User manual

Jamara FCX6 Pro Tel User manual

Jamara

Jamara FCX6 Pro Tel User manual

Jamara SCX 2,4 GHz User manual

Jamara

Jamara SCX 2,4 GHz User manual

Jamara FCX6 Pro Tel User manual

Jamara

Jamara FCX6 Pro Tel User manual

Jamara FCX6 Pro Tel User manual

Jamara

Jamara FCX6 Pro Tel User manual

Jamara Compa X3 Evo User manual

Jamara

Jamara Compa X3 Evo User manual

Jamara SCX User manual

Jamara

Jamara SCX User manual

Jamara CCX Pro 2,4 GHz User manual

Jamara

Jamara CCX Pro 2,4 GHz User manual

Jamara CX 2,4 GHz User manual

Jamara

Jamara CX 2,4 GHz User manual

Jamara SCX 2,4 GHz User manual

Jamara

Jamara SCX 2,4 GHz User manual

Popular Transmitter manuals by other brands

Niko 410-00362 manual

Niko

Niko 410-00362 manual

Fracarro OPT-TX51 operating instructions

Fracarro

Fracarro OPT-TX51 operating instructions

Linx HT Keyfob Data guide

Linx

Linx HT Keyfob Data guide

Crestron DigitalMedia 8G 401 Series Do guide

Crestron

Crestron DigitalMedia 8G 401 Series Do guide

Sennheiser SI 1010 operating instructions

Sennheiser

Sennheiser SI 1010 operating instructions

Ashcroft KM41 installation instructions

Ashcroft

Ashcroft KM41 installation instructions

EYC THM86 Operation manual

EYC

EYC THM86 Operation manual

ABB LST300 Series Operating	 instruction

ABB

ABB LST300 Series Operating instruction

KROHNE OPTIBAR DP 3050 Handbook

KROHNE

KROHNE OPTIBAR DP 3050 Handbook

HETRONIC MINI Operator's manual

HETRONIC

HETRONIC MINI Operator's manual

Datcon DT1600 U Series operating instructions

Datcon

Datcon DT1600 U Series operating instructions

IKUSI OP-131Tx Series user manual

IKUSI

IKUSI OP-131Tx Series user manual

Pyle PIMPTR5B instructions

Pyle

Pyle PIMPTR5B instructions

Integravics IG-TVTS-1 user manual

Integravics

Integravics IG-TVTS-1 user manual

Spirax Sarco TB300 Installation and maintenance instructions

Spirax Sarco

Spirax Sarco TB300 Installation and maintenance instructions

BWI Eagle AIR-EAGLE SR PLUS 36-HH-1 quick start guide

BWI Eagle

BWI Eagle AIR-EAGLE SR PLUS 36-HH-1 quick start guide

Hides HV-100E Quick installation guide

Hides

Hides HV-100E Quick installation guide

Tele Radio 860 manual

Tele Radio

Tele Radio 860 manual

manuals.online logo
manuals.online logoBrands
  • About & Mission
  • Contact us
  • Privacy Policy
  • Terms and Conditions

Copyright 2025 Manuals.Online. All Rights Reserved.