manuals.online logo
Brands
  1. Home
  2. •
  3. Brands
  4. •
  5. Jamara
  6. •
  7. Transmitter
  8. •
  9. Jamara SCX User manual

Jamara SCX User manual

ES - Instrucciones
GB - Instruction
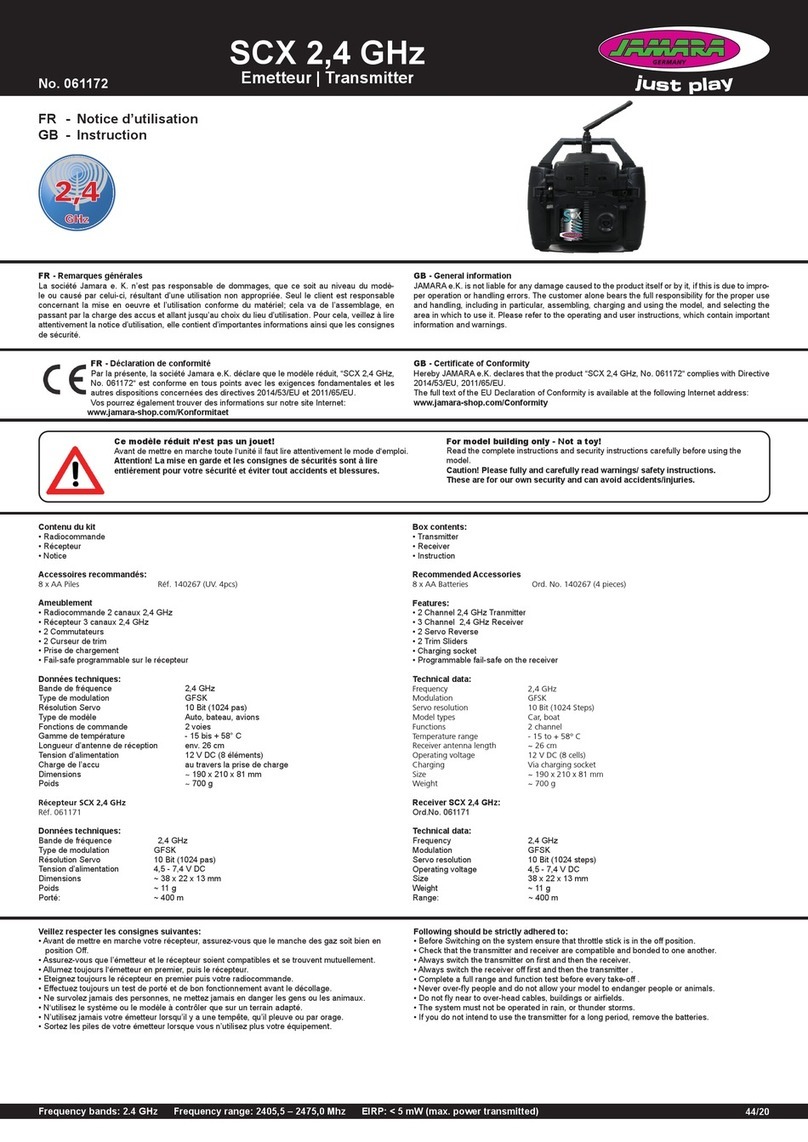
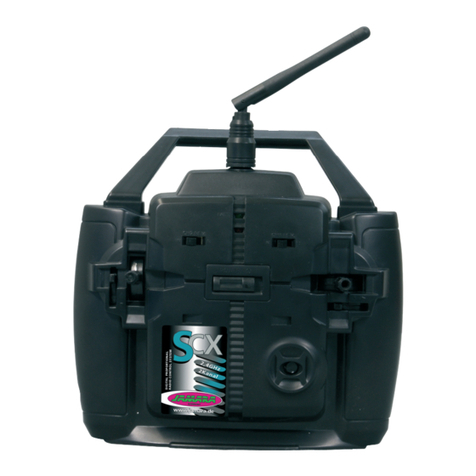
SCX 2,4 GHz
Emisora | Transmitter
No. 061172
44/20
ES - Información general
JAMARA K. no se hace responsable de los daños causados al producto en sí o por medio de
esto, a menos que esto se debe al mal funcionamiento o errores de manejo. El cliente solo tiene la
responsabilidad completa para el uso y manejo adecuado, incluyendo, sin limitaciones, el montaje,
el proceso de carga, el uso de hasta la elección de la zona de aplicación. Por favor, consulte las
instrucciones de uso y funcionamiento, contiene información y avisos importantes.
GB - General information
Jamara e.K. is not liable for any damage caused to the product itself or through this, provided this
is due to improper operation or handling errors. The Customer alone bears the full responsibility for
the proper use and handling, including without limitation, the assembly, the charging process, the
use and choice of the operation area. Please refer to the operating and user instructions, it contains
important information and warnings.
DE - Declaración de conformidad
Por la presente JAMARA e.K. declara que los producto‚ “SCX 2,4 GHz, No. 061172“
cumplen con las Directivas 2014/53/EU y 2011/65/EU.
El texto completo de la declaración de conformidad de la UE está disponible en la
siguiente dirección de Internet: www.jamara-shop.com/Conformity
GB - Certicate of Conformity
Hereby JAMARA e.K. declares that the product “SCX 2,4 GHz, No. 061172“ complies with Directive
2014/53/EU, 2011/65/EU.
The full text of the EU Declaration of Conformity is available at the following Internet address:
www.jamara-shop.com/Conformity
Contenido del kit:
• Emisora
• Receptor
• Instrucciones
Accesorios:
8 x pilas AA Ref. 140267 (4 Uds.)
Características:
• Emisora de 2 canales 2,4 GHz
• Receptor de 3 canales 2,4 GHz
• 2 Interruptores de inversión de canal
• 2 potenciómetros deslizantes para trimado
Características técnicas:
Banda 2,4 GHz
Tipo de modulación GFSK
Resolución de los servos 10 Bit (1024 niveles)
Tipo de modelo barco, coche
Funciones de control 2 Servo/Reverse
Rango de temperaturas - 15 a + 58° C
Tensión de trabajo 12 V DC (8 elementos)
Carga de la batería Mediante conector de carga
Dimensiones ~ 190 x 210 x 81 mm
Peso ~ 700 g
Receptor SCX 2,4 GHz
Ref. 06 1171
Datos técnicos:
Banda 2,4 GHz
Tipo de modulación GFSK
Resolución de los servos 10 Bit (1024 steps | niveles)
Tensión de trabajo 4,5 - 7,4 V DC
Dimensiones ~ 38 x 22 x 13 mm
Peso ~ 11 g
Alcance: ~ 400 m
Box contents:
• Transmitter
• Receiver
• Instruction
Recommended Accessories
8 x AA Batteries Ord. No. 140267 (4 pieces)
Features:
• 2 Channel 2,4 GHz Tranmitter
• 3 Channel 2,4 GHz Receiver
• 2 Servo Reverse
• 2 Trim Sliders
• Charging socket
• Programmable fail-safe on the receiver
Technical data:
Frequency 2,4 GHz
Modulation GFSK
Servo resolution 10 Bit (1024 Steps)
Model types Car, boat
Functions 2 channel
Temperature range - 15 to + 58° C
Receiver antenna length ~ 26 cm
Operating voltage 12 V DC (8 cells)
Charging Via charging socket
Size ~ 190 x 210 x 81 mm
Weight ~ 700 g
Receiver SCX 2,4 GHz
Ord.No. 06 1171
Technical data:
Frequency 2,4 GHz
Modulation GFSK
Servo resolution 10 Bit (1024 steps)
Operating voltage 4,5 - 7,4 V DC
Size ~ 38 x 22 x 13 mm
Weight ~ 11 g
Range ~ 400 m
Modelo de articulo de contrucción- ¡No es un juguete!
Lea atentamente la instruccion completa y seguridad antes de poner el modelo
en funcionamiento
Atención! Leer completamente las notas de advertencia / instrucciones de
seguridad estos son para su seguridad y puede evitar accidentes / lesiones.
For model building only - Not a toy!
Read the complete instructions and security instructions carefully before using the
model.
Caution! Please fully and carefully read warnings/ safety instructions.
These are for our own security and can avoid accidents/injuries.
Beachten Sie unbedingt folgende Hinweise:
Se debe cumplir estrictamente lo siguiente:
• Antes de encender el sistema, asegúrese de que el acelerador esté en la posición de
apagado.
• Compruebe que el transmisor y el receptor son compatibles y están unidos entre sí.
• Siempre encienda primero el transmisor y luego el receptor.
• Siempre apague el receptor primero y luego el transmisor.
• Complete una prueba completa de rango y función antes de cada despegue.
• Nunca sobrevuele personas y no permita que su modelo ponga en peligro a personas o
animales.
• No vuele cerca de cables aéreos, edicios o aeródromos.
• El sistema no debe funcionar bajo lluvia o tormentas eléctricas.
• Si no tiene la intención de utilizar el transmisor durante un período prolongado, retire las
baterías.
Following should be strictly adhered to:
• Before Switching on the system ensure that throttle stick is in the off position.
• Check that the transmitter and receiver are compatible and bonded to one another.
• Always switch the transmitter on rst and then the receiver.
• Always switch the receiver off rst and then the transmitter .
• Complete a full range and function test before every take-off .
• Never over-y people and do not allow your model to endanger people or animals.
• Do not y near to over-head cables, buildings or airelds.
• The system must not be operated in rain, or thunder storms.
• If you do not intend to use the transmitter for a long period, remove the batteries.
Frequency bands: 2.4 GHz Frequency range: 2405,5 – 2475,0 Mhz EIRP: < 5 mW (max. power transmitted)

2
ES - Emisora
1 Antena
2 Asidero
3 LED de encendido
4 Servo Reverse CH 1
5 Mando de dirección
6 Trim de dirección
7 Conector de datos
8 Interruptor On/Off
9 Mando del gas
10 Trim del gas
11 Servo Reverse CH 2
12 Indicador-LED
Reverso de la emisora
En la parte trasera de la emisora se encuentra
el compartimiento de las baterías. Para abrir
la tapa deberá presionar ligeramente y des-
plazarla hacia abajo. Así podrá colocar las ba-
terías. Compruebe la polaridad. Para terminar,
vuelva a colocar la tapa con cuidado.
Receptor
El receptor ofrece conexiones directas para
hasta dos servos.
Asignación de las salidas del receptor:
Canal 1: dirección
Canal 2: gas
Bind/Canal 3: Binding Cable
Receiver
2 Servos can be connected directly to the re-
ceiver.
Receiver Channel Allocation:
Channel 1: Steering
Channel 2: Throttle
Binding Channel 3: Binding Cable
GB - Transmitter
1 Antenna
2 Handle
3 Power LED
4 Servo Reverse CH 1
5 Left/Right Stick
6 Left/Right Trim
7 Binding Button
8 ON/OFF Switch
9 Throttle Stick
10 Throttle Trim
11 Servo Reverse CH 2
12 Indicator LED
Battery Hatch
The battery hatch is located on the rear side
of the transmitter and to open it simply push
down on the position marked ‚Push‘ and slide
the cover away. When tting the batteries al-
ways be very careful not to short circuit them
by observing the correct polarity.
Combinación entre emisora y receptor
Como es el caso con todas las emisoras en 2,4 GHz. también hay que combinar la SCX 2,4 GHz
con su receptor. Este procedimiento es muy importante y sin el proceso abajo descrito no funciona
la emisora. Por lo tanto siga los siguientes pasos antes del primer uso de la emisora :
1. Enchufe el puente de combinación en el canal 3 del receptor. Después conecte el receptor a
la corriente. El LED de indicación de corriente del receptor estará parpadeando.
2. Mantenga presionado el botón de combinar (“binding”) en la emisora y después enciendalá.
De esta forma la emisora entra en el modo “combinación” (“binding”).
3. Cuando este procedimiento haya terminado con éxito, el LED de indicación del receptor se
apagará.
4. Apague ahora la emisora y el receptor.
5. Retire el puente de combinación del receptor. La emisora estará lista para funcionar
normalmente
Aviso Importante
La emisora no funciona mientras el botón de combinar se encuentre presionado. Además tenga en
cuenta sin falta, que no se debe usar la emisora en el modo “combinación” durante mucho tiempo.
accesa a lungo in modalità sincronizzazione.
Binding
As with all 2,4 GHz systems the transmitter and the receiver must be bound together and this process is
vital. Before the system is bound together it will not function and therefore cannot be used and so the
following steps must be followed before you attempt to operate the system:
1. Fit the binding plug to socket 3 on the receiver and connect the power supply.
The receiver LED will begin to blink:
2. Press and hold down the binding button on the transmitter and switch the power on.
This will put the transmitter into binding mode.
3. Once the binding process has finished the LED will shine.
4. Switch the transmitter and receiver off.
5. Remove the binding plug.
Important Information
The system will not function whilst the binding button is pressed. Also, the system should not be left in
binding mode for long periods of time.
El Ajuste
Antes de comenzar a usar su modelo, Ud. debe comprobar si los servos giran en la dirección cor-
recta. Si fuera necesario, active la tecla “Servo-Reverse” correspondiente en la parte frontal de la
emisora. Después ponga los servos y transmisiones del modelo en posición neutral. Los brazos de
los servos tienen que estar centrados y los trims de la emisora tienen que estar en posición neutral.
Con los trims de la emisora solamente se puede realizar un ajuste no. Si su modelo usa un motor
glow, tenga un especial cuidado con las varillas del carburador. El servo no puede llegar a tocarlo
en ninguna de sus posiciones nales.
Settings
Before you operate your model carefully check that the servo operate in the correct direction.
If they do not rotate in the correct direction use the servo reverse switches located on the front of
the transmitter to change the direction. The servo neutral positions should then be set by moving the
servo arms until they are at exactly 900 with the trim central. The trim should only be used to make
ne adjustments when operating the model. If you are using this system with an Internal Combus-
tion engine make sure that the linkage cannot bind in either the full throttle or tick-over positions.
Secuencia de encendido
1. Conecte todos los componentes.
2. Encienda la emisora.
3. Conecte la batería del receptor/BEC con el receptor.
4. Compruebe si los LED’s de la emisora y del receptor se quedan encendidos.
5. El sístema esta encendido y listo para funcionar.
Switching On
1. Connect all of the components together.
2. Switch ion the transmitter.
3. Connect the power supply to the receiver and switch on if required.
4. Check that all of the LEDs are correctly illuminated.
5. The system is now switched on and ready to operate.
Secuencia de apagado
1. Desconecte la batería del receptor.
2. Apague la emisora.
Switching Off
1. Switch off and unplug the receiver power supply.
2. Switch off the transmitter.
12
11
10
9
8
1
2
3
7
4
5
6
33
Direccion
Esta función se utiliza para dirigir y controlar la dirección. Al mover el joystick hacia la derecha o
hacia la izquierda, las ruedas del eje delantero o el timón del casco del barco deben desviarse en
la dirección correspondiente. Si el joystick se mueve hacia la derecha, las ruedas o el timón deben
desviarse hacia la derecha.
Steering
This function is used to steer the model in the correct direction. Moving the steering stick to the left
or right will make the wheels, or hull if operating a boat, move in that direction. Moving the stick to
the left should make the model steer to the left.
ES - Control del modelo GB - Operating The Model
Control de gas
Esta función controla la dirección de avance y retroceso, así como la velocidad. Cuando se empuja
el joystick hacia adelante, el modelo avanza. Cuando se empuja la palanca de control hacia atrás,
el modelo primero frena y luego se mueve hacia atrás.
Throttle
This function is used to make the model move forward or in revers and it also is used to control the
model‘s speed. Pushing the stick forwards makes the model accelerate forwards and pulling it to
the rear will make the model brake rst and then to accelerate in reverse.
Notas sobre el reciclado
Aparatos eléctricos no pueden desecharse en la basura doméstica, pero se deben
desechar de forma separada. Usted está obligado, a quitar las baterías y llevar los
aparatos eléctricos viejos en los puntos de recogida comunales. En caso de que hay
datos personales en el aparato eléctrico se deben remover de usted mismo
Disposal restrictions
Electrical appliances must not be disposed of in domestic waste and must be disposed of separately.
You are obliged to take out the batteries, if possible, and to dispose of the electrical equipment at
the communal collection points. Should personal data be stored on the electrical appliance you must
remove them by yourself.
Reitter Modellbau Versand
Patricia Reitter
Degerfeldstrasse 11
72461 Albstadt
Tel 07432 9802700
Fax 07432 2009594
Mail [email protected]
Web www.modellbauversand.de
PenTec s.r.o.
distributor Jamara for Czech Republic and Slovakia
Veleslavínská 30/19
CZ -162 00 Praha 6
Tel +420 235 364 664
Mobil. +420 739 075 380
Mail servis@topdrony.cz
Web www.topdrony.cz
DE
Bay-Tec
Martin Schaaf
Am Bahndamm 6
86650 Wemding
Tel 07151 5002192
Fax 07151 5002193
Mail [email protected]
Web www.bay-tec.de DE
JAMARA e.K.
Manuel Natterer
Am Lauerbühl 5
DE-88317 Aichstetten
Tel +49 (0) 75 65/94 12-0
Fax +49 (0) 75 65/94 12-23
Mail [email protected]
Web www.jamara.com EU CZ
ES - Servicio asistencia GB - Service centre
Modellbau Zentral
Peter Hofer
Bresteneggstrasse 2
CH-6460 Altdorf
Tel +41 79 429 62 25
Mobil. +41 41 870 02 13
Mail [email protected]
Web www.modellbau-zentral.ch CH
JAMARA e.K.
Inh. Manuel Natterer
Am Lauerbühl 5 - DE-88317 Aichstetten
Tel. +49 (0) 75 65/94 12-0 - Fax +49 (0) 75 65/94 12-23
[email protected] ●www.jamara.com
Service - Tel. +49 (0) 75 65/94 12-777
kundenservice@ jamara.com
Irrtum und technische Änderungen vorbehalten. Copyright JAMARA e.K. 2021
Kopie und Nachdruck, auch auszugsweise, nur mit Genehmigung von JAMARA e. K.
All rights reserved. Copyright JAMARA e.K. 2021
Copying or reproduction in whole or part, only with the expressed permission of JAMARA e.K.
Fordern Sie noch Heute den aktuellen Hauptkatalog mit
unserem gesamten Warensortiment an.
Name _______________________________
Vorname _______________________________
Straße _______________________________
Wohnort _______________________________
Telefon _______________________________
E-mail _______________________________
Bitte senden Sie den Katalog für mich an folgenden
Fachhändler:
Ihr Fachhändler
_______________________________________________
_______________________________________________
_______________________________________________
_______________________________________________
Der Katalog wird mit der nächsten Bestellung des Händ-
lers auf Ihren Namen mitgeliefert.
Order the current catalogue with our complete
assortment of modelling goods today.
Name _______________________________
First name _______________________________
Street _______________________________
City _______________________________
Phone _______________________________
E-mail _______________________________
Please send the catalogue to the following specialist
dealer:
Your dealer
_______________________________________________
_______________________________________________
_______________________________________________
_______________________________________________
We will include a catalogue for your attention with the
next order placed by your dealer.
Gutschein Coupon

This manual suits for next models

1

Other Jamara Transmitter manuals

Jamara Compa X3 Evo User manual

Jamara

Jamara Compa X3 Evo User manual

Jamara CCX Pro 2,4 GHz User manual

Jamara

Jamara CCX Pro 2,4 GHz User manual

Jamara SCX 2,4 GHz User manual

Jamara

Jamara SCX 2,4 GHz User manual

Jamara CCX Pro 2,4 GHz User manual

Jamara

Jamara CCX Pro 2,4 GHz User manual

Jamara CCX Pro User manual

Jamara

Jamara CCX Pro User manual

Jamara Compa X3 Evo User manual

Jamara

Jamara Compa X3 Evo User manual

Jamara CCX Pro 2,4 GHz User manual

Jamara

Jamara CCX Pro 2,4 GHz User manual

Jamara FCX6 Pro Tel User manual

Jamara

Jamara FCX6 Pro Tel User manual

Jamara SCX User manual

Jamara

Jamara SCX User manual

Jamara CX 2,4 GHz User manual

Jamara

Jamara CX 2,4 GHz User manual

Jamara Compa 2,4 GHz User manual

Jamara

Jamara Compa 2,4 GHz User manual

Jamara Compa XR3 User manual

Jamara

Jamara Compa XR3 User manual

Jamara CCX Lipo User manual

Jamara

Jamara CCX Lipo User manual

Jamara CCX Pro 2,4 GHz User manual

Jamara

Jamara CCX Pro 2,4 GHz User manual

Jamara FCX6 Pro Tel User manual

Jamara

Jamara FCX6 Pro Tel User manual

Jamara FCX6 Pro Tel User manual

Jamara

Jamara FCX6 Pro Tel User manual

Jamara CCX Lipo 2,4 GHz 3 CH User manual

Jamara

Jamara CCX Lipo 2,4 GHz 3 CH User manual

Jamara FCX6 Pro Tel User manual

Jamara

Jamara FCX6 Pro Tel User manual

Jamara CCX Pro User manual

Jamara

Jamara CCX Pro User manual

Jamara Compa X3 Evo User manual

Jamara

Jamara Compa X3 Evo User manual

Jamara CCX Lipo User manual

Jamara

Jamara CCX Lipo User manual

Jamara CCX Pro User manual

Jamara

Jamara CCX Pro User manual

Jamara FCX6 Pro Tel User manual

Jamara

Jamara FCX6 Pro Tel User manual

Jamara CCX Lipo 2,4 GHz 3 CH User manual

Jamara

Jamara CCX Lipo 2,4 GHz 3 CH User manual

Popular Transmitter manuals by other brands

KROHNE OPTITEMP TT 53 R Ex Handbook

KROHNE

KROHNE OPTITEMP TT 53 R Ex Handbook

ABB LWT300 series user guide

ABB

ABB LWT300 series user guide

JTS Monacor International PT-950B/5 instruction manual

JTS

JTS Monacor International PT-950B/5 instruction manual

Integravics IG-TVTS-1 user manual

Integravics

Integravics IG-TVTS-1 user manual

M-system 27U instruction manual

M-system

M-system 27U instruction manual

Seasafe SSTX/01 user manual

Seasafe

Seasafe SSTX/01 user manual

Heystar HS-ZSD14-RF01 Instruction book

Heystar

Heystar HS-ZSD14-RF01 Instruction book

Aplisens APRE-2000GN user manual

Aplisens

Aplisens APRE-2000GN user manual

Anderson LN Quick start installation guide

Anderson

Anderson LN Quick start installation guide

DB Elettronica Telecomunicazioni KCL 30 SY user manual

DB Elettronica Telecomunicazioni

DB Elettronica Telecomunicazioni KCL 30 SY user manual

Vega VEGABAR 82 operating instructions

Vega

Vega VEGABAR 82 operating instructions

Safe Fleet TB-100 Installation and configuration guide

Safe Fleet

Safe Fleet TB-100 Installation and configuration guide

Endress+Hauser Proline 500 digital HART Brief operating instructions

Endress+Hauser

Endress+Hauser Proline 500 digital HART Brief operating instructions

Kramer WP-580Txr quick start guide

Kramer

Kramer WP-580Txr quick start guide

TEREN DPTR Operation manual

TEREN

TEREN DPTR Operation manual

Atlona AT-HDTX-RSNET user manual

Atlona

Atlona AT-HDTX-RSNET user manual

Emerson Rosemount 3101 quick start guide

Emerson

Emerson Rosemount 3101 quick start guide

Southland EMD-570 instruction manual

Southland

Southland EMD-570 instruction manual

manuals.online logo
manuals.online logoBrands
  • About & Mission
  • Contact us
  • Privacy Policy
  • Terms and Conditions

Copyright 2025 Manuals.Online. All Rights Reserved.