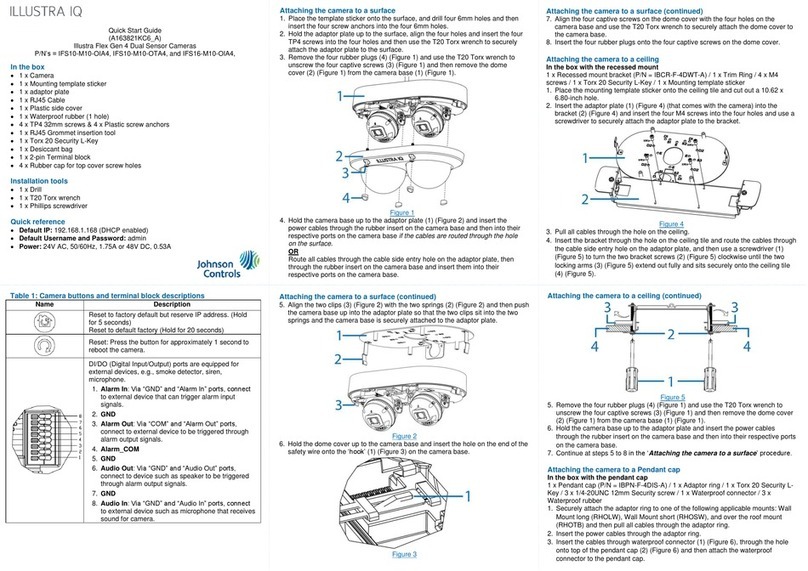
manuals.online logo
Brands
  1. Home
  2. •
  3. Brands
  4. •
  5. Johnson Controls
  6. •
  7. Security Camera
  8. •
  9. Johnson Controls Tyco Illustra User manual

Johnson Controls Tyco Illustra User manual

Docking and charging the Illustra body worn camera
(continued)
Note: To remove the camera from the docking station, hold the camera
on both sides and lift it upwards. The camera is held firmly in place by a
retaining clip, so a small amount of force is required.
Note: When checking-out the body worn camera from the camera
application, ensure that the white light is flashing on the front of the
camera before removing it from the docking station / disconnecting the
USB cable.
Replacing the Illustra body worn camera battery
1. Press the power button (See Figure 2) to power off the Illustra body
worn camera.
2. Place the camera on a flat surface so that the LCD screen is visible.
3. Remove all of the eight rubber inserts covering the eight screws.
4. Use a T5 Torx screwdriver and remove the eight screws.
5. Carefully remove the front case panel.
Note: Take care not to damage the front case panel when removing
it as some force may be required.
Note: The battery is now visible.
6. Remove the old battery from the camera.
7. Align the new battery terminals with the terminals in the camera and
insert the new battery until it clicks into place.
8. Place the front case panel onto the camera body (like it was before
the front case was removed) and carefully push downward on each
of the four corners until the front case panel securely clicks into
place.
Security
Quick Start Guide (8200-2077-01_D0)
Illustra Body Worn Camera
This guide describes the configuration and general usage
of the Illustra body worn camera.
In the Box
1 x Illustra body worn camera
1 x Quick Start Guide
1 x Crocodile clip (for attaching the camera to clothing)
1 x Klick fast adaptor (for attaching the camera to clothing)
1 x USB cable
Illustra body worn camera overview
Figure 1
Illustra body worn camera overview (continued)
Figure 2
Setting up the Illustra body worn camera
1. Set up the Illustra docking station as per instructions in the docking
station Quick Start Guide.
2. Optional: Insert a SIM card into the SIM card slot on the body
worn camera. (See the ‘Inserting a SIM card’ section).
3. Insert the Illustra body worn camera into one of the camera slots
on the Illustra docking station.
Note: Up to 8 cameras can charge at one time.
4. Complete the set up within the Illustra body worn camera
application.
Docking and charging the Illustra body worn camera
1. Set up the Illustra Docking Station as per instructions in the
docking station Quick Start Guide.
2. Insert the Illustra body worn camera into one of the eight camera
charging slots on the Illustra docking station.
Note: Ensure that the docking station connector (See Figure 2) on
the camera inserts into the four pins in the charging slot. The
camera only fits into the slot in the correct orientation.
3. Press down on top of the camera until it clicks into place. The
camera is now securely attached.
Note: A red charging light on the camera is now visible and a
green light indicates that the camera has successfully connected
and is fully charged.
Replacing the Illustra body worn camera battery
(continued)
9. Use a T5 Torx screwdriver to insert and securely attach alleight
screws.
10. Insert all eight rubber inserts into each of the screw holes.
Mounting the camera
The Illustra body worn camera comes with two mounting options in the
box: (i) a crocodile clip or (ii) a klick fast adaptor (for connection to
standard klick fast mounts). Select one of these options.
Mounting the camera with the crocodile clip
1. Place the camera on a flat surface so that the LCD screen is visible.
Note: The ‘U’ shaped mounting slot (‘A’ in Figure 3) is located above
the LCD screen.
2. Align the metal clip on the crocodile clip with the ‘U’ shaped
mounting slot and then slide the metal clip downward into the ‘U’
shaped mounting slot until the metal clip clicks into place.
3. Securely attach the crocodile clip to a piece of clothing.
Mounting the camera with the klick fast adaptor
1. Insert part B in Figure 3 into the ‘U’ shaped mounting slot (A) (Figure
3).
2. Place part C in Figure 3 on top of Part B and align the holes in both
parts.
3. Place part D in Figure 3 on top of Part C and align the holes in both
parts.
4. Insert the screw (E) (Figure 3) into the hole and use a screwdriver to
securely attach the screw all parts to the camera.
Table 2: Camera screen information explained
Note: You must tap the ‘Battery Level’ and ‘Status information’ icons to
view additional information.
Camera settings
The camera settings are configured using a device profile in the Illustra
body worn camera application. If the default device profile is used, then
the camera button functions will be as shown in the Figures 1 and 2. For
more information on customising the camera settings using the device
profile, refer to the Illustra Body Worn Camera Configuration Guide.
Software updates
Software updates must be applied to the Illustra body worn camera
before using it for the first time. To update the Illustra body worn camera,
follow the software update instructions in the Illustra Body Worn Camera
Configuration Guide.
Description
1
Recording Status – Not Recording, Pre Recording or
Recording
2
Wi-Fi Status
– Signal strength
3 Signal Status – 2G / 3G or 4G
4
Live Server Connection State – Online / Offline
5
Battery Level – % of battery left in the camera
6
Status Information – Identifies the server that the camera
is connected to, the Live stream account name and current
active network profile
Security
Mounting the camera (continued)
Figure 3
Inserting a SIM card into the camera
The Illustra body worn camera requires a nano-SIM card. The front
case panel and battery must be removed to access the SIM card slot.
1. Remove the battery as per steps 1 to 6 in the ‘Replacing the
Illustra body worn camera battery’ procedure.
Note: The SIM card slot has a locking tray.
2. Slide the tray (Figure 4) to the right and lift it upward to access the
SIM card slot.
Figure 4
3. Insert the SIM card into the SIM card slot and then place the tray
down on top of the SIM card and gently push the tray downward
onto the SIM card.
4. Slide the tray to the left until it locks into place.
5. Insert the battery as per steps 7 to 10 in the ‘Replacing the Illustra
body worn camera battery’ procedure.
Status LED’s explained
The status LED’s and flashlight are identified in Figure 1. The LED
light sequences in Table 1 below apply when the camera is
docked. The LED light sequences used when the camera is
assigned and operational are configured from the Illustra body
worn camera application. Please refer to the Illustra Body Worn
Camera Configuration Guide for more information on configuring
the device profiles.
Table 1: Status LED’s explained
Docked
Status
Left
LED
Middle
LED
Right
LED
Flashlig
ht
Charging Red Off Off Off
Downloading
recordings Red Flashing
Green Off Off
Ready for
use
Red Green Off Off
Camera
assigned Red Green Off Flashing
Error
(check
camera
screen)
- - Flashing
Blue -
Camera screen information
The ‘CAMERAVIEW’ screen (Figure 5) is visible when the camera is
operational. The information in Figure 5 is visible on screen.
Figure 5
Battery Charging Guidance
This section outlines guidance for charging camera batteries and correct
operation to maximise battery life.
Usage of the equipment outside of the guidelines may result in
shortened battery life, or battery failure.
A failing battery can be identified by its failure to hold charge, or by signs
of swelling - this can be seen by closely examining the camera case
without having to open it.
In either scenario, remove the battery from the device and contact
support at https://illustracameras.com/technical-support/. Do not use or
charge the device.
Battery Lifespan
Rechargeable Lithium-Ion batteries have a rated lifespan of 500 full
charge and discharge cycles. With age, batteries will gradually lose their
capacity to hold a charge. This loss of capacity (aging) is irreversible. As
the battery loses capacity, the length of time it will power your device (run
time) decreases. Additionally, lithium-ion batteries continue to slowly
discharge (self-discharge) when not in use or while in storage. It is
advised that you routinely check the battery’s charge status. The device
should be recharged regularly to maintain the internal chemistry of the
battery.
Charging Guidance
•DO charge the battery in an environment that is below 25°C.
Charging above this temperature range may harm the
performance of the battery or reduce the battery’s life expectancy.
•DO recharge a depleted battery as soon as reasonably possible. If
the camera is operated until it shuts down due to low battery, it
should ideally be recharged within a day.
Hearing Aids
People with hearing aids or other cochlear implants may experience
interfering noises when using wireless devices or when one is nearby.
The level of interference will depend on the type of hearing device and the
distance from the interference source, increasing the separation between
them may reduce the interference. You may also consult your hearing aid
manufacturer to discuss alternatives.
Hospitals
Switch off your camera when requested to do so in hospitals, clinics or
health care facilities. These requests are designed to prevent possible
interference with sensitive medical equipment.
Aircraft
Switch off your camera whenever you are instructed to do so by airport or
airline staff.
Consult the airline staff about the use of camera devices on board the
aircraft.
Explosive environments (Petrol stations and explosive atmospheres).
The camera is not to be used in locations with potentially explosive
atmospheres, all posted signs to turn off wireless devices must be obeyed.
Areas with potentially explosive atmospheres include but are not limited to;
fuelling areas, below decks on boats, fuel or chemical transfer or storage
facilities, areas where the air contains chemicals or particles, such as grain,
dust, or metal powders.
Blasting Caps and Areas
The camera encoder is not to be used in a blasting area or in areas posted
turn off “two-way radios” or “electronic devices” to avoid interfering with
blasting operations.
Security
Charging Guidance
•DO remove the camera from the charger if it remains unused for
more than 1 week. If the camera remains unused for a long period
of time, it should be left off the charger and its charge should be
topped up every 3 months by charging for 1 hour.
•DO replace the battery only with a replacement supplied by an
approved reseller.
•DO dispose of used batteries according to local law and
regulations applicable to Li-Ion batteries.
•DO apply camera updates to the latest firmware revision regularly.
This will ensure it has the latest available battery-protection
features. You can obtain information on firmware releases from
your account manager.
•DO NOT expose the camera or battery to temperatures above or
below those listed on thedatasheet.
•DO NOT leave the camera in direct sunlight, especially behind
glass in a car or a similar environment.
•DO NOT attempt to charge the camera while its operational. An
operational camera is defined as a camera that is recording and/or
live streaming.
•DO NOT leave the camera docked and charging for longer than 1
week. If the camera is expected to be unused for more than 1
week, it should be removed from the charger and kept in the
following state:
i. Powered off
ii. Medium amount of charge
iii. In a temperate environment, ideally at around 20°C
Camera Safety Notes Important Safety Instructions
•You alone are responsible for how you use your camera and any
consequences of its use.
•Always treat your camera and its accessories with care and
endeavour to keep it clean at all times.
•Do not expose your camera or its accessories to open flame or lit
tobacco products.
•Do not drop, throw or try to bend your camera or its accessories.
•Do not use harsh chemicals, cleaning solvents, or aerosols to
clean the camera or its accessories.
•Do not paint your camera or its accessories.
•Keep your camera clear of debris and other environmental
contaminants.
•Do not leave the camera within the reach of young children.
•The camera may become warm during charging and during
normal use.
•Only use approved accessories.
•Do not attempt to disassemble your camera.
•Refer all servicing to qualified service personnel. Servicing is
required when the camera has been damaged in any way, such
as a cracked or damaged enclosure or does not operate normally.
•Please check local regulations for disposal of electronic products
and batteries.
Battery handling and safety
•Always switch the device off and disconnect the charger before
removing the battery.
•Only use the battery and charger supplied, or manufacturer
approved replacements intended for use with the camera.
Battery handling and safety (continued)
•Do not disassemble or short-circuit the battery. Accidental short-
circuiting can occur if a metallic object such as a key, paper clip, or pen
touches the terminals of the battery.
•Improper battery use may result in a fire, explosion, or other hazard. If
you believe the battery has been damaged, do not use it, take it to a
service centre for testing.
•Do not attempt to disassemble the battery packs.
•Do not dispose of battery packs in a fire.
•Avoid letting the battery pack come in contact with liquid, it should be
kept dry.
•Do not crush the battery pack.
•Do not store the battery pack without charge.
•Approved recycling facilities should always be used for battery disposal.
Electrostatic discharge (ESD)
Do not touch the SIM card’s metal connectors.
Outdoor usage
The camera has been designed for use in outdoor environments. It can
operate in temperatures from -20˚C to +50˚C.
RF energy
All wireless data transferring devices produce interference that may affect
other devices which are placed nearby.
Specific absorption rate (SAR)
The camera device is a radio transmitter and receiver. It is designed not to
exceed limits for exposure to radio waves recommended by international
guidelines. These guidelines were developed by the independent scientific
organisation ICNIRP and include safety margins designed to assure the
protection of all persons, regardless of age and health.
The guidelines use a unit of measure known as the Specific Absorption Rate,
or SAR. The SAR limit for mobile devices is 2 W/kg. The highest SAR value
for this device when tested complied with this limit.
The SAR figures for body worn operation have been verified for operation
with a 5mm separation distance from camera to the body.
Limiting exposure to radio frequency (RF) fields
For individuals concerned about limiting their exposure to RF fields, the World
Health Organization (WHO) provides the following advice:
Precautionary measures: Present scientific information does not indicate the
need for any special precautions for the use of mobile phones. If individuals
are concerned, they might choose to limit their own RF exposure by limiting
the duration of cellular operation.
Further information on this subject can be obtained from the WHO home page
http://www.who.int/peh-emf WHO Fact sheet 193: June 2000.
Pacemakers
Pacemaker manufacturers recommend that a minimum separation of 15 cm
be maintained between body worn devices and a pacemaker to avoid
potential interference with the pacemaker. To achieve this the camera must
not be carried on the chest.
Medical Devices
Please consult your doctor and the device manufacturer to determine if
operation of your phone may interfere with the operation of your medical
device.
FCC COMPLIANCE STATEMENT
This device contains module FCC ID: 2ABOE-BW600
This equipment has been tested and found to comply with the limits for a
Class B digital device, pursuant to part 15 of the FCC Rules. These
limits are designed to provide reasonable protection against harmful
interference in a residential installation. This equipment generates, uses
and can radiate radio frequency energy and, if not installed and used in
accordance with the instructions, may cause harmful interference to
radio communications. However, there is no guarantee that interference
will not occur in a particular installation. If this equipment does cause
harmful interference to radio or television reception, which can be
determined by turning the equipment off and on, the user is encouraged
to try to correct the interference by one or more of the following
measures:
Reorient or relocate the receiving antenna.
Increase the separation between the equipment and receiver.
Connect the equipment into an outlet on a circuit different from that to
which the receiver is connected.
Consult the dealer or an experienced radio/TV technician for help.
FCC Warning: changes or modifications not expressly approved by the
party responsible for compliance could void the user's authority to
operate the equipment.
FCC Notice: The camera is in compliance with Specific Absorption Rate
(SAR) for general population/uncontrolled exposure limits (1.6 W/kg)
specified in FCC 47 CRF part 2 (2.1093) and ANSI/IEEE C95/1-2005,
and has been tested in accordance with the measurement methods and
procedures specified in IEEE 1528-2013.
Security
CE COMPLIANCE STATEMENT
The camera complies with the following European Union Directives.
•Radio equipment directive RED 2014/53/EU
•EMC Standards: EN301 489-1 V2.2.3, Draft EN301 489-3 V2.1.2,
EN301 489-17 V3.1.1, Draft EN301 489-19 V2.2.0 & Draft EN301
489-52 V1.1.2
•Spectrum Standards: EN 300 328 V2.2.2, EN 301 893 V2.1.1, EN
300 440 V2.2.1, EN 300 440 V2.2.1, EN 303 413 V1.2.1, EN 301 511
V12.5.1, EN 301 908-1 V13.1.1, EN 301 908-2 V13.1.1 & EN 301
908-13 V13.1.1
•Low Voltage Directive LVD 2014/35/EU
•Standards: IEC 62368-1:2014 (Second Edition), EN 62368-1:2014 +
A11:2017, EN 62209-2:2010; EN 50566:2017 & EN 62479:2010
•Electromagnetic Compatibility EMC 2014/30/EU
•Standards: EN 55032:2015 + A11:2020 & EN 55035:2017
Regulatory Compliance
Exposure to radio frequency energy (SAR)
This device has been tested and does not exceed the limits regarding
human exposure to electromagnetic radiation set forth in related FCC
and CE standards. The radio wave exposure guidelines use a unit of
measurement known as the Specific Absorption Rate (SAR).
Test Standard and
SAR Limit
Test Location
Camera SAR
CE (Maximum: 2.0W/kg)
Body worn
(within 5mm)
0.988W/kg
FCC(Maximum:1.6W/kg)
Body worn
(within 10mm)
0.957W/kg
© 2021 Johnson Controls. All rights reserved. JOHNSON CONTROLS, TYCO
and ILLUSTRA are trademarks and/or registered trademarks. Unauthorized
use is strictly prohibited.

Other Johnson Controls Security Camera manuals

Johnson Controls TYCO Illustra Pro IPS02-P07-RT04 User manual

Johnson Controls

Johnson Controls TYCO Illustra Pro IPS02-P07-RT04 User manual

Johnson Controls Tyco Pro Gen2 User manual

Johnson Controls

Johnson Controls Tyco Pro Gen2 User manual

Johnson Controls Illustra Flex Gen 4 User manual

Johnson Controls

Johnson Controls Illustra Flex Gen 4 User manual

Johnson Controls Tyco Illustra Flex IFS03D1ICWTT Service manual

Johnson Controls

Johnson Controls Tyco Illustra Flex IFS03D1ICWTT Service manual

Johnson Controls Tyco Holis JSV User manual

Johnson Controls

Johnson Controls Tyco Holis JSV User manual

Johnson Controls Tyco Illustra Flex User manual

Johnson Controls

Johnson Controls Tyco Illustra Flex User manual

Johnson Controls tyco Illustra IBPN-M-IS-0 User manual

Johnson Controls

Johnson Controls tyco Illustra IBPN-M-IS-0 User manual

Johnson Controls Illustra PRO User manual

Johnson Controls

Johnson Controls Illustra PRO User manual

Johnson Controls tyco Illustra Pro User manual

Johnson Controls

Johnson Controls tyco Illustra Pro User manual

Johnson Controls Holis JSV02-D02-OI01 User manual

Johnson Controls

Johnson Controls Holis JSV02-D02-OI01 User manual

Johnson Controls Tyco Illustra Essentials Gen4 User manual

Johnson Controls

Johnson Controls Tyco Illustra Essentials Gen4 User manual

Johnson Controls Illustra Standard Gen 3 User manual

Johnson Controls

Johnson Controls Illustra Standard Gen 3 User manual

Johnson Controls Tyco Illustra Pro Gen4 User manual

Johnson Controls

Johnson Controls Tyco Illustra Pro Gen4 User manual

Popular Security Camera manuals by other brands

Eneo MPP-62A0020M0A user manual

Eneo

Eneo MPP-62A0020M0A user manual

Samsung SCC-641 - 22x Zoom Smart Dome Camera Owner's instructions

Samsung

Samsung SCC-641 - 22x Zoom Smart Dome Camera Owner's instructions

COP-USA CM15 Specifications

COP-USA

COP-USA CM15 Specifications

Optiview 30XSPD Specification sheet

Optiview

Optiview 30XSPD Specification sheet

EzwatchPro EZ-BULLET-PRO-VP user manual

EzwatchPro

EzwatchPro EZ-BULLET-PRO-VP user manual

Lorex LNE8950ABW quick start guide

Lorex

Lorex LNE8950ABW quick start guide

Vivotek FD8164 Quick installation guide

Vivotek

Vivotek FD8164 Quick installation guide

Ganz zn1_m4fn3 installation guide

Ganz

Ganz zn1_m4fn3 installation guide

Panasonic WV-SW598 installation guide

Panasonic

Panasonic WV-SW598 installation guide

Velleman CAMSETW12 user manual

Velleman

Velleman CAMSETW12 user manual

XRPlus IPC-300 user manual

XRPlus

XRPlus IPC-300 user manual

Akaso B60 user manual

Akaso

Akaso B60 user manual

Panasonic WV-CP450 operating instructions

Panasonic

Panasonic WV-CP450 operating instructions

Swann MicroCam II Specifications

Swann

Swann MicroCam II Specifications

Axis P5522-E PTZ user manual

Axis

Axis P5522-E PTZ user manual

Spypoint TINY-WBF user manual

Spypoint

Spypoint TINY-WBF user manual

Samsung SCD-3083 Quick manual

Samsung

Samsung SCD-3083 Quick manual

OPTICOM PT-370-36 datasheet

OPTICOM

OPTICOM PT-370-36 datasheet

manuals.online logo
manuals.online logoBrands
  • About & Mission
  • Contact us
  • Privacy Policy
  • Terms and Conditions

Copyright 2025 Manuals.Online. All Rights Reserved.