JUKI DU-1481 Series User manual

DU-1481 Series
INSTRUCTION MANUAL

CONTENTS
1. Overview of the sewing machine....................................................1
2. Specications ...................................................................................1
2-1. Specications......................................................................................................... 1
2-2. Operation environment for the electrical box...................................................... 1
3. Preparation for operation ................................................................2
3-1. Installation of the sewing machine....................................................................... 2
3-2. Installing the knee-lifter......................................................................................... 3
3-3. Lubricating method................................................................................................ 3
3-4. Adjusting the oil amount in the hook ................................................................... 4
3-5. Adjusting the oil amount in the frame.................................................................. 5
4. How to use / adjust the sewing machine........................................5
4-1. Changing the needle.............................................................................................. 5
4-2. Threading the machine head................................................................................. 6
4-3. Adjusting the thread tension................................................................................. 6
4-4. Installing a bobbin.................................................................................................. 7
4-5. Presser foot pressure ............................................................................................ 8
4-6. Adjusting the feed dog .......................................................................................... 8
4-7. Adjusting the presser foot and the walking foot................................................. 9
4-8. Needle-to-hook relationship................................................................................ 11
4-9. Adjusting the feed timing .................................................................................... 12
4-10. Adjusting the thread trimming device.............................................................. 13
4-11. Periodical cleaning of the sewing machine ..................................................... 15
4-12. Adjusting the reverse feed pitch....................................................................... 16
5. Display screen and operation .......................................................17
5-1. Buttons and their functions ................................................................................ 17
5-2. Counter function .................................................................................................. 20
5-3. Initialization........................................................................................................... 20
6. List of memory switches................................................................21
7. Table of error codes .......................................................................27
8. Names of connectors.....................................................................29
9. Troubleshooting .............................................................................30
i

– 1 –
1. Overview of the sewing machine
The top & bottom feed, lockstitch machine with high and long arm and an automatic thread trimmer
has adopted the long-nose design to provide a wider space under the arm for easier handling of the
material. It also has a longer needle stroke and the broader setting range of amount of the alternat-
ing vertical movement of the walking foot and presser foot. With these features, this model of sewing
machine demonstrates substantially improved sewing performance particularly when sewing heavy-
weight materials with thick threads.
The sewing machine comes with an automatic lubrication system, thereby achieving smooth feed of
material with reduced noise and vibration. It is especially suited to the sewing of car seats, tents, sofas,
heavy-weight materials such as leather products and canvass materials as well as belt-shaped products.
2. Specications
2-1. Specications
2-2. Operation environment for the electrical box
2-2-1. When using this product, install it away from equipment that generates high-
frequency electromagnetic waves and electrical waves in order to prevent
malfunctions caused when aected by those waves.
2-2-2. Temperature in the product operating environment
a: Use the product at such a place in which the room temperature is equal to or higher
than 5 °C and equal to or lower than 35 °C.
b: Do not operate the product at such a place that is exposed to the direct sunlight or
outdoors.
c: Do not operate the product near a heater (electric stove).
d: Carry out work at a relative humidity ranging from 35 % to 85 %.
e: Do not carry out work near combustible gas or explosive substances.
2-2-3. Rated voltage: AC220V-AC240V, 50/60Hz
2-2-4. Earth resistance of the system: 4 Ω or less
Motor output: 750W
Maximum sewing speed setting range: 100 to 2200 sti/min
Low sewing speed setting range: 80 to 400 sti/min
Speed regulating method: Stepless speed variation, automatic constant-speed operation
Number of input signals: 2 systems; compensation stitching switch, safety switch includ-
ing the manual BT switch
Number of output signals: 5 systems; solenoids of the thread trimmer, wiper, thread
clamp, reverse feed stitching device and presser foot lifter
Fault detection: Overcurrent, overheat, short-circuit, rotation fault
Time required to detect a rotation fault: 1.5 sec
Model DU-1481-7
Application Medium- to heavy-weight materials
Maximum sewing speed 2200 sti/min
Maximum stitch length 9 mm
Needle bar stroke 38 mm
Thread take-up lever stroke 138 mm
Amount of the alternating vertical movement of the walking
foot and presser foot 2.0 to 5.5 mm
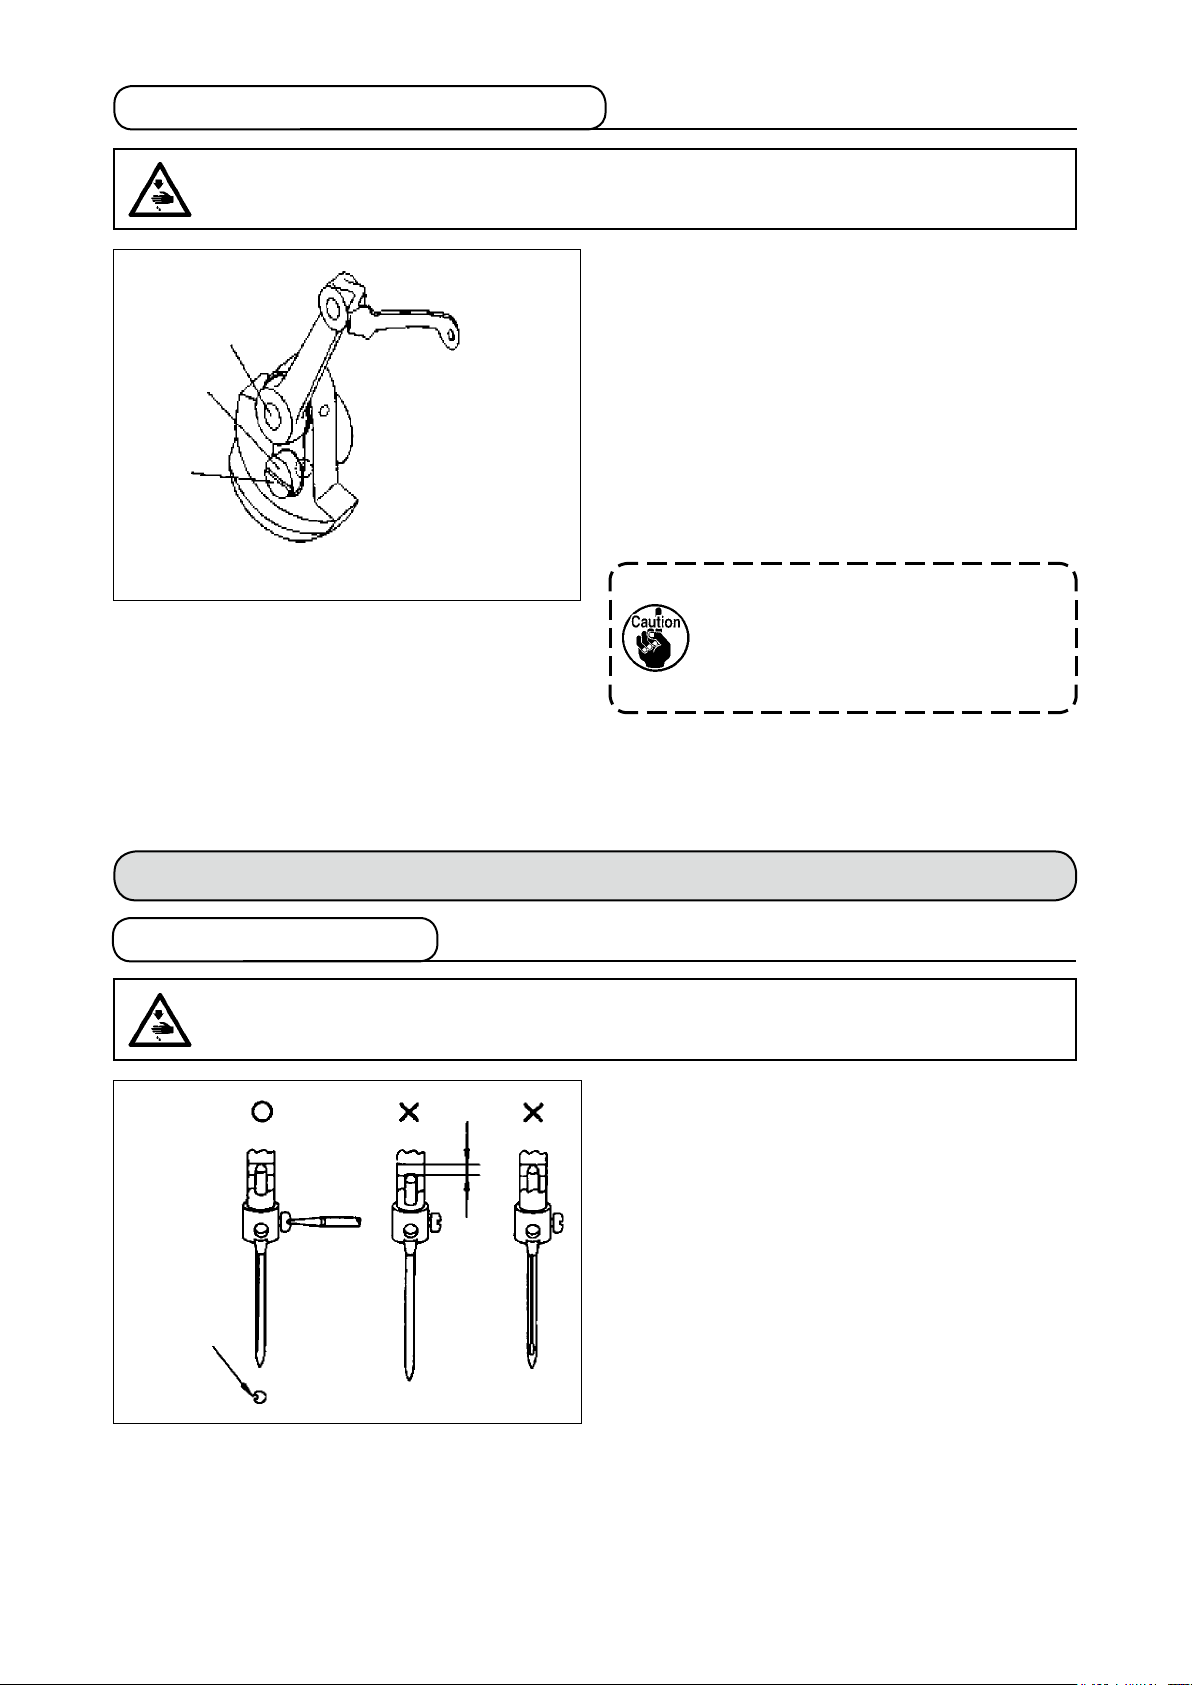
Needle (standard) DP × 17, #23 (#18 to #23)
Lubricating oil JUKI MACHINE Oil (40226742)
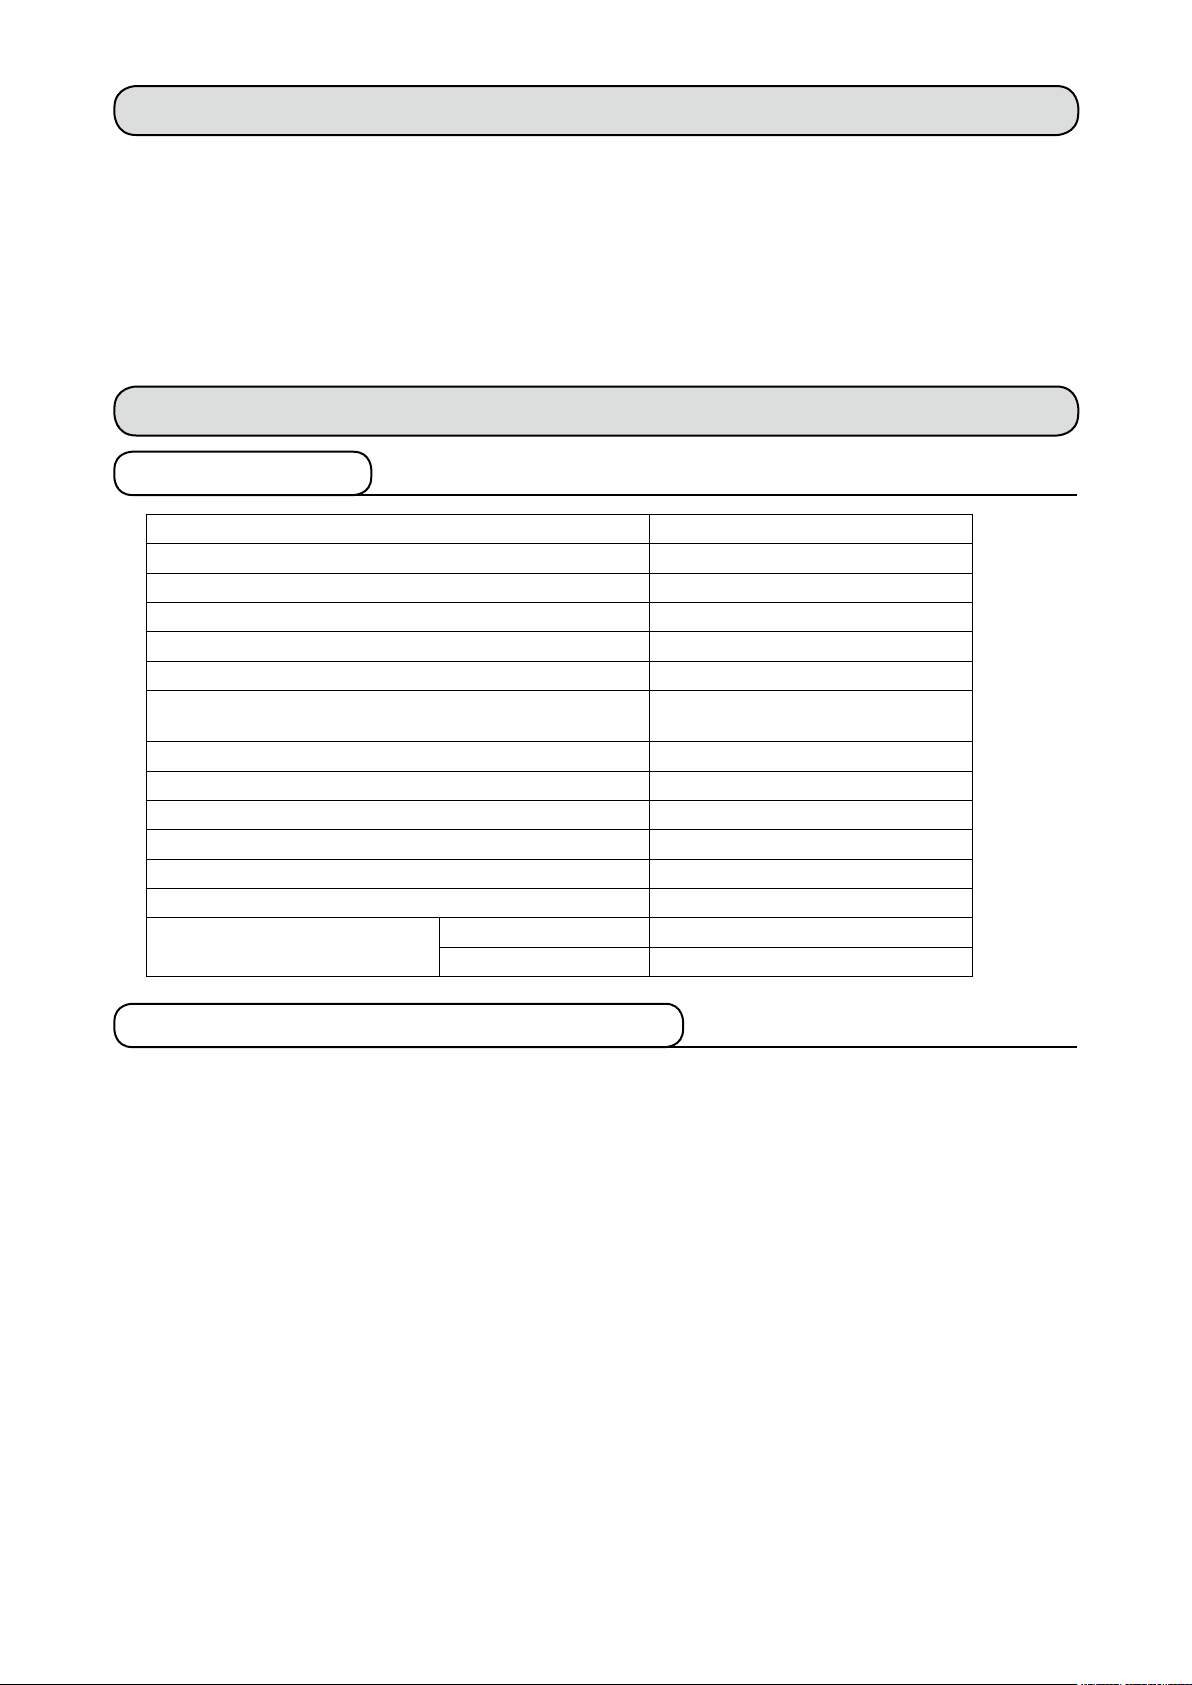
Hook Lubrication of hook (thread trimming)
Lubricating method Automatic lubrication
Thread trimming device Provided
Reverse-feed sewing device Provided
Amount of lift of the presser foot Manual operation 6 mm
Knee-lifter 15 mm

– 2 –
3. Preparation for operation
3-1. Installation of the sewing machine
3. Attach four rubber cushions ❷to four corners
of the table socket.
4. Put oil pan ❸on the rubber cushions.
5. Secure machine head hinge seat ❶on the
table with nails (two pieces) ❹as illustrated in
the gure.
6. Attach the hinge to the machine head. Put the
hinge on the hinge rubber seats.
❹
❶
❸
❷
1. To prevent possible accidents caused by the
full of the sewing machine, perform the work
by two persons or more when the machine is
moved.
2. Place the sewing machine on a horizontal and
plane place when placing it and do not place
any protruding thing such as a screwdriver or
the like.
Never hold the handwheel since it
rotates.

– 3 –
3-2. Installing the knee-lifter
1. Set up knee-lifter shafts ❷while fully pulling
this side of the shafts respectively until it will go
no further.
2. Attach driving arms ❶to knee-lifter shafts ❷.
3. Connect right and left driving arms ❶with links
❸.
4. Attach knee-lifter lever ❹to driving arm ❶.
❸
❶
❷
❶
❷
❹
❶
A
B
3-3. Lubricating method
Pour new special-purpose oil into the oil pan until
the oil surface reaches the line Aof the oil pan.
Carry out lubrication while carefully checking the
oil amount in the oil pan. After the completion of
lubrication of the oil pan, make sure that the oil
surface is aligned with the line A.
While the sewing machine is in opera-
tion, check the state of lubricating oil
through oil sight window ❶.
WARNING :
After the completion of lubrication, insert the power plug. In the case the power plug is inserted
ahead of lubrication, the sewing machine can automatically start running when the operator de-
presses the pedal by mistake, causing a serious injury.
When handling the lubricating oil, be sure to wear protective goggles and gloves to prevent the
lubricating oil from contacting the eyes and skin. Contact with the lubricating oil can lead to inam-
mation or irritation of the eyes and skin. The lubricating oil is not drinkable. Drinking the lubricating
oil can cause vomiting and diarrhea. Be sure to keep the lubricating oil out of reach of children.
When you use the sewing machine for the rst time after the delivery or after a prolonged period
of disuse, it is necessary to lubricate the sewing machine and run it at a low speed until the entire
sewing machine is fully lubricated.
Reference amount of lift of the press-
er foot with the knee lifter is 15 mm in
the case the alternating vertical move-
ment amount is 2 mm.
As the alternating vertical movement
is increased, the amount of lift of the
presser foot is decreased.

– 4 –
After the completion of adjustment of
the oil amount, run the sewing ma-
chine for 30 seconds or more. Then,
check whether the hook is adequately
lubricated.
3-4. Adjusting the oil amount in the hook
Adjust the oil amount with oil amount adjustment
screw ❶that is located on the front bushing of
hook driving shaft. The oil amount is increased
by turning adjustment screw ❶clockwise (+) or
decreased by turning it counterclockwise (-).
❶
IncreaseDecrease
Apply an appropriate amount of oil to the portion
indicated with an arrow.
(Be sure to apply an appropriate amount of oil
once a day.)
WARNING :
To protect against possible personal injury due to abrupt start of the machine, be sure to start the
following work after turning the power o and ascertaining that the motor is at rest.

– 5 –
3-5. Adjusting the oil amount in the frame
Adjust the amount of oil in the frame by turning oil
amount adjustment pin ❶.
Oil amount is maximized:
When marker dot ❷of oil amount adjustment
pin ❶is brought close to thread take-up crank
shaft ❸
Oil amount becomes 0 (zero):
When marker dot ❷of oil amount adjustment
pin ❶is brought to the position that is opposite
to thread take-up crank shaft ❸
4. How to use / adjust the sewing machine
4-1. Changing the needle
❶
❸
❷
Hold the
needle so
that its long
groove faces
to the left.
Clear-
ance
Insert the needle into the needle bar until it will
go no further. Then, tighten the screw. It is neces-
sary, when attaching the needle, to face the long
groove in the needle to the left as observed from
the operator.
After the completion of adjustment of
the oil amount, run the sewing ma-
chine for 30 seconds or more. Then,
check whether the frame is adequate-
ly lubricated.
WARNING :
To protect against possible personal injury due to abrupt start of the machine, be sure to start the
following work after turning the power o and ascertaining that the motor is at rest.
WARNING :
To protect against possible personal injury due to abrupt start of the machine, be sure to start the
following work after turning the power o and ascertaining that the motor is at rest.

– 6 –
❶
❷
❸
❻
❾
❼
❽
❹
❺
❺
❽
❼
❻
4-2. Threading the machine head
Thread the thread take-up lever and the relevant
parts as illustrated in the gure.
(Adequate)
Increase
Decrease
Decrease
❶
❷
Needle thread
tension is ex-
cessively high
Needle thread
tension is ex-
cessively low
4-3. Adjusting the thread tension
1. Thread tension (needle thread)
The needle thread tension is increased by
turning thread tension screw ❶clockwise or
decreased by turning it counterclockwise as
shown in the gure. Finished state of sewn
products varies depending on sewing condi-
tions such as the material, thread and stitch
length. It is therefore necessary to adjust the
thread tension appropriately according to the
sewing conditions.
2. Bobbin thread
Turn thread tension screw of the bobbin with
a screwdriver while tting the screwdriver in
screw slot ❷ as shown in the gure. The thread
tension is increased by turning the thread ten-
sion screw with the screwdriver clockwise or
decreased by turning it counterclockwise.
Increase
WARNING :
To protect against possible personal injury due to abrupt start of the machine, be sure to start the
following work after turning the power o and ascertaining that the motor is at rest.

– 7 –
WARNING :
To protect against possible personal injury due to abrupt start of the machine, be sure to start the
following work after turning the power o and ascertaining that the motor is at rest.
4-4. Installing a bobbin
1. Installing a bobbin
Firstly, t a bobbin in the bobbin case. Draw the bobbin
thread from the bobbin to the right. Then, pull the thread
through threading openings ❶to ❸.
After pulling out the bobbin thread, observe the bobbin from
the bobbin side (not from the bobbin case side) to check
whether or not the bobbin turns clockwise.
The bobbin thread tension can be adjusted with spring ❷.
Open bobbin cap ❹. Fit the hook in position.
In the case the feed dog base overlaps the bob-
bin case when the sewing machine stops, the
bobbin case may not be removed smoothly.
In such a case,
turn the hand-
wheel in the
reverse direction
and remove the
bobbin case.
2. Winding a bobbin
1) Put a bobbin on bobbin winder shaft ❺.
At this time, align the spring of bobbin winder shaft ❺with
groove ❻on this side.
2) Pass the thread in the order of ❽to and wind the
thread on the bobbin.
3) Bobbin winder frame ❼is set in position by pushing the
bobbin.
4) Run the sewing machine. Then, the bobbin rotates to au-
tomatically wind the thread on the bobbin.
5) When the bobbin is fully wind with the thread, bobbin
winder frame ❼ comes o to stop automatically.
The amount of thread wound on a bobbin must be 80 % of
the full capacity of the bobbin.
❶
❸
❹
❷
Standard amount of thread
wound on a bobbin
80%
Loosen screw Aof bobbin winder frame ❼and
adjust the amount of thread wound on a bobbin
by moving pin B.
❺
❼
A
B
❻
❾
❽

– 8 –
4-5. Presser foot pressure
C
D
A
B
1. Adjusting the presser foot pressure
1) Loosen locknut Aof the presser spring regula-
tor.
2) Adjust the presser foot pressure by turning
presser spring regulator B.
The presser foot pressure should be minimized
as long as the material does not slip under the
presser foot.
3) Tighten locknut Aof the presser spring regula-
tor.
2. Adjusting the feeding pressure
1) Loosen feed pressure adjustment screw lock-
nut Cwith a spanner.
2) Adjust the feed pressure by turning feed pres-
sure adjustment screw D.
3) Tighten feed pressure adjustment screw lock-
nut Cwith a spanner.
1. Adjusting the feed dog height
Adjust the height of feed dog ❶so that it is 1.0
mm higher that the top surface of throat plate ❷.
Adjust the feed dog height as described below.
1) Loosen screw ❹of feed lifting rock arm ❸.
Move feed bar ❺up and down.
2) After the completion of adjustment, tighten
screw ❹.
2. Adjusting inclination of the feed dog
1) Loosen screw ❻of the feed rocking arm.
2) Turn eccentric shaft ❼to change inclination of
the feed dog.
3) After the completion of adjustment, tighten
screw ❻of the feed rocking arm.
❶
❷❸
❺
❻
❹
❼Front
Clockwise
Counterclockwise
1.0 to 1.2 mm
Front
Front
Rear
Rear
Rear
4-6. Adjusting the feed dog
The feed dog height may change after
the adjustment of inclination of the
feed dog. It is therefore necessary to
check the feed dog height again.
WARNING :
To protect against possible personal injury due to abrupt start of the machine, be sure to start the
following work after turning the power o and ascertaining that the motor is at rest.

– 9 –
1. Adjusting the amount of alternating vertical
movement of the walking foot and presser
foot
1) The amount of alternating vertical movement of
the walking foot and presser foot must be 2 to
5.5 mm.
2) The amount of alternating vertical movement of
the walking foot and presser foot can be easily
adjusted with dial Amounted on the front sur-
face of sewing machine.
3) Knob
❶mounted on the top surface of sewing
machine locks the operation of dial Aby setting
the former to the same value with the latter.
2. Adjusting a balance of the alternating verti-
cal movement between the walking foot and
the presser foot
(1) In the case of increasing the height of walking
foot ❷and decreasing the height of presser
foot ❸
1) Detach rubber plug ❹.
2) Turn the handwheel until presser foot ❸
goes up above the throat plate.
3) Loosen screw ❺.
4) Presser foot ❸comes down to reach the
throat plate. Then, tighten screw ❺.
5) As described above, decrease the height
of presser foot ❸to an appropriate lower
value. Continue this procedure until the
amount of lift of the presser foot becomes
almost equal to that of walking foot ❷.
(2) In the case of decreasing the height of walking
foot ❷and increasing the height of presser
foot ❸
1) Turn the handwheel until walking foot ❷
goes up above the throat plate.
2) Loosen screw ❺.
3) Walking foot ❷comes down to reach the
throat plate. Then, tighten screw ❺.
To adjust the amount of alternating vertical movement of the walking foot and presser
foot from a smaller value to a larger value, set knob ❶to a larger value to unlock it. Then,
adjust dial A appropriately. After adjusting dial A, turn knob ❶to lock dial A. Similarly, to
adjust the amount of alternating vertical movement of the walking foot and presser foot
from a larger value to a smaller value, adjust dial A rst, and turn knob ❶to lock dial A.
4-7. Adjusting the presser foot and the walking foot
❶
A
❸ ❷
❹
2.0 to 5.5 mm
❺
WARNING :
To protect against possible personal injury due to abrupt start of the machine, be sure to start the
following work after turning the power o and ascertaining that the motor is at rest.

– 10 –
❻
❼
❾
❽
❼
3. Adjusting the amount of lift of the presser
foot
1) Loosen presser spring regulator ❻and bracket
xing screw ❼.
2) Lift the presser foot by means of presser foot
lifting lever ❽. Adjust bracket xing screw ❼
up and down until presser foot ❾is positioned
6 mm above the throat plate.
3) After the completion of adjustment, secure-
ly tighten bracket xing screw ❼and adjust
presser spring regulator ❻appropriately.
4. Adjusting the feed amount of walking foot
Normally, the ratio of feed amount between
the feed dog and walking foot is 1:1. The feed
amount of walking foot can be adjusted accord-
ing to the sewing condition to be used.
1) Loosen nut .
2) Adjust the installed position of vertical move-
ment control shaft . The feed amount of
walking foot is decreased by moving vertical
movement control shaft upward. The feed
amount of walking foot is increased by moving
vertical movement control shaft downward.
3) After the completion of adjustment, tighten nut
.
Small
Large
Throat
plate
6 mm

– 11 –
4-8. Needle-to-hook relationship
WARNING :
To protect against possible personal injury due to abrupt start of the machine, be sure to start the
following work after turning the power o and ascertaining that the motor is at rest.
After the height of the needle bar has been properly adjusted, check that the needle bar
does not come in contact with the walking foot.
1) Positioning the needle bar.
Tighten needle bar connection screw ❸in needle bar connection ❷so that the marker line of the
needle bar aligns with the bottom end of needle bar lower bushing ❶at the lowest position of the
needle bar.
(Fourth line Afrom the bottom for a DB x 1, second line Cfrom the bottom for DP x 17)
❷
❶
❶
❺❹
❸
A
CD
B
Upper
marker line
❹
❺❻
0.05 to 0.1mm
2) Position the needle and the hook.
Adjust so that the specied marker line (third line Bfrom the bottom for a DB x 1 needle, or line D
at the bottom for a DP x 17 needle) on the ascending needle bar aligns with the bottom end of lower
bushing ❶. Further adjust to make hook point ❹nearly meet the center of needle ❺, and adjust
the clearance between needle ❺and hook point ❹to 0.05 to 0.1 mm. Then tighten hook screw ❻.
3) To adjust the hook, remove the throat plate rst. Loosen hook setscrew ❻with a screwdriver and
adjust the hook position from the throat plate side.
Lower
marker line

– 12 –
4-9. Adjusting the feed timing
1) Remove the top cover.
2) Turn the handwheel to bring the needle to the
upper dead point.
3) At this time, adjust so that screw No. 1 ❶is
positioned at eleven o'clock position as viewed
from the handwheel side. Then, tighten the
screw No. 1.
4) Adjust the position of the walking bar lifting ec-
centric so that screw No. 1 ❶of the feed cam
and screw No. 1 ❷of the walking bar lifting ec-
centric are ush with each other. Then, tighten
the screws.
When the feed dog comes down until
the top end of feed dog is aligned with
the top surface of throat plate, the
center of needle eyelet in descending
needle is aligned with the top surface
of throat plate.
❶
❷
WARNING :
To protect against possible personal injury due to abrupt start of the machine, be sure to start the
following work after turning the power o and ascertaining that the motor is at rest.

– 13 –
4-10. Adjusting the thread trimming device
1. The structure of the thread trimming device of this sewing machine is as shown in the
gure given below.
2. Adjusting the counter knife and moving
knife
1) The standard mounting position of the counter
knife and moving knife is the position at which
the center line of cutting portion of moving knife
is aligned with the center line of eye of counter
knife as illustrated in the gure.
2) If portion ⓐof counter knife is larger than the
standard, three threads will be trimmed instead
of two threads in failure. If this phenomenon
occurs, threads will not be brought to the nor-
mal position after thread trimming. If potion ⓑ
is larger than the standard, the knives cannot
trim the threads. It is therefore necessary to
adjust the knives to the correct position.
3. Adjusting the thread trimming cam crank
1) Align the thread trimming cam cranks, right and
left with the at position of thread trimming cam
crank shaft in the arrangement as shown in the
gure.
2) Slowly turning thread trimming cam crank shaft
❶, align stopper lever ❷ with the at portion
on thread trimming cam crank shaft ❶.
Thread trimming solenoid
Thread trimming
cam
Base of solenoid
connection link
Thread
guide
Counter knife
Moving
knife
Thread trimming
lever
Return spring
Return spring
Thread release
cable
Thread trimming
cam crank, left Thread trimming cam
crank, right
ⓐ ⓑ
Counter
knife
Moving
knife
Thread trimming
cam crank, left
Thread trimming
cam crank, right
Return
spring
Shaft sleeve
87.5 mm ❷
❶
WARNING :
To protect against possible personal injury due to abrupt start of the machine, be sure to start the
following work after turning the power o and ascertaining that the motor is at rest.

– 14 –
4. Installing the thread trimming device
1) Adjusting the operating quantity of the thread
trimming solenoid
A. The operating quantity of the thread trim-
ming solenoid is 4 to 5 mm.
B. The operating quantity of the thread trim-
ming solenoid is adjusted by adjusting nut
Ⓐ.
2) Adjusting the installation of the thread trimming
solenoid
A. A 0.5 mm clearance is provided between
thread trimming cam crank, left ❸and
thread trimming cam crank, right ❷in the
case the thread trimming solenoid is op-
erated in the aforementioned conditions.
(Standard installation position)
B. To adjust the thread trimming solenoid,
push the cylinder portion of thread trimming
solenoid in the direction of the arrow as
shown in the gure.
5. Installing the thread trimming cam
1) Bring the thread take-up lever to its lowest
point as shown in the gure.
2) Turn thread trimming cam ❶clockwise
while keeping the cylinder of thread trimming
solenoid held pushed, until thread trimming
cam ❶comes in contact with the roller. At this
position, tighten the screw.
3) When the cylinder of thread trimming solenoid
is no longer pushed, the right-thread cam
crank returns to its home position. Adjust so
that a clearance of 0.5 to 1.0 mm is provided
between thread trimming cam ❶and the
roller. (Standard installation position)
Solenoid
valve link a
Nut Ⓐ
4 to 5 mm
0.5 mm
Solenoid
valve mount-
ing screw
❷
❸
❷
❶
0.5 to 1.0 mm
0.6 mm
Lowest
point

– 15 –
WARNING :
To protect against possible personal injury due to abrupt start of the machine, be sure to start the
following work after turning the power o and ascertaining that the motor is at rest.
6. Adjusting the engagement between the
knives
1) Adjusting the position of the moving knife and
counter knife
The standard initial position of moving knife ❶
is 5 mm from the center of needle. The stan-
dard initial position of counter knife ❷is 5 mm
from the center of needle.
Loosen screw Cand adjust the position of the
knives.
2) Adjusting the forward travel amount of the mov-
ing knife
When you turn the handwheel in the reverse
direction while pushing the cylinder of thread
trimming solenoid, moving knife ❶is rotated
by the thread trimming cam. At this time, adjust
the position of moving knife ❶so that its end
portion moves away from the end portion of
counter knife ❷by 1.0 to 1.5 mm when the
forward travel amount of moving knife ❶is
maximized. (Standard installation position)
❷
❶
Counter knife
Counter
knife
Counter knife
5 mm
1 to 1.5 mm
5 mm
3 mm
3 mm
B
A
C
Moving
knife
Moving
knife
Moving knife
Feed dog ❶, hook ❷and pump ❸should be
periodically cleaned.
4-11. Periodical cleaning of the sewing machine
❶❷
❷
❸
3) Adjusting the counter knife pressure
A. The standard adjustment position of the knives is achieved when the moving knife and counter
knife come in light contact with each other, as shown in the gure.
B. Especially when using thick threads, the knives cannot trim them sharply. In this case, increase
the pressure applied to the counter knife.
C. To adjust the pressure applied to the counter knife, loosen locknut Bwith a box wrench and ad-
just the pressure applied to the counter knife with screw A.
After the completion of adjustment, tighten locknut B.

– 16 –
4-12. Adjusting the reverse feed pitch
1) Detach the reverse feed solenoid cover.
2) Loosen xing screw A. Turn eccentric adjust-
ment pin B.
3) Tighten xing screw A.
A
B
Oil may accumulate in the lower portion of face
plate or inside the thread take-up cover while us-
ing the sewing machine
Be sure to wipe out oil periodically.
Regularly clean the feeding foot, presser foot and
throat plate.
WARNING :
To protect against possible personal injury due to abrupt start of the machine, be sure to start the
following work after turning the power o and ascertaining that the motor is at rest.

– 17 –
5. Display screen and operation
5-1. Buttons and their functions
The operation screen is as illustrated below.
Function Button Explanation of sewing machine operation
Selection of reverse feed
stitching at the beginning
of sewing
The number of stitches set to the revere feed stitching at the beginning of
sewing (A, B) is sewn twice.
The number of stitches set to revere feed stitching at the end of sewing (A,
B) is sewn once.
Selection of reverse feed
stitching at the end of sew-
ing
The number of stitches set to the revere feed stitching at the beginning of
sewing (C, D) is sewn twice.
The number of stitches set to revere feed stitching at the end of sewing (C,
D) is sewn once.
Constant-dimension sew-
ing
Function to sew the constant-dimension sewing (E) is carried out.
When the front part of part is depressed, the sewing machine automatical-
ly sews the preset number of stitches E and stops.
Polygonal shape stitching
For the polygonal shape stitching, the process is set with 1-digit on the
left, and the number of stitches is set with three-digit value (G) on the
right.
When you depress the front part of pedal, the sewing machine sews the
number of stitches for the rst process and stops.
When you depress the front part of pedal again, the sewing machine sews
the number of stitches for the next process.
When the sewing machine sews the number of stitches for the nal pro-
cess, the polygonal shape stitching is completed.
Free stitching
1) When the front part of pedal is depressed, the sewing machine per-
forms sewing. When the pedal is returned to its neutral position, the
sewing machine stops.
2) When the front part of pedal is depressed, the sewing machine au-
tomatically performs thread trimming and related operations such as
thread wiping.
Overlapped stitching
When the front part of pedal is depressed, the sewing machine automat-
ically performs overlapped stitching. The number of repetitions is (E).
When the front part of the pedal is depressed, the sewing machine auto-
matically performs this stitching, trims the thread and stops. The sewing
machine repeats this operation sequence until it is reset by depressing
the back part of pedal.

– 18 –
Function Button Explanation of sewing machine operation
Selection of the number of
stitches setting
For the reverse-feed stitching, the number of stitches is set with A, B, C
and D. The number of stitches can be set within the range of 0 to 9.
For the constant-dimension sewing, the number of stitches is set with E.
The number of stitches can be set within the range of 0 to 99.
For the polygonal shape stitching, the number of stitches is set with G.
The number of stitches can be set within the range of 0 to 200.
Setting of the number of stitches and display can be changed over by
pressing key to A, B, C or D, or E or G.
While the memory switch is displayed, the stored values can be checked
by pressing key.
Needle bar lifting setting
1) Free stitching style:
When this button is pressed, the needle bar goes up and the sewing
machine advances by a half step to enable the compensation stitching
operation.
(Practically, the sewing machine continues compensation stitching
operation as appropriate.)
2) Constant-dimension sewing style (except for the overlapped stitching)
a. When the key is pressed while the sewing machine stops at the mid-
point of each process, the needle goes up.
b. When the key is pressed while the sewing machine is at rest a the
end of each process, one correction stitch can be sewn. (Practically,
the sewing machine continues compensation stitching operation as
appropriate.)
One-shot switch
1) Free stitching and overlapped stitching
This stitching is not enabled even if this key is pressed.
2) Constant-dimension sewing:
Press this key.
This function is initiated by pressing the front part of pedal. Then, the
sewing machine automatically sews the number of stitches set for (E)
and stops.
3) Polygonal shape stitching:
Press this key.
The one-short switch is activated by depressing the front part of pedal.
Then, the sewing machine automatically performs sewing of the num-
ber of stitches set with the right-side value (G) and stops. When the
front part of pedal is depressed again, the sewing machine automati-
cally performs sewing of the next process and stops. The sewing ma-
chine repeats this procedure until it nishes sewing of the last process.
After the completion of last process, the sewing machine automatically
performs thread trimming.
Thread trimming switch
Setting enable / disable of thread trimming:
As long as this switch is displayed on the screen, the sewing machine car-
ries out thread trimming.
If this switch is not displayed on the screen, the sewing machine will not
carry out thread trimming.
Soft start
1) In the case this function is enabled, the sewing machine rstly operates
at a low speed when the motor starts by depressing the front part of
pedal. When the sewing machine has sewn the predetermined num-
ber of stitches, it runs at the normal sewing speed. When the motor
is re-started without thread trimming after the sewing machine has
stopped in the middle of sewing, the soft start function is not activated.
On the other hand, the soft start function is activated when the motor is
re-started after thread trimming.
2) The setting of sewing speed for the soft start function can be adjusted
with [007.S].
3) The setting of the number stitches for the soft start function can be
adjusted with [008.SLS].
This manual suits for next models
1
Table of contents
Other JUKI Sewing Machine manuals

JUKI
JUKI LK-1900B/IP-420 User manual

JUKI
JUKI MO-51EN User manual

JUKI
JUKI LU-1510N Quick start guide

JUKI
JUKI HZL - 353Z Series User manual

JUKI
JUKI HZL-DX3 User manual

JUKI
JUKI TSC-441 User manual

JUKI
JUKI DDL-8700L User manual

JUKI
JUKI HZL-F series User manual

JUKI
JUKI DLD-5430N User manual

JUKI
JUKI MF-7800/UT25 User manual

JUKI
JUKI DDL-9000B User manual

JUKI
JUKI HZL-355ZW-A User manual

JUKI
JUKI DDL-9000 User manual

JUKI
JUKI DLN-9010A User manual

JUKI
JUKI MS-191; MS-191A; MS-261; MS-261J User manual

JUKI
JUKI DLN-6390 User manual

JUKI
JUKI MO-50eN User manual

JUKI
JUKI LU-1520N-7 User manual

JUKI
JUKI DDL-8700B-7 User manual

JUKI
JUKI LK-1910 Quick start guide