JVA Z28 User manual

SECURITY
ENERGIZER
Installation and User Manual
28
JVA ELECTRIC FENCE SYSTEMS
Edition 2.2, 2015

JVA Z Energizer Range Concept
Thank you for choosing our product. The JVA brand is a range of electric fencing
products carefully selected from leading manufacturers around the world to
meet the needs of perimeter security.
THE JVA Z RANGE ENERGIZER CONCEPT
The JVA Range of Energizers has been collaboratively designed and manufactured
by an international team with over 30 years of electric fence experience earned
in some of the most testing security environments in the world. It aims to provide
the very best low-cost, high-voltage security energizers in the world. They are
compact, integrated and fully programmable electric fence energizers with built-in
alarm units and LCD out and return voltage display. They also have the option of
being controlled from a remote LCD keypad.
State-of-the-
art energizer
design IP4 x
and ABS plastic
Unique LCD
display depicting
fence out and
return voltage
Wall-mountable, robust
energizer housing with easily
detachable PCB chassis for
ease of installation and repair
Unique LCD keypad
option depicting fence
and alarm condition
TWO-YEAR WARRANTY
All JVA products carry a 2-year warranty against defective
components and workmanship. The warranty excludes damage
caused by acts of Nature such as lightning or ooding, power
supply surges, rough handling, malicious action or incorrect wiring.
Please retain your invoice as proof of purchase and
ll in the warranty form on page 43.
2-yr
WARRANTY
JVA ELECTRIC FENCE SYSTEMS

JVA ELECTRIC FENCE SYSTEMS
1
Contents
1. INTRODUCTION ...................................................................................... 3
The JVA Z Story ........................................................................................ 3
2. FEATURES ............................................................................................... 4
3. SPECIFICATIONS .................................................................................... 5
4. DESCRIPTION ......................................................................................... 6
4.1 JVA Z28 Exterior .............................................................................. 6
4.2 JVA Z28 – High Voltage Terminals .................................................. 6
4.3 LCD Voltage Display ........................................................................ 7
4.4 Status LED Lights ............................................................................ 8
4.5 Inputs and Outputs .......................................................................... 8
4.6 Keypad (Optional) ............................................................................ 9
4.7 Keypad Lights (236LED Keypad) .................................................... 9
4.8 Internal Beeper / Keypad Beeper .................................................... 9
4.9 Cabling ............................................................................................ 10
4.10 Lightning Protection ......................................................................... 10
4.11 Earth Loop Monitoring ..................................................................... 10
4.12 Noise and Interference .................................................................... 10
4.13 Programmable Options .................................................................... 10
4.14 Low Power Mode ............................................................................. 10
4.15 Control Inputs .................................................................................. 11
4.15.1 Control Inputs ...................................................................... 11
4.15.2 Control Input Functions ....................................................... 11
4.16 Simultaneous Pulse Feature ........................................................... 11
5. INSTALLATION ......................................................................................... 12
JVA recommends installation by qualied technicians
5.1 Installation Steps ............................................................................. 12
5.2 Example Fence Wiring Diagrams .................................................... 13
6. OPERATION ............................................................................................. 15
6.1 Arm / Disarm Control ....................................................................... 15
6.2 Arming the Fence Using the Keypad ............................................... 15
6.3 Turning to Low Power Mode ............................................................ 15
6.4 When an Alarm Occurs .................................................................... 15
6.5 To Silence the Alarm ........................................................................ 16
6.6 Changing the PIN number ............................................................... 16
6.7 Standby Battery ............................................................................... 16
6.8 Status Light ...................................................................................... 16
7. LCD KEYPAD OPERATION ..................................................................... 17
7.1 Arming/Disarming the Fence Using the Keypad .............................. 17
7.2 Keypad Status Display .................................................................... 17
7.3 Changing the Keypad Messages and Address ................................ 17
CONTENTS

JVA ELECTRIC FENCE SYSTEMS
8. TECHNICAL INFORMATION .................................................................... 21
8.1 Power Options ................................................................................. 22
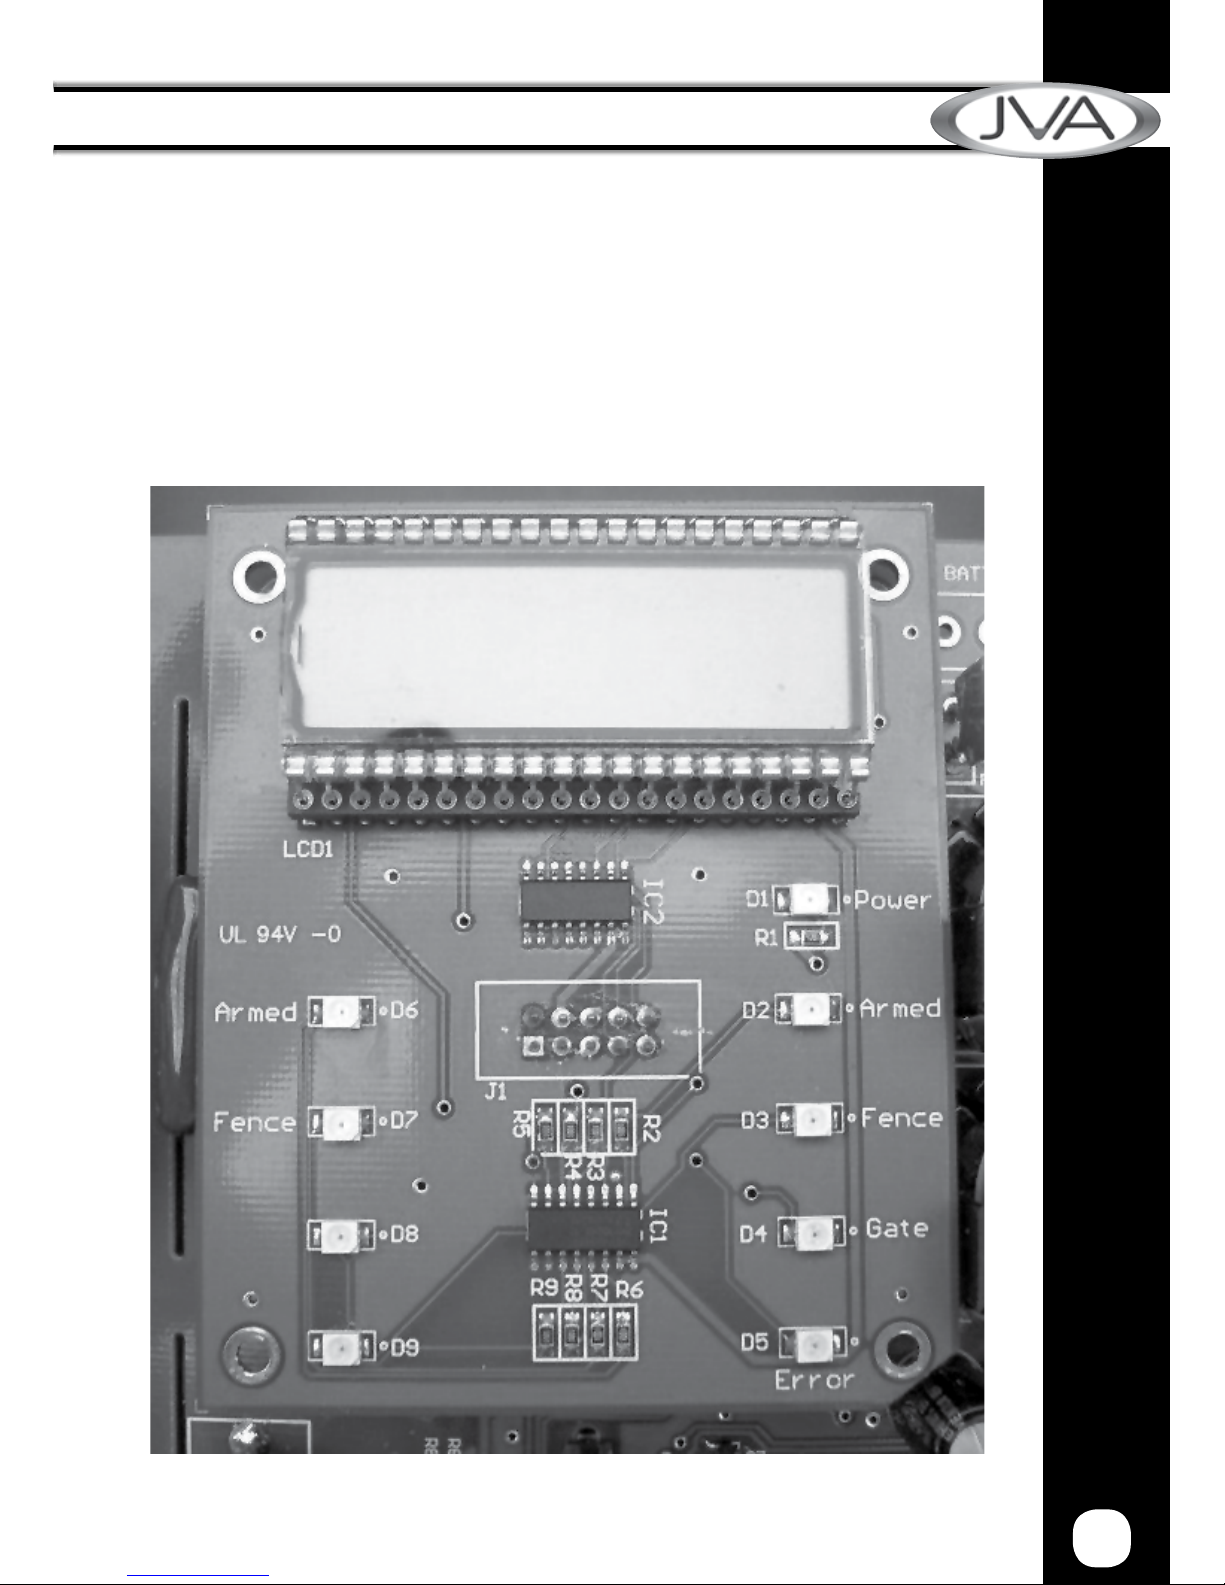
8.2 Status Codes ................................................................................... 22
8.3 Jumpers ........................................................................................... 22
8.3 Multiple Keypads ............................................................................. 23
9. INSTALLATION PROGRAMMING OPTIONS .......................................... 24
9.1 Programming Mode ......................................................................... 24
9.2 To Exit Programming Mode ............................................................. 24
9.3 Changing the Installer PIN ............................................................... 24
9.4 Changing an Option ......................................................................... 24
9.5 Programming Options in Brief ......................................................... 25
9.6 Programming Options in Detail ........................................................ 26
9.6.1 Power Level (01x#) .............................................................. 26
9.6.2 Low Power Level (02x#) ...................................................... 26
9.6.3 Fence Alarm Voltage (03x#) ................................................ 26
9.6.4 Fence Alarm Voltage Zone 2 (04x#) .................................... 27
9.6.5 Low Power Alarm Level (05x#) ............................................ 27
9.6.6 Missed Pulse Count (06x#) ................................................. 27
9.6.7 Battery Alarm Voltage (07x#) ............................................... 27
9.6.8 Siren On Time (08x#) .......................................................... 28
9.6.9 Siren Off Time (09x#) .......................................................... 28
9.6.10 Siren Cycles (10x#) ............................................................. 28
9.6.11 Input Type (11x#) ................................................................. 29
9.6.12 Input 2 and 3 Functions (12x#) ............................................ 29
9.6.13 Gate Entry/Exit Delay (13x#) ............................................... 29
9.6.14 Chime Mode (14x#) ............................................................. 30
9.6.15 Binary Options (16x#) .......................................................... 30
9.6.16 Anti-bridging threshold (17x#) ............................................. 31
9.6.17 Binary Options 2 (18x#) ....................................................... 31
9.6.18 Fence Entry/Exit Delay (19x#) ............................................. 32
9.6.19 Auto Re-arm Time (20x#) .................................................... 32
9.6.20 Relay Functions ................................................................... 33
9.6.21 Relay Function Details ......................................................... 34
9.6.22 Group Mode (26x#) .............................................................. 34
10. SECTOR SETUP TESTS AND ADJUSTMENT ........................................ 38
10.1 Basic Fence Tests ........................................................................... 38
10.2 Fault Condition Tests ....................................................................... 38
11. SOME STANDARD REQUIREMENTS FOR ELECTRIC
SECURITY FENCES ................................................................................ 39
11.1 Denitions ........................................................................................ 39
11.2 Installation, Operation and Maintenance ......................................... 39
11.3 Warning signs .................................................................................. 40
11.4 Gates ............................................................................................... 40
11.5 Earthing ........................................................................................... 40
11.6 Protection ........................................................................................ 41
12. WARRANTY ............................................................................................. 43
2
Contents

JVA ELECTRIC FENCE SYSTEMS
3
Introduction
1. INTRODUCTION
Welcome to the world of JVA monitored electric security fences. The proliferation of
non-lethal, monitored, electric security fences in our towns and cities is indicative of
the condence the public has in this form of perimeter security. The reason for this
popularity is simple – monitored electric security fences are effective, economical,
simple to install, and they offer more D’s of security than any other perimeter
system:
D
emarcation
– The JVA fence around your property shows you mean business.
D
eflection
– Would-be intruders will be deected to softer targets.
D
eterrence
– The safe, powerful JVA shock is a strong deterrent to intruders.
D
elay
– The physical barrier will delay an intruder, something they do not like.
D
etection
– The JVA’s voltage monitor warns you of any tampering with the fence.
D
eny
– A well-erected electric security fence will deny entry.
D
ependable
– 60 seconds a minute, 60 minutes an hour, 24 hours a day, 365 days
a year, your JVA electric security fence is monitored by an alert, sober, electronic
watchman.
Every second, the JVA Z energizer
discharges a very short-duration,
safe, high-voltage pulse down
the fence live wire. The JVA Z
energizer then monitors the voltage
at the end of this live wire, thereby
checking that the voltage is being
maintained along the entire fence
line. In the event of a voltage drop
caused by either shorting, cutting
or poor maintenance, the monitor
will trigger an alarm, thus alerting
you.
Manufactured to meet the most
stringent international safety
standards, the JVA Z energizer is
in a class of its own when it comes
to features and benets at an
affordable price.
An electric fence system which
meets current safety regulations

JVA ELECTRIC FENCE SYSTEMS
2. FEATURES
4
Features
2.1 Power
●8 joules peak output energy (4 + 4 Joules = 8 Joules total)
●Mains powered via external transformer (16–18Vac)
●Battery charger with space for internal 7A/H 12V rechargeable back up battery
2.2 Control / Monitoring:
● 3 Control inputs which can be congured to take N.O. or N.C. control contacts.
● 3 12V driven outputs (also referred to as relays), high side switched (common
negative)
●All relays may be assigned to any alarm function
●LCD voltage display
●LED status lights
●Internal beeper
● AC fail, Low Battery and Bad Battery detection
●Keypad programmable options
●Low power mode – ensures detection together with public safety during the day
● Adjustable energizer power output level
2.3 Safety
●Designed to pass IEC60335.2.76 and EMC standards (reports available on
request)
●Enclosed fence terminals
● Wall mountable, robust enclosure with detachable PCB chassis for ease of
installation and repair
2.4 Reliability
●Microprocessor controlled.
●Pluggable screw terminals
● State of the art, robust, case design IP4x ABS
● Built-in lightning protection from both mains and fence sides, external fence
lightning protection is still advised in high lightning prone areas
●All inputs and outputs protected against stray fence voltage

JVA ELECTRIC FENCE SYSTEMS
5
3. SPECIFICATIONS
Specication Name Specication
Energizer Output Voltage 8.5kV peak no load
Peak Output Energy 2 ×4 Joules
Pulse Rate Locked at 0.9 Hz
12v DC Power Consumption Energizer On – 1005mA average, 1220mA peak
Energizer Off – 28mA
Not including keypad or Auxiliary power
AC Power Input 16-18Vac 1.5A*
Battery Charger Output Float voltage 14V, 700mA, short circuit
protection, reverse battery protection
Switched Outputs Three 12V 2.5A maximum combined load
powered output.
Recommended Operating
Temperature
–15°C to +50°C
Enclosure IP4x ABS Plastic
Size 300mm high, 190mm wide, 115mm deep
Weight – packed, no battery 2.5kg
Specications
• There are no user-serviceable parts in this unit.
• There are potentially lethal high voltages inside the Z
Series energizers.
• The high voltage inside the Z Series Energisers may
take a long time to discharge. Wait at least 10 minutes
after turning off before opening the case.
• Before working on the high voltage wiring of an electric fence, it is recom-
mended that the energiser be disarmed and an intentional short circuit
is placed from the fence live wires to earth. This is a sensible precaution
against the energiser being turned on by others or malfunctioning while
working on the fence.
• If an electric fence is part of a multiple energiser system and the distance
between two separate electric fences, each powered by separate energis-
ers, is less than 2.5 meters, the energisers must be congured to operate in
group mode.
WARNING
* A 24Vdc 1.5A supply can be used in place of the 16Vac. The correct connection is +24V to the right AC pin, GND to the left AC pin. Due to the stored
energy in a 24Vdc plug-pack, an AC Fail could occur 5 minutes before the Energiser reports this fault

JVA ELECTRIC FENCE SYSTEMS
4. DESCRIPTION
6
Description
4.1 JVA Z28 Exterior
4.2 JVA Z28 – High Voltage Terminals
Figure 1: Z28
Figure 2: Output Terminals
ZONE 1 OUT
EARTH
ZONE 2 OUT
ZONE 1 RETURN
EARTH RETURN
ZONE 2 RETURN
The Z28 is a dual channel standard (non Bi-Polar) 8 Joule (4 per channel) security
energizer.
This manual relates to:
● PCB versions: 7.51 and higher
● Firmware versions: 7.50 or higher
(the rmware version is shown on
the LCD on reset)
9.2 9.0

JVA ELECTRIC FENCE SYSTEMS
4.3 LCD Voltage Display
The display on the JVA Z28 shows the voltage at the feed out and return terminals.
Left side = Return zone 1, Right side = Return zone 2.
The LCD also shows the programming option and current setting when in
programming mode. This allows the programming options settings to be checked
easily.
7
Description
Figure 3: LCD Display and Status LEDs
ZONE 1 – RETURN HV – ZONE 2

JVA ELECTRIC FENCE SYSTEMS
8
Description
4.5 Inputs and Outputs
Figure 4: Connection Terminals
4.4 Status Lights
Left side Z28
Armed 1 On when Zone 1 of the energizer is armed (pulsing), will ash when
in low power mode.
Fence 1 Flashes if the return voltage falls below the Fence Alarm Voltage,
stays on when there is a Zone 1 fence alarm.
Gate 1 Flashes Red when the Gate is open, stays Red when there is a
Gate 1 alarm.
Right side Z28
Power On whenever the energizer has power.
Armed 2 On when Zone 2 is armed (pulsing), will ash when in low power
mode.
Fence 2 Flashes if the return voltage falls below the Fence Alarm Voltage,
stays on when there is a Zone 2 fence alarm.
Gate 2 Flashes Red when the Gate is open, stays Red when there is a
Gate 2 alarm.
Status Flashes an error code for energizer (service) errors. See the table
in section 7.2 Status LED Error Codes.
Output Feed
terminals
Output Return
terminals
16VAC
16VAC
Only!
Keypad Control Control
Inputs Outputs
NOTE: Fence and Gate LEDs are latched on (like the strobe) until cleared using the
clear alarm memory sequence (*1#) or the Energiser is re-armed.

JVA ELECTRIC FENCE SYSTEMS
4.6 Keypad (Optional)
LCD screen
Up to three keypads can be used to remotely monitor and control the Z28. A keypad
is required to set the programmable options. See section 8.5. The keypad will display
the fence voltages, alarms and statuses.
4.7 Keypad Lights
Power On with AC power, Off with mains fail, ashes on low battery.
Arm On when the energizer is armed (pulsing), ashes when in low power
mode.
9
Description
Figure 5: LCD Keypad
NOTE: There is no panic function currently implemented.
For information on how to control the Z28 via the keypad see section 6.
4.8 Internal Beeper/Keypad Beeper
Depending on the chime mode setting, the internal beeper and keypad beeper will
sound when there is a fence alarm, a gate alarm or a general alarm or a door
chime. On at battery the keypad will always beep 4 times before the energizer
automatically enters low voltage mode to preserve the battery. On AC Fail it will not
beep.

JVA ELECTRIC FENCE SYSTEMS
4.9 Cabling
High voltage cabling (fence lead out and returns) should be run using suitably rated
cable. Double insulated electric fence underground cable is suitable. High Voltage
Cables must never be run within the same conduit as Low Voltage Cables. A minimum
distance of 30mm should be kept between High Voltage and Low Voltage cables.
4.10 Lightning Protection
Although the Z28 contains internal lightning protection elements, external lightning
protection elements such as additional external lightning kits available from your
local dealer, are recommended as they would help to reduce lightning damage even
further.
4.11 Earth Loop Monitoring
The Z28 has two fence earth terminals which when wired into a series looped fence
system enable the energizer to monitor the earth circuit. In this conguration, only
one earth spike location must be used. If this is not required the installer can loop the
two earth terminals at the energizer and then connect the earth spikes to one of the
parallel earth terminals.
4.12 Noise and Interference
The Z28 contains a microprocessor. Extreme electrical noise can upset
microprocessors. The most likely cause of such noise is the high voltage output from
the unit itself. In the event of erratic behaviour, check that the high voltage wiring is
rmly connected to the terminals and that no sparking is seen. The Z28 is designed
to self-recover from interference, powering off (both AC and battery) should not be
necessary.
4.13 Programmable Options
The Z28 has many programmable options. These are also known as setup
parameters. To alter these options a keypad must be used. The options are explained
in Programming Options in Brief on page 20. Each parameter has a factory set
default.
4.14 Low Power Mode
Z28 energizers can be switched into low power mode. Low Power mode may be used
in situations where the fence is not required to be a deterrent but is still required to
actively detect intrusion. In Low Power mode the fence live wires operate at a much
lower voltage, typically 500V peak. See Programming Options in Brief on page 20 for
details on using the keypad to set low voltage mode.
10
Description

JVA ELECTRIC FENCE SYSTEMS
Description
4.15 Control Inputs
4.15.1 Control Inputs
The Z28 has 3 control inputs. These default to:
Input 1 – Arm/Disarm
Input 2 – Gate 1
Input 3 – Gate 2 or low voltage mode input.
The gate inputs may be wired to a gate switch to trigger an alarm when a gate is
opened.
If the unit is disarmed, the gate input may be set to chime mode. See Programming
Options in Brief on page 21.
NOTE: If not used, the Gate 1 and Gate 2 inputs must be bridged to the Com terminal.
Inputs 2 and 3 can be congured for other functions. See Programming Options in
Detail, Option 12.
4.15.2 Control Input Functions
On/Off (Arm/Disarm)
When congured as an On/Off Input, the Control Input Arms or Disarms the Fence
Zone. On/Arm will make the Fence Live (High Voltage on the Fence), while Off/
Disarm will make the fence Safe (No fence voltage)
Gate Input
When congured as a Gate Input, the Control Input may be wired to a gate switch to
trigger an alarm when the gate is opened for longer than the Gate Entry/Exit Delay
time (Option 13). The timer will reset to zero when the gate closes. If the energizer
is disarmed, the Gate Input may be set to Chime Mode. See section 9, option 14.
High/Low Power Control
When congured to control High/Low Power mode, the Control Input is able to
change the Energizer Output (While Armed) to either High Power or Low Power
modes. It is also used to determine what Power Mode to start in when the energizer
is Armed using a Control Input.
4.16 Group Simultaneous Pulse Feature
All JVA Z Range models may be linked to form a group to power multiple zones. See
Group Mode, page ??.
11

JVA ELECTRIC FENCE SYSTEMS
5. INSTALLATION
12
Installation
JVA recommends installation by qualied technicians.
5.1 Installation Steps
1. Read the entire manual rst!
2. Design and build the fence. (Beyond the scope of this manual.)
3. Decide where the JVA Z28 is to be mounted. If on an external wall it should
be housed within a waterproof equipment box and denitely not in direct
sunlight.
4. Mount the unit by hanging the housing on the two nail-in anchors provided.
If necessary, two extra mounting holes can be used at the bottom of the
housing.
5. If using a keypad, remove the rear housing of the keypad and x it to the
wall.
6. Wire the low voltage cables to the PCB terminals (right side)*. (See page 8)
7. Wire the high voltage cable to the PCB terminals*. (See page 8) If earth
monitoring is not going to be used on the fence, connect a bridge wire from
earth out to earth return.
8. Fit the battery leads to the battery. The Status LED should blink twice to
show mains fail.
9. Mount the 220 – 16V transformer and connect the 16V side to the Z28 16V
input terminals. (AC is not polarity sensitive.) Do not connect a live or neutral
to the earth terminal.
10. The unit is designed not to start when rst powered up irrespective of the
state of the inputs.
11. Replace the front cover.
12. Turn AC power on.
13. Arm and disarm the energizer via the keyswitch or keypad, if tted. The
Status LED should stop blinking.
14. If using a keypad, type *68#. The keypad will analyse the zones.
15. Arm the unit. The LCD display will now show the fence voltage.
16. Check to ensure that a short anywhere on the fence triggers the alarm.
17. On handing the system over to the owner/user, explain how to change the
user PIN. Leave a User Manual with the user.
*NB Keep high voltage and low voltage cables at least 100mm apart.
Do not run high and low voltage cables in the same conduit.

JVA ELECTRIC FENCE SYSTEMS
Return 2
13
Installation
5.2 Example Fence Wiring Diagrams
JVA Z28 Energizer Fence Wiring, Including Earth Monitoring
Feed Return
Feed 1
Earth
Return 1
Fence 1
Earth
Feed 2
Fence 2
Earth spikes

JVA ELECTRIC FENCE SYSTEMS
14
Installation
Return 2
Feed Return
Feed 1
Earth
Return 1
Fence 1
Earth
Feed 2
Fence 2
Earth spikes
JVA Z28 Energizer Fence Wiring, without Earth Monitoring

JVA ELECTRIC FENCE SYSTEMS
15
Operation
6. OPERATION
6.1 Arm/Disarm Control
The unit can be controlled by the keyswitch, control input 1 or via a keypad. The
keypad also allows instant audiovisual indication of the state of the energizer and
therefore the fence it is powering.
If there are two ways to control the energizer both connected at once, i.e. keypad and
control inputs, then the last change will determine the result. So if the unit is armed
via the keypad and then disarmed at the control input it will disarm.
6.2 Arming the Fence Using the Keypad
●Enter your USER PIN number (four digits long; default is 1 2 3 4) and push the #
key.
●Make sure the red ARM light comes on.
● The keypad will beep twice to conrm that the system is armed.
●The fence will power up and if all is well (no faults) the system will be ready to
deter and detect.
● If there is a fault on the fence and it cannot achieve full voltage, zone 1 or zone 2
LEDs will ash.
● To disarm the system, enter your USER PIN and press #. This will also clear any
fault lights and zone lights which may have been on.
6.3 Turning to Low Power mode
To switch to Low Power mode, enter your USER PIN and press *41#. In Low Power
mode the fence will still be powered and any breach will be detected, but the voltage
will be much lower than normal operation. The ARM light will ash in Low Power
mode.
Enter your USER PIN and press *42# to switch back to Full Power mode.
Alternatively, the unit can be switched to Low Power mode using control input 2, if it
has been programmed accordingly.
6.4 When an Alarm Occurs
If the system is armed and the fence is tampered with, the corresponding Zone Light
will ash on the energizer and then remain on. Relays assigned to alarms will turn
on. If the energizer is connected to a building alarm system for monitoring, an alarm
signal may be sent to the alarm company monitoring the alarm system.

JVA ELECTRIC FENCE SYSTEMS
16
Operation
An alarm will also sound if input 2 is assigned to the “gate input” function and the
gate input is opened and the entry/exit delay time has elapsed.
After the siren has cycled on and off according to the times and numbers set in
options, the siren will stop sounding. The on and off timing is able to be set in the
options. The Strobe will remain on. After a further delay (Auto Rearm Time) the
siren will again respond to the next alarm condition with a new set of on / off cycles.
If the alarm condition (low fence voltage or gate input) is removed, the siren will stop
after the end of the current “on” time (Siren On Time).
If the siren is muted by (entering PIN#) then the siren will enter the next “off” cycle
(Siren Off Time). If the alarm condition is still present (voltage is low) the siren will
sound again after the preset “off” time. If the alarm condition is not present the
energizer is instantly rearmed, irrespective of the auto-rearm setting.
6.5 To Silence the Alarm
●Enter your USER PIN and press #. This will silence the alarm but not disarm the
system; the Armed Light will still be on. If Auto-Rearm is set, the system will be
ready for the next alarm. Note that the following functions have an effect on alarm
timing: Siren On time, Siren Off time, Siren Cycles, Auto Re-arm time).
● The zone lights on the keypad will ash to show where the breach occurred.
●The siren and strobe are ready to respond again if triggered.
● To disarm the system, enter your USER PIN and press # again. The zone light
will remain lit until the Clear Alarm Memory command (*1#) is entered.
● Alternatively, disarming using the key switch will reset the alarm.
6.6 Changing the USER PIN Number
●Enter the old 4-digit USER PIN and press *0#. This enters User Programming
mode.
●Enter your new USER PIN (must be 4 digits) and then #.
●Press *# to exit User Programming mode.
●Make sure your new USER PIN works by using it to arm the energizer.
●The default PIN is 1 2 3 4.
6.7 Standby Battery
Should there be a loss of mains power, the Power Light on the keypad will go off.
If the loss of power is prolonged, the battery may discharge power and become
ineffective. The Power Light will start to ash indicating a battery low power problem.
If the standby battery requires replacement, the Status Light will ash three times.
6.8 Status Light
If the energizer develops an internal fault, the Status Light will ash a code. See
section 7.2 (page 19).

JVA ELECTRIC FENCE SYSTEMS
17
LCD Keypad Operation
7. LCD KEYPAD OPERATION
7.1 Arming/Disarming the Fence Using the Keypad
Enter your USER PIN (Personal Identication Number: four digits long) and push
the # key. Make sure the red ARM light comes on and the keypad beeps twice to
conrm that the system is armed.
The fence will power up and if all is well (no faults) the system will be ready to deter
and detect.
To disarm the system enter your USER PIN and press #.
NOTE: If there is an alarm sounding you will need to enter your PIN twice, once to
silence the alarm and once more to disarm.
7.2 Keypad Status Display
In normal operation the keypad shows a continuous summary of the system status.
For example if the system is disarmed the keypad will display “Ready to Arm”.
If the system is armed then the keypad will display the voltages for each zone in
the system.
Since there can be many things to display the keypad automatically “scrolls” through
all relevant detail. Each screen is show for about 2 seconds. If you wish to hold the
display at a particular point simple press the [#] key. The auto scrolling will stop for
about 20 seconds.
Pressing the [#] key again will advance the display one step.
If a new trouble (AC fail, low battery etc) or alarm occurs, the keypad screen will
jump to the relevant zone, the keypad will beep (unless toggled off) and auto
scrolling will cease for about 3 minutes.
7.3 Changing the Keypad Messages and Address
The messages and each of the 15 zone labels can be changed.
The Dealer Message displays when the system is on standby.
Zone Labels display after the [#] key is pressed during alarm memory or faults.
The programmable Service Message is displayed during AC failure, communication
failure, or low battery.

JVA ELECTRIC FENCE SYSTEMS
18
LCD Keypad Operation
7.3.1 Keys used for changing messages:
[1] [2] Character up [3] not used Emergency not used
[4] <- Cursor left [5] Next Message [6] -> Cursor right Fire not used
[7] [8] Character down [9] Panic not used
[*] [0] Last Message [#] Enter / Exit Bypass not used
To activate the keypad programming mode, enter the [Installer’s Code] [*][0][1][#].
Information may be entered into the keypad in the form of letters (upper and lower
case), numbers (0 - 9), and 22 special symbols. All characters are displayed in the
order: upper and lower case letters, numbers, and special symbols. The [Space]
character precedes the letter A.
To enter a Label, use the [2] key to scroll through the characters until you reach the
desired character. If you scroll past the desired character, the [8] key may be used
to scroll backwards. NOTE: the space character is before the A character (When A
is displayed, press [8] to get a space).
When the desired character is displayed, press the [6] key to move the cursor to the
next character position. The [4] key moves the cursor to the left.
When all characters have been entered, press the [#] key to enter the message and
move to the next message position.
Use the [0] key to move backward through the messages.
NOTE: If you move to the next message using [5] instead of the [#] key you will lose
any changes you made!
To change the keypad address, scroll through the messages until the keypad
displays: “Keypad address __” then change the value by pressing [2] (up) or [8]
(down). Validate by pressing [#].
The message order is:
• SERVICE MESSAGE (Displayed under “SYSTEM TROUBLE”)
• DEALER MESSAGE (Displayed under the standby message: “READY TO ARM”)
• ZONE NAMES
• BAUD RATE (should be left at 2400)
• KEYPAD ADDRESS (should be left at 1)
7.3.2 To Exit Keypad Programming
When you have nished programming, press [*] [#].
NOTE: The keypad will also exit the programming mode if you do not press any key
within a ve minute period.
To return the Keypad to default settings press the emergency button during
power up. This feature was added in keypad rmware version 1.2.
Other manuals for Z28
2
Table of contents
Other JVA Power Supply manuals
Popular Power Supply manuals by other brands

SSI America
SSI America ERP2U Design guide

Rollei
Rollei Power Station 240 manual

Vaillant
Vaillant ecoPOWER 3.0 /2 Installation and maintenance instructions

Motor City Wash Works
Motor City Wash Works 7ELECTFRFLSH014 Document

Granit
Granit B200 instruction manual

HP
HP HPJ3136A Installation and reference guide

Elkron
Elkron AS500/RPT instruction manual

Texas Instruments
Texas Instruments UCC28C56EVM-066 user guide

iseg
iseg THQ Series Technical documentation

Apex Digital
Apex Digital APP2 Usage instructions

StetSom
StetSom INFINITE 20A user manual

Keithley
Keithley 2220-30-1 Declassification and security instructions