JVC KM-IP6000 User manual

Page 1
KM-IP6000 (6 input version)
KM-IP4100 (4 input version)
LIVE PRODUCTION SUITE
SOFTWARE USER’S MANUAL
June 2019
JVCKENWOOD Corporation
JVC Professional Video
http://pro.jvc.com/studio
All information in this document is subject to change without notice.
© JVCKENWOOD Corporation, 2019. All rights reserved.

KM-IP6000 KM-IP4100
MULTI-CAMERA
LIVE PRODUCTION
AND STREAMING
SMARTER - FASTER - EASIER

Table of Contents
Introduction . . . . . . . . . . . . . . . . . . . . . . . . . . . . . . . . . . . . . . . . . . . . . . . . . . . . . . . . . . . . . . . . . . . . . . . 5
GUI overview . . . . . . . . . . . . . . . . . . . . . . . . . . . . . . . . . . . . . . . . . . . . . . . . . . . . . . . . . . . . . . . . . . . . . . . 6
Software Start . . . . . . . . . . . . . . . . . . . . . . . . . . . . . . . . . . . . . . . . . . . . . . . . . . . . . . . . . . . . . . . . . . . . . . . 6
Production Layout Section . . . . . . . . . . . . . . . . . . . . . . . . . . . . . . . . . . . . . . . . . . . . . . . . . . . . . . . . . . . . . . . . . . 8
Layers . . . . . . . . . . . . . . . . . . . . . . . . . . . . . . . . . . . . . . . . . . . . . . . . . . . . . . . . . . . . . . . . . . . . . . . 8
Activity Indicators . . . . . . . . . . . . . . . . . . . . . . . . . . . . . . . . . . . . . . . . . . . . . . . . . . . . . . . . . . . . . . . . . . 8
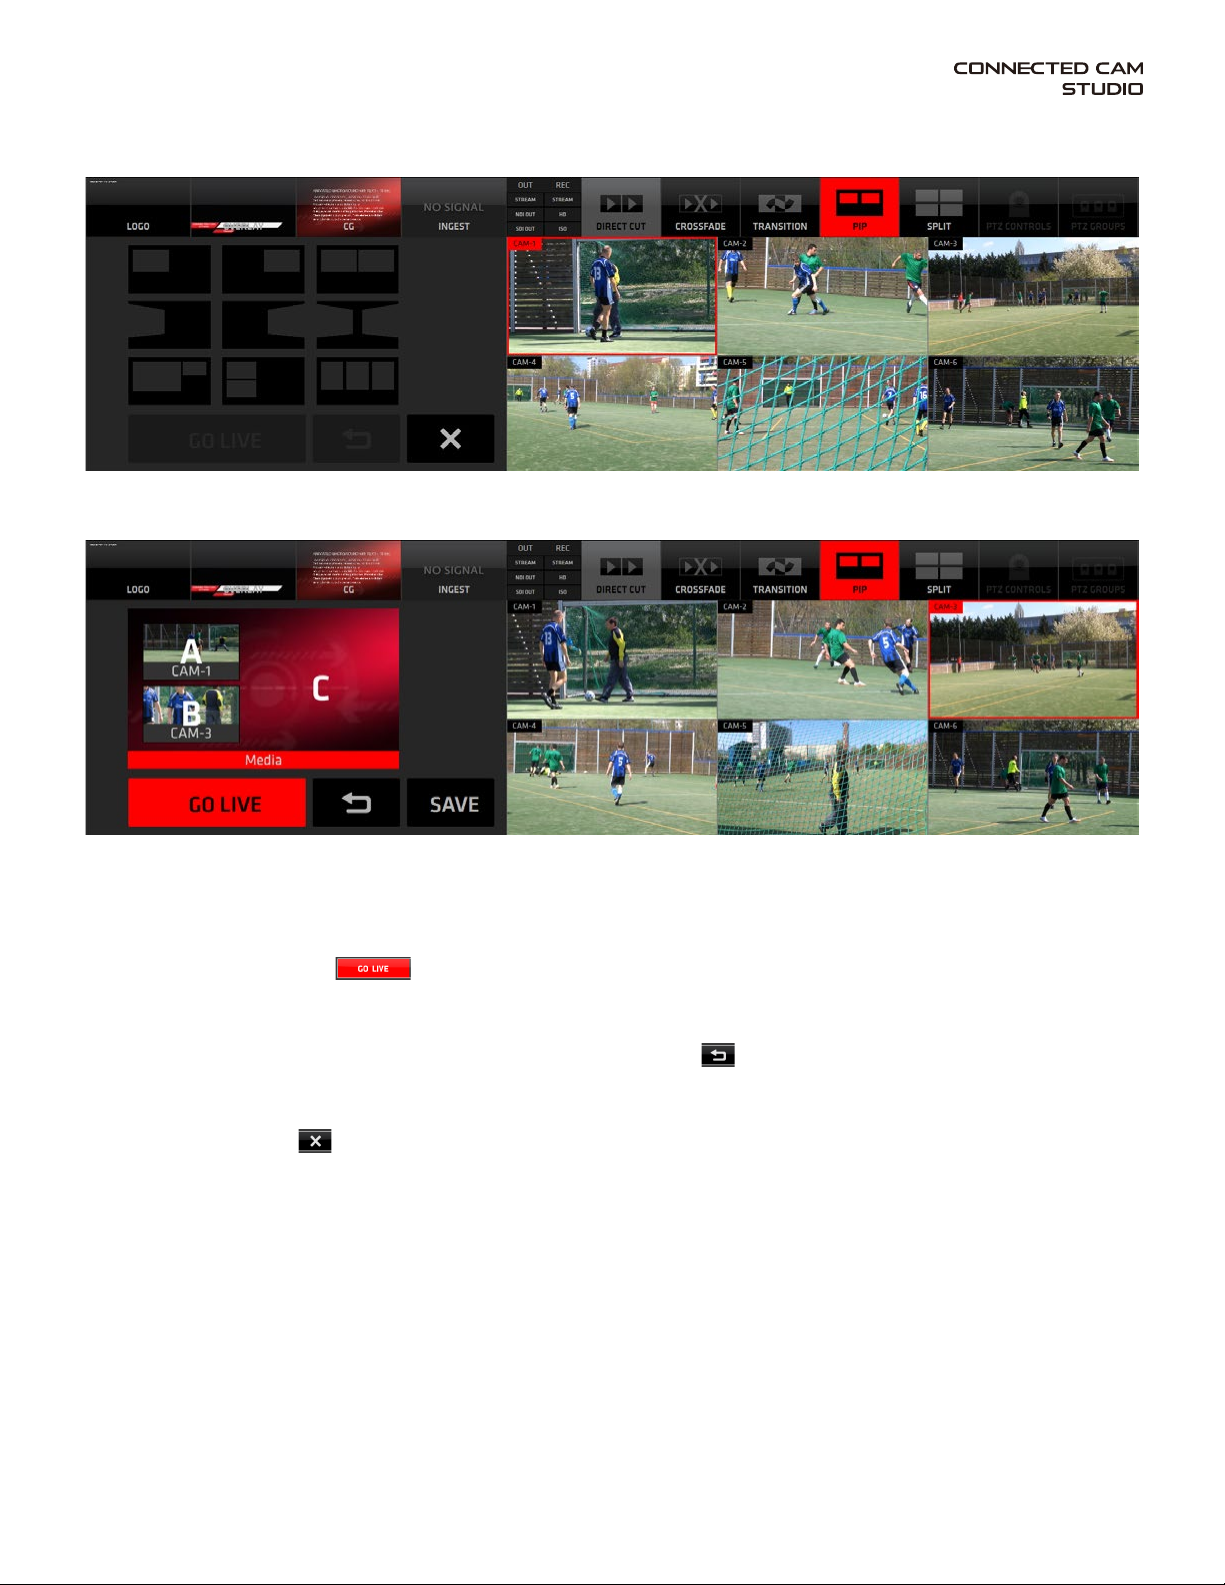
Screen Layout - PIP. . . . . . . . . . . . . . . . . . . . . . . . . . . . . . . . . . . . . . . . . . . . . . . . . . . . . . . . . . . . . . . . . . 8
Screen Layout - Split Screen . . . . . . . . . . . . . . . . . . . . . . . . . . . . . . . . . . . . . . . . . . . . . . . . . . . . . . . . . . . . 10
Mixing Modes . . . . . . . . . . . . . . . . . . . . . . . . . . . . . . . . . . . . . . . . . . . . . . . . . . . . . . . . . . . . . . . . . . . . . 10
Crossfade . . . . . . . . . . . . . . . . . . . . . . . . . . . . . . . . . . . . . . . . . . . . . . . . . . . . . . . . . . . . . . . . . . . . . . . 11
Transitions. . . . . . . . . . . . . . . . . . . . . . . . . . . . . . . . . . . . . . . . . . . . . . . . . . . . . . . . . . . . . . . . . . . . . . . 11
PTZ Camera Control . . . . . . . . . . . . . . . . . . . . . . . . . . . . . . . . . . . . . . . . . . . . . . . . . . . . . . . . . . . . . . . . . 12
Camera Switching Section . . . . . . . . . . . . . . . . . . . . . . . . . . . . . . . . . . . . . . . . . . . . . . . . . . . . . . . . . . . . . . . . . . 12
PGM Monitor . . . . . . . . . . . . . . . . . . . . . . . . . . . . . . . . . . . . . . . . . . . . . . . . . . . . . . . . . . . . . . . . . . . . . 12
Live Camera Monitors . . . . . . . . . . . . . . . . . . . . . . . . . . . . . . . . . . . . . . . . . . . . . . . . . . . . . . . . . . . . . . . . 13
Content Management and Settings Section overview . . . . . . . . . . . . . . . . . . . . . . . . . . . . . . . . . . . . . . . . . . . . . . . . . . 15
Media Tab . . . . . . . . . . . . . . . . . . . . . . . . . . . . . . . . . . . . . . . . . . . . . . . . . . . . . . . . . . . . . . . . . . . . . . . 16
Media IN/OUT Point Editor . . . . . . . . . . . . . . . . . . . . . . . . . . . . . . . . . . . . . . . . . . . . . . . . . . . . . . . . . . . . . 17
Autocut . . . . . . . . . . . . . . . . . . . . . . . . . . . . . . . . . . . . . . . . . . . . . . . . . . . . . . . . . . . . . . . . . . 19
Replays Tab . . . . . . . . . . . . . . . . . . . . . . . . . . . . . . . . . . . . . . . . . . . . . . . . . . . . . . . . . . . . . . . . . . . . . . 20
Replay Capture . . . . . . . . . . . . . . . . . . . . . . . . . . . . . . . . . . . . . . . . . . . . . . . . . . . . . . . . . . . . . 21
Replay Modes . . . . . . . . . . . . . . . . . . . . . . . . . . . . . . . . . . . . . . . . . . . . . . . . . . . . . . . . . . . . . . 23
Replay Favorites and highlights . . . . . . . . . . . . . . . . . . . . . . . . . . . . . . . . . . . . . . . . . . . . . . . . . . . . 24
Autocut in Replays . . . . . . . . . . . . . . . . . . . . . . . . . . . . . . . . . . . . . . . . . . . . . . . . . . . . . . . . . . . 25
Replay Wipes . . . . . . . . . . . . . . . . . . . . . . . . . . . . . . . . . . . . . . . . . . . . . . . . . . . . . . . . . . . . . . 25
Playlists Tab . . . . . . . . . . . . . . . . . . . . . . . . . . . . . . . . . . . . . . . . . . . . . . . . . . . . . . . . . . . . . . . . . . . . . 27
Overlays Tab . . . . . . . . . . . . . . . . . . . . . . . . . . . . . . . . . . . . . . . . . . . . . . . . . . . . . . . . . . . . . . . . . . . . . 28
CG Tab . . . . . . . . . . . . . . . . . . . . . . . . . . . . . . . . . . . . . . . . . . . . . . . . . . . . . . . . . . . . . . . . . . . . . . . 29
CG List Pane Content . . . . . . . . . . . . . . . . . . . . . . . . . . . . . . . . . . . . . . . . . . . . . . . . . . . . . . . . . . 29
CG Operation Procedure. . . . . . . . . . . . . . . . . . . . . . . . . . . . . . . . . . . . . . . . . . . . . . . . . . . . . . . . . 30
CG Object Construction and Editing . . . . . . . . . . . . . . . . . . . . . . . . . . . . . . . . . . . . . . . . . . . . . . . . . . 31
Text Layer Parameters Setup. . . . . . . . . . . . . . . . . . . . . . . . . . . . . . . . . . . . . . . . . . . . . . . . . . . . . . 32
Crawl Text Layer Parameters Setup . . . . . . . . . . . . . . . . . . . . . . . . . . . . . . . . . . . . . . . . . . . . . . . . . . 32
Timer/Score CG Objects . . . . . . . . . . . . . . . . . . . . . . . . . . . . . . . . . . . . . . . . . . . . . . . . . . . . . . . . . 34
Timing Options Tab . . . . . . . . . . . . . . . . . . . . . . . . . . . . . . . . . . . . . . . . . . . . . . . . . . . . . . . . . . . 35
Clock Parameters Setup. . . . . . . . . . . . . . . . . . . . . . . . . . . . . . . . . . . . . . . . . . . . . . . . . . . . . . . . . 35
Game Part Parameters Setup . . . . . . . . . . . . . . . . . . . . . . . . . . . . . . . . . . . . . . . . . . . . . . . . . . . . . 36
Score Parameters Setup . . . . . . . . . . . . . . . . . . . . . . . . . . . . . . . . . . . . . . . . . . . . . . . . . . . . . . . . 36
Timer/Score Live Game Controller . . . . . . . . . . . . . . . . . . . . . . . . . . . . . . . . . . . . . . . . . . . . . . . . . . . 37
Automatic Data Control . . . . . . . . . . . . . . . . . . . . . . . . . . . . . . . . . . . . . . . . . . . . . . . . . . . . . . . . 38
Editing and XML preset . . . . . . . . . . . . . . . . . . . . . . . . . . . . . . . . . . . . . . . . . . . . . . . . . . . . . . . . . 39
Settings Area Menu . . . . . . . . . . . . . . . . . . . . . . . . . . . . . . . . . . . . . . . . . . . . . . . . . . . . . . . . . . . . . . . . . . . . . . 40
SA - System Settings Tab . . . . . . . . . . . . . . . . . . . . . . . . . . . . . . . . . . . . . . . . . . . . . . . . . . . . . . . . . . . . . . 41
General / General tab . . . . . . . . . . . . . . . . . . . . . . . . . . . . . . . . . . . . . . . . . . . . . . . . . . . . . . . . . . 41
Camera Inputs tab . . . . . . . . . . . . . . . . . . . . . . . . . . . . . . . . . . . . . . . . . . . . . . . . . . . . . . 41
Synchronization tab . . . . . . . . . . . . . . . . . . . . . . . . . . . . . . . . . . . . . . . . . . . . . . . . . . . . . 42
Ingest tab. . . . . . . . . . . . . . . . . . . . . . . . . . . . . . . . . . . . . . . . . . . . . . . . . . . . . . . . . . . . 42
Output settings tab . . . . . . . . . . . . . . . . . . . . . . . . . . . . . . . . . . . . . . . . . . . . . . . . . . . . . 42
Tally port selection tab . . . . . . . . . . . . . . . . . . . . . . . . . . . . . . . . . . . . . . . . . . . . . . . . . . . . 42
Streaming - Streaming Destinations / Add New Destination / Encoding tabs . . . . . . . . . . . . . . . . . . . . . . . . . 43
Recording - Recording / ISO recording tabs . . . . . . . . . . . . . . . . . . . . . . . . . . . . . . . . . . . . . . . . . . . . . 44
Layers - Ingest / Logo tabs . . . . . . . . . . . . . . . . . . . . . . . . . . . . . . . . . . . . . . . . . . . . . . . . . . . . . . . 44
Replays settings - Replay cameras / Replay settings / Lead In/Out Wipes tabs . . . . . . . . . . . . . . . . . . . . . . . . 45
Appearance - PIP / SPLIT / Background tabs . . . . . . . . . . . . . . . . . . . . . . . . . . . . . . . . . . . . . . . . . . . . 46
Audio settings . . . . . . . . . . . . . . . . . . . . . . . . . . . . . . . . . . . . . . . . . . . . . . . . . . . . . . . . . . . . . . 46
About . . . . . . . . . . . . . . . . . . . . . . . . . . . . . . . . . . . . . . . . . . . . . . . . . . . . . . . . . . . . . . . . . . 47
Exit . . . . . . . . . . . . . . . . . . . . . . . . . . . . . . . . . . . . . . . . . . . . . . . . . . . . . . . . . . . . . . . . . . 47
SA - Audio Tab . . . . . . . . . . . . . . . . . . . . . . . . . . . . . . . . . . . . . . . . . . . . . . . . . . . . . . . . . . . . . . . . . . . . 48
Audio Mixer . . . . . . . . . . . . . . . . . . . . . . . . . . . . . . . . . . . . . . . . . . . . . . . . . . . . . . . . . . . . . . . . . . . . . . 48
SA - Replays Tab . . . . . . . . . . . . . . . . . . . . . . . . . . . . . . . . . . . . . . . . . . . . . . . . . . . . . . . . . . . . . . . . . . . 49
SA - JVC Camera Control Tab . . . . . . . . . . . . . . . . . . . . . . . . . . . . . . . . . . . . . . . . . . . . . . . . . . . . . . . . . . . . 50
IP Connect . . . . . . . . . . . . . . . . . . . . . . . . . . . . . . . . . . . . . . . . . . . . . . . . . . . . . . . . . . . . . . . . 50
Control . . . . . . . . . . . . . . . . . . . . . . . . . . . . . . . . . . . . . . . . . . . . . . . . . . . . . . . . . . . . . . . . . . 50
Zoom and Focus . . . . . . . . . . . . . . . . . . . . . . . . . . . . . . . . . . . . . . . . . . . . . . . . . . . . . . . . . . . . . 51
PTZ Presets . . . . . . . . . . . . . . . . . . . . . . . . . . . . . . . . . . . . . . . . . . . . . . . . . . . . . . . . . . . . . . . 51
PTZ Groups Presets . . . . . . . . . . . . . . . . . . . . . . . . . . . . . . . . . . . . . . . . . . . . . . . . . . . . . . . . . . . 52
PTZ Presets GUI . . . . . . . . . . . . . . . . . . . . . . . . . . . . . . . . . . . . . . . . . . . . . . . . . . . . . . . . . . . . . 53
PTZ Groups Presets GUI . . . . . . . . . . . . . . . . . . . . . . . . . . . . . . . . . . . . . . . . . . . . . . . . . . . . . . . . 54
Support . . . . . . . . . . . . . . . . . . . . . . . . . . . . . . . . . . . . . . . . . . . . . . . . . . . . . . . . . . . . . . . . . . . . . . . 55

Copyright notice.
This document, all images, text, custom graphics, button icons, the collection and compilation and assembly thereof, and the
overall look and design of this document are the exclusive property of Streamstar and are protected by international copyright
laws. The JVC logo is property of, and used with permission of JVCKENWOOD corporation. The contents of this document may
be used exclusively for information purposes as a learning resource for users of the described systems. Any other use including
reproduction, modification, distribution, transmission, re-publication, display or performance of the contents of this document
without prior written consent of Streamstar is expressly forbidden.

Page 5
WELCOME
Congratulations on your purchase of the CONNECTED CAM STUDIO, the ideal live production system for the
new generation of digital native media professionals.
CONNECTED CAM STUDIO - Live Production Software
The CONNECTED CAM STUDIO SW is specifically designed for live streaming production. It features
a highly eective, intuitive touch screen user interface, that has been fine tuned and tested in thousands
of real life productions. It oers professional live production features that will enable you to produce
broadcast quality productions with unprecedented speed, eciency, flexibility and extreme ease-of-use.
END USER LICENSE AGREEMENT
After the installation/reinstallation/update of the SW at first run the END USER LICENSE AGREEMENT
page will be displayed. Scroll through the text and confirm your agreement with its terms by pushing the
active AGREE button at bottom right.

Page 6
GUI - Graphical User Interface Overview
The Live Production Software is operated via an innovative, touch screen user interface, perfectly tuned
for live streaming production.
It was designed to fulfill all the requirements of a live streaming production in the easiest, most ecient
and user-friendly way. It allows a high level of sophistication, creative freedom, operational flexibility
while maintaining a perfect control of every aspect of the production at all times.
The GUI is designed to allow the control of processes, functionalities and work flows in the most logical
and practical way. Its layout is divided into 3 main, horizontal sections, containing logically related, opera-
tional elements and functions.
1. PRODUCTION LAYOUT section - on top
2. PGM & CAMERA SWITCHING section - in the middle
3. CONTENT MANAGEMENT & SETTINGS section - at bottom
At the very bottom is an additional information bar displaying some helpful info on system status.
PRODUCTION LAYOUT
Section
PGM & CAMERA SWITCHING
Section
CONTENT MANAGEMENT
& SETTINGS section
Info bar
PGM
OUTPUT MONITOR
CAMERA
MONITORS/SWITCHES
NOTE: The GUI of the 4 cam version is modified to make
the best use of the available desktop space. The
LAYERS switches are located on the left of the
PGM. (See 4 cam GUI screenshot on the left)
The PGM and Live Camera monitors desktop
areas are occasionally used to display certain
control elements, logically related to various
functionalities. As you learn the GUI you will
gradually find out how it all makes perfect sense
and allows for incredible speed of operation.
SOFTWARE START
Start the CONNECTED CAM STUDIO SW application in a Windows OS usual way
by double clicking its desktop icon.
KM-IP6000
KM-IP4100

Page 7
After application start the 1st GUI screen appears.
Two large buttons appear in the center of the CONTENT MANAGEMENT AREA.
1 - NEW PROJECT - a new project is created and you can start working immediately
2 - LOAD PROJECT - a dialog screen appears with a list of previously saved projects.
CREATING A PROJECT
1 2
LOAD PROJECT dialog screen:
1. Select an existing project by tap/click on its name in the list
2. Edit the name of projects by tap/click on the PENCIL icon besides the names of projects
3. Delete projects by tap/click on the TRASH Icon
4. Create a new project by typing its name into the text input field and tap/click CREATE
NOTE: To get you started after the SW installation a QUICK TUTORIAL is provided to get basic operational instructions.
3
4
2
1
KM-IP4100

Page 8
PRODUCTION LAYOUT Section
The Production Layout section contains the following elements:
1. LAYERS - Logo / Overlay / CG / Ingest
2. ACTIVITY INDICATORS
3. MIXING MODE SWITCHES
4. SCREEN LAYOUT SWITCHES - PIP / Split screen
5. PTZ CAMERA CONTROLS - reveals PTZ Camera controls / PTZ Groups controls
It is located at the very top of the GUI and contains all important functionality controls for the creation
of the layout and the overall appearance of your production (PGM output) as well as controls of certain
related software functions. The 6 cam version (image above) and 4 camera version (image below) are
dierently organized to make the best use of screen space.
LAYERS:
Contains four switches for video layers superimposed on top of the camera layer:
LOGO on/o switch for the LOGO layer
(for a description go to the SETTINGS / LAYERS / LOGO section on page 44.)
OVERLAYS on/o switch for the OVERLAYS layer
(for a detailed description go to the CMA / OVERLAYS TAB section on page 28.)
CG on/o switch for the Character Generator layer
(for a detailed description go to the CMA / CG TAB section on page 29.)
INGEST on/o switch for the INGEST layer
(for a description go to the SETTINGS / LAYERS / INGEST section on page 44.)
KM-IP6000
KM-IP4100
ACTIVITY INDICATORS:
6 indicators providing status info about system processes.
Their function is informative only.
OUTPUT - indicators of dierent types of outputs
RECORDING - indicators of recording functions
SCREEN LAYOUT SWITCHES
PICTURE IN PICTURE - enables the PIP screen layout functionality
Operating procedure:
1. Tap/click the PIP layout switch to select/activate it
If there is no PIP layout setup yet, you need to set it up to be able to use it.
Tap/click and HOLD the PIP switch for over a second to reveal the PIP SETUP window which opens
above the PGM monitor
2. Tap/click one of the 9 preset templates available - the selected template zooms in (image 1 next page)
3. Select the sources for the individual PIP areas by simply tap/click on the source preview monitor
PLEASE NOTE: a source for a PIP can be a live camera, media file, playlist or a replay
The software prompts you to assign a source by highlighting the area in RED that need to be set ...
A... B... C... depending on the number of PIP areas in the selected template (image 2 next page)
13 4 52
1
2 34 5
KM-IP6000
KM-IP4100

Page 9
Operating procedure - continued...
4. When all PIP screen areas are populated/filled with content a red GO LIVE button at bottom activates
5. Tap/click the GO LIVE button to switch the SPLIT SCREEN layout to live PGM
6. Tap/click SAVE to save the PIP layout - the saved PIP layout is highlighted in grey in the PIP Templates
You can setup another PIP and save it if you wish or exit the PIP SETUP (see point 8b)
7. When assigning sources to PIP areas tap/click BACKSPACE to go back a step,
press twice to go back two steps and so on
... this way you can modify/clear the existing PIPs
8. Tap/click CANCEL to do the following:
a: when in the Content selection state - to cancel and go back to the PIP Templates selector to choose
another template
b: when in PIP Templates selector - to exit the PIP SETUP window
9. The last PIP used in live PGM is assigned to the main PIP SWITCH button in the top section menu
for fast, repeated use.
If you wish to select another PIP simply tap/click and HOLD the PIP switch to access the PIP Setup
window and select another saved PIP or create a new one.
10. To re-assign new content to areas in an already setup PIP template, tap the PIP template, select the
area you wish to re-assign and select a new source by a tap/click on it’s preview monitor.
Image 1 - Selecting the PIP template
Image 2 - Assigning sources to the PIP template areas
KM-IP6000
KM-IP6000

Page 10
SPLIT SCREEN - enables the split screen layout functionality
Operating procedure:
The operating procedure of the SPLIT SCREEN is identical to the of the PIP.
Please refer to the previous page for instructions. The only dierence is that now you are working with
SPLIT SCREEN TEMPLATES.
Selecting a SPLIT template
Selecting sources for the SPLIT areas
MIXING MODES:
Tap/Click any of the three switches to select a switching mode with their respective functionality controls.
DIRECT CUT - enables a direct cut between sources
CROSSFADE - enables automated crossfade transition between sources
TRANSITION - enables automated wipe transition between sources
Adjusting the Mixing Modes parameters:
DIRECT CUT - Tap/Click the button to select the DIRECT CUT mode. There are no parameters to adjust.
CROSSFADE - [Tap/Click and HOLD] the CROSSFADE button for longer than a second to reveal the
CROSSFADE ADJUSTMENT controls.
TRANSITION -[Tap/Click and HOLD] the TRANSITION button for longer than a second to reveal the
TRANSITION ADJUSTMENT controls.
KM-IP6000
KM-IP6000

Page 11
Crossfade Duration Adjustment:
The image bellow shows the CROSSFADE ADJUSTMENT controls window open.
- Use the DURATION BAR to adjust the duration of the crossfade. Slide the red bar to the right to increase
the crossfade duration, ...to the left to decrease it.
Or tap/click anywhere on the duration adjustment bar to set a new duration.
- After a new value is set the Preview window above (with letter A) will play a crossfade animation
previewing the newly set duration.
- When you are OK with the new duration, tap/click OK to confirm the new duration time value.
The CROSSFADE DURATION ADJUSTMENT window closes and from now on all CROSSFADES
will be executed with the new duration time value.
The CANCEL button closes the window without any changes to the Crossfade duration.
Transition Template Selection and Duration Adjustment:
The next image bellow shows the TRANSITION ADJUSTMENT controls window open.
It contains 9 Transition Template buttons. Tap/click any of them to select a desired transition.
Use the TRANSITION DURATION BAR to adjust the duration of the transition. Slide the red bar to the right
to increase the transition duration, ...to the left to decrease it.
Or tap/click anywhere on the duration adjustment bar to set a new duration value.
After a new template is selected and /or new duration is set the Preview window above (with letter A)
will play a transition animation previewing the newly set transition template and duration.
When you are done with the transition setup tap/click OK to confirm the new transition settings.
The TRANSITION ADJUSTMENT window closes and from now on all TRANSITIONS are executed with the
new transition and duration time setting. The last selected transition is assigned to the TRANSITION
button for fast access. If you wish to select another transition use the above described process again.

Page 12
PGM / CAMERA SWITCHING SECTION
This section features the PGM output monitor and the live camera monitors/switches.
PGM Monitor
The large PGM monitor on the left is displaying the composite system output - PGM and the AUDIO LEVELS
indicator superimposed on top.
The audio level indicator is not part of the composite signal created and broadcast by the SW. It is displayed
for information and visual control of the audio output only.
JVC PTZ CAMERA PRESETS and PTZ CAMERA GROUP PRESETS controls display
If JVC PTZ cameras are connected to the system, activating the PTZ CAMERA PRESETS and PTZ CAMERA
GROUP PRESETS buttons will display their respective control switches superimposed over the camera
preview and PGM preview monitors.
NOTE: For a good understanding of these functions we recommend first to go through and familiarize yourself thoroughly
with the CAMERA SWITCHING and JVC CAMERA CONTROL functionalities. Therefore we will discuss the
PTZ CAMERA CONTROL functionalities in detail in the JVC CAMERA CONTROL section on page 50.
PTZ CAMERA CONTROL
The last 2 switches in the top menu section are:
PTZ CONTROLS - which enable the control of individual PTZ CAMERAS over IP
PTZ GROUPS control - which enable the PTZ CAMERA GROUPS control over IP
These 2 functions become available automatically when JVC PTZ cameras are connected to the
CONNECTED CAM STUDIO.
PGM OUTPUT MONITOR CAMERA MONITORS/SWITCHES
KM-IP6000
KM-IP4100

Page 13
Live Camera Monitors
The Live Camera Monitors have several functions:
a, Live camera previews
b, Switches for camera switching - tap/click any of the live camera monitors to switch that camera to PGM.
c, Autocut switches display
If other content than a live camera is played in PGM
(e.g. a Media file or a Replay)
there will be AUTOCUT SWITCHES / BUTTONS
displayed at bottom of the CAMERA MONITOR.
Tap/click on the AUTOCUT to specify which camera
will go to live PGM once the Media/Replay is finished.
d, PTZ CAMERA PRESETS control switches
If JVC PTZ cameras are connected to the system the
PTZ CAMERA PRESETS control switches may be
displayed superimposed over the corresponding
camera monitors to allow instant access to PTZ
camera presets.
Two CONTROL SWITCHES ( 1 ) become visible by
enabling the PTZ CAMERA button in the TOP MENU.
1a - PTZ CAMERA PRESETS display button
1b - SETTINGS hot-key button to allow quick access to PTZ camera settings in the CMA.
Activating the PTZ PRESETS button (1a) reveals the existing PTZ PRESETS ( 2 ) in this PTZ.
Click/tap a Preset button to execute a PTZ camera move to the selected preset.
Click/tap the [X] button to close the presets display.
Click/tap the PTZ CAMERA CONTROL button to hide the PTZ CONTROL SWITCHES and return to a normal
camera switching mode.
2
1
1a 1b
KM-IP6000

Page 14
CONNECTED CAM STUDIO KM-IP6000
6 CHANNEL LIVE PRODUCTION AND STREAMING STUDIO

Page 15
CONTENT MANAGEMENT and SETTINGS Section
This section contains all control elements of the functionalities available in CONNECTED CAM STUDIO.
It’s content displays various controls depending on what is selected.
It provides great flexibility and speed of operation.
This part of the GUI is subdivided into two major SUB-sections:
A- CONTENT MANAGEMENT AREA (CMA) (marked with letter A)
B- SETTINGS AREA (SA) (marked with letter B)
The CMA (Content Management Area) contains 5 TABS on the left that reveal the operational controls for
the MEDIA LIBRARY, REPLAYS, PLAYLISTS, OVERLAYS and CG controls.
The SA (Settings Area) has 4 TABS on the top that reveal the control elements for:
SYSTEM SETTINGS, AUDIO MIXER, REPLAYS, JVC CAMERA CONTROL.
The image below shows the PLAYLISTS controls in CMA and SYSTEM SETTINGS in the SA.
This image shows the AUDIO MIXER controls in CMA and Replay Capture buttons
with the CG Live game controller in the SA.
CMA - Content management area displaying the AUDIO MIXER SA - Settings area displaying
CG TIMER/SCORE CONTROLLER
CMA - Content management area displaying the PLAYLISTS controls SA - Settings area displaying
SYSTEM SETTINGS buttons
Load Project Access and manage files in OS
PLAYLISTS
REPLAYS
OVERLAYS
CG
Character generator
MEDIA LIBRARY
JVC CAMERA CONTROL
REPLAYS
AUDIO MIXER
SYSTEM SETTINGS
A B

Page 16
1
A B
23 4 5 6
7 8
9
Media List Item
1. Media Video Monitor - thumbnail /switch - tap/click it to switch the media file to live PGM.
Media playback is indicated by a red bar moving across the media video preview thumbnail
- when selecting content for a PIP or SPLIT area tap/click will assign the media to a PIP/SPLIT area.
2. Media file info - contains information about the media file status
- 1st row: name of media file | date created | frame-rate
- 2nd row: entire media duration time | selected duration - when IN/OUT points are set for the media
- 3rd row left: media audio indicator icon
- 3rd row right: large countdown timer displaying the remaining time when the media is playing live
3. Media In/Out Points Editor button - tap/click to enter the media In/Out points editor.
The functionality is described in detail on the next page.
4. Media Preview button - tap/click it to preview the media file in the Media Video Monitor thumbnail
The preview progress is indicated by a blue progress bar moving across the Preview button
A media can be cut to live PGM anytime during the preview by a tap/click on the thumbnail media player
5. Assign to Playlist button - used to assign the media files to a Playlists
Tap/click the button -> a dialog box appears that enables you to select a playlist (or to create a new one)
and add this media file to it. (The procedure is described in detail in the PLAYLISTS section on page 27.)
6. Loop button - sets a media file into a loop
- tap/click it several times to cycle through the various loop options
7. Audio Mute switch - mute switch for Media audio
8. Sorting buttons - move Media files up / down in the list
9. Scroll bar - scroll the media files list
CMA (Content Management Area) - MEDIA Tab
Opens the MEDIA LIST pane with all interface elements to operate the MEDIA playback functionality.
The MEDIA pane top bar contains 2 TABS:
A - SELECT MEDIA DIRECTORY - Windows OS access to select the directory which contains your video files
B - OPEN MEDIA DIRECTORY - Windows OS access to manage the selected directory content
Media List Item
represented by a line in the Media List - it contains all controls to operate and manage the media file
NOTE: When the media is playing the AUTOCUT function is active on the camera switches allowing you to choose to which
camera the system will switch after the media is finished.
Tap any camera switch to cut out of the media playback at any time.

Page 17
MEDIA IN/OUT POINTS EDITOR
Enables you to trim your media file by setting up IN/OUT points for media playback.
The functionality is non-destructive and your physical media files are untouched.
You can reset the IN/OUT points at any time.
Enter the IN/OUT points editor by tap/click on any MEDIA IN/OUT POINTS EDITOR BUTTON in the media
file list display - indicated by the yellow arrows in the image bellow.
IN/OUT POINTS control elements functionality description
The MEDIA IN/OUT POINTS EDITOR pane contains several elements that enable you to easily and precisely
setup the media playback In/Out points to prepare your media for playback in your live production.
1st row - PREVIEW/EXIT/ DURATION/ RESET (left to right)
A, Preview Media Video player
B, media info display - Media file name and entire duration | edited duration
C, media In/Out Points Editor EXIT BUTTON
D, playback duration time of media - between the IN and OUT points.
If no In/Out points are set it shows the entire media duration.
E, RESET In/Out Points BUTTON - clears the In/Out Points and resets media playback to the entire
duration of the media file
IN/OUT points control elements functionality
NOTE: When a media is playing in Live PGM the MEDIA IN/OUT points editor button is disabled for that media file
and In/Out points editing is NOT available - indicated by the red arrow in the image above.
A B C D E

Page 18
MEDIA IN/OUT POINTS SETUP PROCEDURE
1. Open the Media In/Out Editor
2. Tap/click on the timeline to position the playhead at a desired In Point location
3. Use Video Navigation control elements to fine tune the In Point location
4. Tap/Click the Mark In button
5. Repeat 2. and 3. to locate the Out Point
6. Tap/Click the Mark Out button
7. Tap /Click the GO TO IN Point button
8. Tap /Click the PLAY button to preview the media playback
9. Tap /Click the EXIT In/Out Points Editor button to go back to the Media List View.
3rd row - TIMELINE BAR
Tap/click anywhere on the Timeline Bar to move the playhead to that location. It is indicated by a red line.
A numeric display bellow the Timeline Bar indicates the current time/location of the playhead.
To set the IN or OUT point to that location tap/click the MARK IN or MARK OUT buttons above.
The IN/OUT point is set and the indicator moves to that location, visually identifying the In/Out position.
Use this procedure to set your in out points roughly and fine tune the positions using the 4th row controls.
4th row - VIDEO NAVIGATION CONTROLS (left to right)
L - GO TO FRONT - moves the playhead to the beginning of the media
M - REWIND 1 SEC. - moves the playhead 1 second towards the beginning of the media
N - STEP BACK 1 FRAME - moves the playhead 1 frame towards the beginning of the media
O - PLAY - plays the media in the PREVIEW Video player on top left from the current playhead location
P - STEP FORWARD 1 FRAME - moves the playhead 1 frame towards the end of the media
Q - FORWARD 1 SEC. - moves the playhead 1 second towards the end of the media
R - GO TO END - moves the playhead to the end of the media
2nd row - IN/OUT POINTS SET/NAVIGATE (left to right)
F - GO TO IN Point - moves the playhead to the IN point location
G - IN POINT Time - displays the IN point time
H - MARK IN Point button - tap/click to set the IN point
I - MARK OUT Point button - tap/click to set the OUT point
J - OUT POINT Time - displays the OUT point time
K - GO TO OUT Point - moves the playhead to the OUT point location
NOTE: For a manual / keyboard entry of In/Out points DOUBLE CLICK on any of the digit pairs in the IN and OUT
POINT DISPLAY and enter a desired numeric value.
F
M N O P Q RL
G J KH I
TIMELINE BAR

Page 19
AUTOCUT
At this point we need to explain the AUTOCUT functionality
It is an unique automated switching feature of the CONNECTED CAM STUDIO production SW inherently
connected with Media and Playlists playback. It allows you to select a Camera, which will be switched to
Live PGM after a Media File or Playlist playback (further: “M/PL”) reached its end.
Procedure to operate:
1. When a M/PL is switched to Live PGM a darkened area = AUTOCUT SWITCH appears in the lower part of
all Live Camera Monitors.
2. Tap/click on any of them, to activate it.
After the M/PL reaches its end a camera with the active AUTOCUT switch is automatically switched
to Live PGM.
By default, when a M/PL is switched to Live PGM, the AUTOCUT SWITCH of a camera is activated,
that was last in live PGM, before the M/PL was played.
Tap/click above the AUTOCUT SWITCH inside the Live Camera Monitor will terminate the AUTOCUT
function and normally switch that camera to Live PGM as usual.
A COUNTDOWN TIMER inside the AUTOCUT button indicates the remaining time of the M/PL.
If a M/PL is set to loop, the countdown timer is showing the remaining time of the M/PL currently playing.
AUTOCUT switches
AUTOCUT switches
1
1
2
KM-IP6000

Page 20
CMA (Content Management Area) - REPLAYS Tab
CONNECTED CAM STUDIO features an extremely powerful and unique replay system specially designed
to make the replays operation fast and easy.
The CMA Replays Menu reveals the REPLAYS LIST of all captured REPLAY SETS.
Each REPLAY SET in the Replays List contains all interface elements to operate the REPLAY functionality.
The REPLAY pane top bar contains 4 TABS:
A -LOAD PROJECT - allows the selection of and existing or creation of a new project
B - OPEN PROJECT DIRECTORY - Windows OS access to manage the project directory content
C - FAVORITES - view only the replay sets that contain a favorite marked replay
D - ALL - view all replay sets captured
Each REPLAY SET contains the following controls/buttons:
1. Tag editor - name a replay set / add a text note “TAG” for easy identification
2. Time of capture - color coded time signature of the captured Replay set
3. Replay TAG - display of replay set Tag
4. Preview button - triggers the display of video monitors to preview the captured replay set
Tap/click a preview to cut the replay of a camera to live PGM OUT
While playing a preview a blue progress bar in the preview button indicates the playhead position
5. SRP replay mode - activation switch (Sequential Replay Playback)
6. DRCS replay mode - activation switch (Dynamic Replay Camera Switching)
7. Camera switches - tap/click any of the camera replay buttons to switch that camera replay to PGM.
Replays are cut IN and OUT to PGM with a lead-in and a lead-out animation - called “WIPE”
The Wipes setup and activation is described in the Settings section under REPLAYS/Settings (page 19)
8. Sorting buttons - move a set of Replays up and down in the list
9. Delete button - deletes a set of Replays from the list and the system
10. Scroll Bar - scroll up and down the list
11. Replay Capture buttons - used to capture replays of 3 dierent lengths, which can be set in the
Settings/Replays section. Go to page 45. for detailed description.
REPLAY SET
145 6 8 9
1110
2
3
A B C D
7 7
This manual suits for next models
1
Table of contents
Other JVC Recording Equipment manuals

JVC
JVC PK-VS4GD3G User manual

JVC
JVC SEA-E30B User manual

JVC
JVC XL-R910SL User manual

JVC
JVC XL-R910SL User manual

JVC
JVC XL-R910 User manual

JVC
JVC KM-H3000 User manual

JVC
JVC VU-LD20U User manual

JVC
JVC HR-S5900EG User manual

JVC
JVC BR-HD50U - Compact HDV/DV Format Video... Quick start guide

JVC
JVC HR-J6009UM User manual

JVC
JVC HM -DR10000EU User manual

JVC
JVC KD-G411 User manual

JVC
JVC SEA-33 User manual

JVC
JVC XR-D400SLE User manual

JVC
JVC HR-V610EX User manual

JVC
JVC XL-R5000BKB User manual

JVC
JVC XL-R5000BK User manual

JVC
JVC KSSRA100 - Vehicle Sirius Satellite Radio... Guide

JVC
JVC KD-LH305 User manual

JVC
JVC SR-S365U User manual