Kabuto WG-1 User manual

WG-1
INSTRUCTIONMANUAL
BE SURE TO READ THIS MANUAL BEFORE USING THE HELMET.
KEEP THE MANUAL IN A SAFE PLACE FOR FUTURE REFERENCE.
NOTES BEFORE USE
2013年04月版

Chinstraps play an important role under an accident, preventing the helmet from coming off.
In order to maintain the original performance of the helmet, make sure to adjust "Chinstraps length" and "Adjustment locks
positions" properly and fasten "Strap buckle" correctly.
Strap buckle is the retention system at the end of both chinstraps.
Try on the helmet before use!
Adjusting the Chinstrap
Adjust the chinstrap to fit your head. It generally should be just long enough to
leave space for 2 to 3 fingers horizontally when fastening the chinstrap.
Try on your helmet before riding, and adjust the length of the "chinstrap", the position
of the "adjustment locks" and the fit of "TRIFIT Adjuster" to fit helmet to your head.
See "pw: TRIFIT Adjuster" for how to adjust TRIFIT Adjuster
Adjusting the Chinstrap
O-ring
Strap holder
Strap buckle
Release button
Bind the strap with the “O-Ring” and “Strap holder” at the end.
Shorten
Lengthen
*Side view
01 Chinstraps
●Make sure to fasten the strap firmly. It is dangerous to ride a bicycle without fastening the chinstrap.
●If the strap buckle is not fastened (ie, you don’t hear it click), or if it is fastened loosely, the helmet may come off in an
accident, leading to death or serious injury.
Fastening the strap buckle Releasing the strap buckle
Strap Buckle Strap buckle
Release
button
Push
Push Release
Be careful not to pinch your
skin when fastening the strap
buckle.
Fastening the Strap Buckle
Warning!
Warning!
3
Strap buckles will be released by pushing the release
button.
Make sure the strap
buckle is facing the
correct direction.

●It is very dangerous if the chinstrap is not inserted in the way as illustrated.
It can be slipped out when subjected to a strong pressure such as fall, and the helmet may come off.
Make sure to insert the chinstraps into the buckles properly as the illustration.
●It is very dangerous if the strap buckle is inserted upside down.
The chinstrap will be loose and the helmet will not fit your head firmly.
Adjusting Adjustment Locks
①Open the cover of the adjustment lock in the direction shown by
the arrow.
②Move the adjustment lock up or down to change the position.
③When the adjustment lock is placed properly, close the cover
until you hear a snapping sound.
Adjustment
lock
Put on the helmet, fasten the strap buckle and adjust the adjustment locks so they can be placed firmly on the side of your
face. Check that the Apart is placed correctly. If the chinstrap around your ears is loose or tight, change the position of the
adjustment lock.
Lock the cover securely after changing the position of the adjustment locks. If the helmet is
used without locking the cover securely, the strap will be loose and the helmet may come off.
Adjustment
lock
②
Chin strap ①・③
Cover
Warning!
Warning!
4
●How to change the adjustment lock position
Correct
positions of the
chinstraps

Turn the dial to the left
Loosen Tighten Turn the dial to the right
Adjusting TRIFIT Adjuster Dial
●
Use the Adjuster dial for
adjustment. Do not forcibly
loosen/tighten the adjuster without
using the dial. It may break the
mechanical system inside the dial.
●
Be careful with your hair,
especially long hair, so it does not
get tangled in the TRIFIT Adjuster.
Hold the front part and turn the dial.
"TRIFIT Adjuster" is the mechanism at the rear of the helmet to keep the helmet from moving.
Adjust TRIFIT Adjuster so it will keep the helmet on your head securely.
First, loosen TRIFIT Adjuster dial, and put on the helmet.
Then, hold the front side of the helmet against your head and tighten the adjuster dial.
02 TRIFIT Adjuster
Hold the front side of the helmet and
tighten the TRIFIT Adjuster using the
adjuster dial.
Arranging TRIFIT Adjuster Position
You can change the position of TRIFIT Adjuster either backward or forward with its arm, and to 3 different angles at the
rear. Select the most comfortable angle.
■Switching the arm attachment position
(backward and forward)
When switching the arm position either to backward or
forward, make sure to hold near the base of the arm attaching
part. Pull gently and it can be removed. When attaching, push
the pin at the edge of the arm into the basket hole (Fig.1).
* If the fitting is loose even after TRIFIT Adjuster is tightened maximum,
attach the arms into the forward holes.
basket holesbasket holes
Pin
Attach backward
Attach forward
Fig. 1
5
Hold the base
of the arm to
detach
Warning!

Please refer to Parts List on our website for more information
about replacement.
http://www.ogkkabuto.com
Replacement TRIFITAdjuster is
available.
Replacement TRIFIT Adjuster
Every adjuster of KABUTO, including TRIFIT Adjuster is designed exclusively for a
particular model. Be sure to purchase a replacement adjuster compatible with your helmet.
Replacement “TRIFIT Adjuster”
Detach/ Attach TRIFIT Adjuster
■
Attach
Push the pins at the both edges of the arm into the basket
holes. Then place the fourth hole over the mounting projection
at the rear, and slide into it by pushing. (Fig. 4) After attaching,
makesurethechinstrapsareplacedinthepositionas
indicated in (Fig. 5) .
■Adjusting TRIIFIT Adjuster Angle (low, mid or high)
Hold near the base of TRIFITAdjuster and slide it up or down
(low, mid or high) to adjust the angle. (Fig. 2)
The forth bigger hole at the bottom is used to detach/ attach
TRIFITAdjuster(Fig.3).Makesure tochange theangle
carefully, or the adjuster will be detached from the fourth hole.
The fourth hole
A
B
C
Fig. 2 Fig. 3
TRIFITAdjusterTRIFITAdjuster
Mounting partMounting part
Fig.4
Chinstrap
position
Chinstrap
position
Fig.5
When adjusting the angle of TRIFIT Adjuster, make sure to
hold near the base of the adjuster. Do not force or twist the
adjuster as this may break the adjuster.
■Detach
Hold the bottom of TRIFITAdjuster mounting part and slide to
the fourth bigger hole as indicated in (Fig.3) . Then hold the
base of the arm mounting part securely and pull gently. By
doing so with the both arms, the Adjuster will be removed.
6
Adjustable
at 3 angles
Placethe
fourthhole
overthe
mounting
projection
Placethe
fourthhole
overthe
mounting
projection
Warning!
Warning!

■A.I. Net*Attached at factory
●Prevents insects from coming in through air intake.
●Improves comfort.
■Winter inner pad*Packaged
●Reduces air intake in cold winter weather.
Replacing A.I. Net (Anti Insect Net) and Winter Inner Pad
Attach linings correctly. Otherwise, the helmet may be uncomfortable.
Three types of linings are packaged standard that can be changed according to usage, desired fit, and weather. Choose
the pads that fit your needs. (A.I. Net is attached at factory.)
03 Linings
A.I. Net
Front
Winter inner pad
Front
Securely attach the linings to the hook-and-loop fastener inside the helmet as indicated.
7
Warning!

■Normal Inner Pads*Packaged
●Improves air intake
Front
Inner Pad
(Front)
Inner Pad
(Top)
Chinstrap Chinstrap
Replacing Normal Inner Pads
Two pads (5mm/10mm) of different thickness are
packaged standard. Change them in order to achieve
a better fit if necessary.
Securely attach the inner pads to the hook-and-loop
fasteners inside the helmet, as indicated in the
figure.
NormalInnerPads
Attach linings correctly.
Otherwise, the helmet may be uncomfortable.
Please refer to Parts List on our
website for more information about
replacement.
http://www.ogkkabuto.com
Linings used every day will wear out over time. Continuing
to use worn linings may lead them to break and cause
poor fit. Old linings should be replaced at an early stage.
Linings wear out over time!
How to Clean Linings
Replacement “WG-1 Linings”
Linings are removable and washable. Keep linings clean by washing periodically. Use warm water (35ºC/95ºF or cooler)
with small amount of hair shampoo or ph-neutral detergent. Hand wash them gently and rinse thoroughly. Dry linings with
a dry cloth after washing, and leave them in a shaded and well-ventilated place. Avoid direct sunlight.
* See Page17 for MOFF cleaning
Contact the shop you purchased the helmet when you purchase a
replacement linings. Make sure the model of your helmet.
8
Remember!
Warning!
Warning!

Wearing your helmet properly
RIGHT WRONG
Your helmet is only effective as protection in case of an accident if it is positioned correctly on your head and the strap is
fastened correctly. Be sure you are wearing the helmet correctly before riding.
04 Wearing Helmet Properly
Wear the helmet so it is level from front to back. Make sure the front of the helmet is just above your eyebrows (check with
a mirror.)
It is important that the length of the chinstrap and adjustment lock be adjusted for correct fitting.
Please make sure to read these Instructions thoroughly before use.
9
Make sure the front
edge of the helmet
is just above your
eyebrows.
Wear helmet level
from front to back.
The front of the
helmet is too far
up, and your
forehead is not
properly covered.
Warning!

Be sure to read these instructions.
Donotleavethehelmetinthedirectsunlight.Theoutercolouroftheshellmaybechanged.
THEEFFECTSOFTHEDIRECTSUNLIGHT
Matteprocessingonthesurfaceofthisproductcouldbepeeledoffiftheattachedstickerisremovedfromthe
surface. To prevent this, never remove the sticker. The same problem may occur also when other sticker are
attachedandremoved.Ifyouattachstickersontheproduct,pleasebeawareoftherisk.
CAUTIONFORMATTECOLOURPRODUCT
Warning!
Warning!
10
●This helmet is designed for bicycle use only. Never use the helmet for purposes or activities other than bicycle riding.
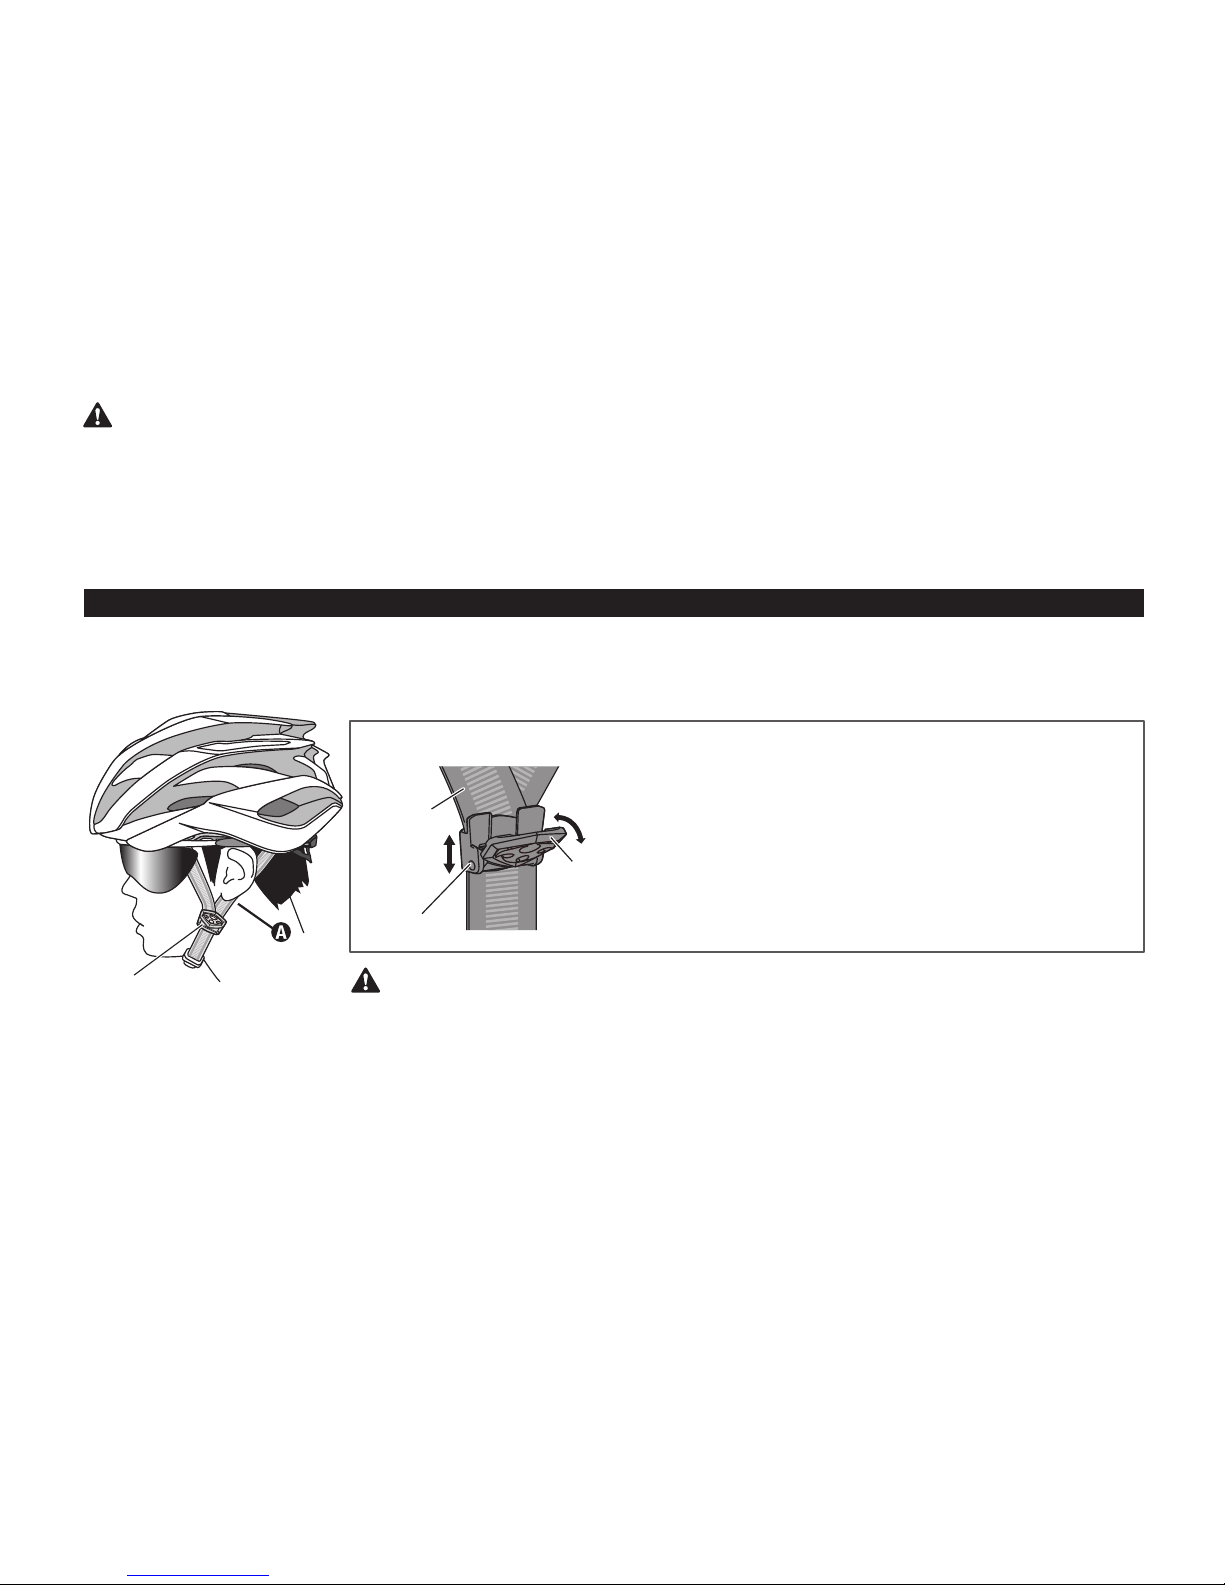
●The helmet should be worn in a way that it protects your forehead, with the edge just above your eyebrows, and never pushed far
over the back of your head. Wear the helmet so it is level from front to back.
●No helmet can protect the wearer against all injuries or foreseeable impacts.
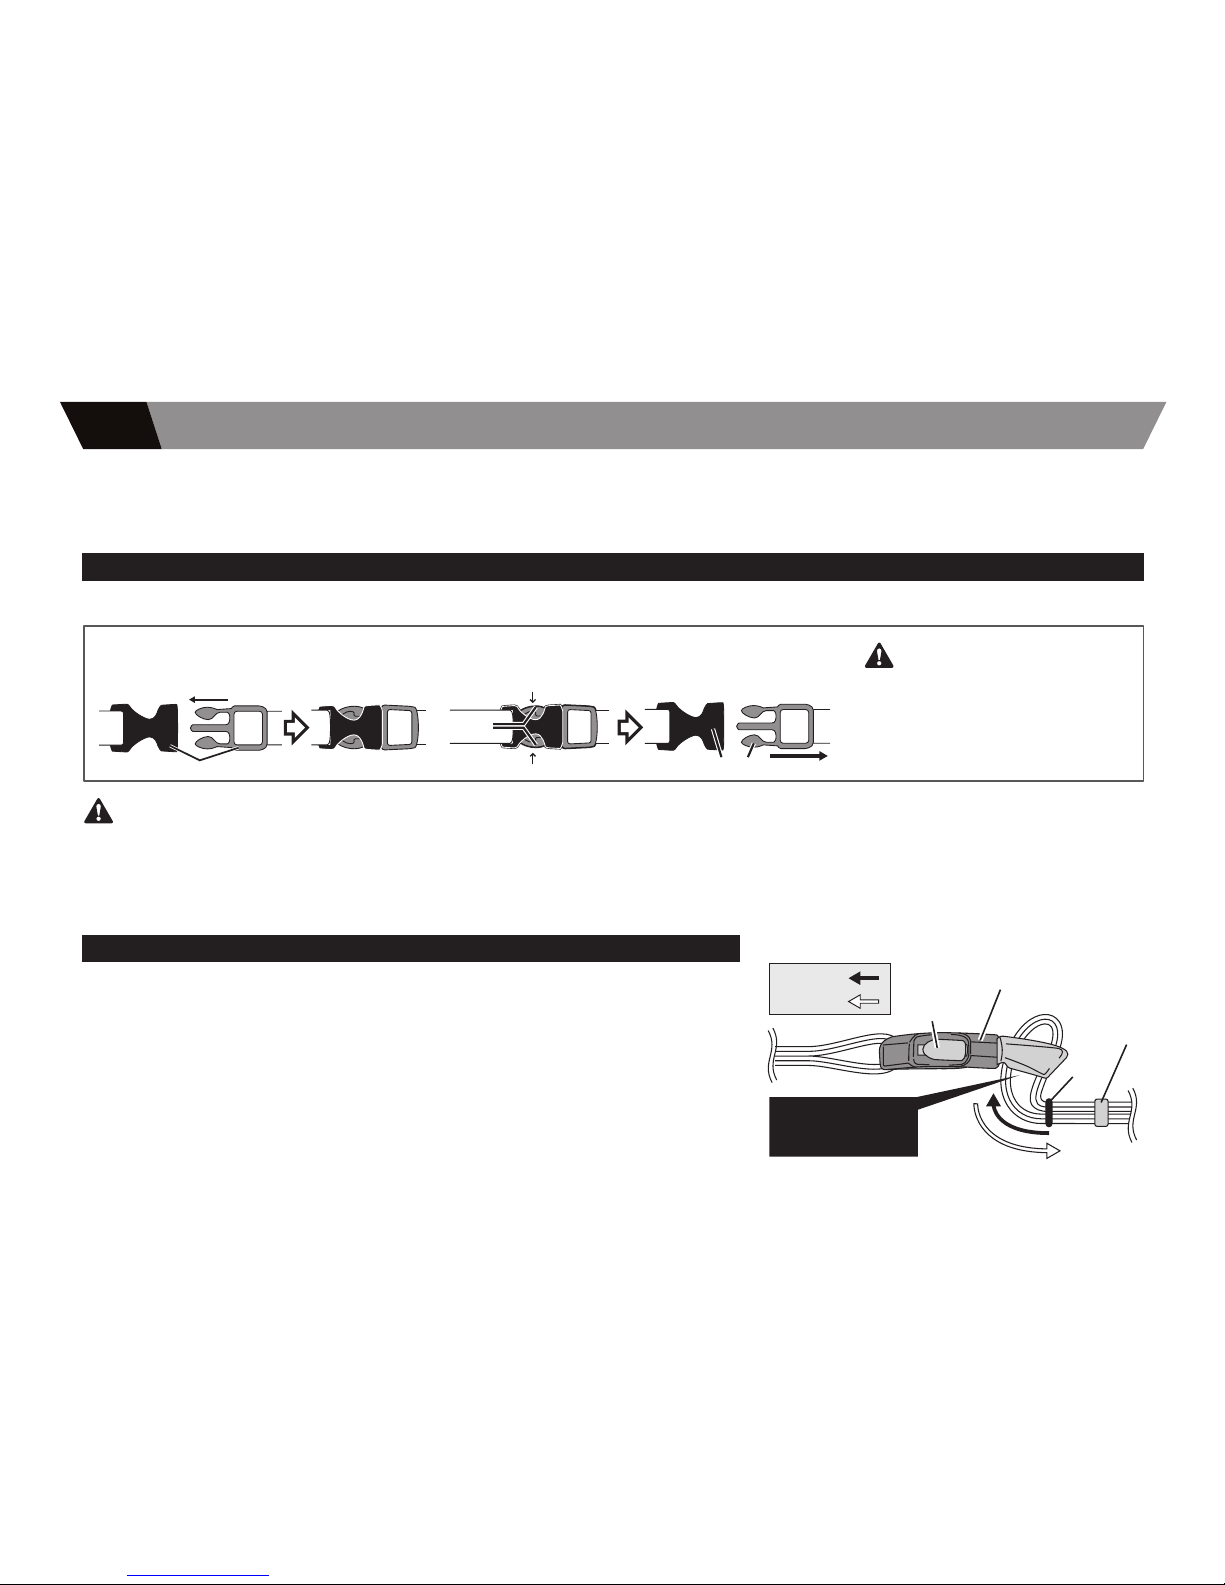
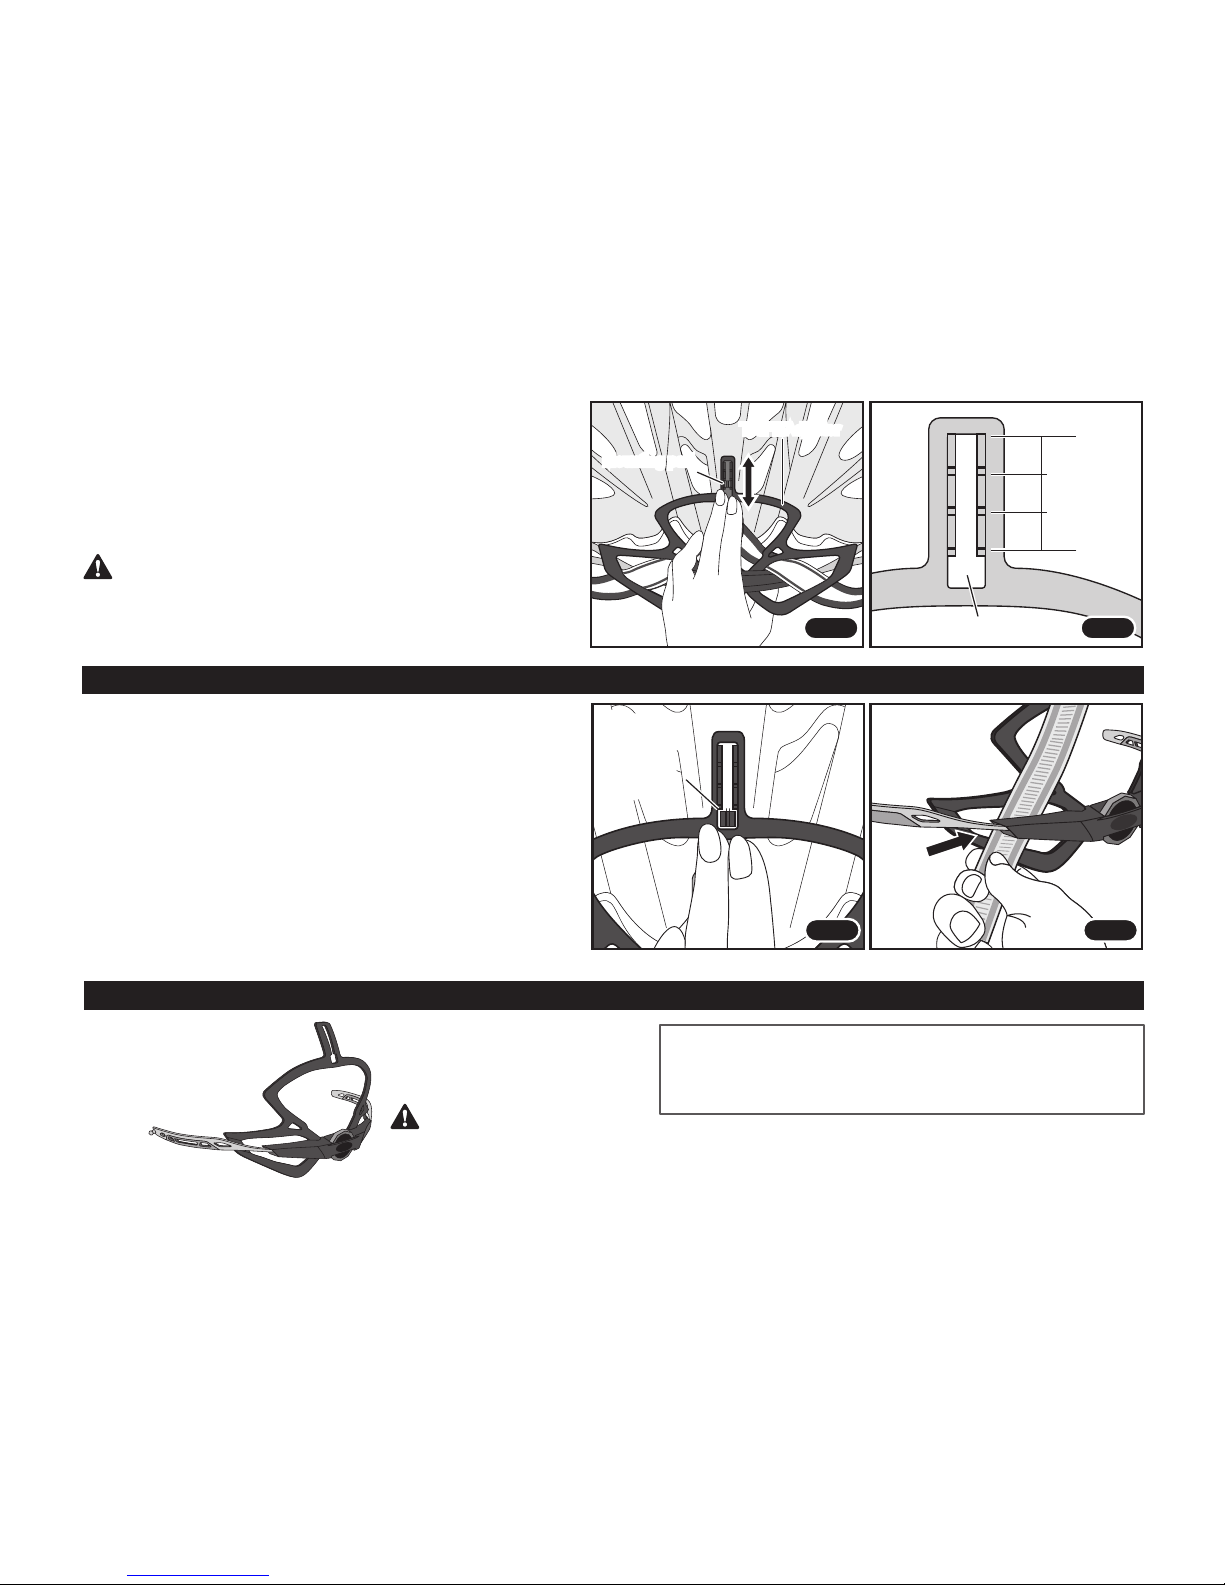
●Before riding a bicycle, make sure to adjust the helmet so it fits your head correctly. The strap should be positioned not to cover
the ears, the buckle positioned away from the jawbone, and the strap and buckle adjusted to be both comfortable and secure.
●Your helmet is effective as protection only when it is worn properly. You should try different sizes to choose the size which feels
secure and comfortable on your head at time of purchase.
●Please handle the helmet with care. The helmet is designed to absorb shock by partial destruction of the liner and its damage may
not be visible. DO NOT sit on it, drop it on the floor or otherwise cause impact.
●If subjected to a severe impact, the helmet should be discarded and destroyed.
●Wipe the helmet with common ph-neutral detergent diluted with clear water.
Never use any petroleum, thinner, benzine, hot water above 50°C/122ºF or saline water.
●
Do not leave the helmet in the direct sunlight or where the temperature may surpass 50ºC/122ºFsuch as in a car or near a heater,
and/or avoid leaving in a humid place for a long time. Doing so will affect the materials and the performance of the helmet will diminish.
●Do not paint the helmet. Paints may reduce the original protective performance of the helmet considerably.
●Do not modify the helmet. In order to fully maintain the performance of the helmet, do not attempt to take it apart or change it in any
manner that involves making holes in it or cutting it (or any of its parts) other than as recommended by the manufacturer.
●This helmet should not be used by children while climbing or doing other activities when there is a risk of strangulation/hanging if
the child gets trapped with the helmet.

12
WG-1系取扱説明書
保存用
この取扱説明書は、ご使用になる前に必ずお読みください。
またお読みの後は、保管してくださいますようお願いいたします。
ご使用になる前に

当製品のチンストラップ本体およびA.Iネットのメッシュ部分には、ナノテク技術を利用した従来とは全く異なる新しい消臭方法を採用した素材
「MOFF」を使用しています。「MOFF」は瞬間消臭・抗菌効果・安全性を合わせ持った次世代の消臭繊維です。
※MOFF素材のお手入れについて
汗などで汚れた場合のお手入れは、水もしくはぬるま湯(35℃以下)のみで軽くすすいで汚れを落とし、しっかり水気を拭き取ってから陰干しすると
MOFF本来の効果が持続できます。なお洗浄剤を使用する場合は、中性の洗濯用洗剤を使用してください。
(アルカリ性洗剤はMOFFの効果が減少しますので使用しないでください)
カラダから発汗すると「クールマックス®」は水分を外へ排出し、空気が外部から入り込んで、冷却・乾燥させる効果があり、体表温度を下げ、
優れた水分調整機能を発揮します。「クールマックス®」は、自然な風合いを持ち、ソフトで軽量、通気性にも優れています。
このたびは、弊社製品をお買い上げいただき、誠にありがとうございます。
この取扱説明書は、ヘルメットの正しい取扱方法について説明しております。ご使用前には必ず最後までこの説明書をお読み
いただき、お読みの後は当説明書を大切に保管していただきますようお願いいたします。
ヘルメットは、いかなる事故にも絶対という訳ではなく、万一の際に危険の度合いを減らす装備の一つで、安全の一要素として
ご理解のうえご使用ください。
安全快適なバイシクルライフを楽しむためにも、以下の注意事項をよくご理解いただきますようお願いいたします。
※「COOLMAX®」および「クールマックス®」は、インビスタ社の登録商標です
ご使用になる前に
■瞬間消臭素材「MOFF」について
■汗を素早く蒸散し、いつもサラッと快適。
警告
●このヘルメットは「自転車専用」です。オートバイやその他の用途には絶対に使用しないでください。
●国で定められている交通規則に必ず従ってください。
13

FRONT
REAR
01
ご使用になる前に
使用素材についての特徴説明
部位名称ともくじ
・・・・・・・・・・・・・・・・・・・・・ 13
・・・・・・・・・・・・・・・ 13
・・・・・・・・・・・・・・・・・・・・・ 14
・・・・・・・・・・・・・・・・・・・・・・・・・・ 22
・・・・・・・・・・・・・・・ 15
・・・・・・・・・・・ 15
・・・・・・・・・・ 16
警告
部位名称ともくじ
チ ン スト ラップ に つ い て
●ワンタッチバックルの着脱
●チンストラップの長さを調整する
●アジャストロックの高さを調整する
02 TRIFITアジャスターについて
●TRIFITアジャスター・ダイヤルの調整方法
●TRIFITアジャスターのポジション変更
●TRIFITアジャスターの脱着
●別売「TRIFITアジャスター」について
03 インナーパッドについて
●A.Iネット(AntiInsectNet)および
Winterインナーパッドの取付位置
●ノーマルインナーパッドセットの取付位置
●インナーパッドのお手入れについて
●別売「WG-1・補修用パッドについて」
04 正しい位置でヘルメットを装着する
ワン タッチ バック ル
シェル
シェル
チ ン スト ラップ
TRIFITアジャスター
ライナー
ライナー
・・・・・・・・・・・・ 15
・・・・・・ 17
・・・・・・・・ 17
・・・・・・・・・・・・・・・ 18
・・・・・・・・・ 18
・・・・・・・・ 17
・・・・・・・・・・ 19
・・・・・・ 20
・・・・・・・・・・ 20
・・・・・・・・・ 20
・・・・・・・・・・・・ 19
・・・・・ 21
14
ア ジャ スト ロック

チンストラップは万一転倒などアクシデントの際に、ヘルメットが容易に脱落しないようにする重要なパーツです。ヘルメット本来の性能を
発揮させるためにも、「チンストラップの長さ」や「アジャストロックの位置」を適切に調整し、「ワンタッチバックル」を正しく留めてください。
ワンタッチバックルは、チンストラップの両先端に付いている保持装置のことです。
ご使用前に必ず試着し、調整しましょう!
チンストラップの長さを調整する
あなたの頭にぴったりフィットするようチンストラップの長さを必ず調整しましょう。チンス
トラップの長さは、ワンタッチバックルを締めたとき、指が2〜3本入る程度が一般的です。
ご使用前に必ず試着を行い、「チンストラップ」の長さや「アジャストロック」のロック位置、
「TRIFITアジャスター」の締め具合などを適切に調整し、あなたの頭にぴったりフィットする
ようにしてください。
※「TRIFITアジャスター」の調整については「pwTRIFITアジャスターの調整」を参照。
チンストラップの長さ調整
Oリング
スト ラッ プ
ホルダー
ワンタッチ バック ル
リリー ス ボ タ ン
最後にチンストラップの先端を「Oリング」と「ストラップホルダー」で止めてください。
短くする
長くする
※真横からみた図
ワン タッチ バック ル
(差し込む側)の
向きにご注意ください。
01 チンストラップについて
●チンストラップは正しくしっかり締めてください。締めないままの走行は、万一転倒した際に大変危険ですので、絶対におやめください。
●ワンタッチバックルは必ず最後まで(カチッと音がするまで)きっちり留めてください。
留めかたが不完全ですと、万一転倒した際にワンタッチバックルが外れてしまいヘルメットが脱落してしまうおそれがあります。
ワンタッチバックルの留め方
ワンタッチバックル の外し方:
リリースボタンを押すと、
ワンタッチバックルが外れます。
ワン タッチ バック ル ワン タッチ バック ル
リリー ス
ボタン
押す
押す 外れる
ワンタッチバックルを留めるときは、
お肌を挟まないようご注意ください。
ワンタッチバックルの着脱
15
警告
警告

●チンストラップをワンタッチバックルに通す際、図以外の通しかたをすると、転倒などで強い力が加わった際、ワンタッチバックルからチンストラ
ップが滑り抜けてしまい、ヘルメットが脱落するおそれがあり大変危険です。バックルへは必ず図の通り正確に通してください。
●ワンタッチバックル(差し込む側〈赤い方〉)の表裏を間違えると、転倒などで強い力が加わった際、ワンタッチバックルからチンストラップが滑り
抜けてしまい、ヘルメットが脱落するおそれがあり大変危険です。
アジャストロックの高さを調整する
● ア ジャスト ロック の
移動方法 ①アジャストロックのカバーを矢印の方向に開きます。
②アジャストロックを正しい高さに調整します。
③高さが決まったら、アジャストロックのカバーを
「パチン」と音がするまで元通りに閉じます。
正しいストラップ
の状態
ワンタッチバックルを留め、しっかり顔の側面に合うように「アジャストロック」の位置を調整します。
チ ン スト ラップ の Aの部分がすっきり収まっているか確認してください。
このとき、耳の辺りが緩いまたはきつい場合は「アジャストロック」を移動させて高さを調整します。
アジャストロックの調整後は、必ず最後までロックしてください。
ロックされていないまま使用すると、アジャストロックの位置が正しく保てない場合があります。
ア ジャ スト ロック
②
スト ラップ
①・③
カバー
16
警告
ご注意
ア ジャ スト ロック

■A.Iネット※標準装着
●エアインテークからの虫の侵入防止に。
●フィッティン グ を 求 め る か た に 。
■Winterインナーパッド※同梱品
●エア導入効果を抑えたい冬場などに
A.Iネット(AntiInsectNet)およびWinterインナーパッドの取付位置
快適な装着感を得るためにも、インナーパッドは正しく取り付けてください。
この製品は、用途やフィッティング、季節などに合わせて使い分けができる「3種類」の内装が付属されています。
お好みによりパッドを取り替えてください。※標準は「A.Iネット」が装着されています。
03 インナーパッドについて
A.Iネット
前
Winterインナーパッド
前
下図のようにインナーパッドをヘルメット本体内部にあるマジックテープに押し付けて貼り付けます。
19
ご注意

■ノーマルインナーパッド※同梱品
●エア導入効果をさらに求めるかたに。
前
インナーパッド
(フロント用)
インナーパッド
(トップ 用 )
チ ン スト ラップ チ ン スト ラップ
ノーマルインナーパッドセットの取付位置
WG-1ノーマルインナーパッドは、2種類(5mm10mm)
の厚みの違うパッドを付属しています。
フィッティングに合わせて厚みを変更してください。
取り付けは図のようにインナーパッドをヘルメット本体内
部にあるマジックテープに押し付けて貼り付けます。
ノーマルインナーパッドセット
快適な装着感を得るためにも、
インナーパッドは正しく取り付けてください。
WG-1・補修用インナーパッド各種について詳
しくは、当製品掲載のカタログもしくはホーム
ページに掲載のパーツリストをご覧ください。
Kabuto 検索
常日ごろより使用されているヘルメット内部のインナーパッドは
消耗品です。傷んだインナーパッドをそのまま使い続けると破れ
てしまい、フィット感などに悪影響をおよぼしかねません。古くな
ったインナーパッドは、早期に交換されることをお薦めします。
インナーパッドは消耗品です!
インナーパッドのお手入れについて
(別売)「WG-1・補修用パッドについて」
汗などで汚れたインナーパッドは、取り外して洗うことができますので、定期的にお手入れすることでインナーパッドを清潔に保てます。インナーパ
ッドを洗う場合は、水もしくはぬるま湯(35℃以下)にごく少量の洗髪用シャンプーもしくは家庭用中性洗剤を入れ、やさしく手もみ洗いを行ってか
らよくすすいでください。洗い終わったら乾いた布などで水気をやさしく取り除き、直射日光の当たらない風通しのよい場所で陰干しを行ってくだ
さい。※MOFF素材のお手入れについては3ページをご覧ください。
別売のインナーパッドセットをお買い求めの際は、お使いのヘルメットのモデルをよくご確
認のうえ、販売店などへご注文ください。
20
ご注意
ご注意

ヘルメットの正しいかぶり方
前から後ろにかけて水平になるようにかぶります。
正しい
かぶり方の例
誤った
かぶり方の例
ヘルメットは正しい位置で正しくかぶり、チンストラップを正確に締める事で、はじめてヘルメット本来の安全性能を発揮します。
ヘルメットは走行前にしっかり正しく装着しましょう。
04 正しい位置でヘルメットを装着する
ヘルメットを前から後ろにかけて水平になるように着用してください。このときにヘルメットの先端がまゆ毛のすぐ上にない場合
は、正しく装着できていません。(装着の際は鏡を見ながら調整してください)また、チンストラップの長さやアジャストロックの調
整もヘルメットを正しくかぶるうえで大変重要な部分です。当説明書の該当項目をよくお読みのうえ、正しくかぶってください。
ヘ ル メ ット の 先 が
まゆ毛のすぐ上に
ある
ヘ ル メ ット の 先 が
上を向き、前頭部
が見えている
21
ご注意

下記の文章は必ずお読みください。
チンストラップを締めなかったり締めかたが緩かったりすると、万一転倒したときなどに脱げてしまい、頭を守ることができず非常に危険です。
またヘルメットの下に、帽子・フード・バイザー・ヘッドフォン等を着用しないでください。ヘルメットがズレたり、脱落するおそれがあります。
「チンストラップは必ずしっかり締めてください。」
ヘルメットはシェルおよび衝撃吸収ライナーが潰れることで、衝撃エネルギーを吸収します。大きな衝撃を受けたヘルメットは、既にライナーが潰
れていることが多く、そのまま使用すると、再度衝撃吸収エネルギーを吸収できず非常に危険です。外観にキズがなくても使用しないでください。
「大きな衝撃を受けたヘルメットは外観上に損傷がなくても、ご使用にならないでください。」
ヘルメットに穴を開けたり、内部の衝撃吸収材を削ったり、またチンストラップなどは絶対に改造しないでください。
ヘルメット本来の性能が発揮できなくなり非常に危険です。
「ヘルメットの改造および分解は絶対にしないでください。」
衝撃吸収ライナーは、塗料や熱の影響により材質が侵され衝撃吸収力が低下する場合がありますので、ペイントは絶対におやめください。
「ヘルメットのペイントは絶対にしないでください。」
ヘルメットは丈夫だからといって、床等に放り投げたり、上に座ったりしないでください。その度に衝撃を吸収するため衝撃吸収力が低下します。
万一のために大切に取り扱ってください。また、乗車時での頭を保護する以外の目的には使用しないでください。
「ヘルメットは大切に取り扱ってください。」
ヘルメットは直射日光の当たる場所、車の中および、暖房機のそばなど、高温(50℃以上)の場所や、湿度の高い場所への長時間の放置を避け、
風通しの良い場所で保管して下さい。ヘルメットに使われている材質等が変質して性能が低下するおそれがあります。
「ヘルメットの保管について」
ヘルメットのカラーによっては、長期間日光を浴びることにより、シェル表面の色調が薄く変色する場合があります。
「長期間の日光照射によるシェル の 変色について」
ガソリン、シンナー、ベンジン、熱湯(50℃以上)や塩水等は絶対に使用しないでください。
「ヘルメットのお手入れは薄めた中性洗剤でふき取るようにしてください。」
マットカラーは表面処理の都合上、あらかじめ貼付されているステッカーをはがすと、表面のマット(つや消し)処理がはがれる事がありますので、
ステッカーは絶対にはがさないでください。またお客様がご購入後にご自身で貼付したステッカーを再度はがし取る場合も、同様のことが考えられ
ますので、ステッカーを貼付される際は十分にご注意ください。
「マット(つや消し)カラーについて」
22
警告
ご注意

OGK KABUTO CO., LTD.
6-3-4, NAGATANISHI, HIGASHIOSAKA, OSAKA, 577-0016, JAPAN. TEL: 06-6747-8031
WEB:www.ogkkabuto.co.jp Kabuto 検索
No.JWG1-2013-ST-1
Table of contents
Other Kabuto Motorcycle Accessories manuals

Kabuto
Kabuto FLAIR User manual

Kabuto
Kabuto AERO-R2 Series User manual

Kabuto
Kabuto avand2 User manual

Kabuto
Kabuto CANVAS CROSS User manual

Kabuto
Kabuto AERO-K1 User manual

Kabuto
Kabuto LEFF User manual

Kabuto
Kabuto IXA Series User manual

Kabuto
Kabuto Aeroblade-III User manual

Kabuto
Kabuto Ryuki User manual

Kabuto
Kabuto Japan RT33 User manual