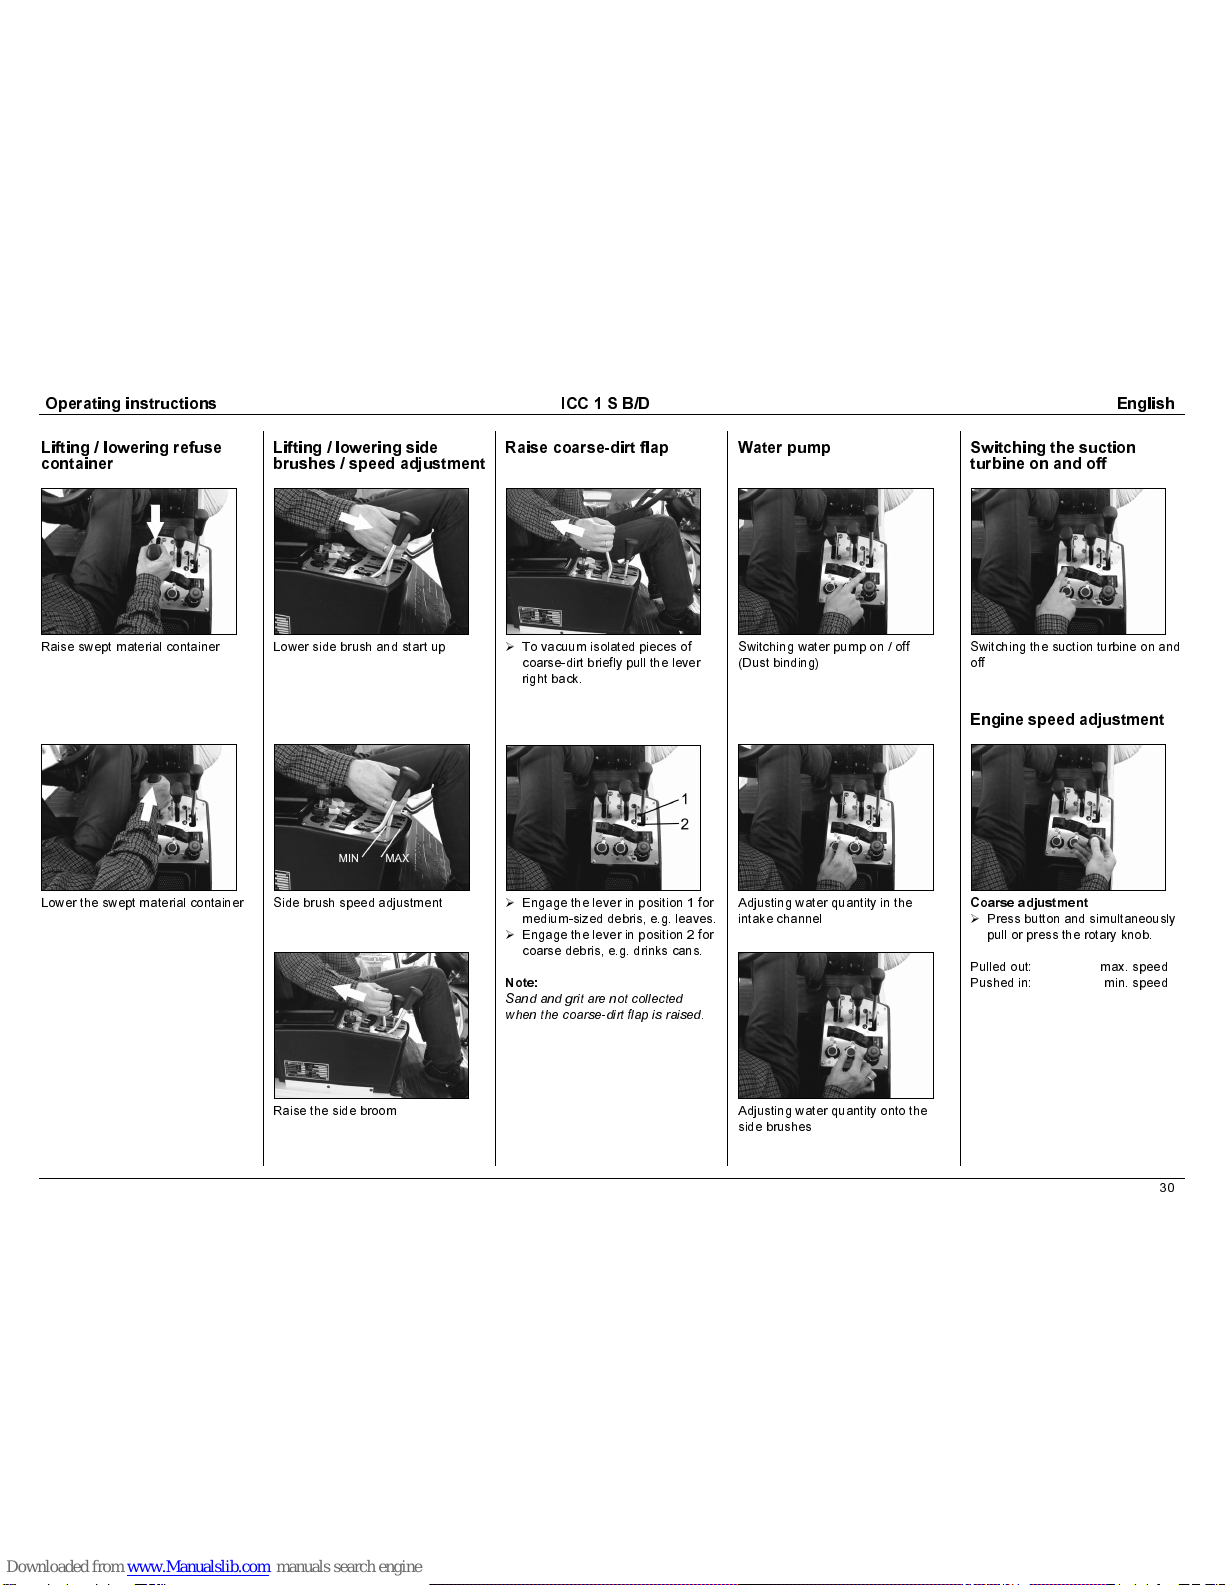
Operating instructions ICC 1 S B/D English
27
For your own safety!
General notes
It is mandatory to read and
observe this prior to using the
appliance!
—
Notify your sales outlet if during
unpacking you detect damage
that has occurred in transit.
Read the operating instructions
of your appliance prior to putting
it into operation, especially the
safety information.
—
The warning signs and
information labels attached to the
unit provide important advice on
its safe operation.
—
In addition to the instructions in
the operating instructions,
general safety- and accident
prevention-regulations from
lawgivers must be followed.
Use
Prior to utilization the appliance
and its working facilities must be
checked regarding their proper
condition and that they operate
safely. It must not be used if its
condition is not faultless.
No modifications permitted on the
machine.
—
The unit is intended for sweeping
inside- and outside surfaces.
Never absorb explosive liquids,
inflammable gases or undiluted
acids and solvents! This includes
petrol, paint thinner or fuel oil,
which can form explosive fumes
due to the swirling suction air, in
addition acetone, undiluted acids
and solvents, since they corrode
the materials used for the
appliance.
Do not sweep up/absorb burning
or smouldering objects.
Only if expressly marked as such
is this appliance suitable for
sucking up health-hazardous
dust types.
Comply with notices concerning
safety regulations given in the
operating instructions.
—
Suitable only for the surfaces
listed in the operating
instructions.
—
The appliance may be used on
only the areas cleared for its use
by the factory owner or a person
authorized by him.
Keep clear of the danger area. Its
operation in explosion hazardous
locations is prohibited.
The following applies generally:
Keep combustible materials away
from the machine (danger of
explosions-/fire).
Operation
The rules, regulations and
stipulations applying to motor
vehicles must always be
observed.
The operator must use the unit in
accordance with its intended
purpose. She must adapt her
mode of operation to the local
conditions and when working with
the appliance keep a look out for
third parties, especially children.
—
The appliance may only be used
by persons instructed in its
handling or who have proved
their capability of operating it and
who are expressely authorized to
use it.
—
The unit must not be operated by
children and youths.
To prevent unauthorized
utilization of appliances provided
with an ignition key the ignition
key must be removed.
The appliance must never be left
unattended as long as the motor
is running. The operator may not
leave the appliance until the
motor is turned off, the appliance
is safeguarded against
unintentional motion, if necessary
the parking brake actuated and
the ignition key removed.
—
n slopes the angle of inclination
to the side and in the direction of
motion must not exceed the
value given in the operating
instructions.
Transport
The motor must be turned off
when the appliance is
transported.
The parking brake must be
locked.
Secure the machine with guy
belts, ropes or chains.
Immobilise the machine at the
wheels with chocks.
Maintenance
Prior to cleaning it and
performing maintenance work,
changing parts or setting it to
another function the appliance is
to be switched off and if
necessary the ignition key
removed.
For battery-run appliances the
battery plug must be pulled out of
the socket prior to work on the
electrical equipment, i.e. the
battery is to be disconnected.
Do not clean the appliance with
jet streamers.
—
Repairs may only be carried out
by approved customer service
centres or by technical personnel
trained in this field which are
familiar with all relevant safety
regulations.
—
Industrially used appliances in
changing locations are subject to
the safety inspection according to
VDE 0701.
—
Use only the brushes/discs with
which the appliance is equipped
or those specified in the
operating instructions. The use of
other brushes/discs can impair
safety.
—
The unit may not be cleaned with
a hose- or a high pressure water
jet (danger of short circuits or
other damages).
Accessories and spare parts
—
nly accessories and spare parts
cleared by the manufacturer may
be used. riginal-accessories
and original-spare parts ensure
that the unit can be operated
safely and trouble-free.
Riding appliances
—
Riding appliances are not
approved for public highways.
Please ask your retailer for the
conversion kit for street-
worthiness.
—
Giving companions lifts is not
permissible.
—
Riding appriances may be set in
motion only from the seat.
Machines with a combustion
engine
The exhaust opening must not be
sealed.
Do not bend over or touch the
exhaust opening (danger of
burns).
Do not touch or grasp the drive
motor (danger of burns).
Adequate ventilation and
extraction of exhaust must be
provided when operating the unit
indoors. (Danger of poisoning)
Exhaust gases are toxic and
damaging to health; do not inhale
them.
The engine takes approx. 3...4 s
to run down after being shut off.
Never enter operating area
during this period!
The following must be observed
when refuelling machines provided
with a combustion engine:
nly the fuel specified in the
operating instructions may be
used. An explosion hazard exists
with unsuitable fuels.
The engine must be switched off.
Do not fill-in fuel in closed rooms.
Take care that no fuel splashes
onto hot surfaces.
Do not use any burning or
smouldering objects during filling
up or carry them with you or bring
them in the vicinity of the
appliance (explosion hazard).
Fill the tank at the most 1 cm
below the lower edge of the filler
neck, since the fuel expands in
heat.
Wipe off spilled over fuel and
close tank cap tightly.