Kiloview N60 User manual

N60
4K UHD HDMI/NDI Bi-Directional Converter
USER MANUAL
Changsha KILOVIEW Electronics Co.,Ltd

Legal Notices
Subject to the receiving of this document from Changsha Kiloview Electronics Co.,
Ltd.,(Hereinafter
referred to “Kiloview”), the following terms are understood and agreed. Or else, please stop
using this
document.
This document is copyright of Kiloview, all rights reserved. The document covers the proprietary
information of the company. No company or individual may copy, transmit, distribute, use or
disclose the
document and any images, forms, data and other information contained in the document without
the
prior written permission of the company.
is the registered trademark of Kiloview. The name and logo are the trademarks or registered
trademarks of the company. Other products or company names mentioned in this document
may be the
trademarks or registered trademarks of their respective owners. The reading of this document
without the
prior written consent of the company or the third party rights holder does not imply that the
reader is
given any right to use any of the marks appearing in this document by implication, non-evidence
or
otherwise.
This product complies with the design requirements related to environmental protection and
personal
safety. The storage, usage and disposal of the product shall be in accordance with the product
manual,
relevant contract or relevant national laws and regulations.
This document is provided "as is" and "only in this state". Products and technical updates are
subject to
change without prior notice.
For matters not covered in this document, please visit our website www.kiloview.com for
information and technical support.

NDI®is a registered trademark of NewTek, Inc..

CONTENTS
1 PRODUCT INTRODUCTION...............................................................................................................................................1
1.1 PRODUCT FEATURES...........................................................................................................................................................2
1.2 TECHNICAL PARAMETERS....................................................................................................................................................3
2 USER GUIDE......................................................................................................................................................................... 5
3 PACKING LIST AND INTERFACE DESCRIPTION........................................................................................................ 6
3.1 PACKING LIST.....................................................................................................................................................................6
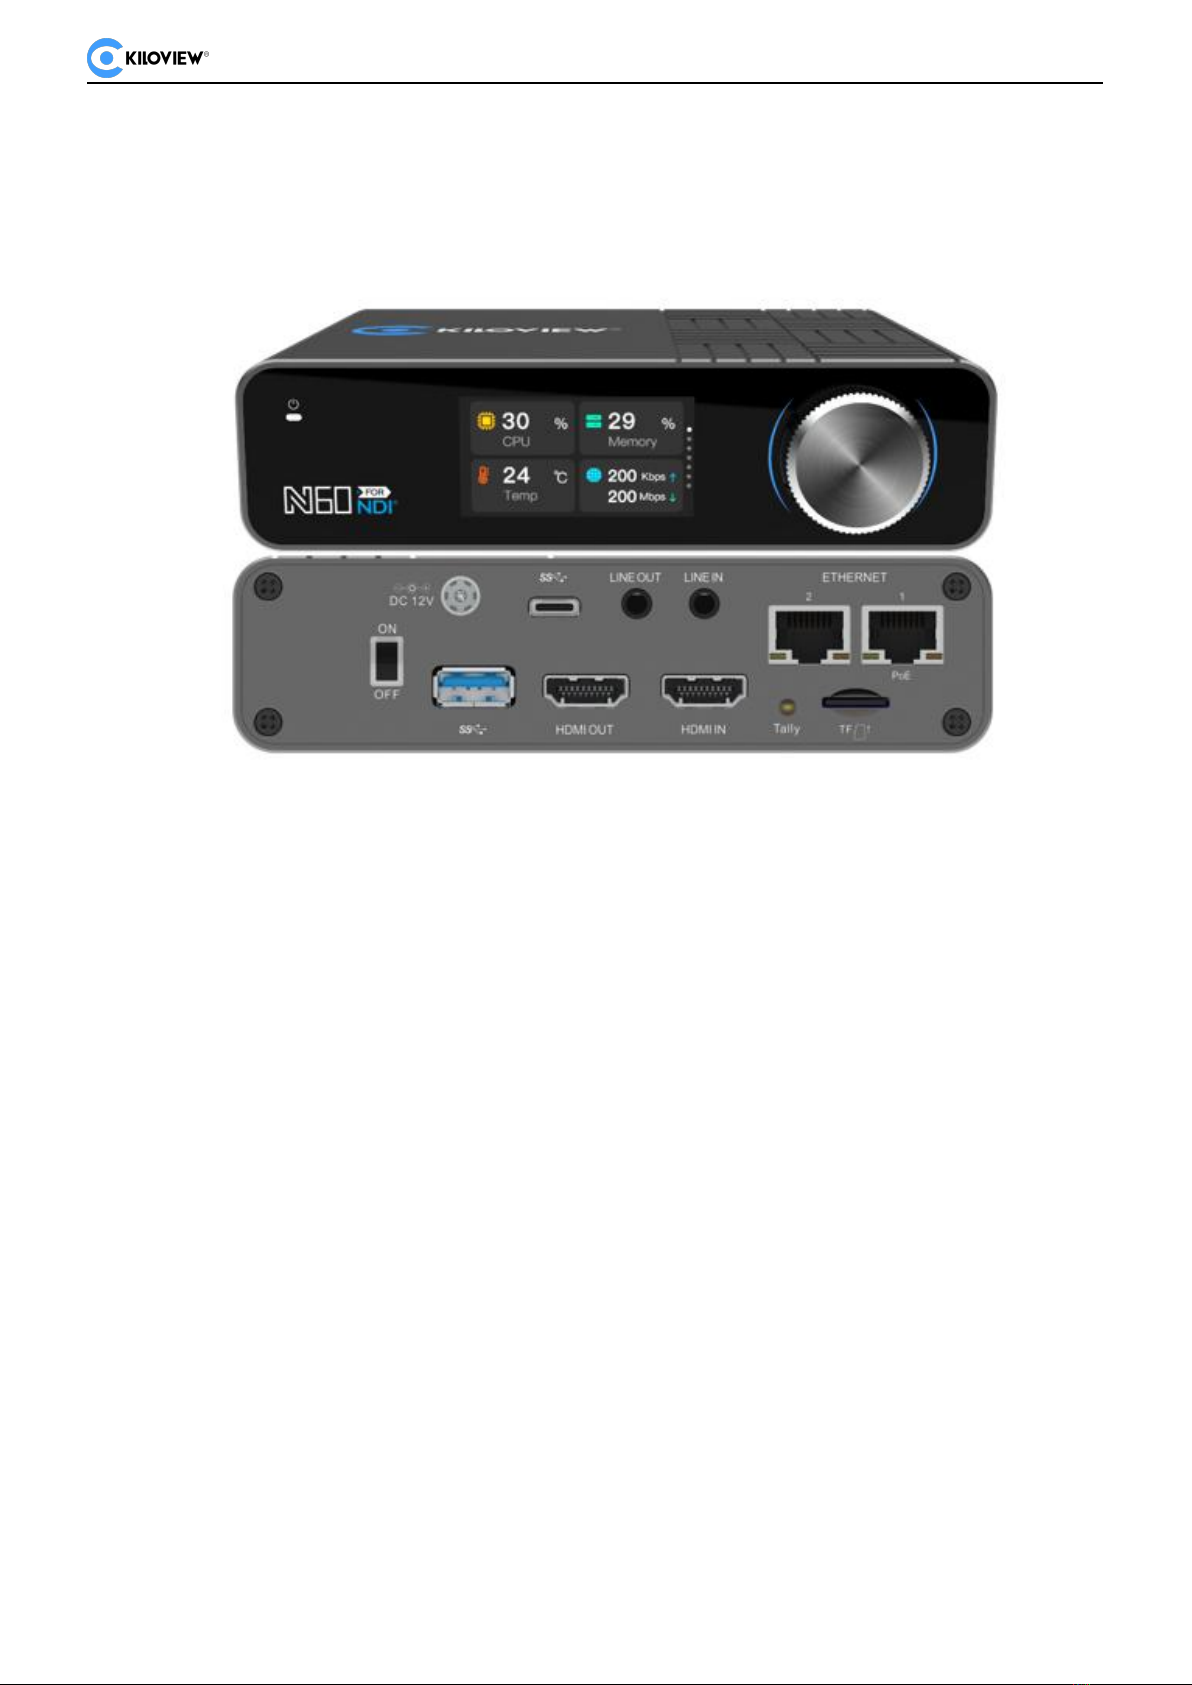
3.2 INTERFACE DESCRIPTION.................................................................................................................................................. 6
3.3 LED INDICATORS................................................................................................................................................................ 6
4 INSTALLATION AND CONNECTION............................................................................................................................... 8
4.1 CONNECT VIDEO SIGNAL.................................................................................................................................................. 8
4.2 CONNECT NETWORK......................................................................................................................................................... 8
4.3 CONNECT POWER SUPPLY............................................................................................................................................... 9
5 LCD SCREEN AND SCROLL WHEEL........................................................................................................................... 10
5.1 SCROLL WHEEL............................................................................................................................................................... 10
5.2 LCD SCREEN.................................................................................................................................................................. 10
5.2.1 Working mode....................................................................................................................................................... 10
5.2.2 Device status......................................................................................................................................................... 12
5.2.3 Network status.......................................................................................................................................................12
5.2.4 Video information..................................................................................................................................................13
5.2.5 Audio information..................................................................................................................................................14
6 LOGIN AND NETWORK CONFIGURATION................................................................................................................. 15
6.1 LOGIN TO THE DEVICE VIA ETHERNET........................................................................................................................... 15
6.2 NETWORK SETTINGS.......................................................................................................................................................15
7 NDI DISCOVERY AND MONITORING............................................................................................................................17
7.1 NDI TOOLS INSTALLATION..............................................................................................................................................17
7.2 DISCOVERY AND CONNECTION.......................................................................................................................................17
7.3 NDI ENCODING BITRATE................................................................................................................................................ 19
8 ENCODER CONFIGURATION..........................................................................................................错误!未定义书签。
8.1 NDI CONFIGURATION......................................................................................................................................................19
8.2 STATUS COLUMN.............................................................................................................................................................20
8.3 BASIC SETTINGS..............................................................................................................................................................20
8.4 NDI CONNECTION........................................................................................................................................................... 21
9 DECODER CONFIGURATION......................................................................................................................................... 21
9.1 DISCOVERY OF NDI SOURCES....................................................................................................................................... 22
9.2 DECODING OUTPUT.........................................................................................................................................................24
9.3 DECODING PRESET........................................................................................................................................................... 24
9.4 DECODING PARAMETER CONFIGURATION...................................................................................................................... 25

9.5 DISCOVERY SERVICE.......................................................................................................................................................26
10 SYSTEM SETTINGS........................................................................................................................................................ 29
10.1 USER MANAGEMENT.....................................................................................................................................................29
10.2 REBOOT......................................................................................................................................................................... 29
10.3 RESTORE....................................................................................................................................................................... 29
10.4 FIRMWARE UPGRADE....................................................................................................................................................29

N60 for NDI·USER MANUAL V1.6
Copyright © KILOVIEW Electronics CO., LTD. All rights reserved
1
1 Product Introduction
Kiloview N60 HDMI to NDI Converter is Kiloview’s latest NDI converter(I/O). Adopting the
leading FPGA technologies, advanced-level AVC/HEVC algorithm and NDI algorithm, N60
comes with more powerful performance, more excellent encoding quality, better low-latency
performance and perfect function.
With the resolution up to 4K UHD (3840x2160@60Hz), N60 can encode a 4K HDMI signal into
an NDI video stream under encoding mode. When decoding, it will decode the NDI to HDMI.
Encoding or encoding, it depends on your end needs.
N60 supports Speed HQ and AVC (H.264)/HEVC (H.265) codec, which means N60 supports IO
conversion between NDI High-bandwidth and NDI|HX. Under encoding mode, N60 can
simultaneously output NDI and NDI|HX video streams up to 4K resolution. When decoding, N60
can automatically adapt to NDI or NDI|HX stream. Using NDI technology, combined with
Kiloview's own in-depth optimization of video encoding and network transmission technology,
N60 can achieve ultra-low latency as low as 80ms from video encoding to decoding.
N60 supports professional YCbCr 4:2:2 color space and 10bit color depth with AVC (H.264)
/HEVC (H.265) video encoding (compatible YCbCr 4:2:0 and 8bit AVC/HEVC video encoding),
which promises higher color and image quality, particularly to fulfill the needs in the broadcasting
and medical image industries. Combined with the IP interconnection advantages of NDI
technology and a complete product ecological chain, N60 can help to gain a leading edge in
UHD video IP services
N60 support 2x1000M Ethernet ports, one of which supports PoE (IEEE 802.3AT). N60 has
HDMI 2.0 video input interface and output interface. When encoding, the HDMI output interface
will loop out the video signal via HDMI; when decoding, the decoded NDI video will be output
from the HDMI interface.
As the latest product, N60 further improves the user experience. It provides a color LCD display
and a scroll wheel on the front panel. N60 can display the device status and obtain configuration
parameters, the recording operations and IP address configuration. At the same time, LCD
display can work as a Tally.

N60 for NDI·USER MANUAL V1.6
Copyright © KILOVIEW Electronics CO., LTD. All rights reserved
2
With exquisite and compact appearance, N60 has an excellent heat dissipation design, which is
convenient for you to use in different scenarios. Cold shoe fixing accessories, V-Mount and
other expansion are provided with additional cost.
Product Features
Bi-Directional converting, encoder and decoder, all-in-one
Plug and play, converting HDMI to NDI, or NDI to the monitor easily.
Support NDI and NDI|HX encoding with resolution up to 4Kp60, to ensure high quality
video transmission.
A built-in LCD panel and scroll wheel for easy management and configuration, working
as a big Tally.
Support PoE+ (IEEE 802.3AT) and 12V-18V DC input.
Configured with 1 x HDMI input and 1 x HDMI output interface, loop out for monitoring
on the display while encoding or output for using via HDMI.
Support up to 4k UHD video resolution, to ensure high quality video transmission
Support encoding HDMI to NDI and decoding NDI to HDMI with resolution up to 4K UHD
(3840x2160@60Hz).
Provide standard camera screw to install on the camera.
Optional control cable/Ethernet for PTZ control over Visca/Visca over IP/Pelco
supported (Note: Customize available for other unlisted PTZ protocols, PTZ function is
not available in current version).
Support YCbCr 4:2:2 color space and AVC (H.264)/HEVC (H.265) video coding up to
10bit color depth (also backward compatible with YCbCr 4:2:0 and 8bit conventional
AVC/HEVC Encoding).
Precise clock and intelligent algorithms ensure frame synchronization and accurate
video and audio synchronization.

N60 for NDI·USER MANUAL V1.6
Copyright © KILOVIEW Electronics CO., LTD. All rights reserved
3
Technical parameters
Item
N60
Basic interface and function
Input interface
1x HDMI 2.0
Output interface
1x HDMI 2.0
Audio port
1x 3.5mm Line in
1x 3.5mm Line out
Network
2x 1000Mbps Ethernet Port (100M/1000M Compatible)
Ethernet 1 with PoE (IEEE 802.3AT, 24W Max)
Video resolution
Input: up to 3840x2160@60fps (4Kp60), lowest 720p50
Output: up to 3840x2160@60fps (4Kp60), lowest 720p50
Video encoding and
decoding
Speed HQ (NDI CODEC): SHQ0, SHQ2
ISO MPEG-4 Part 10: Advanced Video Coding (AVC)/ITU
H.264
ISO MPEG-H Part 2: High Efficiency Video Coding
(HEVC)/ITU H.265
AVC (H.264): Baseline, Main, High, High10, High 4:2:2 up
to 5.2 level
HEVC (H.265): Main, Main Intra, Main10, Main10 Intra,
Main 4:2:2 10, Main 4:2:2 10 Intra up to 5.1 High Tier
Audio encoding and
decoding
NDI Audio; AAC-LC; Opus; G.711 a-Law/u-Law; other
software
expansion
USB
1x USB 3.0 (Type-A)
1x USB 3.0 (Type-C)
TF expansion
interface
1x TF(MicroSD) interface, SDXC(SD 3.0). Rate up to
104MB/s, capacity up to 2TB
Human-computer
interaction
1.91" LCD screen, Kiloview Magic Rotor
Tally
Built-in OLED panel available as front/rear Tally
Power
DC12V/2A or PoE
Mounting
Support cold-shoe mounting and V-mounting
Power consumption
16W MAX
Dimension
135x98x35mm
Weight
545.00g
Working
temperature
-20°C~45°C

N60 for NDI·USER MANUAL V1.6
Copyright © KILOVIEW Electronics CO., LTD. All rights reserved
4
Storage
temperature
-20°C~70°C

N60 for NDI·USER MANUAL V1.6
Copyright © KILOVIEW Electronics CO., LTD. All rights reserved
5
2 User guide
Installation and Connection
Connect the power and video input source correctly, power on the device.
Network Connection and Configuration
The easiest way for network connection is to connect the device to the network by wire,
automatically obtain the IP address and DNS from the network without any setting on the device.
After that, use NewTek Studio Monitor and connect the NDI stream of the device, click the gear
button ( ) in the lower right corner of the software interface, you can directly open the login link
without manually entering the URL. (For the first login or the first login after restoring the factory
settings, you will need to agree to the “EULA” that pops up. Otherwise, the NDI stream service of
the device cannot be used normally).
If you want to set the network manually, you can use the default IP address 192.168.1.168
to login the web page. The default username and password is “admin/admin”
NDI Streaming
NDI has the function of automatic discovery. After the device is connected to the network, other
NDI enabled tools (such as Newtek Studio monitor, OBS, vMix) can automatically discover the
device and pull the NDI stream directly.
NDI Decoding
To find the NDI source in the same LAN or manually adding the source across the network and
decode the corresponding source to the display.

N60 for NDI·USER MANUAL V1.6
Copyright © KILOVIEW Electronics CO., LTD. All rights reserved
6
3 Packing list and Interface description
3.1 Packing list
Name
Unit
Quantity
NDI Converter
PCS
1
DC 12V/2A power adapter
PCS
1
Certificate/Warranty card
PCS
1
Cold shoe screw
PCS
1
Cold shoe cradle
PCS
1
Quick start guide
PCS
1
3.2 Interface description
1
Power Switch
2
Power Port
3
Type-C expansion port
4
Line Out
5
Line In
6
1000M Ethernet port
7
1000M Ethernet- PoE
8
USB expansion port
9
HDMI OUT
10
HDMI IN
11
Tally
12
Micro SD/TF slot
13
Status Indicator
14
LCD screen
15
Scroll wheel
3.3 Led indicators
Tally/LCD screen
Video Status
Green Light
PVW

N60 for NDI·USER MANUAL V1.6
Copyright © KILOVIEW Electronics CO., LTD. All rights reserved
7
Red Light
PGM
Led indicators
Name
Color
Status
Description
Power
White
Always
ON
Power connected
OFF
No power supplied or power failure

N60 for NDI·USER MANUAL V1.6
Copyright © KILOVIEW Electronics CO., LTD. All rights reserved
8
4 Installation and connection
4.1 Connect Video Signal
Connect an HDMI video cable from a suitable video source to N60’s input connector.
The HDMI output is connected to the display device via an HDMI cable.
4.2 Connect Network
Connect the network cable to Ethernet of the device. The other end of the network cable is
connected to your network switch. You can also connect directly to the network port of your
computer.

N60 for NDI·USER MANUAL V1.6
Copyright © KILOVIEW Electronics CO., LTD. All rights reserved
9
4.3 Connect Power Supply
After connecting the power adapter (DC 12V/2A), the power light will be on and device starts
working. (If you use PoE for power supply, there is no need to connect the adapter).

N60 for NDI·USER MANUAL V1.6
Copyright © KILOVIEW Electronics CO., LTD. All rights reserved
10
5 LCD Screen and scroll wheel
N60 provides a color LCD screen and a scroll wheel on the front panel. It can view the device
status and obtain configuration parameters, and operates the recording operations and IP
address configuration. At the same time, LCD screen can work as a Tally.
5.1 Scroll wheel
Rotating the scroll wheel knob to switch the display module. Press the wheel to "OK", and you
can enter the current display module to check the working mode as well as the current status,
and to restart the device.
Rotate counterclockwise to previous page
Rotate clockwise to next page
Press to confirm
5.2 LCD Screen
5.2.1 Working mode
The first page of the LCD screen shows the current working mode (Encoder/Decoder) of the
N60.
A. Encoding mode
“HDMI IN” On, indicates HDMI video source working successfully. Current stream of Full NDI
and NDI|HX shown on the screen. indicates current number of NDI connections. Below
image shows encoding mode:

N60 for NDI·USER MANUAL V1.6
Copyright © KILOVIEW Electronics CO., LTD. All rights reserved
11
Press the scroll wheel to enter the sub menu, and modify the working mode through choose
Model to enter the setting. You can switch from encoding to decoding, and modifying the
encoding quality.
Quality (HX): Encoding quality of NDI|HX
Quality (NDI): Encoding quality of Full NDI
There are 5 levels of encoding quality, which are:
Superior: Encoding quality is “Excellent”
High: Encoding quality is “Good”
Default: Encoding quality is “Default”
Low: Encoding quality is “Average”
Poor: Encoding quality is “Poor”.
B. Decoding mode
Decoder, indicates the current status is decoding mode. “HDMI OUT” On, indicates the HDMI
output video source. The output resolution and NDI stream is shown on the screen. Please take
below picture for reference.
Press the scroll wheel to enter the sub menu, and modify the working mode that switching from
the Decoder (decoding mode) to the Encoder (encoding mode).

N60 for NDI·USER MANUAL V1.6
Copyright © KILOVIEW Electronics CO., LTD. All rights reserved
12
5.2.2 Device status
The second page of the LCD screen shows: the current working status of N60, CPU usage,
memory usage, current temperature of the device, the current version of the device.
CPU:CPU usage;
Memory:Memory usage;
Temp:Current CPU temperature;
Version:Firmware version currently running on the device.
Press to enter the module, quickly reset the device, restart, and restore the factory settings,
then select BACK and press the scroll wheel to exit.
Restart:Quick reset
Reboot:Restart the device
Restore Factory: Restore the factory setting
5.2.3 Network status
The third page and forth page of LCD screen show that the network status of the device.
NETWORK 1/ NETWORK 2: Interface data of Port1/Port2
LINK: Network port bandwidth (Gigabit). The arrows show uplink rate and downlink rate

N60 for NDI·USER MANUAL V1.6
Copyright © KILOVIEW Electronics CO., LTD. All rights reserved
13
STATIC: Static IP address
Press to view the information of NETWORK1, and supports Network configuration and DHCP
on and off.
If it is necessary to modify the IP address manually, please select IP, Mask, Gateway to modify
individually. Scroll up and down by rotating the wheel to adjust the number of the IP address.
After setting, press the rotating wheel and select “OK” to save it, as shown in the following
figure:
5.2.4 Video information
The fifth page of the LCD screen shows: HDMI IN/OUT resolution and color space information. If
N60 is in encoding mode, then it shows HDMI IN.
HDMI IN: HDMI input
HDMI OUT: HDMI output
YCbCr: Color space data
Resolution: HDMI IN/OUT resolution

N60 for NDI·USER MANUAL V1.6
Copyright © KILOVIEW Electronics CO., LTD. All rights reserved
14
5.2.5 Audio information
The sixth page of the LCD screen shows: audio input information. You can view the sampling
rate of the current audio input.
AUDIO IN, indicates that the current audio is HDMI input and Connected.
48KHz|Stereo: Stereo Sampling Rate | Stereo.
AUDIO OUT,indicates that the current audio is in the HDMI output, and displays the current
output sampling rate and number of channels.

N60 for NDI·USER MANUAL V1.6
Copyright © KILOVIEW Electronics CO., LTD. All rights reserved
15
6 Login and Network Configuration
6.1 Login to the Device via Ethernet
First connect the Ethernet port of the NDI encoder and the computer to the same switch. After
powered on, you can turn the wheel knob to switch the screen to view the network port you are
currently connected to, such as "ETHERNET 1" (NETWORK 1) or "ETHERNET 2" (NETWORK
2). IP address can be also shown on the page.
Open the WEB browser, directly input the IP address to login. The default
username and password are admin/admin.
Note: Due to the browser compatibility issues, it is recommended to use Chrome or Firefox. For the first login
after restoring the factory settings, you will need to agree to the “EULA” that pops up. Otherwise, the NDI stream
service cannot be used normally.
After login, the encoding and function parameters can be set on the encoder management web
page. The page is shown as below:
6.2 Network Settings
Connect the network cable to the Ethernet port and configure with an IP address. The IP
address of the network port is obtained by DHCP by default, which will automatically get a full IP
address, gateway and DNS based on this LAN.
The N60 has two Gigabit network ports, of which Network 1 supports POE. Here take Network 1
as an example.
Click “Network” to check the configuration of the Ethernet.
Table of contents
Other Kiloview Media Converter manuals

Kiloview
Kiloview E1-s User manual

Kiloview
Kiloview D300 Series User manual

Kiloview
Kiloview G1-s User manual

Kiloview
Kiloview U40 User manual

Kiloview
Kiloview N3 User manual

Kiloview
Kiloview N6 User manual

Kiloview
Kiloview KV-CV190 User manual

Kiloview
Kiloview P Series User manual

Kiloview
Kiloview N30 User manual

Kiloview
Kiloview D350 User manual

Kiloview
Kiloview N50 User manual

Kiloview
Kiloview G1-s User manual

Kiloview
Kiloview NDI E Series User manual

Kiloview
Kiloview P1 User manual

Kiloview
Kiloview E3 User manual

Kiloview
Kiloview E1-s User manual

Kiloview
Kiloview S2 User manual

Kiloview
Kiloview E1-s User manual

Kiloview
Kiloview DC220 User manual

Kiloview
Kiloview DC220 User manual