Klarstein 10028213 User manual

Zitruspresse orange
10008166 10008167 10008168
10028213
10028214
Lu en euchter

2
Sehr geehrter Kunde,
wir gratulieren Ihnen zum Erwerb Ihres Klarstein Gerätes. Lesen Sie die folgenden Anschluss- und
Anwendungshinweise sorgfältig durch und befolgen Sie diese, um möglichen technischen Schäden
vorzubeugen. Für Schäden, die durch Missachtung der Sicherheitshinweise und unsachgemäßen Ge-
brauch entstehen, übernehmen wir keine Haftung.
Inhaltsverzeichnis
Technische Daten 2
Lieferumfang 2
Sicherheitshinweise 2
Gerätebeschreibung 3
Inbetriebnahme und Bedienung 3
Reinigung und Pege 4
Hinweise zur Entsorgung 4
Konformitätserklärung 4
Technische Daten
Artikelnummer 10028213, 10028214
Stromversorgung Netzteil 12 V DC 5 A
Leistung 60 W
Fassungsvermögen Wassertank 1.5 L
Entfeuchtungsleistung 400 ml/Tag (bei 30°C, 80% RH)
Abmessungen 286 mm (H) x 180 mm (B) x 134 mm (T)
Lieferumfang
1x Luftentfeuchter
1x Wassertank
1x Netzkabel
1x Bedienungsanleitung
Sicherheitshinweise
Lesen Sie sich alle Hinweise sorgfältig durch und bewahren Sie die Bedienungsanleitung zum Nach-
schlagen gut auf.
• Dieses Gerät dient dazu feuchte Luft aus Innenräumen, wie begehbaren Kleiderschränken oder
Badezimmern zu entfernen.
• Entfernen Sie außer dem Wassertank keine anderen Geräteteile.
• Benutzen Sie das Gerät für keinen anderen, als den beschriebenen Verwendungszweck. Für Schä-
den, die durch Missbrauch entstehen, trägt der Hersteller keine Haftung.
• Achten Sie darauf, dass das Gerät immer aufrecht steht.
• Um Stromschläge zu vermeiden, önen Sie nicht das Gehäuse.
• Benutzen Sie das Gerät nicht in extrem nassen Räumen.
• Achten Sie darauf, dass die Lüftungsschlitze frei sind und nichts die Luftzirkulation behindert.
• Benutzen Sie beide Hände wenn Sie das Gerät bewegen, damit es sich nicht verkantet.
• Bewahren Sie das Gerät außerhalb der Reichweite von Kindern auf.

Gerätebeschreibung
1 Betriebsanzeige
2 Anzeige „Voller Wassertank“
3 Trockenluft-Auslass
4 Netzeingang
5 An/Aus-Schalter
6 Kaltluft-Einlass
7 Wassertank
8 Wasserauslass
9 Schwimmer
10 Netzstecker
11 AC/DC Wechselschalter
12 Netzteil mit Netzkabel
Inbetriebnahme und Bedienung
Inbetriebnahme
• Stellen Sie das Gerät auf einen ebenen, stabilen Untergrund.
• Stecken Sie den Netzstecker in den Netzeingang am Gerät.
• Stecken Sie das Netzteil in die Steckdose.
• Schalten Sie das Gerät ein.
• Wenn Sie das Gerät ausschalten möchten drücken Sie auf den Aus-Schalter und ziehen Sie erst
dann den Stecker aus der Steckdose.
Wassertank entleeren
1. Sobald der Wassertank voll ist, geht das Gerät automatisch aus.
2. Die gelbe LED beginnt zu leuchten.
3. Schalten Sie das Gerät aus, bevor Sie den Tank entnehmen.
4. Ziehen Sie den Wassertank vorsichtig am Gri heraus.
5. Ziehen Sie den Stöpsel aus dem Wasserauslass.
6. Entleeren Sie das gesammelte Wasser.
7. Drücken sie den Stöpsel in den Wasserauslass und schieben Sie den Tank wieder ins Gerät.
8. Nun können Sie das Gerät weiter benutzen.
2 3

Reinigung und Pfl ege
• Schalten Sie das Gerät aus und ziehen Sie den Stecker, bevor Sie das Gerät reinigen.
• Benutzen Sie zur Reinigung der Ober äche einen weichen Lappen.
• Entfernen Sie Staub mit einer weichen Bürste aus den Lüftungsgittern.
Hinweise zur Entsorgung
Be ndet sich die linke Abbildung (durchgestrichene Mülltonne auf Rädern) auf dem
Produkt, gilt die Europäische Richtlinie 2002/96/EG. Diese Produkte dürfen nicht mit
dem normalen Hausmüll entsorgt werden. Informieren Sie sich über die örtlichen
Regelungen zur getrennten Sammlung elektrischer und elektronischer Gerätschaf-
ten. Richten Sie sich nach den örtlichen Regelungen und entsorgen Sie Altgeräte
nicht über den Hausmüll. Durch die regelkonforme Entsorgung der Altgeräte werden
Umwelt und die Gesundheit ihrer Mitmenschen vor möglichen negativen Konsequen-
zen geschützt. Materialrecycling hilft, den Verbrauch von Rohsto en zu verringern.
Konformitätserklärung
Hersteller: CHAL-TEC GmbH, Wallstraße 16, 10179 Berlin.
Dieses Produkt entspricht den folgenden Europäischen Richtlinien:
2014/30/EU (EMV)
2014/35/EU (LVD)
2011/65/EU (RoHS)
4

4 5
Dear Customer,
Congratulations on purchasing this Klarstein equipment. Please read this manual carefully and take
care of the following hints on installation and use to avoid technical damages. Any failure caused by
ignoring the mentioned items and cautions mentioned in the operation and installation instructions
are not covered by our warranty and any liability.
Contents
Technical Data 5
Packing Content 5
Safety Instructions 5
Product Description 6
Use and Operation 6
Cleaning and Care 7
Disposal Considerations 7
Declaration of Conformity 7
Technical Data
Item number 10028213, 10028214
Power adapter 12 V DC 5 A
Power consumtion 60 W
Water tank capacity 1.5 L
Capacity 400 ml/day (at 30°C, 80% RH)
Dimensions 286 mm (H) x 180 mm (W) x 134 mm (D)
Packing Content
1 x Dehumidier
1 x Water Tank
1 x Power Cord
1 x User Manual
Safety Instructions
Read all the safety and operating instructions carefully and retain them for future reference.
• This device is intended for use in the removal of excess moisture from small rooms such as studies,
walk-in closets and bathrooms.
• Other than the removable water tank, this device is not user serviceable and should not be disas-
sembled.
• Any use other than that described above will lead to damage to the product and may present ad-
ditional risks.
• Keep unit in upright position whenever in use.
• To avoid electric shock, avoid opening unit.
• Always turn device o when not in use.
• Avoid using power adapter in excessively wet area.
• Ensure that inlet and outlet grilles are unobstructed.
• Use both hands when handling unit to avoid tilting.
• Keep device away from reach of children.

Product Description
1 Power „On“ indicator
2 Water tank full indicator
3 Dry air outlet
4 DC power socket
5 On/O power switch
6 Cold air inlet
7 Removable water tank
8 Water displacement outlet
9 Float switch
10 DC power jack
11 AC/DC switch mode
12 Plug with power cord
Use and Operation
Getting Started
• To remove excess moisture from small rooms, place the dehumidier in preferred area.
• Insert smaller end of AC/DC Power Adapter into DC Power Socket.
• Connect other end to wall socket.
• Toggle On/O Switch to On position.
• To turn unit o at any time, toggle On/O Switch to O position rst, then unplug AC/DC Power
Adapter.
Emptying Water Tank
• The Dehumidier will automatically turn o once tank is full.
• The Yellow „Full“ LED will turn on.
• Before removing water tank, toggle On/O Switch to O position.
• Insert two ngers into Tank Pull-Out Handle and gently pull out.
• Pull out plug from Water Displacement Hole.
• Pour collected water out from tank into sink or toilet.
• Reinsert plug and slide tank back into device until it clicks.
• Device is now ready for use again.
6

Cleaning and Care
• Always turn the Dehumidi er o and disconnect power cord before cleaning unit.
• Use a piece of soft cloth to clean product surface.
• Use soft-bristled brush to wipe dust o air inlet grills.
Disposal Considerations
According to the European waste regulation 2002/96/EC this symbol on the product
or on its packaging indicates that this product may not be treated as household was-
te. Instead it should be taken to the appropriate collection point for the recycling of
electrical and electronic equipment. By ensuring this product is disposed of correct-
ly, you will help prevent potential negative consequences for the environment and
human health, which could otherwise be caused by inappropriate waste handling of
this product. For more detailled information about recycling of this product, please
contact your local council or your household waste disposial service.
Declaration of Conformity
Producer: CHAL-TEC GmbH, Wallstraße 16, 10179 Berlin.
This product is conform to the following European Directives:
2014/30/EU (EMC)
2014/35/EU (LVD)
2011/65/EU (RoHS)
6
7

8
Gentile Cliente,
La ringraziamo per aver acquistato un dispositivo Klarstein. La preghiamo di leggere con cura le se-
guenti istruzioni di installazione e utilizzo del dispositivo e di seguirle per evitare eventuali danni. Non
ci assumiamo alcuna responsabilità per danni derivati da una mancata osservazione delle avvertenze
per la sicurezza e da un uso improprio del dispositivo.
Indice
Dati tecnici 8
Consegna 8
Avvertenze di sicurezza 8
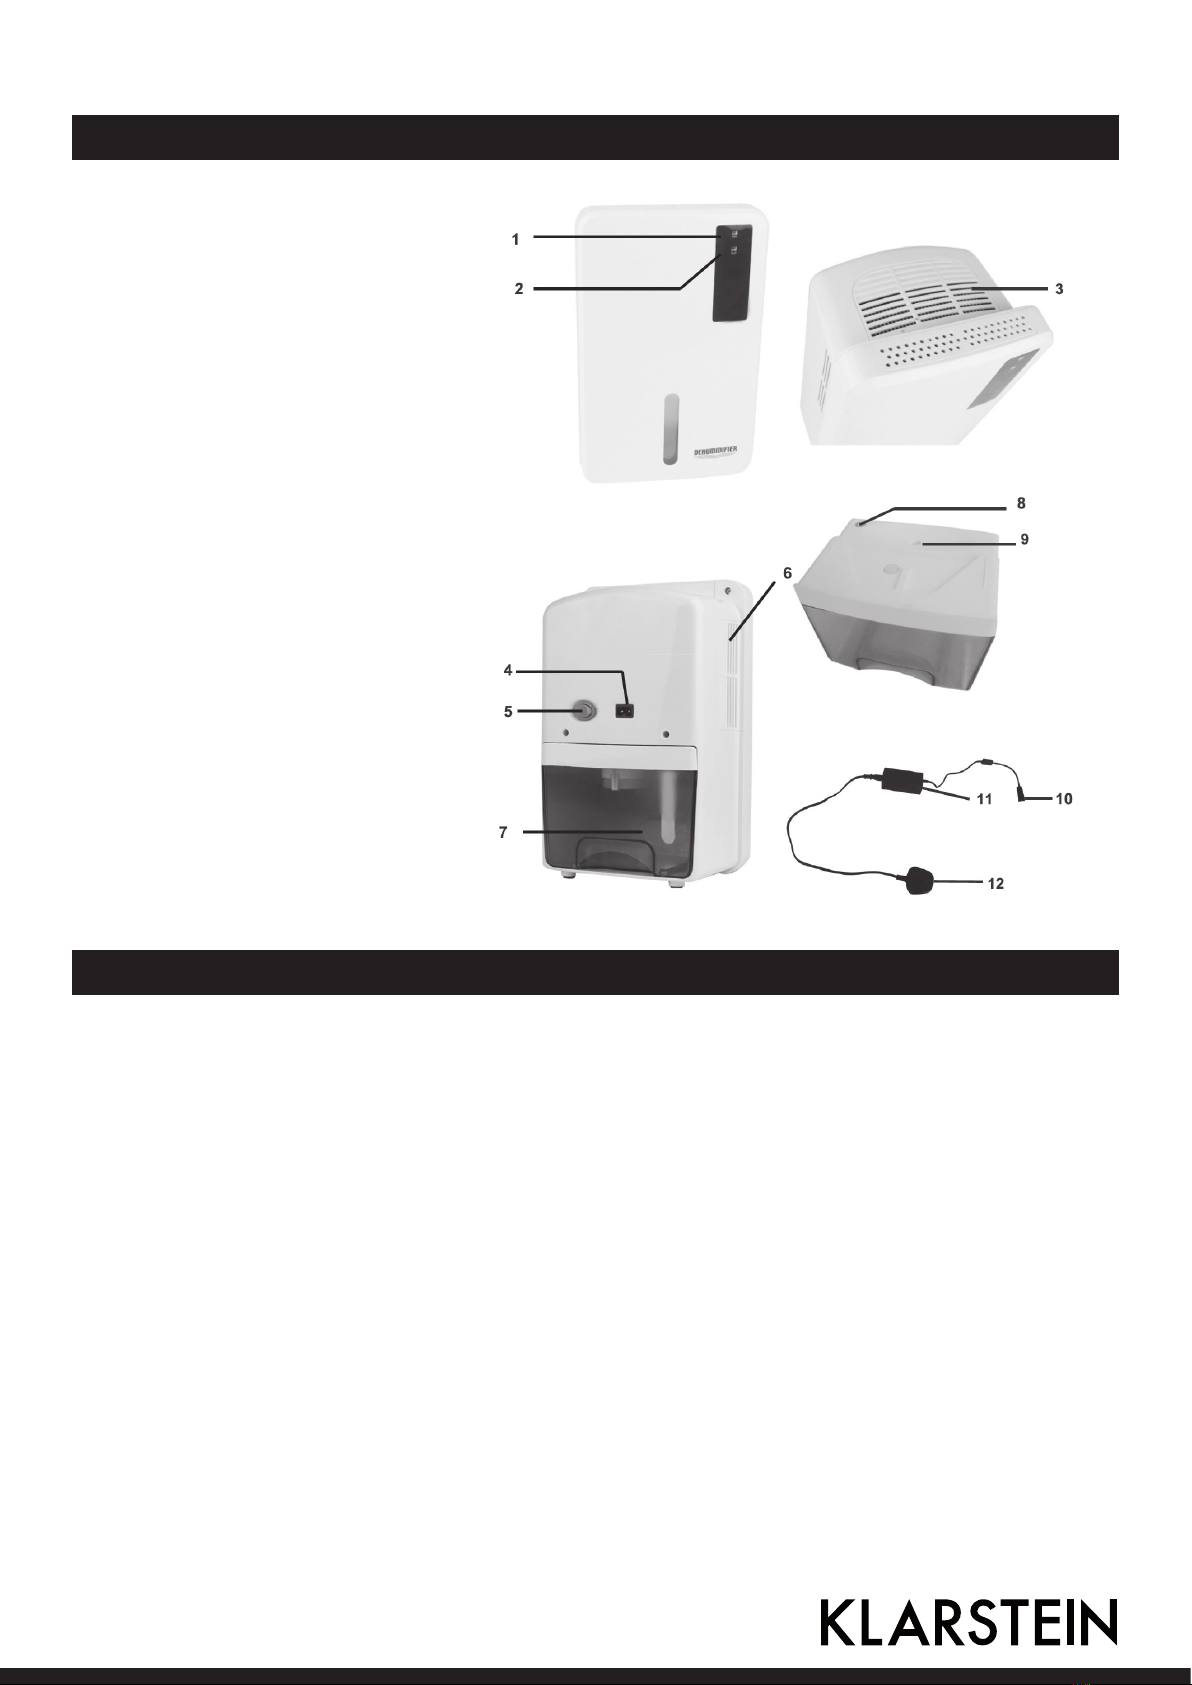
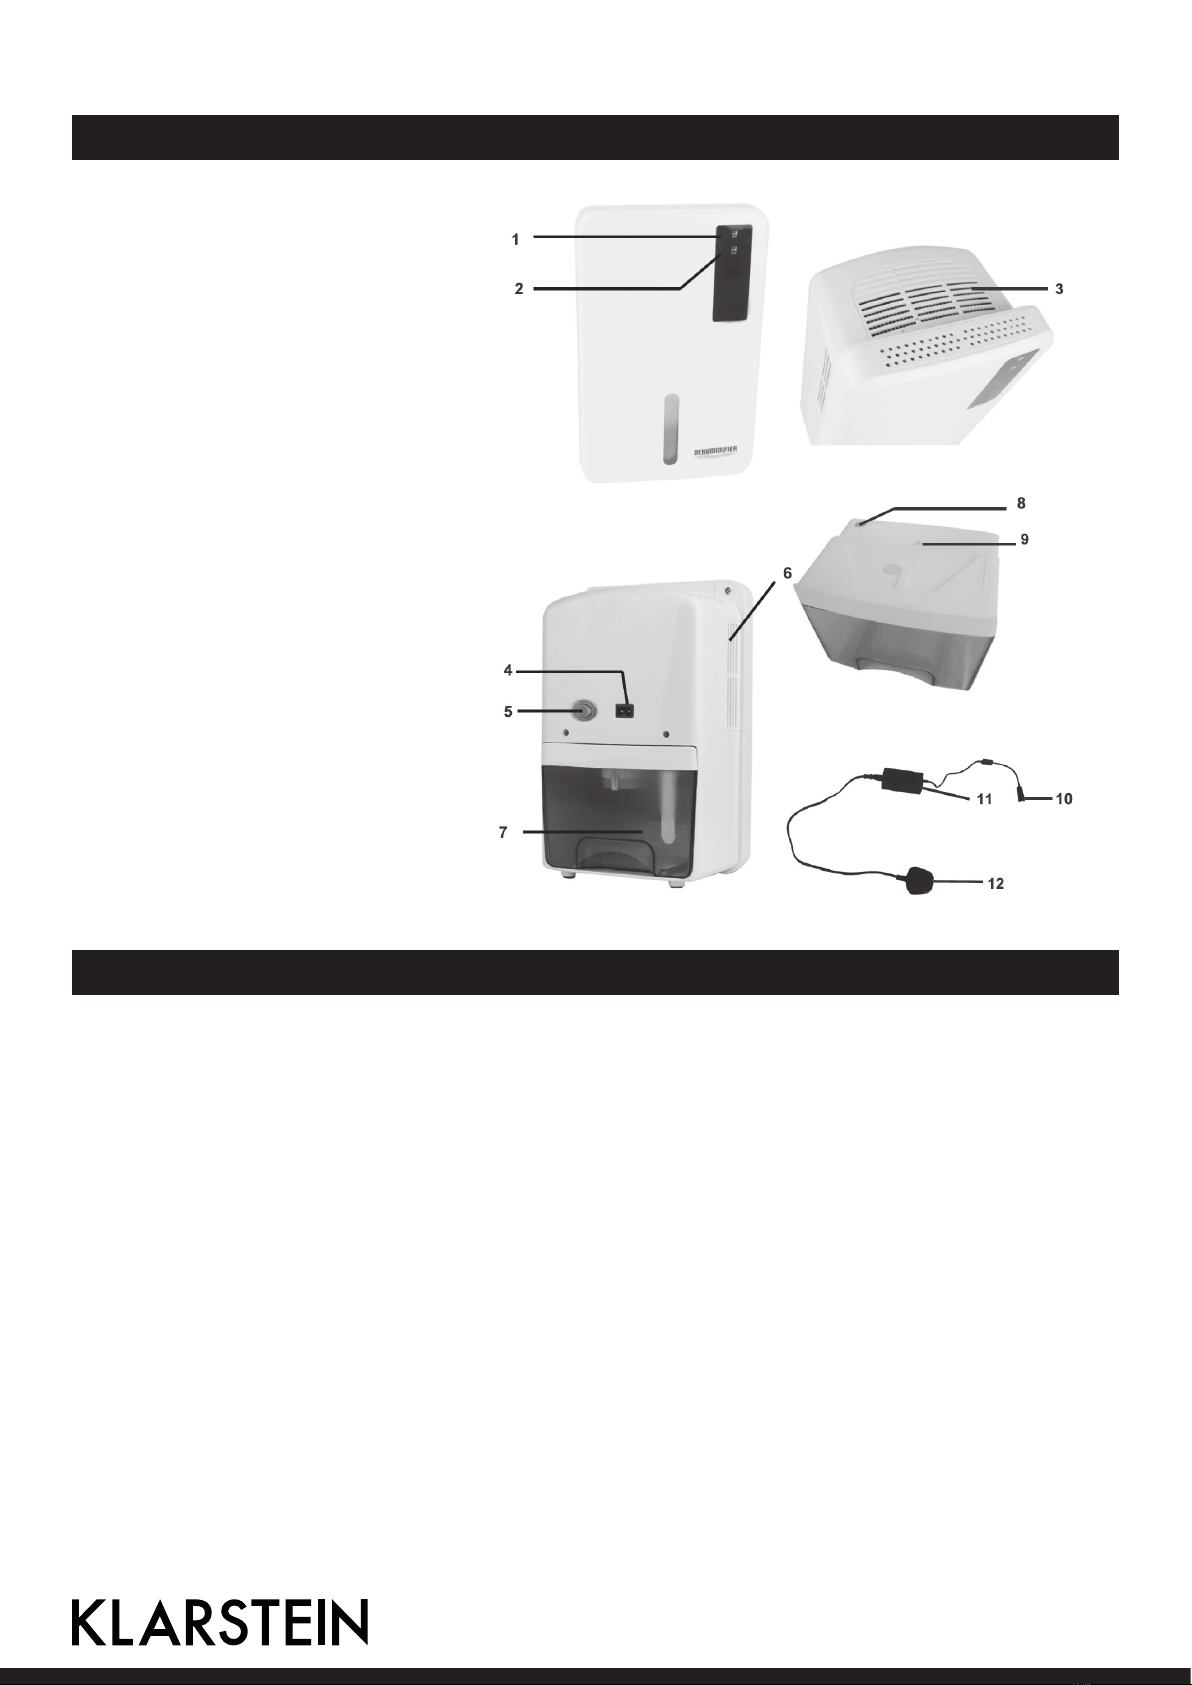
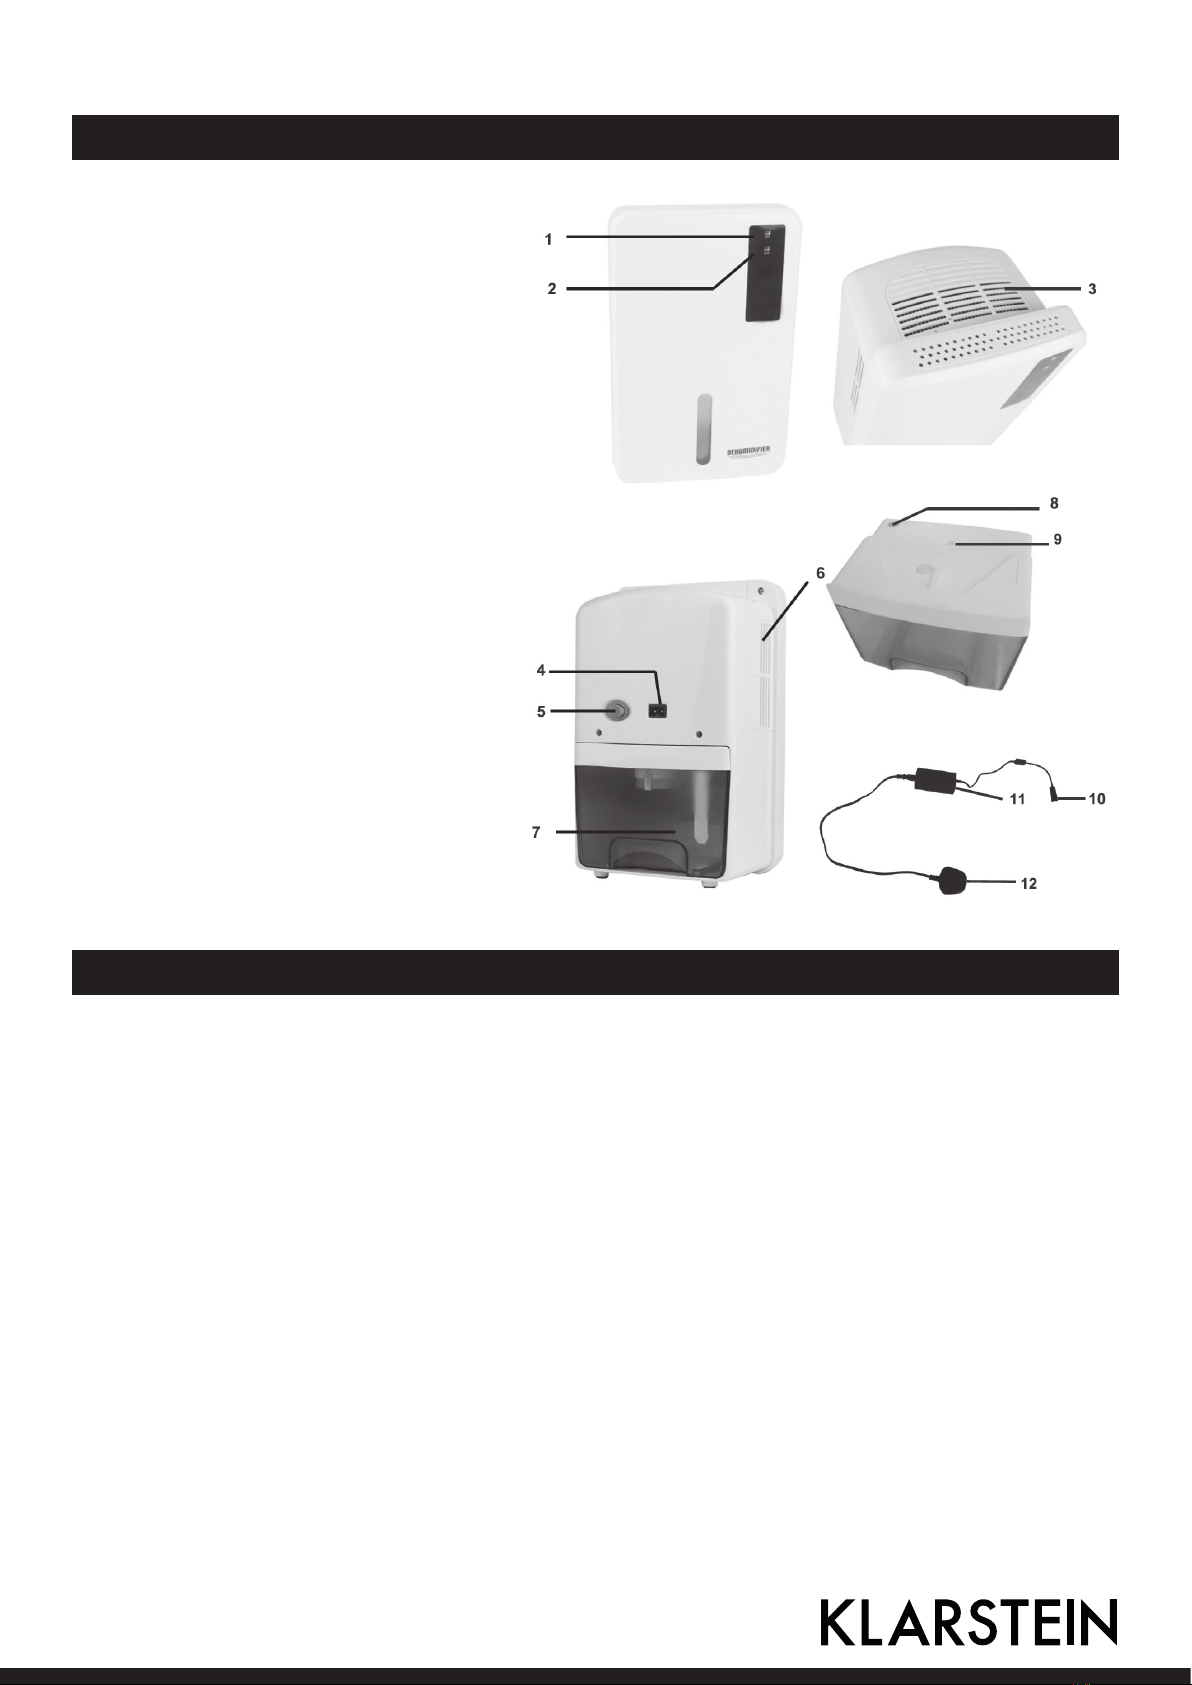
Descrizione del prodotto 9
Messa in funzione e utilizzo 9
Pulizia e manutenzione 10
Avvertenze per lo smaltimento 10
Dichiarazione di conformità 10
Dati tecnici
Numero dell’articolo 10028213, 10028214
Alimentazione 12 V DC 5 A
Potenza 60 W
Capacità del serbatoio 1,5 L
Capacità di deumidicazione 400 ml al giorno (a 30°C, 80% UR)
Dimensioni 286 mm (A) x 180 mm (L) x 134 mm (P)
Consegna
1X Deumidicatore
1X Serbatoio dell’acqua
1X Cavo di rete
1X Manuale di istruzioni
Avvertenze di sicurezza
Leggere attentamente tutte le istruzioni e conservare il manuale di istruzioni per consultazioni future.
• Il dispositivo serve a eliminare l’umidità in eccesso dagli ambienti interni, come ad esempio studi,
cabine armadio e bagni.
• Non rimuovere nessun componente del dispositivo ad eccezione del serbatoio.
• Utilizzare il dispositivo esclusivamente per lo scopo al quale è destinato. Non ci assumiamo nessu-
na responsabilità per danni derivati da un utilizzo improprio.
• Assicurarsi che il dispositivo sia collocato in posizione verticale.
• Per evitare scosse elettriche, non aprire il dispositivo.
• Non usare il dispositivo in ambienti eccessivamente umidi.
• Assicurarsi che le fessure di aereazione non siano bloccate e che l’aria circoli liberamente.
• Spostare il dispositivo con entrambe le mani per evitare che si ribalti.
• Tenere il dispositivo fuori dalla portata dei bambini.

Descrizione del prodotto
1 Spia di accensione
2 Spia “serbatoio pieno”
3 Uscita aria secca
4 Attacco del connettore
5 Accensione/spegnimento
6 Entrata aria fredda
7 Serbatoio
8 Foro del serbatoio
9 Galleggiante
10 Connettore
11 Alimentatore a commutazione CA/CC
12 Spina di alimentazione
Messa in funzione e utilizzo
Funzionamento
• Collocare il dispositivo su una supercie piana e stabile.
• Inserire il connettore nell’attacco apposito.
• Collegare l’alimentatore alla presa.
• Accendere il dispositivo.
• Se si desidera spegnere il dispositivo, premere il tasto di spegnimento e staccare la spina dalla
presa.
Svuotare il serbatoio
• Non appena il serbatoio è pieno, il dispositivo si spegne automaticamente.
• Il LED giallo si accende.
• Spegnere il dispositivo prima di togliere il serbatoio.
• Togliere il serbatoio con cura aerrando l’impugnatura.
• Togliere il tappo del serbatoio.
• Svuotare il serbatoio.
• Richiudere il tappo e reinserire il serbatoio no a quando non si sente un clic.
• Ora è possibile usare di nuovo il dispositivo.
8 9

Pulizia e manutenzione
• Prima di pulire il dispositivo, spegnerlo e staccare la spina.
• Utilizzare un panno morbido per pulirlo.
• Rimuovere la polvere dalle fessure di aereazione con una spazzola morbida.
Avvertenze per lo smaltimento
Se sul prodotto è presente la gura a sinistra (il cassonetto mobile sbarrato), si appli-
ca la direttiva europea 2002/96/CE. Questi prodotti non possono essere smaltiti con i
ri uti normali. Informarsi sulle disposizioni vigenti sulla raccolta separata di dispositivi
elettrici e elettronici. Non smaltire i vecchi dispositivi con i ri uti domestici. Grazie
al corretto smaltimento dei vecchi dispositivi si protegge il pianeta e la salute delle
persone da possibili conseguenze negative. Il riciclo di materiali aiuta a diminuire il
consumo di materie prime.
Dichiarazione di conformità
Produttore: CHAL-TEC GmbH, Wallstraße 16, 10179 Berlin.
Questo prodotto e conforme alle seguenti direttive europee:
2014/30/UE (EMC)
2014/35/UE (LVD)
2011/65/UE (RoHS)
10

10 11
Chère cliente, cher client,
Toutes nos félicitations pour l’acquisition de ce nouvel appareil. Veuillez lire attentivement les inst-
ructions de branchement et d’utilisation an d’éviter d’éventuels dommages techniques. Le fabricant
ne saurait être tenu pour responsable des dommages dus au non-respect des consignes de sécurité
et à la mauvaise utilisation de l’appareil.
Sommaire
Données techniques 11
Inclus dans la livraison 11
Consignes de sécurité 11
Aperçu de l’appareil 12
Mise en marche et fonctionnement 12
Nettoyage et entretien 13
Informations sur le recyclage 13
Déclaration de conformité 13
Données techniques
Numéro d’article 10028213, 10028214
Alimentation électrique 12 V DC 5 A
Puissance 60 W
Capacité du réservoir d’eau 1,5 litre
Capacité de déshumidication 400 ml/jour (à 30 °C et avec 80 % Rh)
Dimensions 286 mm x 180 mm x 134 mm
Inclus dans la livraison
1 déshumidicateur
1 réservoir d’eau
1 cordon d’alimentation
1 mode d’emploi
Consignes de sécurité
Veuillez lire attentivement toutes les indications et conservez ce mode d’emploi soigneusement pour
pouvoir le consulter à tout moment.
• Cet appareil est prévu pour éliminer l’humidité présente dans des pièces telles qu’un dressing-
room ou une salle de bains.
• Ne retirer aucune partie de l’appareil hormis le réservoir d’eau.
• Utiliser l’appareil conformément à l’usage décrit précédemment. Le fabricant ne saurait être tenu
pour responsable des dommages dus à la mauvaise utilisation de l’appareil.
• Installer l’appareil dans une position verticale.
• Pour éviter toute électrocution, ne pas ouvrir l’appareil.
• Ne pas utiliser l’appareil dans une pièce mouillée.
• Veiller à ce que les fentes d’aération et la ventilation ne soient jamais obstruées
• Utiliser les deux mains pour déplacer l’appareil.
• Placer l’appareil hors de la portée des enfants.

Aperçu de l’appareil
1 Témoin de la mise en marche
2 Témoin lumineux indiquant que
le réservoir est plein
3 Sortie d’air sec
4 Prise pour câble de branchement
5 Bouton marche/arrêt
6 Entrée de l’air froid
7 Réservoir d’eau
8 Évacuation d’eau
9 Flotteur
10 Fiche de branchement à l’appareil
11 Convertisseur AC/DC
12 Cordon d’alimentation et che
Mise en marche et fonctionnement
Branchement
• Placer l’appareil sur une surface plane et stable.
• Brancher le cordon d’alimentation à l’appareil.
• Brancher le cordon d’alimentation à une prise.
• Allumer l’appareil.
• Pour éteindre l’appareil, appuyer sur le bouton « arrêt » puis le débrancher.
Vider le réservoir d’eau
1. Dès que le réservoir d’eau est plein, l’appareil s’arrête automatiquement.
2. Le témoin lumineux jaune s’allume.
3. Avant de retirer le réservoir d’eau, débrancher l’appareil.
4. Sortir le réservoir d’eau en le tirant par la poignée avec précaution.
5. Retirer le bouchon de la fente d’évacuation d’eau.
6. Évacuer toute l’eau.
7. Remettre le bouchon à sa place et replacer le réservoir d’eau dans l’appareil.
8. L’appareil est alors prêt à fonctionner de nouveau.
12

Nettoyage et entretien
• Éteindre et débrancher l’appareil avant de le nettoyer.
• Pour nettoyer la surface, utiliser un chi on doux.
• Retirer la poussière du ltre à air avec une brosse douce.
Informations sur le recyclage
Vous trouverez sur le produit l’image ci-contre (une poubelle sur roues, barrée d‘une
croix), ce qui indique que le produit se trouve soumis à la directive européenne
2002/96/CE. Renseignez-vous sur les dispositions en vigueur dans votre région con-
cernant la collecte séparée des appareils électriques et électroniques. Respectez-les
et ne jetez pas les appareils usagés avec les ordures ménagères. La mise en rebut
correcte du produit usagé permet de préserver l’environnement et la santé. Le recyc-
lage des matériaux contribue à la préservation des ressources naturelles.
Déclaration de conformité
Fabricant : CHAL-TEC GmbH, Wallstraße 16, 10179 Berlin.
Ce produit est conforme aux directives européennes suivantes :
2014/30/UE (CEM)
2014/35/UE (LVD)
2011/65/UE (RoHS)
12
13

14
Estimado cliente,
Le felicitamos por la adquisición de su aparato Klarstein. Por favor, lea con atención el siguiente
manual y siga cuidadosamente las instrucciones de uso con el n de evitar posibles daños técnicos.
Sobre los daños acaecidos debido a una deciente aplicación de las indicaciones de seguridad y/o a
un uso inapropiado del aparato, declinamos asumir cualquier responsabilidad.
Índice de contenidos
Datos técnicos 14
Piezas suministradas 14
Indicaciones de seguridad 14
Vista general del aparato 15
Puesta en funcionamiento y utilización 15
Limpieza y cuidado 16
Indicaciones para la retirada del aparato 16
Declaración de conformidad 16
Datos técnicos
Número del artículo 10028213, 10028214
Suministro eléctrico 12 V DC 2.5 A
Potencia 60 W
Capacidad del tanque 1.5 L
Capacidad de humidicación 400 ml/Día (con 30°C y con 80% HR)
Medidas 286 mm (Al) x 180 mm (An) x 134 mm (L)
Piezas suministradas
1x Deshumidicador del aire
1x Tanque de agua
1x Cable de alimentación
1x Manual de instrucciones
Indicaciones de seguridad
Por favor, lea con atención este manual de instrucciones antes de poner en marcha el aparato. Con-
serve el manual mientras tenga en su poder el aparato.
• Este aparato sirve para retirar el aire húmedo de espacios cerrados como habitaciones, armarios
de gran tamaño o baños.
• Exceptuando el tanque de agua, no retire ninguna otra parte del aparato.
• Emplee el aparato sólo para el uso para el que ha sido concebido. El fabricante declina cualquier re-
sponsabilidad sobre los daños acaecidos sobre el aparato debido a un uso inapropiado del mismo.
• Asegúrese de que el aparato permanece siempre en posición vertical.
• Para evitar el riesgo de descargas electricas, no abra nunca la carcasa del aparato.
• No utilice el aparato en espacios extremadamente húmedos.
• Asegúrese de que las rendijas de ventilación están despejadas y no dicultan la circulación del
aire.
• Cuando mueva el aparato, hágalo con ambas manos para que no se ladee.
• Mantenga el aparato fuera del alcance de los niños.

Vista general del aparato
1 Piloto de funcionamiento
2 Piloto “Tanque de agua lleno”
3 Salida del aire seco
4 Toma de electricidad hembra
5 Interruptor de encendido/apagado
6 Salida de aire frío
7 Tanque del agua
8 Salida del agua
9 Flotador
10 Enchufe a la red
11 Interruptor AC/DC
12 Cable de alimentación
Puesta en funcionamiento y utilización
Puesta en funcionamiento
• Coloque el aparato sobre una supercie plana y estable.
• Introduzca el enchufe en la toma del aparato (enchufe hembra).
• Enchufe el aparato a la red
• Encienda el aparato.
• Si desea apagar el aparato, presione el interruptor de apagado y desenchúfelo después.
Vaciado del tanque de agua
1. Tan pronto como el tanque esté lleno, el aparato se apagará automáticamente.
2. El piloto amarillo LED se encenderá.
3. Antes retirar el tanque, desconecte el aparato.
4. Retire con cuidado el tanque usando el asa.
5. Retiere el tapón de la salida de agua del aparato.
6. Vacíe el tanque por completo.
7. Coloque el tapón en la salida de agua y vuelva a introducir el tanque en el aprato.
8. Ya puede volver a usar el aparato.
14 15

Limpieza y cuidado
• Apague y desenchufe el aparato antes de limpiarlo.
• Para limpiar la super cie del aparato, use un trapo suave.
• Para quitar el polvo de las rendijas de ventilación, puede usar un cepillo blando.
Indicaciones para la retirada del aparato
Si el aparato lleva adherida la ilustración de la izquierda (el contenedor de basura
tachado) entonces rige la normativa europea, directiva 2002/96/EG. Este producto
no debe arrojarse a un contenedor de basura común. Infórmese sobre las leyes
territoriales que regulan la recogida separada de aparatos eléctricos y electrónicos.
Respete las leyes territoriales y no arroje aparatos viejos al cubo de la basura domé-
stica. Una retirada de aparatos conforme a las leyes, contribuye a proteger el medio
ambiente y a las personas a su alrededor frente a posibles consecuencias perjudicia-
les para la salud. El reciclaje ayuda a reducir el consumo de materias primas.
Declaración de conformidad
Fabricante : CHAL-TEC GmbH, Wallstraße 16, 10179 Berlin.
Este producto cumple con las siguientes directivas europeas:
2014/30/UE (EMC)
2014/35/UE (baja tensión)
2011/65/UE (refundición RoHS)
16
This manual suits for next models
1
Table of contents
Languages:
Other Klarstein Dehumidifier manuals

Klarstein
Klarstein Jet Set 2500 User manual

Klarstein
Klarstein SHETLAND 600 User manual

Klarstein
Klarstein AeroDry 10 User manual

Klarstein
Klarstein DRYFY 20 User manual

Klarstein
Klarstein DRYBEST 2000 2G User manual

Klarstein
Klarstein DryFy Pro User manual

Klarstein
Klarstein 10029871 User manual

Klarstein
Klarstein DryFy Pro User manual

Klarstein
Klarstein 10030043 User manual

Klarstein
Klarstein 10028211 User manual