manuals.online logo
Brands
  1. Home
  2. •
  3. Brands
  4. •
  5. Kohler
  6. •
  7. Bathroom Fixture
  8. •
  9. Kohler ARCHER 72700X-4 User manual

Kohler ARCHER 72700X-4 User manual

ROUGH-IN DIMENSIONS
1173668-X2-C 4
1173668-X2-C 1
ARCHER
มาตรฐานผลิตภัณฑ STANDARD APPLICABLE
ผลิตภัณฑผลิตภายใตมาตรฐานผลิตภัณฑอุตสาหกรรม (มอก.)
Special model meets or exceeds the following at date
of manufacture: TIS
ระยะการติดตั้ง
INSTALLATION INSTRUCTIONS
ขอแนะนําการติดตั้ง
กอนเริ่มการติดตั้ง BEFORE YOU BEGIN
All information is based on the latest product
information available at the time of publication.
Kohler Co. reserves the right to make changes in
product characteristics, packaging, or availability at
any time without notice.
Please leave these instructions for the consumer.
They contain important information.
NOTES:
1. Shut off the water supplies to the fitting.
2. Inspect the supply tubing for damage. Replace as
necessary.
3. Observe local plumbing codes.
4. The highest working pressure for showerhead &
handspray is 0.5MPa(5 bar). If it exceeds 0.5MPa
(5bar), a pressure reducer is needed. The highest
water and environment temperature is 60°C. Please
keep handspray, shower head and the shower arm
away from heater, or it may become damaged and
cause injury to the user.
72700X-4 กอกผสมยืนอาบพรอมชุดฝกบัวสายออนและชุดฝกบัวกานแข็ง
Classic Shower Column
Ø50.6
Ø56
203±15
350
G1/2˝
950±50
1235
400
G1/2˝
71~81 135 30°
54 925
Ø213.8
G1/2˝
G1/2˝
หัวฝกบัวปรับน้ำได 2 ระดับ
Multi-function Handspray
สายฝกบัว
Hose
1500
G1/2˝
Ø122
79
255
คูมือนี้มีขอมูลสำคัญ โปรดมอบเอกสารใหกับเจาของผลิตภัณฑ
ขอมูลในคูมือนี้มาจากขอมูลผลิตภัณฑลาสุดที่มีอยูในชวงเวลาการ
จัดพิมพ บริษัทฯขอสงวนสิทธิ์ในการเปลี่ยนแปลงขอมูลผลิตภัณฑ
บรรจุภัณฑที่มีอยูโดยมิตองแจงใหทราบลวงหนา
ขอสังเกต:
1. ปดวาลวนํ้าทำความสะอาดทอนํ้าดี เพื่อขจัดเศษสิ่งสกปรก
ตางๆ
4. แรงดันน้ำสูงสุดสำหรับหัวฝกบัวคือ 0.5 เมกะปาสคาล
(5 บาร) หากมากกวา0.5 เมกะปาสคาล (5 บาร)
ตองใชตัวลดแรงดันน้ำ อุณหภูมิน้ำสูงสุดที่ 60°C โปรดเก็บ
ฝกบัว, หัวฝกบัวและกานฝกบัวใหหางจากเครื่องทำความรอน
ซึ่งอาจทำใหผลิตภัณฑเสียหายหรือผูใชงานไดรับบาดเจ็บ
2. ตรวจสอบทอน้ำหากมีการชำรุดแนะนำใหเปลี่ยนใหม
3. ตรวจสอบระบบสุขาภิบาล
กอกผสมยืนอาบพรอมชุดฝกบัวสายออน
และชุดฝกบัวกานแข็ง รุน อารเชอร
ผนัง
Finished Wall
การรับประกันสินคา
LIMITED WARRANTY
Kohler (Thailand) Public Company Limited warrants to the original
products, which are purchased from authorized distributors and dealers
within Kingdom of Thailand only, to be free of defects in material and
workmanship.
Within the below mentioned periods from the date of purchase,
Kohler(Thailand) Public Company Limited will at its election, repair,
replace or make appropriate adjustment where company’s inspection
disclose any such defect occurring in normal usage and maintenance
but is not responsible for labor charges, removal charges, installation,
or other incidental or consequential costs. In no event shall the liability of
Kohler(Thailand) Public Company Limited exceed the purchase price
of the product. This warranty applies only to Kohler Faucets installed in
Thailand.
• Ceramic Valve(leak/drip)
- Lifetime Limited Warranty* for residential use
- and Five (5) Years for commercial use
• Finish Five(5) Years
• Fitting Five(5) Years
• Automatic faucet One(1) Year
• Hygiene spray(leak/drip Five(5) Years for selected models
from hygiene spray body) only
• Shower Five(5) Years
• Bathroom accessories Five(5) Years
This limited warranty DOES NOT COVER the defect or damage caused
by accident, natural disasters such as fire, flood, or earthquake, misuse
or abuse of products. Improper care and cleaning will avoid the warranty.
Consumers are responsible for the cost of service parts and service
fee for such cases.
To ensure continuous product quality and performance, as well as
product durability and lifetime, without any damage to the product,
consumers should purchase and use only genuine service parts and
after-sales services from Kohler (Thailand) Public Company Limited or
company’s authorized service centers, distributors, or dealers only.
*KOHLER® Faucet Lifetime Limited Warranty
Kohler (Thailand) warrants its faucets manufactured after January 1,
1997, to be leak and drip free during normal residential use for as long as the
original consumer purchaser owns his or her home. If the faucet should
leak or drip during normal use, Kohler (Thailand) will, free of charge;
replace
the new cartridge necessary to put the faucet in good working
condition.
Kohler (Thailand) also warrants all other aspects of the faucet or
accessories (“Faucet”)**to be free of defects in material and workmanship
during normal residential use for as long as the original consumer
purchaser owns his or her home. If a defect is found in normal residential
use, Kohler (Thailand) will, at its election, repair, provide a replacement
part or product, or make appropriate adjustment. Damage to a product
caused by accident, misuse, or abuse is not covered by this warranty.
Improper care and cleaning will also void the warranty.
Proof of purchase (original sales receipt) must be provided to
Kohler(Thailand) with all warranty claims. Kohler (Thailand) is not respon-
sible for labor charges, installation, or other incidental or consequential
costs. In no event shall the liability of Kohler (Thailand) exceed the
purchase price of the Faucet.
Important: Never use cleaners containing abrasive cleansers, ammonia,
bleach, acids, waxes, alcohol, solvents or other products not recom-
mended for chrome. This will void the warranty.
To obtain warranty service, please contact your dealers or contact the
KOHLER (Thailand) Call Center, together with proof of purchase at;
Call Center
KOHLER (Thailand) Public Company Limited
16th Floor, Jasmine City Building
2 Soi Sukhumvit 23, Sukhumvit Road,
Wattana, Bangkok 10110
Tel: 02204-6222 Fax: 0-2204-6224
Email: [email protected]
COPYRIGHT ©2014 BY KOHLER (THAILAND) PUBLIC COMPANY
LIMITED
(A)
ระดับพื้นหอง
Finished Floor
*Dimensions are approximate.
*ขนาดระยะแสดงคาโดยประมาณ
*Unit: mm
*หนวย: มม.
*The installation height (A) can be adjusted depending on customer’s requirement
*ความสูงในการติดตั้ง (A) สามารถปรับไดตามความตองการของลูกคา"
1173668-X2-C 2
1173668-X2-C 3
INSTALLATION
การติดตั้ง
CARE AND CLEANING
For best results, keep the following in mind when
caring for your product:
•Always test your cleaning solution on an
inconspicuous area before applying to the entire
surface.
•Wipe surfaces clean and rinse completely with
water immediately after applying cleaner. Rinse and
dry any overspray that lands on nearby surfaces.
•Do not allow cleaners to soak on surfaces.
•Use a soft, dampened sponge or cloth. Never use
an abrasive material such as a brush or scouring
pad to clean surfaces.
•The ideal cleaning technique is to rinse thoroughly
and blot dry any water from the surface after each
use.
การดูแลรักษาและทําความสะอาด
เพื่อการดูแลรักษาและทําความสะอาดผลิตภัณฑของทาน
อยางมีประสิทธิภาพ โปรดปฏิบัติตามคําแนะนําดังนี้
• ทดสอบน้ำยาทําความสะอาดกับพื้นผิวผลิตภัณฑในบริเวณ
ที่ไมเปนที่สังเกตกอนใชนํ้ายาทําความสะอาด
• หลังจากที่ใชนํ้ายาทำความสะอาด เช็ดทำความสะอาดและ
ลางนํ้าออกทันที จากนั้นเช็ดใหแหง
• หามแชนํ้ายาทำความสะอาดบนพื้นผิวผลิตภัณฑ
• ใชฟองนํ้าหรือผานุมทำความสะอาดพื้นผิวผลิตภัณฑ หามใช
วัสดุหยาบ เชน แปรงหรือแผนขัด
• ขอแนะนำในการดูแลพื้นผิวผลิตภัณฑคือ ลางนํ้าสะอาดใหทั่ว
และเช็ดคราบนํ้าบนพื้นผิวผลิตภัณฑหลังจากการใชงานทุกครั้ง
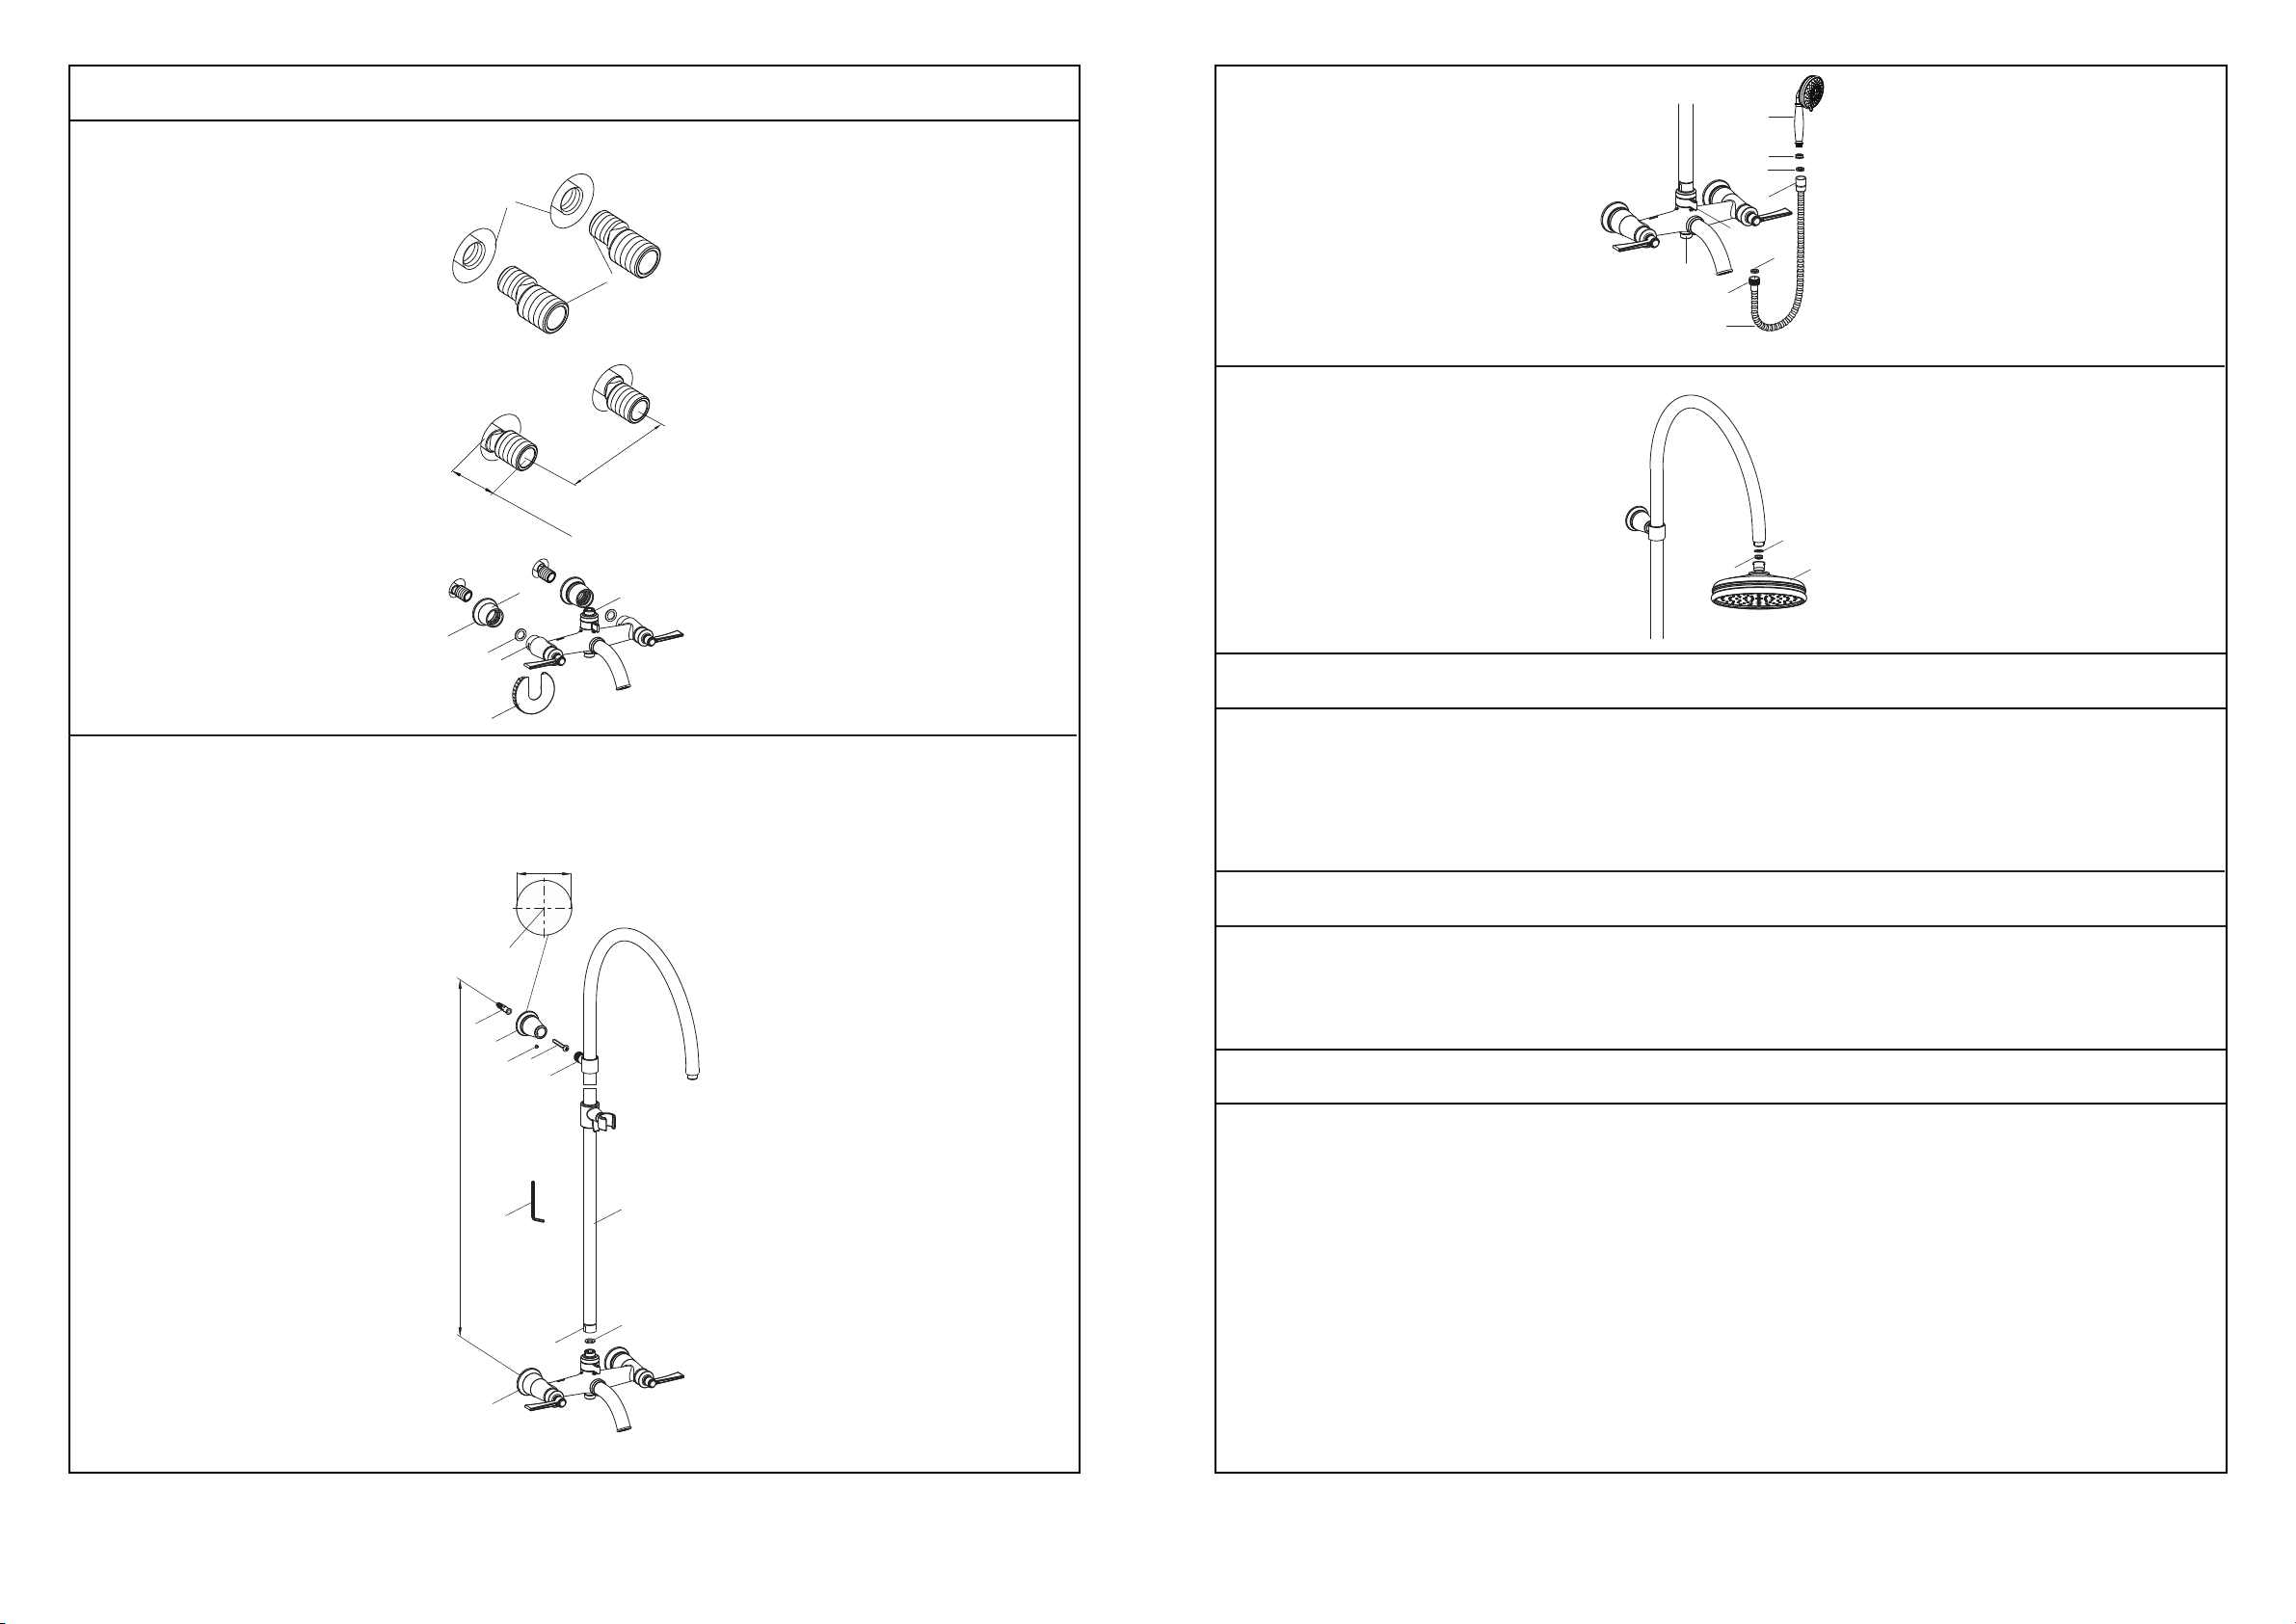
How To Install The Faucet
To perform installation, installer must provide
G1/2˝ female supply fittings(1), spaced
203.2mm apart and level. The supply fittings
should be vertical and not beyond the finished
wall. Hot supply pipe must be located on the
left.
Flush the water supply pipes thoroughly to
remove debris.
Install the two offset connectors(2) into the hot
and cold supply pipes. Use appropriate thread
sealants or thread tape on pipe threads.
Adjust the center-to-center distance between
the connectors to 203.2mm and level. They
should extend 38 to 48mm beyond the finished
wall.
Thread the escutcheon kits(3) onto the
connectors until they are against the finished
wall. Put the washers(4) into the nuts(5).
Keeping the shower faucet outlet(6) upwards,
and thread the nuts to connectors. Tighten the
nuts with the wrench(7). Loosen the
escutcheons(8) so that they cover the nuts.
How To Install The Slide Bar
Rehearse the slide bar kit(9) installation for the
anchor(10) mounting location determination.
Slide the base(11) onto the connector(12).
Install the screw(14) into the base with the hex
wrench(13), and tighten them.
Tighten the nut(15) with the washer(16) onto
the faucet outlet(6) by hand. Keep the slide bar
kit parallel with the finished wall. Loosen the
screw with the hex wrench. Adjust the base so
that it is against the finished wall. Tighten the
screw. Mark the diameter of the base with a
pencil on the location that separate 950±50mm
from the center point of the faucet escutcheon
(17). Loosen the nut by hand, remove the
washer, remove the slide bar kit. Loosen the
screw with the hex wrench (NOTE: Don’t lose
the screw.), remove the base.
Mark the center point of the base diameter
with a pencil. Drill a hole on the center point as
anchor diameter. Press the anchor into the
hole. Secure the base by the self-tapping
screw(18), and make sure screw hole of the
base vertically downwards.
Install the connector into the base. Thread the
nut(15) with the washer(16) to the faucet
outlet(6) by hand. Tighten the nut with strap
wrench or soft cloth between product and
regular wrench. Tighten the screw with the hex
wrench.
Center Point
จุดศูนยกลาง
11
15
17
18
9
16
10
13
12
Ø50.6mm/มม.
Base Diameter
เสนผานศูนยกลางฐานรอง
Hot
Cold
203.2mm
/
มม.
38~48mm
/
มม.
Cold
Hot
14
950±50mm/มม.
How To Install The Handspray
And The Hose
Turn the diverter handle(19) to the
handspray logo and run hot and cold water
for about one minute to remove any debris.
Put the washer(20) into the end A of the
hose(21), and connect to the faucet
outlet(22). Put the restrictor(25) into the inlet
of the handspray(24) Put the washer(23)
into the end B of the hose, and connect the
hose to the handspray.
Ensure that all connections are tight.
Ensure that the handles are in the off position.
Turn on the drain and main water supply, and check for
leaks. Repair as needed.
INSTALLATION CHECKOUT
How To Install The Showerhead
Turn the diverter handle(19) to the
showerhead logo and run hot and cold water
for about one minute to remove any debris
before the showerhead(26) is installed.
Tighten the showerhead onto the slide bar
kit outlet with strap wrench.
Before installation, install restrictor(25) if
needed. Take out washer(27) and install
restrictor as the figure shown, reinstall
washer.
25
26
27
A
B
22
23
24
25
20
19
21
OPERATION INSTRUCTIONS
Left handle opens with turning clockwise, and right handle
opens with turning anticlockwise.
Turn the diverter handle to the handspray logo, water will flow
from the handspray; turn it to the showerhead logo, the
showerhead will work; turn it to the spout logo, water will flow
the spout.
การใชงานมือบิดกานโยก
ทดสอบการติดตั้ง
วิธีการติดตั้งกอกน้ำ
การดำเนินการติดตั้ง ผูติดตั้งจะตองเตรียม
เกลียวทอน้ำดีไว G1/2 นิ้ว(1) ที่ไดระดับ,
เวนระยะหาง 203.2 มม. เกลียวจะตองไมยื่น
ออกจากผนัง ทอน้ำรอนตองอยูทางดานซาย
น้ำรอน
น้ำเย็น
น้ำรอน
น้ำเย็น
ติดตั้งขอเยื้องสองชิ้น(2) เขากับทอนํ้ารอนและ
ทอนํ้าเย็น โดยใชเทปพันเกลียวพันที่เกลียวทอ
ปรับขอเยื้องใหไดระยะกึ่งกลางหางกัน 203.2 มม.
และปรับใหไดระดับ ซึ่งขอเยื้องจะยื่นออกมา
จากผนังประมาณ 38 ถึง 48 มม.
เปดวาลวนํ้าทำความสะอาดทอนํ้าดี เพื่อขจัดเศษ
สิ่งสกปรกตางๆ
สวมฝาครอบ(3) เขากับขอตอ ประกอบฝาครอบ
ใหชิดกับผนังสวมแหวนรอง(4) เขาไปดานใน
นอต(5) โดยใหทางน้ำออกของกอกน้ำ(6)
หันขึ้นดานบน ขันนอตเขากับขอตอใหแนน
ขันนอตดวยประแจ(7) คลายฝาครอบ(8)
เพื่อครอบนอต
วิธีการติดตั้งราวเลื่อน
ปรับชุดราวเลื่อน(9) เพื่อติดตั้งพุก(10)
ยึดชุดราวเลื่อนดานบน โดยเลื่อนฐานรอง(11)
เขากับขอตอ(12) ขันสกรู(14) เขากับฐานรอง
ใหแนนดวยประแจแอล(13)
ขันนอต(15) พรอมแหวนรอง(16) เขากับทางน้ำออก
ของกอกน้ำ(6) ดวยมือ จากนั้นปรับราวเลื่อน
ใหขนานกับกำแพง คลายสกรูดวยประแจแอล
ปรับฐานรองใหชิดกับผนัง ขันสกรูใหแนน
ลากเสนรอบฐานรอง(6) บนผนังดวยดินสอ
โดยหางจากจุดศูนยกลาง 950± 50 มม.
ของฝาครอบกอกน้ำ(17) คลายสกรูดวยมือ
จากนั้นถอดแหวนรองและราวเลื่อน
คลาสกรูดวยประแจแอล(ขอสังเกต: อยาทำสกรูหาย)
ถอดฐานรองออก
ใชดินสอกำหนดจุดกึ่งกลางของฐานรองเจาะรู
ใหเทากับขนาดของพุก สวมพุกเขากับรูที่เจาะไว
ยึดฐานรองใหแนนดวยสกรู(18)
ตรวจสอบใหแนใจวารูสกรูบนฐานรองหันลงดานลาง
ประกอบขอตอเขากับฐานรอง ขันนอต(15)
พรอมแหวนรอง(16) เขากับทางน้ำออก(6) ดวยมือ
ขันนอตดวยประแจแบบสายรัดหรือใชผานุมรองระหวาง
ประแจเหล็กกับนอตเพื่อปองกันรอยบนผลิตภัณฑ
ขันสกรูใหแนนดวยประแจ
วิธีการติดตั้งหัวฝกบัวและสายฝกบัว
หมุนวาลวเปลี่ยนทางน้ำ(19)ใหตรงกับเครื่องหมายฝกบัว
เปดน้ำรอนและน้ำเย็นทิ้งไวสักครูเพื่อลางสิ่งสกปรกออก
สวมแหวนรอง(20) เขากับปลาย A ของสายฝกบัว(21)
และประกอบเขากับทางออกของกอกน้ำ(22)
สวมตัวลดแรงดันน้ำ(25)
เขากับทางน้ำเขาของฝกบัว(24)
สวมแหวนรอง(23) เขาปลาย B ของสายฝกบัว
จากนั้นประกอบเขากับทอน้ำดีและหัวฝกบัว
วิธีการติดตั้งหัวฝกบัวกานแข็ง
หมุนวาลวเปลี่ยนทางน้ำ(19)
ใหตรงกับเครื่องหมายฝกบัวกานแข็ง
เปดน้ำรอนและน้ำเย็นทิ้งไวสักครู
เพื่อลางสิ่งสกปรกออกกอนการติดตั้งฝกบัวกานแข็ง(26)
ขันฝกบัวกานแข็งเขากับทางน้ำออกของราวเลื่อน
ดวยประแจแบบสายรัด
กอนการติดตั้งสามารถใชตัวลดแรงดันน้ำ(25)
ไดหากตองการ โดยนำแหวนรอง(27) ออกแลวติดตั้ง
ตัวลดแรงดันน้ำเขาไปดังภาพและสวมแหวนรอง
ใชมือบิดกานโยกดานซายดวยการหมุนทวนเข็มนาิกา
ใชมือบิดกานโยกดานขวาดวยการหมุนตามเข็มนาิกา
หมุนมือบิดกานโยกของวาลวเปลี่ยนทางน้ำ
ใหตรงกับเครื่องหมายฝกบัวเพื่อใหฝกบัวทำงาน
หมุนตรงกับเครื่องหมายฝกบัวกานแข็ง เพื่อใหฝกบัวกานแข็งทำงาน
หมุนใหตรงกับหัวกอกลงอาง เพื่อใหหัวกอกลงอางทำงาน
ตรวจสอบใหแนใจวา นอตทุกตัวขันแนน
ตรวจสอบใหแนใจวามือบิดกานโยกอยูในตำแหนงปด
จากนั้นเปดวาลวน้ำ เพื่อตรวจสอบการรั่วซึม
ซอมแซมหากเกิดการรั่วซึม
3
45
7
86
2
1
1173668-X2-C 5
ARCHER
**ระบุรหัสวัสดุเคลือบผิว/สีในการสั่งซื้อผลิตภัณฑ
**Color code must be specified when ordering
Call Center: +(66) 2204 6222
e-mail: [email protected]
SERVICE PARTS
อุปกรณประกอบและอะไหล Classic Shower Column
72700X-4 กอกผสมยืนอาบพรอมชุดฝกบัวสายออนและชุดฝกบัวกานแข็ง
1157175
O-Ring
โอริง
3007075
Washer
แหวนรอง
1157164
Diverter Valve
วาลวเปลี่ยนทางน้ำ
1157182**
Diverter Handle
มือบิดวาลวเปลี่ยนทางน้ำ
1157184**
Adjust Nut
นอต
1129959**
Showerhead
ฝกบัวกานแข็ง
1030624
Flow Regulator
ตัวลดแรงดันน้ำ
864922**
Bush
ปลอก
1218659
Washer
แหวนรอง
870992
O-ring
โอริง
1170944**
Connector
ขอเยื้อง
864471
Seat
ปลอก870992
O-ring
โอริง
1157192
Spring
สปริง
1157188**
Coupling Nut
นอต
58744
Stream
ปากกอก
1157191**
Escutcheon
ฝาครอบ
831727**
Hose
สายฝกบัว
880010
Washer
แหวนรอง
1157190**
Escutcheon
ฝาครอบ
1160393
Spanner
ประแจ 1159724**
Plug
ปุมปด
835157
Screw
สกรู
1154193**(Left
/
ซาย
)
1154194**(Right
/
ขวา
)
Lever
มือบิดกานโยก
1178357**
Cover
ฝาครอบ
837207(Left
/
ซาย
)
837206(Right
/
ขวา
)
Valve
วาลว
78125
Adapter
อะแด็ปเตอร
832940
Washer
ขอแขวน
1082904
Anchor
พุก
3013706
Screw
สกรู
1157201**
Bracket
ขอแขวน
1082902
Screw
สกรู
833730
Hex Wrench
ประแจแอล
1157204**
Bracket
ขอแขวน
831752
Check Valve
วาลวกันน้ำไหลยอนกลับ
1157171
O-ring
โอริง
1157177
Screw
สกรู
1157171
O-ring
โอริง
77420
Screen Washer
แหวนกรอง
1157202**
Connector
ขอตอ
1157203
Sleeve
ปลอก
1157180
Sleeve
ปลอก
1157181
Sleeve
ปลอก
1157183
Sleeve
ปลอก
1189866**
Handspray
ฝกบัว
1030624
Water Flow Restrictor
ขอแขวน
กอกผสมยืนอาบพรอมชุดฝกบัวสายออน
และชุดฝกบัวกานแข็ง รุน อารเชอร

Other Kohler Bathroom Fixture manuals

Kohler Mira Logic User manual

Kohler

Kohler Mira Logic User manual

Kohler K-113 User manual

Kohler

Kohler K-113 User manual

Kohler 12966T-C User manual

Kohler

Kohler 12966T-C User manual

Kohler K-1717 Assembly instructions

Kohler

Kohler K-1717 Assembly instructions

Kohler K-2011 User manual

Kohler

Kohler K-2011 User manual

Kohler K-704517 Assembly instructions

Kohler

Kohler K-704517 Assembly instructions

Kohler Margaux K-16238-4 Assembly instructions

Kohler

Kohler Margaux K-16238-4 Assembly instructions

Kohler K-9923 User manual

Kohler

Kohler K-9923 User manual

Kohler K-T6808 Assembly instructions

Kohler

Kohler K-T6808 Assembly instructions

Kohler K-5724 User manual

Kohler

Kohler K-5724 User manual

Kohler K-1301 Assembly instructions

Kohler

Kohler K-1301 Assembly instructions

Kohler Sterling 7104 Series User manual

Kohler

Kohler Sterling 7104 Series User manual

Kohler ACCLIV 33088T-4-CP User manual

Kohler

Kohler ACCLIV 33088T-4-CP User manual

Kohler K-11370 Assembly instructions

Kohler

Kohler K-11370 Assembly instructions

Kohler K-16281 User manual

Kohler

Kohler K-16281 User manual

Kohler ARCHER 7501X-4 User manual

Kohler

Kohler ARCHER 7501X-4 User manual

Kohler K-142 User manual

Kohler

Kohler K-142 User manual

Kohler Karat K-17399 User manual

Kohler

Kohler Karat K-17399 User manual

Kohler K-8013 Assembly instructions

Kohler

Kohler K-8013 Assembly instructions

Kohler K-8515 User manual

Kohler

Kohler K-8515 User manual

Kohler K-557 User manual

Kohler

Kohler K-557 User manual

Kohler K-712-H2 Assembly instructions

Kohler

Kohler K-712-H2 Assembly instructions

Kohler K-8034 User manual

Kohler

Kohler K-8034 User manual

Kohler K-4904 Operating manual

Kohler

Kohler K-4904 Operating manual

Popular Bathroom Fixture manuals by other brands

KEUCO Axess 35015 010202 Mounting instruction

KEUCO

KEUCO Axess 35015 010202 Mounting instruction

Fontana Showers FS9083 installation instructions

Fontana Showers

Fontana Showers FS9083 installation instructions

agape IN-OUT ACER1062FZ Assembly instructions

agape

agape IN-OUT ACER1062FZ Assembly instructions

Gessi RETTANGOLO 20036 Bath Mixing Program

Gessi

Gessi RETTANGOLO 20036 Bath Mixing Program

ABI INTERIORS 13076 installation guide

ABI INTERIORS

ABI INTERIORS 13076 installation guide

Sanela SLUN 52ET Instructions for use

Sanela

Sanela SLUN 52ET Instructions for use

Porcelanosa Noken Forma 100214310 N350798850 installation instructions

Porcelanosa

Porcelanosa Noken Forma 100214310 N350798850 installation instructions

glass 1989 steam plus manual

glass 1989

glass 1989 steam plus manual

Laufen H827360 quick start guide

Laufen

Laufen H827360 quick start guide

NORMBAU Nylon Care 300 Fixing instructions

NORMBAU

NORMBAU Nylon Care 300 Fixing instructions

Porcelanosa SYSTEMPOOL VITRA 9 USA installation manual

Porcelanosa

Porcelanosa SYSTEMPOOL VITRA 9 USA installation manual

ERGONOMIC EHL instruction manual

ERGONOMIC

ERGONOMIC EHL instruction manual

Cavalier niagara instructions

Cavalier

Cavalier niagara instructions

Signature Hardware KEY WEST 948576 Installation

Signature Hardware

Signature Hardware KEY WEST 948576 Installation

Akw iSure 2 Installation and instruction manual

Akw

Akw iSure 2 Installation and instruction manual

Ergonomic products N1A Series Specification and installation guide

Ergonomic products

Ergonomic products N1A Series Specification and installation guide

Grohe GET E 36 366 manual

Grohe

Grohe GET E 36 366 manual

Triton Amala SFXAMA08BLK Installation and operating instructions

Triton

Triton Amala SFXAMA08BLK Installation and operating instructions

manuals.online logo
manuals.online logoBrands
  • About & Mission
  • Contact us
  • Privacy Policy
  • Terms and Conditions

Copyright 2025 Manuals.Online. All Rights Reserved.