manuals.online logo
Brands
  1. Home
  2. •
  3. Brands
  4. •
  5. Kohler
  6. •
  7. Bathroom Fixture
  8. •
  9. Kohler 45532X-4 User manual

Kohler 45532X-4 User manual

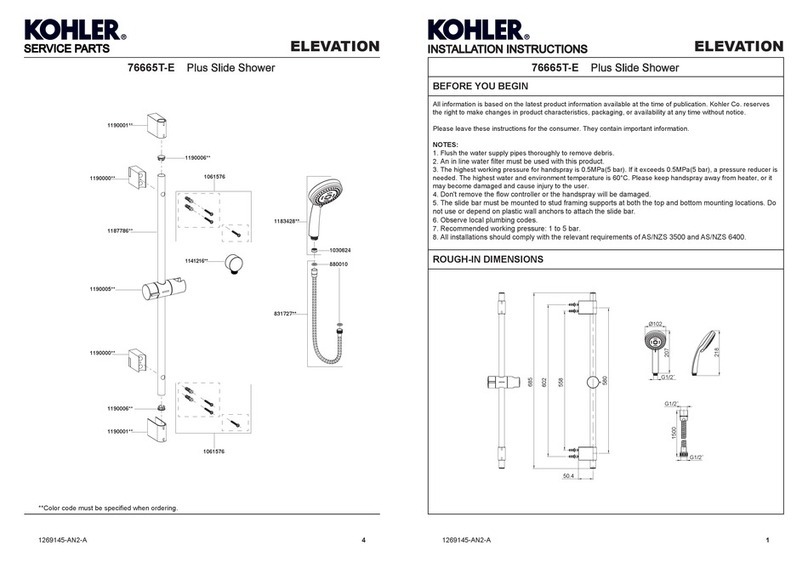
BEFORE YOU BEGIN
All information is based on the latest product
information available at the time of publication.
Kohler Co. reserves the right to make changes in
product characteristics, packaging, or availability at
any time without notice.
Please leave these instructions for the consumer.
They contain important information.
NOTES:
1. Flush the water supply pipes thoroughly to remove
debris.
2. The minimum inlet water pressure for the diverter is
0.05MPa(0.5bar).
3. The highest working pressure for handspray is
0.5MPa(5bar). If it exceeds 0.5MPa(5bar), a
pressure reducer is needed. The highest water and
environment temperature is 60°C. Please keep
handspray, shower head and the shower arm away
from heater, or it may become damaged and cause
injury to the user.
1182569-X2-D 1
45532X-4 กอกผสมลงอางและยืนอาบแบบฝงผนัง
45533X-4 กอกผสมยืนอาบแบบฝงผนัง
INSTALLATION INSTRUCTIONS
ขอแนะนําการติดตั้ง
Wall-Mount Bath/Shower Faucet
1182569-X2-D 4
ROUGH-IN DIMENSIONS
G1/2˝
G1/2˝

Handspray

Hose
1500±15
G1/2˝
Ø66
156.5
G1/2˝
150±15
Ø66 G1/2˝
G1/2˝
57
150±15
30°
114
85
112
135
Bracket
90
228
G1/2˝
45532X-4 45533X-4
กอนเริ่มการติดตั้ง
มาตรฐานผลิตภัณฑ STANDARD APPLICABLE
Special model meets or exceeds the following at date
of manufacture: TIS
ระยะการติดตั้ง
CUFF
กอกผสมลงอางและยืนอาบแบบฝงผนัง รุนคัฟ




ขอสังเกต:









การรับประกันสินคา LIMITED WARRANTY
Kohler (Thailand) Public Company Limited warrants to the original
products, which are purchased from authorized distributors and dealers
within Kingdom of Thailand only, to be free of defects in material and
workmanship.
Within the below mentioned periods from the date of purchase,
Kohler(Thailand) Public Company Limited will at its election, repair,
replace or make appropriate adjustment where company’s inspection
disclose any such defect occurring in normal usage and maintenance
but is not responsible for labor charges, removal charges, installation,
or other incidental or consequential costs. In no event shall the liability of
Kohler(Thailand) Public Company Limited exceed the purchase price
of the product. This warranty applies only to Kohler Faucets installed in
Thailand.
• Ceramic Valve(leak/drip)
- Lifetime Limited Warranty* for residential use
- and Five (5) Years for commercial use
• Finish Five(5) Years
• Fitting Five(5) Years
• Automatic faucet One(1) Year
• Hygiene spray(leak/drip Five(5) Years for selected models
from hygiene spray body) only
• Shower Five(5) Years
• Bathroom accessories Five(5) Years
This limited warranty DOES NOT COVER the defect or damage caused
by accident, natural disasters such as fire, flood, or earthquake, misuse
or abuse of products. Improper care and cleaning will avoid the warranty.
Consumers are responsible for the cost of service parts and service
fee for such cases.
To ensure continuous product quality and performance, as well as
product durability and lifetime, without any damage to the product,
consumers should purchase and use only genuine service parts and
after-sales services from Kohler (Thailand) Public Company Limited or
company’s authorized service centers, distributors, or dealers only.
*KOHLER® Faucet Lifetime Limited Warranty
Kohler (Thailand) warrants its faucets manufactured after January 1,
1997, to be leak and drip free during normal residential use for as long as the
original consumer purchaser owns his or her home. If the faucet should
leak or drip during normal use, Kohler (Thailand) will, free of charge;
replace
the new cartridge necessary to put the faucet in good working
condition.
Kohler (Thailand) also warrants all other aspects of the faucet or
accessories (“Faucet”)**to be free of defects in material and workmanship
during normal residential use for as long as the original consumer
purchaser owns his or her home. If a defect is found in normal residential
use, Kohler (Thailand) will, at its election, repair, provide a replacement
part or product, or make appropriate adjustment. Damage to a product
caused by accident, misuse, or abuse is not covered by this warranty.
Improper care and cleaning will also void the warranty.
Proof of purchase (original sales receipt) must be provided to
Kohler(Thailand) with all warranty claims. Kohler (Thailand) is not respon-
sible for labor charges, installation, or other incidental or consequential
costs. In no event shall the liability of Kohler (Thailand) exceed the
purchase price of the Faucet.
Important: Never use cleaners containing abrasive cleansers, ammonia,
bleach, acids, waxes, alcohol, solvents or other products not recom-
mended for chrome. This will void the warranty.
To obtain warranty service, please contact your dealers or contact the
KOHLER (Thailand) Call Center, together with proof of purchase at;
Call Center
KOHLER (Thailand) Public Company Limited
16th Floor, Jasmine City Building
2 Soi Sukhumvit 23, Sukhumvit Road,
Wattana, Bangkok 10110
Tel: 02204-6222 Fax: 0-2204-6224
Email: [email protected]
COPYRIGHT ©2014 BY KOHLER (THAILAND) PUBLIC COMPANY
LIMITED
49
40º
27
60
58


Dimensions are approximate.

Unit: mm
1182569-X2-D 2
1182569-X2-D 3
INSTALLATION
INSTALLATION CHECKOUT
Ensure that all connections are tight.
Ensure that the handle is in the off
position.
Turn on the drain and main water
supply, and check for leaks. Repair as
needed.
Remove the handspray(12). Remove
the aerator(19) with the key(18). Turn
on the faucet. Run the hot and cold
water through the faucet for about one
minute to remove any debris. Check for
leaks. Remove any debris from the
aerator. Shut off the faucet. Reinstall
the handspray and the aerator.
A
8
B
9
8
How to Install the Faucet
To perform installation, installer must
provide G1/2˝ female supply fittings(1),
spaced 150mm apart and level. The
supply fittings should be vertical and not
beyond the finished wall. Hot supply
pipe must be located on the left.
Install the two offset connectors(2) into
the hot and cold supply pipes. Use
appropriate thread sealants or thread
tape on pipe threads.
Adjust the center-to-center distance
between the connectors to 150mm and
level. They should extend 27mm
beyond the finished wall. Thread the
escutcheons(3) onto the connectors
until they are against the finished wall.
Put the washers(4) into the nuts(5),
thread the nuts to connectors. Tighten
the nuts with strap wrench or soft cloth
between product and regular wrench.
Put the washer(8) into the end A of the
hose(9), and connect to the faucet
outlet(10). Put the restrictor(11) into the
handspray(12) inlet as shown. Put the
washer(8) into the end B of the hose,
and connect to the handspray.
Hot
Cold
150mm/
27mm/
Hot
Cold
3
5
4
10
11
12
How to Install the Shower
Bracket
Determine a suitable location on the
finished wall to install the bracket. Mark
bracket base mounting hole locations
on the wall according to the dimension.
Drill two holes on the finished wall, the
holes should match the anchors(13).
Install the anchors.
Tighten screws(14) to secure bracket
base(15, flat side upward). Put the
bracket(16) onto the bracket base and
lock by stopper.
HANDLE OPERATION
Lift the handle gently, turn clockwise for hot water,
counter-clockwise for cold water, bath spout works; lift
the diverter gently, turns clockwise for shower; shut off
the faucet, turns counter-clockwise until it stops.
ทดสอบการติดตั้ง
CARE AND CLEANING
For best results, keep the following in mind when
caring for your product:
•Always test your cleaning solution on an
inconspicuous area before applying to the entire
surface.
•Wipe surfaces clean and rinse completely with
water immediately after applying cleaner. Rinse and
dry any overspray that lands on nearby surfaces.
•Do not allow cleaners to soak on surfaces.
•Use a soft, dampened sponge or cloth. Never use
an abrasive material such as a brush or scouring
pad to clean surfaces.
•The ideal cleaning technique is to rinse thoroughly
and blot dry any water from the surface after each
use.
การดูแลรักษาและทําความสะอาด
การติดตั้ง
วิธีติดตั้งกอกน้ำ











 
 









วิธีการติดตั้งขอแขวนฝกบัว










การใชงานกานโยก





2
1
12
18
19
27
14
16
15
13










•
 
•
 
•
•
 
•
 
SERVICE PARTS
อุปกรณประกอบและอะไหล
1182569-X2-D 5
Call Center: +(66) 2204 6222
e-mail: [email protected]
Wall-Mount Bath/Shower Faucet
864922**
Bush

870721
O-ring

1178063**
Diverter Button

3012635**
Diverter Kit


1181007**
Handspray

831727**
Hose

880010
Washer

1030624
Regulator

864104**
Coupling Nut

871363
O-ring

864675
Seat

1170944**
Connection

1125667**
Escutcheon

1218659
Washer

880084
O-ring

833438
Screw

834705**
Plug
Button
    
834460
Valve

880085
O-ring

3006660
Nut

3013396**
Bonnet

1215965**
Handle

3005148
Aerator

3006148
Key


880010
Washer

1216770**
Bracket

45532X-4 กอกผสมลงอางและยืนอาบแบบฝงผนัง
45533X-4 กอกผสมยืนอาบแบบฝงผนัง
CUFF
กอกผสมลงอางและยืนอาบแบบฝงผนัง รุนคัฟ

**Color code must be specified when ordering
NOTE: For all Asia pacific regions (excluding China) add SP (SPxxxxxxx-**) in front of the part number when ordering.
หมายเหตุ:

This manual suits for next models

1

Other Kohler Bathroom Fixture manuals

Kohler C3 K-4737T Assembly instructions

Kohler

Kohler C3 K-4737T Assembly instructions

Kohler 10257T User manual

Kohler

Kohler 10257T User manual

Kohler K-9384-BN Assembly instructions

Kohler

Kohler K-9384-BN Assembly instructions

Kohler K-706145 Assembly instructions

Kohler

Kohler K-706145 Assembly instructions

Kohler K-704516 Assembly instructions

Kohler

Kohler K-704516 Assembly instructions

Kohler BELAY K-156T-LCP User manual

Kohler

Kohler BELAY K-156T-LCP User manual

Kohler SINGULIER 10880M-4 Operation manual

Kohler

Kohler SINGULIER 10880M-4 Operation manual

Kohler K-701799T-FMSW User manual

Kohler

Kohler K-701799T-FMSW User manual

Kohler K-1160-H Quick start guide

Kohler

Kohler K-1160-H Quick start guide

Kohler 2738T User manual

Kohler

Kohler 2738T User manual

Kohler Mira Advance 8.7 User manual

Kohler

Kohler Mira Advance 8.7 User manual

Kohler Symbio K-1315-H User manual

Kohler

Kohler Symbio K-1315-H User manual

Kohler Sterling Intrigue SP2270A-38 User guide

Kohler

Kohler Sterling Intrigue SP2270A-38 User guide

Kohler K-3387 User manual

Kohler

Kohler K-3387 User manual

Kohler K-11370 Assembly instructions

Kohler

Kohler K-11370 Assembly instructions

Kohler AVID 97367T-B4 User manual

Kohler

Kohler AVID 97367T-B4 User manual

Kohler K-102 Assembly instructions

Kohler

Kohler K-102 Assembly instructions

Kohler Englefield Valencia Elite User manual

Kohler

Kohler Englefield Valencia Elite User manual

Kohler K-2440 Assembly instructions

Kohler

Kohler K-2440 Assembly instructions

Kohler K-8013 Assembly instructions

Kohler

Kohler K-8013 Assembly instructions

Kohler K-1278 User manual

Kohler

Kohler K-1278 User manual

Kohler K-712-H2 Assembly instructions

Kohler

Kohler K-712-H2 Assembly instructions

Kohler K-T8224 User manual

Kohler

Kohler K-T8224 User manual

Kohler C3 K-8298 User manual

Kohler

Kohler C3 K-8298 User manual

Popular Bathroom Fixture manuals by other brands

Delta Spree 532LF-WF installation instructions

Delta

Delta Spree 532LF-WF installation instructions

RED-RING VORTEX INSTANT I3VS Installation and user guide

RED-RING

RED-RING VORTEX INSTANT I3VS Installation and user guide

Delta 25929LF installation instructions

Delta

Delta 25929LF installation instructions

Delta Kayra MultiChoice T27 Series owner's manual

Delta

Delta Kayra MultiChoice T27 Series owner's manual

bluBathworks TF250 installation guide

bluBathworks

bluBathworks TF250 installation guide

Delta 2689-THD quick start guide

Delta

Delta 2689-THD quick start guide

bluBathworks Pure 2 TEP431.01 installation guide

bluBathworks

bluBathworks Pure 2 TEP431.01 installation guide

Delta Modern 559LF-PP manual

Delta

Delta Modern 559LF-PP manual

Triton EDEN DUAL 2181381d Installation and operating instructions

Triton

Triton EDEN DUAL 2181381d Installation and operating instructions

Handicare LinidoSolutions LI2617.0002-03 manual

Handicare

Handicare LinidoSolutions LI2617.0002-03 manual

Triton T1 Si Installation and operating instructions

Triton

Triton T1 Si Installation and operating instructions

newform 67616E instructions

newform

newform 67616E instructions

Atlantis FX-NTRB Fitting instructions

Atlantis

Atlantis FX-NTRB Fitting instructions

Brizo 69524 Series manual

Brizo

Brizo 69524 Series manual

INR ARC 30 manual

INR

INR ARC 30 manual

Signature Hardware PENDLETON 949203 Install

Signature Hardware

Signature Hardware PENDLETON 949203 Install

Grohe 48 163 Installation

Grohe

Grohe 48 163 Installation

Fontana Showers FS9083 installation instructions

Fontana Showers

Fontana Showers FS9083 installation instructions

manuals.online logo
manuals.online logoBrands
  • About & Mission
  • Contact us
  • Privacy Policy
  • Terms and Conditions

Copyright 2025 Manuals.Online. All Rights Reserved.