manuals.online logo
Brands
  1. Home
  2. •
  3. Brands
  4. •
  5. Kohler
  6. •
  7. Bathroom Fixture
  8. •
  9. Kohler ODEON 98963T-4 User manual

Kohler ODEON 98963T-4 User manual

BEFORE YOU BEGIN
98963T-4 双花洒淋浴柱-5˝音乐魔雨花洒
72704T-B4 挂墙式浴缸双花洒直角淋浴柱
安装之前
INSTALLATION INSTRUCTIONS
安装说明书
安装尺寸 ROUGH-IN DIMENSIONS
Dual Shower Column
G1/2˝
G1/2˝
1500
G1/2˝
G1/2˝
500
150
Ø67
G1/2˝
1196629-2-D 4
G1/2˝
155
30º
1196629-2-D 1
所有的资料是按最新出版的产品资料编写而成。科勒公司
保留任何时候不经通知即可改变产品特性、包装或产品可
供类型的权利。
说明书包括重要的安装、保养及清洁方面的内容,请把这
些资料交给用户阅读。
注意事项:
1.切断供水管路。
2.检查供水管路有无损坏。如需要,进行替换。
3.遵守当地管路安装条例。
4.切换器正常工作的最小压力为:0.05MPa(0.5bar)。
5.推荐最小工作压力:0.1MPa(1bar)。
6.花洒最高工作压力:0.5MPa(5bar)。水压超过0.5MPa
(5bar)须安装减压阀。花洒及无线迷你音箱,电池最高工
作温度及环境温度:60°C。请特别注意无线迷你音箱,电
池,花洒同花洒连接的臂管须远离加热器,否则可能损坏
花洒及其密封件,甚至对使用者造成伤害。
All information is based on the latest product information
available at the time of publication. Kohler Co. reserves the
right to make changes in product characteristics, packaging,
or availability at any time without notice.
Please leave these instructions for the consumer. They
contain important information.
NOTES:
1. Shut off the water supplies to the fitting.
2. Inspect the supply tubing for damage. Replace as
necessary.
3. Observe local plumbing codes.
4. The minimum inlet water pressure for diverter is
0.05MPa(0.5bar).
5. Recommended minimum working pressures is 0.1MPa
(1bar).
6. The highest working pressure for showerhead & hand
shower is 0.5MPa(5bar). If it exceeds 0.5MPa(5bar), a
pressure reducer is needed. The highest water and
environment temperature is 60°C. Please keep wireless
speaker, battery, handshower, showerhead and the shower
arm away from heater, or it may become damaged and
cause injury to the user.
66 19
61
Finished Floor
装修好的地面
Ø102
234
G1/2˝
71
如何使用无线迷你音箱(仅用于98963T)
警告!切勿将电池暴露在阳光、火源或其它过热环境中。
注意!切勿将无线扬声器浸入水中。
注意!无线迷你音箱和电池的工作温度最高为140°F
(60°C)。请勿接近热源或安装在温度超过140°F(60°C)的
地方。
●这款无线迷你音响符合FCC, IC, SRRC和CE标准;
●您的电子设备需要有蓝牙装置,才能连接迷你音箱并播
放您的个人音乐;
●设备符合IPX4防水等级;
请根据当地规范进行妥善处置。
BLUETOOTH
®
字符和图标为蓝牙技术联盟的注册商标,
科勒公司使用此类标志均为授权使用。其它商标和商品牌
号均为其各自供应商所有。
How To Operate The Wireless Speaker
(Only For 98963T)
WARNING: Risk of property damage. Do not expose
batteries to sunlight, fire, or other forms of excessive heat.
CAUTION: Risk of product damage. Do not submerge the
wireless speaker.
CAUTION: Risk of product damage. The wireless speaker
and battery are rated to operate in temperatures up to
140°F(60°C). Do not expose to heat sources or install in any
location where the temperature many exceed 140°F(60°C).
● This wireless speaker complies with FCC, IC, SRRC and
CE.
● To play your personal music files, you need a wireless
BLUETOOTH
®
device.
● This device is rated to IPX4.
Check local regulations for proper disposal.
The BLUETOOTH
®
word mark and logos are registered
trademarks owned by Bluetooth SIG, Inc. and any use of
such marks by Kohler Co. is under license. Other
trademarks and trade names are those of their respective
owners.
●在用无线迷你音响之前,须先将音乐设备
调整至中档音量。
●按住电源开关1秒,即可打开或关闭无线
迷你音响。
●蓝灯闪烁指示示正在进行蓝牙配对。
●在与蓝牙配对时,如果提示需要密码时,
请输入“0000”。当连接成功,指示灯变为
蓝色。
注意:如果蓝牙配对失败或断开连接,无
线迷你音响将在90秒后关闭。
●使用USB电缆线连接至设备进行充电。
●
Set your music device to a midrange
volume before connecting to the wireless
speaker
.
● Press the power button for 1 second to
power the wireless speaker ON or OFF.
● The light will blink blue to indicate pairing
mode.
● Pair with your BLUETOOTH
®
device. If a
password is required, enter “0000”. The light
will turn solid blue when connected.
NOTE: If pairing is lost, the wireless
speaker will power OFF after 90 seconds.
●Use the USB cable provided to recharge.
Power/LED
开关/LED
USB Input 5VDC, 1.2 A
USB输入5VDC, 1.2 A
1070~1270
879~1079
784
68
34
Ø139
400
G1/2˝ G1/2˝
推荐高度
1000~1100
1070~1270
879~1079
784
68
34
Ø127
400
G1/2˝ G1/2˝
推荐高度
1000~1100
98963T-4 72704T-B4
指示灯状态---操作模式
●蓝灯闪烁---蓝牙搜索配对模式;
●蓝灯长亮---已连接至蓝牙设备;
●蓝灯红灯交替闪烁---已连接至蓝牙设备。
电池电量低。
指示灯状态---充电模式
●红灯闪烁---电池正在充电;
●红灯长亮---电池充电完成。
更多关于该音乐魔雨无线迷你音箱的详细信息,请您登录
www.kohler.com.cn网站查询。
LED Status---Operating Mode
●
Blue blink---
BLUETOOTH pairing mode.
●
Blue---Connected to a
BLUETOOTH device.
● Blue/red blink---Connected to a BLUETOOTH device.
Battery is low.
LED Status---Charging Mode
● Red blink---Battery is charging.
● Red---Battery recharge is complete.
For troubleshooting information, refer to homeowners Guide
on your product detail page at www.kohler.com.cn.
1196629-2-D 2
安装步骤 INSTALLATION
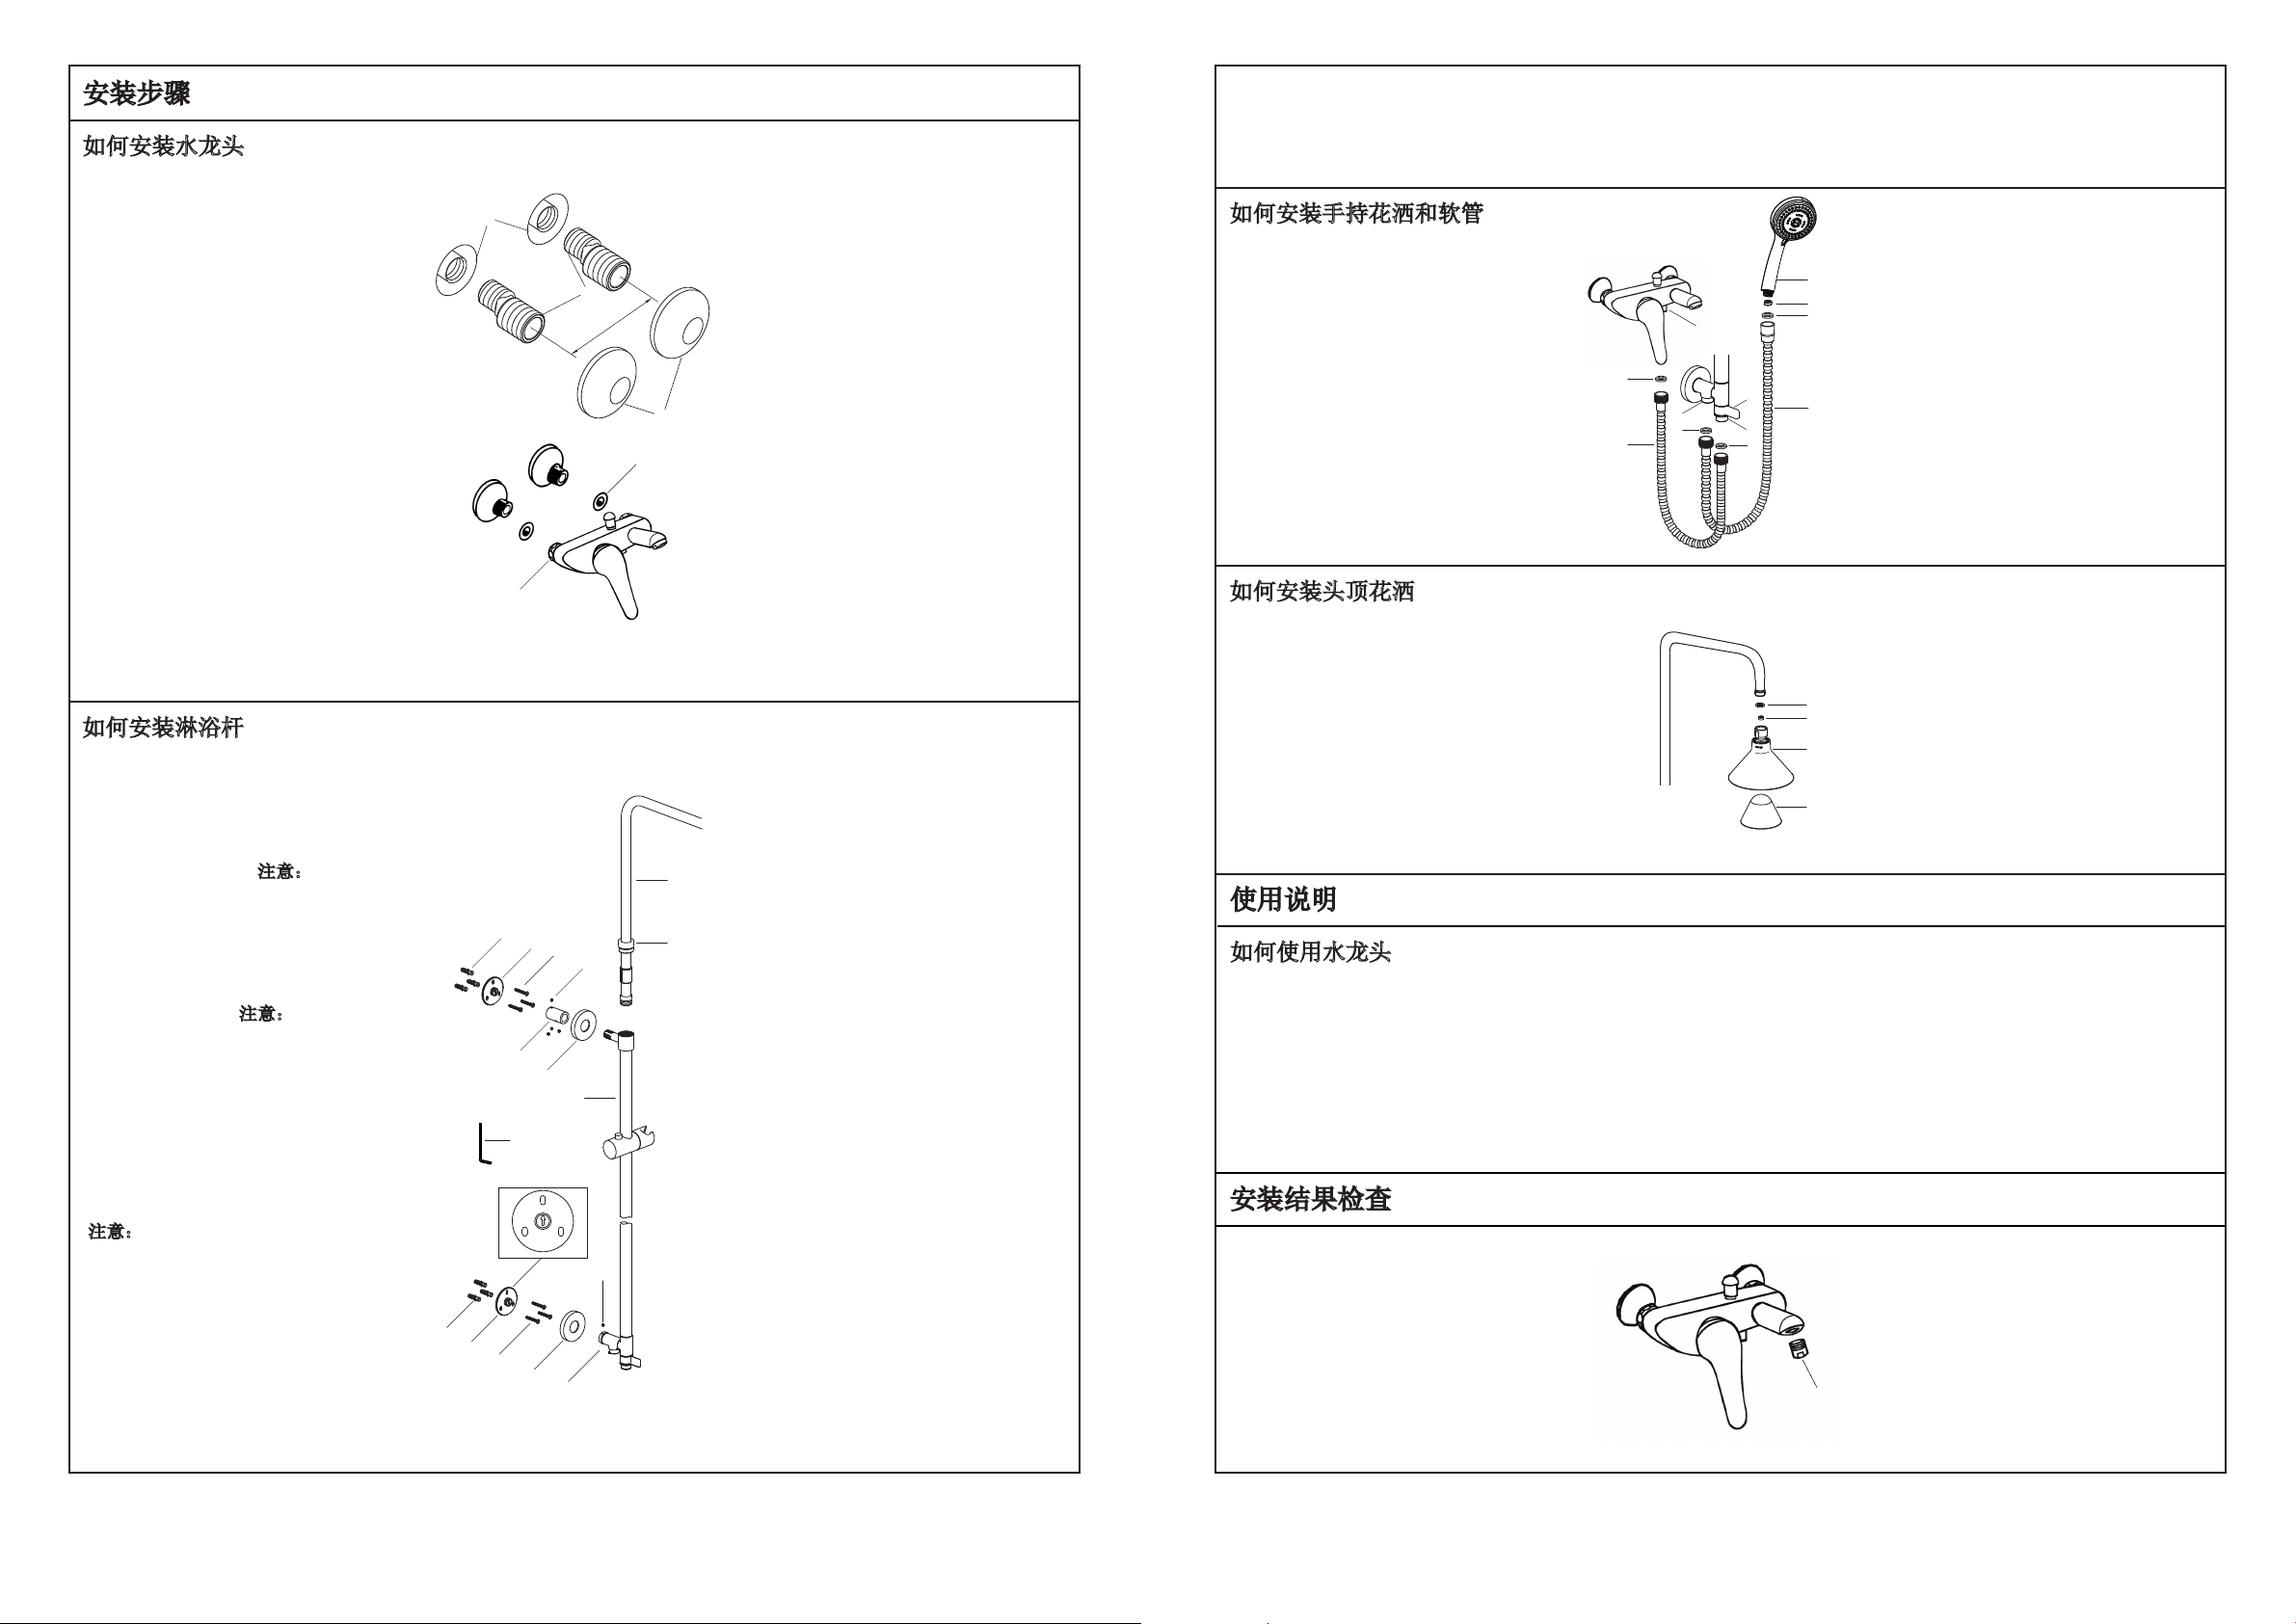
How to Install the Faucet
To perform installation, installer must provide
G1/2˝ female supply fittings(1), spaced
150mm apart and level. The supply fittings
should be vertical and not beyond the
finished wall. Hot supply pipe must be
located on the left.
Flush the water supply pipes thoroughly to
remove debris.
Install the two offset connectors(2) into the
hot and cold supply pipes. Use appropriate
thread sealants or thread tape on pipe
threads.
Adjust the center-to-center distance between
the connectors to 150mm and level. Thread
the escutcheons(3) onto the connectors until
they are against the finished wall.
Put the washers(4) into the nuts(5), thread
the nuts to connectors. Tighten the nuts with
strap wrench or soft cloth between product
and regular wrench.
如何安装水龙头
为使安装顺利,G1/2˝内螺纹管道配件(1)
应已安装好。预留150mm的间距,保持水
平,管道配件要垂直并不能凸出装修好的
墙面。热供水管装在左边。
彻底冲洗供水管,以清除管路中的杂质。
在两个接头(2)涂上螺纹密封胶或缠绕足以
密封的密封胶带,旋入冷热水管中。
调节两个接头,使其中心距离为150mm,
并保持同一水平。将装饰盖(3)旋入接头,
紧贴墙壁。
将垫片(4)放入水龙头螺母(5)中,将螺母旋
到接头上。用带状扳手或用软布垫在普通
扳手和螺母之间,锁紧螺母。
3
1196629-2-D 3
如何安装手持花洒和软管
用两垫片(17)将500mm软管(18)分别与出
水口(19)及接头(20)连接。
转动切换器手柄(21),打开水源以冲掉杂
质。
用滤网垫片(22)连接接头(23)与1500mm软
管(24)。根据需要将限流器(25)塞入手持
花洒(26)进水口。用滤网垫片(22)连接软
管与手持花洒。
How to Install the Handspray
and the Hose
Tighten 500mm length hose(18) to the
outlet(19) and the connector(20) with two
washers(17).
Turn the diverter handle(21), run hot and
cold water for about one minute to remove
any debris.
Tighten 1500mm length hose(24) to the
connector(23) with filter washers(22). Put the
regulator(25) into the handspray(26) inlet if
needed. Tighten the hose to the handspray
with the filter washer(22).
如何安装头顶花洒
装头顶花洒(27)之前
,转动切换器,
打开
水源冲掉管路中的杂质。
根据需要将限流器(28)塞入头顶花洒进水
口。
用垫片(29)连接弯管组件出水口及
头
顶花洒,
并用带状扳手锁紧花洒。
对于98963T,将音乐魔雨无线迷你音箱
(30)轻轻放入花洒内。
How to Install the Showerhead
T
urn the diverter handle, run hot and cold
water for one minute to remove any debris
before the showerhead(27) is installed.
Put the regulator(28) into the showerhead
inlet if needed.
Connect the showerhead to
the tube kit outlet with the washer(29), and
tighten the showerhead with strap wrench.
For 98963T, put the moxie wireless speaker
(30) gently into the showerhead.
5
4
How to Install the Column
Select a location in vertical wall to install
shower column according to rough-in
dimensions.
Drill the lower hole as anchors(6) diameter
and lower base(8-1) position in the finished
wall(NOTE: The arrow in the base is
upward). Press anchors into the hole,
secure the base by the screw(7).
Rehearse the slide bar kit(9) installation for
the upper base(8-2) mounting location
determination. Slide the tube joint(10) onto
the slide bar kit, and connect them to the
base(NOTE: The arrow in the base is
upward). Install the screws(12) into the tube
joint with the hex wrench(11), and tighten
them.
Place the slide bar and the body against the
finished wall. Connect the lower base and
the diverter body kit(13). Position and
tighten them by hex wrench. Mark the hole
of upper base(8-2) with a pencil. Uninstall
the slide bar kit and tube joint.(NOTE: Don’t
lose the screws.)
如何安装淋浴杆
根据安装尺寸,在垂直面的墙壁选一合适
的位置来安装淋浴柱。
根据胀塞(6)的直径和下底座(8-1)的安装位
置在垂直墙壁上钻孔(注意:底座上的箭头
朝上)。将胀塞塞入孔中,用螺钉(7)固定
下底座。
试装滑杆组件(9),以确定上底座(8-2)的安
装位置。将连接管(10)套在滑杆组件接头
上,并与底座连接(注意:底座上的箭头朝
上)。将螺钉(12)装入连接管,并用六角扳
手(11)锁紧。
将滑杆组件紧贴墙壁放置。连接下底座与
切换阀(13)组件,并用螺钉固定。调整好
滑杆及各组件朝向,用铅笔标记上方底座
(8-2)孔位。分别拆下滑杆组件和连接管。
(注意:切勿弄丢螺钉。)
2
1
热
Hot
冷
Cold
150mm
6
7
12
8-2
14
6
7
12
8-1
14
13
16
22
25
26
24
27
29
28
30
19
17
20
21
22
23
17
18
15
10
11
9
Drill holes on the mark. Press the anchors
into the holes. Secure the upper base(8-2) by
the screws. Install the tube joint(10) to the
base(8-2) and tighten them by screws.
Reinstall the slide bar kit with escutcheons
(14) to the bases. Tighten the screws with
the hex wrench. Screw the escutcheons with
the bases until against the finished wall.
根据胀塞直径在标记处钻孔。将胀塞塞入
孔中,并用螺钉固定上底座(8-2)。将连接
管(10)装入到底座(8-2)中,并锁紧螺钉。
将滑杆组件连同装饰罩(14)装在上下底座
上。用六角扳手将滑杆与连接管,切换阀
与下底座的螺钉旋入并锁紧。将装饰罩后
推与底座旋紧直至接触墙面。
Install the tube kit(15) into the slide bar kit. Install the
nut(16) onto the tube kit with soft cloth between internal hole
of the nut and the tube kit. Then screw the nut onto the slide
bar kit with strap wrench or soft cloth between the nut and
regular wrench.
将弯管组件(15)装入滑杆组件。用软布垫在螺母(16)的里
孔和弯管组件之间,将螺母套入弯管组件。然后用带状扳
手或用软布垫在普通扳手和螺母之间,将螺母旋紧到滑杆
组件上。
如何使用水龙头
轻轻抬起把手打开龙头。把手朝下为冷水,顺时针转动把
手为热水。龙头切换器处于正常位置时出水口出水,提起
切换器切换至双花洒淋浴柱出水。
淋浴柱的切换把手向右转靠近墙面,手持花洒出水;把手
向左转垂直墙面,头顶花洒出水。
OPERATION INSTRUCTIONS
How to Operate the Faucet
Lift the handle slightly to turn on the faucet. Handle
downwards for cold water, turn counter-clockwise for hot
water. Water flows out from spout when faucet diverter is
in the normal position and it’s diverted to shower column
when the diverter knob is lifted.
Turn the diverter handle right to close to the wall, water will
flow from the handspray; turn it vertically to the wall, the
showerhead will work.
使用说明
检查并确保所有衔接处都已拧紧,确保手
柄在关的位置。
打开排水系统和主要供水源,检查并修理
有漏水的接口。
将起泡器组件(31)拆下,打开水龙头的冷热
水,让水流约一分钟以清除杂质。冲洗起
泡器,关闭水龙头,重新装回起泡器。
Ensure that all connections are tight. Ensure
that the handle is in the off position.
Turn on the drain and main water supply,
and check for leaks. Repair as needed.
Remove the aerator assembly(31). Run hot
and cold water through spout about one
minute to remove any debris. Clean the
aerator assembly. Shut off the faucet.
Reinstall the aerator assembly.
安装结果检查
INSTALLATION CHECKOUT
31
清洗说明 CLEANING INSTRUCTIONS
适用于所有加工处理过的表面:以中性肥皂水清洗镀层表
面,再以干净的软布彻底擦干整个表面,许多清洁剂,比
如氨水、去污粉及洁厕灵等,会对电镀表面造成伤害,切
忌使用。
有磨损性的清洁用具或清洁剂也不可使用于科勒牌的水龙
头及其配件上。
All Finishes: Clean the finish with mild soap and warm water.
Wipe entire surface completely dry with clean soft cloth.
Many cleaners may contain chemicals, such as ammonia,
chlorine, toilet cleaner etc. which could adversely affect the
finish and are not recommended for cleaning.
Do not use abrasive cleaners or solvents on Kohler faucets
and fittings.
1196629-2-D 5
有害物质统计表 - 98963T
○:表示该有害物质在该部件所有均质材料中的含量均在GB/T 26572现行有效版本规定的限量要求以下。
×:表示有害物质至少在该部件的某一均质材料中的含量超出GB/T 26572现行有效版本规定的限量要求。
注:本表格提供的信息是基于供应商提供的数据及科勒公司的检测结果。
本产品应用环保设计理念,在当前技术水平下,所有有害物质的使用已经控制到了最低程度,科勒公司会
继续努力通过改善现有技术来减少这些物质的使用。
本产品的“环保使用期限”为10年,科勒公司根据产品设计特性指定该期限。只有在本产品使用
说明书所述的正常情况下使用本产品时,“环保使用期限”才有效。
淋浴柱组件
龙头组件
×○
○○○○
×○○ ○ ○ ○
头顶花洒组件
×○○
○
○ ○ ○
手持花洒组件
○○ ○ ○ ○
发声组件
×○○ ○ ○ ○
部件名称
有害物质名称
铅(Pb) 汞(Hg) 镉(Cd)六价铬
(Cr(VI))
多溴联苯
(PBB)
多溴二苯醚
(PBDE)
Statistics of Contents of Toxic or Hazardous Substances or Elements - 98963T
Column Assy
Faucet Assy ×○
○○○○
×○○ ○ ○ ○
Showerhead Assy ×○○
○
○ ○ ○
Handshower Assy ○○ ○ ○ ○
Sounder Assy ×○○ ○ ○ ○
Part name
Toxic or Hazardous Substance or Elements
Lead
(Pb)
Mercury
(Hg)
Cadmium
(Cd)
Hexavalent
Chromium
(Cr(VI))
Polybrominated
biphenyls
(PBB)
Polybrominated
Diphenyl Ethers
(PBDE)
○:
Indicates that the substance in the material composition is below the high limits of the current requirements in
GB/T 26572.
×:
Indicates that at least one of the homogeneous substance in the material composition is below the high limits
of the current requirements in GB/T 26572.
Note: the information provided is based on the supplier data and Kohler inspection results. The product is designed
not to hurt the environment. Under current technology, all hazardous materials have been used in the smallest
amounts possible. Kohler will strive to reduce the use of these hazardous materials used in this product.
The product “service life for environment protection” is 10 years; Kohler Company will specify product
service life based on product characteristics. The product “service life for environment protection” is only
effective when the product is used as described in the product specification.
Dual Shower Column
**订购时请说明颜色编号
**Color code must be specified when ordering
SERVICE PARTS
零 件 图
870992
O-ring
O型圈
1196610
Mountion Base
底座
1196607**
Body
本体
832751
Screw
螺钉
832751
Screw
螺钉
1061576
Screw Kit
螺钉组件 1196621**
Escutchoen
装饰罩
1111667**
Hose
软管
1196628
Washer
垫片
1183267**
Diverter Kit
切换器组件
1109471**
Shower Bracket
花洒挂架
880010
Washer
垫片
1046290
Hex Wrench
六角扳手
833730
Hex Wrench
六角扳手
1121285
Clamp sleeve
夹紧套圈
1196609**
Adjust Nut
调节螺母
1196622**
Tube Joint
连接管
1196610
Mountion Base
底座
832751
Screw
螺钉
831727**
Hose
软管
870921
O-ring
O型圈
870921
O-ring
O型圈
880010
Washer
垫片
1196629-2-D 6
1121294**
Straight Tube Kit
直角弯管组件
834562**
Aerator
起泡器
835927**
Diverter
切换器
834460
Valve
阀
865035**
Diverter Knob
切换器提拉头
865093**
Outlet Bush
出水口接头
834792
Nut
螺母
871556**
Bonnet
阀帽
800078**
Handle
把手
880002
Plug Button Kit
塞扣套件
1149326**
Showerhead
头顶花洒
(仅用于72704T)
1196589**
Showerhead
头顶花洒
(仅用于98963T)
1145696
Regulator
限流器
1191381**
Wireless Speaker
无线迷你音箱
(仅用于98963T)
880084
O-ring
O型圈
880085
O-ring
O型圈
1180884**
Connection Kit
连接套件
871568
O-ring
O型圈
1183428**
Handspray
花洒
1030624
Restrictor
限流器
1061576
Screw Kit
螺钉组件 1196621**
Escutchoen
装饰罩
77420
Washer
垫片
1196627**
Straight Shower Column
With Diverter
直角带切换器的淋浴杆
98963T-4 双花洒淋浴柱-5˝音乐魔雨花洒
72704T-B4 挂墙式浴缸双花洒直角淋浴柱

This manual suits for next models

1

Other Kohler Bathroom Fixture manuals

Kohler Escale K-19033-1 Assembly instructions

Kohler

Kohler Escale K-19033-1 Assembly instructions

Kohler Sterling 66051100 Assembly instructions

Kohler

Kohler Sterling 66051100 Assembly instructions

Kohler C3-500/K-31331T-HC-0 User manual

Kohler

Kohler C3-500/K-31331T-HC-0 User manual

Kohler K-1122P-H Quick start guide

Kohler

Kohler K-1122P-H Quick start guide

Kohler K-2001 User manual

Kohler

Kohler K-2001 User manual

Kohler K-425 Assembly instructions

Kohler

Kohler K-425 Assembly instructions

Kohler K-8247 Assembly instructions

Kohler

Kohler K-8247 Assembly instructions

Kohler K-1160-H Quick start guide

Kohler

Kohler K-1160-H Quick start guide

Kohler K-8052 Assembly instructions

Kohler

Kohler K-8052 Assembly instructions

Kohler C3-149/K-18649T-HC-0 User manual

Kohler

Kohler C3-149/K-18649T-HC-0 User manual

Kohler K-8298 Assembly instructions

Kohler

Kohler K-8298 Assembly instructions

Kohler K-45205 User manual

Kohler

Kohler K-45205 User manual

Kohler Mira Sport Max J03G User manual

Kohler

Kohler Mira Sport Max J03G User manual

Kohler SHIFT+ 21335T User manual

Kohler

Kohler SHIFT+ 21335T User manual

Kohler Finial K-316 Assembly instructions

Kohler

Kohler Finial K-316 Assembly instructions

Kohler Underscore K-1167-GLW User guide

Kohler

Kohler Underscore K-1167-GLW User guide

Kohler Rada PA-TF User manual

Kohler

Kohler Rada PA-TF User manual

Kohler K-895 Assembly instructions

Kohler

Kohler K-895 Assembly instructions

Kohler K-9069 Assembly instructions

Kohler

Kohler K-9069 Assembly instructions

Kohler K-18751 User manual

Kohler

Kohler K-18751 User manual

Kohler C3-230 User manual

Kohler

Kohler C3-230 User manual

Kohler K-2515 Assembly instructions

Kohler

Kohler K-2515 Assembly instructions

Kohler K-1821 Quick start guide

Kohler

Kohler K-1821 Quick start guide

Kohler K-300 Assembly instructions

Kohler

Kohler K-300 Assembly instructions

Popular Bathroom Fixture manuals by other brands

Graff E-11559 L1 Series Instructions for assembly and use

Graff

Graff E-11559 L1 Series Instructions for assembly and use

Bradley SXWS9557FM Installation

Bradley

Bradley SXWS9557FM Installation

RIHO Scandic Soft Q101 Left manual

RIHO

RIHO Scandic Soft Q101 Left manual

Mira L16J Installation and user guide

Mira

Mira L16J Installation and user guide

Graff PESARO 1500-LM10 installation instructions

Graff

Graff PESARO 1500-LM10 installation instructions

IKEA VOXNAN 703.426.13 manual

IKEA

IKEA VOXNAN 703.426.13 manual

Dyson AB 06 owner's manual

Dyson

Dyson AB 06 owner's manual

INDA A0449H Mounting instructions

INDA

INDA A0449H Mounting instructions

agape PEAR C Assembly instructions

agape

agape PEAR C Assembly instructions

Geberit Piave Operation manual

Geberit

Geberit Piave Operation manual

Excellent RIKO DOEX.1601CR Use and care instruction

Excellent

Excellent RIKO DOEX.1601CR Use and care instruction

Woodbridge V8300 instruction manual

Woodbridge

Woodbridge V8300 instruction manual

Dolphin DB3200 Installation and maintenance manual

Dolphin

Dolphin DB3200 Installation and maintenance manual

INDA A04660 Mounting instructions

INDA

INDA A04660 Mounting instructions

Grohe SPA 39972000 installation instructions

Grohe SPA

Grohe SPA 39972000 installation instructions

Simpsons DBDSC1060 installation instructions

Simpsons

Simpsons DBDSC1060 installation instructions

baliv WA-5080 manual

baliv

baliv WA-5080 manual

Pressalit MATRIX R482619 Operation and maintenance manual

Pressalit

Pressalit MATRIX R482619 Operation and maintenance manual

manuals.online logo
manuals.online logoBrands
  • About & Mission
  • Contact us
  • Privacy Policy
  • Terms and Conditions

Copyright 2025 Manuals.Online. All Rights Reserved.