manuals.online logo
Brands
  1. Home
  2. •
  3. Brands
  4. •
  5. Kramer
  6. •
  7. Media Converter
  8. •
  9. Kramer KDS-USB2 Kit User manual

Kramer KDS-USB2 Kit User manual

Other manuals for KDS-USB2 Kit

3

This manual suits for next models

2

Other Kramer Media Converter manuals

Kramer VA-256D User manual

Kramer

Kramer VA-256D User manual

Kramer DigiTOOLS 7408 User manual

Kramer

Kramer DigiTOOLS 7408 User manual

Kramer FC-31 User manual

Kramer

Kramer FC-31 User manual

Kramer FC-1DGH User manual

Kramer

Kramer FC-1DGH User manual

Kramer VP-503XL User manual

Kramer

Kramer VP-503XL User manual

Kramer DigiTOOLS 6505 User manual

Kramer

Kramer DigiTOOLS 6505 User manual

Kramer VP-701SC User manual

Kramer

Kramer VP-701SC User manual

Kramer SD-7401 User manual

Kramer

Kramer SD-7401 User manual

Kramer FC-101Net User manual

Kramer

Kramer FC-101Net User manual

Kramer VM-51 User manual

Kramer

Kramer VM-51 User manual

Kramer VP-426C User manual

Kramer

Kramer VP-426C User manual

Kramer DigiTOOLS 7408 User manual

Kramer

Kramer DigiTOOLS 7408 User manual

Kramer FC-10Dxl User manual

Kramer

Kramer FC-10Dxl User manual

Kramer VP-437xl User manual

Kramer

Kramer VP-437xl User manual

Kramer FC-42 User manual

Kramer

Kramer FC-42 User manual

Kramer FC-174 User manual

Kramer

Kramer FC-174 User manual

Kramer KDS-USB2 Kit User manual

Kramer

Kramer KDS-USB2 Kit User manual

Kramer FC-321 User manual

Kramer

Kramer FC-321 User manual

Kramer OC-1N User manual

Kramer

Kramer OC-1N User manual

Kramer VP-421 User manual

Kramer

Kramer VP-421 User manual

Kramer VP-6AHD User manual

Kramer

Kramer VP-6AHD User manual

Kramer VM-1110xl User manual

Kramer

Kramer VM-1110xl User manual

Kramer FC-331 User manual

Kramer

Kramer FC-331 User manual

Kramer VM-218DT User manual

Kramer

Kramer VM-218DT User manual

Popular Media Converter manuals by other brands

TR-Electronic CMS582M-4096/4096 IOL DMS 14H7 KRF Assembly instructions

TR-Electronic

TR-Electronic CMS582M-4096/4096 IOL DMS 14H7 KRF Assembly instructions

Korenix JetCon 2301S user manual

Korenix

Korenix JetCon 2301S user manual

StarTech.com ET91000LCOAM manual

StarTech.com

StarTech.com ET91000LCOAM manual

Alesis AI-3 Reference manual

Alesis

Alesis AI-3 Reference manual

Caton Vpro 5100 user guide

Caton

Caton Vpro 5100 user guide

Cypress CSC-5500 Operation manual

Cypress

Cypress CSC-5500 Operation manual

H&B TX-100 Installation and instruction manual

H&B

H&B TX-100 Installation and instruction manual

Bolin Technology D Series user manual

Bolin Technology

Bolin Technology D Series user manual

IFM Electronic Efector 400 RN30 Series Device manual

IFM Electronic

IFM Electronic Efector 400 RN30 Series Device manual

GRASS VALLEY KUDOSPRO ULC2000 user manual

GRASS VALLEY

GRASS VALLEY KUDOSPRO ULC2000 user manual

Linear Technology DC1523A Demo Manual

Linear Technology

Linear Technology DC1523A Demo Manual

Lika ROTAPULS I28 Series quick start guide

Lika

Lika ROTAPULS I28 Series quick start guide

Weidmuller IE-MC-VL Series Hardware installation guide

Weidmuller

Weidmuller IE-MC-VL Series Hardware installation guide

Optical Systems Design OSD2139 Series Operator's manual

Optical Systems Design

Optical Systems Design OSD2139 Series Operator's manual

Tema Telecomunicazioni AD615/S product manual

Tema Telecomunicazioni

Tema Telecomunicazioni AD615/S product manual

KTI Networks KGC-352 Series installation guide

KTI Networks

KTI Networks KGC-352 Series installation guide

Gira 0588 Series operating instructions

Gira

Gira 0588 Series operating instructions

Lika SFA-5000-FD user guide

Lika

Lika SFA-5000-FD user guide

manuals.online logo
manuals.online logoBrands
  • About & Mission
  • Contact us
  • Privacy Policy
  • Terms and Conditions

Copyright 2025 Manuals.Online. All Rights Reserved.

KDS-USB2 Quick Start
P/N:
2900- 301391QS
Rev:
3
Scan for full manual
KDS-USB2 Kit/KDS-USB2-EN/KDS-USB2-DEC
Quick Start Guide
This guide helps you install and use your KDS-USB2 for the first time.
Go to www.kramerav.com/downloads/KDS-USB2 to download the latest user manualand check if firmware
upgrades are available.
Step 1: Check what’s in the box
KDS-USB2-EN and/or KDS-USB2-DEC
1 Power adapter and cord (for KDS-USB2-DEC)
1 Quick start guide
1 USB2 cable A male to B male (for KDS-USB2-EN)
Step 2: Get to know your KDS-USB2
KDS-USB2-EN
#
Feature
Function
1
Power LED
Lights blue when power is supplied by KDS-USB2-DEC USB connection.
2
Link LED
Lights green when a USB link is established between the encoder and the decoder.
Flashes slowly when the unit attempts to establish a link. Flashes quickly when in pairing mode.
Off when a link is not established.
3
Host LED
Lights green when KDS-USB2 is properly enumerated on the host computer.
Flashes when in a suspended state.
4
Activity LED
Lights yellow when activity between the decoder and encoder/s is detected.
Off when in suspended mode.
5
Config Button
For factory use.
6
Mode Button
Use for pairing KDS-USB2-EN with the KDS-USB2-DEC decoder/s.
7
USB Host Port
Connect to the host computer.
8
Link RJ-45 Connector
Connect to the KDS-USB2-DEC.
KDS-USB2-DEC
#
Feature
Function
9
USB Ports
Connect up to 4 USB type A devices.
10
Power LED
Lights blue when 24 V power is supplied.
11
Link LED
Lights green when a USB link is established between the encoder and the decoder.
Flashes slowly when the unit attempts to establish a link. Flashes quickly when in pairing mode.
Off when a link is not established.
#
Feature
Function
12
Host LED
Lights green when KDS-USB2 is properly enumerated on the host computer. Flashes when in a
suspended state.
13
Activity LED
Lights yellow when activity between the decoder and encoder/s is detected. Off when in
suspended mode.
14
24V Power Connector
Connect to the supplied power adapter.
15
Config Button
For factory use.
16
Mode Button
Use for pairing KDS-USB2-EN with the KDS-USB2-DEC decoder/s.
17
Link RJ-45 Connector
Connect to the KDS-USB2-EN.
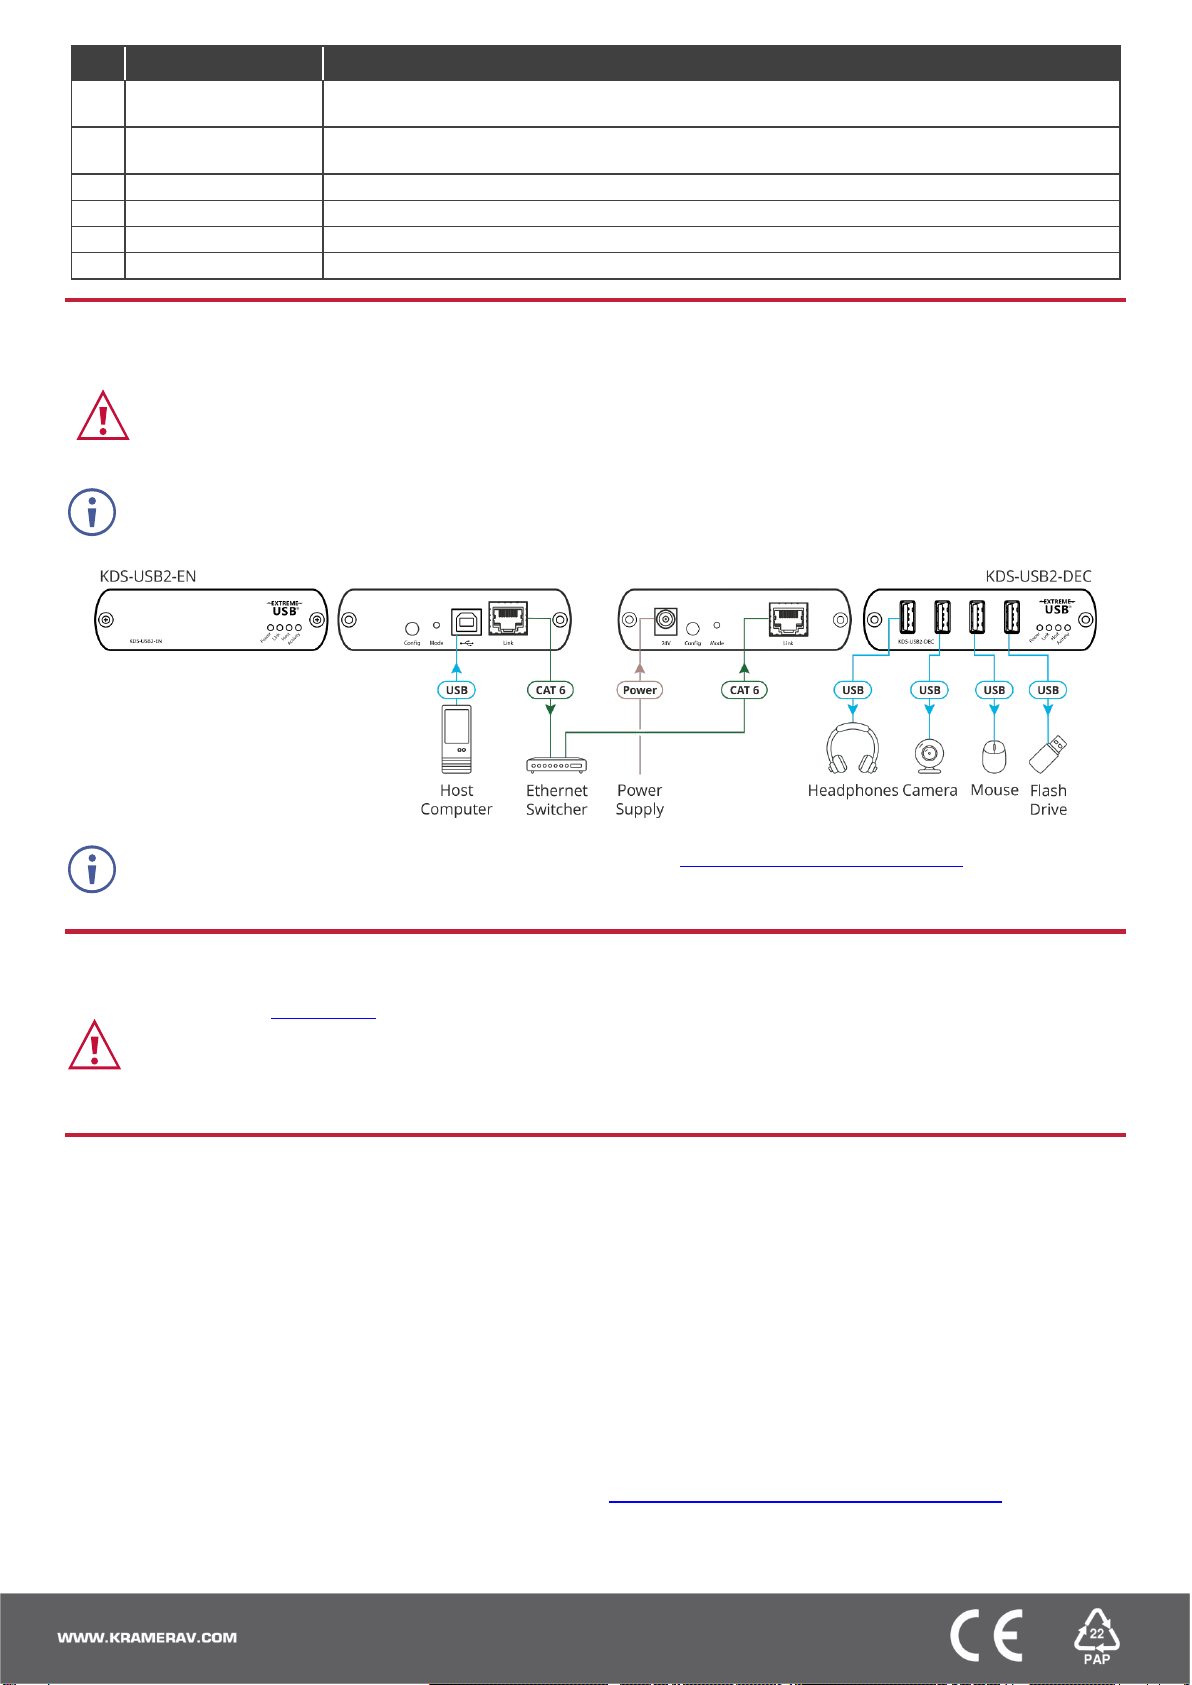
Step 3: Connect inputs and outputs
Always switch OFF the power on each device before connecting it to your KDS-USB2.
•Ensure that the environment (e.g., maximum ambient temperature & air flow) is compatible for the device.
•Avoid uneven mechanical loading.
•Appropriate consideration of equipment nameplate ratings should be used for avoiding overloading of the circuits.
•Reliable earthing of rack-mounted equipment should be maintained.
•Maximum mounting height for the device is 2 meters.
•The encoder is powered by the USB host port only.
•You can also connect multiple KDS-USB2-DEC and KDS-USB2-DEC units.
For optimal performance, use the recommended Kramer cables available at www.kramerav.com/product/KDS-USB2.
Using third-party cables may cause damage!
Step 4: Connect power
Connect the power cord to KDS-USB2 and plug it into the mains electricity.
Safety Instructions (See www.kramerav.com for updated safety information)
Caution:
•For products with relay terminals and GPI\O ports, please refer to the permitted rating for an external connection, located next to the terminal or in the User Manual.
•There are no operator serviceable parts inside the unit.
Warning:
•Use only the power cord that is supplied with the unit.
•Disconnect the power and unplug the unit from the wall before installing.
Step 5: Operate KDS-USB2
By default, the KDS-USB2 kit devices are paired. You can also pair devices manually or map multiple devices via Kramer
Control.
When using unpaired units (for example, individually
purchased devices), you can pair them manually.
To pair KDS-USB2-EN with KDS-USB2-DEC manually:
1. Make sure that the devices are properly connected.
2. On KDS-USB2-EN, press and hold Mode for a few
seconds.
The Link LED flashes.
3. On KDS-USB2-DEC, press and hold Mode for a few
seconds.
The Link LED flashes.
4. Wait until both Link LEDs light.
Devices are paired.
If you are using Kramer Control, you can easily map multiple
encoders to decoders.
To pair KDS-USB2-EN devices with KDS-USB2-DEC
devices via Kramer Control:
1. Launch Kramer Control builder to select the space.
2. Add the KDS-USB2 devices and import their drivers.
3. For each device, add its IP address.
4. Map a single encoder to several decoders, or several
decoders to one encoder, as desired.
For further information, go to:
www.kramerav.com/page/knowledgebase-control