manuals.online logo
Brands
  1. Home
  2. •
  3. Brands
  4. •
  5. Kramer
  6. •
  7. Media Converter
  8. •
  9. Kramer VP-426C User manual

Kramer VP-426C User manual

VP-426C Quick Start
P/N:
2900- 301055QS
Rev:
2
Scan for full manual
VP-426C Quick Start Guide
This guide helps you install and use your VP-426C for the first time.
Go to www.kramerav.com/downloads/VP-426C to download the latest user manual and check if firmware
upgrades are available.
Step 1: Check what’s in the box
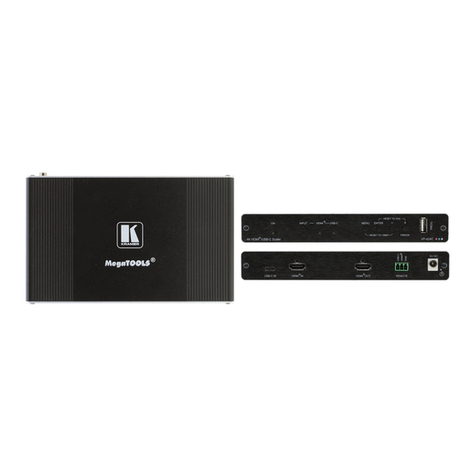
VP-426C 4K HDMI/USB-C/PC Scaler
1 Bracket set
1 Quick start guide
1 Power adapter and cord
4 Rubber feet
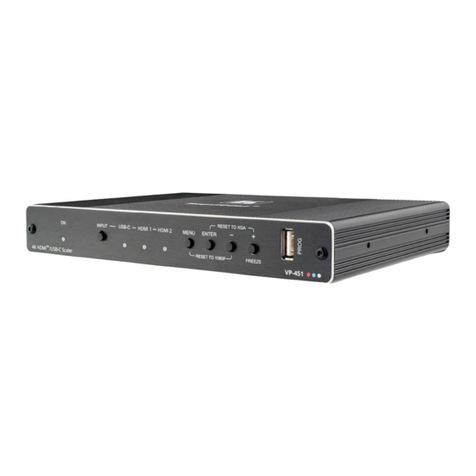
Step 2: Get to know your VP-426C
#
Feature
Function
1
ON LED
Lights green when the unit is powered.
2
INPUT Button
Press to cycle the input between HDMI, USB-C and PC.
3
HDMI™ LED
Lights when the HDMI input is selected.
4
USB-C LED
Lights when the USB-C input is selected.
5
PC LED
Lights when the PC input is selected.
6
MENU Button
Press to enter/escape the on-screen display (OSD) menu. Press together with
the –button to reset to 1080p (RESET TO 1080P).
7
ENTER Button
In OSD, press to choose the highlighted menu item. Press together with the
+ button to reset to XGA (RESET TO XGA).
8
–Button
In OSD, press to move backward through the list or to decrement the
parameter value.
9
+/FREEZE Button
In OSD, press to move forward through the list or to increment the parameter
value. When not in OSD, press to freeze the display.
10
PROG USB Connector
Connect to a PC for upgrading the firmware.
11
AUDIO IN PC 3.5mm Mini Jack
Connect to an unbalanced stereo audio PC source. Can also be selected as
the audio input (instead of the HDMI and USB-C embedded audio inputs).
12
PC IN 15-pin HD Connector
Connect to a laptop.
13
USB-C IN USB Type C Port
Connect to a USB type-C audio-video source.
14
HDMI™ IN Connector
Connect to an HDMI source.
15
HDMI™OUT Connector
Connect to an HDMI acceptor.
16
AUDIO OUT Terminal Block Connector
Connect to a balanced stereo audio acceptor.
17
REMOTE 4-pin Terminal Block Connector
Connect to contact closure switches (by momentary contact between the
desired pin and GND pin) to select an input.
18
5V DC
+5V DC connector for powering the unit.
The terms HDMI, HDMI High-Definition Multimedia Interface, and the HDMI Logo are trademarks or registered trademarks of HDMI Licensing Administrator, Inc.
Step 3: Mount VP-426C
Install VP-426C using one of the following methods:
•Attach the rubber feet and place the unit on a flat surface.
•Fasten a bracket (included) on each side of the unit and attach it to a flat
surface (see www.kramerav.com/downloads/VP-426C).
•Mount the unit in a rack using the recommended rack adapter
(see www.kramerav.com/product/VP-426C).
•Ensure that the environment (e.g., maximum ambient temperature & air
flow) is compatible for the device.
•Avoid uneven mechanical loading.
•Appropriate consideration of equipment nameplate ratings should be
used for avoiding overloading of the circuits.
•Reliable earthing of rack-mounted equipment should be maintained.
•Maximum mounting height for the device is 2 meters.
Step 4: Connect inputs and outputs
Always switch OFF the power on each device before connecting it to your VP-426C.
Connect the audio output
To a balanced
stereo audio
acceptor:
To an
unbalanced
stereo audio
acceptor:
To achieve specified extension distances, use the recommended Kramer cables available at www.kramerav.com/product/VP-426C.
Using third-party cables may cause damage!
Step 5: Connect power
Connect the power cord to VP-426C and plug it into the mains electricity.
Safety Instructions (See www.kramerav.com for updated safety information)
Caution:
•For products with relay terminals and GPI\O ports, please refer to the permitted rating for an external connection, located next to the terminal or in the User Manual.
•There are no operator serviceable parts inside the unit.
Warning:
•Use only the power cord that is supplied with the unit.
•Disconnect the power and unplug the unit from the wall before installing.
Step 6: Operate and control VP-426C
Select the input via the following options:
•Press the front panel INPUT button.
•Use the contact closure terminal block to select an input remotely with the press of a
button.
Press the MENU button to configure and control the device via OSD menu:
•Set brightness, contrast, color, noise reduction etc.
•Manage EDID.
•Configure HDCP behavior.
•Select resolution and aspect ratio.
•Manage auto power down (Auto Sync Off).
•Manage audio bypass and delay.
•View device information.
•Reset to factory default parameters.
•Control OSD display.
Other manuals for VP-426C

2

Other Kramer Media Converter manuals

Kramer FC-10 User manual

Kramer

Kramer FC-10 User manual

Kramer VP-472 User manual

Kramer

Kramer VP-472 User manual

Kramer VA-256D User manual

Kramer

Kramer VA-256D User manual

Kramer 103AV User manual

Kramer

Kramer 103AV User manual

Kramer VP-2XL User manual

Kramer

Kramer VP-2XL User manual

Kramer VP-439 User manual

Kramer

Kramer VP-439 User manual

Kramer TP-583Txr User manual

Kramer

Kramer TP-583Txr User manual

Kramer DigiTOOLS 7508 User manual

Kramer

Kramer DigiTOOLS 7508 User manual

Kramer DigiTOOLS 6505 User manual

Kramer

Kramer DigiTOOLS 6505 User manual

Kramer VM-2Hxl User manual

Kramer

Kramer VM-2Hxl User manual

Kramer TOOLS VP-100 User manual

Kramer

Kramer TOOLS VP-100 User manual

Kramer VM-2DH User manual

Kramer

Kramer VM-2DH User manual

Kramer VA-10 User manual

Kramer

Kramer VA-10 User manual

Kramer VM-212HDMI User manual

Kramer

Kramer VM-212HDMI User manual

Kramer VP-501x1 User manual

Kramer

Kramer VP-501x1 User manual

Kramer VM-1110xl User manual

Kramer

Kramer VM-1110xl User manual

Kramer OC-1N User manual

Kramer

Kramer OC-1N User manual

Kramer VP-475UX User manual

Kramer

Kramer VP-475UX User manual

Kramer DigiTOOLS 6410N User manual

Kramer

Kramer DigiTOOLS 6410N User manual

Kramer DigiTOOLS 7508 User manual

Kramer

Kramer DigiTOOLS 7508 User manual

Kramer KDS-EN6 User manual

Kramer

Kramer KDS-EN6 User manual

Kramer VM-100C User manual

Kramer

Kramer VM-100C User manual

Kramer DigiTOOLS 6410N User manual

Kramer

Kramer DigiTOOLS 6410N User manual

Kramer KDS-SW3-EN7 User manual

Kramer

Kramer KDS-SW3-EN7 User manual

Popular Media Converter manuals by other brands

Audio Authority Authority Digital Audio Converter 979R Specifications

Audio Authority

Audio Authority Authority Digital Audio Converter 979R Specifications

ENFORCER ST-LA108-TPQ installation manual

ENFORCER

ENFORCER ST-LA108-TPQ installation manual

REED AC-006 instruction manual

REED

REED AC-006 instruction manual

epiphan SDI2USB 3.0 user guide

epiphan

epiphan SDI2USB 3.0 user guide

PR 6 MM Series manual

PR

PR 6 MM Series manual

Uotek UT-217E user manual

Uotek

Uotek UT-217E user manual

T+A VSP 1250 R user manual

T+A

T+A VSP 1250 R user manual

Avenview 3G/HD/SD-SDI to HDMI Converter user guide

Avenview

Avenview 3G/HD/SD-SDI to HDMI Converter user guide

PRODECODER HU100-R manual

PRODECODER

PRODECODER HU100-R manual

AMX FG1010-09 quick start guide

AMX

AMX FG1010-09 quick start guide

Transition Networks METTF1011-120 user guide

Transition Networks

Transition Networks METTF1011-120 user guide

evertz 7721AE4-HD manual

evertz

evertz 7721AE4-HD manual

Albalá Ingenieros SPL3005C01 manual

Albalá Ingenieros

Albalá Ingenieros SPL3005C01 manual

Avonic CD500 user manual

Avonic

Avonic CD500 user manual

ExpertDAQ EX9486C-W Operation manual

ExpertDAQ

ExpertDAQ EX9486C-W Operation manual

Leonton MEG2-0201-M Series user manual

Leonton

Leonton MEG2-0201-M Series user manual

Cosel TUNS50F instruction manual

Cosel

Cosel TUNS50F instruction manual

iSP I-7540D-MTCP user manual

iSP

iSP I-7540D-MTCP user manual

manuals.online logo
manuals.online logoBrands
  • About & Mission
  • Contact us
  • Privacy Policy
  • Terms and Conditions

Copyright 2025 Manuals.Online. All Rights Reserved.