Kramer VS-81HDxl User manual

Kramer Electronics, Ltd.
USER MANUAL
Model:
VS-81HDxl
8x1 HD/SD-SDI Switcher

Contents
i
Contents
1Introduction 1
2Getting Started 1
2.1 Quick Start 1
3Overview 3
4Your VS-81HDxl 8x1 HD/SD-SDI Switcher 4
4.1 Using the IR Transmitter 7
5Installing in a Rack 8
6Connecting Your VS-81HDxl 8x1 HD/SD-SDI Switcher 9
6.1 DIP-switch Settings 11
6.1.1 Setting the Machine ID DIP-switches 11
6.2 Controlling via RS-232 (for example, using a PC) 12
6.3 Controlling via the RS-485 Port 13
6.4 Factory Reset 13
6.5 Switching Genlocked Video Signals 14
6.6 Controlling via ETHERNET 14
6.6.1 Connecting the ETHERNET Port directly to a PC (Crossover Cable) 14
6.6.2 Connecting the ETHERNET Port via a Network Hub (Straight-Through Cable) 16
6.6.3 Configuring the Ethernet Port 16
6.7 Controlling via the REMOTE Connector 16
7Operating the VS-81HDxl 17
7.1 Locking the Front Panel 17
8Technical Specifications 18
9Kramer Protocol 2000 19
Figures
Figure 1: VS-81HDxl 8x1 HD/SD-SDI Switcher 5
Figure 2: Connecting the VS-81HDxl 8x1 HD/SD-SDI Switcher 10
Figure 3: VS-81HDxl MACHINE ID DIP-switches 11
Figure 4: Connecting a PC without using a Null-modem Adapter 12
Figure 5: Controlling via RS-485 (for example, using an RC-3000) 13
Figure 6: Local Area Connection Properties Window 15
Figure 7: Internet Protocol (TCP/IP) Properties Window 15
Figure 8: Using the REMOTE Connector 16
Tables
Table 1: VS-81HDxl 8x1 HD/SD-SDI Switcher Features 6
Table 2: MACHINE ID DIP-switch Settings 11
Table 3: Technical Specifications of the VS-81HDxl 8x1 HD/SD-SDI Switcher 18
Table 4: Protocol Definitions 19
Table 5: Instruction Codes for Protocol 2000 20

Introduction
1
1
1 Introduction
Welcome to Kramer Electronics! Since 1981, Kramer Electronics has been
providing a world of unique, creative, and affordable solutions to the vast
range of problems that confront the video, audio, presentation, and
broadcasting professional on a daily basis. In recent years, we have redesigned
and upgraded most of our line, making the best even better! Our 1,000-plus
different models now appear in 11 groups1
Congratulations on purchasing your Kramer VS-81HDxl 8x1 HD/SD-SDI
Switcher. This product is ideal for:
that are clearly defined by
function.
•Professional broadcasting and production studios
•Post production
The package includes the following items:
•VS-81HDxl 8x1 HD/SD-SDI Switcher
•Null-modem adapter, infrared remote control transmitter and power cord
•This user manual2
2 Getting Started
We recommend that you:
•Unpack the equipment carefully and save the original box and packaging
materials for possible future shipment
•Review the contents of this user manual
•Use Kramer high performance high resolution cables3
2.1 Quick Start
This quick start chart summarizes the basic setup and operation steps.
1 GROUP 1: Distribution Amplifiers; GROUP 2: Switchers and Matrix Switchers; GROUP 3: Control Systems;
GROUP 4: Format/Standards Converters; GROUP 5: Range Extenders and Repeaters; GROUP 6: Specialty AV Products;
GROUP 7: Scan Converters and Scalers; GROUP 8: Cables and Connectors; GROUP 9: Room Connectivity;
GROUP 10: Accessories and Rack Adapters; GROUP 11: Sierra Products
2 Download up-to-date Kramer user manuals from the Internet at http://www.kramerelectronics.com
3 The complete list of Kramer cables is on our Web site at http://www.kramerelectronics.com

KRAMER: SIMPLE CREATIVE TECHNOLOGY
Getting Started
2

Overview
3
3
3 Overview
The Kramer VS-81HDxl is a true 8x1 switcher for standard definition / high
definition SDI signals that lets you switch any one of the eight inputs to two
identical outputs. In particular, the VS-81HDxl:
•Features selector buttons that automatically light up in different colors—
green, when it detects a ‘standard definition’ signal, or blue, when it
detects a ‘high definition’ signal
•Operates to up to 2.97Gbps – enabling it to be used for standard definition,
high definition and 3G high definition serial digital video signals
(SD/HD-SDI)
•Includes cable equalization of up to 350m for SD1signals, 140m for
1.5GHz HD2 2
signals, and 120m for 3GHz HD signals
•Features reclocking and equalization on each input
•Is SMPTE 259M, 292M, 344M, 424M and DVB-ASI3
•Supports ANC data (embedded audio, Teletext, time code and so on)
compliant and
supports data rates of 270Mbps, 1483.5Mbps, 1485Mbps and 2970Mbps
•Features the ability to switch genlocked video signals according to timing
of the GENLOCK reference input. Switching according to the Bi-level or
Tri-level Genlock input according to SMPTE RP-1684
•Has an OFF button to disconnect the outputs
•Has a front panel lock button
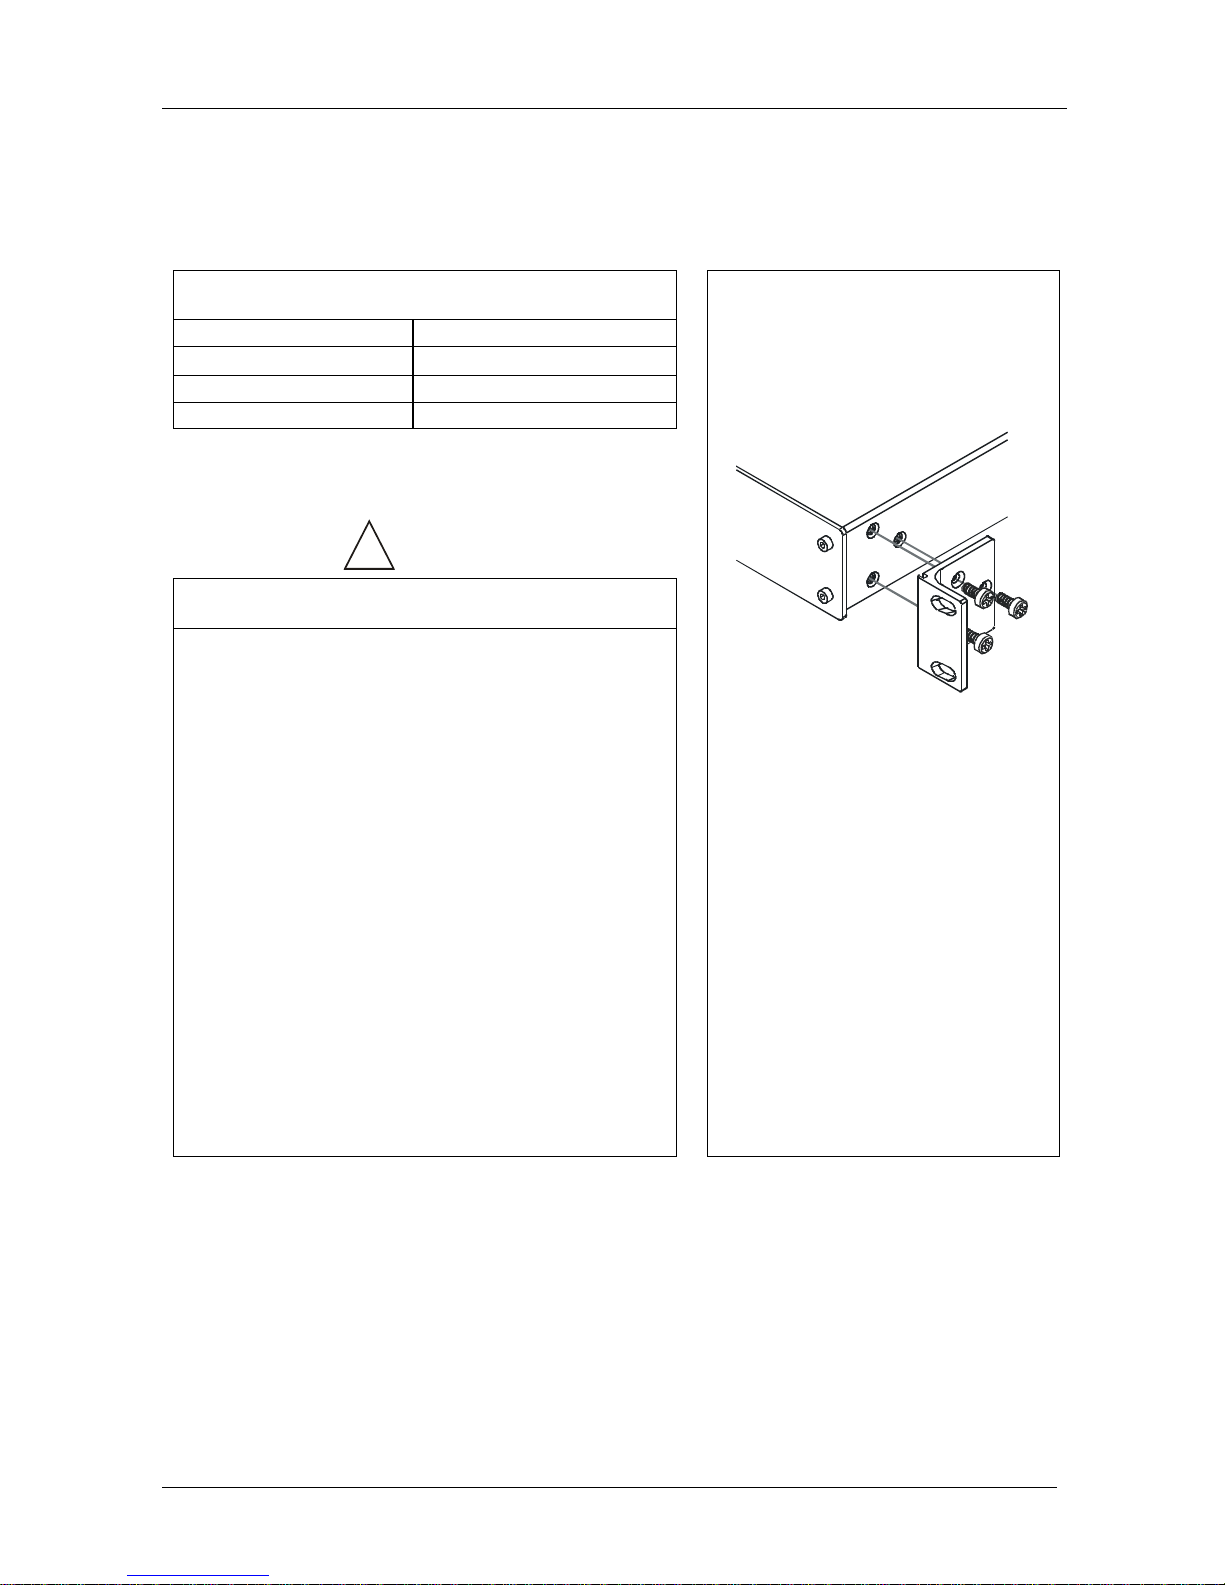
The VS-81HDxl is housed in a 19" 1U rack mountable enclosure, and is fed from
a 100-240 VAC universal switching power supply.
Control the VS-81HDxl via the:
•Front panel buttons
•Infrared remote control transmitter
•Infrared remote extension cable transmitter, see section 4.1
•Remotely, by RS-232 or RS-485 serial commands transmitted by a touch
screen system, PC, or other serial controller
•ETHERNET
•Remote contact closure for forced operation
1 Standard Definition (SD) means an NTSC or PAL compatible video format, consisting of 480 (for NTSC) or 576 (for PAL)
lines of interlaced video
2 High Definition (HD) means a video format, consisting of 720 active lines of progressive video or 1080 lines of progressive
or interlaced video
3 Digital Video Broadcasting - Asynchronous Serial Interface
4 The sources must be genlocked to the GENLOCK input in order to switch cleanly

KRAMER: SIMPLE CREATIVE TECHNOLOGY
Your VS-81HDxl 8x1 HD/SD-SDI Switcher
4
To achieve the best performance:
•Connect only good quality connection cables, thus avoiding interference,
deterioration in signal quality due to poor matching, and elevated noise
levels (often associated with low quality cables)
•Avoid interference from neighboring electrical appliances that may
adversely influence signal quality and position your Kramer VS-81HDxl
away from moisture, excessive sunlight and dust
4 Your VS-81HDxl 8x1 HD/SD-SDI Switcher
Figure 1 and Table 1 define the VS-81HDxl 8x1 HD/SD-SDI Switcher.

Your VS-81HDxl 8x1 HD/SD-SDI Switcher
5
Figure 1: VS-81HDxl 8x1 HD/SD-SDI Switcher

KRAMER: SIMPLE CREATIVE TECHNOLOGY
Your VS-81HDxl 8x1 HD/SD-SDI Switcher
6
Table 1: VS-81HDxl 8x1 HD/SD-SDI Switcher Features
#
Feature
Function
1 IR Receiver The red LED is illuminated when receiving signals from the Infrared
remote control transmitter
2 POWER Switch Illuminated switch for turning the unit ON or OFF
3 OFF Button Press to disconnect the outputs
4 INPUT SELECTOR Buttons Select the input to switch to the output (from 1 to 8)
Press IN buttons 1, 2 and 3 simultaneously to reset the machine to
its factory default values1(see section 6.4)
Use to set the resolution when switching genlocked video signals (see
section 6.5)
5 PANEL LOCK Button Disengages the front panel buttons
6
GENLOCK
IN BNC Connector Connect to the genlock source
7 TERM Button Press to terminate the genlock source (75Ω) or release for looping2
8
LOOP BNC Connector Connect to the GENLOCK connector of the next unit in the line
9 INPUT BNC Connectors Connect to the serial digital video sources (from 1 to 8)
10 OUTPUT SDI BNC
Connectors Connect the two identical SDI outputs to serial digital video
acceptors (1 and 2)
11 RS-485 Detachable Terminal
Block Port PIN G is for the Ground connection3
12
; PINs B (-) and A (+) are for RS-485
RS-232 9-pin D-sub Port Connects to the PC or the Remote Controller4
13
REMOTE Terminal Block
Connector Connect to contact closure switches (see section 6.7)
14 MACHINE ID DIP-switches DIP-switches for setting the machine ID number
15 REMOTE IR Opening5Connects to an external IR receiver6
16
unit for controlling the machine via
an IR remote controller (instead of using the front panel IR receiver)
ETH FACTORY RESET
Button Press to reset to factory default definitions
7
IP number −192.168.1.39 :
Mask – 255.255.255.0
Gateway – 192.168.1.1
17 ETHERNET Connector Connects to the PC or other Serial Controller through computer
networking
18 Power Connector with Fuse AC connector enabling power supply to the unit
1 The 7-segment display shows 12341234, indicating that the operation mode is normal, and that the setups stored via the
INPUT/OUTPUT buttons have been erased
2 Extending the genlock source to another unit
3 The ground connection is sometimes connected to the shield of the RS-485 cable. In most applications, the ground is not
connected
4 Via a null-modem connection
5 Covered by a cap. The 3.5mm connector at the end of the internal IR connection cable fits through this opening
6 Optional. Can be used instead of the front panel (built-in) IR receiver to remotely control the machine (only if the internal
IR connection cable has been installed), see section 4.1
7 First disconnect the power cord and then connect it again while pressing the ETH Factory Reset button. The unit will power
up and load its memory with the factory default definitions

Your VS-81HDxl 8x1 HD/SD-SDI Switcher
7
4.1 Using the IR Transmitter
You can use the RC-IR2 IR transmitter to control the machine via the built-in
IR receiver on the front panel or, instead, via an optional external IR receiver
1
.
The external IR receiver can be located 15 meters away from the machine.
This distance can be extended to up to 60 meters when used with three
extension cables
2
.
Before using the external IR receiver, be sure to arrange for your Kramer
dealer to insert the internal IR connection cable
3
with the 3.5mm connector
that fits into the REMOTE IR opening on the rear panel.
Connect the external IRreceiver to the REMOTE IR 3.5mm connector.
1 Model: C-A35M/IRR-50
2 Model: C-A35M/A35F-50
3 P/N: 505-70434010-S

KRAMER: SIMPLE CREATIVE TECHNOLOGY
Installing in a Rack
8
5 Installing in a Rack
This section describes what to do before installing in a rack and how to rack
mount.
Before Installing in a Rack How to Rack Mount
Before installing in a rack, be sure that the environment is
within the recommended range:
To rack-mount a machine:
1. Attach both ear brackets to the
machine. To do so, remove the
screws from each side of the
machine (3 on each side), and
replace those screws through the
ear brackets.
2. Place the ears of the machine
against the rack rails, and insert the
proper screws (not provided)
through each of the four holes in the
rack ears.
Note that:
•In some models, the front panel
may feature built-in rack ears
•Detachable rack ears can be
removed for desktop use
•Always mount the machine in the
rack before you attach any cables
or connect the machine to the
power
•If you are using a Kramer rack
adapter kit (for a machine that is not
19"), see the Rack Adapters user
manual for installation instructions
(you can download it at:
http://www.kramerelectronics.com)
Operating temperature range +5º to +45º C (41º to 113º F)
Operating humidity range 10 to 90% RHL, non-condensing
Storage temperature range -20º to +70º C (-4º to 158º F)
Storage humidity range 5 to 95% RHL, non-condensing
!
CAUTION!!
When installing in a 19" rack, avoid hazards by taking
care that:
1. It is located within the recommended environmental
conditions, as the operating ambient temperature of a
closed or multi unit rack assembly may exceed the
room ambient temperature.
2. Once rack mounted, enough air will still flow around
the machine.
3. The machine is placed straight in the correct
horizontal position.
4. You do not overload the circuit(s). When connecting
the machine to the supply circuit, overloading the
circuits might have a detrimental effect on overcurrent
protection and supply wiring. Refer to the appropriate
nameplate ratings for information. For example, for
fuse replacement, see the value printed on the
product label.
5. The machine is earthed (grounded) in a reliable way
and is connected only to an electricity socket with
grounding. Pay particular attention to situations where
electricity is supplied indirectly (when the power cord
is not plugged directly into the socket in the wall), for
example, when using an extension cable or a power
strip, and that you use only the power cord that is
supplied with the machine.

Connecting Your VS-81HDxl 8x1 HD/SD-SDI Switcher
9
9
6 Connecting Your VS-81HDxl 8x1 HD/SD-SDI Switcher
You can use your VS-81HDxl to switch one of the eight high definition /
standard definition SDI inputs to the two identical high definition / standard
definition SDI outputs, as the example illustrated in Figure 2 shows.
To connect the VS-81HDxl 8x1 HD/SD-SDI Switcher, as shown in the example
in Figure 2, do the following1
1. Connect up to eight SDI sources to the INPUTS BNC connectors, for example
an:
:
HD/SD SDI camera to INPUT 1
HD/SD SDI camera to INPUT 2
HD/SD SDI camera to INPUT 7
SDI VTR to INPUT 8
2. Connect the SDI OUTPUT BNC connectors to up to2
3. Set the DIP-switches (see section
two SDI acceptors (for
example, two HD/SD SDI displays).
6.1).
4. As an option3
A genlock source to the GENLOCK IN BNC connector
, you can connect:
The LOOP BNC connector to the GENLOCK connector of the next
unit in the line, and release the TERM button for looping4
5. If required, connect a PC and/or controller to the:
RS-232 port (see section 6.2), and/or
RS-485 port (see section 6.3), and/or
ETHERNET connector (see section 6.6)
6. If required3, connect a remote contact closure switch (see section 6.7)
7. Connect5 3
the power cord .
1 Switch OFF the power on each device before connecting it to your VS-81HDxl. After connecting your VS-81HDxl, switch
on its power and then switch on the power on each device
2 When only one output is required, connect that output, and leave the other output unconnected
3 Not illustrated in Figure 2
4 Push in to terminate the input. Release when the input extends to another unit
5 We recommend that you use only the power cord that is supplied with this machine

KRAMER: SIMPLE CREATIVE TECHNOLOGY
Connecting Your VS-81HDxl 8x1 HD/SD-SDI Switcher
10
Figure 2: Connecting the VS-81HDxl 8x1 HD/SD-SDI Switcher

Connecting Your VS-81HDxl 8x1 HD/SD-SDI Switcher
11
11
6.1 DIP-switch Settings
By default, all the DIP-switches are set to OFF.
Figure 3 illustrates the VS-81HDxl DIP-switches:
ON 1 2 3 4
Figure 3: VS-81HDxl MACHINE ID DIP-switches
6.1.1 Setting the Machine ID DIP-switches
The MACHINE ID determines the position of a VS-81HDxl unit, specifying
which VS-81HDxl unit is being controlled when several VS-81HDxl units
connect to a PC or serial controller. Set the Machine number on a VS-81HDxl
unit via MACHINE ID DIP-switches 1, 2, 3 and 4, according to Table 2.
When using a standalone VS-81HDxl unit, set the Machine ID to 1. When
connecting more than one VS-81HDxl unit, set the first machine (the Master)
that is closest to the PC, as Machine ID 1 (the DIP-switches are set to OFF).
Table 2: MACHINE ID DIP-switch Settings
Mach. # DIP 1 DIP 2 DIP 3 DIP 4 Mach. # DIP 1 DIP 2 DIP 3 DIP 4
1 OFF OFF OFF OFF 9 OFF OFF OFF ON
2 ON OFF OFF OFF 10 ON OFF OFF ON
3 OFF ON OFF OFF 11 OFF ON OFF ON
4 ON ON OFF OFF 12 ON ON OFF ON
5 OFF OFF ON OFF 13 OFF OFF ON ON
6 ON OFF ON OFF 14 ON OFF ON ON
7 OFF ON ON OFF 15 OFF ON ON ON
8 ON ON ON OFF 16 ON ON ON ON

KRAMER: SIMPLE CREATIVE TECHNOLOGY
Connecting Your VS-81HDxl 8x1 HD/SD-SDI Switcher
12
6.2 Controlling via RS-232 (for example, using a PC)
To connect a PC to the VS-81HDxl unit, using the Null-modem adapter
provided with the machine (recommended):
•Connect the RS-232 9-pin D-sub rear panel port on the VS-81HDxl unit to
the Null-modem adapter and connect the Null-modem adapter with a
9-wire flat cable to the RS-232 9-pin D-sub port on your PC
To connect a PC to the VS-81HDxl unit, without using a Null-modem adapter:
•Connect the RS-232 9-pin D-sub port on your PC to the RS-232 9-pin D-
sub rear panel port on the VS-81HDxl unit, as Figure 4 illustrates
9-pin D-sub
(From PC) 9-pin D-sub
(Male)
If a shielded cable is used, connect the shield to PIN 5
PIN 4 is connected to PIN 6
PINs 8, 7, 1 are connected together
PIN 5 Connected to PIN 5 (Ground)
PIN 3 Connected to PIN 2
PIN 2 Connected to PIN 3
Figure 4: Connecting a PC without using a Null-modem Adapter

Connecting Your VS-81HDxl 8x1 HD/SD-SDI Switcher
13
13
6.3 Controlling via the RS-485 Port
To cascade up to eight individual VS-81HDxl units, via RS-485 (with control
via a Master Programmable Remote Control system such as the Kramer
RC-3000), as Figure 5 illustrates, do the following:
1. Connect the “A” (+) and “B” (-) PINS on the RS-485 terminal block port of
the RC-3000 to the “A” (+) and “B” (-) PINS, respectively, on each of the
eight VS-81HDxl units. (If using shielded twisted pair cable, the shield is
usually connected to the “G” (Ground) PIN of the first unit).
2. Set the first VS-81HDxl unit as MACHINE # 1 and the following seven
VS-81HDxl units as MACHINE # 2 to MACHINE # 8, according to Table 2.
MACHINE # 1
MACHINE # 8
KEYBOARD EXTENSION REMOTE CONTACT
RS-485 RS-232 IN RS-232 OUT 12 VDC
1 2 1 2 3 4 5 6 7 8 G4 6 8 103 5 7 9 11 12 14 16
OUT
13 15
IN
RC-3000
RS-485 PINOUT
B
A
_
+
Figure 5: Controlling via RS-485 (for example, using an RC-3000)
6.4 Factory Reset
Press and hold the input buttons 1, 2 and 3 simultaneously for 3 seconds until
the three buttons flash to reset the machine to its default values.

KRAMER: SIMPLE CREATIVE TECHNOLOGY
Connecting Your VS-81HDxl 8x1 HD/SD-SDI Switcher
14
6.5 Switching Genlocked Video Signals
The genlock feature lets you switch genlocked video signals according to
timing of the GENLOCK reference input1
Connect the GENLOCK cable.
.
If the HD input signal2
•1080i@60Hz: press and hold INPUT 1 button for 3 seconds. The
button will flash
that is connected is one of the following, it is
necessary to set it up as follows:
3
•1080i@50Hz or 720p@50Hz: press and hold INPUT 2 button for 3
seconds.
The button will flash
to indicate that the set up was completed
3to indicate that the set up was completed
•720p@60Hz: press and hold INPUT 3 button for 3 seconds.
The button will flash3to indicate that the set up was completed
When turning the machine ON, the appropriate button will flash to indicate
the latest setup (last setup is saved).
6.6 Controlling via ETHERNET
You can connect the VS-81HDxl via the Ethernet, using a crossover cable
(see section 6.6.1) for direct connection to the PC or a straight-through cable
(see section 6.6.2) for connection via a network hub or network router4
6.6.1 Connecting the ETHERNET Port directly to a PC (Crossover Cable)
.
You can connect the Ethernet port of the VS-81HDxl to the Ethernet port on
your PC, via a crossover cable with RJ-45 connectors.
This type of connection is recommended for identification of the factory default
IP Address of the VS-81HDxl during the initial configuration
After connecting the Ethernet port, configure your PC as follows:
1. Right-click the My Network Places icon on your desktop.
2. Select Properties.
1 According to SMPTE RP-168. The sources must be genlocked to the GENLOCK input in order to switch cleanly
2 The unit will detect automatically when SD-SDI inputs are used
3 If a change is made to the resolution or refresh rate. The button will not flash if the new timing is the same as that
previously selected
4 After connecting the Ethernet port, you have to install and configure your Ethernet Port and also install the COM Port
Redirector. For detailed instructions, see the “Ethernet Configuration (Lantronix) guide.pdf” file in the technical support
section on our Web site http://www.kramerelectronics.com

Connecting Your VS-81HDxl 8x1 HD/SD-SDI Switcher
15
15
3. Right-click Local Area Connection Properties.
4. Select Properties.
The Local Area Connection Properties window appears.
5. Select the Internet Protocol (TCP/IP) and click the Properties Button (see
Figure 6).
Figure 6: Local Area Connection Properties Window
6. Select Use the following IP address, and fill in the details as shown in
Figure 7.
7. Click OK.
Figure 7: Internet Protocol (TCP/IP) Properties Window

KRAMER: SIMPLE CREATIVE TECHNOLOGY
Connecting Your VS-81HDxl 8x1 HD/SD-SDI Switcher
16
6.6.2 Connecting the ETHERNET Port via a Network Hub (Straight-
Through Cable)
You can connect the Ethernet port of the VS-81HDxl to the Ethernet port on a
network hub or network router, via a straight-through cable with RJ-45
connectors.
6.6.3 Configuring the Ethernet Port
After connecting the Ethernet port, you have to install and configure it.
For detailed instructions on how to install and configure your Ethernet port,
see the “Ethernet Configuration (FC-11) guide.pdf” on our Web site: at
http://www.kramerelectronics.com.
6.7 Controlling via the REMOTE Connector
The contact closure remote control pins operate in a similar way to the input
selector button. Using the contact closure remote control lets you route an input
to the outputs by remote control. To do so, temporarily connect the required
input (from 1 to 8) pin on the REMOTE terminal block connector to the GND
(ground) pin. You can also disconnect the outputs by temporarily connecting the
OFF pin to the GND pin.
DO NOT connect more than one PIN to the GND PIN at the same time
For example, to route input 5 to the outputs, as the example in Figure 8 illustrates,
momentarily touch input # 5 to the GND (ground) pin.
Figure 8: Using the REMOTE Connector

Operating the VS-81HDxl
17
17
7 Operating the VS-81HDxl
You can operate your VS-81HDxl via:
•The front panel buttons
•RS-232/RS-485 serial commands transmitted by a PC, touch screen
system, or other serial controller
•The Kramer RC-IR2Infrared Remote Control Transmitter
•Infra-red remote extension cable transmitter
•The ETHERNET
To switch an input to the outputs via the front panel buttons1
When selecting an input that is not connected, that input button blinks.
, press the desired
input button.
7.1 Locking the Front Panel
To prevent changing the settings accidentally or tampering with the unit via
the front panel buttons, lock2
To lock the VS-81HDxl:
your VS-81HDxl. Unlocking releases the
protection mechanism.
•Press the LOCK button for three seconds, until the LOCK button is
illuminated
The front panel is locked. Pressing a button will have no effect
To unlock the VS-81HDxl:
•Press the illuminated LOCK button until the LOCK button is no longer
illuminated
The front panel unlocks
1 For details of how to route an input to an output using the REMOTE connector, see section 6.7
2 Nevertheless, even though the front panel is locked you can still operate via RS-232 or RS-485, as well as via the Kramer
IR Remote Control Transmitter

KRAMER: SIMPLE CREATIVE TECHNOLOGY
Technical Specifications
18
8 Technical Specifications
Table 3 includes the technical specifications:
Table 3: Technical Specifications1
INPUTS:
of the VS-81HDxl 8x1 HD/SD-SDI Switcher
8 SDI SMPTE-259M, 292M, 344M, 424M serial video, 75 ohms on BNC
connectors
1 GENLOCK 75Ω/ Hi-Z on looping BNC connectors, bi-level, Tri-level inputs
OUTPUTS: 2 identical equalized and reclocked SMPTE-259M, 292M, 344M, 424M
outputs 75 ohms on BNC connectors
1 GENLOCK 75Ω/ Hi-Z on looping BNC connectors, bi-level, Tri-level inputs
MAX. OUTPUT LEVEL: 800mVpp /75 ohms
JITTER: Better than 0.2UI
DATA RATE: Up to 2.97Gbps
CONTROLS: Front-panel, RS-232; RS-485, ETHERNET, infrared remote, contact closure,
and panel lock
POWER SOURCE: Universal, 100-240V AC, 50/60Hz 22VA
DIMENSIONS: 19 inch (W), 7 inch (D), 1U (H) rack mountable
WEIGHT: 1.5kg (3.3lbs) approx.
ACCESSORIES: Power cord, Null-modem adapter
OPTIONS: External remote IR receiver cable
2
1 Specifications are subject to change without notice
2 P/N: C-A35M/IRR-50
Other manuals for VS-81HDxl
1
Table of contents
Other Kramer Switch manuals

Kramer
Kramer VP-23DS User manual

Kramer
Kramer VS-81HDxl User manual

Kramer
Kramer VS-21DTP User manual

Kramer
Kramer SWT3-31-HU User manual

Kramer
Kramer VS-41AV User manual

Kramer
Kramer VP-774A User manual

Kramer
Kramer VS-121HC User manual

Kramer
Kramer VIA CONNECT PRO User manual

Kramer
Kramer VP-725DSA User manual

Kramer
Kramer VP-438 User manual

Kramer
Kramer VS-161HDMI User manual

Kramer
Kramer VS-211UHD User manual

Kramer
Kramer VP-771 User manual

Kramer
Kramer SID-X2N User manual

Kramer
Kramer VS-211UHD User manual

Kramer
Kramer VS-66FW User manual

Kramer
Kramer WP-20 User manual

Kramer
Kramer VP-436N User manual

Kramer
Kramer VIA CONNECT PRO User manual

Kramer
Kramer VP-550X User manual