KWIK GOAL 9B54 User manual
NZ420 Rev. 12/04/19
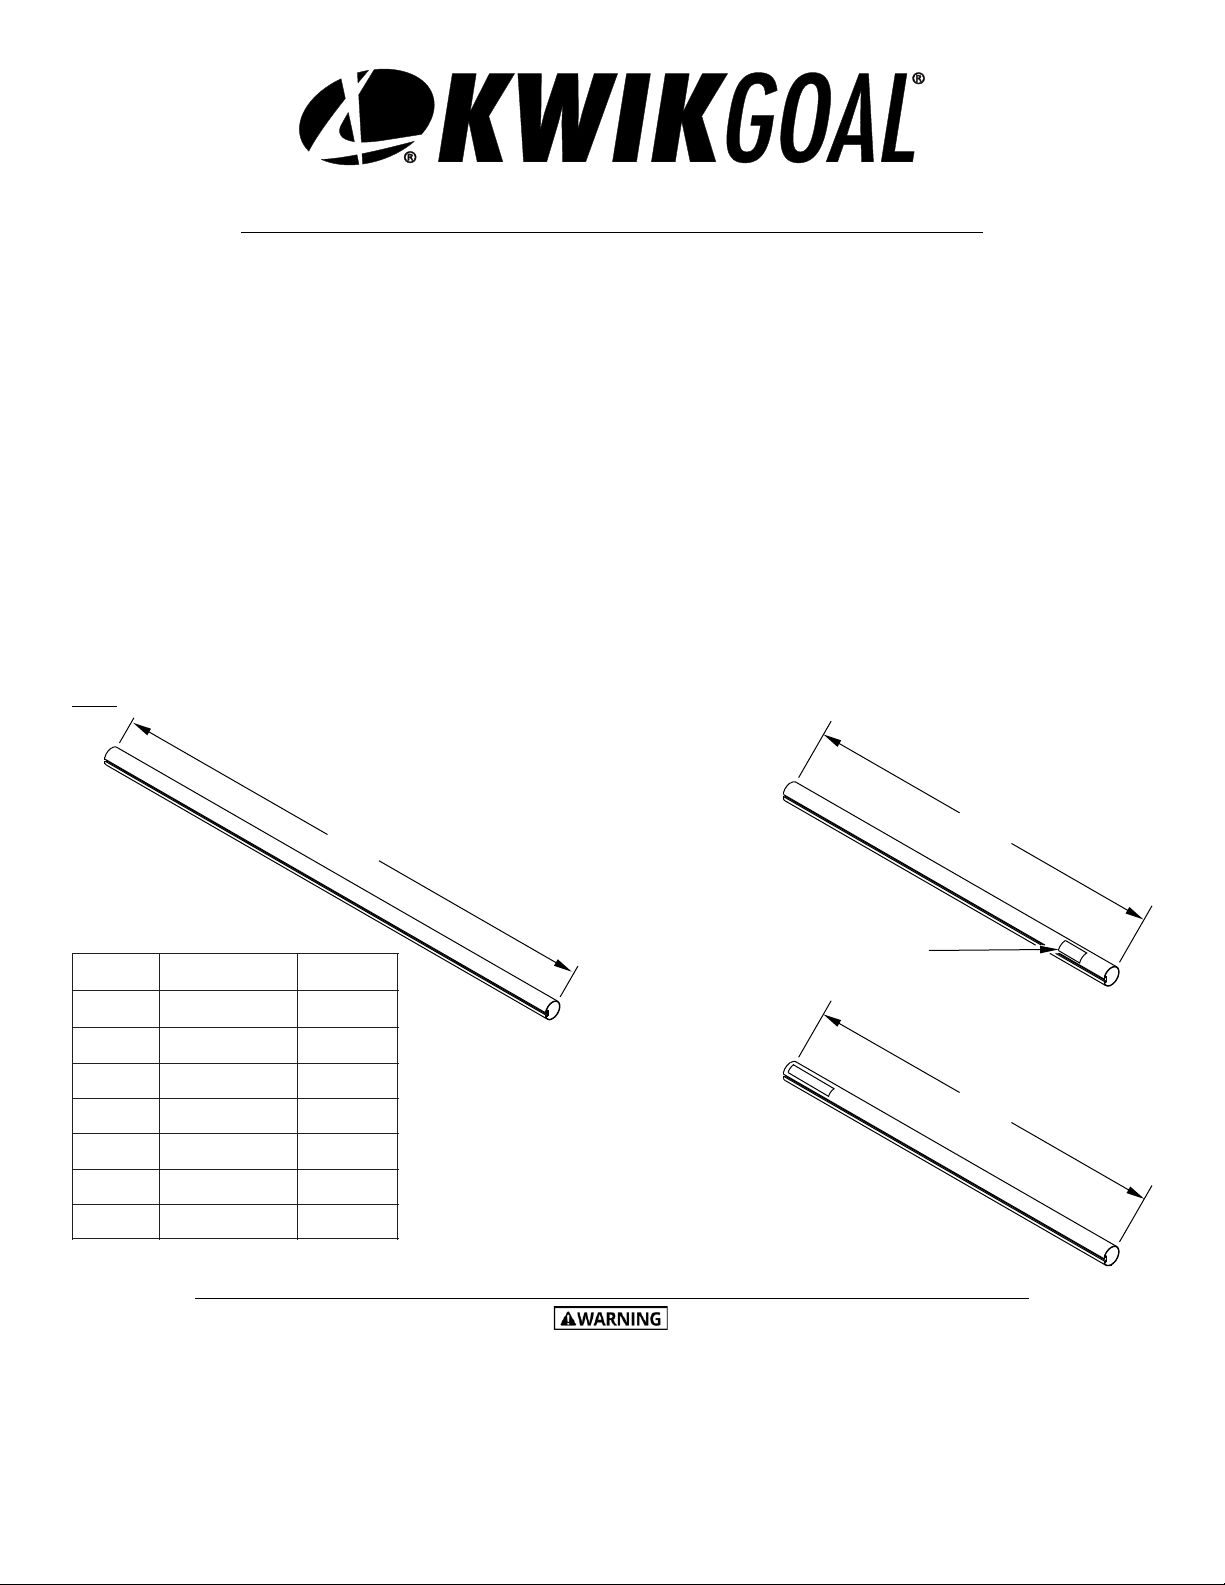
Crossbar (2)
(Part# SEE TABLE)
THIS UNIT MUST BE ANCHORED ACCORDING TO THESE INSTRUCTIONS AT ALL TIMES
*THIS UNIT MUST BE ASSEMBLED BY A MINIMUM OF TWO QUALIFIED PERSONS*
ASSEMBLY INSTRUCTIONS FOR ALL 9B54 PORTABLE SHELTER FRAMES
NOTICE Sunlight reflecting off polycarbonate panels can contribute to increased temperatures of
surrounding objects. In certain situations, these increased temperatures can damage some artificial turf
surfaces. Kwik Goal is not responsible for any damage to artificial turf.
2. Read through entire instruction before beginning assembly and installation.
1. Unpack all parts and check for damage that may have occurred during shipping. If damage has occurred,
notify Kwik Goal immediately. Lay out all parts. Remove all cardboard and packaging immediately. Wet or
damp packaging may damage contents.
NOTE: Components may be packaged in one or more additional boxes.
Left Post (1)
(Part# UZ1103)
67-1/8”
Date of manufacture sticker
67-1/8”
Right Post (1)
(Part# UZ1103)
(A)
PART #
SHELTER WIDTH
DIM (A)
UZ1559
30’
362-3/8”
UZ1116
24’
287-3/4”
UZ1433
21’
250-7/16”
UZ1434
18’
213-1/8”
UZ1435
15’
175-13/16”
UZ1436
12’
138-1/2”
UZ1114
9’
101-3/16”
140 Pacific Drive Quakertown, PA 18951
800-531-4252 Kwikgoal.com
2017, Rev. 2019 Kwik Goal Ltd. ©
THIS EQUIPMENT MUST BE STORED IN A SECURED, SHELTERED AREA WHEN NOT IN USE OR IN THE THREAT
OF HIGH WINDS. ANY WEATHER DAMAGE TO THIS EQUIPMENT WILL NOT BE COVERED UNDER KWIK GOAL’S
PRODUCT GUARANTEE. DO NOT LEAVE THIS EQUIPMENT UNATTENDED.
Parts

IMPORTANT SAFETY INSTRUCTIONS
READ CAREFULLY
1. Lifting and moving heavy field equipment can be dangerous if not done
properly. All Kwik Goal shelters must be moved by qualified personnel who are
experienced in moving large, heavy field equipment. Kwik Goal recommends
storing dolly and wheels in a secured area to prevent unauthorized use.
2. A minimum of four qualified, experienced people are required to install wheels
and move shelter.
9. Always use two people to lift shelter with dolly. With one person maintaining
light pressure on the handle, the second may insert wheels into shelter. Install
both wheels before resting shelter on the ground. (Refer to 9B1201 - Shelter
Dolly instructions for details.)
3. Do not attempt to lift, move, or remove anchors from any shelter in windy
conditions.
4. Shelters must not be left unattended when wheels are installed.
NEVER LOWER SHELTER WITH ONLY ONE WHEEL INSTALLED
7. Use extreme caution when pushing shelter. Excessive force can overturn
shelter. Always push at lowest point on shelter frame possible.
5. Shelter must be on level, flat ground to use dolly handle and/or wheels.
6. Use extreme caution when pushing shelter. Excessive force can overturn
shelter. Always push at lowest point on shelter frame possible.
8. Do not push shelter directly from the front to rear or rear to front. Push from
end to end. (Refer to 9B1201 - Shelter Dolly instructions for details.)
NZ420 Rev. 12/04/19
140 Pacific Drive Quakertown, PA 18951
800-531-4252 Kwikgoal.com
2015, Rev. 2019 Kwik Goal Ltd. ©

THIS UNIT MUST BE ANCHORED ACCORDING TO THESE INSTRUCTIONS AT ALL TIMES
Anchor Hdw (Part# JZ210)
7/16” X 5” Hex Bolt (Part# TZ307) (4)
7/16” Flat Washer (Part# TZ171) (8)
Anchor Chain (Part# VZ564-12) (4)
7/16” X 5-1/2” Hex Bolt (Part# TZ291) (4)
7/16” Lock Nut (Part# TZ47) (4)
1/2” U-bolt (Part# TZ306) (2)
1/2” Lock Nut (Part# TZ28) (4)
Open all boxes and layout all sealed hardware packs
before beginning assembly.
3/8” Lock Washer (Part# TZ65) (20)
1/2” Flat Washer (Part# TZ297) (4)
Frame Hdw (Part#JZ131)
3/8” X 1” Socket Head (Part# TZ323) (20)
Note: Hardware is packed separately in one or more boxes.
Lift Hdw (Part# JZ137)
NZ420 Rev. 12/04/19
Right Base (1)
(Part# UZ1580)
76-1/4”
Left Base (1)
(Part# UZ1579)
76-1/4”
Crossbar Corner (2)
(Part# UZ1211)
Post Corner (2)
(Part# UZ1099)
Ground Anchor (4)
(Part# 10B103 Pack of 4)
Anchor Bracket (8)
(Part# UZ1430)
Left Panel (1)
(Part# UZ1584)
Polycarbonate (1)
(Part# WZ1029)
Right Panel (1)
(Part# UZ1583)
Polycarbonate (1)
(Part# WZ1029)
Center Panel (SEE TABLE)
(Part# UZ1582)
Polycarbonate (1)
(Part# WZ1028)
SHELTER WIDTH
QTY
30’
10
24’
8
21’
7
18’
6
15’
5
12’
4
9’
3
THIS EQUIPMENT MUST BE STORED IN A SECURED, SHELTERED AREA WHEN NOT IN USE OR IN THE THREAT
OF HIGH WINDS. ANY WEATHER DAMAGE TO THIS EQUIPMENT WILL NOT BE COVERED UNDER KWIK GOAL’S
PRODUCT GUARANTEE. DO NOT LEAVE THIS EQUIPMENT UNATTENDED.
Parts Continued
NOTE: Tighten 1/2” nuts only until flush with end of U-bolts.
3. Hardware for this step is in Lift Hdw pack.
Attach 1/2” U-bolt to left and right bases.
1/2” U-bolt
Right Base
1/2” Lock Nut
1/2” Flat Washer
1/2” U-bolt Left Base
1/2” Lock Nut
1/2” Flat Washer
THIS UNIT MUST BE ANCHORED ACCORDING TO THESE INSTRUCTIONS AT ALL TIMES
Ratchet with
1/2”, 9/16”, 5/8” & 3/4”
Sockets
1/2”, 9/16”, 5/8” & 3/4”
Wrenches
9/16
5/16” Hex wrench
Assembly Tools
NZ420 Rev. 12/04/19
Polyurethane Sealant
(Part# VZ837)
5/16 X 3” Double End Stud (Part# TZ273) (8) (8) (8) (8) (8) (8) (8)
5/16” Flat Washer (Part# TZ4) (24) (32) (40) (48) (56) (64) (76)
3/8” X 2-1/4” Hex Bolt (Part# TZ305) (7) (8) (9) (10) (11) (12) (14)
Panel Hdw (Part# JZ202 JZ228)
3/8” X 7/8” Hex Bolt (Part# TZ249) (5) (6) (7) (8) (9) (10) (12)
3/8” Square Nut (Part# TZ247) (12) (14) (16) (18) (20) (22) (26)
3/8” Flat Washer (Part# TZ60) (12) (14) (16) (18) (20) (22) (26)
5/16” X 3-3/4” Hex Bolt (Part# TZ264) (8) (12) (16) (20) (24) (28) (36)
5/16” Lock Nut (Part# TZ5) (16) (20) (24) (28) (32) (36) (44)
9ft 12ft 15ft 18ft 21ft 24ft 30ft
3/8” Lock Washer (Part# TZ65) (12) (14) (16) (18) (20) (22) (26)
THIS EQUIPMENT MUST BE STORED IN A SECURED, SHELTERED AREA WHEN NOT IN USE OR IN THE THREAT
OF HIGH WINDS. ANY WEATHER DAMAGE TO THIS EQUIPMENT WILL NOT BE COVERED UNDER KWIK GOAL’S
PRODUCT GUARANTEE. DO NOT LEAVE THIS EQUIPMENT UNATTENDED.
Parts Continued

NOTE: Square nuts will float loose in channels until used later.
Assemble crossbar, bases, and post corners. Press joints together firmly before tightening bolts.
4. Hardware for this step is in Frame Hdw & Panel Hdw packs.
THIS UNIT MUST BE ANCHORED ACCORDING TO THESE INSTRUCTIONS AT ALL TIMES
NZ420 Rev. 12/04/19
Socket Head Cap Screw
3/8” x 1”
3/8” Lock Washer
Crossbar
Right Base
3/8” Square Nut
Left Base
Crossbar
3/8” Lock Washer
Socket Head Cap Screw
3/8” x 1”
3/8” Square Nut (Qty=Center Panel Qty - 1)
Example: eight center panels = seven 3/8” square nuts
Post Corner
3/8” Square Nut
3/8” Lock Washer
3/8” x 1” Socket Head Cap Screw
Base
THIS EQUIPMENT MUST BE STORED IN A SECURED, SHELTERED AREA WHEN NOT IN USE OR IN THE THREAT
OF HIGH WINDS. ANY WEATHER DAMAGE TO THIS EQUIPMENT WILL NOT BE COVERED UNDER KWIK GOAL’S
PRODUCT GUARANTEE. DO NOT LEAVE THIS EQUIPMENT UNATTENDED.

THIS UNIT MUST BE ANCHORED ACCORDING TO THESE INSTRUCTIONS AT ALL TIMES
5. Hardware for this step is in Frame Hdw & Panel Hdw packs.
Assemble crossbar, posts, and crossbar corners. Press joints together firmly before tightening bolts.
NOTE: Square nuts will float loose in channels until used later.
NZ420 Rev. 12/04/19
Left Post
Crossbar Corner
Crossbar
Crossbar Corner
Right Post
Date of
manufacture sticker
Warning Sticker
Warning Sticker
3/8” x 1” Socket Head Cap Screw
3/8” Lock Washer
3/8” Square Nut
Right Post
Crossbar Corner
Crossbar
3/8” Square Nut (Qty=Center Panel Qty - 1)
3/8” x 1” Socket Head Cap Screw
3/8” Lock Washer
3/8” Square Nut
3/8” x 1”
Socket Head Cap Screw
3/8” Lock Washer
Crossbar
Left Post
Crossbar Corner
THIS EQUIPMENT MUST BE STORED IN A SECURED, SHELTERED AREA WHEN NOT IN USE OR IN THE THREAT
OF HIGH WINDS. ANY WEATHER DAMAGE TO THIS EQUIPMENT WILL NOT BE COVERED UNDER KWIK GOAL’S
PRODUCT GUARANTEE. DO NOT LEAVE THIS EQUIPMENT UNATTENDED.

6. Hardware for this step is in Frame Hdw & Panel Hdw packs.
Insert one 3/8” square nut in each side of assembled base corner. Connect assembled base and post as shown.
Press joints together firmly before tightening bolts.
THIS UNIT MUST BE ANCHORED ACCORDING TO THESE INSTRUCTIONS AT ALL TIMES
NZ420 Rev. 12/04/19
Assembled Post
Assembled Base
Post Corner
Post
3/8” x 1” Socket Head Cap Screw
3/8” Lock Washer
3/8” Square Nut
Assembled Post
Assembled Base
THIS EQUIPMENT MUST BE STORED IN A SECURED, SHELTERED AREA WHEN NOT IN USE OR IN THE THREAT
OF HIGH WINDS. ANY WEATHER DAMAGE TO THIS EQUIPMENT WILL NOT BE COVERED UNDER KWIK GOAL’S
PRODUCT GUARANTEE. DO NOT LEAVE THIS EQUIPMENT UNATTENDED.
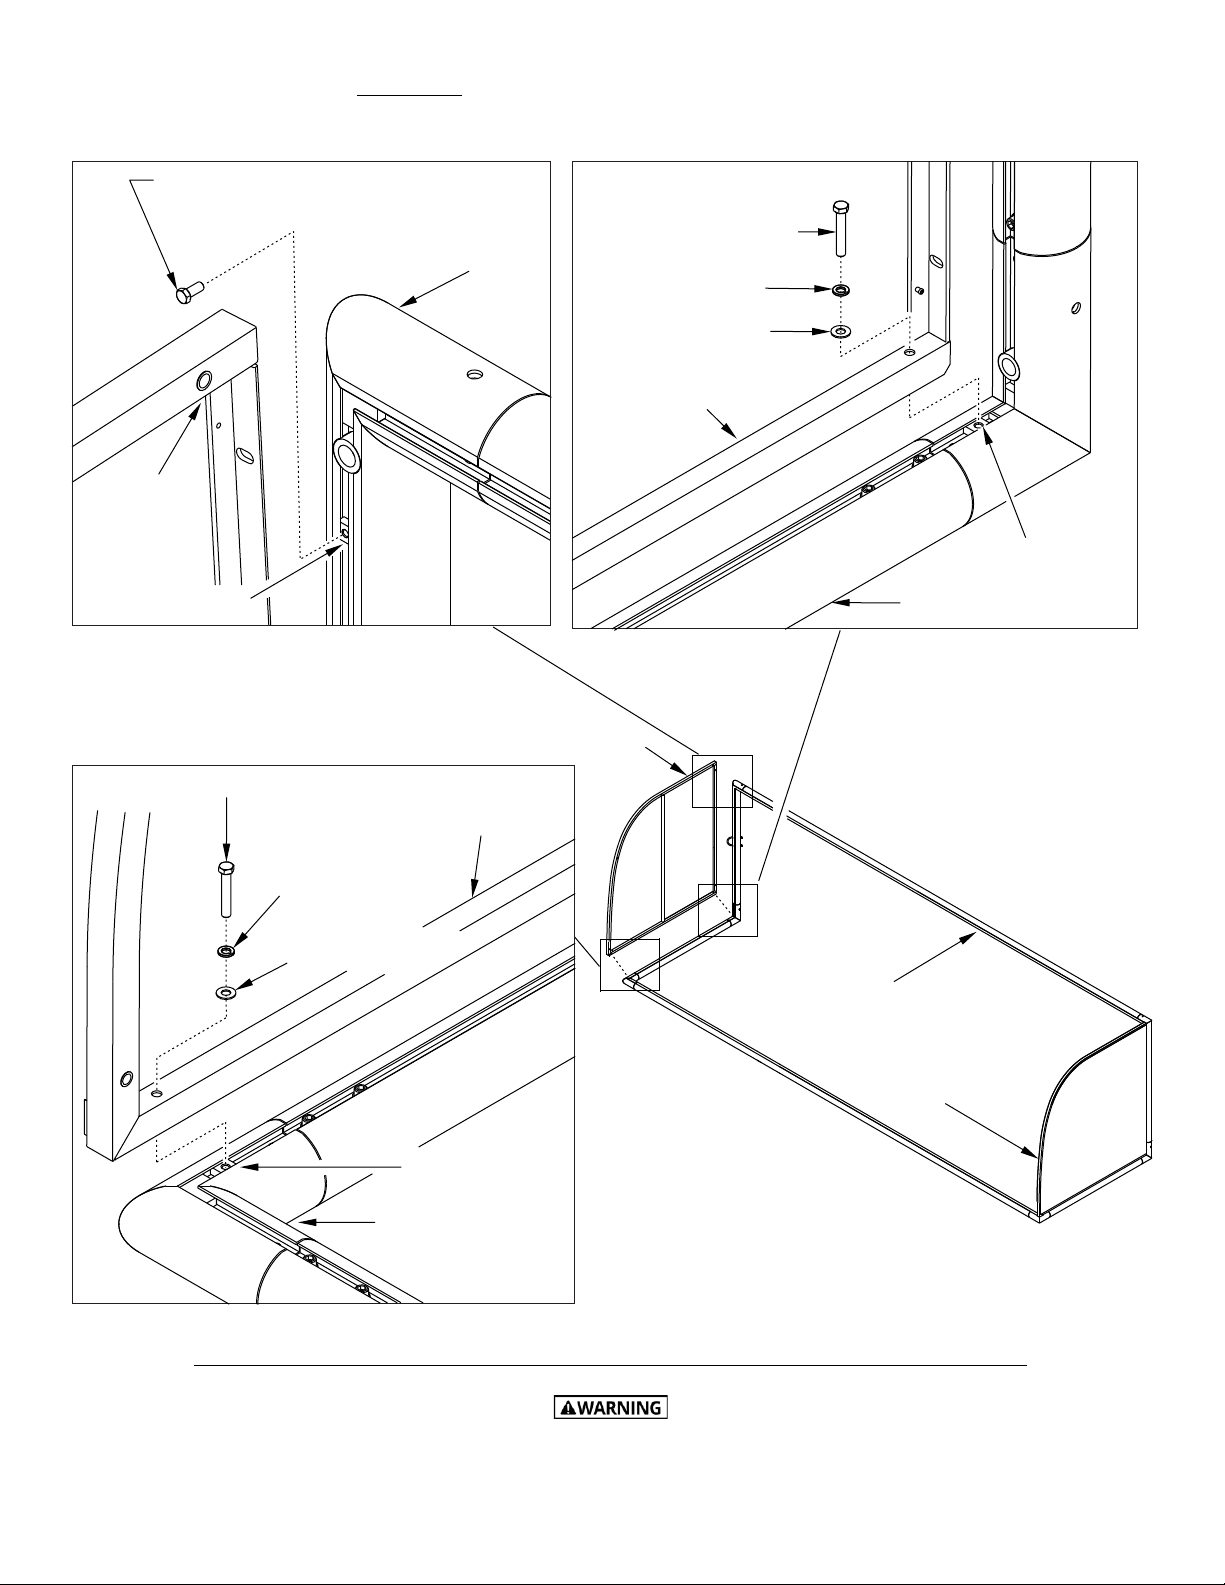
3/8” x 7/8” Hex Bolt - make finger tight
to temporarily hold square nut in place.
Base
Left Panel
3/8” Square Nut
Attach right and left panels to assembled frame as shown.
Do NOT tighten bolts at this time.
7. Hardware for this step is in Panel Hdw packs.
THIS UNIT MUST BE ANCHORED ACCORDING TO THESE INSTRUCTIONS AT ALL TIMES
Left Panel
Right Panel
Assembled Frame
NZ420 Rev. 12/04/19
3/8” x 2 -1/4” Hex Bolt
3/8” Lock Washer
3/8” Flat Washer
3/8” Square Nut
Left Panel
Assembled Frame
Assembled Frame
Left Panel
3/8” Square Nut
3/8” x 2- 1/4” Hex Bolt
3/8” Lock Washer
3/8” Flat Washer
THIS EQUIPMENT MUST BE STORED IN A SECURED, SHELTERED AREA WHEN NOT IN USE OR IN THE THREAT
OF HIGH WINDS. ANY WEATHER DAMAGE TO THIS EQUIPMENT WILL NOT BE COVERED UNDER KWIK GOAL’S
PRODUCT GUARANTEE. DO NOT LEAVE THIS EQUIPMENT UNATTENDED.
THIS UNIT MUST BE ANCHORED ACCORDING TO THESE INSTRUCTIONS AT ALL TIMES
Left Panel
Assembled Frame
Right Panel
Left Panel
Right Panel
Assembled Frame
NZ420 Rev. 12/04/19
3/8” x 7/8” Hex Bolt
3/8” Lock Washer
Assembled Frame
Left Panel
3/8” Square Nut
3/8” Flat Washer
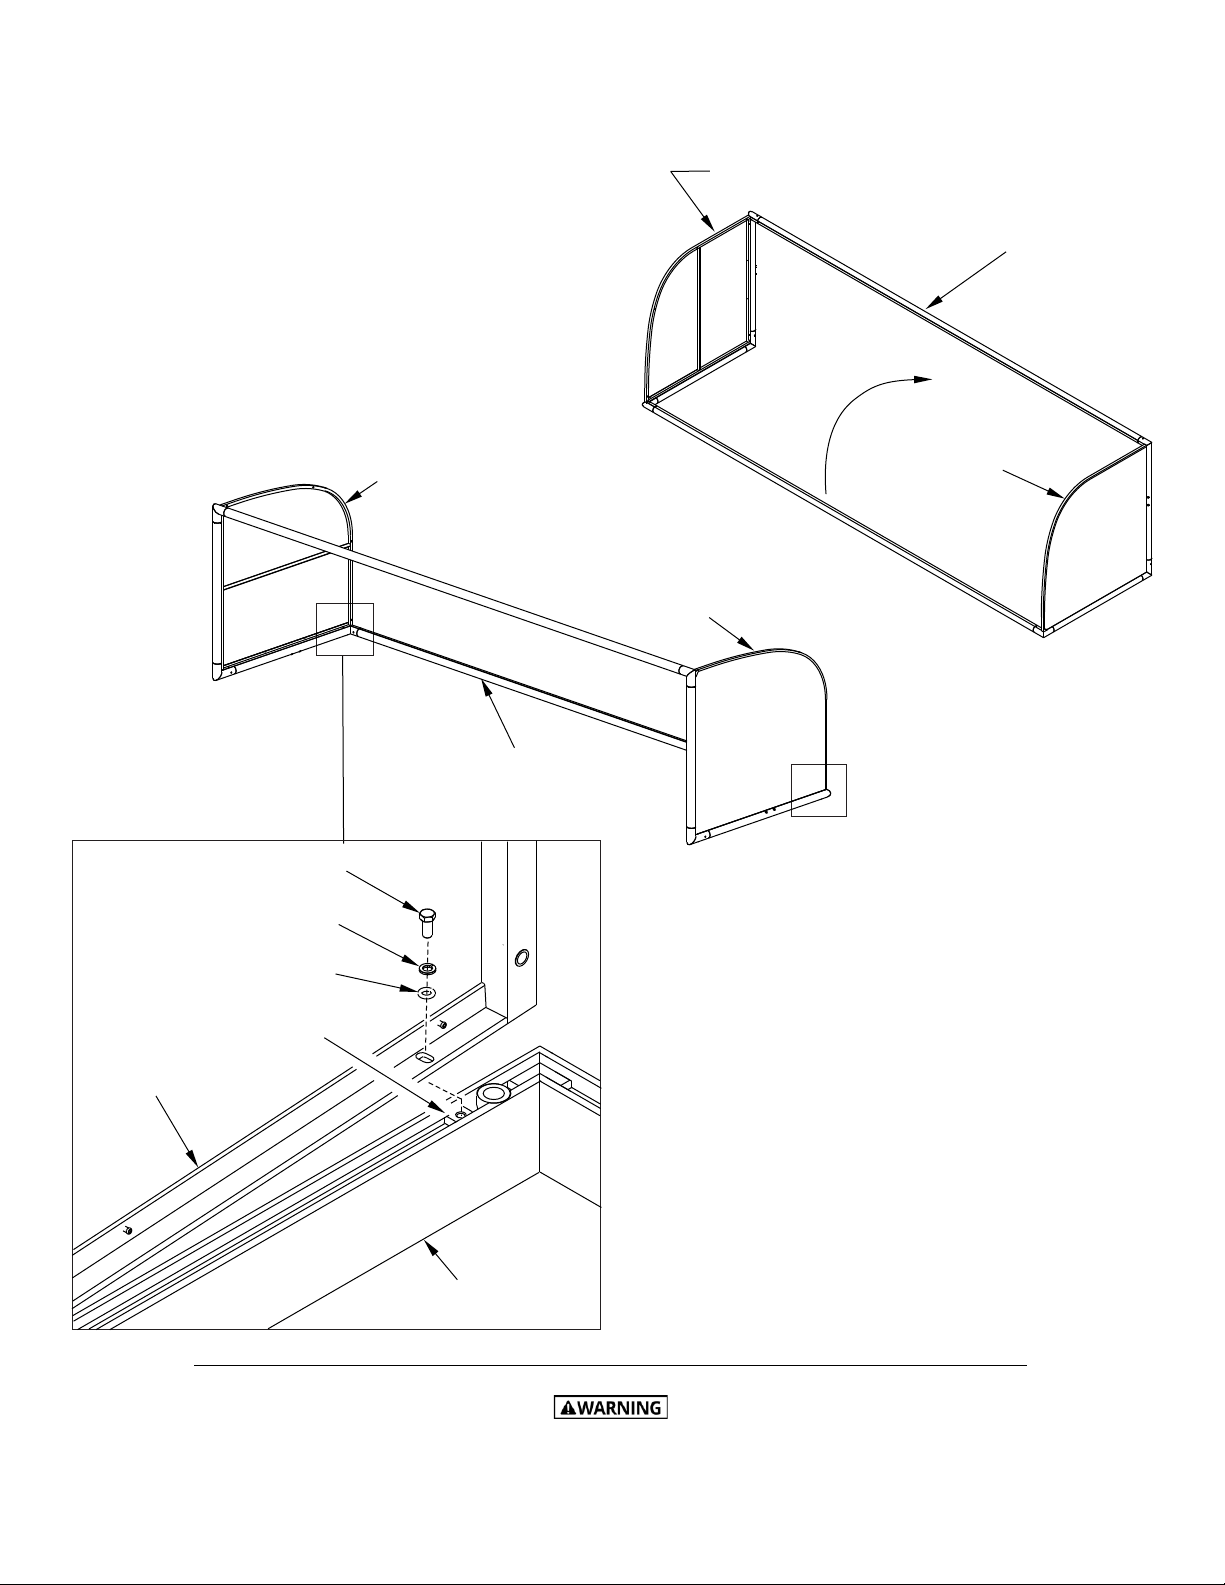
9. Turn shelter frame onto base and remove temporary 3/8” X 7/8” bolt then connect bottom of right and left
panel as shown
Do NOT tighten bolts at this time.
THIS EQUIPMENT MUST BE STORED IN A SECURED, SHELTERED AREA WHEN NOT IN USE OR IN THE THREAT
OF HIGH WINDS. ANY WEATHER DAMAGE TO THIS EQUIPMENT WILL NOT BE COVERED UNDER KWIK GOAL’S
PRODUCT GUARANTEE. DO NOT LEAVE THIS EQUIPMENT UNATTENDED.

10. Hardware for this step is in Panel Hdw packs.
Do NOT tighten bolts at this time.
Insert double end studs into left panel. Move unneeded square nuts in top and bottom crossbars away from
left side at least one center panel width.
Left Panel
Double End Stud
Top Crossbar
Double End Stud
THIS UNIT MUST BE ANCHORED ACCORDING TO THESE INSTRUCTIONS AT ALL TIMES
NZ420 Rev. 12/04/19
Right Panel
Left Panel
Bottom Crossbar
Top Crossbar
Move unneeded square nuts in top & bottom
crossbars away from panel at least a panel width.
THIS EQUIPMENT MUST BE STORED IN A SECURED, SHELTERED AREA WHEN NOT IN USE OR IN THE THREAT
OF HIGH WINDS. ANY WEATHER DAMAGE TO THIS EQUIPMENT WILL NOT BE COVERED UNDER KWIK GOAL’S
PRODUCT GUARANTEE. DO NOT LEAVE THIS EQUIPMENT UNATTENDED.
Other KWIK GOAL Shelter manuals


Popular Shelter manuals by other brands


Storage Canopy
Storage Canopy C3340R Assembly instructions

Frabill
Frabill ICE HUNTER 195 instruction manual

Shelters4Less
Shelters4Less SR1588 Assembly instructions

Sealey
Sealey Power Products GSS150819SD instructions

Crivit
Crivit 104155 Operation and safety notes

No Butts Bin
No Butts Bin SR1558-F Assembly instructions