manuals.online logo
Brands
  1. Home
  2. •
  3. Brands
  4. •
  5. Lansay
  6. •
  7. Toy
  8. •
  9. Lansay BLOpens fashion User manual

Lansay BLOpens fashion User manual

NOTICE / INSTRUCTIONS / GEBRUIKSAANWIJZING /
ANLEITUNG / INSTRUCCIONES / INFORMATIVA
Bonjour ! Merci d’avoir acheté Mon Atelier Mode de Blopens Fashion ! Avant de commencer à jouer, installe-toi
confortablement sur une table ou autre surface plane, rigide et bien propre et sors tous les éléments de la boîte. Lis
attentivement les instructions ci-dessous avec un adulte afin de pouvoir réaliser tes plus belles tenues, comme un(e)
véritable styliste !
ÊHello! Thank you for purchasing “My Fashion Workshop” by Blopens Fashion! Before you start to play, get set up on
a table or another flat, tough and clean surface and take everything out of the box. Carefully read the following
instructions with an adult. You’ll then be ready to create the most beautiful outfits, like a real designer!
Hallo! Wat leuk dat jij Mijn Mode-atelier van Blopens Fashion hebt gekocht! Vooraleer je kan beginnen spelen, moet
je eerst een tafel of een ander vlak oppervlak zoeken dat stevig en proper is en alle onderdelen uit de doos halen. Lees
aandachtig samen met een volwassene onderstaande aanwijzingen en maak prachtige outfits, net als een echte
modeontwerp(st)er!
Hallo! Vielen Dank, dass du das Modeatelier von Blopens Fashion gekauft hast! Bevor du anfängst zu spielen, setze
dich bequem an einen Tisch oder an einen anderen Ort, der eben, stabil und sauber ist. Entnehme alle Gegenstände aus
der Verpackung. Lese die folgenden Anweisungen sorgfältig mit einem Erwachsenen durch, damit du wie ein(e) echte(r)
Stylist(in) die besten Outfits kreieren kannst!
¡Hola! ¡Gracias por haber comprado Mi Taller de Moda Blopens Fashion! Antes de empezar a jugar, busca una mesa
u otra superficie plana, rígida y limpia para instalar tu taller, y saca todos los materiale de la caja. ¡Lee con atención
estas instrucciones con un adulto para poder realizar tus más bellas creaciones, como un/a auténtico/a diseñador/a!
ïBuongiorno! Grazie per aver acquistato Il mio atelier di moda di Blopens Fashion! Prima di iniziare a giocare,
installati comodamente su un tavolo o su un'altra superficie piana, rigida e perfettamente pulita e tira fuori tutto il
contenuto della scatola. Leggi attentamente le istruzioni indicate di seguito insieme a un adulto per poter realizzare i
tuoi abiti più belli, come un/a vero/a stilista !
Attention ! Présence de petites pièces. Danger d’étouffement.
Achtung! Enthält Kleinteile. Erstickungsgefahr.
Waarschuwing! Bevat kleine onderdelen. Verstikkingsgevaar.
ÊWarning! Contains small parts. Choking hazard.
¡Advertencia! Presencia de piezas pequeñas. Peligro de atragantamiento.
ïAvvertenza! Contiene piccole parti. Rischio di soffocamento.
112 quai de Bezons
95100 Argenteuil - FRANCE
www.lansay.fr
REF. 23650 © 2020 Lansay SAS
Commence par bien regarder tous tes pochoirs. Tu vas ainsi pouvoir imaginer les tenues que tu vas créer et
préparer les pochoirs dont tu auras besoin.
ÊStart by looking at all the stencils. You’ll then be able to imagine the outfits you’ll create and prepare the
stencils that you’ll need.
Eerst en vooral moet je goed de sjablonen bestuderen. Hiermee kan je een beeld vormen van de outfit die je
wilt maken en daarna kan je de sjablonen die je wilt gebruiken, voorbereiden.
Schaue dir zunächst alle Schablonen genau an. Du kannst dir nun die Outfits ausdenken, die du kreieren
möchtest und die Schablonen vorbereiten, die du dafür benötigst.
En primer lugar, observa todas tus plantillas. Así podrás imaginar los modelos que vas a crear, y preparar las
plantillas que vas a necesitar.
ïInizia guardando bene tutti i tuoi stencil. Potrai così immaginare gli abiti che creerai e preparli in funzione di
quelli di cui avrai bisogno.
9 Cheveux ÊHair Haar Haare Pelo ïCapelli
 Vêtements (6x Hauts, 6x Bas) ÊClothing (6x Tops + 6x Bottoms)
Kledij (6x Bovenstukken + 6x Onderstukken)  Kleidung (6x Oberteile + 6x Unterteile)
Ropa (6x Partes de arriba + 6x Partes de abajo) ï Vestiti (6x Maglie + 6x Gonne)
 Chaussures ÊShoes Schoenen Schuhe Zapatos ïScarpe
 Sacs ÊHandbags Tassen Taschen Bolsos ïBorse
 Motifs (x4) ÊPatterns Motieven Muster Estampados ïMotivi
10
11
12
13
ATELIER DE CRÉATION MODE ÊFASHION CREATION STAND
STANDAARD OM DE MODECREATIES OP TE MAKEN ATELIER FÜR MODE-KREATIONEN
TALLER DE DISEÑO DE MODA ïATELIER DI CREAZIONE MODA
POCHOIRS ÊSTENCILS SJABLONEN SCHABLONEN PLANTILLAS ïSTENCIL
 Encoches de création
ÊCreation notches
Gleufjes om je model in te schuiven
Schlitze für kreationen
Ranuras de diseño
ïIncavi di creazione
 Encoches d’exposition
ÊDisplay notches
Houders om de gemaakte creaties in te zetten
Schlitze für ausstellungen
Ranuras de exposición
ïIncavi di esposizione
 Encoche de rangement des pochoirs
ÊStencil storage space
Houder waarin je de sjablonen kan opbergen
Schlitze zum aufbewahren der schablonen
Ranuras para guardar las plantillas
ïIncavo per riporre gli stencil
 Picots pour hauts, bas et motifs
ÊClothing & pattern nibs
Pinnetjes voor boven- en onderstukken en
motieven
Stifte für oberteile, unterteile und muster
Pitorros para partes de arriba, de abajo y
estampados
ïPerni per capi sopra e sotto e motivi
 Bouton cheveux
ÊHair knob
Draaiknop haar
Drehknopf für haare
Tope pelo
ïBottone capelli
 Bouton sacs
ÊHandbag knob
Draaiknop handtassen
Drehknopf für taschen
Tope bolsos
ïBottone borse
 Bouton chaussures
ÊShoe knob
Draaiknop schoenen
Drehknopf für schuhe
Tope zapatos
ïBottone scarpe
1
2
3
4
5
6
7
FEUILLES MANNEQUIN ÊMODEL SHEETS
MODELLEN MODEL-VORLAGEN
HOJAS MODELOS ïFOGLI MODELLA
8
10
11
12
2
3
4
1
5
6
7
COMMENT UTILISER MON ATELIER MODE ? ÊHOW TO USE MY FASHION WORKSHOP? HOE WERKT MIJN MODE-ATELIER?
WIE FUNKTIONIERT MEIN MODEATELIER? ¿CÓMO UTILIZAR MI TALLER DE MODA? ïCOME UTILIZZARE IL MIO ATELIER DI MODA?
13
9
NETTOYAGE DE L’ATELIER ÊHOW TO CLEAN THE CREATION STAND
HET ATELIER SCHOONMAKEN REINIGUNG DES ATELIERS
LIMPIEZA DEL TALLER ïPULIZIA DELL’ATELIER
Avec l’aide d’un adulte, retire tout ce qu’il y a sur ton atelier de création (Mini Blopens, mannequins, pochoirs…).
À l’aide d’un chiffon mouillé, nettoie les résidus d’encre qu’il peut y avoir. Range les Mini Blopens dans leurs
emplacements dédiés, les pochoirs dans l’encoche de rangement et expose tes mannequins dans les encoches
d’exposition (2).
ÊWith an adult’s help, remove everything from your creation stand (Mini Blopens, model sheets, stencils...). With a
damp cloth, clean the ink stains and replace the Mini Blopens, the stencils and the model sheets in their dedicated
space (2).
Verwijder samen met een volwassene alles van je atelier (Mini Blopens, modellen, sjablonen,...). Met een vochtige
doek kan je de inktresten wegvegen. Berg je Mini Blopens op in de speciaal daarvoor voorziene houders. De sjablonen
stop je ook op hun plaats. Je aangeklede modellen kan je in de houders laten staan (2).
Entferne mit Hilfe eines Erwachsenen alles, was sich in deinemAtelier für Mode-Kreationen befindet (Mini Blopens,
Models, Schablonen ...). Entferne eventuell vorhandene Tintenreste mit einem feuchten Tuch. Stelle die Mini Blopens
an den dafür vorgesehenen Orten auf und stecke die Schablonen in den Aufbewahrungsschlitz. Präsentiere deine
Models in den Schlitzen für Ausstellungen (2).
Con ayuda de un adulto, retira todo lo que tengas en el taller de diseño (Mini Blopens, modelos, plantillas…) Con
un trapo mojado, limpia los restos de tinta que pueda haber. Guarda los Mini Blopens y las plantillas en su lugar, y
expón tus diseños utilizando las ranuras de exposición (2).
ïCon l'aiuto di un adulto, togli tutto quello che c'è sull'atelier creativo (Mini Blopens, modelle, stencil…). Con l'aiuto
di un panno umido, pulisci i residui di inchiostro che possono esserci. Sistema i Mini Blopens nei loro appositi spazi, gli
stencil nell'incavo per riporli ed esponi le tue modelle negli appositi incavi (2).
Avant de commencer à jouer, appuie doucement sur les parties détachables du pochoir (si nécessaire). Souffle à une distance d’au moins 8 à 10 cm du papier. Ne mets jamais l’embout ou la cartouche d’encre dans la bouche.
Fais des pauses entre chaque utilisation. Rince les embouts et capuchons entre chaque utilisation et laisse sécher quelques instants. Non rechargeable. Les Blopens peuvent tacher. Nous vous suggérons de porter un tablier et de
protéger vos meubles et vos tapis. On peut enlever les taches sur la peau et la plupart des vêtements avec du savon. Evitez les produits de prélavage, qui peuvent tacher. Laissez éventuellement tremper pendant toute une nuit,
puis lavez à l’eau chaude avec du savon. Un lavage supplémentaire peut s’avérer nécessaire pour les taches les plus tenaces. Afin d’éviter tout problème de décoloration, suivez les instructions données par le fabricant du savon
ou du produit détergent. Evitez le chlore, les nettoyants chimiques et les lessives biologiques.
ÊBefore starting, gently remove the detachable parts of the stencil (if necessary). Blow at a distance of at least 8 to 10 cm from the paper. Never put the tip or the ink cartridge in the mouth.Take breaks between each use. Rinse
the tips and caps between each use and let dry for a few minutes. Non-rechargeable. Blopens may stain. We suggest wearing an apron and protecting your furniture and carpets. Stains on skin and fabric can be cleaned with soap.
Avoid prewash products that may stain. For tougher stains fabric may have to soak overnight in soap and water. An additional washing may be necessary for thepersistent stains. In order to avoid any discoloration, follow the
instructions provided by the soap or detergent product manufacturer. Avoid chlorine, chemical cleaners and biological washing powders.
Alvorens te spelen, oefen een lichte druk uit op de uitneembare delen van de sjabloon (indien nodig). Blaas op een afstand van minstens 8 tot 10 cm van het papier. Stop nooit het uiteinde of de inktpatroon in uw mond. Las
een pauze in na elk gebruik. Spoel de uiteinden en doppen tussen elk gebruik en laat ze vervolgens kortstondig drogen. Niet navulbaar. De Blopens kunnen vlekken achterlaten. Wij raden u aan om een schort te dragen en uw
meubilair en vloerbedekking te beschermen. Verwijder vlekken op de huid en kledingstukken met zeep. Gebruik geen voorwasmiddelen, ze kunnen vlekken achterlaten. Laat eventueel een nacht weken, en was vervolgens in een
warm sopje. Een extra wasbeurt kan in geval van hardnekkige vlekken nodig zijn. Om verkleuring te voorkomen, volg de instructies van de fabrikant van de zeep of het wasmiddel. Gebruik geen chloor, chemische schoonmaakmid-
delen of biologische wasmiddelen.
 Vor Beginn des Spiels vorsichtig auf die abnehmbaren Teile der Schablone drücken (falls erforderlich). Aus einer Entfernung von mindestens 8 bis 10 cm zum Papier pusten. Den Aufsatz oder die Tintenpatrone niemals in den
Mund nehmen. Zwischen jedem Gebrauch Pausen einlegen. Die Aufsätze und Deckel zwischen jedem Gebrauch abspülen und einen Moment trocknen lassen. Nicht nachfüllbar. Die Blopens können Flecken verursachen. Wir
empfehlen Ihnen, eine Schürze zu tragen sowie Ihre Möbel und Teppiche abzudecken. Flecken auf der Haut und den meisten Kleidungsstücken sind mit Seife zu entfernen. Vermeiden Sie Vorwaschmittel, die Flecken verursachen
können. Fleck eventuell über Nacht einweichen lassen und anschließend mit warmem Wasser und Seife abwaschen. Bei hartnäckigen Flecken kann ein zusätzlicher Waschgang erforderlich sein. Befolgen Sie die Anweisungen des
Seifenherstellers oder des Reinigungsmittelherstellers, um Verfärbungen zu vermeiden. Vermeiden Sie Chlor, chemische Reinigungsmittel und organische Laugen.
Antes de empezar a jugar,(si fuese necesario) retira suavemente las partes que se desprenden de la plantilla . Sopla a una distancia mínima de unos 8 a 10 cm del papel. Nunca metas la boquilla o el cartucho de tinta en la
boca. Haz descansos entre cada utlización. Aclara las boquillas y tapas entre cada utilización y deja secar unos instantes. No recargable. Los Blopens pueden manchar. Se recomienda usar un mandilón y proteger muebles y
alfombras. La mayoría de las manchas sobre la piel y la ropa se pueden lavar con jabón. Evite los productos de prelavado que pueden manchar. Dejar a remojo durante una noche, y lavar posteriormente con agua caliente y jabón.
Para las manchas más persistentes puede ser necesario repetir la operación. Para evitar decoloraciones siga las instrucciones del fabricante del jabón o producto detergente. Evite la lejía, los productos químicos y los detergentes
ecológicos.
ïPrima di iniziare a giocare, premi delicatamente sulle parti staccabili dello stencil (se necessario). Soffia a una distanza di almeno 8-10 cm dalla carta. Non mettere mai l'estremità o la cartuccia di inchiostro in bocca. Fai delle
pause tra un utilizzo e l'altro. Sciacqua le estremità e i cappucci tra un utilizzo e l'altro e lascia asciugare per qualche istante. Non ricaricabile. I Blopens possono macchiare. Suggeriamo l'uso di un grembiule e di proteggere mobili
e tappeti. Le macchie sulla pelle e sulla maggior parte dei vestiti si possono togliere con del sapone. Evitare i prodotti di prelavaggio che possono macchiare. Lasciare eventualmente i capi macchiati a mollo per tutta una notte,
quindi lavare con acqua calda e sapone. Un lavaggio supplementare potrebbe rivelarsi necessario per le macchie più tenaci. Per evitare qualsiasi problema di decolorazione, seguire le istruzioni fornite dal produttore del sapone o
del prodotto detergente. Evitare il cloro, i detergenti chimici e i detersivi biologici.
Il est recommandé de bien enlever toutes les attaches en plastique et autres éléments de protection ne faisant pas partie du jouet avant de le donner à l’enfant. Informations à conserver. Les décorations et les couleurs peuvent
varier. Il est recommandé de ne pas viser les yeux ou le visage. En cas de projection rincez abondamment à l’eau claire et consultez un médecin en amenant le produit. Ne pas inhaler. Bien se laver les mains après utilisation des
éléments de la boîte.
ÊPlease remove all plastic tags, ties, and any other protective elements which do not make up part of the toy, before giving it to the child. Please retain information for future reference. Colors and contents may vary from those
shown. Do not aim for eyes and face. In case of contact with the eyes, rinse thoroughly with clear water and consult a doctor bringing the product with you. Should not be inhaled. Wash hands well after use.
Het wordt aanbevolen om alle plastic bevestigingen en beschermingsonderdelen die geen deel uitmaken van het speelgoed te verwijderen voordat u het aan het kind geeft.Bewaar deze informatie. De kleuren en versieringen
kunnen variëren. Waarschuwing: Nooit in de richting van iemands ogen of gelaat verstuiven. Bij spatten ruim met helder water spoelen en een arts raadplegen, neem het product mee. Je kunt geen inkt inademen. Wast u vele
handen na de elementen gebruikt te hebben.
 Es wird empfohlen, alle Kunststoffstecker und andere Schutzteilchen, die kein Bestandteil des Spielzeugs sind, zu entfernen, bevor das Spielzeug dem Kind gegeben wird. Information aufbewahren. Farben und Muster können
variieren. Es wird empfohlen, nicht auf die Augen oder das Gesicht zu zielen. Eventuelle Spritzer mit klarem Wasser reichlich abspülen. Beim Verschlucken des Produkts einen Arzt konsultieren. Nicht einatmen. Nach Verwendung
der Gegenstände aus der Schachtel Hände gründlich waschen.
Se recomienda retirar bien todos los complementos de plástico y los demás elementos de protección que no forman parte del juguete antes de dárselo al niño. Conservar las instrucciones. Los colores y los adornos pueden
variar. Se recomienda no dirigir el Blopens hacia los ojos o la cara. En caso de proyección, aclarar abundantemente con agua. Consulte con un médico y lleve el producto. No inhalar. Lávese bien las manos tras haber utilizado
cualquiera de los elementos de la caja.
ïSi raccomanda di rimuovere tutte le fascette in plastica e gli altri elementi protettivi che non fanno parte del giocattolo prima di darlo al bambino. Informazioni da conservare. I colori e le decorazioni possono variare. Si consiglia
di non puntare in direzione degli occhi o del viso. In caso di spruzzo,sciacquare con abbondante acqua pulita e consultare un medico portando con sé il prodotto. Non inalare. Lavarsi bene le mani dopo l'uso degli elementi contenuti
nella scatola.
Une fois tes 20 feuilles de mannequin utilisées, rends-toi
sur le site www.lansay.fr pour en imprimer autant que tu le
souhaites !
ÊOnce you’ve used all of your 20 model sheets, you can go
on the www.lansay.com website to print out more!
Als je 20 modellen zijn aangekleed kan je op de website
www.lansay.fr zoveel nieuwe afdrukken als je wilt!
Wenn du die 20 Model-Vorlagen aufgebraucht hast, gehe
auf die Website www.lansay.fr, um so viele auszudrucken, wie
du möchtest!
Cuando hayas usado las 20 hojas de modelos, visita la
página www.lansay.fr y ¡podrás imprimir todas las que
quieras!
ïUna volta utilizzati i 20 fogli con le modelle, visita il sito
www.lansay.fr per stampare tutti quelli che desideri! Message aux parents : Avant de commencer, lire attentivement la notice d’utilisation avec l’enfant. ÊMessage to parents : Prior to starting, carefully read the instructions with the child.
Mededeling voor de ouders: Alvorens te starten, lees deze gebruiksaanwijzing samen met het kind aandachtig door.
Mitteilung an die Eltern: Lesen Sie diese Bedienungsanleitung sorgfältig mit Ihrem Kind, bevor Sie beginnen. Mensaje a los padres: Antes de empezar, lean atentamente esta guía con el niño.
ïMessaggio per i genitori: Prima di iniziare, leggere attentamente questa guida all'utilizzo insieme al bambino.
GUIDE D’UTILISATION DES MINI BLOPENS ÊHOW TO USE MINI BLOPENS GEBRUIKSAANWIJZING VOOR DE MINI,BLOPENS
BENUTZERHANDBUCH FÜR DIE MINI BLOPENS GUÍA DE UTILIZACIÓN DE LOS MINI BLOPENS ïGUIDA ALL'UTILIZZO DEI MINI BLOPENS
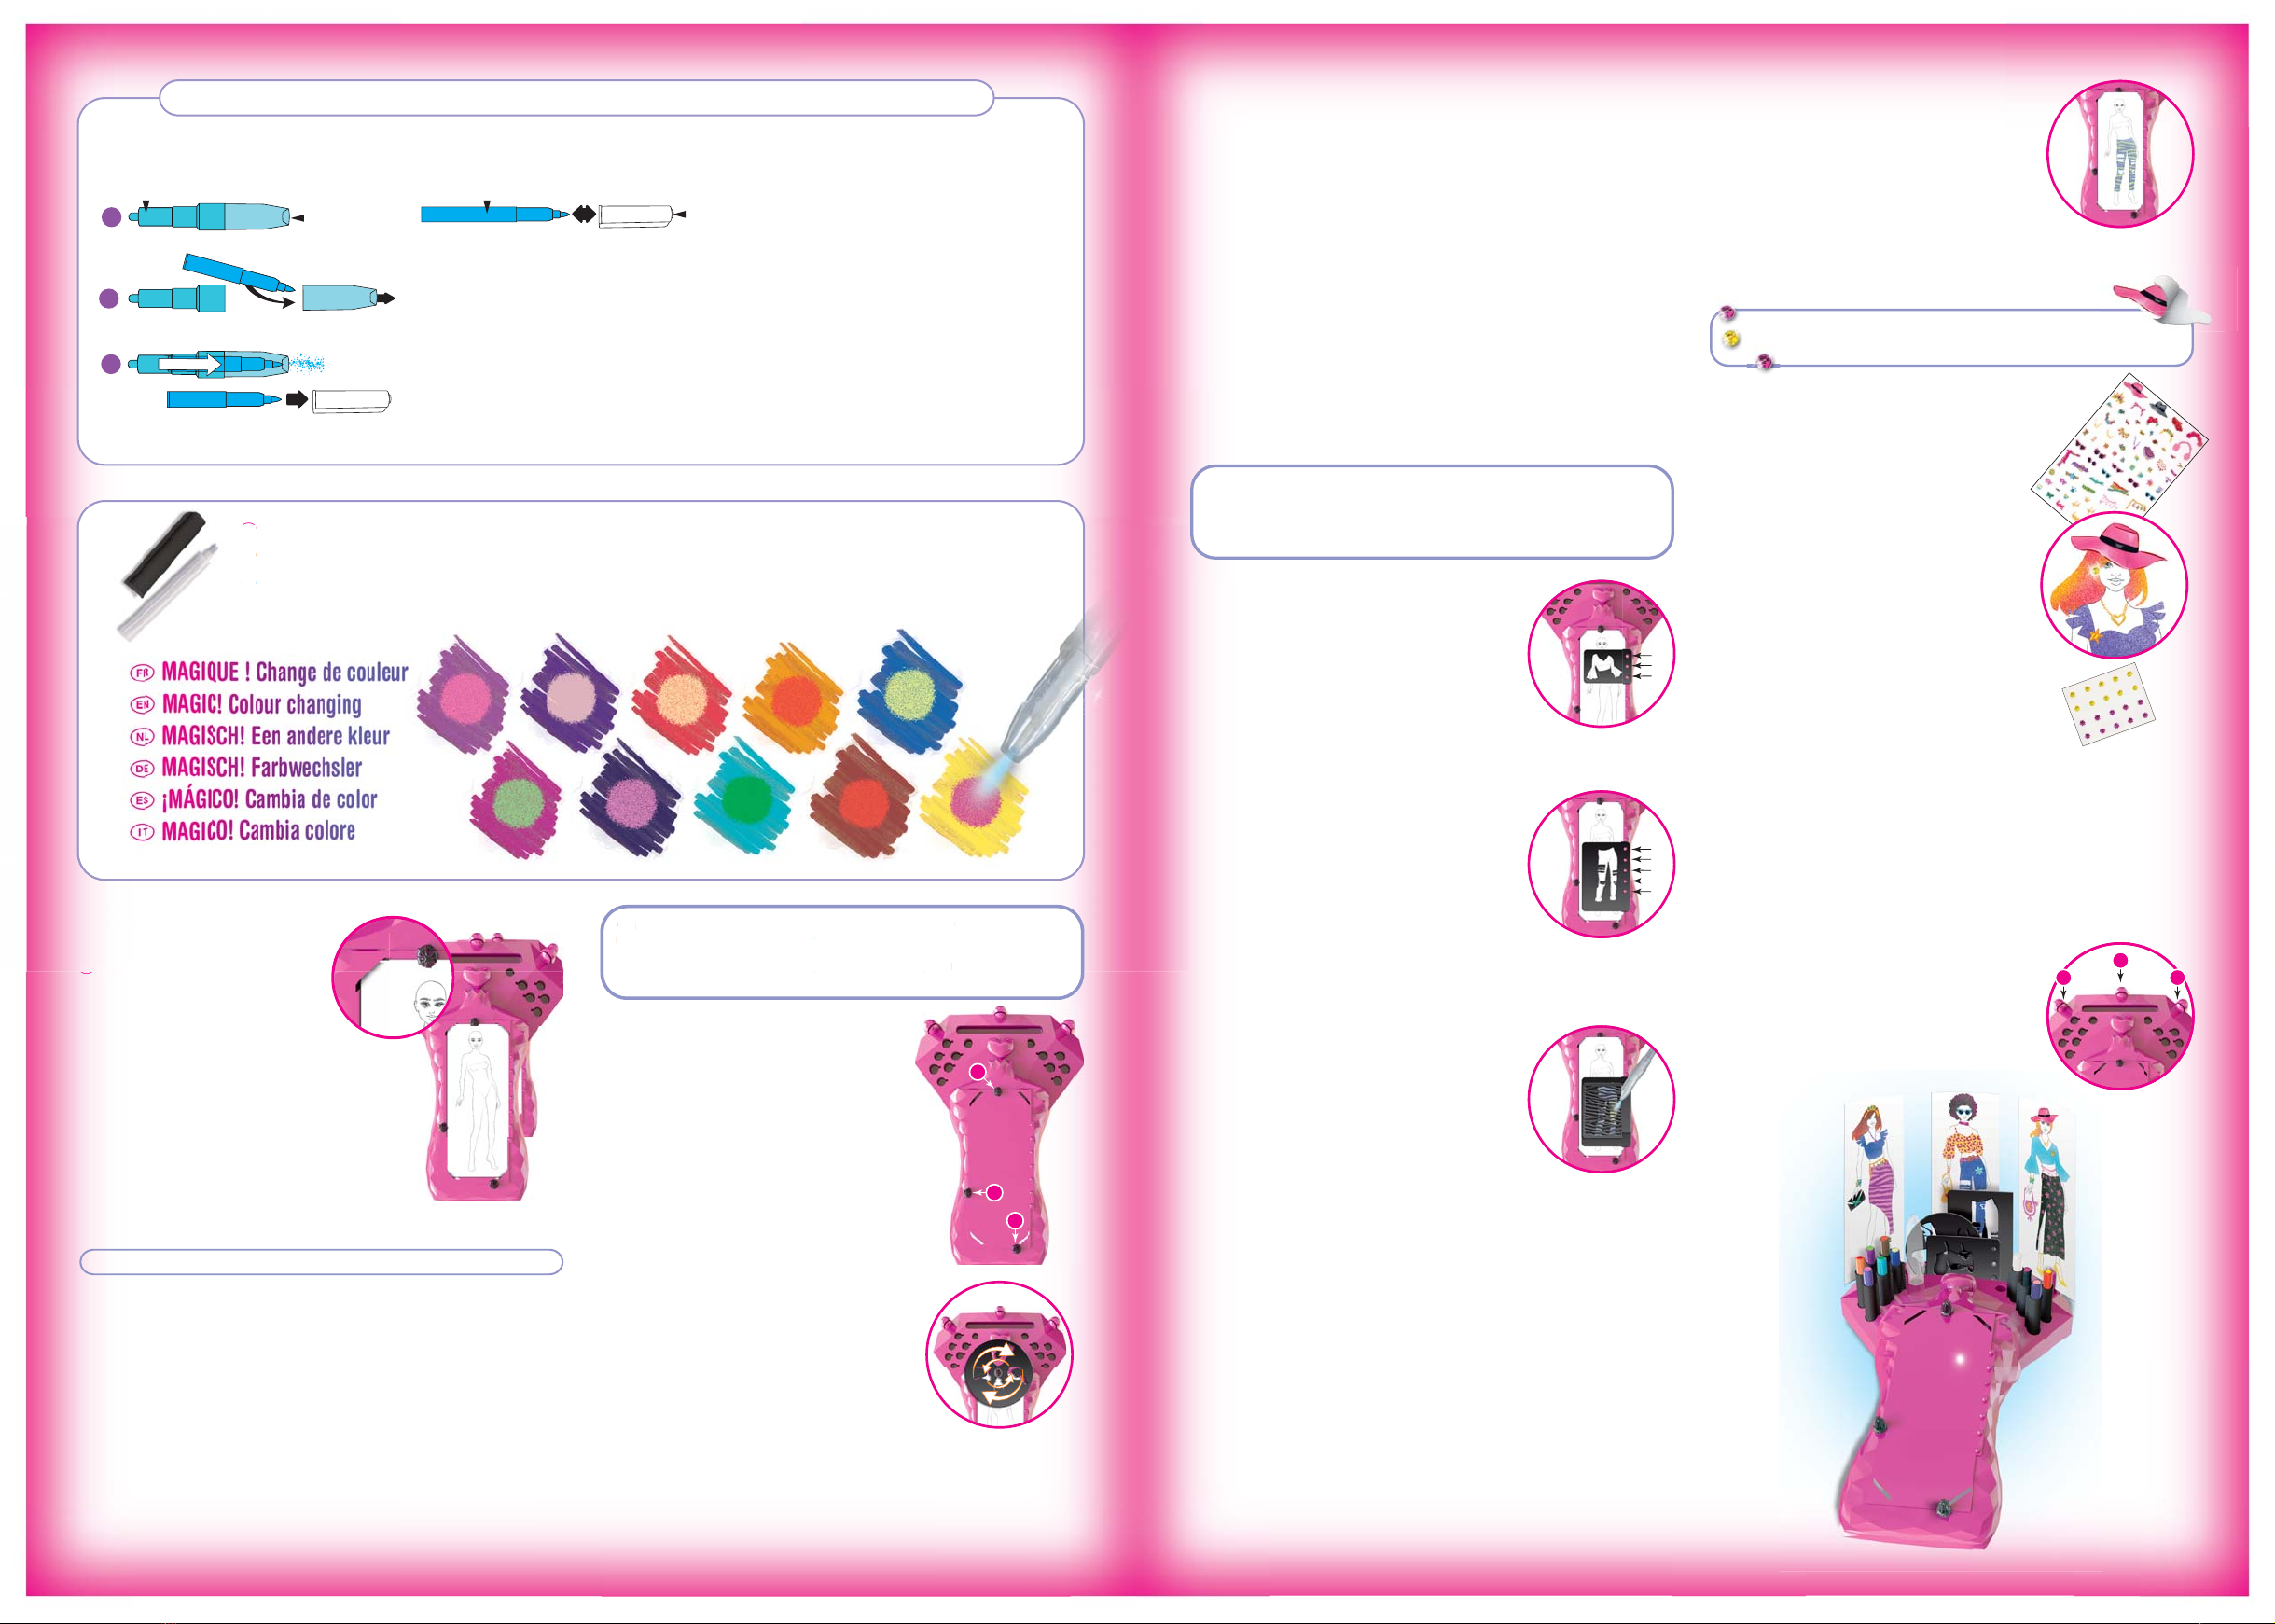
La cartouche du Mini Blopens est fournie avec son
bouchon. Retire le bouchon. ÊThe cartridge comes with its
protective cap. Remove the cap. Het inktpatroon van Mini
Blopens wordt geleverd met een dopje erop. Verwijder de dop.
Die Mini-Blopens-Patrone wird mit einer Verschlusskappe
geliefert. Verschlusskappe abziehen. El cartucho del Mini
Blopens viene con un tapón. Retíralo. ïLa cartuccia del Mini
Blopens è dotata di tappo. Togli il tappo.
 Pointe le Mini Blopens et souffle par le capuchon pour asperger le papier. Referme toujours la cartouche du Mini Blopens avec son bouchon lorsqu’elle
n’est pas utilisée. ÊPoint the Blopens and blow into the cap to spray the paper. Always close the cartridge with its protective cap when not in use. Druk
met de punt van de Blopens-viltstift op het blad en blaas op de blaasdop om de inkt op het papier te verspreiden. Steek altijd de dop weer op het inktpatroon
van je Mini Blopens wanneer je hem niet meer gebruikt. Blopens-Filzstift ausrichten und durch den Deckel pusten, um das Papier zu besprühen. Stets die
Patrone des Mini-Blopens mit der Verschlusskappe wieder schließen, wenn sie nicht verwendet wird.Dirige el rotulador Blopens y sopla por la tapa para
rociar el papel. Cierra siempre el cartucho del Mini Blopens con su tapón cuando no lo estés utilizando. ïDirigi il pennarello Blopens e soffia attraverso il
cappuccio per spruzzare sulla carta. Richiudi sempre la cartuccia del Mini Blopens con il tappo quando non la utilizzi.
 Place la mine du feutre dans l’embout du Mini Blopens. Enfonce la cartouche et replace le capuchon du Mini Blopens en pressant fortement. ÊPlace the
lead of the cartridge in the corresponding colored tip. Put the cap back and press tightly. Plaats de punt van de viltstift in het uiteinde van de Mini Blopens.
Druk op het inktpatroon. Door hard te duwen, gaat de blaasdop van de Mini Blopens het inktpatroon in de juiste positie duwen. Mine des Filzstiftes in den
Aufsatz des Mini-Blopens setzen. Patrone hineindrücken und Deckel des Mini-Blopens durch festes Drücken wieder aufsetzen. Coloca la punta del rotulador
en la boquilla del Mini Blopens. Encaja el cartucho y vuelve a colocar la tapa del Mini Blopens apretando con fuerza.ïPosiziona la punta del pennarello
nell'estremità del Mini Blopens. Spingi la cartuccia e sostituisci il cappuccio del Mini Blopens premendo forte.
2
FEUTRE MINI BLOPENS / MINI BLOPENS MARKER /
MINI BLOPENS-VILTSTIFTEN / MINI-BLOPENS-FILZSTIFTE /
MINI ROTULADORES BLOPENS / MINI PENNARELLI BLOPENS
Bouchon / Protective Cap /
Stop / Bouchon /
Protective Cap / Stop
Cartouche / Cartridge / Patroon / Cartouche / Cartridge / Patroon
Embout / Tip /
Mondstuk / Mundstück /
Punta / Boquilla
1
COQUE MINI BLOPENS / MINI BLOPENS SHELLS /
MINI-BLOPENS-SCHELPEN / MINI-BLOPENS-HALTER /
CARCASAS MINI BLOPENS / CUSTODIE MINI BLOPENS
Capuchon / Cap / Dop / Kappe / Capuchón / Cappuccio
3
Place ta feuille mannequin en position sur ton
atelier de création, dans les encoches de création (1).
ÊPlace the model sheet on the creation stand, in the
creation notches (1).
Plaats je model in de gleufjes op de standaard (1).
Platziere deine Model-Vorlage im Atelier für
Mode-Kreationen in den Schlitzen für Kreationen (1).
Coloca la hoja con la modelo en las ranuras de
creación del taller de diseño (1).
ïPosiziona il foglio con la modella sull'atelier
creativo, negli appositi incavi di creazione (1).
CONSEIL ÊTIP TIP TIPP CONSEJO ïCONSIGLIO
Nous te conseillons de placer une feuille de brouillon sur les modèles que tu ne souhaites pas utiliser pour que leur
forme n’apparaisse pas sur ton dessin lorsque tu souffles avec ton Mini Blopens.
ÊWe advise placing a draft sheet on the styles you do not wish to use, so that their shape doesn’t appear on your
drawing while you’re blowing into your Mini Blopens.
Wij raden je aan om een kladpapier te leggen over dat wat je niet wilt gebruiken op je model. Zo komen die
afbeeldingen niet per ongeluk op jouw model terecht wanneer je met je blaaspijpje op jouw Mini Blopens blaast.
Wir empfehlen dir, ein Schmierpapier auf die Modelle zu legen, die du nicht verwenden möchtest, damit ihre Form
nicht auf der Zeichnung erscheint, wenn du in deinen Mini Blopens pustest.
Te aconsejamos colocar una hoja de sucio sobre los motivos que no vas a utilizar. Así evitarás que esa forma
aparezca en tu dibujo final.
ïTi consigliamo di posizionare un foglio di prova sui modelli che non vuoi utilizzare affinché la forma non appaia sul
disegno nel momento in cui soffi con il Mini Blopens.
Choisis un pochoir et assure-toi bien qu’il soit du bon côté avant de le
placer (9-11-12).
Soulève le bouton (5-6-7) et dépose-le sur la table. Place ton pochoir
au-dessus de l’embout en forme de croix, insère-le dans l’embout et
replace le bouton pour fixer le pochoir.
Choisis les cheveux, le sac et les chaussures que tu souhaites, en tournant
le bouton vers la droite ou vers la gauche. Avant de souffler dans ton Mini
Blopens, maintiens ton pochoir en place, bien à plat sur ton mannequin (8),
afin que les couleurs ne débordent pas des pochoirs.
Une fois que tu as terminé, soulève le bouton et dépose-le sur la table.
Retire ensuite délicatement ton pochoir et remets le bouton à sa place.
Tu commences à devenir un(e) véritable styliste !
ÊChoose a stencil and make sure you use it on the correct side
(9-11-12).
Lift the knob and place it near you on the table. Place the stencil of your
choice on top of the cross-shaped post (5-6-7), insert it in the post and put
the knob back to hold the stencil in place.
Choose the hairstyle, handbag and pair of shoes of your choice by turning
the knob clockwise and counterclockwise. Before blowing into the Mini
Blopens, hold the stencil in place, flat on the model sheet (8) so the colours
don’t go under the stencil.
Once you’re finished, lift the knob and place it near you on the table.
Carefully remove the stencil and put the knob back in its place.
You’re in the process of becoming a real stylist!
Kies een sjabloon en leg hem met de juiste kant naar boven vooraleer
je hem gaat vastmaken (9-11-12).
Verwijder de draaiknop op en leg hem op de tafel. Leg je sjabloon over de
kruisvormige houder (5-6-7) en breng de draaiknop weer aan om op het
sjabloon vast te maken.
Kies het haar, de handtas en schoenen die je wil door de knop naar links of
rechts te draaien.Vooraleer je met het blaaspijpje op je Mini Blopens blaast,
moet je ervoor zorgen dat het sjabloon op z'n plaats blijft, d.w.z. strak tegen het model (8). Zo voorkom je dat de
kleuren onder de sjablonen gaan uitlopen.
Zodra je klaar bent, verwijder je de draaiknop en leg je hem op tafel.Verwijder nu voorzichtig het sjabloon en plaats de
knop terug op zijn plaats.
Je begint al een echte ontwerp(st)er te worden!
POSITIONNEMENT DES POCHOIRS RONDS (CHEVEUX, SACS & CHAUSSURES) ÊHOW TO POSITION THE
ROUND STENCILS (HAIR, HANDBAGS & SHOES) BEVESTIG DE RONDE SJABLOONSCHIJVEN KLAAR (HAAR,
HANDTASSEN EN SCHOENEN) PLATZIERUNG DER RUNDEN SCHABLONEN (HAARE, TASCHEN UND SCHUHE)
COLOCAR LAS PLANTILLAS REDONDAS (PELO, BOLSOS Y ZAPATOS) ïPOSIZIONAMENTO DEGLI
STENCIL ROTONDI (CAPELLI, BORSE E SCARPE)
5
6
7
Wähle eine Schablone aus und achte darauf, dass sie auf der richtigen Seite liegt (9-11-12).
Öffne den Drehknopf und lege ihn auf den Tisch. Lege deine Schablone auf den kreuzförmigen Aufsatz (5-6-7), schiebe
sie in den Aufsatz hinein und schließe den Drehknopf wieder, um die Schablone zu befestigen.
Wähle die gewünschten Haare,Taschen und Schuhe aus, indem du den Drehknopf nach rechts oder links drehst. Halte
die Schablone dicht über deinem Model fest, bevor du in deinen Mini Blopens pustest (8), damit die Farbe nicht über
die Schablone hinaus läuft.
Wenn du fertig bist, öffne den Drehknopf und lege ihn auf den Tisch. Entferne anschließend vorsichtig deine Schablone
und schließe den Drehknopf wieder.
Du wirst zu einem/einer wahren Stylist(in)!
Elige una plantilla y comprueba que lo has colocado del lado correcto (9-11-12).
Retira el tope y déjalo encima de la mesa. Coloca la plantilla encima del saliente en forma de cruz (5-6-7), encájala y
vuelve a colocar el tope para fijar la plantilla.
Elige el pelo, el bolso y los zapatos que quieras utilizar girando el tope hacia la derecha o la izquierda. Antes de soplar
en el Mini Blopens, sujeta bien la plantilla (8) para que los colores no se desborden.
Cuando termines, retira el tope, y déjalo en la mesa. Quita delicadamente la plantilla, y vuelve a colocar el tope en su
sitio.
¡Te estás convirtiendo en un/a auténtico/a diseñador/a!
ïScegli uno stencil e assicurati che sia dal lato giusto prima di posizionarlo (9-11-12).
Solleva il bottone e appoggialo sul tavolo. Posiziona lo stencil sopra all'estremità a forma di croce (5-6-7), inseriscilo
nell'estremità e sostituisci il bottone per fissare lo stencil.
Scegli i capelli, la borsa e le scarpe che desideri, ruotando il bottone verso destra o verso sinistra. Prima di soffiare nel
Mini Blopens, mantieni ben fermo lo stencil, ben piatto sulla modella (8), affinché i colori non escano dai bordi degli
stencil.
Quando hai finito, solleva il bottone e appoggialo sul tavolo. Ritira quindi delicatamente lo stencil e riposiziona il bottone
al suo posto.
Stai diventando un/a vero/a stilista!
POSITIONNEMENT DES POCHOIRS RECTANGULAIRES (VÊTEMENTS & MOTIFS) ÊHOW TO POSITION THE
RECTANGULAR STENCILS (CLOTHING & PATTERNS) BRENG DE RECHTHOEKIGE SJABLONEN AAN OP HET
MODEL (KLEDING & MOTIEVEN) PLATZIERUNG DER RECHTECKIGEN SCHABLONEN (KLEIDUNG UND MUSTER)
COLOCAR LAS PLANTILLAS RECTANGULARES (ROPA Y ESTAMPADOS) ïPOSIZIONAMENTO DEGLI
STENCIL RETTANGOLARI (ABITI E MOTIVI)
Tous les pochoirs « Hauts » (10) se positionnent sur les 3 picots du haut
(1 à 3).
ÊAll the “Top” stencils (10) are to be positioned on the 3 top nibs (1 to 3),
as indicated on the below image.
Alle sjablonen 'Bovenstukken' (10) klik je over de drie bovenste pinnetjes
(1 tot 3), zie de afbeelding hiernaast.
Alle Schablonen mit den „Oberteilen“ (10) sind auf den oberen drei Stiften
(1 bis 3) zu befestigen, wie in der nachstehenden Abbildung zu sehen ist.
Todas las plantillas "Partes de arriba" (10) se colocan en los tres pitorros
de arriba (1 a 3), como se indica en el visual más abajo
ïTutti gli stencil "Maglie, camicie, giacche" (10) si posizionano sui 3 perni
della parte alta (1 a 3), come indicato nell'immagine qui sotto.
Les pochoirs « Bas » (10) ont des tailles différentes. Ils se positionneront
tous à partir du 3ème picot (3-7).
ÊThe “Bottom”stencils (10) all have different sizes. Their top hole is always
to be inserted in the 3rd nib down (3 to 7).
De sjablonen 'Onderstukken' (10) hebben verschillende afmetingen. Zij
moeten vanaf het derde pinnetje worden vastgemaakt over je tekening op je
werkblad (3-7).
Die Schablonen mit den „Unterteilen“ (10) haben unterschiedliche
Größen. Sie werden alle ab dem 3. Stift (3 bis 7) positioniert.
Las plantillas "Partes de abajo" (10) tienen diferentes tamaños. Se
colocan todas a partir del tercer pitorro (3-7).
ïGli stencil "Gonne, pantaloni" (10) hanno taglie diverse. Si posizioneranno
tutti a partire dal 3° perno (3-7) .
Les pochoirs « Motif » (13) se positionnent sur les picots, là où tu le
souhaites. Pour donner plus de style à tes tenues, colorise la tenue de ton
choix, puis utilise un pochoir Motif et souffle avec le Mini Blopens Magique
pour révéler le changement de couleur. Wahou, c’est trop stylé !
Astuce : Si tu ne souhaites créer des motifs que sur un haut ou sur un bas,
place le pochoir Haut ou Bas en-dessous de ton pochoir Motif ; cela te
permettra de ne créer des motifs que sur l’endroit choisi.
ÊYou can place the “Pattern” stencils (13) wherever you want on the nibs.
To make your outfits more stylish, color the outfit of your choice, use a
“Pattern” stencil and blow on it with the Magic Mini Blopens to reveal the
colour change. Wow, it looks amazing!
Tip: If you wish to create patterns only on a top or only on a bottom, place the
“Top” or “Bottom” stencil below the “Pattern” stencil; it will allow you to only
create a pattern on the desired space.
De sjablonen 'Motieven' (13) plaats je waar jij ze wenst. Wil je je outfits nog wat meer cachet geven? Kleur ze dan
in met jouw favoriete kleuren en breng met het Motief-sjabloon een motief aan en blaas vervolgens met de Magische
Mini Blopens om de andere kleur tevoorschijn te toveren. Mooi he?
Tip: Als je enkel op een boven- of een onderstuk motieven wilt, moet je het sjabloon Bovenstuk of Onderstuk onder
jouw sjabloon Motief plaatsen. Zo zullen er alleen op de door jou gekozen plaats motieven zijn.
Die Schablonen mit den „Mustern“ (13) werden auf den Stiften deiner Wahl positioniert. Um deinen Outfits mehr
Stil zu verleihen, färbe dein Outfit in deiner Wunschfarbe. Nimm dann eine Muster-Schablone und puste in den
magischen Mini Blopens, um ein tolles Farbspiel zu erhalten. Wow, das hat Stil!
Tipp: Wenn du ein Muster nur auf einem Ober- oder Unterteil kreieren möchtest, platziere die Schablone mit den Ober-
oder Unterteilen unter deiner Schablone mit den Mustern. So erstellst du das Muster nur an der ausgewählten Stelle.
Las plantillas "Estampados" (13) se colocan en los pitorros que tú quieras. Para sublimar tus diseños, colorea la
prenda, y después usa la plantilla Estampado; sopla con el Mini Blopens Mágico y la prenda cambiará de color. ¡Guau!
¡Súper tendencia!
Truco: Si quieres hacer un estampado solo en la parte de arriba o solo en la parte de abajo, coloca la plantilla de la
prenda por debajo de la plantilla Estampado. Esto hará que el estampado solo se aplique a la prenda elegida.
ïGli stencil "Motivo" (13) si posizionano sui perni dove lo desideri. Per dare più stile alle tue tenute, colora la tenuta
di tua scelta, quindi utilizza uno stencil Motivo e soffia con il Mini Blopens Magico per rivelare il cambio colore. Wow,
che stile!
Suggerimento: Se desideri creare motivi solo su un capo piuttosto che su un altro, posiziona lo stencil "Maglie,
camicie, giacche" o "Gonne, pantaloni" sotto al tuo stencil Motivo; facendo in questo modo potrai creare motivi solo
nel punto scelto.
1
2
3
3
4
5
6
7
Tu peux donc coloriser un jean en bleu et placer un pochoir Motif. En
utilisant ton Mini Blopens magique, le bleu devient jaune !
ÊFor example, you can colour a pair of jeans with the blue Mini Blopens and
place a Pattern stencil on top of it. When blowing with the Magic Mini Blopens,
you’ll have a yellow pattern on your pair of blue jeans!
Je kan ook een jeans blauw kleuren en een Motief-sjabloon bevestigen.
Blaas nu op de Magische Mini Blopens en blauw wordt geel!
Du kannst also eine Jeans blau färben und dann eine Muster-Schablone
darauflegen. Mit dem magischen Mini Blopens verwandelt sich das Blau in Gelb!
Así puedes colorear un vaquero de azul y colocar luego la plantilla
Estampado. Utiliza tu Mini Blopens mágico, y ¡el azul se vuelve amarillo!
ïPuoi quindi colorare un jeans di blu e posizionare uno stencil Motivo.
Utilizzando il Mini Blopens magico, il blu diventerà giallo!

Place ta feuille mannequin en position sur ton

POS
ITI
O
NNEMENT DE
S
P
OC
H
O
IR
S
R
O
ND
S
(C
HEVEUX,
S
A
CS
&
C
HAU
SS
URE
S)
Ê
H
O
W T
O
P
OS
ITI
O
N THE
RO
UND
S
TEN
C
IL
S
(HAIR, HANDBA
GS
&
S
H
O
E
S
)

BEVE
S
TI
G
DE R
O
NDE
S
JABL
OO
N
SC
HIJVEN KLAAR (HAAR,
HANDTA
SS
EN EN
SC
H
O
ENEN)

P
LATZIERUN
G
DER RUNDEN
SC
HABL
O
NEN (HAARE, TA
SC
HEN UND
SC
HUHE)

CO
L
OC
AR LA
S
PLANTILLA
S
RED
O
NDA
S
(
PEL
O,
B
O
L
SOS
Y ZAPAT
OS)
ï
POS
IZI
O
NAMENT
O
DE
G
LI
Tous les Mini Blopens de ton Atelier Mode sont bicolores, c’est-à-dire qu’ils changent de
couleur lorsque tu utilises le Mini Blopens magique (le seul Mini Blopens blanc).
ÊAll of the Mini Blopens in this set are two-coloured, meaning they change colors when you
use the Magic Mini Blopens (the only white marker).
Alle Mini Blopens van jouw Mode-Atelier zijn tweekleurig. Dat wil zeggen dat ze van kleur
veranderen als jij de Magische Mini Blopens gaat gebruiken (de enige witte Mini Blopens).
Alle Mini Blopens in deinem Modeatelier sind zweifarbig, sie ändern also ihre Farbe, wenn
du den magischen Mini Blopens verwendest (der einzige weiße Mini Blopens).
Todos los Mini Blopens de tu Taller de Moda son bicolor, cambian de color con el Mini
Blopens mágico (el único Mini Blopens blanco).
ïTutti i Mini Blopens del tuo Atelier di Moda sono bicolori, ovvero cambiano colore quando
utilizzi il Mini Blopens magico (l'unico Mini Blopens bianco).
ACCESSOIRES (STRASS, AUTOCOLLANTS) ÊACCESSOIRES (STRASS, AUTOCOLLANTS)
ACCESSORIES (GEM STICKERS, STICKERS) ACCESSOIRES (STRASS-STEINE, AUFKLEBER)
ACCESORIOS (STRASS, PEGATINAS) ïACCESSORI (STRASS, ADESIVI)
Ajoute des autocollants à ton mannequin pour accessoiriser ta tenue !
Tu as le choix entre des lunettes de soleil, des chapeaux, des colliers, des
ceintures et bien d’autres choses encore...
ÊAdd stickers to your model to accessorise her outfit! You can choose
sunglasses, hats, necklaces, belts and many other things!
Met stickers kan je jouw model accessoires geven en haar outfit
helemaal af maken! Wat denk je bijvoorbeeld van een zonnebril, een hoed,
een halsketting, riem...
Füge deinem Model Aufkleber hinzu, um das Outfit mit Accessoires zu
ergänzen! Du hast die Wahl zwischen Sonnenbrillen, Hüten, Halsketten,
Gürteln und vielen anderen Dingen ...
Añade pegatinas a tu modelo para completar con accesorios el
conjunto. Puedes elegir entre gafas de sol, sombreros, collares, cinturas y
muchos más...
ïAggiungi degli adesivi alla tua modella per accessoriare l'outfit! Puoi
scegliere tra occhiali da sole, cappelli, collane, cinture e molti altri
accessori...
Pour sublimer ta tenue, ajoute des strass et fais briller ton mannequin !
ÊFor the final touch, add gem stickers to make your model sparkle!
Wil je een chique outfit? Breng dan strasssteentjes aan om jouw model
te laten schitteren!
Um dein Outfit zu verschönern, füge Strass-Steine hinzu und bringe
dein Model zum Leuchten!
Para subir un nivel tu outfit añade strass y ¡haz brillar a tu modelo!
ïPer valorizzare l'outfit creato, aggiungi gli strass e fai brillare la tua
modella!
COLLANTS)
Ton look est maintenant terminé. Waouh, le résultat est magnifique ! Tu es un(e) véritable styliste !
ÊYour outfit is now ready.Wow, it looks incredible! You’re a real stylist!
Jouw look is nu helemaal af. Wat heb je je model mooi aangekleed zeg! Jij bent een echte modeontwerp(st)er!
Dein Look ist jetzt fertig. Wow, das Ergebnis ist wunderschön! Du bist ein/eine wahre(r) Stylist(in)!
Tu look ya está terminado. ¡Guau, el resultado es magnífico!. ¡Eres un/a auténtico/a diseñador/a!
ïIl tuo look ora è finito. Wow, il risultato è magnifico! Sei un/a vero/a stilista!
Si tu le souhaites, tu peux exposer tes mannequins en haut de ton atelier de création, dans les encoches
d’exposition (2). Il y a plus de 1 000 combinaisons possibles !
ÊIf you wish to, you can display your models in the notches on top of the creation stand (2). There are more than
1,000 possible combinations!
Als je wilt, kan je je aangeklede modellen op de bovenkant van je
werkblad tentoonstellen in de houders (2). Er zijn meer dan 1000
combinatiemogelijkheden!
Wenn du möchtest, kannst du deine Models im oberen Bereich deines
Atelier für Mode-Kreationen in den Schlitzen für Ausstellungen präsentieren
(2). Es gibt mehr als 1.000 mögliche Kombinationen!
Puedes exponer tu modelo utilizando las ranuras de la parte superior de
tu taller de creación. En las ranuras de exposición (2). ¡Hay más de 1000
combinaciones posibles!
ïSe lo desideri, puoi esporre le tue modelle nella parte alta del tuo atelier
creativo, negli incavi previsti a tale scopo (2). Esistono oltre 1.000
combinazioni possibili!
2
2 2
ncavi
previsti
a
tale
scopo
(2)
.
Esistono
oltre
1
.
000
s
s
ibili!


c
ou
Ê
u
se

v
er
a

Other Lansay Toy manuals

Lansay mini delices User manual

Lansay

Lansay mini delices User manual

Lansay Glitterizz My Electronic Glitter Studio User manual

Lansay

Lansay Glitterizz My Electronic Glitter Studio User manual

Lansay Mini-Délices 17846 User manual

Lansay

Lansay Mini-Délices 17846 User manual

Lansay Pixelo 20272 User manual

Lansay

Lansay Pixelo 20272 User manual

Lansay Mini-Licious User manual

Lansay

Lansay Mini-Licious User manual

Lansay mini-licious 17903 User manual

Lansay

Lansay mini-licious 17903 User manual

Lansay Mini-Délices 17880 User manual

Lansay

Lansay Mini-Délices 17880 User manual

Lansay BLOpens User manual

Lansay

Lansay BLOpens User manual

Lansay Mini Licious 17846 User manual

Lansay

Lansay Mini Licious 17846 User manual

Lansay MONSTER HIGH CUTIE STIX ORIGINAL User manual

Lansay

Lansay MONSTER HIGH CUTIE STIX ORIGINAL User manual

Lansay Fabrikid User manual

Lansay

Lansay Fabrikid User manual

Lansay Disney Frozen II My light-up jewellery User manual

Lansay

Lansay Disney Frozen II My light-up jewellery User manual

Lansay PIXELO Metallic User manual

Lansay

Lansay PIXELO Metallic User manual

Lansay Disney Frozen II My Light-Up Glitter Globe User manual

Lansay

Lansay Disney Frozen II My Light-Up Glitter Globe User manual

Lansay mini delices 17904 User manual

Lansay

Lansay mini delices 17904 User manual

Lansay Peche aux Canards User manual

Lansay

Lansay Peche aux Canards User manual

Lansay REPRO MAGIC 2IN1 Operation and maintenance manual

Lansay

Lansay REPRO MAGIC 2IN1 Operation and maintenance manual

Lansay minideices 17865 User manual

Lansay

Lansay minideices 17865 User manual

Lansay ZAG HEROEZ Miraculous Pixelo User manual

Lansay

Lansay ZAG HEROEZ Miraculous Pixelo User manual

Lansay FABRIKID 15250 User manual

Lansay

Lansay FABRIKID 15250 User manual

Lansay mini licious User manual

Lansay

Lansay mini licious User manual

Popular Toy manuals by other brands

Eduard PT-13 Kaydet manual

Eduard

Eduard PT-13 Kaydet manual

Mega Construx Destiny FFB56 manual

Mega Construx

Mega Construx Destiny FFB56 manual

KANGKE INDUSTRIAL Monocoupe 90A Assembly manual

KANGKE INDUSTRIAL

KANGKE INDUSTRIAL Monocoupe 90A Assembly manual

Eduard Brassin MiG-23M/MF wheels manual

Eduard

Eduard Brassin MiG-23M/MF wheels manual

THE WORLD MODELS Aure EP instruction manual

THE WORLD MODELS

THE WORLD MODELS Aure EP instruction manual

Faller CAR SYSTEM DIGITAL manual

Faller

Faller CAR SYSTEM DIGITAL manual

LEGO TECHNIC 42063 Building instructions

LEGO

LEGO TECHNIC 42063 Building instructions

Black Horse Model renegade bh66 Instruction manual book

Black Horse Model

Black Horse Model renegade bh66 Instruction manual book

MTHTrains RailKing SW-9 Operator's manual

MTHTrains

MTHTrains RailKing SW-9 Operator's manual

Rolly Toys rollyTrac manual

Rolly Toys

Rolly Toys rollyTrac manual

LGB 22225 instruction manual

LGB

LGB 22225 instruction manual

Jamara 405235 Instruction

Jamara

Jamara 405235 Instruction

Happy Puzzle WaxiDoodles instructions

Happy Puzzle

Happy Puzzle WaxiDoodles instructions

REPTILE DRAGON-TALON instruction manual

REPTILE

REPTILE DRAGON-TALON instruction manual

Multiplex EasyStar Building instructions

Multiplex

Multiplex EasyStar Building instructions

Torro KING TIGER 3888-1 instruction manual

Torro

Torro KING TIGER 3888-1 instruction manual

marklin 58026 user guide

marklin

marklin 58026 user guide

Trix BR 89.0 user manual

Trix

Trix BR 89.0 user manual

manuals.online logo
manuals.online logoBrands
  • About & Mission
  • Contact us
  • Privacy Policy
  • Terms and Conditions

Copyright 2025 Manuals.Online. All Rights Reserved.